浅析Android动画(一),View动画高级实例探究
转载请注明出处!http://www.cnblogs.com/wondertwo/p/5295976.html
视图动画的基本用法
提起 Android 动画很多初学者就会一脸懵逼二阶茫然,当初翻遍图书馆的一大堆入门书籍都找不到一本书在讲 Android 动画机制,好在一颗痴迷技术的心让我自备燃料有始有终,最后总算弄明白了 Android 动画到底是个什么鬼。其实我们有木有经常用手机拍了很多漂亮照片以后,打开相册,点击更多,点击自动播放,这些静态的照片就会连贯的播放起来了有木有?这其实就是逐帧动画,类似于动画片的效果。是不是很简单呢?关于Android动画的分类我查了很多资料,最初只有两种动画即逐帧动画(frame-by-frame animation)和补间动画(tweened animation),补间动画只需要开发者设置动画的起始值和结束值,中间的动画由系统自动帮我们完成,下面要介绍的视图动画就属于补间动画。但是从Android 3.x开始谷歌引入了一种全新的动画——属性动画,相对于视图动画只能给View对象设置动画效果来说,属性动画要强大的太多,只要是一个Object对象属性动画都能为其设置动画属性,不管这个对象能不能看得见,会不会与用户产生交互。关于属性动画的用法会在下一篇博客中详细介绍,下面的主要以讲解视图动画为主。视图动画即我们常说的 View Animation, 有四种效果如下:
- 透明度变化(
AlphaAnimation); - 位移(
TranslateAnimation); - 缩放(
ScaleAnimation); - 旋转(
RotateAnimation);
可以从Android api文档看到视图动画 Add in api level 1 ,算是 Android 动画家族中的老腊肉了。那我们就从视图动画的基本用法着手,一步步深入学习!这里先放上狂炫酷帅的QQ客户端抖一抖动画和3D旋转&电视关闭画面的自定义动画,哈哈,这都是用视图动画做出来的效果哦!


哈哈,上面的自定义动画有木有惊艳到你呢?“每一个宅男心中都藏着一个女神”,你看的没错!画面中就是我的女神——张钧甯。上面的动画特效是在四种最基本的视图动画的基础上稍加改进出来的,那么四种基本的视图动画效果如何呢?
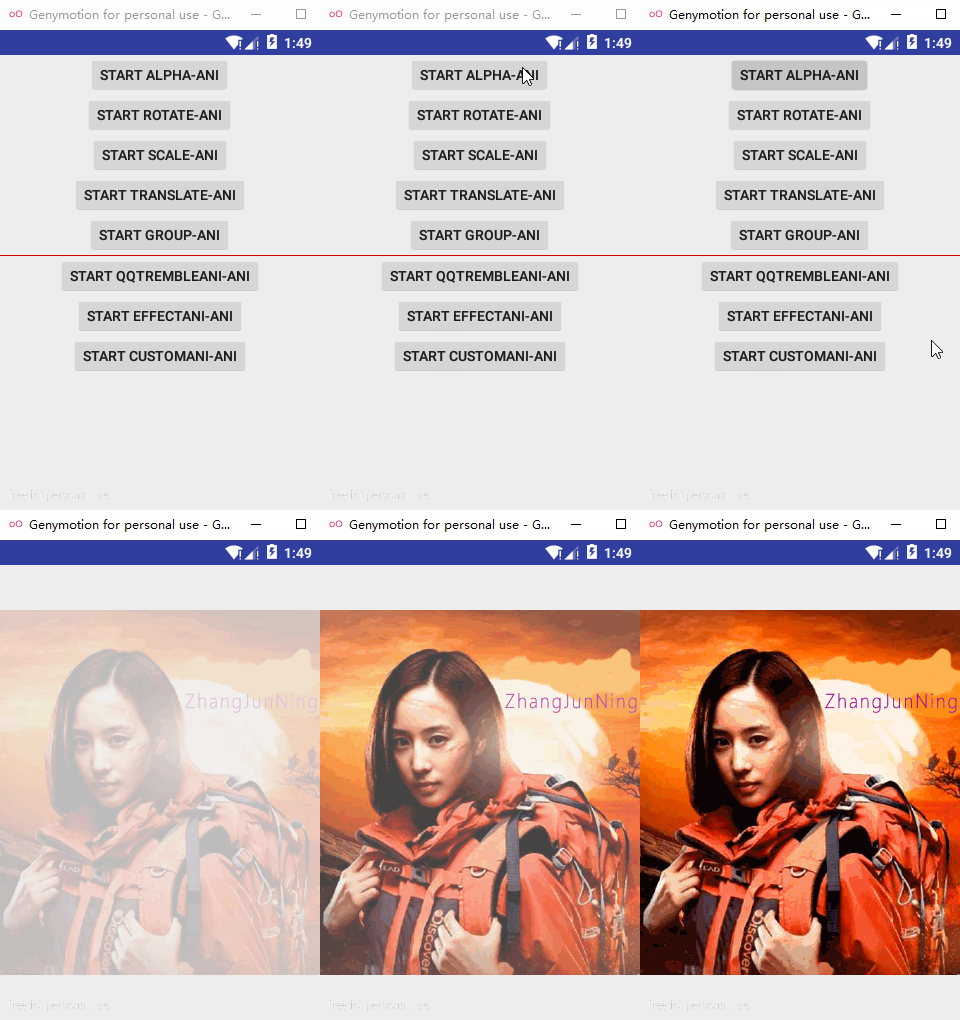
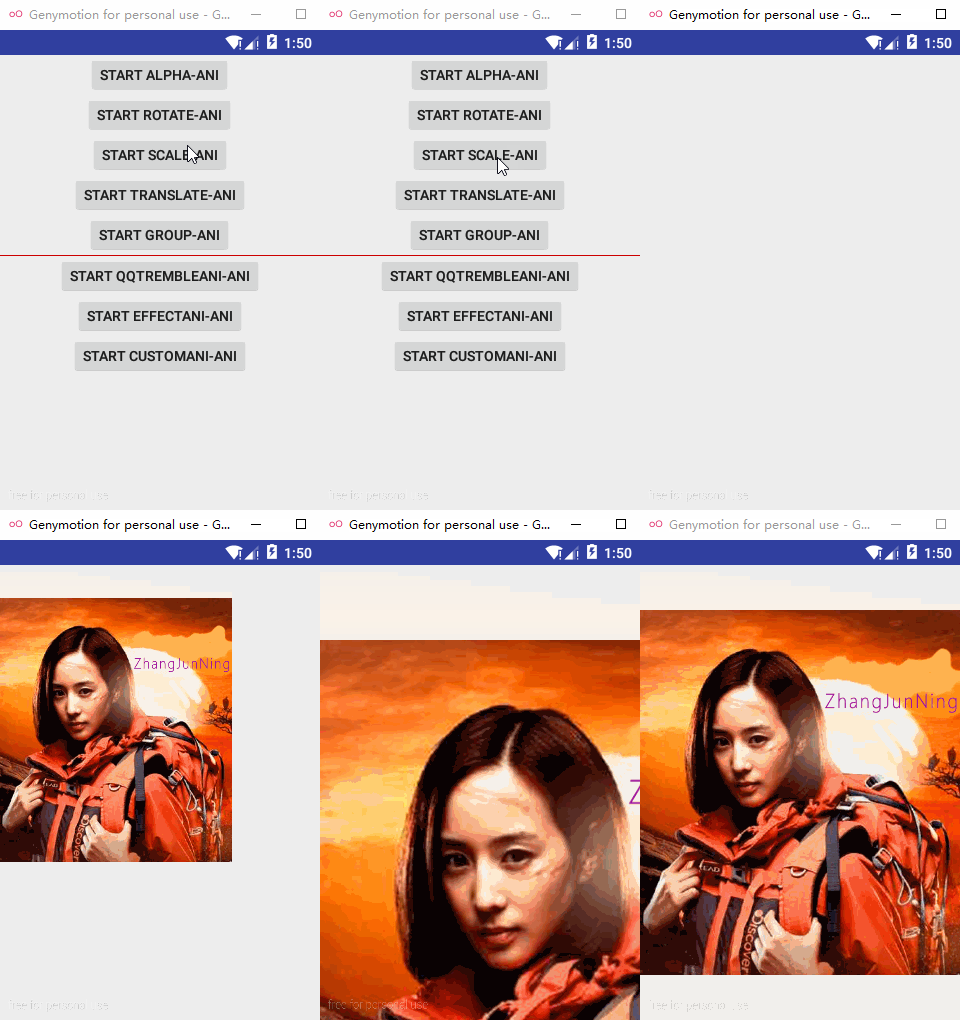

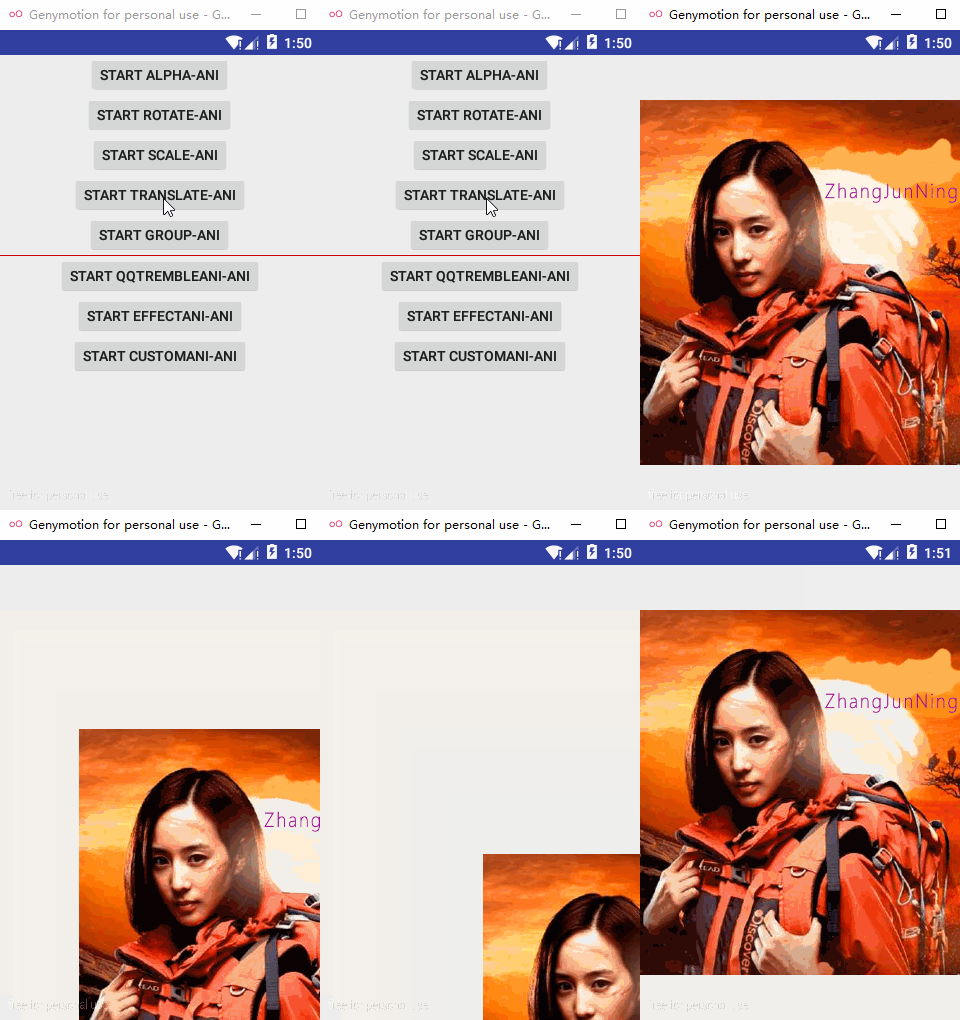
分别对应着透明度变化(AlphaAnimation),缩放(ScaleAnimation),旋转(RotateAnimation),位移(TranslateAnimation); View 动画的四种变换效果对应着的 AlphaAnimation , ScaleAnimation , RotateAnimation , TranslateAnimation 这4个动画类都继承自 Animation 类,Animation 类是所有视图动画类的父类,后面讲解的自定义动画类其实也必须继承 Animation 。
并且既可以在代码中动态的指定这四种动画效果,也可以在 xml 文件中定义, xml 文件中视图动画的目录是 res/anim/file_name.xml ,与视图动画不同, xml 文件中属性动画的目录是 res/animator/file_name.xml ,不过属性动画并不推荐在 xml 文件中定义,关于属性动画请关注我的下一篇博客哦 。xml 文件中视图动画代码如下,透明度动画对应标签 <alpha> ,缩放动画对应标签 <scale> ,旋转动画对应标签 <rotate> ,位移动画对应标签 <translate> ,根标签 <set> 就表示一个动画集合 AnimationSet ;shareInterpolator="true" 表示动画集合中的所有动画共享插值器,反之shareInterpolator="false" 表示不共享插值器,关于插值器会在第二篇博客的属性动画中详细介绍。
<?xml version="1.0" encoding="utf-8"?>
<set xmlns:android="http://schemas.android.com/apk/res/android"
    android:shareInterpolator="true" >

	<!--透明度-->
    <alpha
        android:fromAlpha="0"
        android:toAlpha="1" />

	<!--缩放-->
    <scale
        android:fromXScale="0.5f"
        android:fromYScale="1.5f"
        android:toXScale="0.5f"
        android:toYScale="1.5f"
        android:pivotX="100"
        android:pivotY="100" />

	<!--位移-->
    <translate
        android:fromXDelta="0"
        android:toXDelta="0"
        android:fromYDelta="200"
        android:toYDelta="200" />

	<!--旋转-->
    <rotate
        android:fromDegrees="0"
        android:toDegrees="360"
        android:pivotX="200"
        android:pivotY="200" />

</set>
以上代码标签中的属性值,其具体含义如下:
- alpha
- fromAlpha ---- 透明度起始值,0表示完全透明
- toAlpha ---- 透明度最终值,1表示不透明
- scale
- fromXScale ---- 水平方向缩放的起始值,比如0
- fromYScale ---- 竖直方向缩放的起始值,比如0
- toXScale ---- 水平方向缩放的结束值,比如2
- toYScale ---- 竖直方向缩放的结束值,比如2
- pivotX ---- 缩放支点的x坐标
- pivotY ---- 缩放支点的y坐标(支点可以理解为缩放的中心点,缩放过程中这点的坐标是不变的;支点默认在中心位置)
- translate
- fromXDelta ---- x起始值
- toXDelta ---- x结束值
- fromYDelta ---- y起始值
- toYDelta ---- y结束值
- rotate
- fromDegrees ---- 旋转起始角度
- toDegrees ---- 旋转结束角度
除此之外,还有一些常见的属性值,如下:
- android:duration ---- 动画的持续时间
- android:fillAfter ---- true表示保持动画结束时的状态,false表示不保持
上面就是通过 xml 文件定义的 View 动画,那怎么应用上面的动画呢?也很简单,通过 View 对象在代码中动态加载即可,代码如下。值得注意的是,AnimationUtils.loadAnimation(this, R.anim.ani_view) 方法接收两个参数,第一个是当前的上下文环境,第二个就是我们通过 xml 定义的动画啦。代码如下:
ImageView ivAni = (ImageView) findViewById(R.id.iv_ani);
Animation ani = AnimationUtils.loadAnimation(this, R.anim.ani_view);
ivAni.startAnimation(ani);
OK那么问题来了,怎样直接通过代码动态定义 View 动画呢?也很简单,先上代码如下:
AlphaAni----透明度动画代码如下,相信你经过前面的部分已经能很容易就看懂这些代码了,在 beginAnimation() 方法中,我们在3000ms的时间内把一个 LinearLayout 对象 llAlpha 的透明度从0到1,即从完全透明渐变到完全不透明,然后在 onCreate() 方法中调用 beginAnimation() 方法就能以透明度渐变动画的方式跳转到 AlphaAni :
package com.wondertwo.viewani;

import android.app.Activity;
import android.os.Bundle;
import android.view.animation.AlphaAnimation;
import android.widget.LinearLayout;

import com.wondertwo.R;

/**
 * AlphaAni----透明度动画
 * Created by wondertwo on 2016/3/11.
 */
public class AlphaAni extends Activity {

    private LinearLayout llAlpha;

    @Override
    protected void onCreate(Bundle savedInstanceState) {
        super.onCreate(savedInstanceState);
        setContentView(R.layout.activity_alpha);
        llAlpha = (LinearLayout) findViewById(R.id.ll_alpha);
        beginAnimation();
    }

    // 启动动画
    private void beginAnimation() {
        AlphaAnimation alpha = new AlphaAnimation(0, 1);// 0---->1从透明到不透明
        alpha.setDuration(3000);// 设置动画持续时间
        llAlpha.startAnimation(alpha);// 启动动画
    }
}
ScaleAni----缩放动画代码如下,与上面的透明度渐变动画类似,通过 ctrl+左键 查看源码可以知道,在创建 ScaleAnimation 缩放动画的对象的时候, ScaleAnimation(0, 2, 0, 2) 接受的四个参数分别是 ScaleAnimation(float fromX, float toX, float fromY, float toY) :
package com.wondertwo.viewani;

import android.app.Activity;
import android.os.Bundle;
import android.view.animation.ScaleAnimation;
import android.widget.LinearLayout;

import com.wondertwo.R;

/**
 * ScaleAni----缩放动画
 * Created by wondertwo on 2016/3/11.
 */
public class ScaleAni extends Activity {

    private LinearLayout llScale;

    @Override
    protected void onCreate(Bundle savedInstanceState) {
        super.onCreate(savedInstanceState);
        setContentView(R.layout.activity_scale);
        llScale = (LinearLayout) findViewById(R.id.ll_scale);
        beginAnimation();
    }

    // 启动动画
    private void beginAnimation() {
        ScaleAnimation scale = new ScaleAnimation(0, 2, 0, 2);
        scale.setDuration(3000);
        llScale.startAnimation(scale);
    }
}
RotateAni----旋转动画代码如下,表示把一个 View 对象从起始角度0旋转到360度,后面的四个参数 RotateAnimation.RELATIVE_TO_SELF, 0.5f, RotateAnimation.RELATIVE_TO_SELF, 0.5f 表示以中心位置为旋转支点:
package com.wondertwo.viewani;

import android.app.Activity;
import android.os.Bundle;
import android.view.animation.RotateAnimation;
import android.widget.LinearLayout;

import com.wondertwo.R;

/**
 * RotateAni----旋转动画
 * Created by wondertwo on 2016/3/11.
 */
public class RotateAni extends Activity {

    private LinearLayout llRotate;

    @Override
    protected void onCreate(Bundle savedInstanceState) {
        super.onCreate(savedInstanceState);
        setContentView(R.layout.activity_rotate);
        llRotate = (LinearLayout) findViewById(R.id.ll_rotate);
        beginAnimation();
    }

    // 启动动画
    private void beginAnimation() {
        RotateAnimation rotate = new RotateAnimation(0, 360,
                RotateAnimation.RELATIVE_TO_SELF, 0.5f,
                RotateAnimation.RELATIVE_TO_SELF, 0.5f);
        rotate.setDuration(3000);
        llRotate.startAnimation(rotate);
    }
}
TranslateAni----位移动画代码如下,表示把 View 对象从起始坐标 (0, 0) 位移到 (200, 300) ,是不是很简单呢:
package com.wondertwo.viewani;

import android.app.Activity;
import android.os.Bundle;
import android.view.animation.TranslateAnimation;
import android.widget.LinearLayout;

import com.wondertwo.R;

/**
 * TranslateAni----位移动画
 * Created by wondertwo on 2016/3/11.
 */
public class TranslateAni extends Activity {

    private LinearLayout llTranslate;

    @Override
    protected void onCreate(Bundle savedInstanceState) {
        super.onCreate(savedInstanceState);
        setContentView(R.layout.activity_translate);
        llTranslate = (LinearLayout) findViewById(R.id.ll_translate);
        beginAnimation();
    }

    // 启动动画
    private void beginAnimation() {
        TranslateAnimation translate = new TranslateAnimation(0, 200, 0, 300);
        translate.setDuration(3000);
        llTranslate.startAnimation(translate);
    }
}
视图动画的高级用法
趁热打铁,接下来正是掌握 View 动画高级用法的好时机啦,所谓高级用法,其实也很简单,就是把上面的四种基本效果进行任意的排列组合,然后设定重复次数、重复模式(常用的重复模式有顺序、逆向等等),同时启动或者延迟一定的时间启动动画!为了更直观感受视图动画的高级用法,直接上图请往下看,一种很酷炫的图片旋转飞入效果!
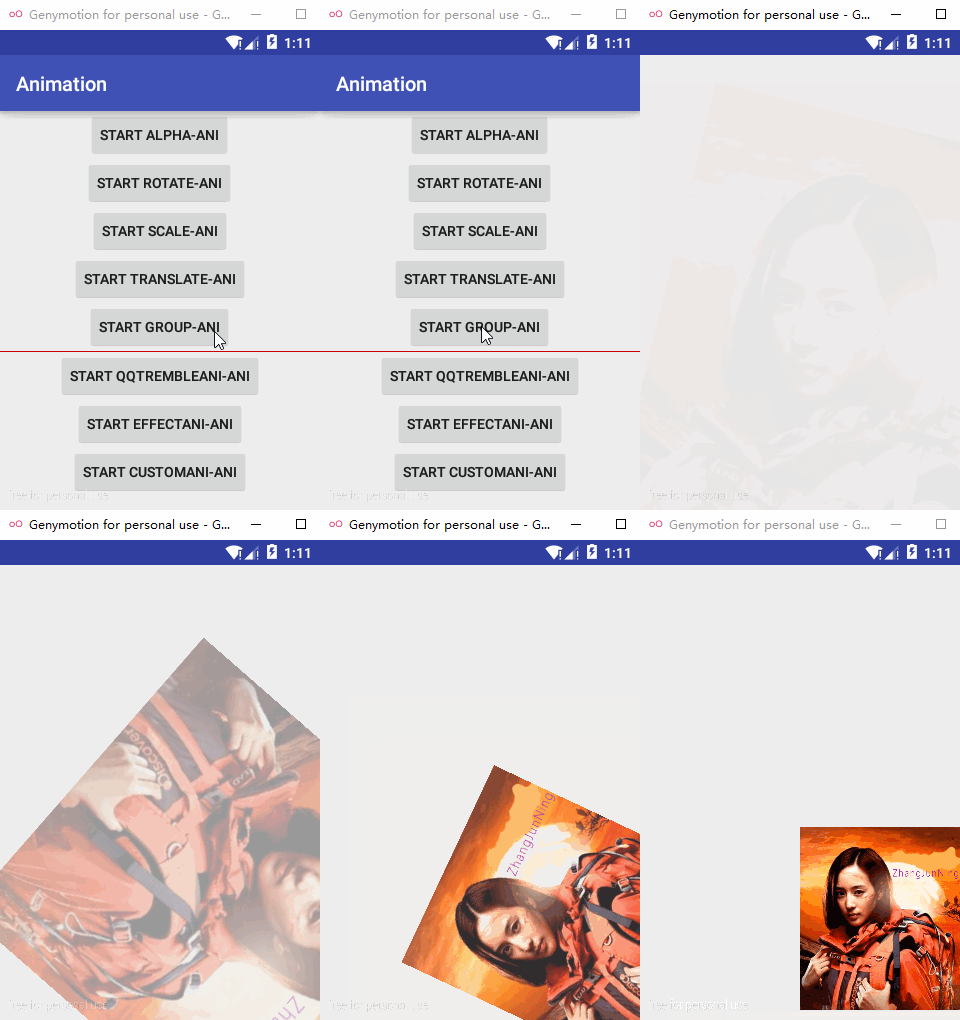
直接上代码如下,看过代码肯定会觉得,不就是把上面介绍的四种动画组合到一起了嘛,事实上就是这么简单。
package com.wondertwo.viewani;

import android.app.Activity;
import android.content.Intent;
import android.os.Bundle;
import android.view.animation.AlphaAnimation;
import android.view.animation.Animation;
import android.view.animation.AnimationSet;
import android.view.animation.RotateAnimation;
import android.view.animation.ScaleAnimation;
import android.view.animation.TranslateAnimation;
import android.widget.LinearLayout;

import com.wondertwo.MainActivity;
import com.wondertwo.R;

/**
 * AlphaAnimation、RotateAnimation、ScaleAnimation、TranslateAnimation四种视图动画的组合动画
 * Created by wondertwo on 2016/3/11.
 */
public class GroupAni extends Activity {

    private LinearLayout llGroup;

    @Override
    protected void onCreate(Bundle savedInstanceState) {
        super.onCreate(savedInstanceState);
        setContentView(R.layout.activity_group);
        llGroup = (LinearLayout) findViewById(R.id.ll_group);
        beginAnimation();
    }

    // 启动组合动画
    private void beginAnimation() {
        // 创建动画集合
        AnimationSet aniSet = new AnimationSet(false);

        // 透明度动画
        AlphaAnimation alpha = new AlphaAnimation(0, 1);
        alpha.setDuration(4000);
        aniSet.addAnimation(alpha);

        // 旋转动画
        RotateAnimation rotate = new RotateAnimation(0, 360,
                RotateAnimation.RELATIVE_TO_SELF, 0.5f,
                RotateAnimation.RELATIVE_TO_SELF, 0.5f);
        rotate.setDuration(4000);
        aniSet.addAnimation(rotate);

        // 缩放动画
        ScaleAnimation scale = new ScaleAnimation(1.5f, 0.5f, 1.5f, 0.5f);
        scale.setDuration(4000);
        aniSet.addAnimation(scale);

        // 位移动画
        TranslateAnimation translate = new TranslateAnimation(0, 160, 0, 240);
        translate.setDuration(4000);
        aniSet.addAnimation(translate);

        // 动画监听
        aniSet.setAnimationListener(new Animation.AnimationListener() {
            // 动画开始
            @Override
            public void onAnimationStart(Animation animation) {

            }

            // 动画结束,一般在这里实现页面跳转逻辑
            @Override
            public void onAnimationEnd(Animation animation) {
                // 动画结束后,跳转到主页面
                startActivity(new Intent(GroupAni.this, MainActivity.class));
            }

            // 动画重复
            @Override
            public void onAnimationRepeat(Animation animation) {

            }
        });

        // 把动画设置给llGroup
        llGroup.startAnimation(aniSet);
    }
}
唯一不同的是,我们这次是把四个 View 动画装进了一个动画集合(AnimationSet)中,至于动画集合,你就把他当做普通的 Set 集合使用就好,创建动画集合时传入的参数 false 表示动画集合中装入的和四个 View 动画不共享插值器。到这里你已经学会 View 动画了,但是后面还有更高级用法呢!
自定义View动画
当你看完上面的 View 动画,自定义 View 动画对你来说已经不在话下,我准备的两个 demo 你肯定很期待,分别是:模仿QQ客户端的抖一抖特效,和电视画面关闭&3D旋转,效果如下:

模仿QQ客户端的抖一抖特效,先上代码!
package com.wondertwo.qqTremble;

import android.view.animation.Animation;
import android.view.animation.Transformation;

/**
 * QQ抖一抖特效的自定义View动画实现
 * Created by wondertwo on 2016/3/17.
 */
public class QQTrembleAni extends Animation {
    @Override
    protected void applyTransformation(float interpolatedTime, Transformation t) {
        t.getMatrix().setTranslate(
                (float) Math.sin(interpolatedTime * 50) * 8,
                (float) Math.sin(interpolatedTime * 50) * 8
                );// 50越大频率越高,8越小振幅越小
        super.applyTransformation(interpolatedTime, t);
    }
}
上面这段代码就是我们自定义的QQ抖一抖动画了,所有的自定义动画都需要继承 android.view.animation.Animation 抽象类,然后重写 initialize() 和 applyTransformation() 这两个方法,在 initialize() 方法中对一些变量进行初始化,在 applyTransformation() 方法中通过矩阵修改动画数值,从而控制动画的实现过程,这也是自定义动画的核心。 applyTransformation(float interpolatedTime, Transformation t) 方法在动画的执行过程中会不断地调用,可以看到接收的两个参数分别是 float interpolatedTime 表示当前动画进行的时间与动画总时间(一般在 setDuration() 方法中设置)的比值,从0逐渐增大到1; Transformation t 传递当前动画对象,一般可以通过代码 android.graphics.Matrix matrix = t.getMatrix() 获得 Matrix 矩阵对象,再设置 Matrix 对象,一般要用到 interpolatedTime 参数,以此达到控制动画实现的结果。可以看到在上面的代码中 t.getMatrix().setTranslate((float) Math.sin(interpolatedTime * 50) * 8, (float) Math.sin(interpolatedTime * 50) * 8) 设置了 Matrix 对象的 Translate ,传入的参数是一个正弦函数值,这个值是通过 interpolatedTime 参数计算出来的,这样就实现了动画在x,y轴两个方向上的来回抖动效果。
下面是QQ抖一抖动画的测试类 Activity ,代码如下:
package com.wondertwo.qqTremble;

import android.app.Activity;
import android.os.Bundle;
import android.view.View;
import android.widget.Button;
import android.widget.RelativeLayout;

import com.wondertwo.R;

/**
 * 模仿QQ抖一抖效果的测试类
 * Created by wondertwo on 2016/3/17.
 */
public class QQTrembleTest extends Activity {

    private RelativeLayout rlTremble;
    private Button btnTremble;

    @Override
    protected void onCreate(Bundle savedInstanceState) {
        super.onCreate(savedInstanceState);
        setContentView(R.layout.activity_qq_tremble);
        rlTremble = (RelativeLayout) findViewById(R.id.rl_tremble);
        btnTremble = (Button) findViewById(R.id.btn_tremble);

        // 创建抖一抖动画对象
        final QQTrembleAni tremble = new QQTrembleAni();
        tremble.setDuration(800);// 持续时间800ms,持续时间越短频率越高
        tremble.setRepeatCount(2);// 重复次数,不包含第一次

        // 设置按钮点击监听
        btnTremble.setOnClickListener(new View.OnClickListener() {
            @Override
            public void onClick(View v) {
                // 启动抖一抖效果
                rlTremble.startAnimation(tremble);
            }
        });
    }
}
接着我们再看一个酷炫的自定义动画,类似电视机关机画面和图片3D旋转,效果如下!

直接上代码,电视关机画面效果动画 TVCloseAni 如下:
package com.wondertwo.custom;

import android.graphics.Matrix;
import android.view.animation.Animation;
import android.view.animation.Transformation;

/**
 * 通过矩阵变换模拟电视关闭效果,使图片的纵向比例不断缩小
 * Created by wondertwo on 2016/3/13.
 */
public class TVCloseAni extends Animation {

    private int mCenterWidth, mCenterHeight;

    @Override
    public void initialize(int width, int height, int parentWidth, int parentHeight) {
        super.initialize(width, height, parentWidth, parentHeight);
        // 设置默认时长
        setDuration(4000);
        // 保持动画的结束状态
        setFillAfter(true);
        // 设置默认插值器
        // setInterpolator(new BounceInterpolator());// 回弹效果的插值器
        mCenterWidth = width / 2;
        mCenterHeight = height /2;
    }

    @Override
    protected void applyTransformation(float interpolatedTime, Transformation t) {
        super.applyTransformation(interpolatedTime, t);
        final Matrix matrix = t.getMatrix();
        matrix.preScale(1,
                        1 - interpolatedTime,
                        mCenterWidth,
                        mCenterHeight);
    }
}
图片3D旋转效果动画代码如下:
package com.wondertwo.custom;

import android.graphics.Camera;
import android.graphics.Matrix;
import android.view.animation.Animation;
import android.view.animation.BounceInterpolator;
import android.view.animation.Transformation;

/**
 *
 * Created by wondertwo on 2016/3/13.
 */
public class CustomAni extends Animation {

    private int mCenterWidth, mCenterHeight;
    private Camera mCamera = new Camera();
    private float mRotateY = 0.0f;

    // 一般在此方法初始化一些动画相关的变量和值
    @Override
    public void initialize(int width, int height, int parentWidth, int parentHeight) {
        super.initialize(width, height, parentWidth, parentHeight);
        // 设置默认时长
        setDuration(4000);
        // 保持动画的结束状态
        setFillAfter(true);
        // 设置默认插值器
        setInterpolator(new BounceInterpolator());// 回弹效果的插值器
        mCenterWidth = width / 2;
        mCenterHeight = height /2;
    }

    // 暴露接口设置旋转角度
    public void setRotateY(float rotateY) {
        mRotateY = rotateY;
    }

    // 自定义动画的核心,在动画的执行过程中会不断回调此方法,并且每次回调interpolatedTime值都在不断变化(0----1)
    @Override
    protected void applyTransformation(float interpolatedTime, Transformation t) {
        super.applyTransformation(interpolatedTime, t);
        final Matrix matrix = t.getMatrix();
        mCamera.save();
        // 使用Camera设置Y轴方向的旋转角度
        mCamera.rotateY(mRotateY * interpolatedTime);
        // 将旋转变化作用到matrix上
        mCamera.getMatrix(matrix);
        mCamera.restore();
        // 通过pre方法设置矩阵作用前的偏移量来改变旋转中心
        matrix.preTranslate(mCenterWidth, mCenterHeight);// 在旋转之前开始位移动画
        matrix.postTranslate(-mCenterWidth, -mCenterHeight);// 在旋转之后开始位移动画
    }
}
下面是电视机关机画面和图片3D旋转动画的测试类, CustomAniTest 代码如下!
package com.wondertwo.custom;

import android.app.Activity;
import android.os.Bundle;
import android.view.View;

import com.wondertwo.R;

/**
 * 自定义动画测试类
 * Created by wondertwo on 2016/3/13.
 */
public class CustomAniTest extends Activity {

    private boolean flag = true;// 标记位,轮换展示两种自定义动画

    @Override
    protected void onCreate(Bundle savedInstanceState) {
        super.onCreate(savedInstanceState);
        setContentView(R.layout.activity_custom_ani);
    }

    /**
     * 设置按钮点击事件
     */
    public void startCustomAni(View view) {
        if (flag) {
            TVCloseAni tvAni = new TVCloseAni();
            view.startAnimation(tvAni);
            // 重置标记位
            flag = false;
        } else {
            CustomAni customAni = new CustomAni();
            customAni.setRotateY(30);
            view.startAnimation(customAni);
            // 重置标记位
            flag = true;
        }
    }
}
唯一不同的是在上面3D旋转自定义动画中,我们引入了 Camera 的概念, android.graphics.Camera 中的 Camera 类封装了 openGL 的3D动画,因此可以通过 Camera 类实现很多酷炫的3D动画效果。关于Android中矩阵Matrix的概念,在很多地方都会用到,比如图片处理,动画变换等等地方,这里我就不仔细展开啦!贴上http://www.cnblogs.com/qiengo/archive/2012/06/30/2570874.html#code,看完你肯定能明白矩阵的巨大威力啦,这里感谢原作者!
在最后附上浅析Android动画系列的三篇文章:
- 浅析Android动画(一),View动画高级实例探究 http://www.cnblogs.com/wondertwo/p/5295976.html
- 浅析Android动画(二),属性动画与高级实例探究 http://www.cnblogs.com/wondertwo/p/5312482.html
- 浅析Android动画(三),自定义Interpolator与TypeEvaluator http://www.cnblogs.com/wondertwo/p/5327586.html
如果觉得不错,请继续关注哦!下一篇将继续介绍Android属性动画哈!


