opencv 模板匹配,在图像中寻找物体
使用模板匹配在图像中寻找物体
模板匹配
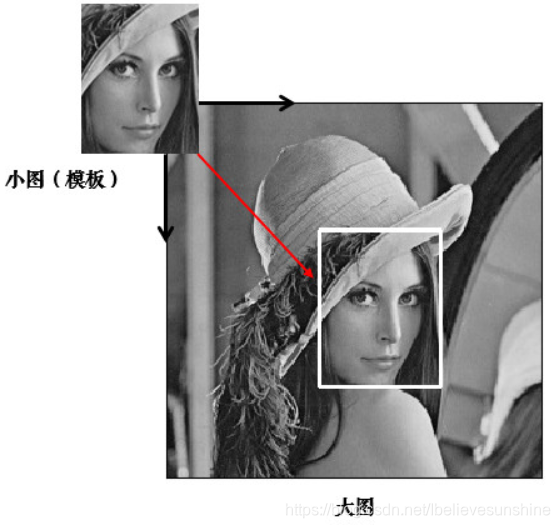
模板匹配就是用来在大图中找小图,也就是说在一副图像中寻找另外一张模板图像的位置:

opencv中用 cv.matchTemplate() 实现模板匹配。
模板匹配的原理其实很简单,就是不断地在原图中移动模板图像去比较,有6种不同的比较方法,详情可参考:TemplateMatchModes
1. 平方差匹配CV_TM_SQDIFF:用两者的平方差来匹配,最好的匹配值为0
2. 归一化平方差匹配CV_TM_SQDIFF_NORMED
3. 相关匹配CV_TM_CCORR:用两者的乘积匹配,数值越大表明匹配程度越好
4. 归一化相关匹配CV_TM_CCORR_NORMED
5. 相关系数匹配CV_TM_CCOEFF:用两者的相关系数匹配,1表示完美的匹配,-1表示最差的匹配
6. 归一化相关系数匹配CV_TM_CCOEFF_NORMED
归一化的意思就是将值统一到0~1,这些方法的对比代码可到源码处查看。模板匹配也是应用卷积来实现的:假设原图大小为W×H,模板图大小为w×h,那么生成图大小是(W-w+1)×(H-h+1),生成图中的每个像素值表示原图与模板的匹配程度。
实验:源图像中匹配模板图像
源图像:

模板图像:

import cv2 as cv
import numpy as np
from matplotlib import pyplot as plt

# 1.模板匹配
img = cv.imread('lena.jpg', 0)
template = cv.imread('face.jpg', 0)
h, w = template.shape[:2]  # rows->h, cols->w

# 6种匹配方法
methods = ['cv.TM_CCOEFF', 'cv.TM_CCOEFF_NORMED', 'cv.TM_CCORR',
           'cv.TM_CCORR_NORMED', 'cv.TM_SQDIFF', 'cv.TM_SQDIFF_NORMED']

for meth in methods:
    img2 = img.copy()

    # 匹配方法的真值
    method = eval(meth)
    res = cv.matchTemplate(img, template, method)
    min_val, max_val, min_loc, max_loc = cv.minMaxLoc(res)

    # 如果是平方差匹配TM_SQDIFF或归一化平方差匹配TM_SQDIFF_NORMED,取最小值
    if method in [cv.TM_SQDIFF, cv.TM_SQDIFF_NORMED]:
        top_left = min_loc
    else:
        top_left = max_loc
    bottom_right = (top_left[0] + w, top_left[1] + h)

    # 画矩形
    cv.rectangle(img2, top_left, bottom_right, 255, 2)

    plt.subplot(121), plt.imshow(res, cmap='gray')
    plt.xticks([]), plt.yticks([])  # 隐藏坐标轴
    plt.subplot(122), plt.imshow(img2, cmap='gray')
    plt.xticks([]), plt.yticks([])
    plt.suptitle(meth)
    plt.show()
实验结果

匹配多个物体
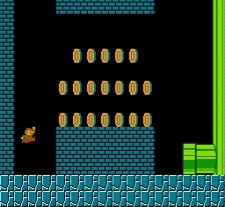
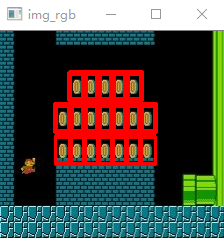
前面我们是找最大匹配的点,所以只能匹配一次。我们可以设定一个匹配阈值来匹配多次:
实验:匹配图像中的硬币


import cv2 as cv
import numpy as np
from matplotlib import pyplot as plt

# 2.匹配多个物体
img_rgb = cv.imread('mario.jpg')
img_gray = cv.cvtColor(img_rgb, cv.COLOR_BGR2GRAY)
template = cv.imread('mario_coin.jpg', 0)
h, w = template.shape[:2]

res = cv.matchTemplate(img_gray, template, cv.TM_CCOEFF_NORMED)
threshold = 0.8
# 取匹配程度大于%80的坐标
loc = np.where(res >= threshold)
for pt in zip(*loc[::-1]):  # *号表示可选参数
    bottom_right = (pt[0] + w, pt[1] + h)
    cv.rectangle(img_rgb, pt, bottom_right, (0, 0, 255), 2)

cv.imshow('img_rgb', img_rgb)
cv.waitKey(0)
cv.destroyAllWindows()
代码难点讲解
第3步有几个Python/Numpy的重要知识:
x = np.arange(9.).reshape(3, 3)
print(np.where(x > 5))
# 结果:(array([2, 2, 2]), array([0, 1, 2]))

zip()函数,功能强大到难以解释,举个简单例子就知道了:
x = [1, 2, 3]
y = [4, 5, 6]
print(list(zip(x, y)))  # [(1, 4), (2, 5), (3, 6)]
实验结果


