startActivity流程\AMS
1:context和contextImpl、contextWrapper:
1)Application和Activity、service都继承ContextWrapper
2)Application或者Activity的context就是ContextWrapper的mBase.getApplicationContext
3) ContextWrapper的mBase就是contextImpl,及ContextWrapper持有contextImpl
4)contextImpl和contextWrapper如何关联:
ActivityThread->performLaunchActivity->
//通过createBaseContextForActivity生成ContextImpl实例
Context appContext = createBaseContextForActivity(r, activity)->
//通过attach绑定到contextWrapper的mBase
activity.attach(appContext, this, getInstrumentation(), r.token,
        r.ident, app, r.intent, r.activityInfo, title, r.parent,
        r.embeddedID, r.lastNonConfigurationInstances, config,
        r.referrer, r.voiceInteractor, window);

2:Activity启动流程:
1)startActivity:
startActivity->contextImpl.startActivity->mMainThread.getInstrumentation().execStartActivity
->ActivityManagerNative.getDefault().startActivity,
getDefault:通过getService获取到服务端AMS的引用,然后生成一个代理类,该类持有AMS的引用ActivityManagerProxy
private static final Singleton<IActivityManager> gDefault = new Singleton<IActivityManager>() {
        protected IActivityManager create() {
            IBinder b = ServiceManager.getService("activity");
            IActivityManager am = ActivityManagerNative.asInterface(b);
            return am;
        }
    };
public static IActivityManager asInterface(IBinder obj) {
        if (obj == null) {
            return null;
        } else {
            IActivityManager in = (IActivityManager)obj.queryLocalInterface("android.app.IActivityManager");
            return (IActivityManager)(in != null ? in : new ActivityManagerProxy(obj));
        }
    }
最终执行的是ActivityManagerProxy里面的startActivity。
以上的流程和我们平时aidl的bindService过程是一样的,只不过获取IBinder的方式不一样,
bindService是绑定成功之后,回调:onServiceConnected,底层帮我们取得了IBinder并通过回调回传给我们:
private ServiceConnection serviceConnection = new ServiceConnection() {
        @Override
        public void onServiceConnected(ComponentName name, IBinder service) {
            Timber.i("Sub-app service connected");
            subAppInterface = ISubAppAidlInterface.Stub.asInterface(service);
        }

        @Override
        public void onServiceDisconnected(ComponentName name) {
            Timber.i("Sub-app service disconnected");
            subAppInterface = null;
        }
    };
而startActivity是自己获得:IBinder b = ServiceManager.getService("activity");
其实bindService的底层也是通过这种方式获得的,只不过底层帮我们做了这个步骤。
所有的service在初始化的时候,都需要在ServiceManager里面注册,client用的时候,才能通过IBinder b = ServiceManager.getService("activity");拿到该servcie的代理引用。
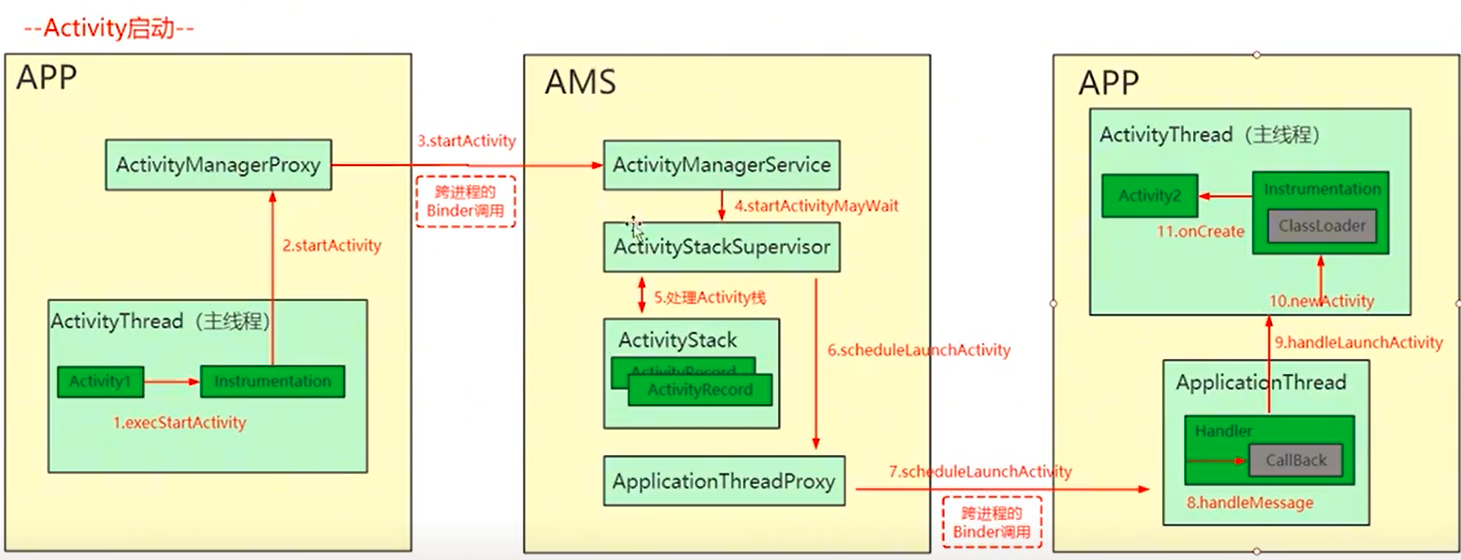
2):启动Activity的操作从客户端 跨进程 转移到 AMS,AMS通过ActivityTaskManagerService、ActivityStarter、ActivityStack、ActivityStackSupervisor 对 Activity任务、activity栈、Activity记录 管理后,又用过跨进程把正在启动过程又转移到了客户端。(ApplicationThread是binder的服务端,APP传给AMS,后续AMS通过ApplicationThread返回信息给APP)
ApplicationThread把启动Activity的操作,通过mH切到了主线程,走到了ActivityThread的handleLaunchActivity方法。
3):ApplicationThread->ActivityThread->handleLaunchActivity->performLaunchActivity:
performLaunchActivity:Core implementation of activity launch.Activity启动的核心流程:
最后回调到Instrumentation的newActivity实例化。
private Activity performLaunchActivity(ActivityClientRecord r, Intent customIntent) {
     //1:从ActivityClientRecord里面获取待启动的Activity的组件信息
        ActivityInfo aInfo = r.activityInfo;
        if (r.packageInfo == null) {
            r.packageInfo = getPackageInfo(aInfo.applicationInfo, r.compatInfo,
                    Context.CONTEXT_INCLUDE_CODE);
        }

        ComponentName component = r.intent.getComponent();
        if (component == null) {
            component = r.intent.resolveActivity(
                mInitialApplication.getPackageManager());
            r.intent.setComponent(component);
        }

        if (r.activityInfo.targetActivity != null) {
            component = new ComponentName(r.activityInfo.packageName,
                    r.activityInfo.targetActivity);
        }

        ContextImpl appContext = createBaseContextForActivity(r);
        Activity activity = null;
        try {//2:创建activity实例
            java.lang.ClassLoader cl = appContext.getClassLoader();
            activity = mInstrumentation.newActivity(
                    cl, component.getClassName(), r.intent);
            StrictMode.incrementExpectedActivityCount(activity.getClass());
            r.intent.setExtrasClassLoader(cl);
            r.intent.prepareToEnterProcess(isProtectedComponent(r.activityInfo),
                    appContext.getAttributionSource());
            if (r.state != null) {
                r.state.setClassLoader(cl);
            }
        } catch (Exception e) {
            if (!mInstrumentation.onException(activity, e)) {
                throw new RuntimeException(
                    "Unable to instantiate activity " + component
                    + ": " + e.toString(), e);
            }
        }

        try {
       //3:创建Application对象(如果没有的话)
            Application app = r.packageInfo.makeApplication(false, mInstrumentation);

            if (localLOGV) Slog.v(TAG, "Performing launch of " + r);
            if (localLOGV) Slog.v(
                    TAG, r + ": app=" + app
                    + ", appName=" + app.getPackageName()
                    + ", pkg=" + r.packageInfo.getPackageName()
                    + ", comp=" + r.intent.getComponent().toShortString()
                    + ", dir=" + r.packageInfo.getAppDir());return activity;
    }
3:AMS端流程:
1)Activity启动模式的处理
2)生命周期管理
3)栈管理
4)注册校验
5)判断要启动的应用进程是否存在,如果不存在,通知Zygote fork出一个新的进程,启动新的app(Launcher第一次启动APP)
4:ActivityThread:
1)Android应用的入口就是ActivityThread里面的main函数,调用prepareMainLooper()为UI线程创建一个消息队列(MessageQueue)。
2)ApplicationThread,是一个继承binder的类,相当于Binder机制的Server端,当AMS处理完流程之后,会通过这个Binder传递回信息。
在AMS端就是IApplicationThread接口
ApplicationThread传递给AMS的过程:
main()->thread.attach->
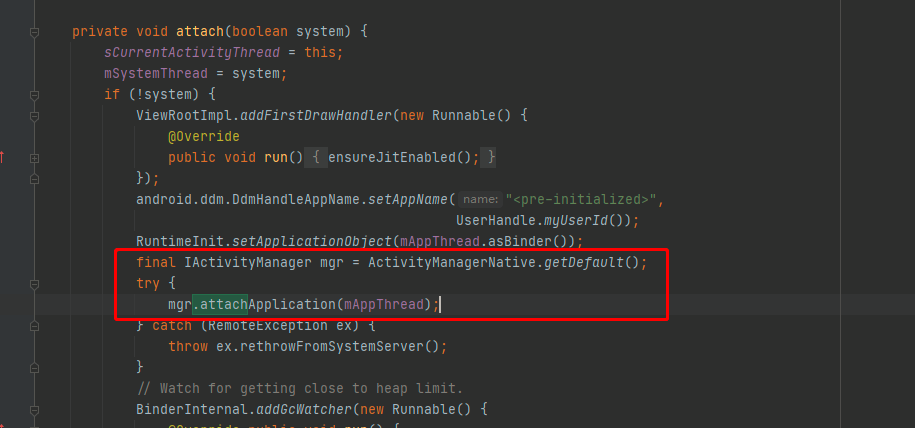
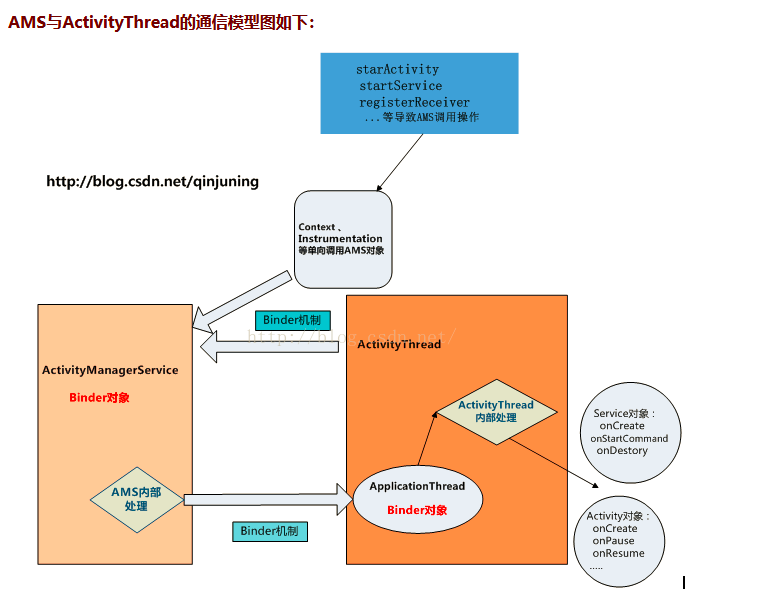
3)Application oncreate回调:
main->thread.attach->mInitialApplication.onCreate(),这里回调到我们应用层Application的onCreate().
5:AMS
当Zygote进程启动SystemServer进程的时候,执行到这里:
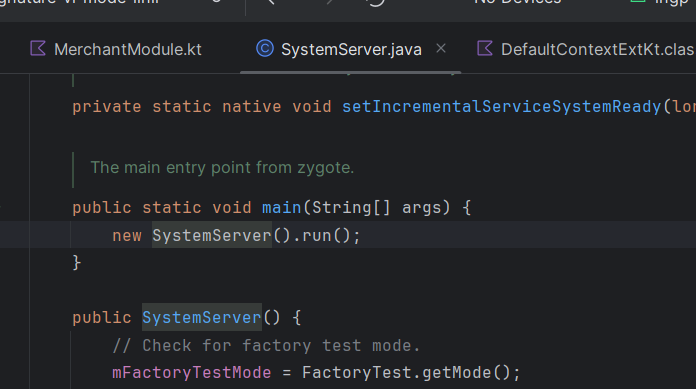
由于服务有80多个,所以分成了4个部分:
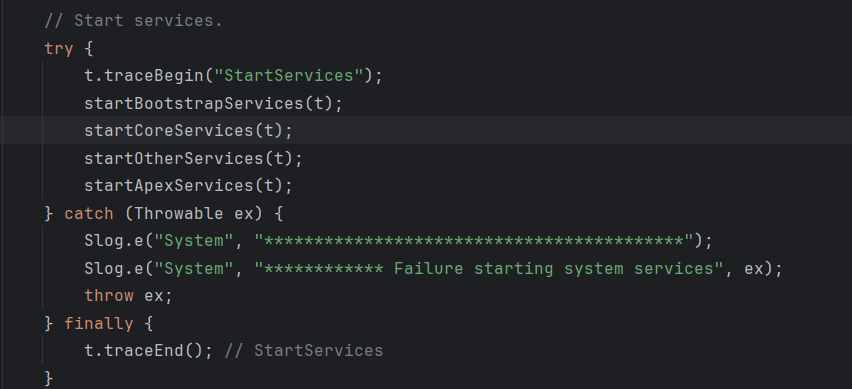
1)AMS是由SystemServer启动的:main->SystemServer().run()->startBootstrapServices->:
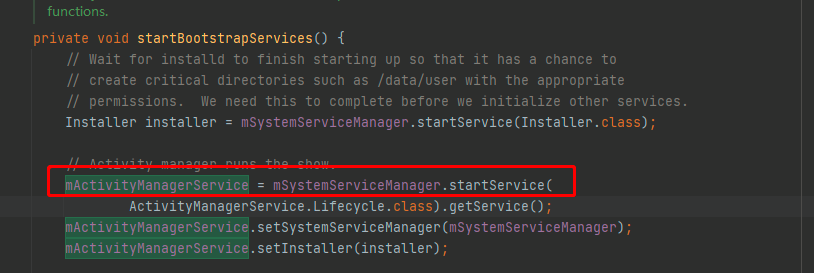
2)setSystemProcess:main->SystemServer().run()->startBootstrapServices->mActivityManagerService.setSystemProcess();
该函数注册AMS和meminfo等服务到ServiceManager中。
另外,它为SystemServer创建了一个ProcessRecord对象。由于AMS是Java世界的进程管理及调度中心,要做到对Java进程一视同仁,尽管SystemServer贵为系统进程,此时也不得不将其并入AMS的管理范围内。

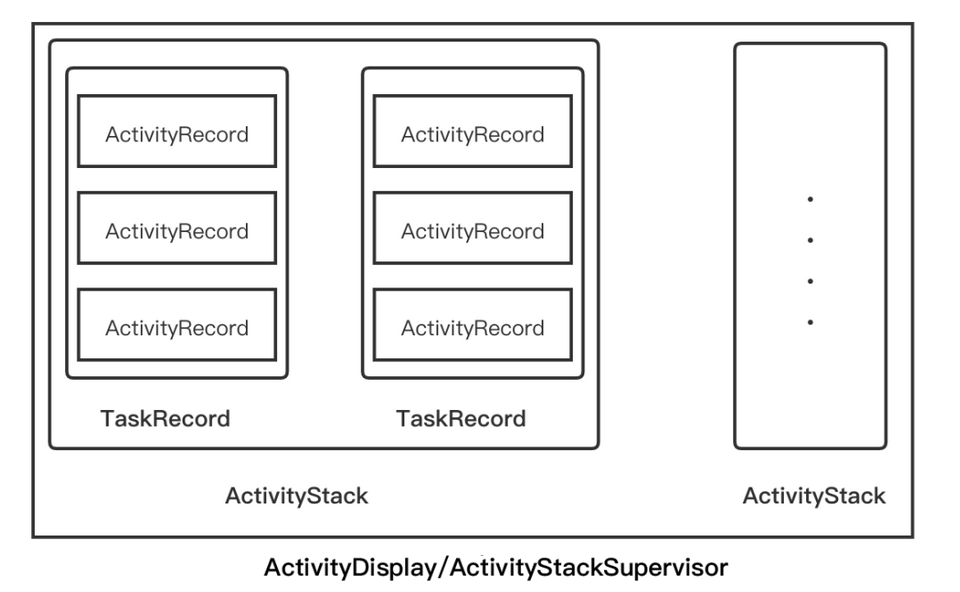
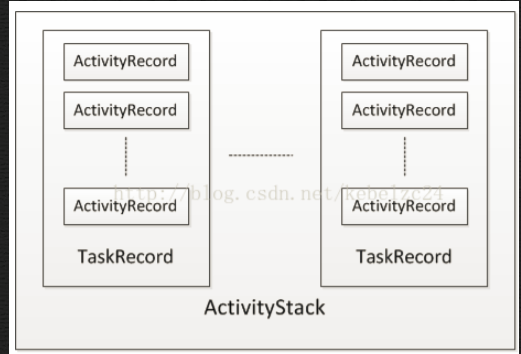
3)ActivityRecord、TaskRecord、ActivityStack的关系
http://liujunyang.site/?p=1201
a:ActivityRecord就是Activity在AMS中的代表,ActivityRecord和应用中的Activity一一对应,并且包含了Activity的所有信息。(就好比Activity在ActivityThread中对应ActivityClientRecord一
样)每一个ActivityRecord都会有一个Activity与之对应,一个Activity可能会有多个ActivityRecord,因为Activity可以被多次实例化,取决于其Launchmode。
其中task对象标识了其所归属的TaskRecord,这样ActivityRecord和TaskRecord就联系起来了。
final class ActivityRecord {
  // AMS的引用
  final ActivityManagerService service; // owner
  // token用来和WMS交互
  final IApplicationToken.Stub appToken; // window manager token
  final ActivityInfo info; // all about me
  final ApplicationInfo appInfo; // information about activity's app
  final ComponentName realActivity; // the intent component, or target of an alias.
  ...
  //Activity资源信息
  CharSequence nonLocalizedLabel; // the label information from the package mgr.
  int labelRes; // the label information from the package mgr.
  int icon; // resource identifier of activity's icon.
  int logo; // resource identifier of activity's logo.
  int theme; // resource identifier of activity's theme.
  int realTheme; // actual theme resource we will use, never 0.
  int windowFlags; // custom window flags for preview window.
  // ActivityRecord所在的TaskRecord
  TaskRecord task; // the task this is in.
  ...
  // ActivityRecord所在进程
  ProcessRecord app; // if non-null, hosting application
  ActivityState state; // current state we are in
  ...
}
b:TaskRecord
final class TaskRecord {
  // TaskRecord的唯一标识
  final int taskId; // Unique identifier for this task.
  .....
  // This represents the last resolved activity values for thistask
  // NOTE: This value needs to be persisted with each task
  TaskDescription lastTaskDescription = new TaskDescription();
  // TaskRecord里所有的ActivityRecord信息
  /** List of all activities in the task arranged in history order */
  final ArrayList<ActivityRecord> mActivities;
  // TaskRecord所在的stack
  ActivityStack stack;
  ......
}
TaskRecord中我列出来三个成员变量:
taskId:唯一标示的id号
mActivities:当前栈中所有的ActivityRecord
stack:ActivityStack的引用,为了回调ActivityStack的方法
从TaskRecord 的数据结构我们可以看到,mActivities保存了一组ActivityRecord信息,同时每
一个ActivityRecord都有其所在TaskRecord的引用。TaskRecord都有一个唯一标示taskId,
还包含了ActivityStack的引用对象。
因此,TaskRecord可以理解为一个mActivities组成的栈,也可以理解为一个由一系列Activity
组成的活动。
c:ActivityStack
final class ActivityStack {
  /**
  * The back history of all previous (and possibly still
  * running) activities. It contains #TaskRecord objects.
  */
  private final ArrayList<TaskRecord> mTaskHistory = new ArrayList<>();
  ...
  final int mStackId;
  ...
  /** Run all ActivityStacks through this */
  final ActivityStackSupervisor mStackSupervisor;
}
每一个ActivityRecord都会有一个Activity与之对应。一系列相关的ActivityRecord组成了一个
TaskRecord,TaskRecord是存在于ActivityStack中,ActivityStackSupervisor是用来管理这
些ActivityStack的。
下面是一个简单的关系图
Task 是Activity的集合。Android把用户一次相关操作用使用的Activity按照先后顺序保存在
Task中,这样当用户按back键的时候就能按照相反的顺序依次返回退出。Task像一个栈,以
先进后出的方式管理着Activity。系统运行时内存中会存在多个Task,当我们查看最近任务栏
时,会弹出一个列表让你选择,这个列表就是系统中存在的Task集合,选择一个Task会将它
所包含的Activity作为一个整体带到前台。Task中的Activity的顺序通常是不能改变的,只能压
栈和出栈。
AMS中使用ActivityStack 类来管理Task,它管理的Task都存放在成员变量mTaskHistory
中。mTaskHistory也是一个列表,存储的是TaskRecord对象。TaskRecord对象代表一个
Task,他的成员变量mActivities也是一个列表,存储了属于该Task中的所有ActivityRecord对象。
当我们说Activity入栈或出栈时,实际上是指ActivityRecord在TaskRecord所代表的返回栈中的添加或移除操作。