IOC详解
1:IOC,控制反转(Inversion of Control)
软件设计原则中有一个依赖倒置原则(DIP)讲的是要依赖于抽象,不要依赖与具体,高层模块不应该依赖于低层模块。
比如我们的Client类,里面调用一个Test,那就是Client对Test形成依赖关系,Test是Client的依赖类。
Test test = new Test()
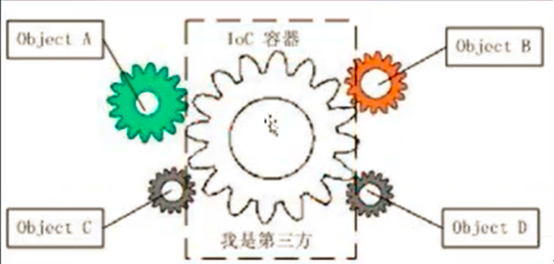
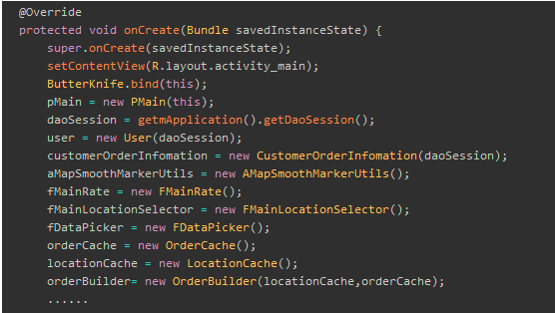
这种方式就形成比较大的耦合,控制反转就是Client需要Test对象的时候,不需要自己去new对象,而是通过其他方式,直接得到Test的对象,然后使用。
从主动new对象到被动接受对象,就是控制反转。
2:IOC是一种编程思想,依赖注入是实现的技术DI(Dependency Injection)

举例子:
有3个类:
1)Tiger:
public class Tiger{
    public String getName(){
        return "Tiger";
    }
}
2)Rabbit:
public class Rabbit{
    public String getName() {
        return "Rabbit";
    }
}
3)People
People想要饲养一直兔子:
public class People {
    Rabbit rabbit = new Rabbit();
}
在这里,pople类和Rabbit类是紧密耦合的,想要换成Tiger类,变化就很大
改进,接口编程:
1)Animal接口,然后Tiger和Rabbit都实现改接口
public interface Animal {
}
2)People:
People想要饲养一直兔子:
public class People {
    Animal rabbit = new Rabbit();
}
这种方法有改进,但是还是改变不了People和Rabbit耦合的情况。
依赖注入:
1)构造函数注入,对于People这个类来说,当他想要替换动物的时候,People这个类不需要改动,只需要外部传进来的实例化的Animal
不同就可以了,即People本身不去new具体的动物,有外部提供具体的实例。
public class People {
    Animal animal;

    public People(Animal animal) {
        this.animal = animal;
    }
}
public class Test {
        People people = new People(new Rabbit());
        People people2 = new People(new Tiger());
}
2):setter依赖注入:当依赖的类比较多的时候使用
People类:
public class People {
    Animal animal;

    public void setAnimal(Animal animal){
        this.animal = animal;
    }
}
使用:
 Animal animal = new Tiger();
        Animal animal1 = new Rabbit();
        People people = new People();
        people.setAnimal(animal);
        people.setAnimal(animal1);
4:Dagger2用法:
1):普通类:
public class OkhttpClient {
    String timeout;
    Context context;
    public String call() {
        return "OkhttpClient";
    }

    public OkhttpClient(String timeout, Context context) {
        this.timeout = timeout;
    }

    public void setTimeout(String timeout) {
        this.timeout = timeout;
    }
}
2)Module:
@Module
public class CommunicationModule {
    String timeout;
    Context context;

    public CommunicationModule(String timeout, Context context) {
        this.timeout = timeout;
        this.context = context;
    }

    @Provides
    OkhttpClient provideOkhttpClient() {
        return new OkhttpClient(timeout, context);
    }

    @Provides
    RetrofitManager provideRetrofitManager(OkhttpClient client) {
        return new RetrofitManager(client);
    }
}
3)Component:
@Component(modules = {FlowerModule.class, CommunicationModule.class})
public interface MyComponent {
    void inject(MainActivity activity);
}
4)调用者使用:
@Inject
    OkhttpClient okhttpClient;

    @Inject
    RetrofitManager retrofitManager;
 DaggerMyComponent.builder()
                .flowerModule(new FlowerModule())
                .communicationModule(new CommunicationModule("60", this))
                .build().inject(this);
最主要的三个注解要素:
Module、Component、Inject
1)Inject:告诉调用者,哪个类可以直接使用
2)Module:负责new对象,供调用者使用
3)Component:负责注入,是调用者和Module之间的桥梁,使他们能够联系起来,但是调用者和Module又是松耦合的状态。
疑问:
 DaggerMyComponent.builder()
                .flowerModule(new FlowerModule())
                .communicationModule(new CommunicationModule("60", this))
                .build().inject(this);
这句话也会形成耦合,和直接new的区别在哪里:
是的,耦合还是存在,并不能绝对的消除,只是比较大程度的松耦合。如果需要调用者传入一些参数,还是要改变调用者的代码,
做不到觉得的不改动调用者代码。
3:依赖注入和工厂模式:
1)相同点:两者都是将new的过程交于他人,使用者无需自己去new对象
2)不同点:工厂模式的耦合度相对较高,因为调用者依然依赖于工厂这个类,而我们对象的时候,也需要去改动工厂类,形成了依赖关系。
而依赖注入的Module和使用者完全隔离开来,形成松耦合关系。
5::Java Spring的IOC和Android IOC 的不同
Java Spring的IOC是基于反射,传入全限定名,根据全限定名自动new成一个类供调用者使用(工厂模式+反射机制)
Android IOC,不使用反射,考虑到会影响终端性能。使用的是APT技术,编译时自动new对象,在编译器已经完成new的过程,不影响性能。
6:使用依赖注入的好处:
1)可以将负责的new的步骤分装在容器之内,作为调用者,无需关系new 对象的过程,专注于业务
使用之前:new一个对象可能需要很多步骤才能完成

使用之后:所有的步骤交给module去完成。

2):Client对依赖项的变化不敏感,方便替换new的对象,
在项目中如果有大量地方通过new关键字实例化对象,并且不使用DI,如果你想替换这个类,传统的做法是需要在所有使用到该类的地方修改代码,将new的对象替换为新的类。但是,如果你使用Dagger 2,你可以在模块(Module)中进行对象的替换。这意味着你可以在模块中定义一个新的类,并将其与原始类进行绑定,而不需要修改调用者的代码。这样,在使用依赖注入的情况下,调用者无需改动代码就可以享受到新类的功能,因为依赖注入框架会自动处理对象的创建和替换。
举例:
假设你的项目中有一个HorseCar类,用于代表汽车。在多个地方通过new关键字创建了Car对象。
比如在CarUser里面new HorseCar()
public class HouseCar {
    // Car 类的实现...
}
现在,你想替换Car类为ElectricCar类,传统做法是需要在各个调用类替换成new ElectricCar()
public class ElectricCar {
    // ElectricCar 类的实现...
}
然而,在Dagger 2的Module中,你可以进行绑定,告诉Dagger 2在需要Car对象的地方,使用ElectricCar对象替代:
@Module
public class CarModule {
    @Provides
    public Car provideCar() {
        return new ElectricCar();
    }
}
CarUser类不用改动
public class CarUser {
    @Inject
    private Car car;

    card.run...
}
这样,在项目中通过Dagger 2的依赖注入,你可以轻松地替换Car类为ElectricCar类,而不需要修改CarUser类的代码。
3):方便单元测试,通过让构造一些假的依赖项, 可以方便的对Client进行独立的测试.
假设我们有一个简单的计算器类Calculator,它依赖于一个Adder接口来执行加法操作。Adder接口有两个方法:int add(int a, int b) 和 int subtract(int a, int b)。
public interface Adder {
    int add(int a, int b);
    int subtract(int a, int b);
}

public class Calculator {
    private Adder adder;

    public Calculator(Adder adder) {
        this.adder = adder;
    }

    public int add(int a, int b) {
        return adder.add(a, b);
    }

    public int subtract(int a, int b) {
        return adder.subtract(a, b);
    }
}
在传统的方式中,我们可能会在Calculator类中直接创建一个具体的Adder实现类的对象。然而,这样做会导致Calculator与特定的实现类紧密耦合在一起,不利于单元测试。
现在,我们使用Dagger 2进行依赖注入:
@Module
public class AdderModule {
    @Provides
    Adder provideAdder() {
        return new SimpleAdder(); // 这里提供具体的 Adder 实现类
    }
}

@Component(modules = {AdderModule.class})
public interface CalculatorComponent {
    Calculator getCalculator();
}
在这里,我们使用Dagger 2的Module和Component来定义依赖关系。AdderModule中提供了一个具体的Adder实现类SimpleAdder,而CalculatorComponent定义了获取Calculator对象的方法。
现在,在我们的测试代码中,我们可以使用模拟对象来替代真正的Adder实现类:
public class MockAdder implements Adder {
    public int add(int a, int b) {
        return a + b;
    }

    public int subtract(int a, int b) {
        return a - b;
    }
}

// 在单元测试中使用依赖注入来创建 Calculator 对象
Calculator calculator = DaggerCalculatorComponent.builder()
                         .adderModule(new AdderModule() {
                             @Override
                             Adder provideAdder() {
                                 return new MockAdder(); // 使用模拟的 Adder 对象
                             }
                         })
                         .build()
                         .getCalculator();

// 进行单元测试
assertEquals(5, calculator.add(2, 3));
assertEquals(-1, calculator.subtract(2, 3));
通过使用依赖注入,我们可以在单元测试中使用模拟的Adder对象,而不必关心具体的实现类。这样,我们可以更方便地编写单元测试,而且测试结果是可预测和可控的。通过更好地解耦代码和依赖关系,Dagger 2使得单元测试变得更加简单、可靠和高效。


 浙公网安备 33010602011771号