JavaSE
本篇是对JavaSE基础的学习笔记,是我对b站韩顺平老师的Javase视频做的学习视频,韩老师的视频讲的非常的细致和详细,欢迎大家去学习。
视频链接:https://www.bilibili.com/video/BV1fh411y7R8/?spm_id_from=333.337.search-card.all.click&vd_source=93a9791635a85d78b9590de285f670f6
一、Java概述
1.1 Java的特点
-
Java 语言是面向对象的(oop)
-
Java 语言是健壮的。Java 的强类型机制、异常处理、垃圾的自动收集等是 Java 程序健壮性的重要保证
-
Java 语言是跨平台性的。[即: 一个编译好的.class 文件可以在多个系统下运行,这种特性称为跨平台]
-
Java 语言是解释型的[了解] 解释性语言:javascript,PHP, java 编译性语言: c / c++ 区别是:解释性语言,编译后的代码,不能直接被机器执行,需要解释器来执行, 编译性语言, 编译后的代码, 可 以直接被机器执行, c /c++
1.2 Java运行机制及运行过程
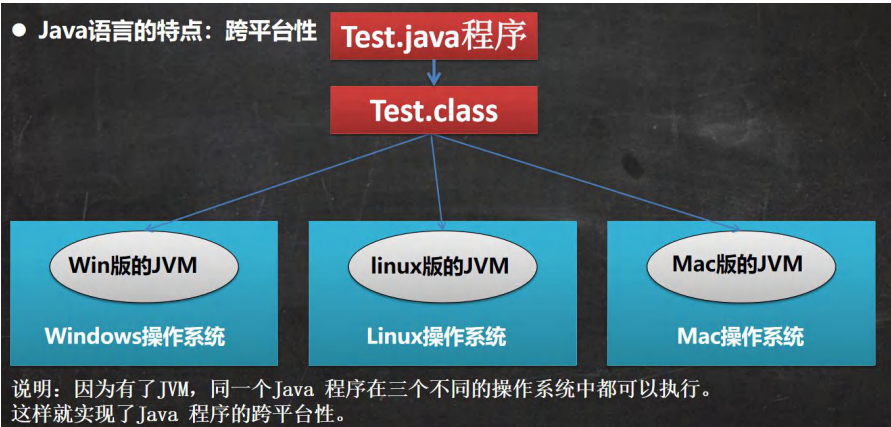
1.2.1 Java语言的特点:跨平台性
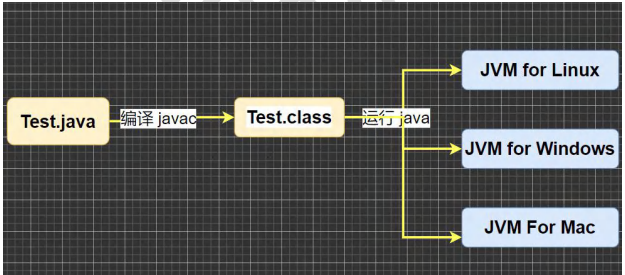
1.2.2 Java核心机制-Java虚拟机
1.介绍:
-
JVM 是一个虚拟的计算机,具有指令集并使用不同的存储区域。负责执行指令,管理数据、内存、寄存器,包含在 JDK 中.
-
对于不同的平台,有不同的虚拟机。
-
Java 虚拟机机制屏蔽了底层运行平台的差别,实现了“一次编译,到处运行” [说明]
2.示意图
1.3 什么是JDK、JRE
1.3.1 JDK基本介绍
-
JDK 的全称(Java Development Kit Java 开发工具包) JDK = JRE + java 的开发工具 [java, javac,javadoc,javap 等]
-
JDK 是提供给 Java 开发人员使用的,其中包含了 java 的开发工具,也包括了 JRE。所以安装了 JDK,就不用在单独 安装 JRE 了。
1.3.2 JRE 基本介绍
-
JRE(Java Runtime Environment Java 运行环境) JRE = JVM + Java 的核心类库[类]
-
包括 Java 虚拟机(JVM Java Virtual Machine)和 Java 程序所需的核心类库等,如果想要运行一个开发好的 Java 程序, 计算机中只需要安装 JRE 即可。
1.3.3 JDK、JRE和JVM的包含关系
-
JDK = JRE + 开发工具集(例如 Javac,java 编译工具等)
-
JRE = JVM + Java SE 标准类库(java 核心类库)
-
如果只想运行开发好的 .class 文件 只需要 JRE
1.4 下载、安装JDK
1.4.1 下载地址
官网地址:https://www.oracle.com/java/technologies/downloads/
1.4.2 安装步骤
下一步即可
1.4.3 细节说明
1.安装路径不要有中文或者特殊符号。
2.提示安装JRE,可以安装也可以不安装
1.5 配置环境
1.5.1 为什么要配置环境
当前执行的程序在当前目录下如果不存在,win10系统会在系统中已有的一个名为path的环境变量指定目录下寻找。如果仍未找到,就会提示错误。
1.5.2 配置环境步骤
1.我的电脑--属性--高级系统设置--环境变量
2.增加JAVA_HOME环境变量,指向jdk的安装路径 如:C:\Program Files\Java\jdk1.8.0_341
3.编辑path环境变量,增加%JAVA_HOME%\bin
4.增加CLASSPATH,添加.;%JAVA_HOME%\lib;%JAVA_HOME%\lib\tools.jar
5.打开DOS命令行,输入javac/java。如果出现参数信息,配置成功

1.6 入门
1.6.1 需求
开发一个Hello.java,运行可以输出"hello,word!"
1.6.2 运行原理示意图

1.6.3 案例演示
//这是 java 的快速入门, 演示 java 的开发步骤
//对代码的相关说明
//1. public class Hello 表示 Hello 是一个类,是一个 public 公有的类
//2. Hello{ } 表示一个类的开始和结束
//3. public static void main(String[] args) 表示一个主方法,即我们程序的入口
//4. main() {} 表示方法的开始和结束
//5. System.out.println("hello,world!"); 表示输出"hello,world!"到屏幕
//6. ;表示语句结束
public class Hello {
    //编写一个 main 方法
    public static void main(String[] args) {
        System.out.println("hello,word!");
    }
}
1.6.4 注意事项和细节说明
1.7 转义字符
1.7.1 Java常用的转义字符
\t :一个制表位,实现对齐的功能
\n :换行符
\ \ :一个
\ " :一个"
\ ' :一个'
\r :一个回车
1.7.2 案例演示
//演示转义字符的使用
public class ChangeChar {
    //编写一个 main 方法
    public static void main(String[] args) {
        //\t :一个制表位,实现对齐的功能
        System.out.println("北京\t 天津\t 上海");
        // \n :换行符
        System.out.println("jack\nsmith\nmary");
        // \\ :一个\
        System.out.println("C:\\Windows\\System32\\cmd.exe");
        //  \":一个:
        System.out.println("你\"我");
        //   \':一个'
        System.out.println("java\'c++");
        //  \r 表示回车
        System.out.println("湖南\r 北京"); // 北京平教育
    }
}
1.8 注释
1.8.1 介绍
用于注解说明解释程序的文字就是注释,注释提高了代码的阅读性(可读性);注释是一个程序员必须要具有的良好编程习惯。将自己的思想通过注释先整理出来,再用代码去体现。
1.8.2 Java的注释类型
-
单行注释 //
-
多行注释 /* */
-
文档注释 /** */
1.8.3 单行注释
基本格式
格式: //注释文字
1.8.4 多行注释
基本格式
格式: /* 注释文字 */
1.8.5 文档注释
基本格式
格式: /** 注释文字 */
注:注释内容可以被JDK提供的工具javadoc所解析,生成一套以网页文件形式体现的该程序的说明文档,一般写在类
1.9 Java代码规范
二、变量
2.1 变量的介绍
2.1.1 概念
变量相当于内存中一个数据存储空间的表示,你可以把变量看做是一个房间的门牌号,通过门牌号我们可以找到房间,而通过变量名可以访问到变量(值)。
2.1.2 变量使用的基本步骤
1.声明变量
int a;
2.赋值
a = 60;//把60赋给a
//也可以一步到位[int a = 60];
2.2 入门
public class Var02 {
    //编写一个 main 方法
    public static void main(String[] args) {
        //记录人的信息
        int age = 30;
        double score = 88.9;
        char gender = '男';
        String name = "king";
        //输出信息, 快捷键
        System.out.println("人的信息如下:");
        System.out.println(name);
        System.out.println(age);
        System.out.println(score);
        System.out.println(gender);
    }
}
2.3 注意事项和细节说明
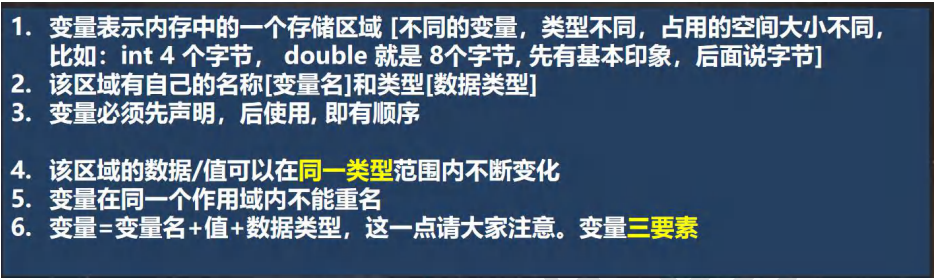
2.4 程序中+号的使用
1.当左右两边都是数值型时,则做加法运算
2.当左右两边有一方为字符串,则做拼接运算
3.运算顺序,是从左到右
2.5 数据类型
每一种数据都定义了明确的数据类型,在内存中分配了不同大小的内存空间(字节)。
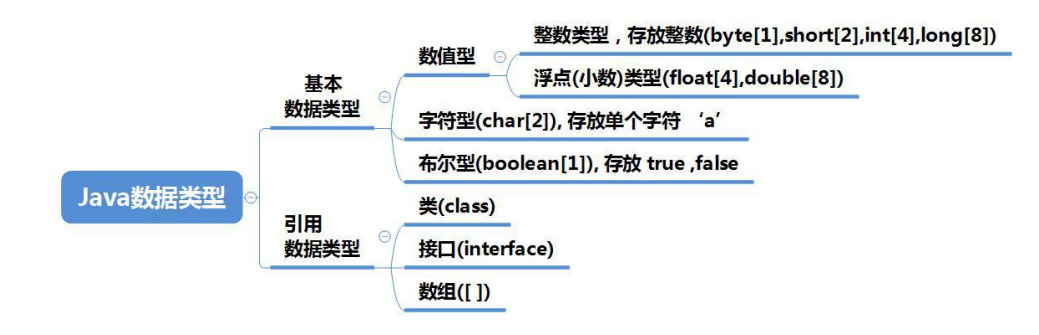
上图说明:
1.Java数据类型分为两大类,基本数据和引用类型
2.基本数据类型有8种[byte,short,int,long,float,double,char,boolean]
3.引用类型[类,接口,数组]
2.6 数据类型
2.6.1 基本介绍
Java 的整数类型就是用于存放整数值的,比如 12 , 30, 456等等
2.6.2 案例演示
byte n1 = 10;
short n2 = 10;
int n3 = 10;//4 个字节
long n4 = 10; //8 个字节
2.6.3 整数的类型
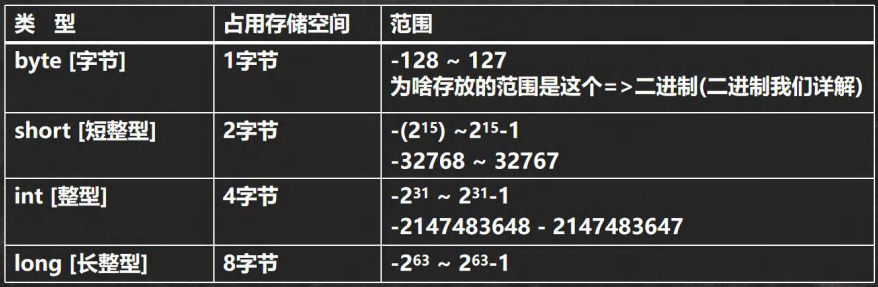
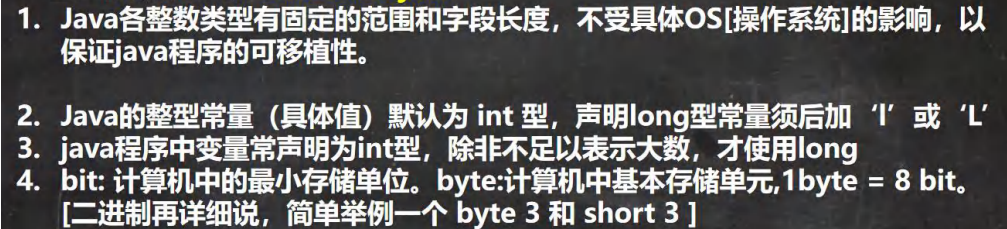
2.6.4 整型的使用细节
public class IntDetail {
    //编写一个 main 方法
    public static void main(String[] args) {
        //Java 的整型常量(具体值)默认为 int 型,声明 long 型常量须后加‘l’或‘L’
        int n1 = 1;//4 个字节
        //int n2 = 1L;//对不对?不对
        long n3 = 1L;//对
    }
}
2.7 浮点类型
2.7.1 基本介绍
Java 的浮点类型可以表示一个小数,比如 123.4 ,7.8 ,0.12 等等
2.7.2 浮点的分类

2.7.3 说明一下
-
关于浮点数在机器中存放形式的简单说明,浮点数=符号位+指数位+尾数位
-
尾数部分可能丢失,造成精度损失(小数都是近似值)。
2.7.4 浮点的使用细节
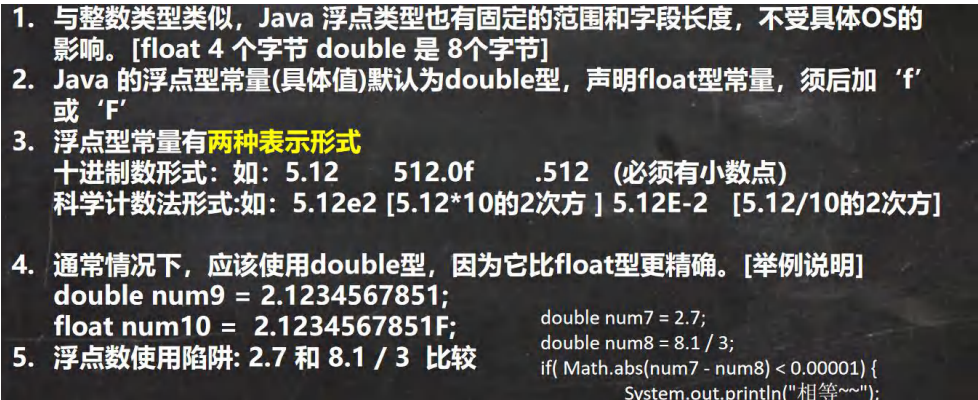
public class FloatDetail {
    //编写一个 main 方法
    public static void main(String[] args) {
        //Java 的浮点型常量(具体值)默认为 double 型,声明 float 型常量,须后加‘f’或‘F' //float num1 = 1.1; //对不对?错误
        float num2 = 1.1F; //对的
        double num3 = 1.1; //对
        double num4 = 1.1f; //对
        //十进制数形式:如:5.12 512.0f .512 (必须有小数点)
        double num5 = .123; //等价 0.123
        System.out.println(num5);
        //科学计数法形式:如:5.12e2 [5.12 * 10 的 2 次方 ] 5.12E-2 []
        System.out.println(5.12e2);//512.0
        System.out.println(5.12E-2);//0.0512
        //通常情况下,应该使用 double 型,因为它比 float 型更精确。
        //[举例说明]double num9 = 2.1234567851;float num10 = 2.1234567851F;
        double num9 = 2.1234567851;
        float num10 = 2.1234567851F;
        System.out.println(num9);
        System.out.println(num10);
        //浮点数使用陷阱: 2.7 和 8.1 / 3 比较
        double num11 = 2.7;
        double num12 = 2.7; //8.1 / 3; //2.7
        System.out.println(num11);//2.7
        System.out.println(num12);//接近 2.7 的一个小数,而不是 2.7
        //得到一个重要的使用点: 当我们对运算结果是小数的进行相等判断是,要小心
        //应该是以两个数的差值的绝对值,在某个精度范围类判断
        if( num11 == num12) {
            System.out.println("num11 == num12 相等");
        }
        //正确的写法 , ctrl + / 注释快捷键, 再次输入就取消注释
        if(Math.abs(num11 - num12) < 0.000001 ) {
            System.out.println("差值非常小,到我的规定精度,认为相等...");
        }
        // 可以通过 java API 来看 下一个视频介绍如何使用 API
        System.out.println(Math.abs(num11 - num12));
        //细节:如果是直接查询得的的小数或者直接赋值,是可以判断相等
    }
}
2.8 JavaAPI文档
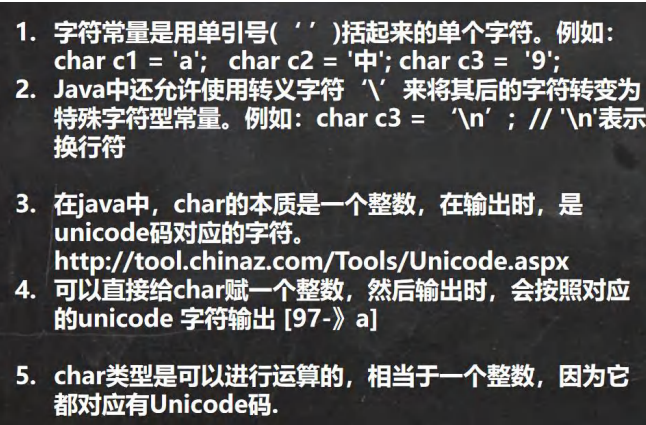
2.9 字符类型
2.9.1 基本介绍
字符类型可以表示单个字符,字符类型是 char,char 是两个字节(可以存放汉字),多个字符我们用字符串 String
2.9.2 案例演示
char c1 = 'a';
char c2 = '\t';
char c3 = '韩';
char c4 = 97;
2.9.3 字符类型使用类型
public class CharDetail {
    //编写一个 main 方法
    public static void main(String[] args) {
        //在 java 中,char 的本质是一个整数,在默认输出时,是 unicode 码对应的字符
        //要输出对应的数字,可以(int)字符
        char c1 = 97;
        System.out.println(c1); // a
        char c2 = 'a'; //输出'a' 对应的 数字
        System.out.println((int)c2);
        char c3 = '韩';
        System.out.println((int)c3);//38889
        char c4 = 38889;
        System.out.println(c4);//韩
        //char 类型是可以进行运算的,相当于一个整数,因为它都对应有 Unicode 码. System.out.println('a' + 10);//107
        char c5 = 'b' + 1;//98+1==> 99
        System.out.println((int)c5); //99
        System.out.println(c5); //99->对应的字符->编码表 ASCII(规定好的)=>c
    }
}
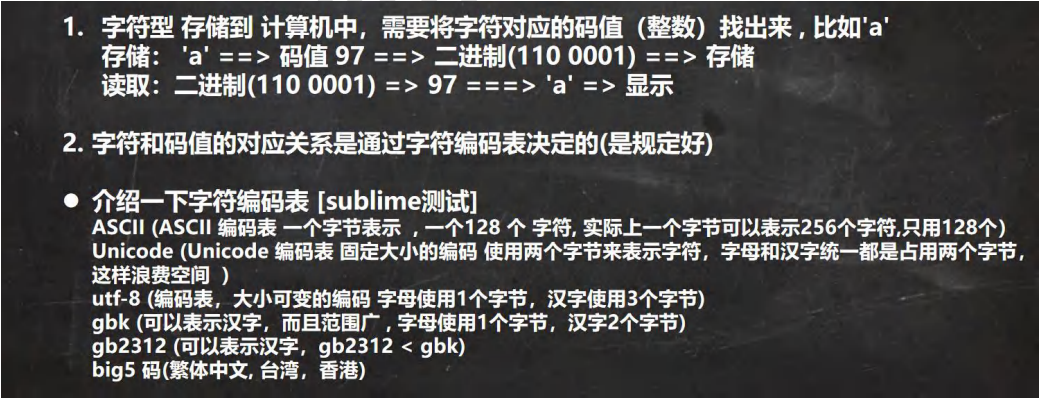
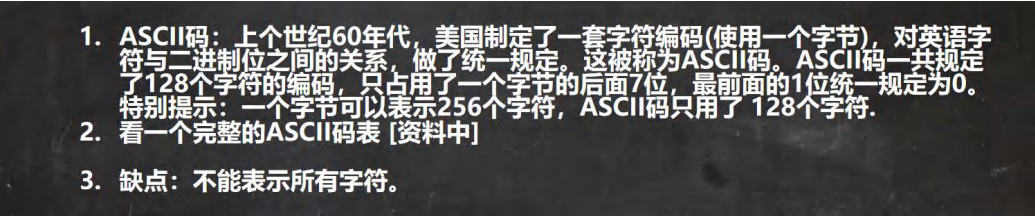
2.10 ASCII 码介绍(了解)
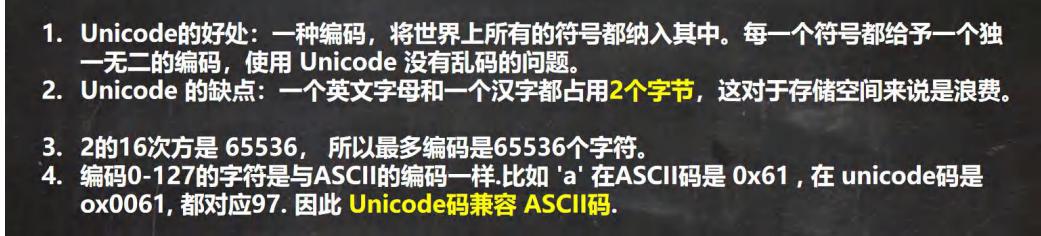
2.11 Unicode 编码介绍(了解)
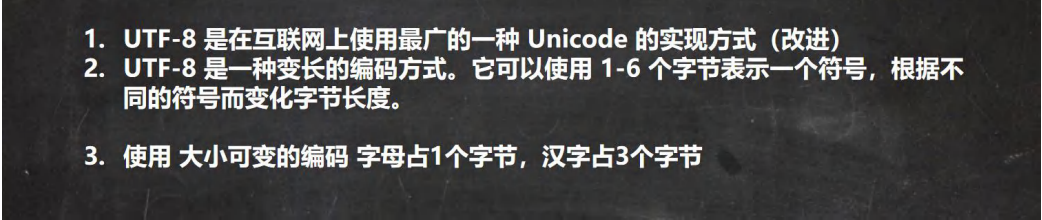
2.12 UTF-8 编码介绍(了解)
2.13 布尔类型:boolean
2.13.1 基本介绍
1.布尔类型也叫boolean类型,boolean类型数据只允许取值true和false,无null。
2.boolean类型占一个字节
3.boolean类型适用于逻辑运算,一般用于流程控制
2.13.2 案例演示
public class Boolean01 {
    //编写一个 main 方法
    public static void main(String[] args) {
        //演示判断成绩是否通过的案例
        //定义一个布尔变量
        boolean isPass = true;//
        if(isPass == true) {
            System.out.println("考试通过,恭喜");
        } else {
            System.out.println("考试没有通过,下次努力");
        }
    }
}
2.14 基本数据类型转换
2.14.1 自动类型转换
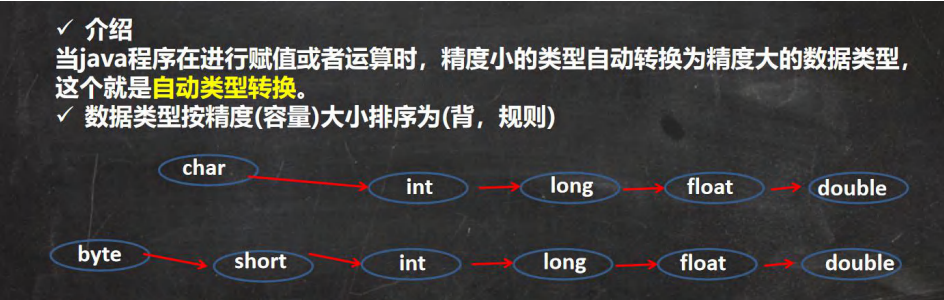
2.14.2 自动类型转换注意和细节
2.14.3 案例演示
//自动类型转换细节
public class AutoConvertDetail {
//编写一个 main 方法
public static void main(String[] args) {
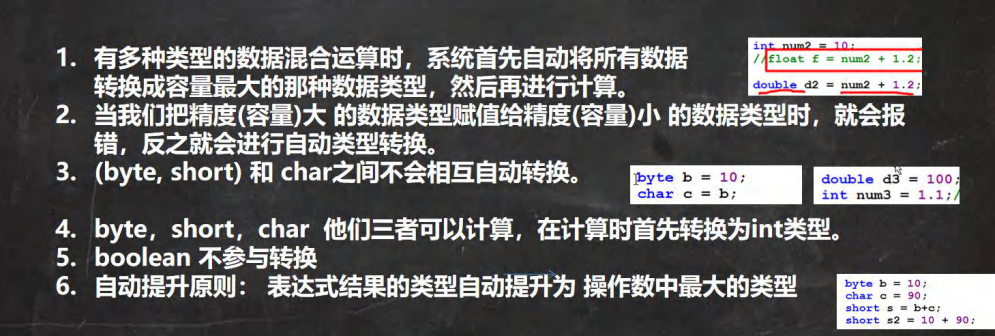
//细节 1: 有多种类型的数据混合运算时,
//系统首先自动将所有数据转换成容量最大的那种数据类型,然后再进行计算
int n1 = 10; //ok
//float d1 = n1 + 1.1;//错误 n1 + 1.1 => 结果类型是 double
//double d1 = n1 + 1.1;//对 n1 + 1.1 => 结果类型是 double
float d1 = n1 + 1.1F;//对 n1 + 1.1 => 结果类型是 float
//细节 2: 当我们把精度(容量)大 的数据类型赋值给精度(容量)小 的数据类型时,
//就会报错,反之就会进行自动类型转换。
//
//int n2 = 1.1;//错误 double -> int
//细节 3: (byte, short) 和 char 之间不会相互自动转换
//当把具体数赋给 byte 时,(1)先判断该数是否在 byte 范围内,如果是就可以
byte b1 = 10; //对 , -128-127
// int n2 = 1; //n2 是 int
// byte b2 = n2; //错误,原因: 如果是变量赋值,判断类型
//
// char c1 = b1; //错误, 原因 byte 不能自动转成 char
//
//
//细节 4: byte,short,char 他们三者可以计算,在计算时首先转换为 int 类型
byte b2 = 1;
byte b3 = 2;
short s1 = 1;
//short s2 = b2 + s1;//错, b2 + s1 => int
int s2 = b2 + s1;//对, b2 + s1 => int
//byte b4 = b2 + b3; //错误: b2 + b3 => int
//
//boolean 不参与转换
boolean pass = true;
//int num100 = pass;// boolean 不参与类型的自动转换
//自动提升原则: 表达式结果的类型自动提升为 操作数中最大的类型
//看一道题
byte b4 = 1;
short s3 = 100;
int num200 = 1;
float num300 = 1.1F;
double num500 = b4 + s3 + num200 + num300; //float -> double
}
}
2.15 强制类型转换
2.15.1 介绍
自动类型转换的逆过程,将容量大的数据类型转换为容量小的数据类型。使用时要加上强制转换符 ( ),但可能造成 精度降低或溢出,格外要注意。
2.15.2 案例演示
public class ForceConvert {
    public static void main(String[] args) {
        int i = (int) 1.9;
        System.out.println(i);

        int j = 100;
        byte b1 = (byte)j;
        System.out.println(b1);
    }
}
2.15.3 强制类型细节说明
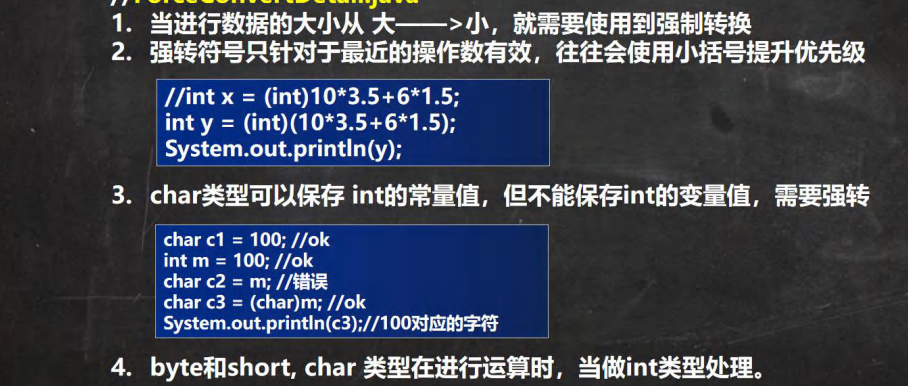
public class ForceConvertDetail {
    //编写一个 main 方法
    public static void main(String[] args) {
        //演示强制类型转换
        //强转符号只针对于最近的操作数有效,往往会使用小括号提升优先级
        //int x = (int)10*3.5+6*1.5;//编译错误: double -> int
        int x = (int)(10*3.5+6*1.5);// (int)44.0 -> 44
        System.out.println(x);//44
        char c1 = 100; //ok
        int m = 100; //ok
        //char c2 = m; //错误
        char c3 = (char)m; //ok
        System.out.println(c3);//100 对应的字符, d 字符
    }
}
2.16 基本数据类型和String类型的转换
2.16.1 介绍和使用
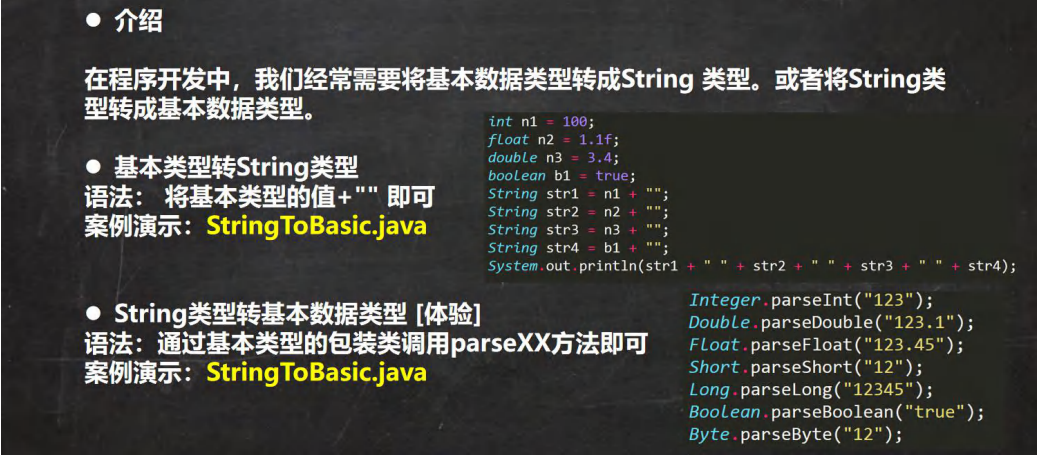
2.16.2 注意事项
-
在将 String 类型转成 基本数据类型时,要确保String类型能够转成有效的数据,比如 我们可以把 "123" , 转成一 个整数,但是不能把 "hello" 转成一个整数
-
如果格式不正确,就会抛出异常,程序就会终止, 这个问题在异常处理章节中,会处理
三、运算符
3.1 运算符介绍
3.1.1 运算符介绍
运算符是一种特殊的符号,用以表示数据的运算、赋值和比较等。
-
算术运算符
-
赋值运算符
-
关系运算符 [比较运算符]
-
逻辑运算符
-
位运算符 [需要二进制基础]
-
三元运算符
3.2 算术运算符
3.2.1 介绍
算术运算符是对数值类型的变量进行运算的,在Java程序中使用的非常多。
3.2.2 算术运算符一览
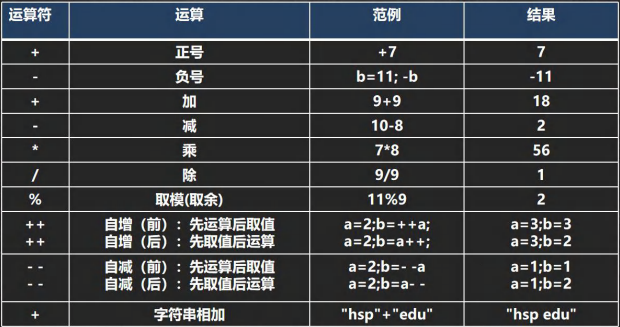
3.2.3 案例演示
/**
* 演示算术运算符的使用
*/
public class ArithmeticOperator {
//编写一个 main 方法
public static void main(String[] args) {
// /使用
System.out.println(10 / 4); //从数学来看是 2.5, java 中 2
System.out.println(10.0 / 4); //java 是 2.5
// 注释快捷键 ctrl + /, 再次输入 ctrl + / 取消注释
double d = 10 / 4;//java 中 10 / 4 = 2, 2=>2.0
System.out.println(d);// 是 2.0
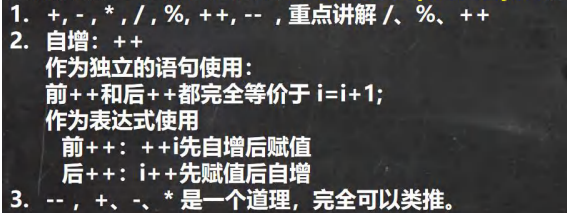
// % 取模 ,取余
// 在 % 的本质 看一个公式!!!! a % b = a - a / b * b
// -10 % 3 => -10 - (-10) / 3 * 3 = -10 + 9 = -1
// 10 % -3 = 10 - 10 / (-3) * (-3) = 10 - 9 = 1
// -10 % -3 = (-10) - (-10) / (-3) * (-3) = -10 + 9 = -1
System.out.println(10 % 3); //1
System.out.println(-10 % 3); // -1
System.out.println(10 % -3); //1
System.out.println(-10 % -3);//-1
//++的使用
//
int i = 10;
i++;//自增 等价于 i = i + 1; => i = 11
++i;//自增 等价于 i = i + 1; => i = 12
System.out.println("i=" + i);//12
/*
作为表达式使用
前++:++i 先自增后赋值
后++:i++先赋值后自增
*/
int j = 8;
//int k = ++j; //等价 j=j+1;k=j;
int k = j++; // 等价 k =j;j=j+1;
System.out.println("k=" + k + "j=" + j);//8 9
}
}
3.2.4 细节演示
3.3 关系运算符
3.3.1 介绍
1.关系运算符的结果都是 boolean 型,也就是要么是 true,要么是 false
2.关系表达式 经常用在 if 结构的条件中或循环结构的条件中
3.3.2 关系运算符一览
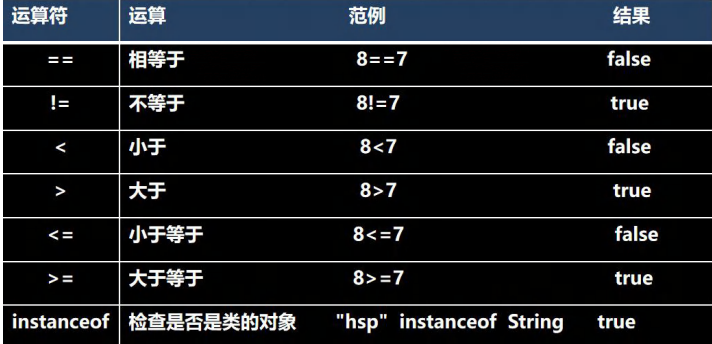
3.3.3 案例演示
//演示关系运算符的使用
public class RelationalOperator {
    //编写一个 main 方法
    public static void main(String[] args) {
        int a = 9; //开发中,不可以使用 a, b
        int b = 8;
        System.out.println(a > b); //T
        System.out.println(a >= b); //T
        System.out.println(a <= b); //F
        System.out.println(a < b);//F
        System.out.println(a == b); //F
        System.out.println(a != b); //T
        boolean flag = a > b; //T
        System.out.println("flag=" + flag);
    }
}
3.3.4 细节说明
1.关系运算符的结果都是 boolean 型,也就是要么是 true,要么是 false。
2.关系运算符组成的表达式,我们称为关系表达式。a > b
3.比较运算符"=="不能误写成"="
3.4 逻辑运算符
3.4.1 介绍
用于连接多个条件(多个关系表达式),最终的结果也是一个 boolean 值。
3.4.2 逻辑运算符一览
1.短路与 && , 短路或 ||,取反 !
2.逻辑与 &,逻辑或 |,^ 逻辑异或
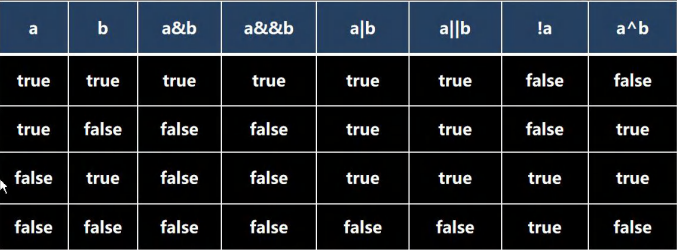
3.逻辑说明
-
a&b : & 叫逻辑与:规则:当 a 和 b 同时为 true ,则结果为 true, 否则为 false
-
a&&b : && 叫短路与:规则:当 a 和 b 同时为 true ,则结果为 true,否则为 false
-
a|b : | 叫逻辑或,规则:当 a 和 b ,有一个为 true ,则结果为 true,否则为 false
-
a||b : || 叫短路或,规则:当 a 和 b ,有一个为 true ,则结果为 true,否则为 false
-
!a : 叫取反,或者非运算。当 a 为 true, 则结果为 false, 当 a 为 false 是,结果为 true
-
a^b: 叫逻辑异或,当 a 和 b 不同时,则结果为 true, 否则为 false
3.4.3 && 和 & 基本规则
名称 语法 特点
短路与&& 条件 1&&条件2 两个条件都为 true,结果为 true,否则 false
逻辑与& 条件 1&条件2 两个条件都为 true,结果为 true,否则 false
3.4.4 案例演示
/**
 * 演示逻辑运算符的使用
 */
public class LogicOperator01 {
    //编写一个 main 方法
    public static void main(String[] args) {
        //&&短路与 和 & 案例演示
        int age = 50;
        if(age > 20 && age < 90) {
            System.out.println("ok100");
        }
        //&逻辑与使用
        if(age > 20 & age < 90) {
            System.out.println("ok200");
        }
        //区别
        int a = 4;
        int b = 9;
        //对于&&短路与而言,如果第一个条件为 false ,后面的条件不再判断
        //对于&逻辑与而言,如果第一个条件为 false ,后面的条件仍然会判断
        if(a < 1 & ++b < 50) {
            System.out.println("ok300");
        }
        System.out.println("a=" + a + " b=" + b);// 4 10
    }
}
3.4.5 && 和 & 使用区别
1.&&短路与:如果第一个条件为 false,则第二个条件不会判断,最终结果为 false,效率高
2.& 逻辑与:不管第一个条件是否为 false,第二个条件都要判断,效率低
3.开发中, 我们使用的基本是使用短路与&&,
3.4.6 || 和 | 基本规则
名称 语法 特点
短路或|| 条件 1||条件2 两个条件中只要有一个成立,结果为 true,否则为 false
逻辑或| 条件 1|条件2 只要有一个条件成立,结果为 true,否则为 false
3.4.7 案例演示
//演示| || 使用
public class LogicOperator02 {
    //编写一个 main 方法
    public static void main(String[] args) {
        //||短路或 和 |逻辑或 案例演示
        //|| 规则: 两个条件中只要有一个成立,结果为 true,否则为 false
        //| 规则: 两个条件中只要有一个成立,结果为 true,否则为 false
        int age = 50;
        if(age > 20 || age < 30) {
            System.out.println("ok100");
        }
        //&逻辑与使用
        if(age > 20 | age < 30) {
            System.out.println("ok200");
        }
        //(1)||短路或:如果第一个条件为 true,
        //则第二个条件不会判断,最终结果为 true,效率高
        //(2)| 逻辑或:不管第一个条件是否为 true,第二个条件都要判断,效率低
        int a = 4;
        int b = 9;
        if( a > 1 || ++b > 4) { // 可以换成 | 测试
            System.out.println("ok300");
        }
        System.out.println("a=" + a + " b=" + b); //4 10
    }
}
3.4.8 || 和 | 使用区别
1.||短路或:如果第一个条件为 true,则第二个条件不会判断,最终结果为 true,效率高
2.| 逻辑或:不管第一个条件是否为 true,第二个条件都要判断,效率低
3.开发中,我们基本使用 ||
3.4.9 !取反基本规则
名称 语法 特点
! 非(取反) !条件 如果条件本身成立,结果为 false,否则为 true
a^b逻辑异或,当 a 和 b 不同时,则结果为 true
3.4.10 案例演示
//!和^案例演示
public class InverseOperator {
    //编写一个 main 方法
    public static void main(String[] args) {
        //! 操作是取反 T->F , F -> T
        System.out.println(60 > 20); //T
        System.out.println(!(60 > 20)); //F
        //a^b: 叫逻辑异或,当 a 和 b 不同时,则结果为 true, 否则为 false
        boolean b = (10 > 1) ^ ( 3 > 5);
        System.out.println("b=" + b);//T
    }
}
3.5 赋值运算符
3.5.1 介绍
赋值运算符就是将某个运算后的值,赋给指定的变量。
3.5.2 赋值运算符的分类
1.基本赋值运算符 = int a = 10;
2.复合赋值运算符 += ,-= ,*= , /= ,%= 等 , 重点讲解一个 += ,其它的使用是一个道理
a += b; [等价 a = a + b; ]
a -= b; [等价 a = a - b; ]
3.5.3 案例演示
//演示赋值运算符的使用
public class AssignOperator {
    //编写一个 main 方法
    public static void main(String[] args) {
        int n1 = 10;
        n1 += 4;// n1 = n1 + 4;
        System.out.println(n1); // 14
        n1 /= 3;// n1 = n1 / 3;//4
        System.out.println(n1); // 4
        //复合赋值运算符会进行类型转换
        byte b = 3;
        b += 2; // 等价 b = (byte)(b + 2);
        b++; // b = (byte)(b+1);
    }
}
3.6 三元运算符
3.6.1 基本语法
条件表达式 ? 表达式 1: 表达式 2;
运算规则:
-
如果条件表达式为 true,运算后的结果是表达式 1;
-
如果条件表达式为 false,运算后的结果是表达式 2;
口诀: [一灯大师:一真大师]
3.6.2 案例演示
//三元运算符使用
public class TernaryOperator {
    //编写一个 main 方法
    public static void main(String[] args) {
        int a = 10;
        int b = 99;
        // 1. a > b 为 false
        // 2. 返回 b--, 先返回 b 的值,然后在 b-1
        // 3. 返回的结果是 99
        int result = a > b ? a++ : b--;
        System.out.println("result=" + result);
        System.out.println("a=" + a);
        System.out.println("b=" + b);
    }
}
3.6.3 使用细节
1.表达式 1 和表达式 2 要为可以赋给接收变量的类型(或可以自动转换) 2.三元运算符可以转成 if--else 语句
int res = a > b ? a++ : --b;
if ( a > b) res = a++; else res = --b;
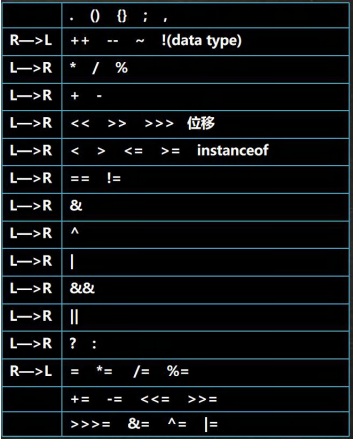
3.7 运算符的优先级
3.8 标识符的命名规范

3.8.1 专业版
1.包名:多单词组成时所有字母都小写:aaa.bbb.ccc //比如 com.hsp.crm
2.类名、接口名:多单词组成时,所有单词的首字母大写:XxxYyyZzz [大驼峰] 比如: TankShotGame
3.变量名、方法名:多单词组成时,第一个单词首字母小写,第二个单词开始每个单词首字母大写:xxxYyyZzz [小 驼峰, 简称 驼峰法] 比如: tankShotGame
4.常量名:所有字母都大写。多单词时每个单词用下划线连接:XXX_YYY_ZZZ 比如 :定义一个所得税率 TAX_RATE
5.后面我们学习到 类,包,接口,等时,我们的命名规范要这样遵守,更加详细的看文档.
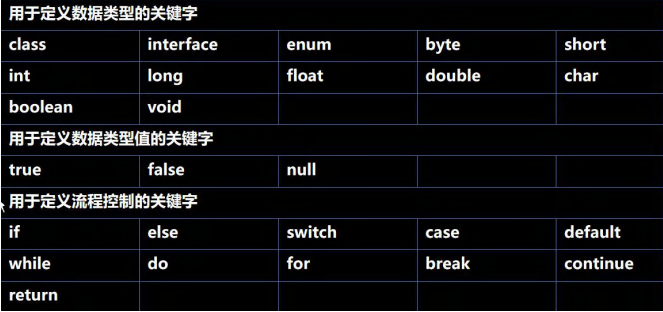
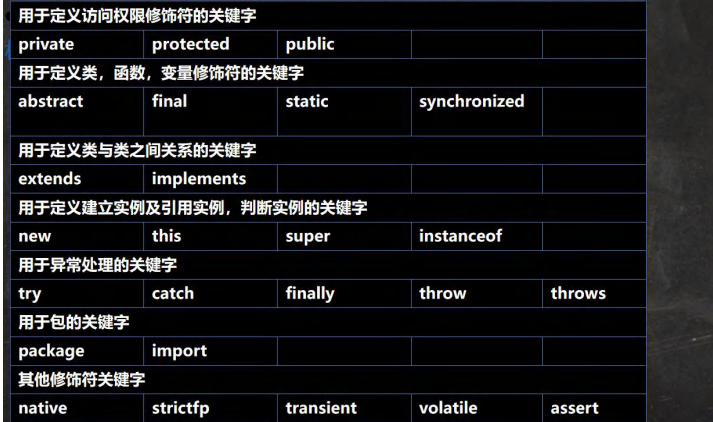
3.9 关键字
定义:被 Java 语言赋予了特殊含义,用做专门用途的字符串(单词)
特点:关键字中所有字母都为小写
3.10 保留字
3.10.1 介绍
Java 保留字:现有 Java 版本尚未使用,但以后版本可能会作为关键字使用。自己命名标识符时要避免使用这些保留字byValue、cast、future、generic、inner、 operator、outer、rest、var 、goto 、cons
3.11 键盘输入语句
3.11.1 介绍
在编程中,需要接收用户输入的数据,就可以使用键盘输入语句来获取。Input.java , 需要一个扫描器(对象), 就是Scanner
3.11.2 步骤
1.导入该类的所在包, java.util.*
2.创建该类对象(声明变量)
3.调用里面的功能
3.11.3 案例演示
import java.util.Scanner;//表示把 java.util 下的 Scanner 类导入
public class Input {
    //编写一个 main 方法
    public static void main(String[] args) {
        //演示接受用户的输入
        //步骤
        //Scanner 类 表示 简单文本扫描器,在 java.util 包
        //1. 引入/导入 Scanner 类所在的包
        //2. 创建 Scanner 对象 , new 创建一个对象,体会
        // myScanner 就是 Scanner 类的对象
        Scanner myScanner = new Scanner(System.in);
        //3. 接收用户输入了, 使用 相关的方法
        System.out.println("请输入名字");
        //当程序执行到 next 方法时,会等待用户输入~~~
        String name = myScanner.next(); //接收用户输入字符串
        System.out.println("请输入年龄");
        int age = myScanner.nextInt(); //接收用户输入 int
        System.out.println("请输入薪水");
        double sal = myScanner.nextDouble(); //接收用户输入 double
        System.out.println("人的信息如下:");
        System.out.println("名字=" + name
                + " 年龄=" + age + " 薪水=" + sal);
    }
}
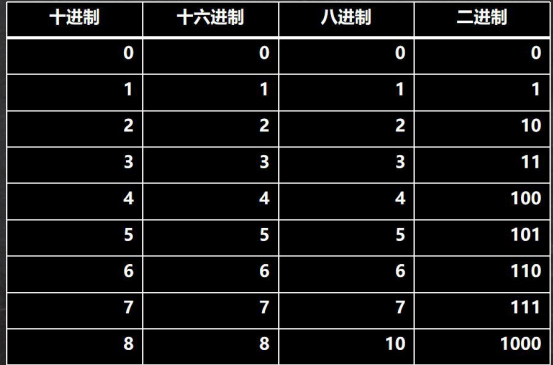
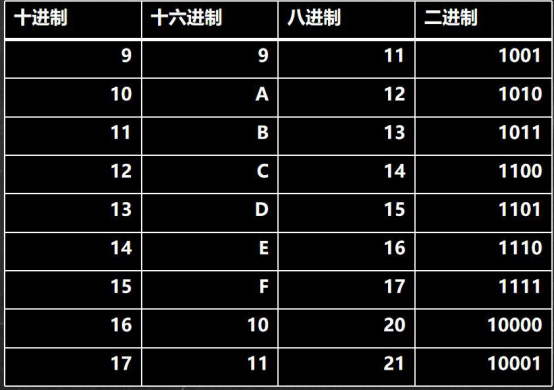
3.12 进制
3.12.1 进制介绍
对于整数,有四种表示方式:
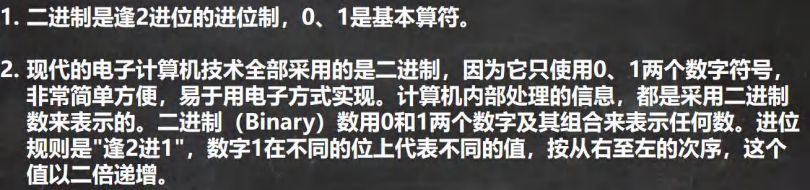
二进制:0,1 ,满 2 进 1.以 0b 或 0B 开头。
十进制:0-9 ,满 10 进 1。
八进制:0-7 ,满 8 进 1. 以数字 0 开头表示。 十六进制:0-9 及 A(10)-F(15),满 16 进 1. 以 0x 或 0X 开头表示。此处的 A-F 不区分大小写。
3.12.2 举例
//演示四种进制
public class BinaryTest {
    //编写一个 main 方法
    public static void main(String[] args) {
        //n1 二进制
        int n1 = 0b1010;
        //n2 10 进制
        int n2 = 1010;
        //n3 8 进制
        int n3 = 01010;
        //n4 16 进制
        int n4 = 0X10101;
        System.out.println("n1=" + n1);
        System.out.println("n2=" + n2);
        System.out.println("n3=" + n3);
        System.out.println("n4=" + n4);
        System.out.println(0x23A);
    }
}
3.13 进制图示
3.14 进制的转换
3.14.1 进制转换的介绍
第一组:
- 二进制转十进制
2.八进制转十进制
3.十六进制转十进制
第二组:
1.十进制转二进制
2.十进制转八进制
3.十进制转十六进制
第三组
1.二进制转八进制
2.二进制转十六进制
第四组
1.八进制转二进制
2.十六进制转二进制
3.15 二进制转换成十进制示例
规则:从最地位(右边)开始,将每个位上的数提取出来,乘以2的(位数-1)次方,然后求和。
案例:请将0b1011转成十进制的数
0b1011 = 1 * 2的(1-1)次方 + 1 * 2的(2-1)次方 + 0 * 2的(3-1)次方 + 1 * 2的(4-1)次方 = 1 + 2 + 0 + 8 = 11
3.16 八进制转换成十进制示例
规则:从最低位(右边)开始,将每个位上的数提取出来,乘以8的(位数-1)次方,然后求和。
案例:请将0234转成十进制的数
0234 = 4 * 8^0 + 3 * 8^1 + 2 * 8^2 = 4 + 24 +128 = 156
3.17 十六进制转换成十进制示例
规则:从最低位(右边)开始,将每个位上的数提取出来,乘以 16 的(位数-1)次方,然后求和。
案例:请将 0x23A 转成十进制的数
0x23A = 10 * 16^0 + 3 * 16 ^ 1 + 2 * 16^2 = 10 + 48 + 512 = 570
3.18 十进制转换成二进制
规则:将该数不断除以2,直到商为0为止,然后将每步得到的余数倒过来,就是对应的二进制。
案例:请将 34 转成二进制 = 0B00100010
3.19 十进制转换成八进制
规则:将该数不断除以 8,直到商为0为止,然后将每步得到的余数倒过来,就是对应的八进制。
案例:请将 131 转成八进制 => 0203
3.20 十进制转换成十六进制
规则:将该数不断除以 16,直到商为0为止,然后将每步得到的余数倒过来,就是对应的十六进制。
案例:请将 237 转成十六进制 => 0xED
3.21 二进制转换成八进制
规则:从低位开始,将二进制数每三位一组,转成对应的八进制数即可。
案例:请将 ob11010101 转成八进制
ob11(3)010(2)101(5) => 0325
3.22 二进制转换成十六进制
规则:从低位开始,将二进制数每四位一组,转成对应的十六进制数即可。
案例:请将 ob11010101 转成十六进制
ob1101(D)0101(5) = 0xD5
3.23 八进制转换成二进制
规则:将八进制数每 1 位,转成对应的一个 3 位的二进制数即可。
案例:请将 0237 转成二进制
02(010)3(011)7(111) = 0b10011111
3.24 十六进制转换成二进制
规则:将十六进制数每 1 位,转成对应的 4 位的一个二进制数即可。
案例:请将 0x23B 转成二进制
0x2(0010)3(0011)B(1011) = 0b001000111011
3.25 二进制在运算中的说明
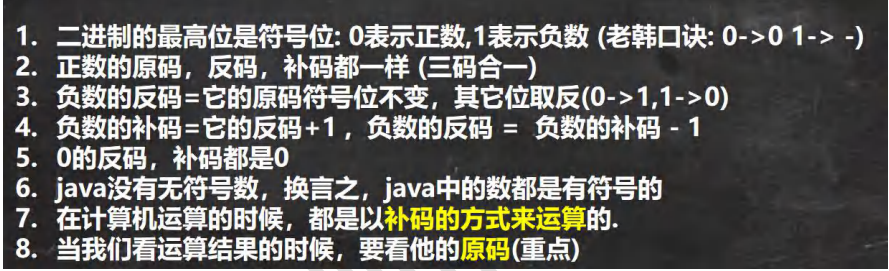
3.26 原码、反码、补码
3.27 位运算符
3.27.1 java 中有 7 个位运算(&、|、 ^ 、~、>>、<<和 >>>)

3.27.2 还有 3 个位运算符 >>、<< 和 >>> , 运算规则:
1.算术右移 >>:低位溢出,符号位不变,并用符号位补溢出的高位
2.算术左移 <<: 符号位不变,低位补 0
3.>>> 逻辑右移也叫无符号右移,运算规则是: 低位溢出,高位补 0
4.特别说明:没有 <<< 符号
四、程序控制结构
4.1 程序流程控制介绍
在程序中,程序运行的流程控制决定程序是如何执行的,是我们必须掌握的,主要有三大流程控制语句。
1.顺序控制
2.分支控制
3.循环控制
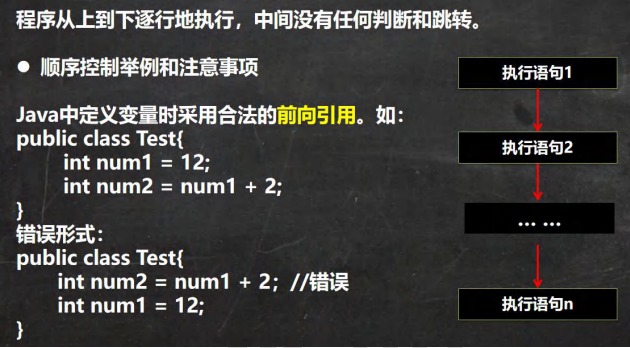
4.2顺序控制
4.3 分支控制if-else
4.3.1 分支控制if-else介绍
让程序有选择的的执行,分支控制有三种
1.单分支 if
2.双分支 if-else
3.多分支 if-else if -....-else
4.4 单分支
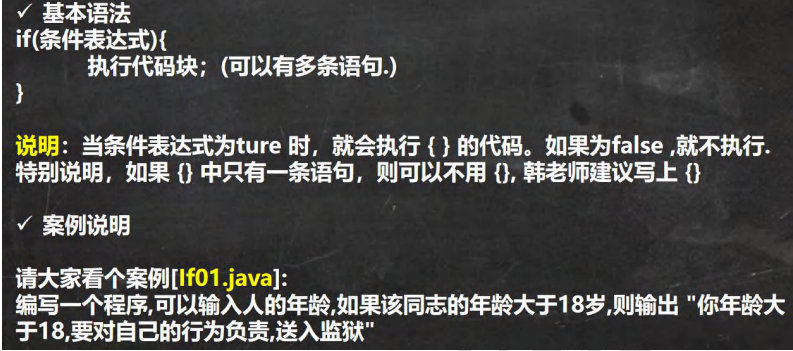
//if 的快速入门
import java.util.Scanner;//导入
public class If01 {
    //编写一个 main 方法
            public static void main(String[] args) {
//编写一个程序,可以输入人的年龄,如果该同志的年龄大于 18 岁, //则输出 "你年龄大于 18,要对自己的行为负责,送入监狱"
        //思路分析
        //1. 接收输入的年龄, 应该定义一个 Scanner 对象
        //2. 把年龄保存到一个变量 int age
        //3. 使用 if 判断,输出对应信息
        //应该定义一个 Scanner 对象
        Scanner myScanner = new Scanner(System.in);
        System.out.println("请输入年龄");
        //把年龄保存到一个变量 int age
        int age = myScanner.nextInt();
        //使用 if 判断,输出对应信息
        if(age > 18) {
            System.out.println("你年龄大于 18,要对自己的行为负责,送入监狱");
        }
        System.out.println("程序继续...");
    }
}
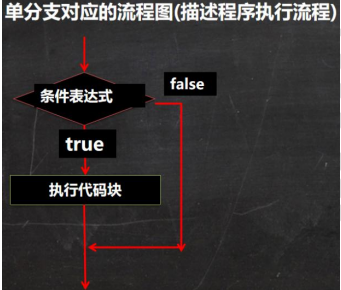
4.4.1 流程图
4.5 双分支
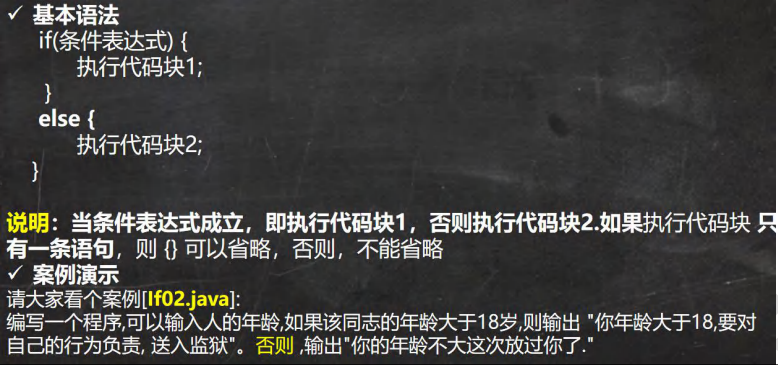
//if-else 的快速入门
import java.util.Scanner;//导入
public class If02 {
    //编写一个 main 方法
    public static void main(String[] args) {
        //编写一个程序,可以输入人的年龄,如果该同志的年龄大于 18 岁, //则输出 "你年龄大于 18,要对
        //自己的行为负责, 送入监狱"。否则 ,输出"你的年龄不大这次放过你了."
        //思路分析
        //1. 接收输入的年龄, 应该定义一个 Scanner 对象
        //2. 把年龄保存到一个变量 int age
        //3. 使用 if-else 判断,输出对应信息
        //应该定义一个 Scanner 对象
        Scanner myScanner = new Scanner(System.in);
        System.out.println("请输入年龄");
        //把年龄保存到一个变量 int age
        int age = myScanner.nextInt();
        //使用 if-else 判断,输出对应信息
        if(age > 18) {
            System.out.println("你年龄大于 18,要对自己的行为负责,送入监狱");
        } else {//双分支
            System.out.println("你的年龄不大这次放过你了");
        }
        System.out.println("程序继续...");
    }
}
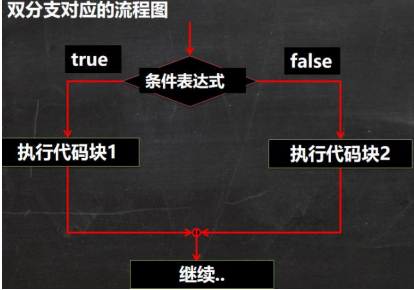
4.5.1 流程图
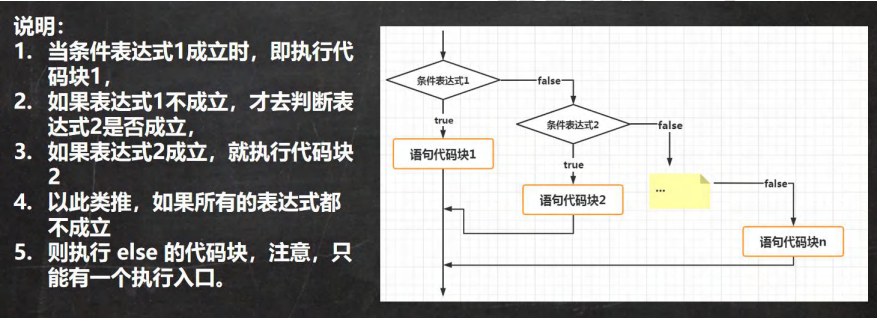
4.6 多分支
4.6.1 流程图
4.6.2 案例演示
输入保国同志的芝麻信用分: 如果:
1.信用分为 100 分时,输出 信用极好;
2.信用分为(80,99]时,输出 信用优秀;
3.信用分为[60,80]时,输出 信用一般;
4.其它情况,输出信用不及格
5.请从键盘输入保国的芝麻信用分,并加以判断
import java.util.Scanner;
public class If03 {
    //编写一个 main 方法
    public static void main(String[] args) {
         /*
         输入保国同志的芝麻信用分:
         如果:
         信用分为 100 分时,输出 信用极好;
         信用分为(80,99]时,输出 信用优秀;
         信用分为[60,80]时,输出 信用一般;
         其它情况 ,输出 信用 不及格
         请从键盘输入保国的芝麻信用分,并加以判断
         假定信用分数为 int
         */
        Scanner myScanner = new Scanner(System.in);
         //接收用户输入
        System.out.println("请输入信用分(1-100):");
        int grade = myScanner.nextInt();
         //先对输入的信用分,进行一个范围的有效判断 1-100, 否则提示输入错误
        if(grade >=1 && grade <= 100) {
         //因为有 4 种情况,所以使用多分支
            if(grade == 100) {
                System.out.println("信用极好");
            } else if (grade > 80 && grade <= 99) { //信用分为(80,99]时,输出 信用优秀;
                System.out.println("信用优秀");
            } else if (grade >= 60 && grade <= 80) {//信用分为[60,80]时,输出 信用一般
                System.out.println("信用一般");
            } else {//其它情况 ,输出 信用 不及格
                System.out.println("信用不及格");
            }
        } else {
            System.out.println("信用分需要在 1-100,请重新输入:)");
        }
    }
}
4.7 嵌套分支
4.7.1 基本介绍
在一个分支结构中又完整的嵌套了另一个完整的分支结构,里面的分支的结构称为内层分支外面的分支结构称为外层分支。
4.7.2 基本语句
if(){
if(){
}else{
}
}
4.7.3 案例演示
参加歌手比赛,如果初赛成绩大于 8.0 进入决赛,否则提示淘汰。并且根据性别提示进入男子组或女子组。输入成绩和性别,进行判断和输出信息。
提示:
double score; char gender;
接收字符: char gender = scanner.next().charAt(0)
import java.util.Scanner;

public class NestedIf {
    //编写一个 main 方法
    public static void main(String[] args) {
        /*
        参加歌手比赛,如果初赛成绩大于 8.0 进入决赛,
        否则提示淘汰。并且根据性别提示进入男子组或女子组。
        提示: double score; char gender;
        接收字符: char gender = scanner.next().charAt(0)
        */
        //思路分析
        //1. 创建 Scanner 对象,接收用户输入
        //2. 接收 成绩保存到 double score
        //3. 使用 if-else 判断 如果初赛成绩大于 8.0 进入决赛,否则提示淘汰
        //4. 如果进入到 决赛,再接收 char gender, 使用 if-else 输出信息
        //代码实现 => 思路 --> java 代码
        Scanner myScanner = new Scanner(System.in);
        System.out.println("请输入该歌手的成绩");
        double score = myScanner.nextDouble();
        if( score > 8.0 ) {
            System.out.println("请输入性别");
            char gender = myScanner.next().charAt(0);
            if( gender == '男' ) {
                System.out.println("进入男子组");
            } else if(gender == '女') {
                System.out.println("进入女子组");
            } else {
                System.out.println("你的性别有误,不能参加决赛~");
            }
        } else {
            System.out.println("sorry ,你被淘汰了~");
        }
    }
}
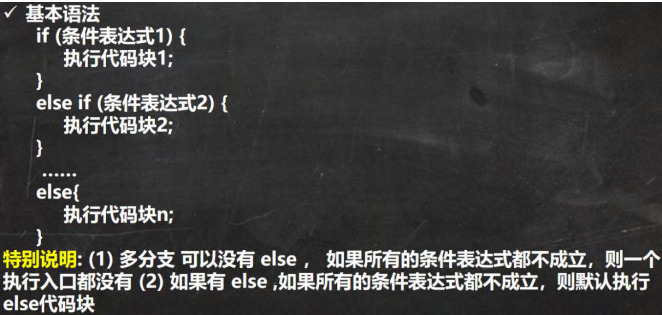
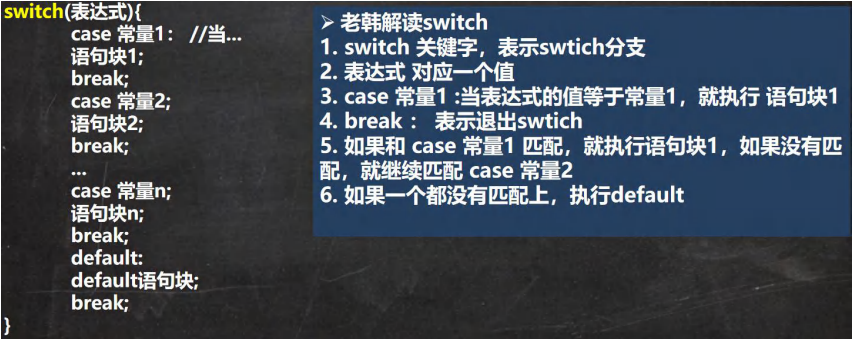
4.8 switch分支
4.8.1 基本语法
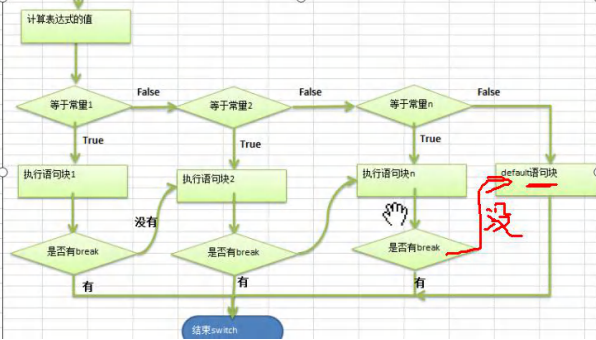
4.8.2 流程图
4.8.3 案例演示
请编写一个程序,该程序可以接收一个字符,比如:a,b,c,d,e,f,g a 表示星期一,b 表示星期二 … 根据用户的输入显示相应的信息.要求使用 switch 语句完成
import java.util.Scanner;
public class Switch01 {
    //编写一个 main 方法
    public static void main(String[] args) {
/*
案例:Switch01.java
请编写一个程序,该程序可以接收一个字符,比如:a,b,c,d,e,f,g
a 表示星期一,b 表示星期二 …
根据用户的输入显示相应的信息.要求使用 switch 语句完成
思路分析
1. 接收一个字符 , 创建 Scanner 对象
2. 使用 switch 来完成匹配,并输出对应信息
代码
*/
        Scanner myScanner = new Scanner(System.in);
        System.out.println("请输入一个字符(a-g)");
        char c1 = myScanner.next().charAt(0);//
        //在 java 中,只要是有值返回,就是一个表达式
        switch(c1) {
            case 'a' :
                System.out.println("今天星期一,猴子穿新衣");
                break;
            case 'b' :
                System.out.println("今天星期二,猴子当小二");
                break;
            case 'c' :
                System.out.println("今天星期三,猴子爬雪山..");
                break;
        default:
            System.out.println("你输入的字符不正确,没有匹配的");
        }
        System.out.println("退出了 switch ,继续执行程序");
    }
}
4.8.4 细节说明和注意事项
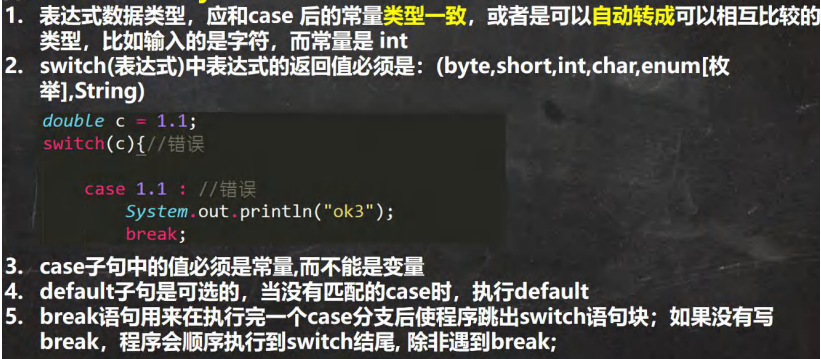
4.8.5 switch 和 if 的比较
-
如果判断的具体数值不多,而且符合 byte、 short 、int、 char, enum[枚举], String 这 6 种类型。虽然两个语句都可 以使用,建议使用 swtich 语句。
-
其他情况:对区间判断,对结果为 boolean 类型判断,使用 if,if 的使用范围更广
4.9 for循环控制
4.9.1 介绍
循环代码
4.9.2 基本语法

- for关键字,表示循环控制
- for有四要素: (1)循环变量初始化(2)循环条件(3)循环操作(4)循环变量迭代
- 循环操作,这里可以有多条语句,也就是我们要循环执行的代码
- 如果循环操作(语句) 只有一条语句,可以省略 {}, 建议不要省略
4.9.3 流程图
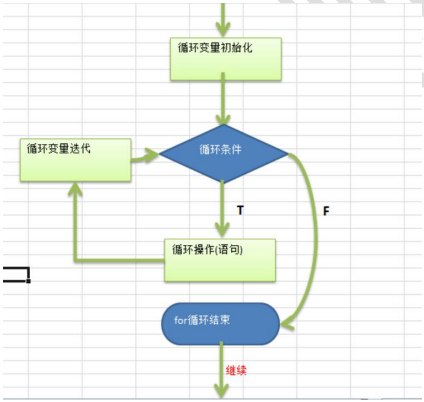
4.9.4 注意事项和细节说明
1.循环条件是返回一个布尔值的表达式
2.for(;循环判断条件;) 中的初始化和变量迭代可以写到其它地方,但是两边的分号不能省略。
3.循环初始值可以有多条初始化语句,但要求类型一样,并且中间用逗号隔开,循环变量迭代也可以有多条变量迭代语句,中间用逗号隔开。
4.9.5 案例演示
1.打印 1~100 之间所有是 9 的倍数的整数,统计个数及总和
public class ForExercise {
    //编写一个 main 方法
    public static void main(String[] args) {
        //打印 1~100 之间所有是 9 的倍数的整数,统计个数 及 总和.[化繁为简,先死后活]
        //思路分析
        //打印 1~100 之间所有是 9 的倍数的整数,统计个数 及 总和
        //化繁为简
        //(1) 完成 输出 1-100 的值
        //(2) 在输出的过程中,进行过滤,只输出 9 的倍数 i % 9 ==0
        //(3) 统计个数 定义一个变量 int count = 0; 当 条件满足时 count++;
        //(4) 总和 , 定义一个变量 int sum = 0; 当条件满足时累积 sum += i;
        //先死后活
        //(1) 为了适应更好的需求,把范围的开始的值和结束的值,做出变量
        //(2) 还可以更进一步 9 倍数也做成变量 int t = 9;
        int count = 0; //统计 9 的倍数个数 变量
        int sum = 0; //总和
        int start = 10;
        int end = 200;
        int t = 5; // 倍数
        for(int i = start; i <= end; i++) {
            if( i % t == 0) {
                System.out.println("i=" + i);
                count++;
                sum += i;//累积
            }
        }
        System.out.println("count=" + count);
        System.out.println("sum=" + sum);
    }
}
2.输出下面
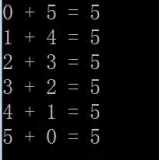
public class ForExercise02 {
    //编写一个 main 方法
    public static void main(String[] args) {
        int n = 9;
        for( int i = 0; i <= n; i++) {
            System.out.println(i + "+" + (n-i) + "=" + n);
        }
    }
}
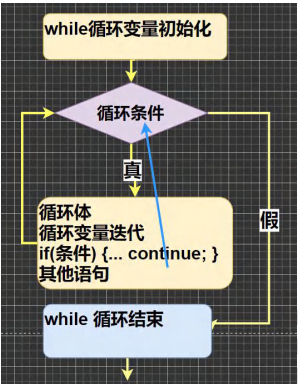
4.10 while循环控制
4.10.1 基本语法
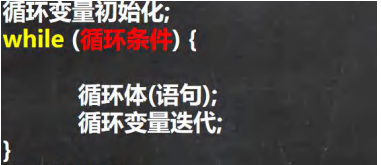
4.10.2 流程图
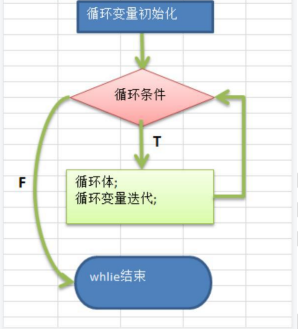
4.10.3 注意事项和细节说明
1.循环条件是返回一个布尔值的表达式
2.while 循环是先判断再执行语句
4.10.4 案例演示
1.打印1—100 之间所有能被3整除的数[使用 while]
2.打印40—200 之间所有的偶数[使用 while]
public class WhileExercise {
    //编写一个 main 方法
    public static void main(String[] args) {
        // 打印 1—100 之间所有能被 3 整除的数
        int i = 1;
        int endNum = 100;
        while( i <= endNum) {
            if( i % 3 == 0) {
                System.out.println("i=" + i);
            }
            i++;//变量自增
        }
        // 打印 40—200 之间所有的偶数
        System.out.println("========");
        int j = 40; //变量初始化
        while ( j <= 200) {
            //判断
            if( j % 2 == 0) {
                System.out.println("j=" + j);
            }
            j++;//循环变量的迭代
        }
    }
}
4.11 do..while循环控制
4.11.1 基本语法
循环变量初始化;
do{
循环体(语句);
循环变量迭代;
}while(循环条件);
4.11.2 流程图
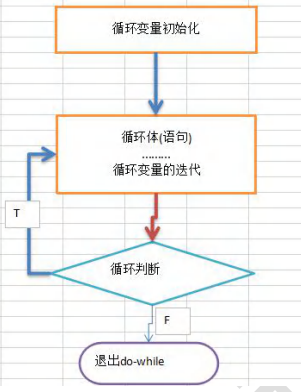
4.11.3 注意事项和细节说明
1.循环条件是返回一个布尔值的表达式
2.do..while 循环是先执行,再判断, 因此它至少执行一次
4.11.4 案例演示
1.打印1—100
2.计算1—100 的和
3.统计1---200 之间能被5整除但不能被3整除的个数
public class DoWhileExercise01 {
    //编写一个 main 方法
    public static void main(String[] args) {
        //统计 1---200 之间能被 5 整除但不能被 3 整除的 个数
        //(1) 使用 do-while 输出 1-200
        //(2) 过滤 能被 5 整除但不能被 3 整除的数 %
        //(3) 统计满足条件的个数 int count = 0;
        //(1) 范围的值 1-200 你可以做出变量
        //(2) 能被 5 整除但不能被 3 整除的 , 5 和 3 可以改成变量
        int i = 1;
        int count = 0; //统计满足条件的个数
        do {
            if( i % 5 == 0 && i % 3 != 0 ) {
                System.out.println("i=" + i);
                count++;
            }
            i++;
        }while(i <= 200);
        System.out.println("count=" + count);
    }
}
4.12 多重循环控制
4.12.1 基本介绍
1.将一个循环放在另一个循环体内,就形成了嵌套循环。其中,for ,while ,do…while 均可以作为外层循环和内层循环。 【建议一般使用两层,最多不要超过3层,否则,代码的可读性很差】
2.实质上,嵌套循环就是把内层循环当成外层循环的循环体。当只有内层循环的循环条件为 false 时,才会完全跳出内层循环,才可结束外层的当次循环,开始下一次的循环[听不懂,走案例]。
3.设外层循环次数为m次,内层为n次,则内层循环体实际上需要执行m*n次。
4.12.2 应用实例
1.统计3个班成绩情况,每个班有5名同学,求出各个班的平均分和所有班级的平均分[学生的成绩从键盘输入]。
2.统计三个班及格人数,每个班有5名同学。
import java.util.Scanner;
public class MulForExercise01 {
    //编写一个 main 方法
    public static void main(String[] args) {
        //统计 3 个班成绩情况,每个班有 5 名同学,
        //求出各个班的平均分和所有班级的平均分[学生的成绩从键盘输入]。
        //统计三个班及格人数,每个班有 5 名同学。
        //(1) 先计算一个班 , 5 个学生的成绩和平均分 , 使用 for
        //1.1 创建 Scanner 对象然后,接收用户输入
        //1.2 得到该班级的平均分 , 定义一个 doubel sum 把该班级 5 个学生的成绩累积
        //(2) 统计 3 个班(每个班 5 个学生) 平均分
        //(3) 所有班级的平均分
        //3.1 定义一个变量,double totalScore 累积所有学生的成绩
        //3.2 当多重循环结束后,totalScore / (3 * 5)
        //(4) 统计三个班及格人数
        //4.1 定义变量 int passNum = 0; 当有一个学生成绩>=60, passNum++
        //4.2 如果 >= 60 passNum++
        //(5) 可以优化[效率,可读性, 结构]
        //创建 Scanner 对象
        Scanner myScanner = new Scanner(System.in);
        double totalScore = 0; //累积所有学生的成绩
        int passNum = 0;//累积 及格人数
        int classNum = 3; //班级个数
        int stuNum = 5;//学生个数
        for( int i = 1; i <= classNum; i++) {//i 表示班级
            double sum = 0; //一个班级的总分
            for( int j = 1; j <= stuNum; j++) {//j 表示学生
                System.out.println("请数第"+i+"个班的第"+j+"个学生的成绩");
                double score = myScanner.nextDouble();
                //当有一个学生成绩>=60, passNum++
                if(score >= 60) {
                    passNum++;
                }
                sum += score; //累积
                System.out.println("成绩为" + score);
            }
            //因为 sum 是 5 个学生的总成绩
            System.out.println("sum=" + sum + " 平均分=" + (sum / stuNum));
            //把 sum 累积到 totalScore
            totalScore += sum;
        }
        System.out.println("三个班总分="+ totalScore
                + " 平均分=" + totalScore / (classNum*stuNum));
        System.out.println("及格人数=" + passNum);
    }
}
4.12.1 打印九九乘法表
public class Themultiplicationtable {
    public static void main(String[] args) {
        for(int i = 1;i < 10;i++){
            for(int j = 1;j <= i ;j++){
                System.out.print(j + " * " + i + " = " + ( i * j ) + "\t");
            }
            System.out.println();
        }
    }
}
4.12.2 金字塔

public class Stars {
    //编写一个 main 方法
    public static void main(String[] args) {
/*
*
* *
* *
********
1. 先打印一个矩形
*****
*****
*****
*****
*****
2. 打印半个金字塔
* //第 1 层 有 1 个*
** //第 2 层 有 2 个*
*** //第 3 层 有 3 个*
**** //第 4 层 有 4 个*
***** //第 5 层 有 5 个*
3. 打印整个金字塔
* //第 1 层 有 1 个* 2 * 1 -1 有 4=(总层数-1)个空格
*** //第 2 层 有 3 个* 2 * 2 -1 有 3=(总层数-2)个空格
***** //第 3 层 有 5 个* 2 * 3 -1 有 2=(总层数-3)个空格
******* //第 4 层 有 7 个* 2 * 4 -1 有 1=(总层数-4)个空格
********* //第 5 层 有 9 个* 2 * 5 -1 有 0=(总层数-5)个空格
4. 打印空心的金字塔 [最难的]
* //第 1 层 有 1 个* 当前行的第一个位置是*,最后一个位置也是*
* * //第 2 层 有 2 个* 当前行的第一个位置是*,最后一个位置也是*
* * //第 3 层 有 2 个* 当前行的第一个位置是*,最后一个位置也是*
* * //第 4 层 有 2 个* 当前行的第一个位置是*,最后一个位置也是*
********* //第 5 层 有 9 个* 全部输出*
先死后活
5 层数做成变量 int totalLevel = 5;
//小伙伴 技术到位,就可以很快的把代码写出
*/
        int totalLevel = 20; //层数
        for(int i = 1; i <= totalLevel; i++) { //i 表示层数
//在输出*之前,还有输出 对应空格 = 总层数-当前层
            for(int k = 1; k <= totalLevel - i; k++ ) {
                System.out.print(" ");
            }
//控制打印每层的*个数
            for(int j = 1;j <= 2 * i - 1;j++) {
//当前行的第一个位置是*,最后一个位置也是*, 最后一层全部 *
                if(j == 1 || j == 2 * i - 1 || i == totalLevel) {
                    System.out.print("*");
                } else { //其他情况输出空格
                    System.out.print(" ");
                }
            }
//每打印完一层的*后,就换行 println 本身会换行
            System.out.println("");
        }
    }
}
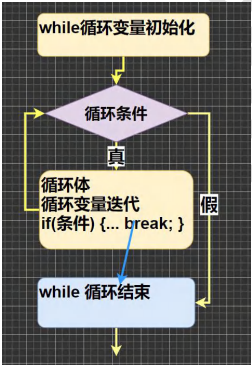
4.13 跳转语句break
4.13.1 基本介绍
break语句用于终止某个语句的执行,一般使用在switch或者循环[for,while,do-while]中
4.13.2 基本语法
{
……
break;
……
}
4.13.3 流程图
4.13.4 注意事项和细节说明
4.13.5 案例演示
1.1-100 以内的数求和,求出 当和 第一次大于 20 的当前数 【for + break】
public class BreakExercise {
    //编写一个 main 方法
    public static void main(String[] args) {
//1-100 以内的数求和,求出 当和 第一次大于 20 的当前数 【for + break】
//思路分析
//1. 循环 1-100, 求和 sum
//2. 当 sum > 20 时,记录下当前数,然后 break
//3. 在 for 循环外部,定义变量 n , 把当前 i 赋给 n
        int sum = 0; //累积和
//注意 i 的作用范围在 for{}
        int n = 0;
        for (int i = 1; i <= 100; i++) {
            sum += i;//累积
            if (sum > 20) {
                System.out.println("和>20 时候 当前数 i=" + i);
                n = i;
                break;
            }
        }
        System.out.println("当前数=" + n);
    }
}
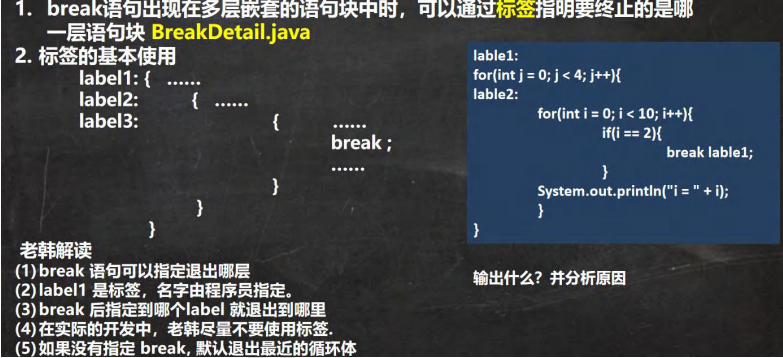
4.14 跳转控制语句-continue
4.14.1 基本介绍
1.continue语句用于结束本次循环,继续执行下一次循环。
2.continue语句出现在多层嵌套的循环语句体中时,可以通过标签指明要跳过的是哪一层循环,这个和前面的标签的使用的规则一样.
4.14.2 基本语法
{
……
continue;
……
}
4.14.3 流程图
五、数组、排序和查找
5.1 数组
5.1.1 数组介绍
数组可以存放多个同一类型的数据。数组也是一种数据类型,是引用类型。
即:数(数据)组(一组)就是一组数据
5.1.2 数组入门
//数组的引出
public class Array01 {
    //编写一个 main 方法
    public static void main(String[] args) {
/*
它们的体重分别是 3kg,5kg,1kg,3.4kg,2kg,50kg 。
请问这六只鸡的总体重是多少?平均体重是多少?
思路分析
1. 定义六个变量 double , 求和 得到总体重
2. 平均体重 = 总体重 / 6
3. 分析传统实现的方式问题. 6->600->566
4. 引出新的技术 -> 使用数组来解决. */
// double hen1 = 3;
// double hen2 = 5;
// double hen3 = 1;
// double hen4 = 3.4;
// double hen5 = 2;
// double hen6 = 50;
// double totalWeight = hen1 + hen2 + hen3 + hen4 + hen5 + hen6;
// double avgWeight = totalWeight / 6;
// System.out.println("总体重=" + totalWeight
// + "平均体重=" + avgWeight);
//比如,我们可以用数组来解决上一个问题 => 体验
//
//定义一个数组
//1. double[] 表示 是 double 类型的数组, 数组名 hens
//2. {3, 5, 1, 3.4, 2, 50} 表示数组的值/元素,依次表示数组的
// 第几个元素
        double[] hens = {3, 5, 1, 3.4, 2, 50, 7.8, 88.8,1.1,5.6,100};
//遍历数组得到数组的所有元素的和, 使用 for
//1. 我们可以通过 hens[下标] 来访问数组的元素
// 下标是从 0 开始编号的比如第一个元素就是 hens[0]
// 第 2 个元素就是 hens[1] , 依次类推
//2. 通过 for 就可以循环的访问 数组的元素/值
//3. 使用一个变量 totalWeight 将各个元素累积
        System.out.println("===使用数组解决===");
//System.out.println("数组的长度=" + hens.length);
        double totalWeight = 0;
        for( int i = 0; i < hens.length; i++) {
//System.out.println("第" + (i+1) + "个元素的值=" + hens[i]);
            totalWeight += hens[i];
        }
        System.out.println("总体重=" + totalWeight
                + "平均体重=" + (totalWeight / hens.length) );
    }
}
5.2 数组的使用
import java.util.Scanner;
public class Array02 {
//编写一个 main 方法
public static void main(String[] args) {
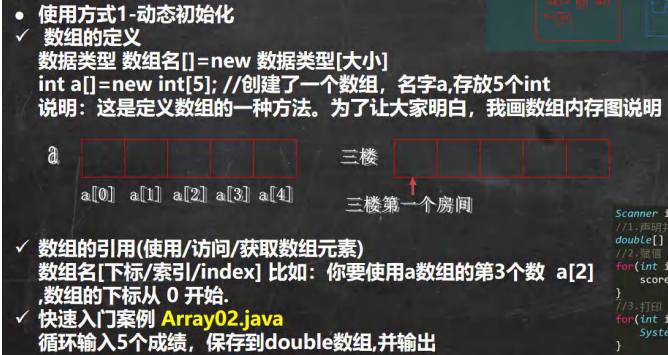
//演示 数据类型 数组名[]=new 数据类型[大小]
//循环输入 5 个成绩,保存到 double 数组,并输出
//步骤
//1. 创建一个 double 数组,大小 5
//(1) 第一种动态分配方式
//double scores[] = new double[5];
//(2) 第 2 种动态分配方式, 先声明数组,再 new 分配空间
double scores[]; //声明数组, 这时 scores 是 null
scores = new double[5]; // 分配内存空间,可以存放数据
//2. 循环输入
// scores.length 表示数组的大小/长度
//
Scanner myScanner = new Scanner(System.in);
for (int i = 0; i < scores.length; i++) {
System.out.println("请输入第" + (i + 1) + "个元素的值");
scores[i] = myScanner.nextDouble();
}
//输出,遍历数组
System.out.println("==数组的元素/值的情况如下:===");
for (int i = 0; i < scores.length; i++) {
System.out.println("第" + (i + 1) + "个元素的值=" + scores[i]);
}
}
}
5.2.1 使用方法-动态初始化
1.先声明数组
语法:数据类型 数组名[]; 也可以 数据类型[] 数组名;
int a[]; 或者 int[] a;
2.创建数组
语法: 数组名=new 数据类型[大小];
a=new int[10];
5.2.2 使用方法-静态初始化
语法:数据类型 数组名[] = {元素值,元素值...}
int a[] = {2,5,7,8,89,90,34,56}
5.3 数组注意事项和使用细节
1.数组是多个相同类型数据的组合,实现对这些数据的统一管理
2.数组中的元素可以是任何数据类型,包括基本类型和引用类型,但是不能混用。
3.数组创建后,如果没有赋值,有默认值 int 0,short 0, byte 0, long 0, float 0.0,double 0.0,char \u0000,boolean false,String null
4.使用数组的步骤 1. 声明数组并开辟空间 2 给数组各个元素赋值 3 使用数组
5.数组的下标是从 0 开始的。
6.数组下标必须在指定范围内使用,否则报:下标越界异常,比如int [] arr=new int[5]; 则有效下标为 0-4 7) 数组属引用类型,数组型数据是对象(object)
5.4 案例演示
创建一个 char 类型的 26 个元素的数组,分别 放置'A'-'Z'。使用 for 循环访问所有元素并打印出来。提示:char 类型 数据运算 'A'+2 -> 'C'
public class ArrayExercise01 {
    //编写一个 main 方法
    public static void main(String[] args) {
/*
创建一个 char 类型的 26 个元素的数组,分别 放置'A'-'Z'。
使用 for 循环访问所有元素并打印出来。
提示:char 类型数据运算 'A'+1 -> 'B' 思路分析
1. 定义一个 数组 char[] chars = new char[26]
2. 因为 'A' + 1 = 'B' 类推,所以老师使用 for 来赋值
3. 使用 for 循环访问所有元素
*/
        char[] chars = new char[26];
        for( int i = 0; i < chars.length; i++) {//循环 26 次
//chars 是 char[]
//chars[i] 是 char
            chars[i] = (char)('A' + i); //'A' + i 是 int , 需要强制转换
        }
//循环输出
        System.out.println("===chars 数组===");
        for( int i = 0; i < chars.length; i++) {//循环 26 次
            System.out.print(chars[i] + " ");
        }
    }
}
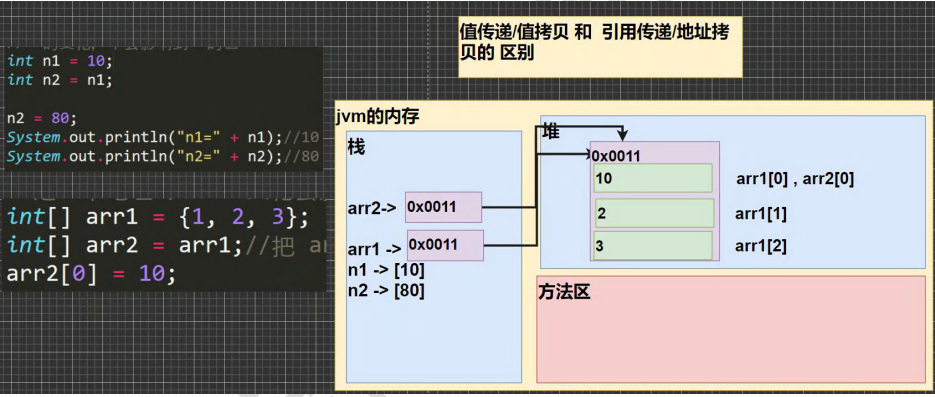
5.5 数组赋值机制
1.基本数据类型赋值,这个值就是具体的数据,而且相互不影响。
int n1 = 2; int n2 = n1;
2.数组在默认情况下是引用传递,赋的值是地址。 看一个案例,并分析数组赋值的内存图(重点, 难点. )。
//代码 ArrayAssign.java
int[] arr1 = {1,2,3};
int[] arr2 = arr1;
5.6 数组拷贝
将 int[] arr1 = {10,20,30}; 拷贝到 arr2 数组, 要求数据空间是独立的.
public class ArrayCopy {
    //编写一个 main 方法
    public static void main(String[] args) {
//将 int[] arr1 = {10,20,30}; 拷贝到 arr2 数组,
// 要求数据空间是独立的.
        int[] arr1 = {10,20,30};
//创建一个新的数组 arr2,开辟新的数据空间
//大小 arr1.length;
        int[] arr2 = new int[arr1.length];
//遍历 arr1 ,把每个元素拷贝到 arr2 对应的元素位置
        for(int i = 0; i < arr1.length; i++) {
            arr2[i] = arr1[i];
        }
//输出 arr1
        System.out.println("====arr1 的元素====");
        for(int i = 0; i < arr1.length; i++) {
            System.out.println(arr1[i]);//10,20,30
        }
//
        System.out.println("====arr2 的元素====");
        for(int i = 0; i < arr2.length; i++) {
            System.out.println(arr2[i]);//
        }
    }
}
5.7 数组反转
要求:把数组的元素内容反转。
arr {11,22,33,44,55,66} {66, 55,44,33,22,11}
public class ArrayReverse {
    //编写一个 main 方法
    public static void main(String[] args) {
//定义数组
        int[] arr = {11, 22, 33, 44, 55, 66};
//规律
//1. 把 arr[0] 和 arr[5] 进行交换 {66,22,33,44,55,11}
//2. 把 arr[1] 和 arr[4] 进行交换 {66,55,33,44,22,11}
//3. 把 arr[2] 和 arr[3] 进行交换 {66,55,44,33,22,11}
//4. 一共要交换 3 次 = arr.length / 2
//5. 每次交换时,对应的下标 是 arr[i] 和 arr[arr.length - 1 -i]
//代码
//优化
        int temp = 0;
        int len = arr.length; //计算数组的长度
        for( int i = 0; i < len / 2; i++) {
            temp = arr[len - 1 - i];//保存
            arr[len - 1 - i] = arr[i];
            arr[i] = temp;
        }
        System.out.println("===翻转后数组===");
        for(int i = 0; i < arr.length; i++) {
            System.out.print(arr[i] + "\t");//66,55,44,33,22,11
        }
    }
}
5.8 数组扩容
要求:实现动态的给数组添加元素效果,实现对数组扩容。
1.原始数组使用静态分配 int[] arr = {1,2,3}
2.增加的元素 4,直接放在数组的最后 arr = {1,2,3,4}
3.用户可以通过如下方法来决定是否继续添加,添加成功,是否继续?y/n
import java.util.Scanner;
public class ArrayAdd02 {
    //编写一个 main 方法
    public static void main(String[] args) {
/*
要求:实现动态的给数组添加元素效果,实现对数组扩容。ArrayAdd.java
1.原始数组使用静态分配 int[] arr = {1,2,3}
2.增加的元素 4,直接放在数组的最后 arr = {1,2,3,4}
3.用户可以通过如下方法来决定是否继续添加,添加成功,是否继续?y/n
思路分析
1. 定义初始数组 int[] arr = {1,2,3}//下标 0-2
2. 定义一个新的数组 int[] arrNew = new int[arr.length+1];
3. 遍历 arr 数组,依次将 arr 的元素拷贝到 arrNew 数组
4. 将 4 赋给 arrNew[arrNew.length - 1] = 4;把 4 赋给 arrNew 最后一个元素
5. 让 arr 指向 arrNew ; arr = arrNew; 那么 原来 arr 数组就被销毁
6. 创建一个 Scanner 可以接受用户输入
7. 因为用户什么时候退出,不确定,老师使用 do-while + break 来控制
*/
        Scanner myScanner = new Scanner(System.in);
//初始化数组
        int[] arr = {1,2,3};
        do {
            int[] arrNew = new int[arr.length + 1];
//遍历 arr 数组,依次将 arr 的元素拷贝到 arrNew 数组
            for(int i = 0; i < arr.length; i++) {
                arrNew[i] = arr[i];
            }
            System.out.println("请输入你要添加的元素");
            int addNum = myScanner.nextInt();
//把 addNum 赋给 arrNew 最后一个元素
            arrNew[arrNew.length - 1] = addNum;
//让 arr 指向 arrNew, arr = arrNew;
//输出 arr 看看效果
            System.out.println("====arr 扩容后元素情况====");
            for(int i = 0; i < arr.length; i++) {
                System.out.print(arr[i] + "\t");
            }
//问用户是否继续
            System.out.println("是否继续添加 y/n");
            char key = myScanner.next().charAt(0);
            if( key == 'n') { //如果输入 n ,就结束
                break;
            }
        }while(true);
        System.out.println("你退出了添加...");
    }
}
5.9 排序
排序是将多个数据,依指定的顺序进行排列的过程。
排序的分类:
内部排序
外部排序
5.9.1 内部排序
指将需要处理的所有数据都加载到内部存储器中进行排序。包括(交换式排序法、选择式排序法和插入式排序法);
5.9.2 外部排序法
数据量过大,无法全部加载到内存中,需要借助外部存储进行排序。包括(合并排序法和直接合并排序法)。
5.10 冒泡排序
5.10.1 介绍
冒泡排序(Bubble Sorting)的基本思想是:通过对待排序序列从后向前(从下标较大的元素开始),依次比较相邻元素的值,若发现逆序则交换,使值较大的元素逐渐从前移向后部,就像水底下的气泡一样逐渐向上冒。
5.10.2 案例演示
将五个无序:24,69,80,57,13使用冒泡排序法将其排成一个从小到大的有序数列。
public class BubbleSort {
    //编写一个 main 方法
    public static void main(String[] args) {
/*
数组 [24,69,80,57,13]
第 1 轮排序: 目标把最大数放在最后
第 1 次比较[24,69,80,57,13]
第 2 次比较[24,69,80,57,13]
第 3 次比较[24,69,57,80,13]
第 4 次比较[24,69,57,13,80]
*/
        int[] arr = {24,69,80,57,13};
        int temp = 0; //用于辅助交换的变量
//将多轮排序使用外层循环包括起来即可
        for( int i = 0; i < arr.length - 1; i++) {//外层循环是 4 次
            for( int j = 0; j < arr.length - 1 - i; j++) {//4 次比较-3 次-2 次-1 次
//如果前面的数>后面的数,就交换
                if(arr[j] > arr[j + 1]) {
                    temp = arr[j];
                    arr[j] = arr[j+1];
                    arr[j+1] = temp;
                }
            }
            System.out.println("\n==第"+(i+1)+"轮==");
            for(int j = 0; j < arr.length; j++) {
                System.out.print(arr[j] + "\t");
            }
        }
// for( int j = 0; j < 4; j++) {//4 次比较
// //如果前面的数>后面的数,就交换
// if(arr[j] > arr[j + 1]) {
// temp = arr[j];
// arr[j] = arr[j+1];
// arr[j+1] = temp;
// }
// }
// System.out.println("==第 1 轮==");
// for(int j = 0; j < arr.length; j++) {
// System.out.print(arr[j] + "\t");
// }
// /*
// 第 2 轮排序: 目标把第二大数放在倒数第二位置
// 第 1 次比较[24,69,57,13,80]
// 第 2 次比较[24,57,69,13,80]
// 第 3 次比较[24,57,13,69,80]
// */
// for( int j = 0; j < 3; j++) {//3 次比较
// //如果前面的数>后面的数,就交换
// if(arr[j] > arr[j + 1]) {
// temp = arr[j];
// arr[j] = arr[j+1];
// arr[j+1] = temp;
// }
// }
// System.out.println("\n==第 2 轮==");
// for(int j = 0; j < arr.length; j++) {
// System.out.print(arr[j] + "\t");
// }
// 第 3 轮排序: 目标把第 3 大数放在倒数第 3 位置
// 第 1 次比较[24,57,13,69,80]
// 第 2 次比较[24,13,57,69,80]
// for( int j = 0; j < 2; j++) {//2 次比较
// //如果前面的数>后面的数,就交换
// if(arr[j] > arr[j + 1]) {
// temp = arr[j];
// arr[j] = arr[j+1];
// arr[j+1] = temp;
// }
// }
// System.out.println("\n==第 3 轮==");
// for(int j = 0; j < arr.length; j++) {
// System.out.print(arr[j] + "\t");
// }
// /*
// 第 4 轮排序: 目标把第 4 大数放在倒数第 4 位置
// 第 1 次比较[13,24,57,69,80]
// */
// for( int j = 0; j < 1; j++) {//1 次比较
// //如果前面的数>后面的数,就交换
// if(arr[j] > arr[j + 1]) {
// temp = arr[j];
// arr[j] = arr[j+1];
// arr[j+1] = temp;
// }
// }
// System.out.println("\n==第 4 轮==");
// for(int j = 0; j < arr.length; j++) {
// System.out.print(arr[j] + "\t");
// }
    }
}
5.11 查找
5.11.1 介绍在
java 中,我们常用的查找有两种:
1.顺序查找
2.二分查找
5.11.2 案例演示
有一个数列:白眉鹰王、金毛狮王、紫衫龙王、青翼蝠王猜数游戏:从键盘中任意输入一个名称,判断数列中是否包含此名称 要求: 如果找到了,就提示找到,并给出下标值。
import java.util.Scanner;
public class SeqSearch {
    //编写一个 main 方法
    public static void main(String[] args) {
/*
有一个数列:白眉鹰王、金毛狮王、紫衫龙王、青翼蝠王猜数游戏:
从键盘中任意输入一个名称,判断数列中是否包含此名称
要求: 如果找到了,就提示找到,并给出下标值
思路分析
1. 定义一个字符串数组
2. 接收用户输入, 遍历数组,逐一比较,如果有,则提示信息,并退出
*/
//定义一个字符串数组
        String[] names = {"白眉鹰王", "金毛狮王", "紫衫龙王", "青翼蝠王"};
        Scanner myScanner = new Scanner(System.in);
        System.out.println("请输入名字");
        String findName = myScanner.next();
//遍历数组,逐一比较,如果有,则提示信息,并退出
//这里老师给大家一个编程思想/技巧, 一个经典的方法
        int index = -1;
        for(int i = 0; i < names.length; i++) {
//比较 字符串比较 equals, 如果要找到名字就是当前元素
            if(findName.equals(names[i])) {
                System.out.println("恭喜你找到 " + findName);
                System.out.println("下标为= " + i);
//把 i 保存到 index
                index = i;
                break;//退出
            }
        }
        if(index == -1) { //没有找到
            System.out.println("sorry ,没有找到 " + findName);
        }
    }
}
5.12 多维数组-二维数组
5.12.1 入门案例
请用二维数组输出如下图形
0 0 0 0 0 0
0 0 1 0 0 0
0 2 0 3 0 0
0 0 0 0 0 0
public class TwoDimensionalArray01 {
    //编写一个 main 方法
    public static void main(String[] args) {
/*
请用二维数组输出如下图形
0 0 0 0 0 0
0 0 1 0 0 0
0 2 0 3 0 0
0 0 0 0 0 0
*/
//什么是二维数组:
//1. 从定义形式上看 int[][]
//2. 可以这样理解,原来的一维数组的每个元素是一维数组, 就构成二维数组
        int[][] arr = { {0, 0, 0, 0, 0, 0}, {0, 0, 1, 0, 0, 0}, {0,2, 0, 3, 0, 0}, {0, 0, 0, 0, 0, 0} };
//关于二维数组的关键概念
//(1)
        System.out.println("二维数组的元素个数=" + arr.length);
//(2) 二维数组的每个元素是一维数组, 所以如果需要得到每个一维数组的值
// 还需要再次遍历
//(3) 如果我们要访问第 (i+1)个一维数组的第 j+1 个值 arr[i][j];
// 举例 访问 3, =》 他是第 3 个一维数组的第 4 个值 arr[2][3]
        System.out.println("第 3 个一维数组的第 4 个值=" + arr[2][3]); //3
//输出二维图形
        for(int i = 0; i < arr.length; i++) {//遍历二维数组的每个元素
//遍历二维数组的每个元素(数组)
//1. arr[i] 表示 二维数组的第 i+1 个元素 比如 arr[0]:二维数组的第一个元素
//2. arr[i].length 得到 对应的 每个一维数组的长度
            for(int j = 0; j < arr[i].length; j++) {
                System.out.print(arr[i][j] + " "); //输出了一维数组
            }
            System.out.println();//换行
        }
    }
}
5.12.2 案例演示
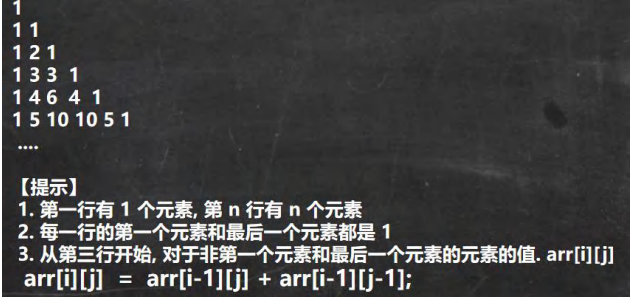
使用二维数组打印一个 10 行杨辉三角
public class YangHui {
    //编写一个 main 方法
    public static void main(String[] args) {
/*
使用二维数组打印一个 10 行杨辉三角
1
1 1
1 2 1
1 3 3 1
1 4 6 4 1
1 5 10 10 5 1
规律
1.第一行有 1 个元素, 第 n 行有 n 个元素
2. 每一行的第一个元素和最后一个元素都是 1
3. 从第三行开始, 对于非第一个元素和最后一个元素的元素的值. arr[i][j]
arr[i][j] = arr[i-1][j] + arr[i-1][j-1]; //必须找到这个规律
*/
        int[][] yangHui = new int[12][];
        for (int i = 0; i < yangHui.length; i++) {//遍历 yangHui 的每个元素
//给每个一维数组(行) 开空间
            yangHui[i] = new int[i + 1];
//给每个一维数组(行) 赋值
            for (int j = 0; j < yangHui[i].length; j++) {
//每一行的第一个元素和最后一个元素都是 1
                if (j == 0 || j == yangHui[i].length - 1) {
                    yangHui[i][j] = 1;
                } else {//中间的元素
                    yangHui[i][j] = yangHui[i - 1][j] + yangHui[i - 1][j - 1];
                }
            }
        }
//输出杨辉三角
        for (int i = 0; i < yangHui.length; i++) {
            for (int j = 0; j < yangHui[i].length; j++) {//遍历输出该行
                System.out.print(yangHui[i][j] + "\t");
            }
            System.out.println();//换行. }
        }
    }
}
5.13 二维数组注意事项和使用细节
1.一维数组的声明方式有: int[] x 或者 int x[]
2.二维数组的声明方式有: int[] [] y 或者 int[] y[] 或者 int y[] []
3.二维数组实际上是由多个一维数组组成的,它的各个一维数组的长度可以相同,也可以不相同。比如: map[] []是 一个二维数组 int map[] [] = {{1,2},{3,4,5}} 由 map[0] 是一个含有两个元素的一维数组 ,map[1] 是一个含有三个元素的一维数组构成,我们也称为列数不等 的二维数组
六、面向对象(基础)
6.1 类与对象
6.1.1 类与对象的区别和联系
1.类是抽象的,概念的,代表一类事物,比如人类,猫类.., 即它是数据类型.
2.对象是具体的,实际的,代表一个具体事物, 即 是实例.
3.类是对象的模板,对象是类的一个个体,对应一个实例
6.1.2 对象在内存中存在形式
6.1.3 属性/成员变量/字段
1.基本介绍
1) 从概念或叫法上看: 成员变量 = 属性 = field(字段) (即,成员变量是用来表示属性的)
public class Object02 {
    //编写一个 main 方法
    public static void main(String[] args) {
    }
}
class Car {
    String name;//属性, 成员变量, 字段 field
    double price;
    String color;
    String[] master;//属性可以是基本数据类型,也可以是引用类型(对象,数组)
}
- 属性是类的一个组成部分,一般是基本数据类型,也可是引用类型(对象,数组)。
2.注意事项和细节说明
1.属性的定义语法同变量,示例:访问修饰符 属性类型 属性名; 这里老师简单的介绍访问修饰符: 控制属性的访问范围 有四种访问修饰符 public, proctected, 默认, private ,后面我会详细介绍
2.属性的定义类型可以为任意类型,包含基本类型或引用类型
3.属性如果不赋值,有默认值,规则和数组一致。具体说: int 0,short 0, byte 0, long 0, float 0.0,double 0.0,char \u0000, boolean false,String null
6.1.4 如何创建对象
1.先声明再创建
Cat cat ;
//声明对象 cat cat = new Cat();
//创建
2.直接创建 Cat cat
6.1.5 如何访问属性
基本语法
对象名.属性名;
案例演示赋值和输出
cat.name ;
cat.age;
cat.color;
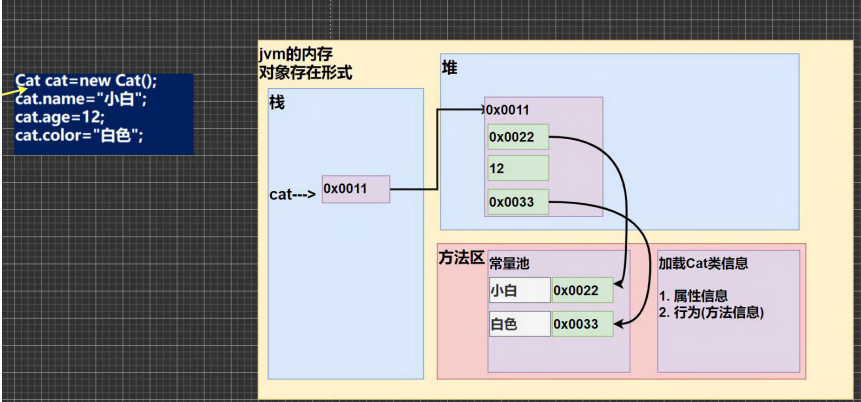
6.1.6 类和对象的内存分配机制
1.Java 内存的结构分析
-
栈: 一般存放基本数据类型(局部变量)
-
堆: 存放对象(Cat cat , 数组等)
-
方法区:常量池(常量,比如字符串), 类加载信息
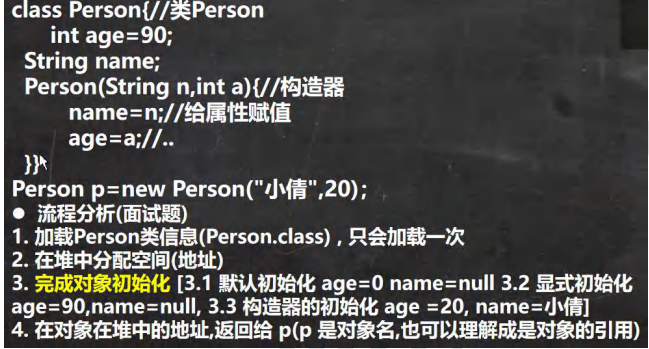
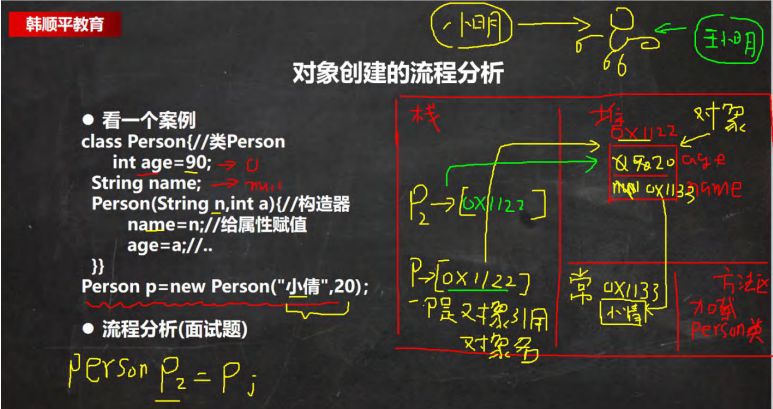
2.Java 创建对象的流程简单分析
Person p = new Person();
p.name = “jack”;
p.age = 10
-
先加载 Person 类信息(属性和方法信息, 只会加载一次)
-
在堆中分配空间, 进行默认初始化(看规则)
-
把地址赋给 p , p 就指向对象
-
进行指定初始化, 比如 p.name =”jack” p.age = 10
6.2 成员方法
6.2.1 基本介绍
在某些情况下,我们要需要定义成员方法(简称方法)。比如人类:除了有一些属性外( 年龄,姓名..),我们人类还有一 些行为比如:可以说话、跑步..,通过学习,还可以做算术题。这时就要用成员方法才能完成。
6.2.2 成员方法入门
1.添加 speak 成员方法,输出 “我是一个好人”
2.添加 cal01 成员方法,可以计算从 1+..+1000 的结果
3.添加 cal02 成员方法,该方法可以接收一个数 n,计算从 1+..+n 的结果
4.添加 getSum 成员方法,可以计算两个数的和
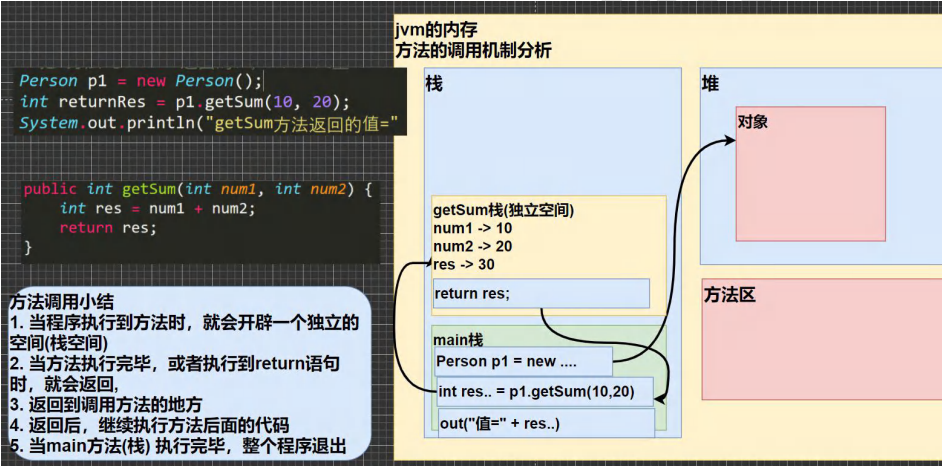
public class Method01 {
    //编写一个 main 方法
    public static void main(String[] args) {
//方法使用
//1. 方法写好后,如果不去调用(使用),不会输出
//2. 先创建对象 ,然后调用方法即可
        Person p1 = new Person();
        p1.speak(); //调用方法
        p1.cal01(); //调用 cal01 方法
        p1.cal02(5); //调用 cal02 方法,同时给 n = 5
        p1.cal02(10); //调用 cal02 方法,同时给 n = 10
//调用 getSum 方法,同时 num1=10, num2=20
//把 方法 getSum 返回的值,赋给 变量 returnRes
        int returnRes = p1.getSum(10, 20);
        System.out.println("getSum 方法返回的值=" + returnRes);
    }
}
class Person {
    String name;
    int age;
    //方法(成员方法)
//添加 speak 成员方法,输出 “我是一个好人”
//1. public 表示方法是公开
//2. void : 表示方法没有返回值
//3. speak() : speak 是方法名, () 形参列表
//4. {} 方法体,可以写我们要执行的代码
//5. System.out.println("我是一个好人"); 表示我们的方法就是输出一句话
    public void speak() {
        System.out.println("我是一个好人");
    }
    //添加 cal01 成员方法,可以计算从 1+..+1000 的结果
    public void cal01() {
//循环完成
        int res = 0;
        for(int i = 1; i <= 1000; i++) {
            res += i;
        }
        System.out.println("cal01 方法 计算结果=" + res);
    }
    //添加 cal02 成员方法,该方法可以接收一个数 n,计算从 1+..+n 的结果
//1. (int n) 形参列表, 表示当前有一个形参 n, 可以接收用户输入
    public void cal02(int n) {
//循环完成
        int res = 0;
        for(int i = 1; i <= n; i++) {
            res += i;
        }
        System.out.println("cal02 方法 计算结果=" + res);
    }
    //添加 getSum 成员方法,可以计算两个数的和
//1. public 表示方法是公开的
//2. int :表示方法执行后,返回一个 int 值
//3. getSum 方法名
//4. (int num1, int num2) 形参列表,2 个形参,可以接收用户传入的两个数
//5. return res; 表示把 res 的值, 返回
    public int getSum(int num1, int num2) {
        int res = num1 + num2;
        return res;
    }
}
6.2.3 方法调用的内存机制
6.2.4 成员方法的好处
1.提高代码的复用性
2.可以将实现的细节封装起来,然后供其他用户来调用即可
6.2.5 成员方法的定义
访问修饰符 返回数据类型 方法名(形参列表..) {//方法体
语句;
return 返回值;
}
1.形参列表:表示成员方法输入 cal(int n) ,getSum(int num1, int num2)
2.返回数据类型:表示成员方法输出, void 表示没有返回值
3.方法主体:表示为了实现某一功能代码块 4) return 语句不是必须的。
6.2.6 注意事项和细节说明
1.访问修饰符 (作用是控制 方法使用的范围) 如果不写默认访问,[有四种: public, protected, 默认, private]
2.返回数据类型
-
一个方法最多有一个返回值
-
返回类型可以为任意类型,包含基本类型或引用类型(数组,对象)
-
如果方法要求有返回数据类型,则方法体中最后的执行语句必须为 return 值; 而且要求返回值类型必须和 return 的 值类型一致或兼容
-
如果方法是 void,则方法体中可以没有 return 语句,或者 只写 return ;
3.方法名
遵循驼峰命名法,最好见名知义,表达出该功能的意思即可, 比如得到两个数的和getSum, 开发中按照规范
4.形参列表
1)一个方法可以有0个参数,也可以有多个参数,中间用逗号隔开,、
2)参数类型可以为任意类型,包含基本类型或引用类型
3)调用带参数的方法时,一定对应着参数列表传入相同类型或兼容类型的参数![getSum]方法定义时的参数称为形式参数,简称形参;方法调用时的传入参数称为实际参数,简称实参,实参和形参的类型要一致或兼容、个数、顺序必须一致!
5.方法体
里面写完成功能的具体的语句,可以为输入、输出、变量、运算、分支、循环、方法调用,但里面不能再定义方法!即方法不可以嵌套
6.方法调用的细节说明
1)同一类中的方法调用:直接调用即可
2)跨类中的方法A类调用B类方法:需要通过对象名调用
6.2.7 案例演示
1.编写类 AA ,有一个方法:判断一个数是奇数 odd 还是偶数, 返回 boolean
2.根据行、列、字符打印 对应行数和列数的字符,比如:行:4,列:4,字符#,则打印相应的效果
public class MethodExercise01 {
    //编写一个 main 方法
    public static void main(String[] args) {
        AA a = new AA();
// if(a.isOdd(2)) {//T , 这样的写法以后会看到很多
// System.out.println("是奇数");
// } else {
// System.out.println("是偶数");
// }
//
//
// 使用 print 方法
        a.print(4, 4, '#');
    }
}
//编写类 AA ,有一个方法:判断一个数是奇数 odd 还是偶数, 返回 boolean
class AA {
//1. 方法的返回类型 boolean
//2. 方法的名字 isOdd
//3. 方法的形参 (int num)
//4. 方法体 , 判断
    public boolean isOdd(int num) {
// if(num % 2 != 0) {
// return true;
// } else {
// return false;
// }
//return num % 2 != 0 ? true; false;
//
        return num % 2 != 0;
    }
    //根据行、列、字符打印 对应行数和列数的字符,
//比如:行:4,列:4,字符#,则打印相应的效果
/*
####
####
####
####
*/
//1. 方法的返回类型 void
//2. 方法的名字 print
//3. 方法的形参 (int row, int col, char c)
//4. 方法体 , 循环
    public void print(int row, int col, char c) {
        for(int i = 0; i < row; i++) {
            for(int j = 0; j < col; j++) {//输出每一行
                System.out.print(c);
            }
            System.out.println(); //换行
        }
    }
}
6.3 成员方法的传参机制
6.3.1 基本数据类型的传参机制
基本数据类型,传递的是值(值拷贝),形参的任何改变不影响实参
6.3.2 引用数据类型的传参机制
引用类型传递的是地址(传递也是值,但是值是地址),可以通过形参影响实参!
6.4 方法递归
6.4.1 基本介绍
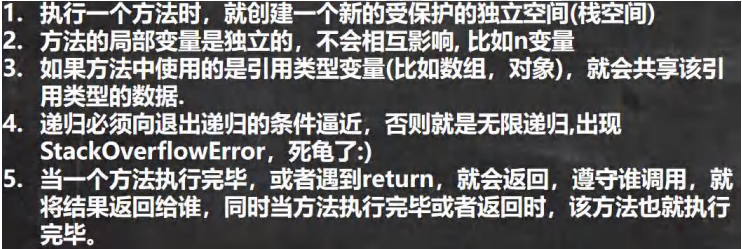
递归就是方法自己调用自己,每次调用时传入不同的变量.递归有助于编程者解决复杂问题,同时可以让代码变得简洁
6.4.2 递归的重要规则
6.4.3 案例演示1

public class RecursionExercise01 {
    //编写一个 main 方法
    public static void main(String[] args) {
        T t1 = new T();
// int n = 7;
// int res = t1.fibonacci(n);
// if(res != -1) {
// System.out.println("当 n="+ n +" 对应的斐波那契数=" + res);
// }

//桃子问题
        int day = 0;
        int peachNum = t1.peach(day);
        if(peachNum != -1) {
            System.out.println("第 " + day + "天有" + peachNum + "个桃子");
        }

    }
}
class T {
    /*
    请使用递归的方式求出斐波那契数 1,1,2,3,5,8,13...给你一个整数 n,求出它的值是多
    思路分析
    1. 当 n = 1 斐波那契数 是 1
    2. 当 n = 2 斐波那契数 是 1
    3. 当 n >= 3 斐波那契数 是前两个数的和
    4. 这里就是一个递归的思路
    */
    public int fibonacci(int n) {
        if( n >= 1) {
            if( n == 1 || n == 2) {
                return 1;
            } else {
                return fibonacci(n-1) + fibonacci(n-2);
            }
        } else {
            System.out.println("要求输入的 n>=1 的整数");
            return -1;
        }
    }

    /*
    猴子吃桃子问题:有一堆桃子,猴子第一天吃了其中的一半,并再多吃了一个!
    以后每天猴子都吃其中的一半,然后再多吃一个。当到第 10 天时,
    想再吃时(即还没吃),发现只有 1 个桃子了。问题:最初共多少个桃子?
    思路分析 逆推
    1. day = 10 时 有 1 个桃子
    2. day = 9 时 有 (day10 + 1) * 2 = 4
    3. day = 8 时 有 (day9 + 1) * 2 = 10
    4. 规律就是 前一天的桃子 = (后一天的桃子 + 1) *2//就是我们的能力
    5. 递归
    */
    public int peach(int day) {
        if(day == 10) {//第 10 天,只有 1 个桃
            return 1;
        } else if ( day >= 1 && day <=9 ) {
            return (peach(day + 1) + 1) * 2;//规则,自己要想
        } else {
            System.out.println("day 在 1-10");
            return -1;
        }
    }
}
6.4.4 案例演示2
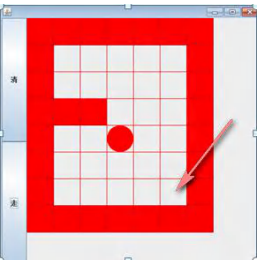
public class MiGong {
    //编写一个 main 方法
    public static void main(String[] args) {
//1. 先创建迷宫,用二维数组表示 int[][] map = new int[8][7];
//2. 先规定 map 数组的元素值: 0 表示可以走 1 表示障碍物
        int[][] map = new int[8][7];
//3. 将最上面的一行和最下面的一行,全部设置为 1
        for(int i = 0; i < 7; i++) {
            map[0][i] = 1;
            map[7][i] = 1;
        }
//4.将最右面的一列和最左面的一列,全部设置为 1
        for(int i = 0; i < 8; i++) {
            map[i][0] = 1;
            map[i][6] = 1;
        }
        map[3][1] = 1;
        map[3][2] = 1;
        map[2][2] = 1; //测试回溯
// map[2][1] = 1;
// map[2][2] = 1;
// map[1][2] = 1;
//输出当前的地图
        System.out.println("=====当前地图情况======");
        for(int i = 0; i < map.length; i++) {
            for(int j = 0; j < map[i].length; j++) {
                System.out.print(map[i][j] + " ");//输出一行
            }
            System.out.println();
        }
//使用 findWay 给老鼠找路
        A t1 = new A();
//下右上左
        t1.findWay(map, 1, 1);
        System.out.println("\n====找路的情况如下=====");
        for(int i = 0; i < map.length; i++) {
            for(int j = 0; j < map[i].length; j++) {
                System.out.print(map[i][j] + " ");//输出一行
            }
            System.out.println();
        }
    }
}
class A {
    //使用递归回溯的思想来解决老鼠出迷宫
//老韩解读
//1. findWay 方法就是专门来找出迷宫的路径
//2. 如果找到,就返回 true ,否则返回 false
//3. map 就是二维数组,即表示迷宫
//4. i,j 就是老鼠的位置,初始化的位置为(1,1)
//5. 因为我们是递归的找路,所以我先规定 map 数组的各个值的含义
// 0 表示可以走 1 表示障碍物 2 表示可以走 3 表示走过,但是走不通是死路
//6. 当 map[6][5] =2 就说明找到通路,就可以结束,否则就继续找.
// 7. 先确定老鼠找路策略 下->右->上->左
    public boolean findWay(int[][] map , int i, int j) {
        if(map[6][5] == 2) {//说明已经找到
            return true;
        } else {
            if(map[i][j] == 0) {//当前这个位置 0,说明表示可以走
//我们假定可以走通
                map[i][j] = 2;
//使用找路策略,来确定该位置是否真的可以走通
//下->右->上->左
                if(findWay(map, i + 1, j)) {//先走下
                    return true;
                } else if(findWay(map, i, j + 1)){//右
                    return true;
                } else if(findWay(map, i-1, j)) {//上
                    return true;
                } else if(findWay(map, i, j-1)){//左
                    return true;
                } else {
                    map[i][j] = 3;
                    return false;
                }
            } else { //map[i][j] = 1 , 2, 3
                return false;
            }
        }
    }
    //修改找路策略,看看路径是否有变化
//下->右->上->左 ==> 上->右->下->左
    public boolean findWay2(int[][] map , int i, int j) {
        if(map[6][5] == 2) {//说明已经找到
            return true;
        } else {
            if(map[i][j] == 0) {//当前这个位置 0,说明表示可以走
//我们假定可以走通
                map[i][j] = 2;
//使用找路策略,来确定该位置是否真的可以走通
//上->右->下->左
                if(findWay2(map, i - 1, j)) {//先走上
                    return true;
                } else if(findWay2(map, i, j + 1)){//右
                    return true;
                } else if(findWay2(map, i+1, j)) {//下
                    return true;
                } else if(findWay2(map, i, j-1)){//左
                    return true;
                } else {
                    map[i][j] = 3;
                    return false;
                }
            } else { //map[i][j] = 1 , 2, 3
                return false;
            }
        }
    }
}
6.4.5 案例演示3
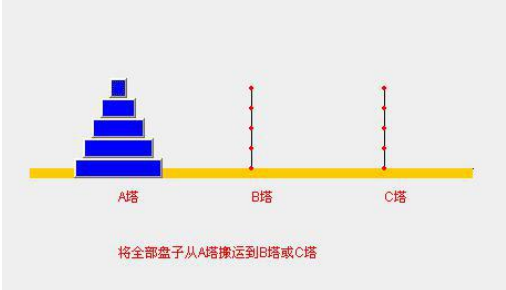
public class HanoiTower {
    //编写一个 main 方法
    public static void main(String[] args) {
        Tower tower = new Tower();
        tower.move(64, 'A', 'B', 'C');
    }
}

class Tower {
    //方法
//num 表示要移动的个数, a, b, c 分别表示 A 塔,B 塔, C 塔
    public void move(int num , char a, char b ,char c) {
//如果只有一个盘 num = 1
        if(num == 1) {
            System.out.println(a + "->" + c);
        } else {
//如果有多个盘,可以看成两个 , 最下面的和上面的所有盘(num-1)
//(1)先移动上面所有的盘到 b, 借助 c
            move(num - 1 , a, c, b);
//(2)把最下面的这个盘,移动到 c
            System.out.println(a + "->" + c);
//(3)再把 b 塔的所有盘,移动到 c ,借助 a
            move(num - 1, b, a, c);
        }
    }
}
6.5 方法重载
6.5.1 基本介绍
java中允许同一个类中,多个同名方法的存在,但要求形参列表不一致!
6.5.2 好处
1.减轻了起名的麻烦
2.减轻了记名的麻烦
6.5.3 案例演示
1.calculate(int n1, int n2) //两个整数的和
2.calculate(int n1, double n2) //一个整数,一个 double 的和
3.calculate(double n2, int n1)//一个 double ,一个 Int 和
4.calculate(int n1, int n2,int n3)//三个 int 的和
public class OverLoad01 {
    //编写一个 main 方法
    public static void main(String[] args) {
// System.out.println(100);
// System.out.println("hello,world");
// System.out.println('h');
// System.out.println(1.1);
// System.out.println(true);

        MyCalculator mc = new MyCalculator();
        System.out.println(mc.calculate(1, 2));
        System.out.println(mc.calculate(1.1, 2));
        System.out.println(mc.calculate(1, 2.1));
    }
}
class MyCalculator {
    //下面的四个 calculate 方法构成了重载
//两个整数的和
    public int calculate(int n1, int n2) {
        System.out.println("calculate(int n1, int n2) 被调用");
        return n1 + n2;
    }
    //没有构成方法重载, 仍然是错误的,因为是方法的重复定义
// public void calculate(int n1, int n2) {
// System.out.println("calculate(int n1, int n2) 被调用");
// int res = n1 + n2;
// }
//看看下面是否构成重载, 没有构成,而是方法的重复定义,就错了
// public int calculate(int a1, int a2) {
// System.out.println("calculate(int n1, int n2) 被调用");
// return a1 + a2;
// }
//一个整数,一个 double 的和
    public double calculate(int n1, double n2) {
        return n1 + n2;
    }
    //一个 double ,一个 Int 和
    public double calculate(double n1, int n2) {
        System.out.println("calculate(double n1, int n2) 被调用..");
        return n1 + n2;
    }
    //三个 int 的和
    public int calculate(int n1, int n2,int n3) {
        return n1 + n2 + n2;
    }
}
6.5.4 注意事项和使用细节
1.方法名:必须相同
2.形参列表:必须不同(形参类型或个数或顺序,至少有一样相同,参数名无要求)
3.返回类型:无要求
6.6 可变参数
6.6.1 基本概念
java允许将同一个类中多个同名同功能但参数个数不同的方法,封装成一个方法。
就可以通过可变参数实现
6.6.2 基本语法
访问修饰符 返回类型 方法名(数据类型... 形参名) {
}
6.6.4 注意事项和使用细节
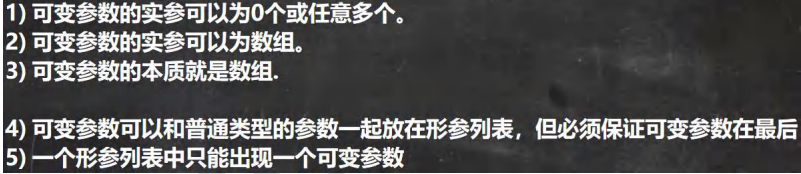
6.6.5 案例演示
有三个方法,分别实现返回姓名和两门课成绩(总分),返回姓名和三门课成绩(总分),返回姓名和五门课程成绩(总分).封装成一个可变参数的方法
public class VarParameterExercise {
    //编写一个 main 方法
    public static void main(String[] args) {
        HspMethod hm = new HspMethod();
        System.out.println(hm.showScore("milan" , 90.1, 80.0 ));
        System.out.println(hm.showScore("terry" , 90.1, 80.0,10,30.5,70 ));
    }
}
class HspMethod {
    /*
    有三个方法,分别实现返回姓名和两门课成绩(总分),
    返回姓名和三门课成绩(总分),返回姓名和五门课成绩(总分)。
    封装成一个可变参数的方法
    */
//分析 1. 方法名 showScore 2. 形参(String ,double... ) 3. 返回 String
    public String showScore(String name ,double... scores ) {
        double totalScore = 0;
        for(int i = 0; i < scores.length; i++) {
            totalScore += scores[i];
        }
        return name + " 有 " +scores.length + "门课的成绩总分为=" + totalScore;
    }
}
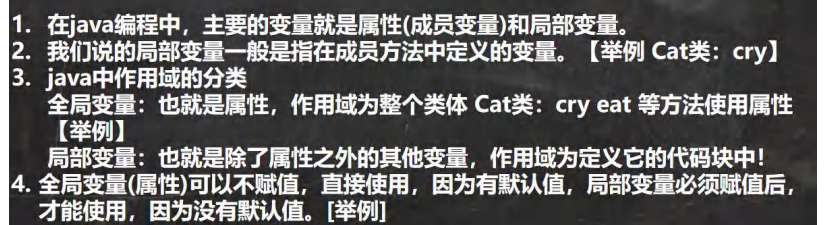
6.7 作用域
6.7.1 基本使用
public class VarScope {
    //编写一个 main 方法
    public static void main(String[] args) {
    }
}

class Cat {
    //全局变量:也就是属性,作用域为整个类体 Cat 类:cry eat 等方法使用属性
//属性在定义时,可以直接赋值
    int age = 10; //指定的值是 10
    //全局变量(属性)可以不赋值,直接使用,因为有默认值,
    double weight; //默认值是 0.0
    public void hi() {
//局部变量必须赋值后,才能使用,因为没有默认值
        int num = 1;
        String address = "北京的猫";
        System.out.println("num=" + num);
        System.out.println("address=" + address);
        System.out.println("weight=" + weight);//属性
    }
    public void cry() {
//1. 局部变量一般是指在成员方法中定义的变量
//2. n 和 name 就是局部变量
//3. n 和 name 的作用域在 cry 方法中
        int n = 10;
        String name = "jack";
        System.out.println("在 cry 中使用属性 age=" + age);
    }
    public void eat() {
        System.out.println("在 eat 中使用属性 age=" + age);
//System.out.println("在 eat 中使用 cry 的变量 name=" + name);//错误
    }
}
6.7.2 注意事项和注意细节
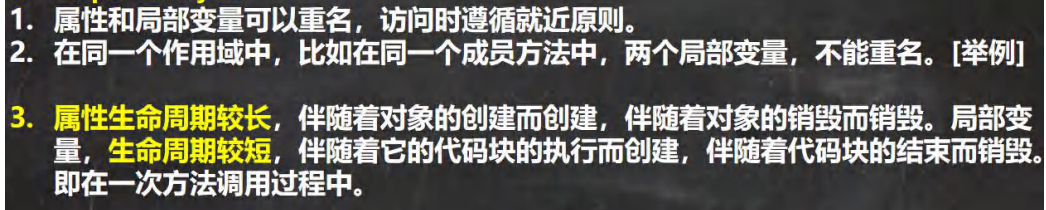
public class VarScopeDetail {
//编写一个 main 方法
public static void main(String[] args) {
Person1 p1 = new Person1();
/*
属性生命周期较长,伴随着对象的创建而创建,伴随着对象的销毁而销毁。
局部变量,生命周期较短,伴随着它的代码块的执行而创建,
伴随着代码块的结束而销毁。即在一次方法调用过程中
*/
//p1.say();//当执行 say 方法时,say 方法的局部变量比如 name,会创建,当 say 执行完毕后
//name 局部变量就销毁,但是属性(全局变量)仍然可以使用
//
N t1 = new N();
t1.test(); //第 1 种跨类访问对象属性的方式
t1.test2(p1);//第 2 种跨类访问对象属性的方式
}
}
class N {
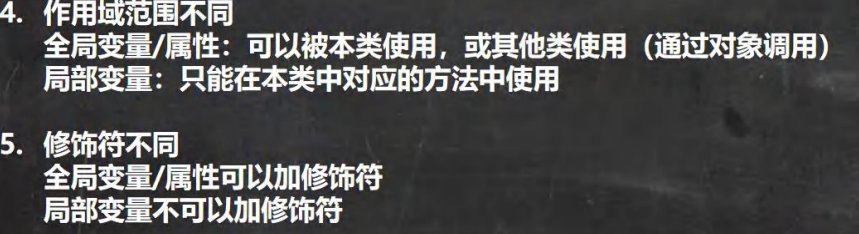
//全局变量/属性:可以被本类使用,或其他类使用(通过对象调用)
public void test() {
Person p1 = new Person();
System.out.println(p1.name);//jack
}
public void test2(Person p) {
System.out.println(p.name);//jack
}
}
class Person1 {
//细节: 属性可以加修饰符(public protected private..)
// 局部变量不能加修饰符
public int age = 20;
String name = "jack";
public void say() {
//细节 属性和局部变量可以重名,访问时遵循就近原则
String name = "king";
System.out.println("say() name=" + name);
}
public void hi() {
String address = "北京";
//String address = "上海";//错误,重复定义变量
String name = "hsp";//可以
}
}
6.8 构造器
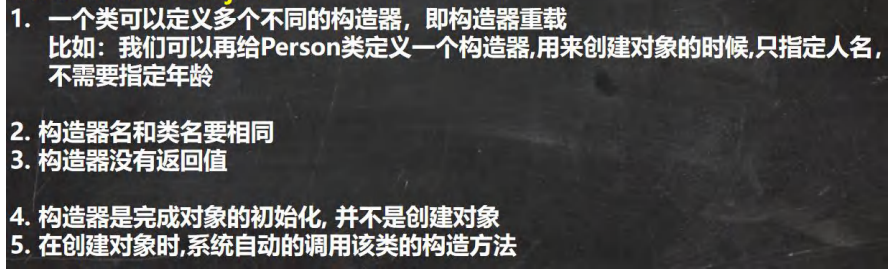
6.8.1 基本介绍
构造方法又叫构造器(constructor),是类的一种特殊的方法,它的主要作用是完成对新对象的初始化。它有几个特点:
1.方法名和类名相同
2.没有返回值
3.在创建对象时,系统会自动的调用该类的构造器完成对象的初始化。
6.8.2 基本语法
[修饰符] 方法名(形参列表){
方法体;
}
说明:
1.构造器的修饰符可以默认, 也可以是 public protected private
2.构造器没有返回值
3.方法名和类名字必须一样
4.参数列表和成员方法一样的规则
5.构造器的调用, 由系统完成
6.8.3 注意事项和细节说明

6.8.4 案例演示
第一个无参构造器:利用构造器设置所有人的 age 属性初始值都为 18
第二个带 pName 和 pAge 两个参数的构造器:使得每次创建 Person 对象的同时初始化对象的 age 属性值和 name 属性值。 分别使用不同的构造器,创建对象.
public class ConstructorExercise {
    //编写一个 main 方法
    public static void main(String[] args) {
        Person2 p1 = new Person2();//无参构造器
//下面输出 name = null, age = 18
        System.out.println("p1 的信息 name=" + p1.name + " age=" + p1.age);
        Person2 p2 = new Person2("scott", 50);
//下面输出 name = scott, age = 50
        System.out.println("p2 的信息 name=" + p2.name + " age=" + p2.age);
    }
}
/**
 * 在前面定义的 Person 类中添加两个构造器:
 * 第一个无参构造器:利用构造器设置所有人的 age 属性初始值都为 18
 * 第二个带 pName 和 pAge 两个参数的构造器:
 * 使得每次创建 Person 对象的同时初始化对象的 age 属性值和 name 属性值。
 * 分别使用不同的构造器,创建对象. */
class Person2 {
    String name;//默认值 null
    int age;//默认 0
    //第一个无参构造器:利用构造器设置所有人的 age 属性初始值都为 18
    public Person2() {
        age = 18;//
    }
    //第二个带 pName 和 pAge 两个参数的构造器
    public Person2(String pName, int pAge) {
                name = pName;
        age = pAge;
    }
}
6.9 对象流程分析
6.10 this关键字
6.10.1 基本介绍
Java虚拟机会给每个对象分配this,代表当前对象。
6.10.2 深入了解
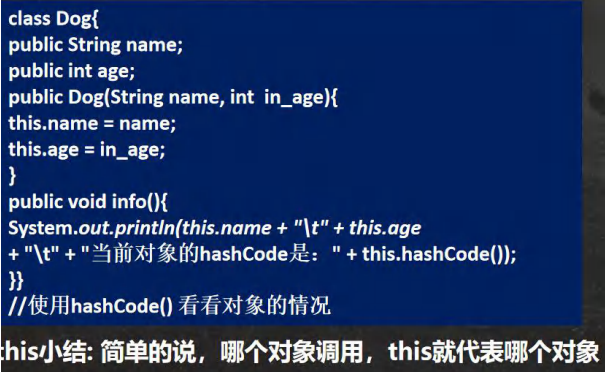
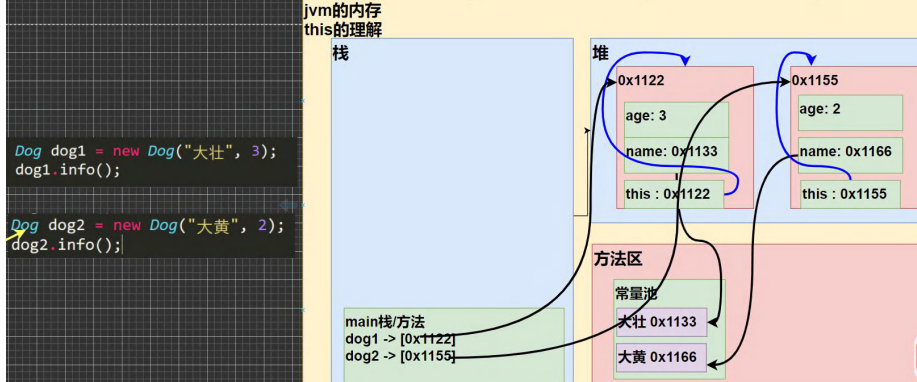
6.10.3 注意事项和细节说明
1.this 关键字可以用来访问本类的属性、方法、构造器
2.this 用于区分当前类的属性和局部变量
3.访问成员方法的语法:this.方法名(参数列表);
4.访问构造器语法:this(参数列表); 注意只能在构造器中使用(即只能在构造器中访问另外一个构造器, 必须放在第一 条语句)
5.this 不能在类定义的外部使用,只能在类定义的方法中使用。
6.10.4 案例演示
定义 Person 类,里面有 name、age 属性,并提供 compareTo 比较方法,用于判断是否和另一个人相等,提供测试类 TestPerson 用于测试, 名字和年龄完全一样,就返回 true, 否则返回 false
public class TestPerson {
    //编写一个 main 方法
    public static void main(String[] args) {
        Person4 p1 = new Person4("mary", 20);
        Person4 p2 = new Person4("mary", 20);
        System.out.println("p1 和 p2 比较的结果=" + p1.compareTo(p2));
    }
}
/*
定义 Person 类,里面有 name、age 属性,并提供 compareTo 比较方法,
用于判断是否和另一个人相等,提供测试类 TestPerson 用于测试, 名字和年龄完全一样,就返回 true, 否则返回 false
*/
class Person4 {
    String name;
    int age;
    //构造器
    public Person4(String name, int age) {
        this.name = name;
        this.age = age;
    }
    //compareTo 比较方法
    public boolean compareTo(Person4 p) {
//名字和年龄完全一样
// if(this.name.equals(p.name) && this.age == p.age) {
// return true;
// } else {
// return false;
// }
        return this.name.equals(p.name) && this.age == p.age;
    }
}
七、面向对象(中级)
7.1 包
7.1.1 包的作用

7.1.2 包的基本语法
package com.wmr
说明:
1.package 关键字,表示打包
2.com.wmr 表示包名
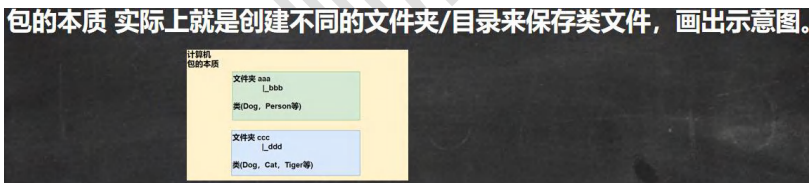
7.1.3 包的本质分析
7.1.4 包的命名
1.命名规则
只能包含数字、字母、下划线、小圆点,但不能用数字开头,不能关键字或保留字
2.命名规范
一般是小写字母+小圆点
一般是:
com.公司名.项目名.业务模块名
7.1.5 常用的包
一个包下,包含很多的类,java 中常用的包有:
1.java.lang.* //lang 包是基本包,默认引入,不需要再引入.
2.java.util.* //util 包,系统提供的工具包, 工具类,使用 Scanner
3.java.net.* //网络包,网络开发
4.java.awt.* //是做 java 的界面开发,GUI
7.1.6 如何引入包
com.wmr.package:Import01.java
语法:import包
我们引入一个包的主要目的是要使用该包下的类
比如:import java.util.Scanner;就只是引入一个类的Scanner
import java.util.*;//表示将java.util包所有都引入
7.1.7 注意事项和使用细节

7.2 范围修饰符
7.2.1 基本介绍
java 提供四种访问控制修饰符号,用于控制方法和属性(成员变量)的访问权限(范围):
1.公开级别:用 public 修饰,对外公开
2.受保护级别:用 protected 修饰,对子类和同一个包中的类公开
3.默认级别:没有修饰符号,向同一个包的类公开.
4.私有级别:用 private 修饰,只有类本身可以访问,不对外公开.
7.2.2 访问修饰符的访问范围
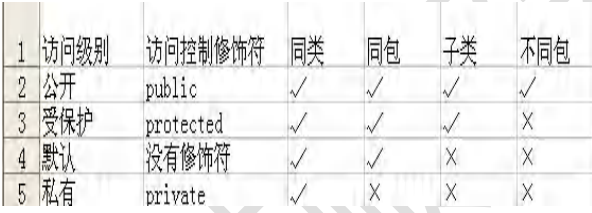
7.2.3 使用注意事项

7.3 面向对象的三大特征
7.3.1 基本介绍
面向对象的三大特征:封装、继承、多态
7.3.2 封装介绍

7.3.3 封装的理解和好处
1.隐藏实现细节:方法(连接数据库)<--调用(传入参数)
2.可以对数据进行验证,保证安全合理
7.3.4 封装的实现步骤
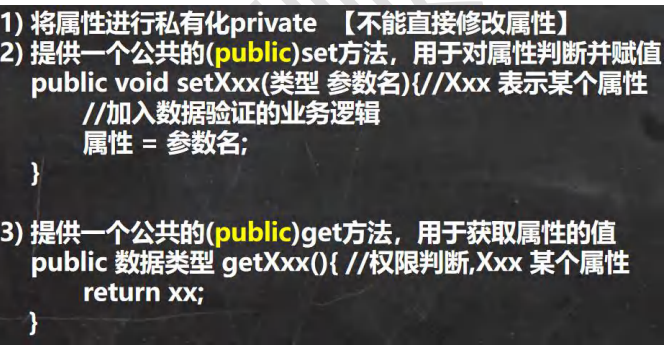
7.3.5 案例演示
一个小程序,不能随便查看人的年龄、工资等隐私,并对设置年龄进行合理的验证。年龄合理设置,否则给默认年龄,必须在1-120年龄,工资不能直接查看,name的长度在2-6字符之间
public class Encapsulation01 {
    public static void main(String[] args) {
//如果要使用快捷键 alt+r, 需要先配置主类
//第一次,我们使用鼠标点击形式运算程序,后面就可以用
        Person person = new Person();
        person.setName("张三");
        person.setAge(30);
        person.setSalary(30000);
        System.out.println(person.info());
        System.out.println(person.getSalary());
//如果我们自己使用构造器指定属性
        Person smith = new Person("smith", 80, 50000);
        System.out.println("====smith 的信息======");
        System.out.println(smith.info());
    }
}

/*
请大家看一个小程序, 不能随便查看人的年龄,工资等隐私,并对设置的年龄进行合理的验证。年龄合理就设置,否则给默认
年龄, 必须在 1-120, 年龄, 工资不能直接查看 , name 的长度在 2-6 字符 之间
*/
class Person {
    public String name; //名字公开
    private int age; //age 私有化
    private double salary; //..

    public void say(int n, String name) {
    }

    //构造器 alt+insert
    public Person() {
    }

    //有三个属性的构造器
    public Person(String name, int age, double salary) {
// this.name = name;
// this.age = age;
// this.salary = salary;
//我们可以将 set 方法写在构造器中,这样仍然可以验证
        setName(name);
        setAge(age);
        setSalary(salary);
    }

    //自己写 setXxx 和 getXxx 太慢,我们使用快捷键
//然后根据要求来完善我们的代码.
    public String getName() {
        return name;
    }

    public void setName(String name) {
//加入对数据的校验,相当于增加了业务逻辑
        if (name.length() >= 2 && name.length() <= 6) {
            this.name = name;
        } else {
            System.out.println("名字的长度不对,需要(2-6)个字符,默认名字");
            this.name = "无名人";
        }
    }

    public int getAge() {
        return age;
    }

    public void setAge(int age) {
//判断
        if (age >= 1 && age <= 120) {//如果是合理范围
            this.age = age;
        } else {
            System.out.println("你设置年龄不对,需要在 (1-120), 给默认年龄 18 ");
            this.age = 18;//给一个默认年龄
        }
    }

    public double getSalary() {
//可以这里增加对当前对象的权限判断
        return salary;
    }

    public void setSalary(double salary) {
        this.salary = salary;
    }

    //写一个方法,返回属性信息
    public String info() {
        return "信息为 name=" + name + " age=" + age + " 薪水=" + salary;
    }
}
7.3.6 将构造器和set结合
//有三个属性的构造器
public Person(String name, int age, double salary) {
// this.name = name;
// this.age = age;
// this.salary = salary;
//我们可以将 set 方法写在构造器中,这样仍然可以验证
        setName(name);
        setAge(age);
        setSalary(salary);
    }
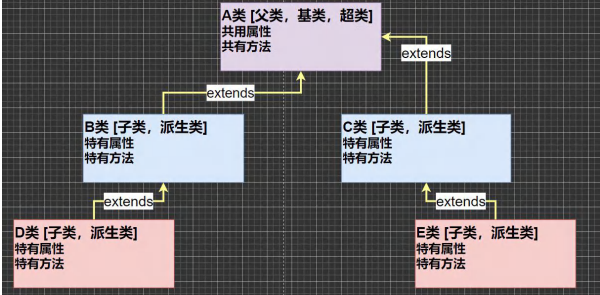
7.4 面向对象-继承
7.4.1 继承基本介绍和示意图
继承可以解决代码复用,让我们的编程更加靠近人类思维.当多个类存在相同的属性(变量)和方法时,可以从这些类中 抽象出父类,在父类中定义这些相同的属性和方法,所有的子类不需要重新定义这些属性和方法,只需要通过 extends 来 声明继承父类即可。画出继承的示意图
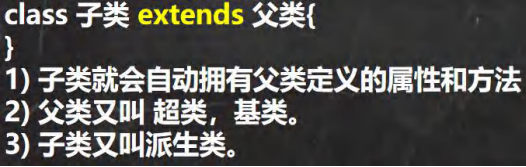
7.4.2 继承的基本语法
7.4.3 继承带来的便利
1.代码的复用性提高了
2.代码的扩展性和维护性提高了
7.4.4 继承的深入讨论和细节说明
1.子类继承了所有的属性和方法,非私有的属性和方法可以在子类直接访问, 但是私有属性和方法不能在子类直接访问,要通过父类提供公共的方法去访问
2.子类必须调用父类的构造器,完成父类的初始化
3.当创建子类对象时,不管使用子类的哪个构造器,默认情况下总会去调用父类的无参构造器,如果父类没有提供无 参构造器,则必须在子类的构造器中用 super 去指定使用父类的哪个构造器完成对父类的初始化工作,否则,编译不会通过(怎么理解。)
4.如果希望指定去调用父类的某个构造器,则显式的调用一下 : super(参数列表)
5.super 在使用时,必须放在构造器第一行(super 只能在构造器中使用)
6.super() 和 this() 都只能放在构造器第一行,因此这两个方法不能共存在一个构造器
7.java 所有类都是 Object 类的子类, Object 是所有类的基类.
8.父类构造器的调用不限于直接父类!将一直往上追溯直到 Object 类(顶级父类)
9.子类最多只能继承一个父类(指直接继承),即 java 中是单继承机制。
10.不能滥用继承,子类和父类之间必须满足 is-a 的逻辑关系
7.4.5 继承的本质分析
/**
 * 讲解继承的本质
 */
public class ExtendsTheory {
    public static void main(String[] args) {
        Son son = new Son();//内存的布局
//?-> 这时请大家注意,要按照查找关系来返回信息
//(1) 首先看子类是否有该属性
//(2) 如果子类有这个属性,并且可以访问,则返回信息
//(3) 如果子类没有这个属性,就看父类有没有这个属性(如果父类有该属性,并且可以访问,就返回信息..)
//(4) 如果父类没有就按照(3)的规则,继续找上级父类,直到 Object... System.out.println(son.name);//返回就是大头儿子
//System.out.println(son.age);//返回的就是 39
//System.out.println(son.getAge());//返回的就是 39
        System.out.println(son.hobby);//返回的就是旅游
    }
}
class GrandPa { //爷类
    String name = "大头爷爷";
    String hobby = "旅游";
}
class Father extends GrandPa {//父类
    String name = "大头爸爸";
    private int age = 39;
    public int getAge() {
        return age;
    }
}
class Son extends Father { //子类
    String name = "大头儿子";
}
7.4.6 子类创建的内存布局

7.4.7 案例演示
编写 Computer 类,包含 CPU、内存、硬盘等属性,getDetails 方法用于返回 Computer 的详细信息 编写 PC 子类,继承 Computer 类,添加特有属性【品牌 brand】 编写 NotePad 子类,继承 Computer 类,添加特有属性【color】 编写 Test 类,在 main 方法中创建 PC 和 NotePad 对象,分别给对象中特有的属性赋值,以及从 Computer 类继承的 属性赋值,并使用方法并打印输出信息
//编写 Computer 类,包含 CPU、内存、硬盘等属性,getDetails 方法用于返回 Computer 的详细信息
public class Computer {
    private String cpu;
    private int memory;
    private int disk;
    public Computer(String cpu, int memory, int disk) {
        this.cpu = cpu;
        this.memory = memory;
        this.disk = disk;
    }
    //返回 Computer 信息
    public String getDetails() {
        return "cpu=" + cpu + " memory=" + memory + " disk=" + disk;
    }
    public String getCpu() {
        return cpu;
    }
    public void setCpu(String cpu) {
        this.cpu = cpu;
    }
    public int getMemory() {
        return memory;
    }
    public void setMemory(int memory) {
        this.memory = memory;
    }
    public int getDisk() {
        return disk;
    }
    public void setDisk(int disk) {
        this.disk = disk;
    }
}
//编写 PC 子类,继承 Computer 类,添加特有属性【品牌 brand】
public class PC extends Computer{
    private String brand;
    //这里 IDEA 根据继承的规则,自动把构造器的调用写好
//这里也体现: 继承设计的基本思想,父类的构造器完成父类属性初始化
//子类的构造器完成子类属性初始化
    public PC(String cpu, int memory, int disk, String brand) {
        super(cpu, memory, disk);
        this.brand = brand;
    }
    public String getBrand() {
        return brand;
    }
    public void setBrand(String brand) {
        this.brand = brand;
    }
    public void printInfo() {
        System.out.println("PC 信息=");
// System.out.println(getCpu() + getMemory() + getDisk());
//调用父类的 getDetails 方法,得到相关属性信息.. System.out.println(getDetails() + " brand=" + brand);
    }
}
public class ExtendsExercise03 {
    public static void main(String[] args) {
        PC pc = new PC("intel", 16, 500, "IBM");
        pc.printInfo();
    }
}
/*
编写 Computer 类,包含 CPU、内存、硬盘等属性,getDetails 方法用于返回 Computer 的详细信息
编写 PC 子类,继承 Computer 类,添加特有属性【品牌 brand】
编写 NotePad 子类,继承 Computer 类,添加特有属性【color】//同学们自己写。
编写 Test 类,在 main 方法中创建 PC 和 NotePad 对象,分别给对象中特有的属性赋值,
以及从 Computer 类继承的属性赋值,并使用方法并打印输出信息
*/
7.5 super关键字
7.5.1 基本介绍
super 代表父类的引用,用于访问父类的属性、方法、构造器
7.5.2 基本语法
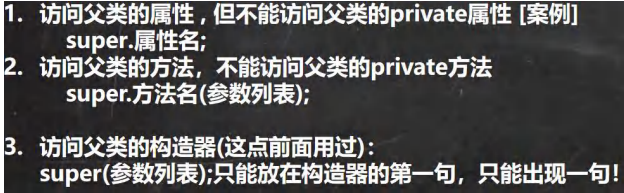
7.5.3 super带来的便利和细节


7.5.4 super和this的比较
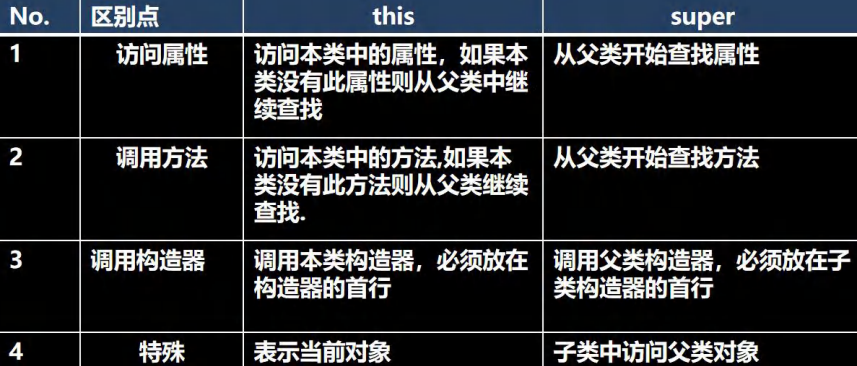
7.6 方法重写/覆盖
7.6.1 基本介绍
方法重写(覆盖)就是子类有一个方法,和父类某个方法的名称、返回类型、参数一样,那么我们就说子类这个方法覆盖了父类的方法
7.6.2 注意事项和细节说明
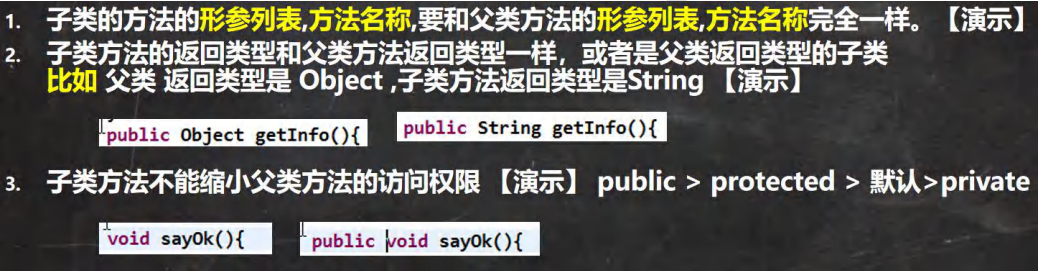
7.6.3 重写和重载的区别
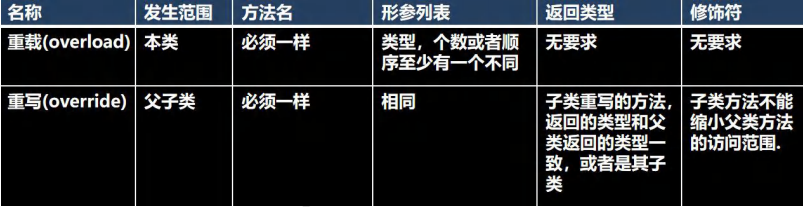
7.6.4 案例演示
1.编写一个 Person 类,包括属性/private(name、age),构造器、方法 say(返回自我介绍的字符串)。
2.编写一个 Student 类,继承 Person 类,增加 id、score 属性/private,以及构造器,定义 say 方法(返回自我介绍的信息)。
3.在 main 中,分别创建 Person 和 Student 对象,调用 say 方法输出自我介绍
//编写一个 Person 类,包括属性/private(name、age),构造器、方法 say(返回自我介绍的字符串)
public class Person1 {
    private String name;
    private int age;
    public Person1(String name, int age) {
        this.name = name;
        this.age = age;
    }
    public String say() {
        return "name=" + name + " age=" + age;
    }
    public String getName() {
        return name;
    }
    public void setName(String name) {
        this.name = name;
    }
    public int getAge() {
        return age;
    }
    public void setAge(int age) {
        this.age = age;
    }
}
//编写一个 Student 类,继承 Person 类,增加 id、score 属性/private,以及构造器,定义 say 方法(返回自我介绍的信息)。
public class Student extends Person1{
    private int id;
    private double score;
    public Student(String name, int age, int id, double score) {
        super(name, age);//这里会调用父类构造器
        this.id = id;
        this.score = score;
    }
    //say
    public String say() { //这里体现 super 的一个好处,代码复用.
        return super.say() + " id=" + id + " score=" + score;
    }
    public int getId() {
        return id;
    }
    public void setId(int id) {
        this.id = id;
    }
    public double getScore() {
        return score;
    }
    public void setScore(double score) {
        this.score = score;
    }
}
public class OverrideExercise {
    public static void main(String[] args) {
//在 main 中,分别创建 Person 和 Student 对象,调用 say 方法输出自我介绍
        Person1 jack = new Person1("jack", 10);
        System.out.println(jack.say());
        Student smith = new Student("smith", 20, 123456, 99.8);
        System.out.println(smith.say());
    }
}
7.7 多态
7.7.1 多[多种]态[状态]基本介绍
方法或对象具有多种形态。是面向对象的第三大特征,多态是建立在封装和继承基础之上的。
7.7.2 多态的具体表现
1.方法的多态
重写和重载就体现多态
public class PloyMethod {
    public static void main(String[] args) {
//方法重载体现多态
        M m = new M();
//这里我们传入不同的参数,就会调用不同 sum 方法,就体现多态
        System.out.println(m.sum(10, 20));
        System.out.println(m.sum(10, 20, 30));
//方法重写体现多态
        U u = new U();
        u.say();
        m.say();
    }
}
class U { //父类
    public void say() {
        System.out.println("B say() 方法被调用...");
    }
}
class M extends U {//子类
    public int sum(int n1, int n2){//和下面 sum 构成重载
        return n1 + n2;
    }
    public int sum(int n1, int n2, int n3){
        return n1 + n2 + n3;
    }
    public void say() {
        System.out.println("A say() 方法被调用...");
    }
}
2.对象的多态


public class Animal {
    public void cry() {
        System.out.println("Animal cry() 动物在叫....");
    }
}
public class Cat extends Animal {
    public void cry() {
        System.out.println("Cat cry() 小猫喵喵叫...");
    }
}
public class Dog extends Animal{
    public void cry() {
        System.out.println("Dog cry() 小狗汪汪叫...");
    }
}
public class PolyObject {
    public static void main(String[] args) {
//体验对象多态特点
//animal 编译类型就是 Animal , 运行类型 Dog
        Animal animal = new Dog();
//因为运行时 , 执行到改行时,animal 运行类型是 Dog,所以 cry 就是 Dog 的 cry
        animal.cry(); //小狗汪汪叫
//animal 编译类型 Animal,运行类型就是 Cat
        animal = new Cat();
        animal.cry(); //小猫喵喵叫
    }
}
7.7.3 多态注意事项和细节说明
-
多态的前提是:两个对象(类)存在继承关系
-
多态的向上转型
![image-20220924164420484]()
-
多态向下转型
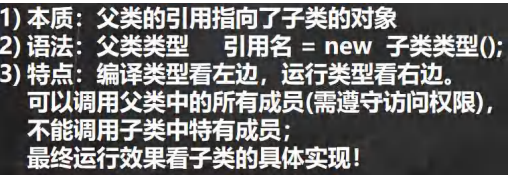

public class Animal1 {
    String name = "动物";
    int age = 10;
    public void sleep(){
        System.out.println("睡");
    }
    public void run(){
        System.out.println("跑");
    }
    public void eat(){
        System.out.println("吃");
    }
    public void show(){
        System.out.println("hello,你好");
    }
}
public class Cat1 extends Animal1 {
    public void eat(){//方法重写
        System.out.println("猫吃鱼");
    }
    public void catchMouse(){//Cat 特有方法
        System.out.println("猫抓老鼠");
    }
}
public class Dog1 extends Animal1 {//Dog 是 Animal 的子类
}
public class PolyDetail {
    public static void main(String[] args) {
//向上转型: 父类的引用指向了子类的对象
//语法:父类类型引用名 = new 子类类型();
        Animal1 animal = new Cat1();
        Object obj = new Cat1();//可以吗? 可以 Object 也是 Cat 的父类
//向上转型调用方法的规则如下:
//(1)可以调用父类中的所有成员(需遵守访问权限)
//(2)但是不能调用子类的特有的成员
//(#)因为在编译阶段,能调用哪些成员,是由编译类型来决定的
//animal.catchMouse();错误
//(4)最终运行效果看子类(运行类型)的具体实现, 即调用方法时,按照从子类(运行类型)开始查找方法
//,然后调用,规则我前面我们讲的方法调用规则一致。
        animal.eat();//猫吃鱼.. animal.run();//跑
        animal.show();//hello,你好
        animal.sleep();//睡
//老师希望,可以调用 Cat 的 catchMouse 方法
//多态的向下转型
//(1)语法:子类类型 引用名 =(子类类型)父类引用;
//问一个问题? cat 的编译类型 Cat,运行类型是 Cat
        Cat1 cat = (Cat1) animal;
        cat.catchMouse();//猫抓老鼠
//(2)要求父类的引用必须指向的是当前目标类型的对象
        Dog1 dog = (Dog1) animal; //可以吗?
        System.out.println("ok~~");
    }
}
-
属性没有重写之说!属性的值看编译类型
public class PolyDetail02 { public static void main(String[] args) { //属性没有重写之说!属性的值看编译类型 Base base = new Sub();//向上转型 System.out.println(base.count);// ? 看编译类型 10 Sub sub = new Sub(); System.out.println(sub.count);//? 20 } } class Base { //父类 int count = 10;//属性 } class Sub extends Base {//子类 int count = 20;//属性 } -
instanceOf 比较操作符,用于判断对象的运行类型是否为 XX 类型或 XX 类型的子类型
public class PolyDetail03 {
    public static void main(String[] args) {
        BB bb = new BB();
        System.out.println(bb instanceof BB);// true
        System.out.println(bb instanceof AA);// true
//aa 编译类型 AA, 运行类型是 BB
//BB 是 AA 子类
        AA aa = new BB();
        System.out.println(aa instanceof AA);
        System.out.println(aa instanceof BB);
        Object obj = new Object();
        System.out.println(obj instanceof AA);//false
        String str = "hello";
//System.out.println(str instanceof AA);
        System.out.println(str instanceof Object);//true
    }
}
class AA {} //父类

class BB extends AA {}//子类
7.7.4 Java的动态绑定机制
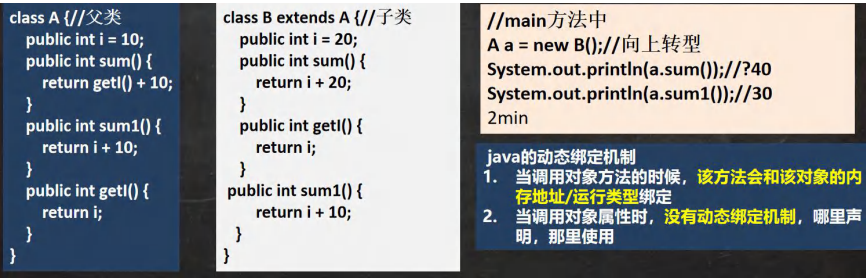
public class DynamicBinding {
    public static void main(String[] args) {
//a 的编译类型 A, 运行类型 B
        O a = new P();//向上转型
        System.out.println(a.sum());//?40 -> 30
        System.out.println(a.sum1());//?30-> 20
    }
}
class O {//父类
    public int i = 10;
    //动态绑定机制:
    public int sum() {//父类 sum()
        return getI() + 10;//20 + 10
    }
    public int sum1() {//父类 sum1()
        return i + 10;//10 + 10
    }
    public int getI() {//父类 getI
        return i;
    }
}
class P extends O {//子类
    public int i = 20;
    // public int sum() {
// return i + 20;
// }
    public int getI() {//子类 getI()
        return i;
    }
// public int sum1() {
// return i + 10;
// }
}
7.7.5 多态的应用
1)多态数组
数组的定义类型为父类类型,里面保存的实际元素类型为子类类型
应用实例:现有一个继承结构如下:要求创建 1 个 Person 对象、2 个 Student 对象和 2 个 Teacher 对象, 统一放在数组 中,并调用每个对象 say 方法.
应用实例升级:如何调用子类特有的方法,比如 Teacher 有一个 teach , Student 有一个 study 怎么调用?
public class Person4 {//父类
    private String name;
    private int age;
    public Person4(String name, int age) {
        this.name = name;
        this.age = age;
    }
    public String getName() {
        return name;
    }
    public void setName(String name) {
        this.name = name;
    }
    public int getAge() {
        return age;
    }
    public void setAge(int age) {
        this.age = age;
    }
    public String say() {//返回名字和年龄
        return name + "\t" + age;
    }
}
public class Student2 extends Person4 {
    private double score;
    public Student2(String name, int age, double score) {
        super(name, age);
        this.score = score;
    }
    public double getScore() {
        return score;
    }
    public void setScore(double score) {
        this.score = score;
    }
    //重写父类 say
    public String say() {
        return "学生 " + super.say() + " score=" + score;
    }
    //特有的方法
    public void study() {
        System.out.println("学生 " + getName() + " 正在学 java...");
    }
}
public class Teacher extends Person4 {
    private double salary;
    public Teacher(String name, int age, double salary) {
        super(name, age);
        this.salary = salary;
    }
    public double getSalary() {
        return salary;
    }
    public void setSalary(double salary) {
        this.salary = salary;
    }
    //写重写父类的 say 方法
    public String say() {
        return "老师 " + super.say() + " salary=" + salary;
    }
    //特有方法
    public void teach() {
        System.out.println("老师 " + getName() + " 正在讲 java 课程...");
    }
}
public class PloyArray {
    public static void main(String[] args) {
//应用实例:现有一个继承结构如下:要求创建 1 个 Person 对象、
// 2 个 Student 对象和 2 个 Teacher 对象, 统一放在数组中,并调用每个对象 say 方法
        Person4[] persons = new Person4[5];
        persons[0] = new Person4("jack", 20);
        persons[1] = new Student2("mary", 18, 100);
        persons[2] = new Student2("smith", 19, 30.1);
        persons[3] = new Teacher("scott", 30, 20000);
        persons[4] = new Teacher("king", 50, 25000);
//循环遍历多态数组,调用 say
        for (int i = 0; i < persons.length; i++) {
//老师提示: person[i] 编译类型是 Person ,运行类型是是根据实际情况有 JVM 来判断
            System.out.println(persons[i].say());//动态绑定机制
//这里大家聪明. 使用 类型判断 + 向下转型.
          if(persons[i] instanceof Student2) {//判断 person[i] 的运行类型是不是 Student
            Student2 student = (Student2)persons[i];//向下转型
            student.study();
//小伙伴也可以使用一条语句 ((Student)persons[i]).study();
        } else if(persons[i] instanceof Teacher) {
            Teacher teacher = (Teacher)persons[i];
            teacher.teach();
        } else if(persons[i] instanceof Person4){
//System.out.println("你的类型有误, 请自己检查...");
        } else {
            System.out.println("你的类型有误, 请自己检查...");
        }
    }
}
}
2.多态参数
方法定义的形参类型为父类类型,实参类型允许为子类类型

public class Employee {
    private String name;
    private double salary;
    public Employee(String name, double salary) {
        this.name = name;
        this.salary = salary;
    }
    //得到年工资的方法
    public double getAnnual() {
        return 12 * salary;
    }
    public String getName() {
        return name;
    }
    public void setName(String name) {
        this.name = name;
    }
    public double getSalary() {
        return salary;
    }
    public void setSalary(double salary) {
        this.salary = salary;
    }
}
public class Worker extends Employee {
    public Worker(String name, double salary) {
        super(name, salary);
    }
    public void work() {
        System.out.println("普通员工 " + getName() + " is working");
    }
    @Override
    public double getAnnual() { //因为普通员工没有其它收入,则直接调用父类方法
        return super.getAnnual();
    }
}
public class Manager extends Employee{
    private double bonus;
    public Manager(String name, double salary, double bonus) {
        super(name, salary);
        this.bonus = bonus;
    }
    public double getBonus() {
        return bonus;
    }
    public void setBonus(double bonus) {
        this.bonus = bonus;
    }
    public void manage() {
        System.out.println("经理 " + getName() + " is managing");
    }
//重写获取年薪方法
    public double getAnnual() {
        return super.getAnnual() + bonus;
    }
}
public class PloyParameter {
    public static void main(String[] args) {
        Worker tom = new Worker("tom", 2500);
        Manager milan = new Manager("milan", 5000, 200000);
        PloyParameter ployParameter = new PloyParameter();
        ployParameter.showEmpAnnual(tom);
        ployParameter.showEmpAnnual(milan);
        ployParameter.testWork(tom);
        ployParameter.testWork(milan);
    }
    //showEmpAnnual(Employee e)
//实现获取任何员工对象的年工资,并在 main 方法中调用该方法 [e.getAnnual()]
    public void showEmpAnnual(Employee e) {
        System.out.println(e.getAnnual());//动态绑定机制.
    }
//添加一个方法,testWork,如果是普通员工,则调用 work 方法,如果是经理,则调用 manage 方法
        public void testWork(Employee e){
            if(e instanceof Worker) {
                ((Worker) e).work();//有向下转型操作
            } else if(e instanceof Manager) {
                ((Manager) e).manage();//有向下转型操作
            } else {
                System.out.println("不做处理...");
            }
        }
    }
7.7 Object类
7.7.1 equals方法
-
==和equals的对比
![image-20220926100708922]()


public class Equals01 {
    public static void main(String[] args) {
        A a = new A();
        A b = a;
        A c = b;
        System.out.println(a == c);//true
        System.out.println(b == c);//true
        B bObj = a;
        System.out.println(bObj == c);//true
        int num1 = 10;
        double num2 = 10.0;
        System.out.println(num1 == num2);//基本数据类型,判断值是否相等
//equals 方法,源码怎么查看. //把光标放在 equals 方法,直接输入 ctrl+b
//如果你使用不了. 自己配置. 即可使用. /*
//带大家看看 Jdk 的源码 String 类的 equals 方法
//把 Object 的 equals 方法重写了,变成了比较两个字符串值是否相同
        /*public boolean equals(Object anObject) {
            if (this == anObject) {//如果是同一个对象
                return true;//返回 true
            }
            if (anObject instanceof String) {//判断类型
                String anotherString = (String)anObject;//向下转型
                int n = value.length;
                if (n == anotherString.value.length) {//如果长度相同
                    char v1[] = value;
                    char v2[] = anotherString.value;
                    int i = 0;
                    while (n-- != 0) {//然后一个一个的比较字符
                        if (v1[i] != v2[i])
                            return false;
                        i++;
                    }
                    return true;//如果两个字符串的所有字符都相等,则返回 true
                }
            }
            return false;//如果比较的不是字符串,则直接返回 false
        }*/
        "hello".equals("abc");
//看看 Object 类的 equals 是
/*
//即 Object 的 equals 方法默认就是比较对象地址是否相同
//也就是判断两个对象是不是同一个对象.
*/
        /*public boolean equals(Object obj) {
            return (this == obj);
        }*/
/*
//从源码可以看到 Integer 也重写了 Object 的 equals 方法, //变成了判断两个值是否相同
*/
        /*public boolean equals(Object obj) {
            if (obj instanceof Integer) {
                return value == ((Integer)obj).intValue();
            }
            return false;
        }*/

        Integer integer1 = new Integer(1000);
        Integer integer2 = new Integer(1000);
        System.out.println(integer1 == integer2);//false
        System.out.println(integer1.equals(integer2));//true
        String str1 = new String("hspedu");
        String str2 = new String("hspedu");
        System.out.println(str1 == str2);//false
        System.out.println(str1.equals(str2));//true
    }
}
class B {}
class A extends B {}
7.7.2 如何重写equals方法
应用实例: 判断两个 Person 对象的内容是否相等,如果两个 Person 对象的各个属性值都一样,则返回 true,反之 false。
public class Encapsulation01 {
    public static void main(String[] args) {
//如果要使用快捷键 alt+r, 需要先配置主类
//第一次,我们使用鼠标点击形式运算程序,后面就可以用
        Person6 person = new Person6();
        person.setName("张三");
        person.setAge(30);
        person.setSalary6(30000);
        System.out.println(person.info());
        System.out.println(person.getSalary());
//如果我们自己使用构造器指定属性
        Person6 smith = new Person6("smith", 80, 650000);
        System.out.println("====smith 的信息======");
        System.out.println(smith.info());
    }
}

/*
请大家看一个小程序, 不能随便查看人的年龄,工资等隐私,并对设置的年龄进行合理的验证。年龄合理就设置,否则给默认
年龄, 必须在 1-120, 年龄, 工资不能直接查看 , name 的长度在 2-6 字符 之间
*/
class Person6 {
    public String name; //名字公开
    private int age; //age 私有化
    private double salary; //..

    public void say(int n, String name) {
    }

    //构造器 alt+insert
    public Person6() {
    }

    //有三个属性的构造器
    public Person6(String name, int age, double salary) {
// this.name = name;
// this.age = age;
// this.salary = salary;
//我们可以将 set 方法写在构造器中,这样仍然可以验证
        setName(name);
        setAge(age);
        setSalary(salary);
    }

    //自己写 setXxx 和 getXxx 太慢,我们使用快捷键
//然后根据要求来完善我们的代码.
    public String getName() {
        return name;
    }

    public void setName(String name) {
//加入对数据的校验,相当于增加了业务逻辑
        if (name.length() >= 2 && name.length() <= 6) {
            this.name = name;
        } else {
            System.out.println("名字的长度不对,需要(2-6)个字符,默认名字");
            this.name = "无名人";
        }
    }

    public int getAge() {
        return age;
    }

    public void setAge(int age) {
//判断
        if (age >= 1 && age <= 120) {//如果是合理范围
            this.age = age;
        } else {
            System.out.println("你设置年龄不对,需要在 (1-120), 给默认年龄 18 ");
            this.age = 18;//给一个默认年龄
        }
    }

    public double getSalary() {
//可以这里增加对当前对象的权限判断
        return salary;
    }

    public void setSalary(double salary) {
        this.salary = salary;
    }

    //写一个方法,返回属性信息
    public String info() {
        return "信息为 name=" + name + " age=" + age + " 薪水=" + salary;
    }

    public void setSalary6(int i) {
    }
}
7.7.3 hashCode方法
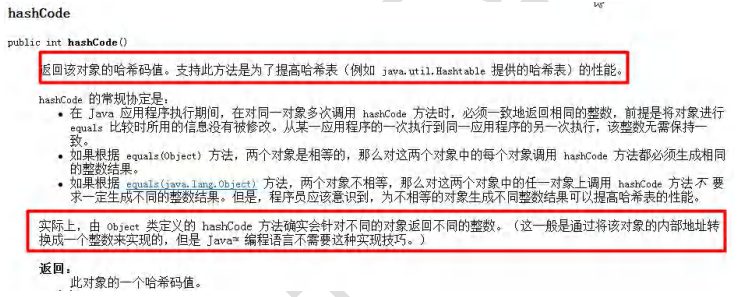
1.提高具有哈希结构的容器的效率!
2.两个引用,如果指向的是同一个对象,则哈希值肯定是一样的!
3.两个引用,如果指向的是不同对象,则哈希值是不一样的
4.哈希值主要根据地址号来的!,不能完全将哈希值等价于地址。
5.obj.hashCode() [测试:A obj1 = new A(); A obj2 = new A(); A obj3 = obj1]
6.后面在集合,中 hashCode 如果需要的话,也会重写。
public class HashCode_ {
    public static void main(String[] args) {
        AAa aa = new AAa();
        AAa aa2 = new AAa();
        AAa aa3 = aa;
        System.out.println("aa.hashCode()=" + aa.hashCode());
        System.out.println("aa2.hashCode()=" + aa2.hashCode());
        System.out.println("aa3.hashCode()=" + aa3.hashCode());
    }
}
class AAa {}
7.7.4 toString方法
1.基本介绍 默认返回:全类名+@+哈希值的十六进制,【查看 Object 的 toString 方法】 子类往往重写 toString 方法,用于返回对象的属性信息
2.重写 toString 方法,打印对象或拼接对象时,都会自动调用该对象的 toString 形式. 案例演示:Monster [name, job, sal]
3.当直接输出一个对象时,toString 方法会被默认的调用, 比如 System.out.println(monster); 就会默认调用 monster.toString()
public class ToString_ {
    public static void main(String[] args) {
/*
Object 的 toString() 源码
(1)getClass().getName() 类的全类名(包名+类名 )
(2)Integer.toHexString(hashCode()) 将对象的 hashCode 值转成 16 进制字符串
public String toString() {
return getClass().getName() + "@" + Integer.toHexString(hashCode());
}
*/
        Monster monster = new Monster("小妖怪", "巡山的", 1000);
        System.out.println(monster.toString() + " hashcode=" + monster.hashCode());
        System.out.println("==当直接输出一个对象时,toString 方法会被默认的调用==");
        System.out.println(monster); //等价 monster.toString()
    }
}
class Monster {
    private String name;
    private String job;
    private double sal;
    public Monster(String name, String job, double sal) {
        this.name = name;
        this.job = job;
        this.sal = sal;
    }
    //重写 toString 方法, 输出对象的属性
//使用快捷键即可 alt+insert -> toString
    @Override
    public String toString() { //重写后,一般是把对象的属性值输出,当然程序员也可以自己定制
        return "Monster{" +
                "name='" + name + '\'' +
                ", job='" + job + '\'' +
                ", sal=" + sal +
                '}';
    }
    @Override
    protected void finalize() throws Throwable {
        System.out.println("fin..");
    }
}
7.7.5 finalize 方法
1.当对象被回收时,系统自动调用该对象的 finalize 方法。子类可以重写该方法,做一些释放资源的操作
2.什么时候被回收:当某个对象没有任何引用时,则 jvm 就认为这个对象是一个垃圾对象,就会使用垃圾回收机制来 销毁该对象,在销毁该对象前,会先调用 finalize 方法。
3.垃圾回收机制的调用,是由系统来决定(即有自己的GC算法), 也可以通过 System.gc() 主动触发垃圾回收机制,测试Car[name]
//演示 Finalize 的用法
public class Finalize_ {
    public static void main(String[] args) {
        Car bmw = new Car("宝马");
//这时 car 对象就是一个垃圾,垃圾回收器就会回收(销毁)对象, 在销毁对象前,会调用该对象的 finalize 方法
//,程序员就可以在 finalize 中,写自己的业务逻辑代码(比如释放资源:数据库连接,或者打开文件..)
//,如果程序员不重写 finalize,那么就会调用 Object 类的 finalize, 即默认处理
//,如果程序员重写了 finalize, 就可以实现自己的逻辑
                bmw = null;
        System.gc();//主动调用垃圾回收器
        System.out.println("程序退出了....");
    }
}
class Car {
    private String name;
    //属性, 资源。。
    public Car(String name) {
        this.name = name;
    }
    //重写 finalize
    @Override
    protected void finalize() throws Throwable {
        System.out.println("我们销毁 汽车" + name );
        System.out.println("释放了某些资源...");
    }
}
7.8 项目-零钱通
7.8.1 项目需求说明
使用 Java 开发零钱通项目,可以完成收益入账,消费,查看明细,退出系统等功能.
7.8.2 项目开发流程说明
1.先完成显示菜单,并可以选择
2.完成零钱通明细
3.完成收益入账
4.消费
5.退出
普通方法:
public class SmallChangeSys {
    public static void main(String[] args) {
        //定义相关的变量
        boolean loop = true;
        Scanner scanner = new Scanner(System.in);
        String key = "";

        //完成零钱通明细
        String details = "============零钱通明细============";

        //收益入账
        double money = 0;
        double balance = 0;
        Date date = null;
        SimpleDateFormat sdf = new SimpleDateFormat("yyyy-MM-dd HH:mm");//可以用于日期格式化

        //消费
        String note = "";

        do{
            System.out.println("\n------------零钱通菜单------------");
            System.out.println("\t\t\t1 零钱通明细");
            System.out.println("\t\t\t2 收益入账");
            System.out.println("\t\t\t3 消费");
            System.out.println("\t\t\t4 退  出");
            System.out.println("请选择(1-4):");
            key = scanner.next();


            //使用switch分支控制
            switch (key){
                case "1":
                    System.out.println(details);
                    break;
                case "2":
                    System.out.println("收益入账金额:");
                    money = scanner.nextDouble();
                    //money的值范围应该校验
                    //找出不正确的金额条件,然后给出提示,就直接break;
                    if(money <= 0){
                        System.out.println("收益入账金额需要大于0");
                        break;
                    }
                    balance += money;
                    //拼接收益入账信息到details
                    date = new Date();//获取当前日期
                    details += "\n收益入账\t" + money + "\t" + sdf.format(date) + "\t" + balance;
                    break;
                case "3":
                    System.out.println("消费金额:");
                    money = scanner.nextDouble();
                    //找出不正确的情况
                    if(money <= 0 || money > balance){
                        System.out.println("你的消费金额应该在 0-" + balance);
                        break;
                    }
                    System.out.println("消费说明:");
                    note = scanner.next();
                    balance -= money;
                    //拼接消费信息到details
                    date = new Date();//获取当前日期
                    details += "\n" + note + "\t-" + money + "\t" + sdf.format(date) + "\t" + balance;
                    break;
                case "4":
                    String choice = "";
                    while (true){
                        System.out.println("你确定要退出吗?y/n");
                        choice = scanner.next();
                        if("y".equals(choice) || "n".equals(choice)){
                            break;
                        }
                        //当用户退出后再判断是y还是n
                        if(choice.equals("y")){
                            loop = false;
                        }
                    }
                    break;
                default:
                    System.out.println("选择有误,请重新选择");
            }
        }while(loop);
        System.out.println("退出了零钱通项目");
    }
}
面向对象:
/**
 * 该类是完成零钱通的各个功能的类
 **/
public class SmallChangeSysOOP {

    boolean loop = true;
    Scanner scanner = new Scanner(System.in);
    String key = "";
    String details = "============零钱通明细============";
    double money = 0;
    double balance = 0;
    Date date = null;
    SimpleDateFormat sdf = new SimpleDateFormat("yyyy-MM-dd HH:mm");//可以用于日期格式化
    String note = "";
    String choice = "";

    //显示菜单,并且选择
    public void mainMenu(){
        do{
            System.out.println("\n------------零钱通菜单(OOP)------------");
            System.out.println("\t\t\t1 零钱通明细");
            System.out.println("\t\t\t2 收益入账");
            System.out.println("\t\t\t3 消费");
            System.out.println("\t\t\t4 退  出");
            System.out.println("请选择(1-4):");
            key = scanner.next();


            //使用switch分支控制
            switch (key){
                case "1":
                    this.detail();
                    break;
                case "2":
                    this.income();
                    break;
                case "3":
                   this.pay();
                    break;
                case "4":
                    this.exit();
                    break;
                default:
                    System.out.println("选择有误,请重新选择");
            }
        }while(loop);
    }

    //完成零钱通明细
    public void detail(){
        System.out.println(details);
    }

    //完成收益入账
    public void income(){
        System.out.println("收益入账金额:");
        money = scanner.nextDouble();
        //money的值范围应该校验
        //找出不正确的金额条件,然后给出提示,就直接break;
        if(money <= 0){
            System.out.println("收益入账金额需要大于0");
            return;//退出方法,不在执行后面代码
        }
        balance += money;
        //拼接收益入账信息到details
        date = new Date();//获取当前日期
        details += "\n收益入账\t" + money + "\t" + sdf.format(date) + "\t" + balance;
    }

    //消费
    public void pay(){
        System.out.println("消费金额:");
        money = scanner.nextDouble();
        //找出不正确的情况
        if(money <= 0 || money > balance){
            System.out.println("你的消费金额应该在 0-" + balance);
            return;
        }
        System.out.println("消费说明:");
        note = scanner.next();
        balance -= money;
        //拼接消费信息到details
        date = new Date();//获取当前日期
        details += "\n" + note + "\t-" + money + "\t" + sdf.format(date) + "\t" + balance;
    }

    //退出
    public void exit(){
        while (true){
            System.out.println("你确定要退出吗?y/n");
            choice = scanner.next();
            if("y".equals(choice) || "n".equals(choice)){
                break;
            }
            //当用户退出后再判断是y还是n
            if(choice.equals("y")){
                loop = false;
            }
        }
    }

}
/**
 * 这里我们直接调用SmallChangeSysOOP对象,显示菜单即可
 * */
public class SmallChangeSysApp {
    public static void main(String[] args) {
        new SmallChangeSysOOP().mainMenu();
    }
}
八、项目-房屋出租系统
8.1 房屋出租系统-需求
8.1.1 项目需求说明
实现文本形式的房屋出租软件
能够对房屋信息的添加、修改和删除(用数组实现),并能够打印房屋明细表
8.2 房屋出租系统-界面
8.2.1 项目界面-主菜单
8.2.2 项目界面-新增房源

8.2.3 项目界面-查找房源
8.2.4 项目界面-删除房源
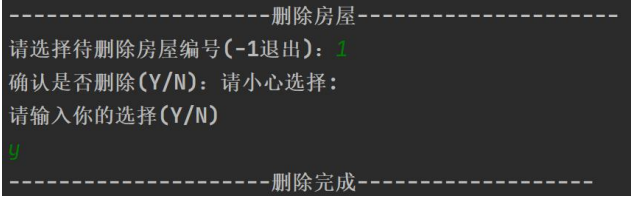
8.2.5 项目界面-修改房源
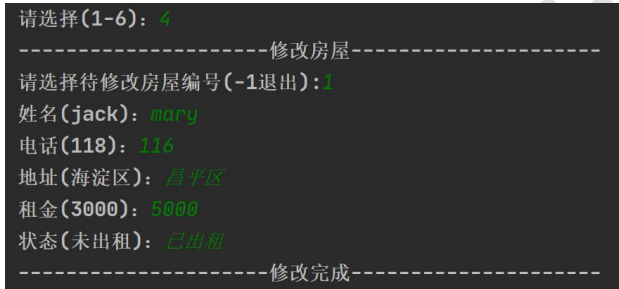
8.2.6 项目界面-房屋列表

8.2.7 项目界面-退出系统
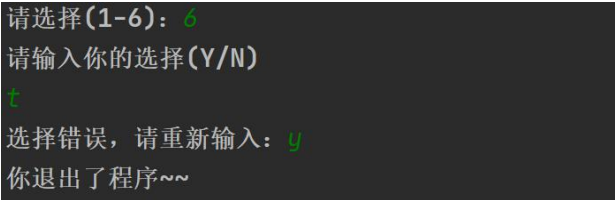
8.3 房屋出租系统-设计
项目设计-程序框架图(分层模式->当软件比较复杂,需要模式管理)
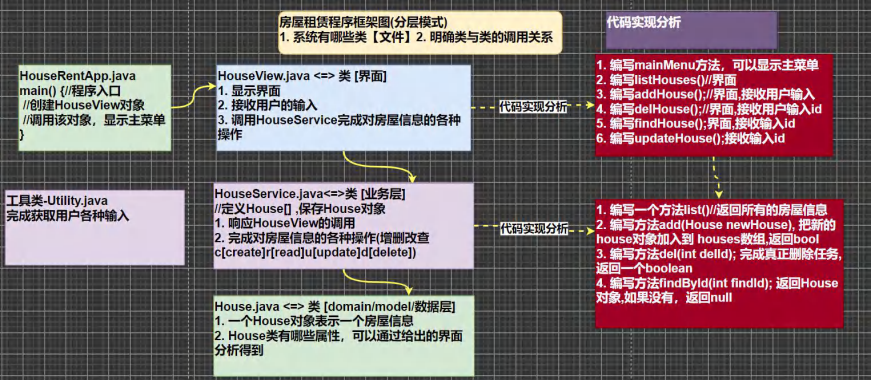
8.4 房屋出租系统-实现
8.4.1 工具类-Utility
在实际开发中,公司都会提供相应的工具类和开发库,可以提高开发效率,程序员也需要能够看懂别人写的代码, 并能够正确的调用。
8.4.2 项目功能实现-House类
编号 房主 电话 地址 月租 状态(未出租/已出租)
8.4.3 项目功能实现-显示主菜单和完成退出软件功能
用户打开软件,可以看到主菜单,可以退出软件
8.4.4 项目功能实现-完成显示房屋列表的功能
---------------------------房屋列表-------------------------
编号 房主 电话 地址 月租 状态(未出租/已出租)
2 none 116 昌平区 5000 已出租
3 mary 111 海淀区 9000 未出租
---------------------------房屋列表-------------------------
8.4.5 项目功能实现-添加房屋信息的功能
--------------添加房屋信息-------------
姓名:
电话:
地址:
月租:
状态(未出租/已出租):
--------------添加完成-------------
8.4.6 项目功能实现-完善删除房屋信息的功能
-------------删除房屋信息------------
请选择待删除房屋编号(-1退出):
确认是否删除(Y/N): 请小心选择:
请输入你的选择(Y/N):
8.4.7 项目功能实现-完善退出确认功能
要求在退出时提示"确认是否退出(Y/N): ",必须输入y/n,否则循环提示。
8.4.8 项目功能实现-完成修改房屋信息的功能
-------------修改房屋信息------------
请选择待修改房屋编号(-1退出):
姓名(xxx):
电话(xxx):
地址(xxx):
月租(xxx):
状态(未出租/已出租)(xxx):
--------------修改完成-------------
8.4.9 项目功能实现-根据id查找房屋信息的功能
-------------查找房屋信息------------
请输入你要查找id:
8.4.10 代码展示
domain层House
/**
 * House的对象表示一个房屋的信息
 */
public class House {
    private int id;
    private String name;
    private String phone;
    private String address;
    private int rent;
    private String state;

    public House(int id, String name, String phone, String address, int rent, String state) {
        this.id = id;
        this.name = name;
        this.phone = phone;
        this.address = address;
        this.rent = rent;
        this.state = state;
    }

    public int getId() {
        return id;
    }

    public void setId(int id) {
        this.id = id;
    }

    public String getName() {
        return name;
    }

    public void setName(String name) {
        this.name = name;
    }

    public String getPhone() {
        return phone;
    }

    public void setPhone(String phone) {
        this.phone = phone;
    }

    public String getAddress() {
        return address;
    }

    public void setAddress(String address) {
        this.address = address;
    }

    public int getRent() {
        return rent;
    }

    public void setRent(int rent) {
        this.rent = rent;
    }

    public String getState() {
        return state;
    }

    public void setState(String state) {
        this.state = state;
    }

    @Override
    public String toString() {
        return id +
                "\t\t" + name +
                "\t" + phone +
                "\t\t" + address +
                "\t" + rent +
                "\t" + state;
    }
}
service层HouseService
import eighthchapter.domain.House;

/**
 * 1.定义House[],保存House对象
 * 2.响应HouseView的调用
 * 3.完成对房屋信息的各种操作(增删改查)
 */
public class HouseService {

    private House[] houses;//保存House对象
    private int houseNums = 1;//记录当前有多少个房屋信息
    private int idCounter = 1;//记录当前id增长到哪个值

    //构造器
    public HouseService(int size) {
        houses = new House[size];//当创建HouseService对象,指定数组大小
        //为了配合测试,这里初始化一个House对象
        houses[0] = new House(1, "jack", "112", "海淀区", 2000, "未出租");
    }

    //findById方法,返回House对象或者null
    public House findById(int findId) {
        //遍历数组
        for (int i = 0; i < houseNums; i++) {
            if (findId == houses[i].getId()) {
                return houses[i];
            }
        }
        return null;
    }

    //del方法,删除一个房屋信息
    public boolean del(int delId) {
        //应当先找到删除的房屋信息
        //一定要搞清楚,下标和房屋的编号不是一回事
        int index = -1;
        for (int i = 0; i < houseNums; i++) {
            if (delId == houses[i].getId()) {//要删除的房屋(id),是数组下标为i的元素
                index = i;//就使用index记录i
            }
        }
        if (index == -1) {//说明delId在数组中不存在
            return false;
        }
        for (int i = index; i < houseNums - 1; i++) {
            houses[i] = houses[i + 1];
        }
        houses[--houseNums] = null;//把当前存在的房屋信息的最后一个设置为null
        return false;
    }

    //add方法,添加新对象,返回boolean
    public boolean add(House newhouses) {
        //判断是否还可以继续添加(暂时不考虑扩容的问题)
        if (houseNums == houses.length) {//不能再添加
            System.out.println("数值已经满了,不能再添加了...");
            return false;
        }

        houses[houseNums++] = newhouses;
        //id自增长,然后更新newhouses的id
        newhouses.setId(++idCounter);
        return true;
    }

    //list方法,返回houses
    public House[] list() {
        return houses;
    }
}
utils层Utility
/**
	工具类的作用:
	处理各种情况的用户输入,并且能够按照程序员的需求,得到用户的控制台输入。
*/

import java.util.*;
/**


*/
public class Utility {
	//静态属性。。。
    private static Scanner scanner = new Scanner(System.in);


    /**
     * 功能:读取键盘输入的一个菜单选项,值:1——5的范围
     * @return 1——5
     */
	public static char readMenuSelection() {
        char c;
        for (; ; ) {
            String str = readKeyBoard(1, false);//包含一个字符的字符串
            c = str.charAt(0);//将字符串转换成字符char类型
            if (c != '1' && c != '2' &&
                c != '3' && c != '4' && c != '5') {
                System.out.print("选择错误,请重新输入:");
            } else break;
        }
        return c;
    }

	/**
	 * 功能:读取键盘输入的一个字符
	 * @return 一个字符
	 */
    public static char readChar() {
        String str = readKeyBoard(1, false);//就是一个字符
        return str.charAt(0);
    }
    /**
     * 功能:读取键盘输入的一个字符,如果直接按回车,则返回指定的默认值;否则返回输入的那个字符
     * @param defaultValue 指定的默认值
     * @return 默认值或输入的字符
     */

    public static char readChar(char defaultValue) {
        String str = readKeyBoard(1, true);//要么是空字符串,要么是一个字符
        return (str.length() == 0) ? defaultValue : str.charAt(0);
    }

    /**
     * 功能:读取键盘输入的整型,长度小于2位
     * @return 整数
     */
    public static int readInt() {
        int n;
        for (; ; ) {
            String str = readKeyBoard(2, false);//一个整数,长度<=2位
            try {
                n = Integer.parseInt(str);//将字符串转换成整数
                break;
            } catch (NumberFormatException e) {
                System.out.print("数字输入错误,请重新输入:");
            }
        }
        return n;
    }
    /**
     * 功能:读取键盘输入的 整数或默认值,如果直接回车,则返回默认值,否则返回输入的整数
     * @param defaultValue 指定的默认值
     * @return 整数或默认值
     */
    public static int readInt(int defaultValue) {
        int n;
        for (; ; ) {
            String str = readKeyBoard(10, true);
            if (str.equals("")) {
                return defaultValue;
            }

			//异常处理...
            try {
                n = Integer.parseInt(str);
                break;
            } catch (NumberFormatException e) {
                System.out.print("数字输入错误,请重新输入:");
            }
        }
        return n;
    }

    /**
     * 功能:读取键盘输入的指定长度的字符串
     * @param limit 限制的长度
     * @return 指定长度的字符串
     */

    public static String readString(int limit) {
        return readKeyBoard(limit, false);
    }

    /**
     * 功能:读取键盘输入的指定长度的字符串或默认值,如果直接回车,返回默认值,否则返回字符串
     * @param limit 限制的长度
     * @param defaultValue 指定的默认值
     * @return 指定长度的字符串
     */

    public static String readString(int limit, String defaultValue) {
        String str = readKeyBoard(limit, true);
        return str.equals("")? defaultValue : str;
    }


	/**
	 * 功能:读取键盘输入的确认选项,Y或N
	 * 将小的功能,封装到一个方法中.
	 * @return Y或N
	 */
    public static char readConfirmSelection() {
        System.out.println("请输入你的选择(Y/N)");
        char c;
        for (; ; ) {//无限循环
        	//在这里,将接受到字符,转成了大写字母
        	//y => Y n=>N
            String str = readKeyBoard(1, false).toUpperCase();
            c = str.charAt(0);
            if (c == 'Y' || c == 'N') {
                break;
            } else {
                System.out.print("选择错误,请重新输入:");
            }
        }
        return c;
    }

    /**
     * 功能: 读取一个字符串
     * @param limit 读取的长度
     * @param blankReturn 如果为true ,表示 可以读空字符串。
     * 					  如果为false表示 不能读空字符串。
     *
	 *	如果输入为空,或者输入大于limit的长度,就会提示重新输入。
     * @return
     */
    private static String readKeyBoard(int limit, boolean blankReturn) {

		//定义了字符串
		String line = "";

		//scanner.hasNextLine() 判断有没有下一行
        while (scanner.hasNextLine()) {
            line = scanner.nextLine();//读取这一行

			//如果line.length=0, 即用户没有输入任何内容,直接回车
			if (line.length() == 0) {
                if (blankReturn) return line;//如果blankReturn=true,可以返回空串
                else continue; //如果blankReturn=false,不接受空串,必须输入内容
            }

			//如果用户输入的内容大于了 limit,就提示重写输入
			//如果用户如的内容 >0 <= limit ,我就接受
            if (line.length() < 1 || line.length() > limit) {
                System.out.print("输入长度(不能大于" + limit + ")错误,请重新输入:");
                continue;
            }
            break;
        }

        return line;
    }
}
view层HouseView
import eighthchapter.domain.House;
import eighthchapter.service.HouseService;
import eighthchapter.utils.Utility;

/**
 * 1.显示界面
 * 2.接收用户输入
 * 3.调用HouseService完成对房屋信息的各种操作
 */
public class HouseView {

    private boolean loop = true;//控制显示菜单
    private char key = ' ';//接收用户选择
    private HouseService houseService = new HouseService(10);

    //根据id修改房屋信息
    public void update() {
        System.out.println("===============修改房屋信息===============");
        System.out.println("请选择待修改房屋编号(-1表示退出):");
        int updateId = Utility.readInt();
        if (updateId == -1) {
            System.out.println("===============你放弃修改房屋信息===============");
            return;
        }
        //根据输入得到updateId,查找对象
        //返回的引用类型[即:就是数值的元素]
        //因此在后面对house.setxx(),就会修改HouseService中数组的元素!!!!!
        House house = houseService.findById(updateId);
        if (house == null) {
            System.out.println("===============修改房屋信息编号不存在..===============");
            return;
        }
        System.out.println("姓名(" + house.getName() + "): ");
        String name = Utility.readString(8, "");//这里如果用户直接回车表示不修改该信息,默认""
        if (!"".equals(name)) {
            house.setName(name);
        }

        System.out.println("电话(" + house.getPhone() + "): ");
        String phone = Utility.readString(12);
        if (!"".equals(phone)) {
            house.setPhone(phone);
        }

        System.out.println("地址(" + house.getAddress() + "): ");
        String address = Utility.readString(18);
        if (!"".equals(address)) {
            house.setAddress(address);
        }

        System.out.println("租金(" + house.getRent() + "): ");
        int rent = Utility.readInt(-1);
        if (rent != -1) {
            house.setRent(rent);
        }

        System.out.println("状态(未出租/已出租)(" + house.getState() + "): ");
        String state = Utility.readString(3, "");
        if (!"".equals(state)) {
            house.setState(state);
        }
        System.out.println("===============修改房屋信息成功===============");
    }

    //根据id查找房屋信息
    public void findHouse() {
        System.out.println("===============查找房屋信息===============");
        System.out.println("请输入要查找的id: ");
        int findId = Utility.readInt();
        //调用方法
        House house = houseService.findById(findId);
        if (house != null) {
            System.out.println(house);
        } else {
            System.out.println("===============查找房屋信息id不存在===============");
        }
    }

    //完成退出确认
    public void exit() {
        //使用Utility提供方法
        char c = Utility.readConfirmSelection();
        if (c == 'Y') {
            loop = false;
        }
    }

    //编写delHouse()接受输入的id,调用service的del方法
    public void delHouse() {
        System.out.println("===============删除房屋信息===============");
        System.out.println("请输入待删除房屋的编号(-1退出):");
        int delId = Utility.readInt();
        if (delId == -1) {
            System.out.println("===============放弃删除房屋信息===============");
            return;
        }
        //注意该方法本身就有循环判断的逻辑,必须输出Y/N
        char choice = Utility.readConfirmSelection();
        if (choice == 'Y') {//真的删除
            if (houseService.del(delId)) {
                System.out.println("===============删除房屋信息成功===============");
            } else {
                System.out.println("===============房屋编号不存在,删除失败===============");
            }
        } else {
            System.out.println("===============放弃删除房屋信息===============");
        }
    }

    //编写addHouse()接受输入,创建House对象,调用add方法
    public void addHouse() {
        System.out.println("===============添加房屋===============");
        System.out.print("姓名:");
        String name = Utility.readString(8);
        System.out.print("电话:");
        String phone = Utility.readString(12);
        System.out.print("地址:");
        String address = Utility.readString(16);
        System.out.print("月租:");
        int rent = Utility.readInt();
        System.out.print("状态(未出租/已出租):");
        String state = Utility.readString(3);
        //创建一个新的House对象,注意id是系统分配的,用户不能输入
        House newhouse = new House(0, name, phone, address, rent, state);
        if (houseService.add(newhouse)) {
            System.out.println("===============添加房屋成功===============");
        } else {
            System.out.println("===============添加房屋失败===============");
        }
    }

    //编写listHouses()显示房屋列表
    public void listHouses() {
        System.out.println("\n==========房屋出租系统菜单==========");
        System.out.println("编号\t\t房主\t\t电话\t\t地址\t\t月租\t\t状态(未出租/已出租)");
        House[] houses = houseService.list();//得到所有房屋信息
        for (int i = 0; i < houses.length; i++) {
            if (houses[i] == null) {
                break;
            }
            System.out.println(houses[i]);
        }
    }

    //显示主菜单
    public void mainMenu() {
        do {
            System.out.println("==========房屋出租系统菜单==========");
            System.out.println("\t\t\t1 新 增 房 源");
            System.out.println("\t\t\t2 查 找 房 源");
            System.out.println("\t\t\t3 删 除 房 屋 信 息");
            System.out.println("\t\t\t4 修 改 房 屋 信 息");
            System.out.println("\t\t\t5 房 屋 列 表");
            System.out.println("\t\t\t6 退      出");
            System.out.println("请输入你的选择(1-6): ");
            key = Utility.readChar();
            switch (key) {
                case '1':
                    addHouse();
                    break;
                case '2':
                    findHouse();
                    break;
                case '3':
                    delHouse();
                    break;
                case '4':
                    update();
                    break;
                case '5':
                    listHouses();
                    break;
                case '6':
                    exit();
                    break;
            }
        } while (loop);
    }
}
HouseRentApp
import eighthchapter.view.HouseView;

public class HouseRentApp {
    public static void main(String[] args) {
        //创建HouseView对象,并且显示主菜单,是整个程序的人口
        new HouseView().mainMenu();
    }
}
九、面向对象(高级)
9.1 类变量和类方法
9.1.1 问题
有一群小孩在玩堆雪人,不时有新的小孩加入,请问如何知道现在共有多少人在玩?,编写程序解决。
public class ChildGame {
    public static void main(String[] args) {
//定义一个变量 count, 统计有多少小孩加入了游戏
        int count = 0;

        Child child1 = new Child("白骨精");
        child1.join();
        count++;

        Child child2 = new Child("狐狸精");
        child2.join();
        count++;

        Child child3 = new Child("老鼠精");
        child3.join();
        count++;

        System.out.println("共有" + count + " 小孩加入了游戏...");
    }
}

class Child { //类

    private String name;

    public Child(String name) {
        this.name = name;
    }

    public void join() {
        System.out.println(name + " 加入了游戏..");
    }
}
存在问题
1.count是一个独立对象
2.以后访问count很免费,没有使用到oop
9.1.2 类变量快速入门
如果,设计一个 int count 表示总人数,我们在创建一个小孩时,就把 count 加 1,并且 count 是所有对象共享的 就 ok 了!,我们使用类变量来解决 ChildGame.java 改进
public class ChildGame {
    public static void main(String[] args) {
//定义一个变量 count, 统计有多少小孩加入了游戏
        int count = 0;
        Child child1 = new Child("白骨精");
        child1.join();
//count++;
        child1.count++;
        Child child2 = new Child("狐狸精");
        child2.join();
//count++;
        child2.count++;
        Child child3 = new Child("老鼠精");
        child3.join();
//count++;
        child3.count++;
//===========
//类变量,可以通过类名来访问
        System.out.println("共有" + Child.count + " 小孩加入了游戏...");
//下面的代码输出什么?
        System.out.println("child1.count=" + child1.count);//3
        System.out.println("child2.count=" + child2.count);//3
        System.out.println("child3.count=" + child3.count);//3
    }
}

class Child { //类
    private String name;
    //定义一个变量 count ,是一个类变量(静态变量) static 静态
//该变量最大的特点就是会被 Child 类的所有的对象实例共享
    public static int count = 0;

    public Child(String name) {
        this.name = name;
    }

    public void join() {
        System.out.println(name + " 加入了游戏..");
    }
}
9.1.3 类变量内存布局
public static int totalNum = 0;
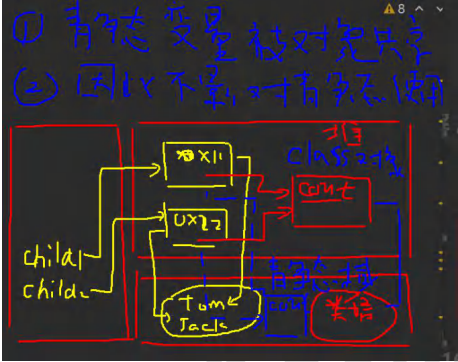
9.1.4 什么是类变量
类变量也叫静态变量/静态属性,是该类的所有对象共享的变量,任何一个该类的对象去访问它时,取到的都是相同的值,同样任何一个该类的对象去修改它时,修改的也是同一个变量。
9.1.5 定义类变量
1.访问修饰符 static 数据类型 变量名;[推荐]
2.static 访问修饰符 数据类型 变量名;
9.1.6 访问类变量
类名.类变量名[推荐]
或者 对象名.类变量名[静态变量的访问修饰符的访问权限和范围和普通属性一样的]
public class VisitStatic {
    public static void main(String[] args) {
//类名.类变量名
//说明:类变量是随着类的加载而创建,所以即使没有创建对象实例也可以访问
        System.out.println(A.name);
        A a = new A();
//通过对象名.类变量名
        System.out.println("a.name=" + a.name);
    }
}

class A {
    //类变量
//类变量的访问,必须遵守 相关的访问权限.
    public static String name = "张三";
    //普通属性/普通成员变量/非静态属性/非静态成员变量/实例变量
    private int num = 10;
}
9.1.7 类变量注意事项和细节说明
1.什么时候需要类变量
当我们需要让某个类的所有对象的共享一个变量时,就可以考虑使用类变量(静态变量):比如:定义学生类,统计所有学生共交多少钱。Student(name,static fee)
2.类变量与实例变量(普通属性)区别
类变量是该类的所有对象共享的,而实例变量是每个对象独享的。
3.加上static称为类变量或静态变量,否则称为实例变量/普通变量/非静态变量。
4.类变量可以通过 类名.类变量名 或者对象名.类变量名 来访问,但Java设计者推荐我们使用 类名.类变量名方法询问。[前提是 满足访问修饰符的访问权限和范围]
5.实例变量不能通过 类名.类变量名 方式来访问
6.类变量是在类加载时就初始化了,也就是说,即使你没有创建对象,只要类加载了,就可以使用类变量了。
7.类变量的生命周期说随类的加载开始,随着类消亡而销毁。
public class StaticDetail {
    public static void main(String[] args) {
        B b = new B();
//System.out.println(B.n1);
        System.out.println(B.n2);
//静态变量是类加载的时候,就创建了,所以我们没有创建对象实例
//也可以通过类名.类变量名来访问
        System.out.println(C.address);
    }
}
class B {
    public int n1 = 100;
    public static int n2 = 200;
}
class C {
    public static String address = "北京";
}
9.1.8 类方法基本介绍
类方法也叫静态方法。
形式如下:
访问修饰符 static 数据返回类型 方法名(){}
static 访问修饰符 数据返回类型 方法名(){}
9.1.9 类方法的调用
使用方法:类名.类方法名 或者 对象名.类方法名 [前提是满足访问修饰符的访问权限和范围]
9.1.10 类方法应用案例
public class StaticMethod {
    public static void main(String[] args) {
//创建 2 个学生对象,叫学费
        Stu tom = new Stu("tom");
//tom.payFee(100);
        Stu.payFee(100);//对不对?对
        Stu mary = new Stu("mary");
//mary.payFee(200);
        Stu.payFee(200);//对
//输出当前收到的总学费
        Stu.showFee();//300
//如果我们希望不创建实例,也可以调用某个方法(即当做工具来使用)
//这时,把方法做成静态方法时非常合适
        System.out.println("9 开平方的结果是=" + Math.sqrt(9));
        System.out.println(MyTools.calSum(10, 30));
    }
}

//开发自己的工具类时,可以将方法做成静态的,方便调用
class MyTools {
    //求出两个数的和
    public static double calSum(double n1, double n2) {
        return n1 + n2;
    }
    //可以写出很多这样的工具方法...
}

class Stu {
    private String name;//普通成员
    //定义一个静态变量,来累积学生的学费
    private static double fee = 0;

    public Stu(String name) {
        this.name = name;
    }

    //说明
//1. 当方法使用了 static 修饰后,该方法就是静态方法
//2. 静态方法就可以访问静态属性/变量
    public static void payFee(double fee) {
        Stu.fee += fee;//累积到
    }

    public static void showFee() {
        System.out.println("总学费有:" + Stu.fee);
    }
}
9.1.11 类方法的使用场景
当方法中不涉及到任何和对象相关的成员,则可以将方法设计成静态方法,提高开发效率。
比如:工具类中的方法utils
Math类、Arrays类、Collections集合类
实际开发,往往会将一些通用的方法,设计成静态方法,这样我们不需要创建对象就可以使用了。
9.1.12 类方法使用注意事项和细节说明

public class StaticMethodDetail {
    public static void main(String[] args) {
        D.hi();//ok
//非静态方法,不能通过类名调用
//D.say();, 错误,需要先创建对象,再调用
        new D().say();//可以
    }
}

class D {
    private int n1 = 100;
    private static int n2 = 200;

    public void say() {//非静态方法,普通方法
    }

    public static void hi() {//静态方法,类方法
//类方法中不允许使用和对象有关的关键字,
//比如 this 和 super。普通方法(成员方法)可以。
//System.out.println(this.n1);
    }

    //类方法(静态方法)中 只能访问 静态变量 或静态方法
//口诀:静态方法只能访问静态成员.
    public static void hello() {
        System.out.println(n2);
        System.out.println(D.n2);
        //System.out.println(this.n2);不能使用
        hi();//OK
//say();//错误
    }

    //普通成员方法,既可以访问 非静态成员,也可以访问静态成员
//小结: 非静态方法可以访问 静态成员和非静态成员
    public void ok() {
//非静态成员
        System.out.println(n1);
        say();
//静态成员
        System.out.println(n2);
        hello();
    }
}
9.2 理解main方法语法
9.2.1 深入理解main方法
9.2.2 特别说明
1.在 main()方法中,我们可以直接调用 main 方法所在类的静态方法或静态属性。
2.但是,不能直接访问该类中的非静态成员,必须创建该类的一个实例对象后,才能通过这个对象去访问类中的非静 态成员,
public class Main01 {
    //静态的变量/属性
    private static String name = "韩顺平教育";
    //非静态的变量/属性
    private int n1 = 10000;
    //静态方法
    public static void hi() {
        System.out.println("Main01 的 hi 方法");
    }
    //非静态方法
    public void cry() {
        System.out.println("Main01 的 cry 方法");
    }
    public static void main(String[] args) {
//可以直接使用 name
//1. 静态方法 main 可以访问本类的静态成员
        System.out.println("name=" + name);
        hi();
//2. 静态方法 main 不可以访问本类的非静态成员
//System.out.println("n1=" + n1);//错误
//cry();
//3. 静态方法 main 要访问本类的非静态成员,需要先创建对象 , 再调用即可
        Main01 main01 = new Main01();
        System.out.println(main01.n1);//ok
        main01.cry();
    }
}
9.3 代码块
9.3.1 基本介绍

9.3.2 基本语法
9.3.3 代码块的好处

public class CodeBlock01 {
    public static void main(String[] args) {
        Movie movie = new Movie("你好,李焕英");
        System.out.println("===============");
        Movie movie2 = new Movie("唐探 3", 100, "陈思诚");
    }
}

class Movie {
    private String name;
    private double price;
    private String director;

    //3 个构造器-》重载
//(1) 下面的三个构造器都有相同的语句
//(2) 这样代码看起来比较冗余
//(3) 这时我们可以把相同的语句,放入到一个代码块中,即可
//(4) 这样当我们不管调用哪个构造器,创建对象,都会先调用代码块的内容
//(5) 代码块调用的顺序优先于构造器..
    {
        System.out.println("电影屏幕打开...");
        System.out.println("广告开始...");
        System.out.println("电影正是开始...");
    }

    ;

    public Movie(String name) {
        System.out.println("Movie(String name) 被调用...");
        this.name = name;
    }

    public Movie(String name, double price) {
        this.name = name;
        this.price = price;
    }

    public Movie(String name, double price, String director) {
        System.out.println("Movie(String name, double price, String director) 被调用...");
        this.name = name;
        this.price = price;
        this.director = director;
    }
}
9.3.4 代码块使用注意事项和细节讨论
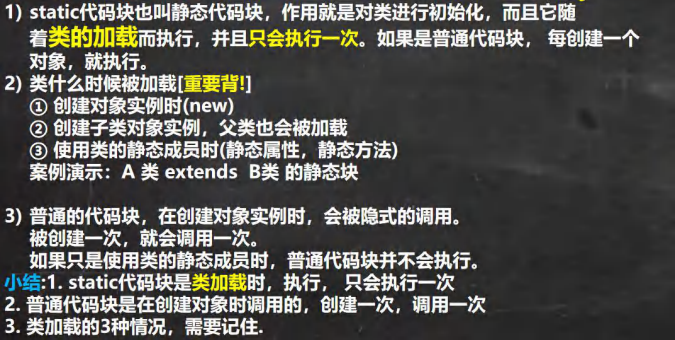
public class CodeBlockDetail01 {
    public static void main(String[] args) {
//类被加载的情况举例
//1. 创建对象实例时(new)
// AA aa = new AA();
//2. 创建子类对象实例,父类也会被加载, 而且,父类先被加载,子类后被加载
// AA aa2 = new AA();
//3. 使用类的静态成员时(静态属性,静态方法)
// System.out.println(Cat.n1);
//static 代码块,是在类加载时,执行的,而且只会执行一次. // DD dd = new DD();
// DD dd1 = new DD();
//普通的代码块,在创建对象实例时,会被隐式的调用。
// 被创建一次,就会调用一次。
// 如果只是使用类的静态成员时,普通代码块并不会执行
        System.out.println(DD.n1);//8888, 静态模块块一定会执行
    }
}
class DD {
    public static int n1 = 8888;//静态属性
    //静态代码块
    static {
        System.out.println("DD 的静态代码 1 被执行...");//
    }
    //普通代码块, 在 new 对象时,被调用,而且是每创建一个对象,就调用一次
//可以这样简单的,理解 普通代码块是构造器的补充
    {
        System.out.println("DD 的普通代码块...");
    }
}
class Animal {
    //静态代码块
    static {
        System.out.println("Animal 的静态代码 1 被执行...");//
    }
}
class Cat extends Animal {
    public static int n1 = 999;//静态属性
    //静态代码块
    static {
        System.out.println("Cat 的静态代码 1 被执行...");//
    }
}
class BB {
    //静态代码块
    static {
        System.out.println("BB 的静态代码 1 被执行...");//1
    }
}
class AA extends BB {
    //静态代码块
    static {
        System.out.println("AA 的静态代码 1 被执行...");//2
    }
}
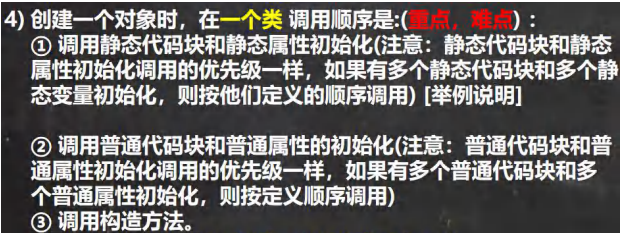
public class CodeBlockDetail02 {
    public static void main(String[] args) {
        A1 a = new A1();// (1) A 静态代码块 01 (2) getN1 被调用...(3)A 普通代码块 01(4)getN2 被调用...(5)A() 构造器被调用
    }
}
class A1 {
    { //普通代码块
        System.out.println("A 普通代码块 01");
    }
    private int n2 = getN2();//普通属性的初始化
    static { //静态代码块
        System.out.println("A 静态代码块 01");
    }
    //静态属性的初始化
    private static int n1 = getN1();
    public static int getN1() {
        System.out.println("getN1 被调用...");
        return 100;
    }
    public int getN2() { //普通方法/非静态方法
        System.out.println("getN2 被调用...");
        return 200;
    }
    //无参构造器
    public A1() {
        System.out.println("A() 构造器被调用");
    }
}
5)构造器的最前面其实隐含了super()和调用普通代码块,演示,静态相关的代码,属性初始化,在类加载时,就执行完毕,因此是优于构造器和普通代码块执行的
public class CodeBlockDetail03 {
    public static void main(String[] args) {
        new BBB();//(1)AAA 的普通代码块(2)AAA() 构造器被调用(3)BBB 的普通代码块(4)BBB() 构造器被调用
    }
}
class AAA { //父类 Object
    {
        System.out.println("AAA 的普通代码块");
    }
    public AAA() {
//(1)super()
//(2)调用本类的普通代码块
        System.out.println("AAA() 构造器被调用....");
    }
}
class BBB extends AAA {
    {
        System.out.println("BBB 的普通代码块...");
    }
    public BBB() {
//(1)super()
//(2)调用本类的普通代码块
        System.out.println("BBB() 构造器被调用....");
    }
}
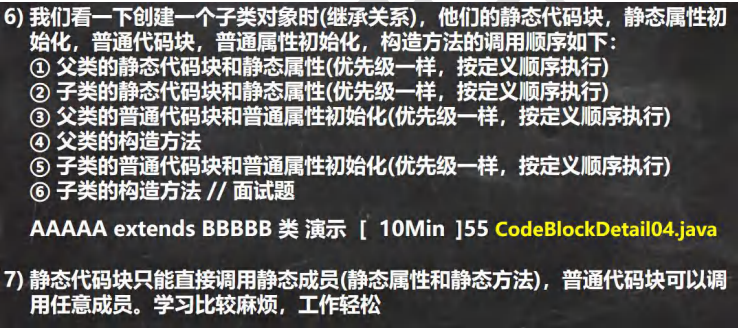
public class CodeBlockDetail04 {
    public static void main(String[] args) {
//(1) 进行类的加载
//1.1 先加载 父类 A02 1.2 再加载 B02
//(2) 创建对象
//2.1 从子类的构造器开始
//new B02();//对象
        new C02();
    }
}
class A02 { //父类
    private static int n1 = getVal01();
    static {
        System.out.println("A02 的一个静态代码块..");//(2)
    }
    {
        System.out.println("A02 的第一个普通代码块..");//(5)
    }
    public int n3 = getVal02();//普通属性的初始化
    public static int getVal01() {
        System.out.println("getVal01");//(1)
        return 10;
    }
    public int getVal02() {
        System.out.println("getVal02");//(6)
        return 10;
    }
    public A02() {//构造器
//隐藏
//super()
//普通代码和普通属性的初始化...... System.out.println("A02 的构造器");//(7)
    }
}
class C02 {
    private int n1 = 100;
    private static int n2 = 200;
    private void m1() {
    }
    private static void m2() {
    }
    static {
//静态代码块,只能调用静态成员
//System.out.println(n1);错误
        System.out.println(n2);//ok
//m1();//错误
        m2();
    }
    {
//普通代码块,可以使用任意成员
        System.out.println(n1);
        System.out.println(n2);//ok
        m1();
        m2();
    }
}
class B02 extends A02 { //
    private static int n3 = getVal03();
    static {
        System.out.println("B02 的一个静态代码块..");//(4)
    }
    public int n5 = getVal04();
    {
        System.out.println("B02 的第一个普通代码块..");//(9)
    }
    public static int getVal03() {
        System.out.println("getVal03");//(3)
        return 10;
    }
    public int getVal04() {
        System.out.println("getVal04");//(8)
        return 10;
    }
//一定要慢慢的去品.. public B02() {//构造器
//隐藏了
//super()
//普通代码块和普通属性的初始化... System.out.println("B02 的构造器");//(10)
// TODO Auto-generated constructor stub
}
9.4 单例设计模式
9.4.1 什么是设计模式
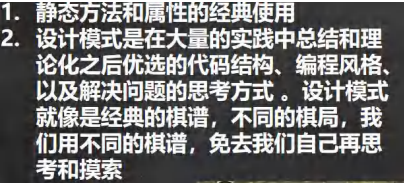
9.4.2 什么是单例模式

9.4.3 单例模式应用实例
演示饿汉式和懒汉式的实现
/**
 * 演示饿汉式的单例模式
 */
public class SingleTon01 {
    public static void main(String[] args) {
        //GirlFriend xh = new GirlFriend("小红");
        //GirlFriend xb = new GirlFriend("小白");

        //通过方法获取
        GirlFriend instance = GirlFriend.getInstance();
        System.out.println(instance);
        GirlFriend instance2 = GirlFriend.getInstance();
        System.out.println(instance2);
        System.out.println(instance == instance2);//T
//System.out.println(GirlFriend.n1);
//...
    }
}

//有一个类, GirlFriend
//只能有一个女朋友
class GirlFriend {
    private String name;
    //为了能够在静态方法中,返回 gf 对象,需要将其修饰为 static
//對象,通常是重量級的對象, 餓漢式可能造成創建了對象,但是沒有使用.
    private static GirlFriend gf = new GirlFriend("小红红");
    //public static int n1 = 100;


    //如何保障我们只能创建一个 GirlFriend 对象
//步骤[单例模式-饿汉式]
//1. 将构造器私有化
//2. 在类的内部直接创建对象(该对象是 static)
//3. 提供一个公共的 static 方法,返回 gf 对象
    private GirlFriend(String name) {
        this.name = name;
    }

    public static GirlFriend getInstance() {
        return gf;
    }

    @Override
    public String toString() {
        return "GirlFriend{" +
                "name='" + name + '\'' +
                '}';
    }
}
/**
 * 演示懶漢式的單例模式
 */
public class SingleTon02 {
    public static void main(String[] args) {
//new Cat("大黃");
//System.out.println(Cat.n1);
        Cat1 instance = Cat1.getInstance();
        System.out.println(instance);
//再次調用 getInstance
        Cat1 instance2 = Cat1.getInstance();
        System.out.println(instance2);
        System.out.println(instance == instance2);//T
    }
}
//希望在程序運行過程中,只能創建一個 Cat 對象
//使用單例模式
class Cat1 {
    private String name;
    public static int n1 = 999;
    private static Cat1 cat1 ; //默認是 null
    //步驟
//1.仍然構造器私有化
//2.定義一個 static 靜態屬性對象
//3.提供一個 public 的 static 方法,可以返回一個 Cat 對象
//4.懶漢式,只有當用戶使用 getInstance 時,才返回 cat 對象, 後面再次調用時,會返回上次創建的 cat 對象
// 從而保證了單例

    private Cat1(String name) {
        this.name = name;
    }

    public static Cat1 getInstance(){
        if(cat1 == null){
            cat1 = new Cat1("小可爱");
        }
        return cat1;
    }

    @Override
    public String toString() {
        return "Cat1{" +
                "name='" + name + '\'' +
                '}';
    }
}
9.4.4 饿汉式vs懒汉式
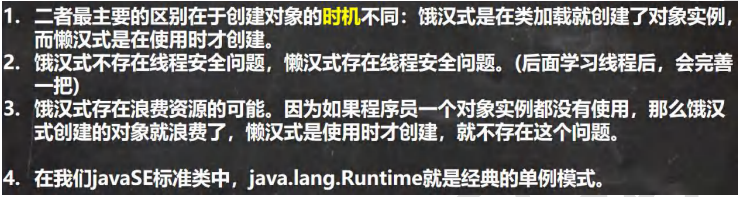
9.5 final关键字
9.5.1 基本介绍
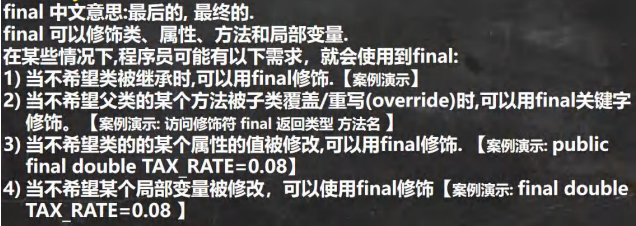
public class Final01 {
    public static void main(String[] args) {
        E e = new E();
//e.TAX_RATE = 0.09;
    }
}

//如果我们要求 A 类不能被其他类继承
//可以使用 final 修饰 A 类
final class A2 {
}

//class B extends A {}
class C1 {
    //如果我们要求 hi 不能被子类重写
//可以使用 final 修饰 hi 方法
    public final void hi() {
    }
}

class D1 extends C1 {
// @Override
// public void hi() {
// System.out.println("重写了 C 类的 hi 方法..");
// }
}

//当不希望类的的某个属性的值被修改,可以用 final 修饰
class E {
    public final double TAX_RATE = 0.08;//常量
}

//当不希望某个局部变量被修改,可以使用 final 修饰
class F {
    public void cry() {
//这时,NUM 也称为 局部常量
        final double NUM = 0.01;
//NUM = 0.9;
        System.out.println("NUM=" + NUM);
    }
}
9.5.2 final使用注意事项和细节说明
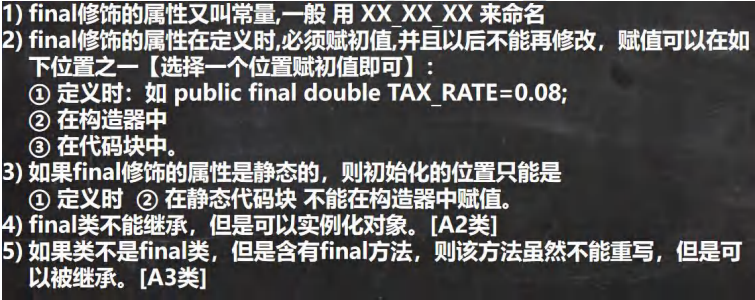
public class FinalDetail01 {
    public static void main(String[] args) {
        CC cc = new CC();
        new EE().cal();
    }
}

class AA1 {
    /*
    1. 定义时:如 public final double TAX_RATE=0.08;
    2. 在构造器中
    3. 在代码块中
    */
    public final double TAX_RATE = 0.08;//1.定义时赋值
    public final double TAX_RATE2;
    public final double TAX_RATE3;

    public AA1() {//构造器中赋值
        TAX_RATE2 = 1.1;
    }

    {//在代码块赋值
        TAX_RATE3 = 8.8;
    }
}

class BB1 {
    /*
    如果 final 修饰的属性是静态的,则初始化的位置只能是
    1 定义时 2 在静态代码块 不能在构造器中赋值。
    */
    public static final double TAX_RATE = 99.9;
    public static final double TAX_RATE2;

    static {
        TAX_RATE2 = 3.3;
    }
}

//final 类不能继承,但是可以实例化对象
final class CC {
}

//如果类不是 final 类,但是含有 final 方法,则该方法虽然不能重写,但是可以被继承
//即,仍然遵守继承的机制.
class DD1 {
    public final void cal() {
        System.out.println("cal()方法");
    }
}

class EE extends DD1 {
}
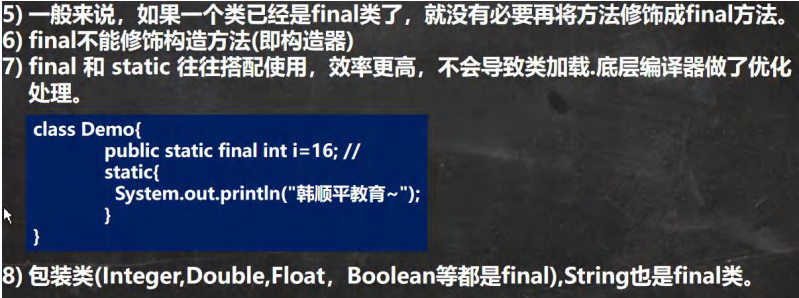
public class FinalDetail02 {
    public static void main(String[] args) {
        System.out.println(BBB1.num);
//包装类,String 是 final 类,不能被继承
    }
}
//final 和 static 往往搭配使用,效率更高,不会导致类加载.底层编译器做了优化处理
class BBB1 {
    public final static int num = 10000;
    static {
        System.out.println("BBB 静态代码块被执行");
    }
}
final class AAA1{
//一般来说,如果一个类已经是 final 类了,就没有必要再将方法修饰成 final 方法
//public final void cry() {}
}
9.5.3 应用案例
请编写一个程序,能够计算圆形的面积.要求圆周率为3.14.赋值的位置3个方法都写一下。
public class FinalExercise01 {
    public static void main(String[] args) {
        Circle circle = new Circle(5.0);
        System.out.println("面积=" + circle.calArea());
    }
}

class Circle {
    private double radius;
    private final double PI;// = 3.14;

    //构造器
    public Circle(double radius) {
        this.radius = radius;
//PI = 3.14;
    }

    {
        PI = 3.14;
    }

    public double calArea() {
        return PI * radius * radius;
    }
}
9.6 抽象类
9.6.1 问题
当父类的某些方法,需要声明,但是又不确定如何实现,可以先将其声明为抽象方法,那么这个类就是抽象类。
public class Abstract01 {
    public static void main(String[] args) {
    }
}
abstract class Animal1 {
    private String name;
    public Animal1(String name) {
        this.name = name;
    }
    //思考:这里 eat 这里你实现了,其实没有什么意义
//即: 父类方法不确定性的问题
//===> 考虑将该方法设计为抽象(abstract)方法
//===> 所谓抽象方法就是没有实现的方法
//===> 所谓没有实现就是指,没有方法体
//===> 当一个类中存在抽象方法时,需要将该类声明为 abstract 类
//===> 一般来说,抽象类会被继承,有其子类来实现抽象方法. // public void eat() {
// System.out.println("这是一个动物,但是不知道吃什么..");
// }
    public abstract void eat() ;
}
9.6.2 抽象类快速入门
当父类的一些方法不确定时,可以用abstract关键字来修饰方法,这个方法就是抽象方法,用abstract来修饰该类就是抽象类。
我们看看如何把Animal做成抽象类,并让子类Cat类实现
abstract class Animal{
String name;
int age;
abstract public void cty();
}
9.6.3 抽象类介绍
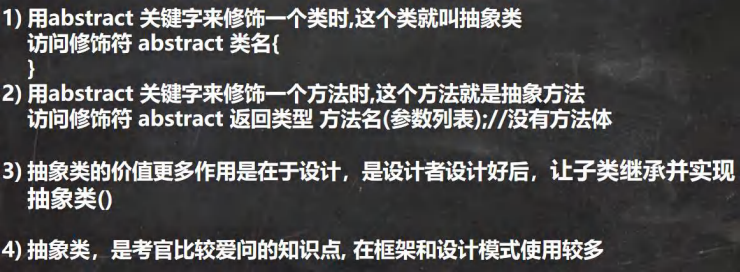
9.6.4 抽象类使用细节和注意事项

public class AbstractDetail01 {
    public static void main(String[] args) {
//抽象类,不能被实例化
//new A();
    }
}
//抽象类不一定要包含 abstract 方法。也就是说,抽象类可以没有 abstract 方法
//,还可以有实现的方法。
abstract class A3 {
    public void hi() {
        System.out.println("hi");
    }
}
//一旦类包含了 abstract 方法,则这个类必须声明为 abstract
abstract class B1 {
    public abstract void hi();
}
//abstract 只能修饰类和方法,不能修饰属性和其它的
class C2 {
// public abstract int n1 = 1;
}
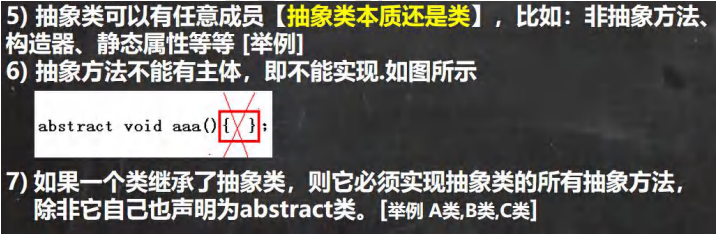

public class AbstractDetail02 {
    public static void main(String[] args) {
        System.out.println("hello");
    }
}
//抽象方法不能使用 private、final 和 static 来修饰,因为这些关键字都是和重写相违背的
abstract class H {
    public abstract void hi();//抽象方法
}
//如果一个类继承了抽象类,则它必须实现抽象类的所有抽象方法,除非它自己也声明为 abstract 类
abstract class E1 {
    public abstract void hi();
}
abstract class F1 extends E1 {
}
class G extends E1 {
    @Override
    public void hi() { //这里相等于 G 子类实现了父类 E 的抽象方法,所谓实现方法,就是有方法体
    }
}
//抽象类的本质还是类,所以可以有类的各种成员
abstract class D3 {
    public int n1 = 10;
    public static String name = "韩顺平教育";
    public void hi() {
        System.out.println("hi");
    }
    public abstract void hello();
    public static void ok() {
        System.out.println("ok");
    }
}
9.6.5 练习

public class AbstractExercise01 {
    public static void main(String[] args) {
//测试
        Manager jack = new Manager("jack", 999, 50000);
        jack.setBonus(8000);
        jack.work();
        CommonEmployee tom = new CommonEmployee("tom", 888, 20000);
        tom.work();
    }
}
abstract public class Employee {
    private String name;
    private int id;
    private double salary;

    public Employee(String name, int id, double salary) {
        this.name = name;
        this.id = id;
        this.salary = salary;
    }

    //将 work 做成一个抽象方法
    public abstract void work();

    public String getName() {
        return name;
    }

    public void setName(String name) {
        this.name = name;
    }

    public int getId() {
        return id;
    }

    public void setId(int id) {
        this.id = id;
    }

    public double getSalary() {
        return salary;
    }

    public void setSalary(double salary) {
        this.salary = salary;
    }
}
public class Manager extends Employee {
    private double bonus;

    public Manager(String name, int id, double salary) {
        super(name, id, salary);
    }

    public double getBonus() {
        return bonus;
    }

    public void setBonus(double bonus) {
        this.bonus = bonus;
    }

    @Override
    public void work() {
        System.out.println("经理 " + getName() + " 工作中...");
    }
}
public class CommonEmployee extends Employee {
    public CommonEmployee(String name, int id, double salary) {
        super(name, id, salary);
    }

    @Override
    public void work() {
        System.out.println("普通员工 " + getName() + " 工作中...");
    }
}
9.7 抽象类的最佳实践-模板设计模式
9.7.1 基本介绍

9.7.2 模板设计模式能解决的问题

9.7.3 最佳实践
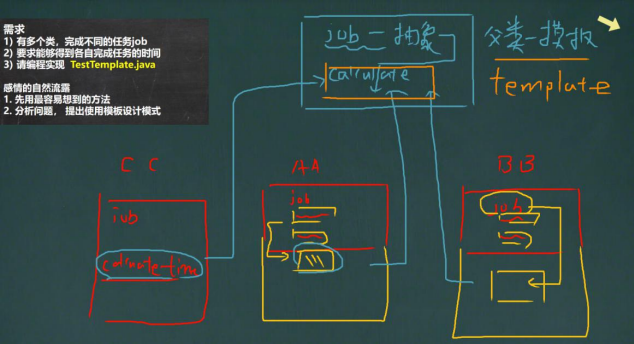
public class TestTemplate {
    public static void main(String[] args) {
        AA aa = new AA();
        aa.calculateTime(); //这里还是需要有良好的 OOP 基础,对多态
        BB bb = new BB();
        bb.calculateTime();
    }
}
abstract public class Template { //抽象类-模板设计模式
    public abstract void job();//抽象方法

    public void calculateTime() {//实现方法,调用 job 方法
//得到开始的时间
        long start = System.currentTimeMillis();
        job(); //动态绑定机制
//得的结束的时间
        long end = System.currentTimeMillis();
        System.out.println("任务执行时间 " + (end - start));
    }
}
public class AA extends Template {
    //计算任务
//1+....+ 800000
    @Override
    public void job() { //实现 Template 的抽象方法 job
        long num = 0;
        for (long i = 1; i <= 800000; i++) {
            num += i;
        }
    }
    // public void job2() {
// //得到开始的时间
// long start = System.currentTimeMillis();
// long num = 0;
// for (long i = 1; i <= 200000; i++) {
// num += i;
// }
// //得的结束的时间
// long end = System.currentTimeMillis();
// System.out.println("AA 执行时间 " + (end - start));
// }
}
public class BB extends Template{
    public void job() {//这里也去,重写了 Template 的 job 方法
        long num = 0;
        for (long i = 1; i <= 80000; i++) {
            num *= i;
        }
    }
}
9.8 接口
9.8.1 接口是什么
接口描述可属于任何类或结构的一组相关行为,规定了实现本接口的类或接口必须拥有的一组规则。体现了自然界“如果你是……则必须能……”的理念。
9.8.2 接口入门
/*
* 接口类
* */
public interface UsbInterface { //接口
    public void start();

    //规定接口的相关方法,规定的.即规范... public void start();
    public void stop();
}
public class Camera implements UsbInterface{//实现接口,就是把接口方法实现
    @Override
    public void start() {
        System.out.println("相机开始工作...");
    }
    @Override
    public void stop() {
        System.out.println("相机停止工作....");
    }
}
//Phone 类 实现 UsbInterface
//即 Phone 类需要实现 UsbInterface 接口 规定/声明的方法
public class Phone implements UsbInterface {
    @Override
    public void start() {
        System.out.println("手机开始工作...");
    }
    @Override
    public void stop() {
        System.out.println("手机停止工作.....");
    }
}
public class Computer {
    //编写一个方法,计算机工作
    public void work(UsbInterface usbInterface){
        usbInterface.start();
        usbInterface.stop();
    }
}
public class Interface01 {
    public static void main(String[] args) {
//创建手机,相机对象
//Camera 实现了 UsbInterface
        Camera camera = new Camera();
//Phone 实现了 UsbInterface
        Phone phone = new Phone();
//创建计算机
        Computer computer = new Computer();
        computer.work(phone);//把手机接入到计算机
        System.out.println("===============");
        computer.work(camera);//把相机接入到计算机
    }
}
9.8.3 基本介绍
接口就是给出一些没有实现的方法,封装到一起,到某个类要使用的时候,在根据具体情况把这些方法写出来。
interface 接口名{
//属性
//方法(1.抽象方法 2.默认实现方法 3.静态方法)
}
class 类名 implements 接口{
自己属性;
自己方法;
必须实现的接口的抽象方法;
}
小结:
1.在jdk7.0前,接口里的所有方法都没有方法体,即都是抽象方法。
2.在jdk8.0后,接口可以有静态方法,即默认方法,也就是说接口中可以一方法的具体实现,但是实现方法要用default关键字修饰
9.8.4 深入了解
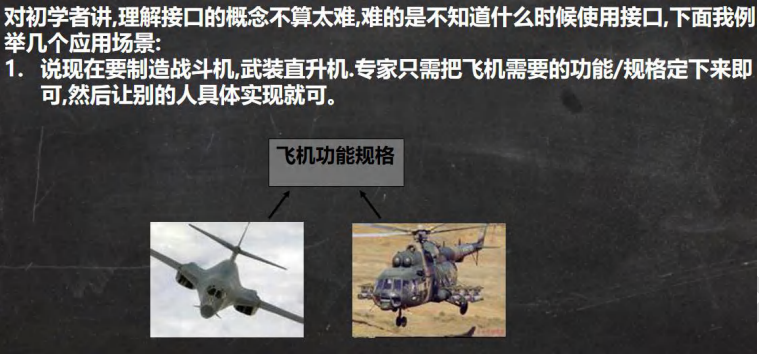
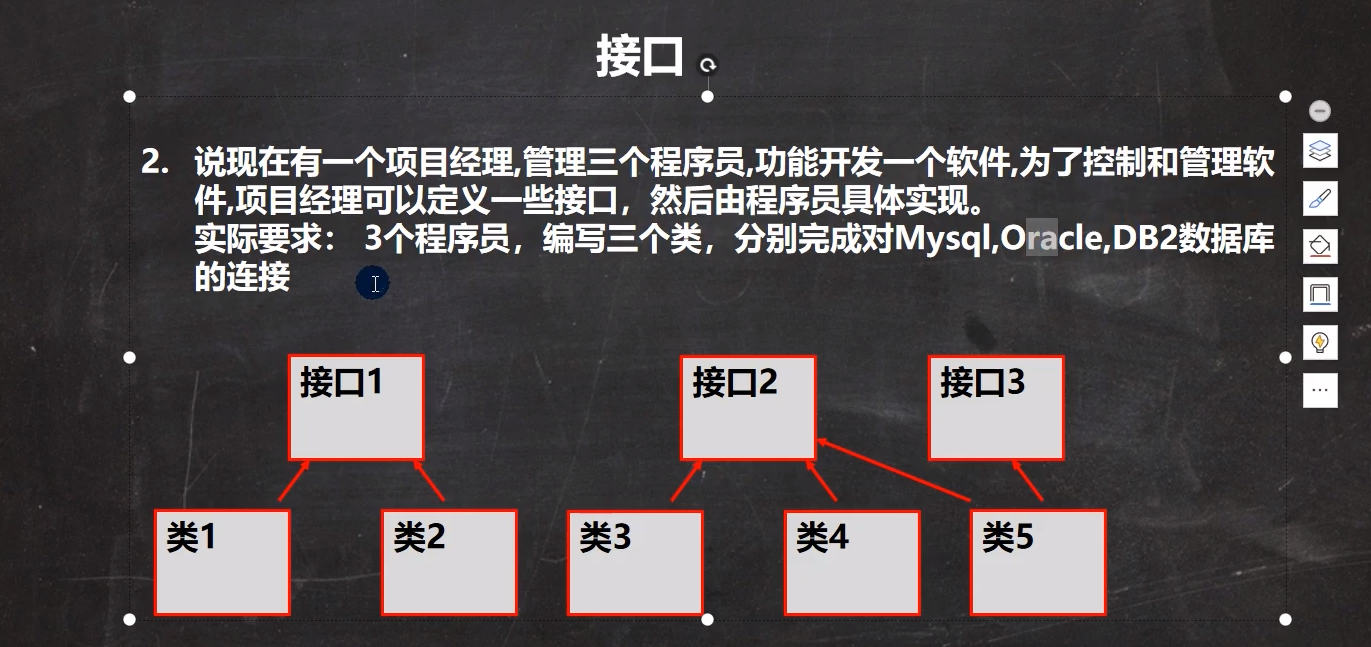
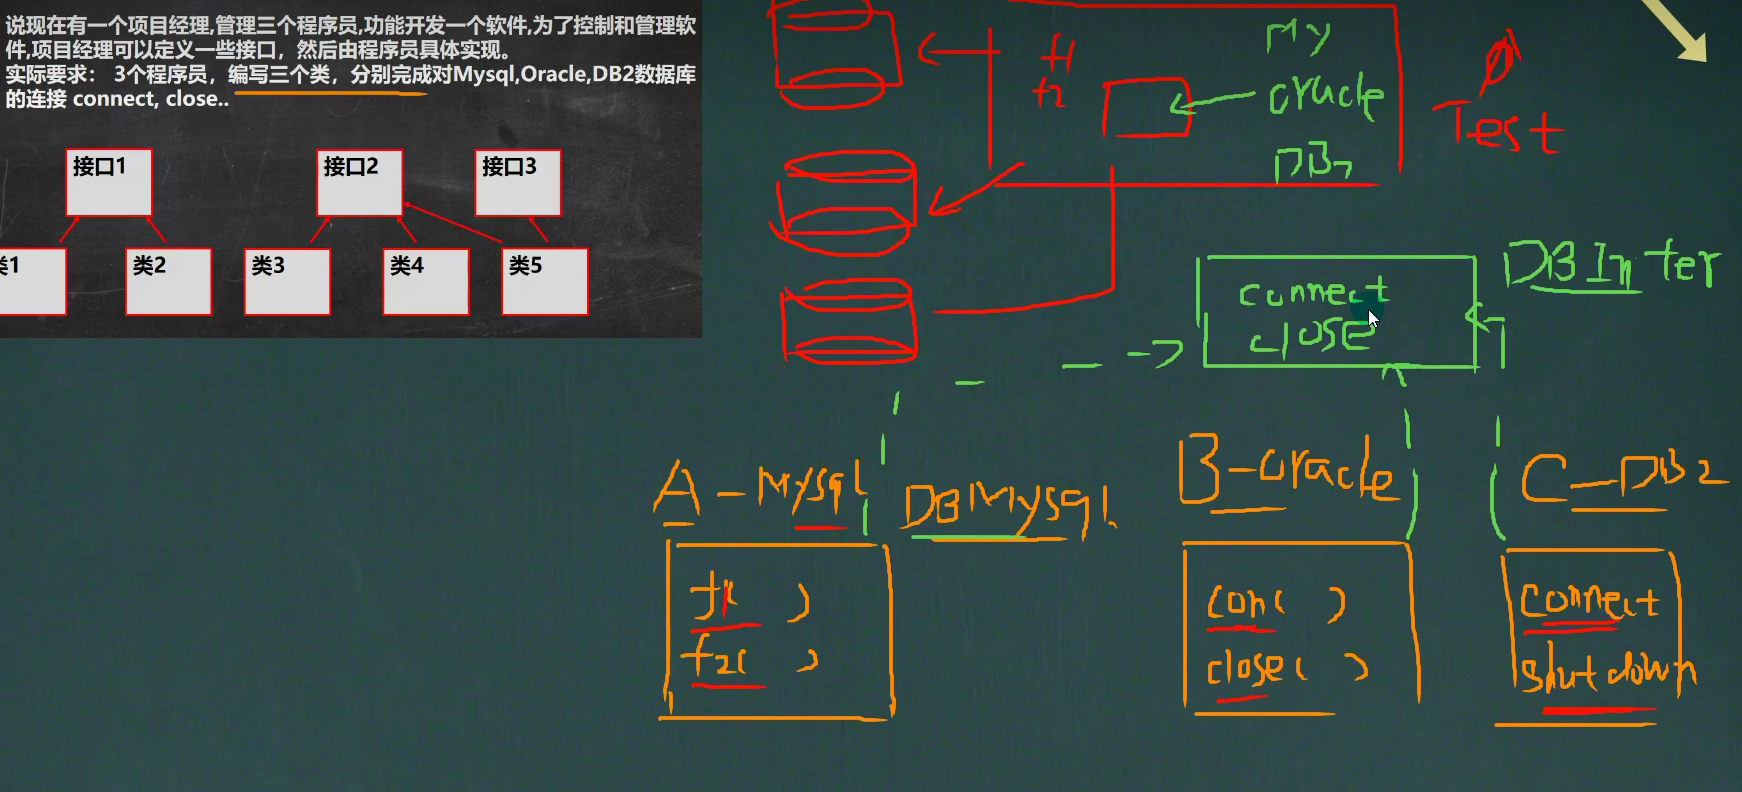
public interface DBInterface { //项目经理
    public void connect();//连接方法
    public void close();//关闭连接
}
//A 程序
public class MysqlDB implements DBInterface {
    @Override
    public void connect() {
        System.out.println("连接 mysql");
    }
    @Override
    public void close() {
        System.out.println("关闭 mysql");
    }
}
//B 程序员连接 Oracle
public class OracleDB implements DBInterface{
    @Override
    public void connect() {
        System.out.println("连接 oracle");
    }
    @Override
    public void close() {
        System.out.println("关闭 oracle");
    }
}
public class Interface03 {
    public static void main(String[] args) {
        MysqlDB mysqlDB = new MysqlDB();
        t(mysqlDB);
        OracleDB oracleDB = new OracleDB();
        t(oracleDB);
    }
    public static void t(DBInterface db) {
        db.connect();
        db.close();
    }
}
9.8.5 注意事项和细节
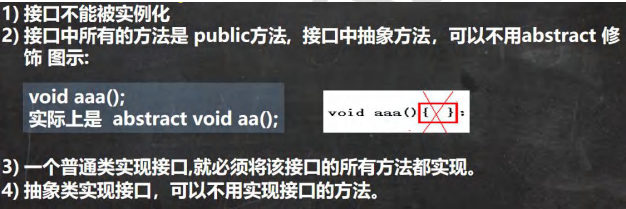
public class InterfaceDetail01 {
    public static void main(String[] args) {
//new IA();
    }
}

//1.接口不能被实例化
//2.接口中所有的方法是 public 方法, 接口中抽象方法,可以不用 abstract 修饰
//3.一个普通类实现接口,就必须将该接口的所有方法都实现,可以使用 alt+enter 来解决
//4.抽象类去实现接口时,可以不实现接口的抽象方法
interface IA {
    void say();//修饰符 public protected 默认 private

    void hi();
}

class Cat implements IA {
    @Override
    public void say() {
    }

    @Override
    public void hi() {
    }
}

abstract class Tiger implements IA {
}
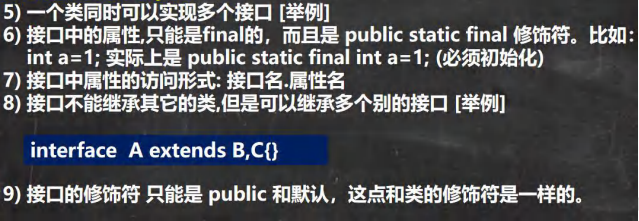
public class InterfaceDetail02 {
    public static void main(String[] args) {
//接口中的属性,是 public static final
        System.out.println(IB.n1);//说明 n1 就是 static
//IB.n1 = 30; 说明 n1 是 final
    }
}
interface IB {
    //接口中的属性,只能是 final 的,而且是 public static final 修饰符
    int n1 = 10; //等价 public static final int n1 = 10;
    void hi();
}
interface IC {
    void say();
}
//接口不能继承其它的类,但是可以继承多个别的接口
interface ID extends IB,IC {
}
//接口的修饰符 只能是 public 和默认,这点和类的修饰符是一样的
interface IE{}
//一个类同时可以实现多个接口
class Pig implements IB,IC {
    @Override
    public void hi() {
    }
    @Override
    public void say() {
    }
}
9.8.6 接口和继承类
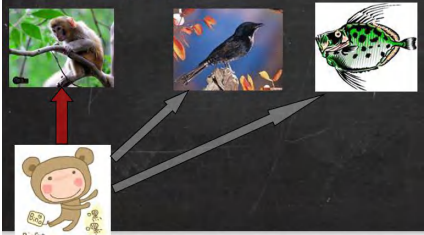
public class ExtendsVsInterface {
    public static void main(String[] args) {
        LittleMonkey wuKong = new LittleMonkey("悟空");
        wuKong.climbing();
        wuKong.swimming();
        wuKong.flying();
    }
}
//猴子
class Monkey {
    private String name;
    public Monkey(String name) {
        this.name = name;
    }
    public void climbing() {
        System.out.println(name + " 会爬树...");
    }
    public String getName() {
        return name;
    }
}
//接口
interface Fishable {
    void swimming();
}
interface Birdable {
    void flying();
}
    //继承
//小结: 当子类继承了父类,就自动的拥有父类的功能
// 如果子类需要扩展功能,可以通过实现接口的方式扩展. // 可以理解 实现接口 是 对 java 单继承机制的一种补充.
class LittleMonkey extends Monkey implements Fishable,Birdable {
    public LittleMonkey(String name) {
        super(name);
    }
    @Override
    public void swimming() {
        System.out.println(getName() + " 通过学习,可以像鱼儿一样游泳...");
    }
    @Override
    public void flying() {
        System.out.println(getName() + " 通过学习,可以像鸟儿一样飞翔...");
    }
}
9.8.7 接口的多态特性
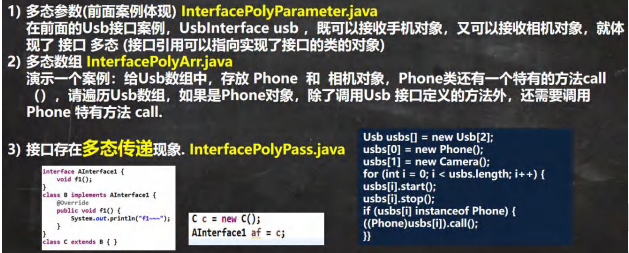
public class InterfacePolyParameter {
    public static void main(String[] args) {
//接口的多态体现
//接口类型的变量 if01 可以指向 实现了 IF 接口类的对象实例
        IF if01 = new Monster();
        if01 = new Car();
//继承体现的多态
//父类类型的变量 a 可以指向 继承 AAA 的子类的对象实例
        AAA a = new BBB();
        a = new CCC();
    }
}
interface IF {}
class Monster implements IF{}
class Car implements IF{}
class AAA {
}
class BBB extends AAA {}
class CCC extends AAA {}
public class InterfacePolyArr {
    public static void main(String[] args) {
//多态数组 -> 接口类型数组
        Usb[] usbs = new Usb[2];
        usbs[0] = new Phone_();
        usbs[1] = new Camera_();
/*
给 Usb 数组中,存放 Phone 和 相机对象,Phone 类还有一个特有的方法 call(),
请遍历 Usb 数组,如果是 Phone 对象,除了调用 Usb 接口定义的方法外,
还需要调用 Phone 特有方法 call
*/
        for(int i = 0; i < usbs.length; i++) {
            usbs[i].work();//动态绑定.. //和前面一样,我们仍然需要进行类型的向下转型
            if(usbs[i] instanceof Phone_) {//判断他的运行类型是 Phone_
                ((Phone_) usbs[i]).call();
            }
        }
    }
}
interface Usb{
    void work();
}
class Phone_ implements Usb {
    public void call() {
        System.out.println("手机可以打电话...");
    }
    @Override
    public void work() {
        System.out.println("手机工作中...");
    }
}
class Camera_ implements Usb {
    @Override
    public void work() {
        System.out.println("相机工作中...");
    }
}
/**
 * 演示多态传递现象
 */
public class InterfacePolyPass {
    public static void main(String[] args) {
//接口类型的变量可以指向,实现了该接口的类的对象实例
        IG ig = new Teacher();
//如果 IG 继承了 IH 接口,而 Teacher 类实现了 IG 接口
//那么,实际上就相当于 Teacher 类也实现了 IH 接口. //这就是所谓的 接口多态传递现象. IH ih = new Teacher();
    }
}
interface IH {
    void hi();
}
interface IG extends IH{ }
class Teacher implements IG {
    @Override
    public void hi() {
    }
}
9.9 内部类
定义类在局部位置(方法中/代码块中):(1)局部内部类 (2)匿名内部类
定义在成员位置(1)成员内部类 (2)静态内部类
9.9.1 基本介绍

9.9.2 基本语法
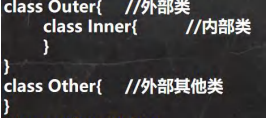
9.9.3 入门案例
public class InnerClass01 { //外部其他类
    public static void main(String[] args) {
    }
}
class Outer { //外部类
    private int n1 = 100;//属性
    public Outer(int n1) {//构造器
        this.n1 = n1;
    }
    public void m1() {//方法
        System.out.println("m1()");
    }
    {//代码块
        System.out.println("代码块...");
    }
    class Inner { //内部类, 在 Outer 类的内部
    }
}
9.9.4 内部类的分类
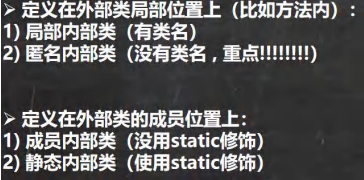
9.9.5 局部内部类的使用
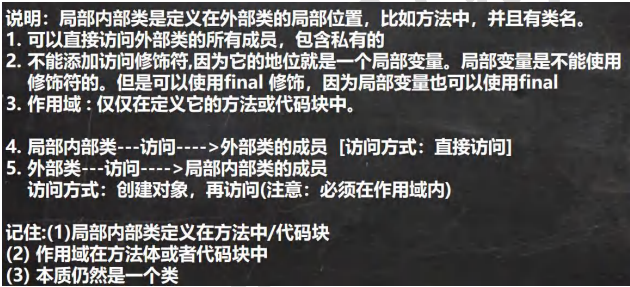
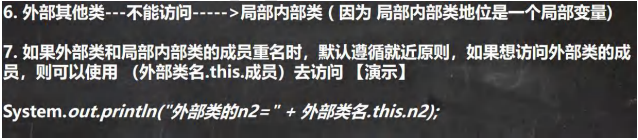
/**
 * 演示局部内部类的使用
 */
public class LocalInnerClass {//
    public static void main(String[] args) {
//演示一遍
        Outer02 outer02 = new Outer02();
        outer02.m1();
        System.out.println("outer02 的 hashcode=" + outer02);
    }
}
class Outer02 {//外部类
    private int n1 = 100;
    private void m2() {
        System.out.println("Outer02 m2()");
    }//私有方法
    public void m1() {//方法
//局部内部类是定义在外部类的局部位置,通常在方法
//不能添加访问修饰符,但是可以使用 final 修饰
//作用域 : 仅仅在定义它的方法或代码块中
        final class Inner02 {//局部内部类(本质仍然是一个类)
            //2.可以直接访问外部类的所有成员,包含私有的
            private int n1 = 800;
            public void f1() {
//局部内部类可以直接访问外部类的成员,比如下面 外部类 n1 和 m2()
//如果外部类和局部内部类的成员重名时,默认遵循就近原则,如果想访问外部类的成员,
// 使用 外部类名.this.成员)去访问
// Outer02.this 本质就是外部类的对象, 即哪个对象调用了 m1, Outer02.this 就是哪个对象
                System.out.println("n1=" + n1 + " 外部类的 n1=" + Outer02.this.n1);
                System.out.println("Outer02.this hashcode=" + Outer02.this);
                m2();
            }
        }
//外部类在方法中,可以创建 Inner02 对象,然后调用方法即可
        Inner02 inner02 = new Inner02();
        inner02.f1();
    }
}
9.9.6 匿名内部类的使用
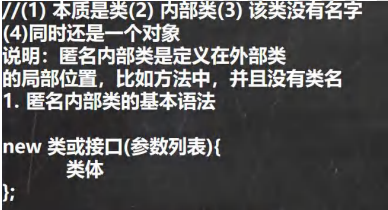
/**
 * 演示匿名内部类的使用
 */
public class AnonymousInnerClass {
    public static void main(String[] args) {
        Outer04 outer04 = new Outer04();
        outer04.method();
    }
}
class Outer04 { //外部类
    private int n1 = 10;//属性
    public void method() {//方法
//基于接口的匿名内部类
//1.需求: 想使用 IA 接口,并创建对象
//2.传统方式,是写一个类,实现该接口,并创建对象
//3.需求是 Tiger/Dog 类只是使用一次,后面再不使用
//4. 可以使用匿名内部类来简化开发
//5. tiger 的编译类型 ? IA
//6. tiger 的运行类型 ? 就是匿名内部类 Outer04$1
/*
我们看底层 会分配 类名 Outer04$1
class Outer04$1 implements IA {
@Override
public void cry() {
System.out.println("老虎叫唤...");
}
}
*/
//7. jdk 底层在创建匿名内部类 Outer04$1,立即马上就创建了 Outer04$1 实例,并且把地址
// 返回给 tiger
//8. 匿名内部类使用一次,就不能再使用
        IA tiger = new IA() {
            @Override
            public void cry() {
                System.out.println("老虎叫唤...");
            }
        };
        System.out.println("tiger 的运行类型=" + tiger.getClass());
        tiger.cry();
        tiger.cry();
        tiger.cry();
// IA tiger = new Tiger();
// tiger.cry();
//演示基于类的匿名内部类
//分析
//1. father 编译类型 Father
//2. father 运行类型 Outer04$2
//3. 底层会创建匿名内部类
/*
class Outer04$2 extends Father{
@Override
public void test() {
System.out.println("匿名内部类重写了 test 方法");
}
}
*/
//4. 同时也直接返回了 匿名内部类 Outer04$2 的对象
//5. 注意("jack") 参数列表会传递给 构造器
        Father father = new Father("jack"){
            @Override
            public void test() {
                System.out.println("匿名内部类重写了 test 方法");
            }
        };
        System.out.println("father 对象的运行类型=" + father.getClass());//Outer04$2
        father.test();
//基于抽象类的匿名内部类
        Animal animal = new Animal(){
            @Override
            void eat() {
                System.out.println("小狗吃骨头...");
            }
        };
        animal.eat();
    }
}
interface IA {//接口
    public void cry();
}
//class Tiger implements IA {
//
// @Override
// public void cry() {
// System.out.println("老虎叫唤...");
// }
//}
//class Dog implements IA{
// @Override
// public void cry() {
// System.out.println("小狗汪汪...");
// }
//}
class Father {//类
    public Father(String name) {//构造器
        System.out.println("接收到 name=" + name);
    }
    public void test() {//方法
    }
}
abstract class Animal { //抽象类
    abstract void eat();
}

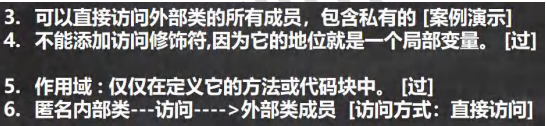

public class AnonymousInnerClassDetail {
    public static void main(String[] args) {
        Outer05 outer05 = new Outer05();
        outer05.f1();
//外部其他类---不能访问----->匿名内部类
        System.out.println("main outer05 hashcode=" + outer05);
    }
}
class Outer05 {
    private int n1 = 99;
    public void f1() {
//创建一个基于类的匿名内部类
//不能添加访问修饰符,因为它的地位就是一个局部变量
//作用域 : 仅仅在定义它的方法或代码块中
        Person p = new Person(){
            private int n1 = 88;
            @Override
            public void hi() {
//可以直接访问外部类的所有成员,包含私有的
//如果外部类和匿名内部类的成员重名时,匿名内部类访问的话,
//默认遵循就近原则,如果想访问外部类的成员,则可以使用 (外部类名.this.成员)去访问
                System.out.println("匿名内部类重写了 hi 方法 n1=" + n1 +
                        " 外部内的 n1=" + Outer05.this.n1 );
//Outer05.this 就是调用 f1 的 对象
                System.out.println("Outer05.this hashcode=" + Outer05.this);
            }
        };
        p.hi();//动态绑定, 运行类型是 Outer05$1
//也可以直接调用, 匿名内部类本身也是返回对象
// class 匿名内部类 extends Person {}
// new Person(){
// @Override
// public void hi() {
// System.out.println("匿名内部类重写了 hi 方法,哈哈...");
// }
// @Override
// public void ok(String str) {
// super.ok(str);
// }
// }.ok("jack");
    }
}
class Person {//类
    public void hi() {
        System.out.println("Person hi()");
    }
    public void ok(String str) {
        System.out.println("Person ok() " + str);
    }
}
//抽象类/接口...
9.9.7 匿名内部类的实践
当做实参直接传递,简洁高效。
public class InnerClassExercise01 {
    public static void main(String[] args) {
//当做实参直接传递,简洁高效
        f1(new IL() {
            @Override
            public void show() {
                System.out.println("这是一副名画~~...");
            }
        });
//传统方法
        f1(new Picture());
    }
    //静态方法,形参是接口类型
    public static void f1(IL il) {
        il.show();
    }
}
//接口
interface IL {
    void show();
}
//类->实现 IL => 编程领域 (硬编码)
class Picture implements IL {
    @Override
    public void show() {
        System.out.println("这是一副名画 XX...");
    }
}
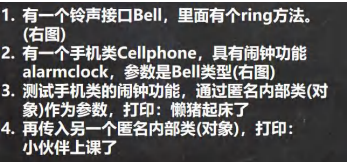
public class InnerClassExercise02 {
    public static void main(String[] args) {
        CellPhone cellPhone = new CellPhone();
//1. 传递的是实现了 Bell 接口的匿名内部类 InnerClassExercise02$1
//2. 重写了 ring
//3. Bell bell = new Bell() {
// @Override
// public void ring() {
// System.out.println("懒猪起床了");
// }
// }
        cellPhone.alarmClock(new Bell() {
            @Override
            public void ring() {
                System.out.println("懒猪起床了");
            }
        });
        cellPhone.alarmClock(new Bell() {
            @Override
            public void ring() {
                System.out.println("小伙伴上课了");
            }
        });
    }
}
interface Bell{ //接口
    void ring();//方法
}
class CellPhone{//类
    public void alarmClock(Bell bell){//形参是 Bell 接口类型
        System.out.println(bell.getClass());
        bell.ring();//动态绑定
    }
}
9.9.8 成员内部类的使用
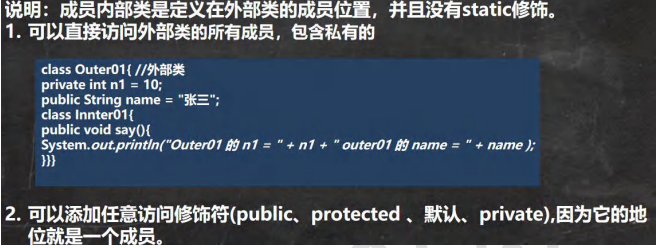
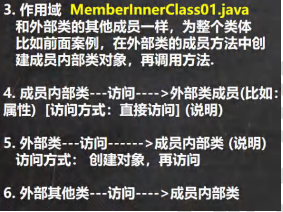

public class MemberInnerClass01 {
    public static void main(String[] args) {
        Outer08 outer08 = new Outer08();
        outer08.t1();
//外部其他类,使用成员内部类的三种方式
// 第一种方式
// outer08.new Inner08(); 相当于把 new Inner08()当做是 outer08 成员
// 这就是一个语法,不要特别的纠结.
        Outer08.Inner08 inner08 = outer08.new Inner08();
        inner08.say();
// 第二方式 在外部类中,编写一个方法,可以返回 Inner08 对象
        Outer08.Inner08 inner08Instance = outer08.getInner08Instance();
        inner08Instance.say();
    }
}

class Outer08 { //外部类
    private int n1 = 10;
    public String name = "张三";

    private void hi() {
        System.out.println("hi()方法...");
    }

    //1.注意: 成员内部类,是定义在外部内的成员位置上
//2.可以添加任意访问修饰符(public、protected 、默认、private),因为它的地位就是一个成员
    public class Inner08 {//成员内部类
        private double sal = 99.8;
        private int n1 = 66;

        public void say() {
//可以直接访问外部类的所有成员,包含私有的
//如果成员内部类的成员和外部类的成员重名,会遵守就近原则. //,可以通过 外部类名.this.属性 来访问外部类的成员
            System.out.println("n1 = " + n1 + " name = " + name + " 外部类的 n1=" + Outer08.this.n1);
            hi();
        }
    }

    //方法,返回一个 Inner08 实例
    public Inner08 getInner08Instance() {
        return new Inner08();
    }

    //写方法
    public void t1() {
//使用成员内部类
//创建成员内部类的对象,然后使用相关的方法
        Inner08 inner08 = new Inner08();
        inner08.say();
        System.out.println(inner08.sal);
    }
}
9.9.9 静态内部类的使用


public class StaticInnerClass01 {
    public static void main(String[] args) {
        Outer10 outer10 = new Outer10();
        outer10.m1();
//外部其他类 使用静态内部类
//方式 1
//因为静态内部类,是可以通过类名直接访问(前提是满足访问权限)
        Outer10.Inner10 inner10 = new Outer10.Inner10();
        inner10.say();
//方式 2
//编写一个方法,可以返回静态内部类的对象实例.
        Outer10.Inner10 inner101 = outer10.getInner10();
        System.out.println("============");
        inner101.say();
        Outer10.Inner10 inner10_ = Outer10.getInner10_();
        System.out.println("************");
        inner10_.say();
    }
}

class Outer10 { //外部类
    private int n1 = 10;
    private static String name = "张三";

    private static void cry() {
    }

    //Inner10 就是静态内部类
//1. 放在外部类的成员位置
//2. 使用 static 修饰
//3. 可以直接访问外部类的所有静态成员,包含私有的,但不能直接访问非静态成员
//4. 可以添加任意访问修饰符(public、protected 、默认、private),因为它的地位就是一个成员
//5. 作用域 :同其他的成员,为整个类体
    static class Inner10 {
        private static String name = "李四";

        public void say() {
//如果外部类和静态内部类的成员重名时,静态内部类访问的时,
//默认遵循就近原则,如果想访问外部类的成员,则可以使用 (外部类名.成员)
            System.out.println(name + " 外部类 name= " + Outer10.name);
            cry();
        }
    }

    public void m1() { //外部类---访问------>静态内部类 访问方式:创建对象,再访问
        Inner10 inner10 = new Inner10();
        inner10.say();
    }

    public Inner10 getInner10() {
        return new Inner10();
    }

    public static Inner10 getInner10_() {
        return new Inner10();
    }
}
十、枚举和注解
10.1 需求
要求创建季节(Season) 对象,请设计并完成。
public class Enumeration01 {
    public static void main(String[] args) {
        //使用
        Season1 spring = new Season1("春天", "温暖");
        Season1 winter = new Season1("冬天", "寒冷");
        Season1 summer = new Season1("夏天", "炎热");
        Season1 autumn = new Season1("秋天", "凉爽");
// autumn.setName("XXX");
// autumn.setDesc("非常的热..");
        //因为对于季节而已,他的对象(具体值),是固定的四个,不会有更多
        //这个设计类的思路,不能体现季节是固定的四个对象
        //因此,这样的设计不好===> 枚举类[枚: 一个一个 举: 例举 , 即把具体的对象一个一个例举出来的类
        // 就称为枚举类]
        Season1 other = new Season1("红天", "~~~");
    }
}

class Season1 {//类
    private String name;
    private String desc;//描述

    public Season1(String name, String desc) {
        this.name = name;
        this.desc = desc;
    }

    public String getName() {
        return name;
    }

    public void setName(String name) {
        this.name = name;
    }

    public String getDesc() {
        return desc;
    }

    public void setDesc(String desc) {
        this.desc = desc;
    }
}
10.2 问题解析
10.2.1 创建Season对象有如下特点
1.季节的是有限的几个值(spring,sunmmer,autumn,winter)
2.只读,不需要修改
10.3 枚举
1.枚举是一组常量的集合
2.是一种特殊的类,里面包含一组有限的特定的对象
3.枚举英文enumeration,简写enum
10.4 枚举的两种实现方式
1.自定义类实现枚举
2.使用enum关键字实现枚举
10.5 自定义类实现枚举

public class Enumeration02 {
    public static void main(String[] args) {
        System.out.println(Season.AUTUMN);
        System.out.println(Season.SPRING);
        System.out.println(Season.WINTER);
        System.out.println(Season.SUMMER);
    }
}

//演示字定义枚举实现
class Season {//类
    private String name;
    private String desc;//描述
    //定义了四个对象, 固定.
    public static final Season SPRING = new Season("春天", "温暖");
    public static final Season WINTER = new Season("冬天", "寒冷");
    public static final Season AUTUMN = new Season("秋天", "凉爽");
    public static final Season SUMMER = new Season("夏天", "炎热");

    //1. 将构造器私有化,目的防止 直接 new
    //2. 去掉 setXxx 方法, 防止属性被修改
    //3. 在 Season 内部,直接创建固定的对象
    //4. 优化,可以加入 final 修饰符
    private Season(String name, String desc) {
        this.name = name;
        this.desc = desc;
    }

    public String getName() {
        return name;
    }

    public String getDesc() {
        return desc;
    }

    @Override
    public String toString() {
        return "Season{" +
                "name='" + name + '\'' +
                ", desc='" + desc + '\'' +
                '}';
    }
}
10.6 自定义枚举小结
10.6.1 自定义枚举有以下特点
1.构造器私有化
2.本类内部创建一组对象[四个 春夏秋冬]
3.对外暴露对象(通过为对象添加 public final static 修饰符)
4.可以提供 get 方法,但是不要提供 set
10.7 enum关键字实现枚举
10.7.1 说明
public class Enumeration03 {
    public static void main(String[] args) {
        System.out.println(Season2.AUTUMN);
        System.out.println(Season2.SUMMER);
    }
}

//演示使用 enum 关键字来实现枚举类
enum Season2 {//类
    //定义了四个对象, 固定. // public static final Season SPRING = new Season("春天", "温暖");
// public static final Season WINTER = new Season("冬天", "寒冷");
// public static final Season AUTUMN = new Season("秋天", "凉爽");
// public static final Season SUMMER = new Season("夏天", "炎热");
//如果使用了 enum 来实现枚举类
//1. 使用关键字 enum 替代 class
//2. public static final Season SPRING = new Season("春天", "温暖") 直接使用
// SPRING("春天", "温暖") 解读 常量名(实参列表)
//3. 如果有多个常量(对象), 使用 ,号间隔即可
//4. 如果使用 enum 来实现枚举,要求将定义常量对象,写在前面
//5. 如果我们使用的是无参构造器,创建常量对象,则可以省略 ()
    SPRING("春天", "温暖"), WINTER("冬天", "寒冷"), AUTUMN("秋天", "凉爽"), SUMMER("夏天", "炎热")/*, What()*/;
    private String name;
    private String desc;//描述

    private Season2() {//无参构造器
    }

    private Season2(String name, String desc) {
        this.name = name;
        this.desc = desc;
    }

    public String getName() {
        return name;
    }

    public String getDesc() {
        return desc;
    }

    @Override
    public String toString() {
        return "Season{" +
                "name='" + name + '\'' +
                ", desc='" + desc + '\'' +
                '}';
    }
}
10.7.2 enum关键字实现枚举注意事项
1.当我们使用 enum 关键字开发一个枚举类时,默认会继承 Enum 类, 而且是一个 final 类
2.传统的 public static final Season2 SPRING = new Season2("春天", "温暖"); 简化成 SPRING("春天", "温暖"),这里必须知道,它调用的是哪个构造器.
3.如果使用无参构造器创建枚举对象,则实参列表和小括号都可以省略
4.当有多个枚举对象时,使用间隔,最后有一个分号结尾
5.枚举对象必须放在枚举类的行首.
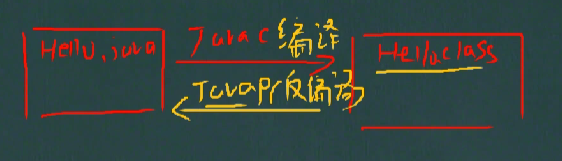

10.8 enum常用方法说明
说明:使用关键字 enum 时,会隐式继承 Enum 类, 这样我们就可以使用 Enum 类相关的方法。
public abstract class Enum<E extends Enum<E>>
        implements Comparable<E>, Serializable {
}
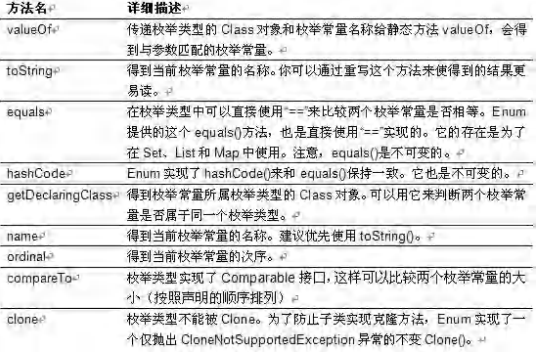
10.9 enum常用方法应用案例
1.toString:Enum 类已经重写过了,返回的是当前对象 名,子类可以重写该方法,用于返回对象的属性信息
2.name:返回当前对象名(常量名),子类中不能重写
3.ordinal:返回当前对象的位置号,默认从 0 开始 4.values:返回当前枚举类中所有的常量
5.valueOf:将字符串转换成枚举对象,要求字符串必须 为已有的常量名,否则报异常!
6.compareTo:比较两个枚举常量,比较的就是编号!
public class EnumMethod {
    public static void main(String[] args) {
//使用 Season2 枚举类,来演示各种方法
        Season2 autumn = Season2.AUTUMN;
//输出枚举对象的名字
        System.out.println(autumn.name());
//ordinal() 输出的是该枚举对象的次序/编号,从 0 开始编号
//AUTUMN 枚举对象是第三个,因此输出 2
        System.out.println(autumn.ordinal());
//从反编译可以看出 values 方法,返回 Season2[]
//含有定义的所有枚举对象
        Season2[] values = Season2.values();
        System.out.println("===遍历取出枚举对象(增强 for)====");
        for (Season2 season: values) {//增强 for 循环
            System.out.println(season);
        }
//valueOf:将字符串转换成枚举对象,要求字符串必须为已有的常量名,否则报异常
//执行流程
//1. 根据你输入的 "AUTUMN" 到 Season2 的枚举对象去查找
//2. 如果找到了,就返回,如果没有找到,就报错
        Season2 autumn1 = Season2.valueOf("AUTUMN");
        System.out.println("autumn1=" + autumn1);
        System.out.println(autumn == autumn1);
//compareTo:比较两个枚举常量,比较的就是编号
//1. 就是把 Season2.AUTUMN 枚举对象的编号 和 Season2.SUMMER 枚举对象的编号比较
//2. 看看结果
/*
public final int compareTo(E o) {
return self.ordinal - other.ordinal;
}
Season2.AUTUMN 的编号[2] - Season2.SUMMER 的编号[3]
*/
        System.out.println(Season2.AUTUMN.compareTo(Season2.SUMMER));
//补充了一个增强 for
// int[] nums = {1, 2, 9};
// //普通的 for 循环
// System.out.println("=====普通的 for=====");
// for (int i = 0; i < nums.length; i++) {
// System.out.println(nums[i]);
// }
// System.out.println("=====增强的 for=====");
// //执行流程是 依次从 nums 数组中取出数据,赋给 i, 如果取出完毕,则退出 for
// for(int i : nums) {
// System.out.println("i=" + i);
// }
    }
}
声明 Week 枚举类,其中包含星期一至星期日的定义; MONDAY,TUESDAY,WEDNESDAY,THURSDAY,FRIDAY, SATURDAY,SUNDAY;
使用 values 返回所有的枚举数组, 并遍历
public class EnumExercise02 {
    public static void main(String[] args) {
//获取到所有的枚举对象, 即数组
        Week[] weeks = Week.values();
//遍历,使用增强 for
        System.out.println("===所有星期的信息如下===");
        for (Week week : weeks) {
            System.out.println(week);
        }
    }
}
    /*
    声明 Week 枚举类,其中包含星期一至星期日的定义;
    MONDAY, TUESDAY, WEDNESDAY, THURSDAY, FRIDAY, SATURDAY, SUNDAY;
    使用 values 返回所有的枚举数组, 并遍历 , 输出左图效果
    */
enum Week {
    //定义 Week 的枚举对象
    MONDAY("星期一"), TUESDAY("星期二"), WEDNESDAY("星期三"), THURSDAY("星期四"), FRIDAY("星期五"), SATURDAY("星期六"), SUNDAY("星期日");
    private String name;
    private Week(String name) {//构造器
        this.name = name;
    }
    @Override
    public String toString() {
        return name;
    }
}
10.10 enum实现接口
1.使用 enum 关键字后,就不能再继承其它类了,因为 enum 会隐式继承 Enum,而 Java 是单继承机制。
2.枚举类和普通类一样,可以实现接口,如下形式。 enum 类名 implements 接口 1,接口 2{}
public class EnumDetail {
    public static void main(String[] args) {
        Music.CLASSICMUSIC.playing();
    }
}
class A {
}
    //1.使用 enum 关键字后,就不能再继承其它类了,因为 enum 会隐式继承 Enum,而 Java 是单继承机制
//enum Season3 extends A {
//
//}
//2.enum 实现的枚举类,仍然是一个类,所以还是可以实现接口的.
interface IPlaying {
    public void playing();
}
enum Music implements IPlaying {
    CLASSICMUSIC;
    @Override
    public void playing() {
        System.out.println("播放好听的音乐...");
    }
}
10.11 注解的理解
1.注解(Annotation)也被称为元数据(Metadata),用于修饰解释 包、类、方法、属性、构造器、局部变量等数据信息。
2.和注释一样,注解不影响程序逻辑,但注解可以被编译或运行,相当于嵌入在代码中的补充信息。
3.在 JavaSE 中,注解的使用目的比较简单,例如标记过时的功能,忽略警告等。在 JavaEE 中注解占据了更重要的角色,例如用来配置应用程序的任何切面,代替javaEE旧版中所遗留的繁冗代码和XML 配置等。
10.12 基本的Annotation介绍
使用 Annotation 时要在其前面增加 @ 符号, 并把该Annotation当成一个修饰符使用。用于修饰它支持的程序元素
三个基本的 Annotation:
1.@Override: 限定某个方法,是重写父类方法, 该注解只能用于方法
2.@Deprecated: 用于表示某个程序元素(类, 方法等)已过时
3.@SuppressWarnings: 抑制编译器警告
10.13 基本的Annotation应用案例
10.13.1 @Override注解案例
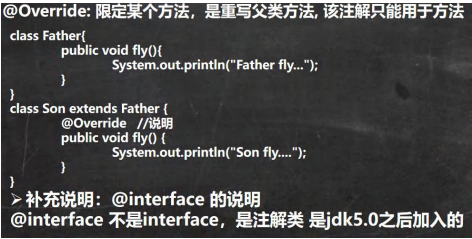
public class Override_ {
    public static void main(String[] args) {
    }
}
class Father{//父类
    public void fly(){
        System.out.println("Father fly...");
    }
    public void say(){}
}
class Son extends Father {//子类
//1. @Override 注解放在 fly 方法上,表示子类的 fly 方法时重写了父类的 fly
//2. 这里如果没有写 @Override 还是重写了父类 fly
//3. 如果你写了@Override 注解,编译器就会去检查该方法是否真的重写了父类的
// 方法,如果的确重写了,则编译通过,如果没有构成重写,则编译错误
//4. 看看 @Override 的定义
// 如果发现 @interface 表示一个 注解类
/*
@Target(ElementType.METHOD)
@Retention(RetentionPolicy.SOURCE)
public @interface Override {
}
*/
    @Override //说明
    public void fly() {
        System.out.println("Son fly....");
    }
    @Override
    public void say() {}
}
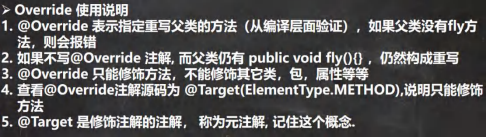
10.13.2 @Deprecated注解案例
@Deprecated: 用于表示某个程序元素(类, 方法等)已过时
public class Deprecated_ {
    public static void main(String[] args) {
        A a = new A();
        a.hi();
        System.out.println(a.n1);
    }
}
//1. @Deprecated 修饰某个元素, 表示该元素已经过时
//2. 即不在推荐使用,但是仍然可以使用
//3. 查看 @Deprecated 注解类的源码
//4. 可以修饰方法,类,字段, 包, 参数 等等
//5. @Deprecated 可以做版本升级过渡使用
/*
@Documented
@Retention(RetentionPolicy.RUNTIME)
@Target(value={CONSTRUCTOR, FIELD, LOCAL_VARIABLE, METHOD, PACKAGE, PARAMETER, TYPE})
public @interface Deprecated {
}
*/
@Deprecated
class A {
    @Deprecated
    public int n1 = 10;
    @Deprecated
    public void hi(){
    }
}
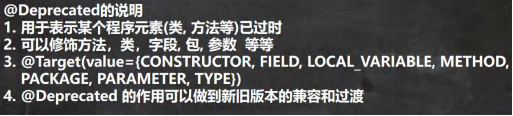
10.13.3 @SuppressWarning注解案例
@SuppressWarnings: 抑制编译器警告
import java.util.ArrayList;
import java.util.List;

@SuppressWarnings({"rawtypes", "unchecked", "unused"})
public class SuppressWarnings_ {
//1. 当我们不希望看到这些警告的时候,可以使用 SuppressWarnings 注解来抑制警告信息
//2. 在{""} 中,可以写入你希望抑制(不显示)警告信息
//3. 可以指定的警告类型有
// all,抑制所有警告
// boxing,抑制与封装/拆装作业相关的警告
// //cast,抑制与强制转型作业相关的警告
// //dep-ann,抑制与淘汰注释相关的警告
// //deprecation,抑制与淘汰的相关警告
// //fallthrough,抑制与 switch 陈述式中遗漏 break 相关的警告
// //finally,抑制与未传回 finally 区块相关的警告
// //hiding,抑制与隐藏变数的区域变数相关的警告
// //incomplete-switch,抑制与 switch 陈述式(enum case)中遗漏项目相关的警告
// //javadoc,抑制与 javadoc 相关的警告
    // //nls,抑制与非 nls 字串文字相关的警告
// //null,抑制与空值分析相关的警告
// //rawtypes,抑制与使用 raw 类型相关的警告
// //resource,抑制与使用 Closeable 类型的资源相关的警告
// //restriction,抑制与使用不建议或禁止参照相关的警告
// //serial,抑制与可序列化的类别遗漏 serialVersionUID 栏位相关的警告
// //static-access,抑制与静态存取不正确相关的警告
// //static-method,抑制与可能宣告为 static 的方法相关的警告
// //super,抑制与置换方法相关但不含 super 呼叫的警告
// //synthetic-access,抑制与内部类别的存取未最佳化相关的警告
// //sync-override,抑制因为置换同步方法而遗漏同步化的警告
// //unchecked,抑制与未检查的作业相关的警告
// //unqualified-field-access,抑制与栏位存取不合格相关的警告
// //unused,抑制与未用的程式码及停用的程式码相关的警告
//4. 关于 SuppressWarnings 作用范围是和你放置的位置相关
// 比如 @SuppressWarnings 放置在 main 方法,那么抑制警告的范围就是 main
// 通常我们可以放置具体的语句, 方法, 类. //5. 看看 @SuppressWarnings 源码
//(1) 放置的位置就是 TYPE, FIELD, METHOD, PARAMETER, CONSTRUCTOR, LOCAL_VARIABLE
//(2) 该注解类有数组 String[] values() 设置一个数组比如 {"rawtypes", "unchecked", "unused"}
/*
@Target({TYPE, FIELD, METHOD, PARAMETER, CONSTRUCTOR, LOCAL_VARIABLE})
@Retention(RetentionPolicy.SOURCE)
public @interface SuppressWarnings {
String[] value();
}
*/
    public static void main(String[] args) {
        List list = new ArrayList();
        list.add("jack");
        list.add("tom");
        list.add("mary");
        int i;
        System.out.println(list.get(1));
    }
    public void f1() {
// @SuppressWarnings({"rawtypes"})
        List list = new ArrayList();
        list.add("jack");
        list.add("tom");
        list.add("mary");
// @SuppressWarnings({"unused"})
        int i;
        System.out.println(list.get(1));
    }
}
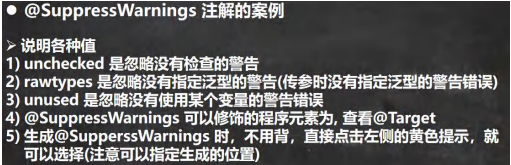
10.14 JDK的元Annotation(元注解,了解)
10.14.1 元注解的基本介绍
JDK 的元 Annotation 用于修饰其他 Annotation
10.14.2 元注解的种类(使用不多,了解)
1.Retention //指定注解的作用范围,三种 SOURCE,CLASS,RUNTIME
2.Target // 指定注解可以在哪些地方使用
3.Documented //指定该注解是否会在 javadoc 体现 4.Inherited //子类会继承父类注解
10.14.3 @Retention注解
说明
只能用于修饰一个Annotation定义,用于指定该Annotation 可以保留多长时间,@Rentention包含一个RetentionPolicy类型的成员变量, 使用@Rentention时必须为该value成员变量指定值:@Retention 的三种值
1.RetentionPolicy.SOURCE: 编译器使用后,直接丢弃这种策略的注释
2.RetentionPolicy.CLASS: 编译器将把注解记录在 class 文件中. 当运行 Java 程序时, JVM 不会保留注解。这是默认值
3.RetentionPolicy.RUNTIME:编译器将把注解记录在 class 文件中. 当运行 Java 程序时, JVM 会保留注解,程序可以通过反射获取该注解
10.14.4 @Target
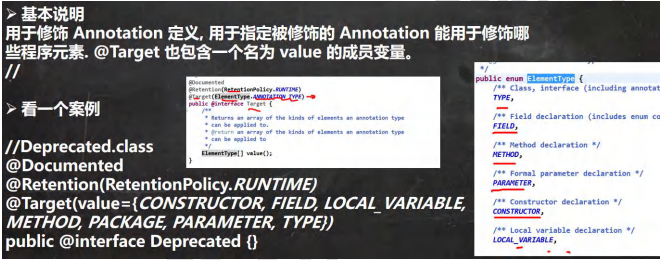
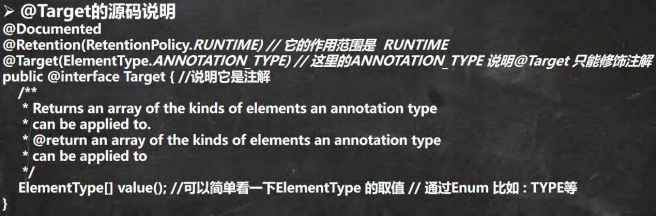
10.14.5 @Documented
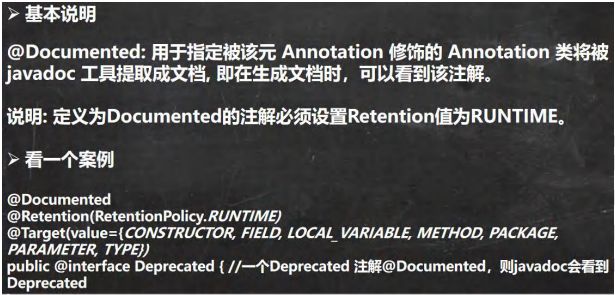
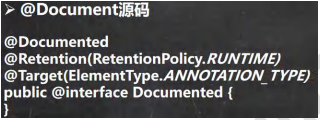
10.14.6 @InherIted注解
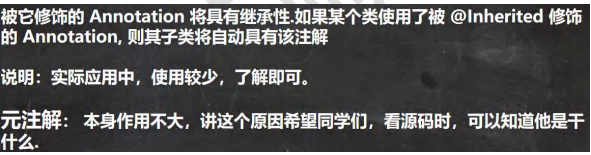
十一、异常-Exception
11.1 一段代码出现的问题
public class qq {
    public static void main(String[] args) {
        int num1 = 10;
        int num2 = 0;
        int res = num1 / num2;
        System.out.println(res);
        System.out.println("程序继续运行....");
    }
}
11.2 异常捕获
对异常进行捕获,保证程序可以继续运行.
public class Exception01 {
    public static void main(String[] args) {
        int num1 = 10;
        int num2 = 0;//Scanner();
//1. num1 / num2 => 10 / 0
//2. 当执行到 num1 / num2 因为 num2 = 0, 程序就会出现(抛出)异常 ArithmeticException
//3. 当抛出异常后,程序就退出,崩溃了 , 下面的代码就不在执行
//4. 大家想想这样的程序好吗? 不好,不应该出现了一个不算致命的问题,就导致整个系统崩溃
//5. java 设计者,提供了一个叫 异常处理机制来解决该问题
// int res = num1 / num2;
//如果程序员,认为一段代码可能出现异常/问题,可以使用 try-catch 异常处理机制来解决
//从而保证程序的健壮性
//将该代码块->选中->快捷键 ctrl + alt + t -> 选中 try-catch
//6. 如果进行异常处理,那么即使出现了异常,程序可以继续执行
        try {
            int res = num1 / num2;
        } catch (Exception e) {
//e.printStackTrace();
            System.out.println("出现异常的原因=" + e.getMessage());//输出异常信息
        }
        System.out.println("程序继续运行....");
    }
}
11.3 异常介绍
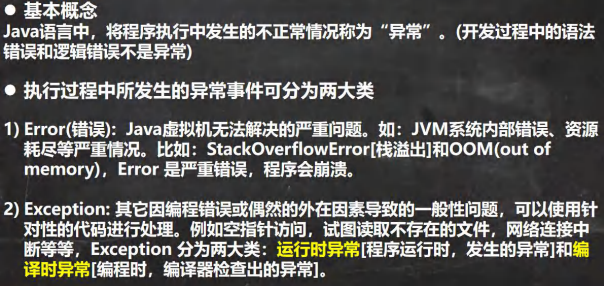
11.4 异常体系图一览
11.4.1 异常体系图
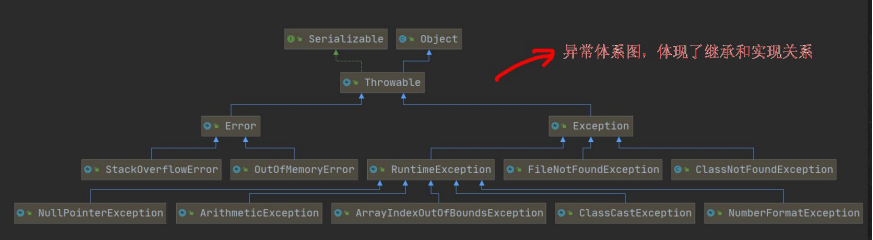
11.4.2 异常体系图小结
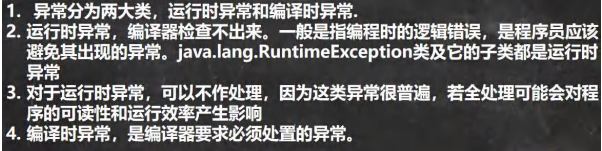
11.5 常见的运行时异常
11.5.1 常见的运行时异常包括
1.NullPointerException 空指针异常 2.ArithmeticException 数学运算异常
3.ArrayIndexOutOfBoundsException 数组下标越界异常 4.ClassCastException 类型转换异常
5.NumberFormatException 数字格式不正确异常[]
11.5.2 常见的运行时异常举例
1.NullPointerException 空指针异常
当应用程序试图在需要对象的地方使用 null 时,抛出该异常.
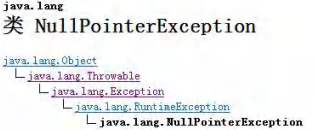
public class NullPointerException_ {
    public static void main(String[] args) {
        String name = null;
        System.out.println(name.length());
    }
}
2.ArithmeticException 数学运算异常
当出现异常的运算条件时,抛出此异常。例如,一个整数“除以零”时,抛出此类的一个实例.
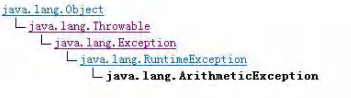
public class NumberFormatException_ {
    public static void main(String[] args) {
        String name = "张三";
//将 String 转成 int
        int num = Integer.parseInt(name);//抛出 NumberFormatException
        System.out.println(num);//1234
    }
}
3.ArrayIndexOutOfBoundsException 数组下标越界异常
用非法索引访问数组时抛出的异常。如果索引为负或大于等于数组大小,则该索引为非法索引
public class ArrayIndexOutOfBoundsException_ {
    public static void main(String[] args) {
        int[] arr = {1,2,4};
        for (int i = 0; i <= arr.length; i++) {
            System.out.println(arr[i]);
        }
    }
}
4.ClassCastException 类型转换异常
当试图将对象强制转换为不是实例的子类时,抛出该异常。

public class ClassCastException_ {
    public static void main(String[] args) {
        A b = new B(); //向上转型
        B b2 = (B)b;//向下转型,这里是 OK
        C c2 = (C)b;//这里抛出 ClassCastException
    }
}
class A {}
class B extends A {}
class C extends A {}
5.NumberFormatException 数字格式不正确异常
当应用程序试图将字符串转换成一种数值类型,但该字符串不能转换为适当格式时,抛出该异常 => 使用异常我们 可以确保输入是满足条件数字.
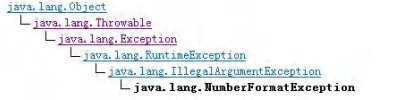
public class NumberFormatException__ {
    public static void main(String[] args) {
        String name = "张三";
//将 String 转成 int
        int num = Integer.parseInt(name);//抛出 NumberFormatException
        System.out.println(num);//1234
    }
}
11.6 编译异常
11.6.1 介绍

11.6.2 常见的编译异常
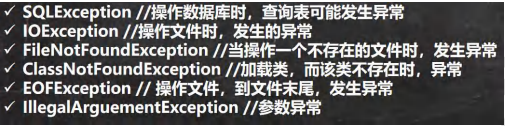
11.6.3 案例说明
import java.io.FileInputStream;
import java.io.IOException;

public class Exception02 {
    public static void main(String[] args) {
        try {
            FileInputStream fis;
            fis = new FileInputStream("d:\\aa.jpg");
            int len;
            while ((len = fis.read()) != -1) {
                System.out.println(len);
            }
            fis.close();
        } catch (IOException e) {
            e.printStackTrace();
        }
    }
}
11.7 异常处理
11.7.1 基本介绍
异常处理就是当异常发生时,对异常处理的方式。
11.7.2 异常处理方式

11.7.3 示意图
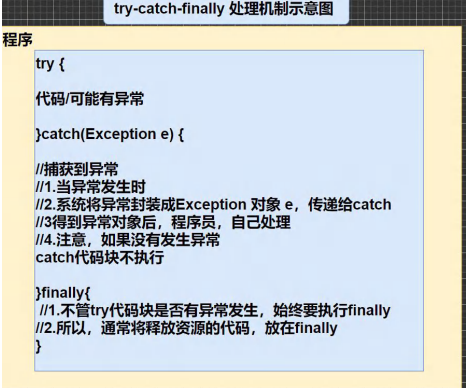
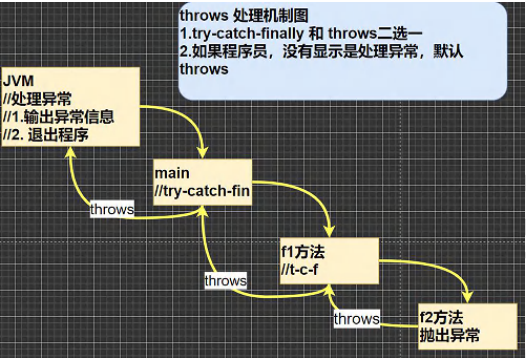
11.8 try-catch异常处理
11.8.1 try-catch方式处理异常说明
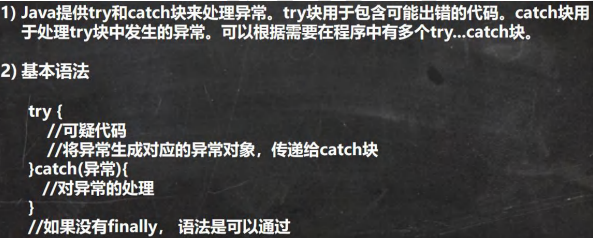
11.8.2 try-catch方式处理异常-入门
public class trycatch {
    public static void main(String[] args) {
        int num1 = 10;
        int num2 = 0;
        try {
            int res = num1 / num2;
        } catch (Exception e) {
            System.out.println(e.getMessage());
        }
    }
}
11.8.3 try-catch方式处理异常-注意事项
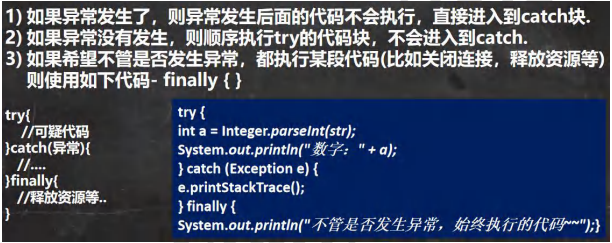
public class TryCatchDetail {
    public static void main(String[] args) {
//ctrl + atl + t
//1. 如果异常发生了,则异常发生后面的代码不会执行,直接进入到 catch 块
//2. 如果异常没有发生,则顺序执行 try 的代码块,不会进入到 catch
//3. 如果希望不管是否发生异常,都执行某段代码(比如关闭连接,释放资源等)则使用如下代码- finally
        try {
            String str = "张三";
            int a = Integer.parseInt(str);
            System.out.println("数字:" + a);
        } catch (NumberFormatException e) {
            System.out.println("异常信息=" + e.getMessage());
        } finally {
            System.out.println("finally 代码块被执行...");
        }
        System.out.println("程序继续...");
    }
}

public class TryCatchDetail02 {
    public static void main(String[] args) {
//1.如果 try 代码块有可能有多个异常
//2.可以使用多个 catch 分别捕获不同的异常,相应处理
//3.要求子类异常写在前面,父类异常写在后面
        try {
            Person person = new Person();
//person = null;
            System.out.println(person.getName());//NullPointerException
            int n1 = 10;
            int n2 = 0;
            int res = n1 / n2;//ArithmeticException
        } catch (NullPointerException e) {
            System.out.println("空指针异常=" + e.getMessage());
        } catch (ArithmeticException e) {
            System.out.println("算术异常=" + e.getMessage());
        } catch (Exception e) {
            System.out.println(e.getMessage());
        } finally {
        }
    }
}
class Person {
    private String name = "jack";
    public String getName() {
        return name;
    }
}

public class TryCatchDetail03 {
    public static void main(String[] args) {
/*
可以进行 try-finally 配合使用, 这种用法相当于没有捕获异常,
因此程序会直接崩掉/退出。应用场景,就是执行一段代码,不管是否发生异常,
都必须执行某个业务逻辑
*/
        try{
            int n1 = 10;
            int n2 = 0;
            System.out.println(n1 / n2);
        }finally {
            System.out.println("执行了 finally..");
        }
        System.out.println("程序继续执行..");
    }
}
11.8.4 try-catch-finally执行顺序小结
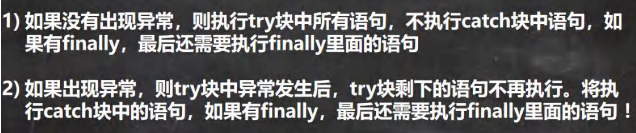
11.8.5 习题
如果用户输入的不是一个整数,就提示他反复输入,直到输入一个整数为止
import java.util.Scanner;

public class TryCatchExercise04 {
    public static void main(String[] args) {
//如果用户输入的不是一个整数,就提示他反复输入,直到输入一个整数为止
//1. 创建 Scanner 对象
//2. 使用无限循环,去接收一个输入
//3. 然后将该输入的值,转成一个 int
//4. 如果在转换时,抛出异常,说明输入的内容不是一个可以转成 int 的内容
//5. 如果没有抛出异常,则 break 该循环
        Scanner scanner = new Scanner(System.in);
        int num = 0;
        String inputStr = "";
        while (true) {
            System.out.println("请输入一个整数:"); //
            inputStr = scanner.next();
            try {
                num = Integer.parseInt(inputStr); //这里是可能抛出异常
                break;
            } catch (NumberFormatException e) {
                System.out.println("你输入的不是一个整数:");
            }
        }
        System.out.println("你输入的值是=" + num);
    }
}
11.9 throws异常介绍
11.9.1 基本介绍
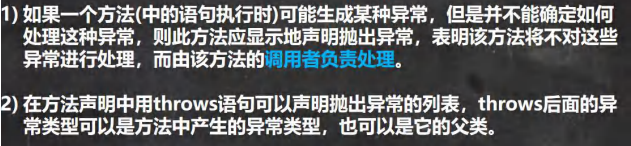
11.9.2 快速入门案例
11.9.3 注意事项和使用细节

import java.io.FileInputStream;
import java.io.FileNotFoundException;

public class ThrowsDetail {
    public static void main(String[] args) {
        f2();
    }
    public static void f2() /*throws ArithmeticException*/ {
//1.对于编译异常,程序中必须处理,比如 try-catch 或者 throws
//2.对于运行时异常,程序中如果没有处理,默认就是 throws 的方式处理
        int n1 = 10;
        int n2 = 0;
        double res = n1 / n2;
    }
    public static void f1() throws FileNotFoundException {
//这里大家思考问题 调用 f3() 报错
//1. 因为 f3() 方法抛出的是一个编译异常
//2. 即这时,就要 f1() 必须处理这个编译异常
//3. 在 f1() 中,要么 try-catch-finally ,或者继续 throws 这个编译异常
        f3(); // 抛出异常
    }
    public static void f3() throws FileNotFoundException {
        FileInputStream fis = new FileInputStream("d://aa.txt");
    }
    public static void f4() {
//1. 在 f4()中调用方法 f5() 是 OK
//2. 原因是 f5() 抛出的是运行异常
//3. 而 java 中,并不要求程序员显示处理,因为有默认处理机制
        f5();
    }
    public static void f5() throws ArithmeticException {
    }
}
class Father { //父类
    public void method() throws RuntimeException {
    }
}
class Son extends Father {//子类

    //3. 子类重写父类的方法时,对抛出异常的规定:子类重写的方法,
// 所抛出的异常类型要么和父类抛出的异常一致,要么为父类抛出的异常类型的子类型
//4. 在 throws 过程中,如果有方法 try-catch , 就相当于处理异常,就可以不必 throws
    @Override
    public void method() throws ArithmeticException {
    }
}
11.10 自定义异常
11.10.1 基本概念

11.10.2 自定义异常的步骤

11.10.3 自定义异常的案例
当我们接受Person对象年龄时,要求范围在18-120之间,否则抛出一个自定义异常(要求 继承RuntimeException),并给出提示。
public class CustomException {
    public static void main(String[] args) /*throws AgeException*/ {
        int age = 180;
//要求范围在 18 – 120 之间,否则抛出一个自定义异常
        if(!(age >= 18 && age <= 120)) {
//这里我们可以通过构造器,设置信息
            throw new AgeException("年龄需要在 18~120 之间");
        }
        System.out.println("你的年龄范围正确.");
    }
}
    //自定义一个异常
//1. 一般情况下,我们自定义异常是继承 RuntimeException
//2. 即把自定义异常做成 运行时异常,好处时,我们可以使用默认的处理机制
//3. 即比较方便
class AgeException extends RuntimeException {
    public AgeException(String message) {//构造器
        super(message);
    }
}
11.11 throw和throws的区别
11.11.1 图
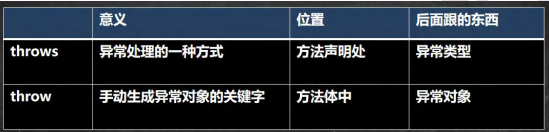
十二、常用类
12.1 包装类
12.1.1 包装类的分类
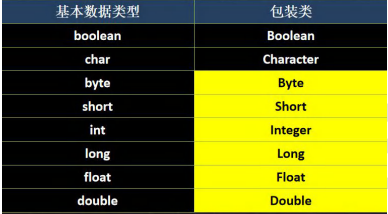
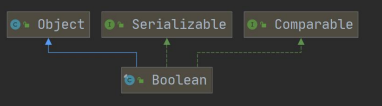
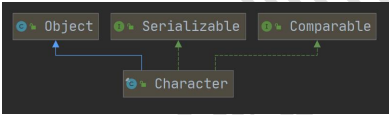
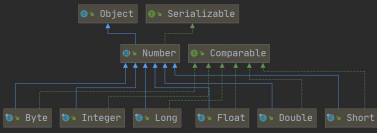
12.1.2 包装类和基本数据的转换

12.1.3 演示
public class Integer01 {
    public static void main(String[] args) {
//int <--> Integer 的装箱和拆箱
//jdk5 前是手动装箱和拆箱
//手动装箱 int->Integer
        int n1 = 100;
        Integer integer = new Integer(n1);
        Integer integer1 = Integer.valueOf(n1);
//手动拆箱
//Integer -> int
        int i = integer.intValue();
//jdk5 后,就可以自动装箱和自动拆箱
        int n2 = 200;
//自动装箱 int->Integer
        Integer integer2 = n2; //底层使用的是 Integer.valueOf(n2)
//自动拆箱 Integer->int
        int n3 = integer2; //底层仍然使用的是 intValue()方法
    }
}
12.1.4 包装类型和String类型的互相转换
public class WrapperVSString {
    public static void main(String[] args) {
//包装类(Integer)->String
        Integer i = 100;//自动装箱
//方式 1
        String str1 = i + "";
//方式 2
        String str2 = i.toString();
//方式 3
        String str3 = String.valueOf(i);
//String -> 包装类(Integer)
        String str4 = "12345";
        Integer i2 = Integer.parseInt(str4);//使用到自动装箱
        Integer i3 = new Integer(str4);//构造器
        System.out.println("ok~~");
    }
}
12.1.5 Integer类和Character类的常用方法
public class WrapperMethod {
    public static void main(String[] args) {
        System.out.println(Integer.MIN_VALUE); //返回最小值
        System.out.println(Integer.MAX_VALUE);//返回最大值
        System.out.println(Character.isDigit('a'));//判断是不是数字
        System.out.println(Character.isLetter('a'));//判断是不是字母
        System.out.println(Character.isUpperCase('a'));//判断是不是大写
        System.out.println(Character.isLowerCase('a'));//判断是不是小写
        System.out.println(Character.isWhitespace('a'));//判断是不是空格
        System.out.println(Character.toUpperCase('a'));//转成大写
        System.out.println(Character.toLowerCase('A'));//转成小写
    }
}
12.1.6 Integer类创建机制
public class WrapperExercise02 {
    public static void main(String[] args) {
        Integer i = new Integer(1);
        Integer j = new Integer(1);
        System.out.println(i == j); //False
//所以,这里主要是看范围 -128 ~ 127 就是直接返回
/*
//1. 如果 i 在 IntegerCache.low(-128)~IntegerCache.high(127),就直接从数组返回
//2. 如果不在 -128~127,就直接 new Integer(i)
public static Integer valueOf(int i) {
if (i >= IntegerCache.low && i <= IntegerCache.high)
return IntegerCache.cache[i + (-IntegerCache.low)];
return new Integer(i);
}
*/
        Integer m = 1; //底层 Integer.valueOf(1); -> 阅读源码
        Integer n = 1;//底层 Integer.valueOf(1);
        System.out.println(m == n); //T
//所以,这里主要是看范围 -128 ~ 127 就是直接返回
//,否则,就 new Integer(xx);
        Integer x = 128;//底层 Integer.valueOf(1);
        Integer y = 128;//底层 Integer.valueOf(1);
        System.out.println(x == y);//False
    }
}
12.1.7 Integer类面试题
public class WrapperExercise03 {
    public static void main(String[] args) {
//示例一
        Integer i1 = new Integer(127);
        Integer i2 = new Integer(127);
        System.out.println(i1 == i2);//F
//示例二
        Integer i3 = new Integer(128);
        Integer i4 = new Integer(128);
        System.out.println(i3 == i4);//F
//示例三
        Integer i5 = 127;//底层 Integer.valueOf(127)
        Integer i6 = 127;//-128~127
        System.out.println(i5 == i6); //T
//示例四
        Integer i7 = 128;
        Integer i8 = 128;
        System.out.println(i7 == i8);//F
//示例五
        Integer i9 = 127; //Integer.valueOf(127)
        Integer i10 = new Integer(127);
        System.out.println(i9 == i10);//F
//示例六
        Integer i11=127;
        int i12=127;
//只要有基本数据类型,判断的是值是否相同
        System.out.println(i11==i12); //T
//示例七
        Integer i13=128;
        int i14=128;
        System.out.println(i13==i14);//T
    }
}
12.2 String类
12.2.1 String类的理解和创建对象
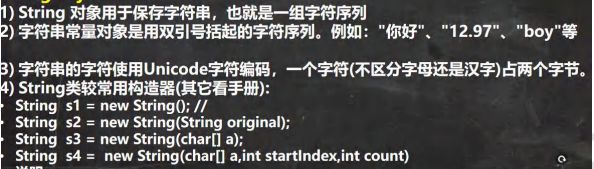
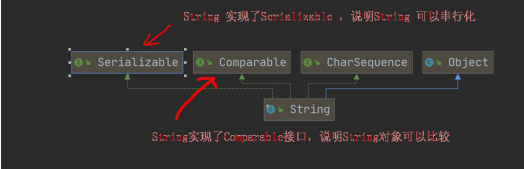
public class String01 {
    public static void main(String[] args) {
//1.String 对象用于保存字符串,也就是一组字符序列
//2. "jack" 字符串常量, 双引号括起的字符序列
//3. 字符串的字符使用 Unicode 字符编码,一个字符(不区分字母还是汉字)占两个字节
//4. String 类有很多构造器,构造器的重载
// 常用的有 String s1 = new String(); //
//String s2 = new String(String original);
//String s3 = new String(char[] a);
//String s4 = new String(char[] a,int startIndex,int count)
//String s5 = new String(byte[] b)
//5. String 类实现了接口 Serializable【String 可以串行化:可以在网络传输】
// 接口 Comparable [String 对象可以比较大小]
//6. String 是 final 类,不能被其他的类继承
//7. String 有属性 private final char value[]; 用于存放字符串内容
//8. 一定要注意:value 是一个 final 类型, 不可以修改(需要功力):即 value 不能指向
// 新的地址,但是单个字符内容是可以变化
        String name = "jack";
        name = "tom";
        final char[] value = {'a','b','c'};
        char[] v2 = {'t','o','m'};
        value[0] = 'H';
//value = v2; 不可以修改 value 地址
    }
}
12.2.2 创建String对象的两种方式
1.方式一:直接赋值 String s = "zhangsan";
2.方式二:调用构造器 String s = new String("zhangsan");
12.2.3 两种方式的区别
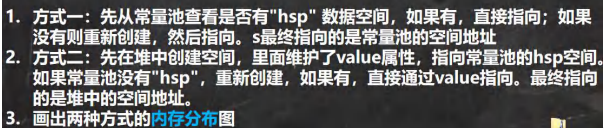

12.3 字符串的特性
12.3.1 说明
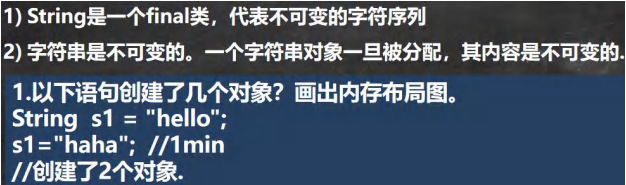
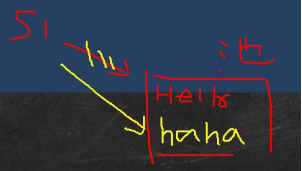
12.3.2 面试题
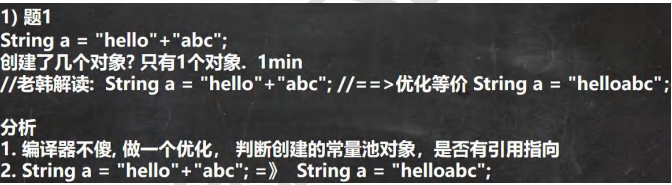

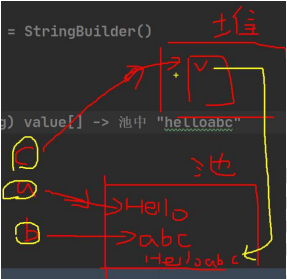
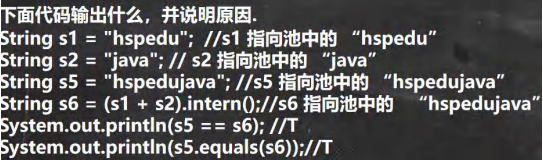
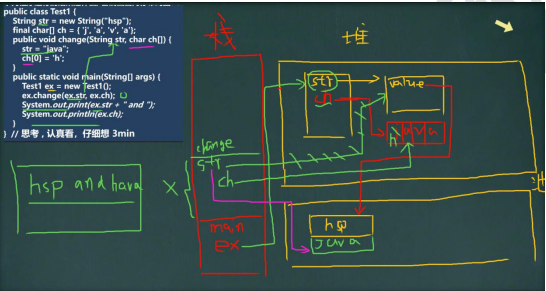
12.4 Sring类的常见方法
12.4.1 说明
12.4.2 String类的常见方法一览
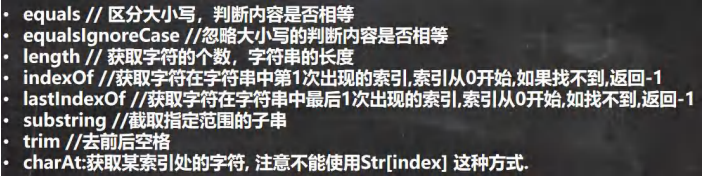
public class StringMethod01 {
    public static void main(String[] args) {
//1. equals 前面已经讲过了. 比较内容是否相同,区分大小写
        String str1 = "hello";
        String str2 = "Hello";
        System.out.println(str1.equals(str2));//
// 2.equalsIgnoreCase 忽略大小写的判断内容是否相等
        String username = "johN";
        if ("john".equalsIgnoreCase(username)) {
            System.out.println("Success!");
        } else {
            System.out.println("Failure!");
        }
// 3.length 获取字符的个数,字符串的长度
        System.out.println("李四".length());
// 4.indexOf 获取字符在字符串对象中第一次出现的索引,索引从 0 开始,如果找不到,返回-1
        String s1 = "wer@terwe@g";
        int index = s1.indexOf('@');
        System.out.println(index);// 3
        System.out.println("weIndex=" + s1.indexOf("we"));//0
// 5.lastIndexOf 获取字符在字符串中最后一次出现的索引,索引从 0 开始,如果找不到,返回-1
        s1 = "wer@terwe@g@";
        index = s1.lastIndexOf('@');
        System.out.println(index);//11
        System.out.println("ter 的位置=" + s1.lastIndexOf("ter"));//4
// 6.substring 截取指定范围的子串
        String name = "hello,张三";
//下面 name.substring(6) 从索引 6 开始截取后面所有的内容
        System.out.println(name.substring(6));//截取后面的字符
//name.substring(0,5)表示从索引 0 开始截取,截取到索引 5-1=4 位置
        System.out.println(name.substring(2,8));//llo
    }
}
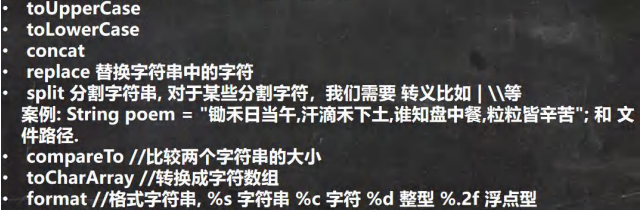
public class StringMethod02 {
    public static void main(String[] args) {
// 1.toUpperCase 转换成大写
        String s = "heLLo";
        System.out.println(s.toUpperCase());//HELLO
// 2.toLowerCase
        System.out.println(s.toLowerCase());//hello
// 3.concat 拼接字符串
        String s1 = "宝玉";
        s1 = s1.concat("林黛玉").concat("薛宝钗").concat("together");
        System.out.println(s1);//宝玉林黛玉薛宝钗 together
// 4.replace 替换字符串中的字符
        s1 = "宝玉 and 林黛玉 林黛玉 林黛玉";
//在 s1 中,将 所有的 林黛玉 替换成薛宝钗
//s1.replace() 方法执行后,返回的结果才是替换过的. // 注意对 s1 没有任何影响
        String s11 = s1.replace("宝玉", "jack");
        System.out.println(s1);//宝玉 and 林黛玉 林黛玉 林黛玉
        System.out.println(s11);//jack and 林黛玉 林黛玉 林黛玉
// 5.split 分割字符串, 对于某些分割字符,我们需要 转义比如 | \\等
        String poem = "锄禾日当午,汗滴禾下土,谁知盘中餐,粒粒皆辛苦";
// 1. 以 , 为标准对 poem 进行分割 , 返回一个数组
// 2. 在对字符串进行分割时,如果有特殊字符,需要加入 转义符 \
        String[] split = poem.split(",");
        poem = "E:\\aaa\\bbb";
        split = poem.split("\\\\");
        System.out.println("==分割后内容===");
        for (int i = 0; i < split.length; i++) {
            System.out.println(split[i]);
        }
// 6.toCharArray 转换成字符数组
                s = "happy";
        char[] chs = s.toCharArray();
        for (int i = 0; i < chs.length; i++) {
            System.out.println(chs[i]);
        }
// 7.compareTo 比较两个字符串的大小,如果前者大,
// 则返回正数,后者大,则返回负数,如果相等,返回 0
// (1) 如果长度相同,并且每个字符也相同,就返回 0
// (2) 如果长度相同或者不相同,但是在进行比较时,可以区分大小
// 就返回 if (c1 != c2) {
// return c1 - c2;
// }
// (3) 如果前面的部分都相同,就返回 str1.len - str2.len
        String a = "jcck";// len = 3
        String b = "jack";// len = 4
        System.out.println(a.compareTo(b)); // 返回值是 'c' - 'a' = 2 的值
// 8.format 格式字符串
        /* 占位符有:
         * %s 字符串 %c 字符 %d 整型 %.2f 浮点型
         *
         */
        String name = "john";
        int age = 10;
        double score = 56.857;
        char gender = '男';
//将所有的信息都拼接在一个字符串.
String info =
        "我的姓名是" + name + "年龄是" + age + ",成绩是" + score + "性别是" + gender + "。希望大家喜欢我!";
        System.out.println(info);
//1. %s , %d , %.2f %c 称为占位符
//2. 这些占位符由后面变量来替换
//3. %s 表示后面由 字符串来替换
//4. %d 是整数来替换
//5. %.2f 表示使用小数来替换,替换后,只会保留小数点两位, 并且进行四舍五入的处理
//6. %c 使用 char 类型来替换
        String formatStr = "我的姓名是%s 年龄是%d,成绩是%.2f 性别是%c.希望大家喜欢我!";
        String info2 = String.format(formatStr, name, age, score, gender);
        System.out.println("info2=" + info2);
    }
}
12.5 StringBuffer类
12.5.1 基本介绍
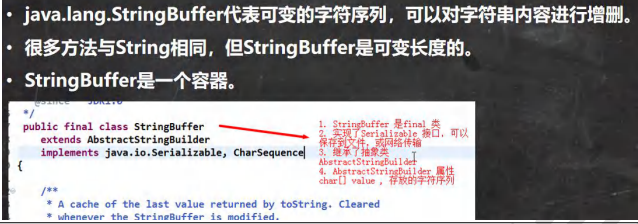
public class StringBuffer01 {
    public static void main(String[] args) {
//1. StringBuffer 的直接父类 是 AbstractStringBuilder
//2. StringBuffer 实现了 Serializable, 即 StringBuffer 的对象可以串行化
//3. 在父类中 AbstractStringBuilder 有属性 char[] value,不是 final
// 该 value 数组存放 字符串内容,引出存放在堆中的
//4. StringBuffer 是一个 final 类,不能被继承
//5. 因为 StringBuffer 字符内容是存在 char[] value, 所有在变化(增加/删除)
// 不用每次都更换地址(即不是每次创建新对象), 所以效率高于 String
        StringBuffer stringBuffer = new StringBuffer("hello");
    }
}
12.5.2 String VS StringBuffer
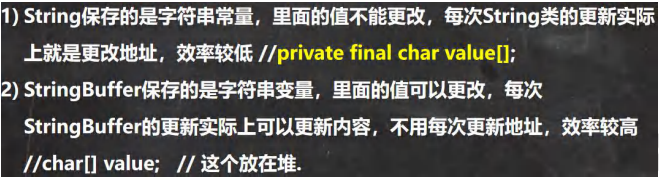
12.5.3 String和StringBuffer相互转换
public class StringAndStringBuffer {
    public static void main(String[] args) {
//看 String——>StringBuffer
        String str = "hello tom";
//方式 1 使用构造器
//注意: 返回的才是 StringBuffer 对象,对 str 本身没有影响
        StringBuffer stringBuffer = new StringBuffer(str);
//方式 2 使用的是 append 方法
        StringBuffer stringBuffer1 = new StringBuffer();
        stringBuffer1 = stringBuffer1.append(str);
//看看 StringBuffer ->String
        StringBuffer stringBuffer3 = new StringBuffer("韩顺平教育");
//方式 1 使用 StringBuffer 提供的 toString 方法
        String s = stringBuffer3.toString();
//方式 2: 使用构造器来搞定
        String s1 = new String(stringBuffer3);
    }
}
12.5.4 StringBuffer类常见方法
public class StringBufferMethod {
    public static void main(String[] args) {
        StringBuffer s = new StringBuffer("hello");
//增
        s.append(',');// "hello,"
        s.append("张三丰");//"hello,张三丰"
        s.append("赵敏").append(100).append(true).append(10.5);//"hello,张三丰赵敏 100true10.5" System.out.println(s);//"hello,张三丰赵敏 100true10.5"
//删
        /*
         * 删除索引为>=start && <end 处的字符
         * 解读: 删除 11~14 的字符 [11, 14)
         */
        s.delete(11, 14);
        System.out.println(s);//"hello,张三丰赵敏 true10.5"
//改
//使用 周芷若 替换 索引 9-11 的字符 [9,11)
        s.replace(9, 11, "周芷若");
        System.out.println(s);//"hello,张三丰周芷若 true10.5"
//查找指定的子串在字符串第一次出现的索引,如果找不到返回-1
        int indexOf = s.indexOf("张三丰");
        System.out.println(indexOf);//6
//插

//在索引为 9 的位置插入 "赵敏",原来索引为 9 的内容自动后移
        s.insert(9, "赵敏");
        System.out.println(s);//"hello,张三丰赵敏周芷若 true10.5"
//长度
        System.out.println(s.length());//22
        System.out.println(s);
    }
}
12.5.5 测试
public class StringBufferExercise01 {
    public static void main(String[] args) {
        String str = null;// ok
        StringBuffer sb = new StringBuffer(); //ok
        sb.append(str);//需要看源码 , 底层调用的是 AbstractStringBuilder 的 appendNull
        System.out.println(sb.length());//4
        System.out.println(sb);//null
//下面的构造器,会抛出 NullpointerException
        StringBuffer sb1 = new StringBuffer(str);//看底层源码 super(str.length() + 16);
        System.out.println(sb1);
    }
}
12.5.6 练习

public class StringBufferExercise02 {
    public static void main(String[] args) {
/*
输入商品名称和商品价格,要求打印效果示例, 使用前面学习的方法完成:
商品名 商品价格
手机 123,564.59 //比如 价格 3,456,789.88
要求:价格的小数点前面每三位用逗号隔开, 在输出。
思路分析
1. 定义一个 Scanner 对象,接收用户输入的 价格(String)
2. 希望使用到 StringBuffer 的 insert ,需要将 String 转成 StringBuffer
3. 然后使用相关方法进行字符串的处理
代码实现
*/
//new Scanner(System.in)
        String price = "8123564.59";
        StringBuffer sb = new StringBuffer(price);
//先完成一个最简单的实现 123,564.59
//找到小数点的索引,然后在该位置的前 3 位,插入,即可
// int i = sb.lastIndexOf(".");
// sb = sb.insert(i - 3, ",");
//上面的两步需要做一个循环处理,才是正确的
        for (int i = sb.lastIndexOf(".") - 3; i > 0; i -= 3) {
            sb = sb.insert(i, ",");
        }
        System.out.println(sb);//8,123,564.59
    }
}
12.6 StringBuilder类
12.6.1 基本介绍
12.6.2 StringBuilder常用方法
public class StringBuilder01 {
    public static void main(String[] args) {
//1. StringBuilder 继承 AbstractStringBuilder 类
//2. 实现了 Serializable ,说明 StringBuilder 对象是可以串行化(对象可以网络传输,可以保存到文件)
//3. StringBuilder 是 final 类, 不能被继承
//4. StringBuilder 对象字符序列仍然是存放在其父类 AbstractStringBuilder 的 char[] value;
// 因此,字符序列是堆中
//5. StringBuilder 的方法,没有做互斥的处理,即没有 synchronized 关键字,因此在单线程的情况下使用
// StringBuilder
        StringBuilder stringBuilder = new StringBuilder();
    }
}
12.6.3 String、StringBuffer和StringBuilder的比较
12.6.4 String、StringBuffer和StringBuilder的效率测试
public class StringVsStringBufferVsStringBuilder {
    public static void main(String[] args) {
        long startTime = 0L;
        long endTime = 0L;
        StringBuffer buffer = new StringBuffer("");
        startTime = System.currentTimeMillis();
        for (int i = 0; i < 80000; i++) {//StringBuffer 拼接 20000 次
            buffer.append(String.valueOf(i));
        }
        endTime = System.currentTimeMillis();
        System.out.println("StringBuffer 的执行时间:" + (endTime - startTime));
        StringBuilder builder = new StringBuilder("");
        startTime = System.currentTimeMillis();
        for (int i = 0; i < 80000; i++) {//StringBuilder 拼接 20000 次
            builder.append(String.valueOf(i));
        }
        endTime = System.currentTimeMillis();
        System.out.println("StringBuilder 的执行时间:" + (endTime - startTime));
        String text = "";
        startTime = System.currentTimeMillis();
        for (int i = 0; i < 80000; i++) {//String 拼接 20000
            text = text + i;
        }
        endTime = System.currentTimeMillis();
        System.out.println("String 的执行时间:" + (endTime - startTime));
    }
}
12.7 Math类
12.7.1 基本介绍
Math 类包含用于执行基本数学运算的方法,如初等指数、对数、平方根和三角函数。
12.7.2 方法一览(都是静态方法)
12.7.3 Math类常见方法案例
public class MathMethod {
    public static void main(String[] args) {
//看看 Math 常用的方法(静态方法)
//1.abs 绝对值
        int abs = Math.abs(-9);
        System.out.println(abs);//9
//2.pow 求幂
        double pow = Math.pow(2, 4);//2 的 4 次方
        System.out.println(pow);//16
//3.ceil 向上取整,返回>=该参数的最小整数(转成 double);
        double ceil = Math.ceil(3.9);
        System.out.println(ceil);//4.0
//4.floor 向下取整,返回<=该参数的最大整数(转成 double)
        double floor = Math.floor(4.001);
        System.out.println(floor);//4.0
//5.round 四舍五入 Math.floor(该参数+0.5)
        long round = Math.round(5.51);
        System.out.println(round);//6
//6.sqrt 求开方
        double sqrt = Math.sqrt(9.0);
        System.out.println(sqrt);//3.0
//7.random 求随机数
// random 返回的是 0 <= x < 1 之间的一个随机小数
// 思考:请写出获取 a-b 之间的一个随机整数,a,b 均为整数 ,比如 a = 2, b=7
// 即返回一个数 x 2 <= x <= 7
// Math.random() * (b-a) 返回的就是 0 <= 数 <= b-a
// (1) (int)(a) <= x <= (int)(a + Math.random() * (b-a +1) )
// (2) 使用具体的数给小伙伴介绍 a = 2 b = 7
// (int)(a + Math.random() * (b-a +1) ) = (int)( 2 + Math.random()*6)
// Math.random()*6 返回的是 0 <= x < 6 小数
// 2 + Math.random()*6 返回的就是 2<= x < 8 小数
// (int)(2 + Math.random()*6) = 2 <= x <= 7
// (3) 公式就是 (int)(a + Math.random() * (b-a +1) )
        for(int i = 0; i < 100; i++) {
            System.out.println((int)(2 + Math.random() * (7 - 2 + 1)));
        }
//max , min 返回最大值和最小值
        int min = Math.min(1, 9);
        int max = Math.max(45, 90);
        System.out.println("min=" + min);
        System.out.println("max=" + max);
    }
}
12.8 Arrays类
12.8.1 Arrays类常见方法案例

import java.util.Arrays;
import java.util.Comparator;

public class ArraysMethod01 {
    public static void main(String[] args) {
        Integer[] integers = {1, 20, 90};
//遍历数组
// for(int i = 0; i < integers.length; i++) {
// System.out.println(integers[i]);
// }
//直接使用 Arrays.toString 方法,显示数组
// System.out.println(Arrays.toString(integers));//
//演示 sort 方法的使用
        Integer arr[] = {1, -1, 7, 0, 89};
//进行排序
//1. 可以直接使用冒泡排序 , 也可以直接使用 Arrays 提供的 sort 方法排序
//2. 因为数组是引用类型,所以通过 sort 排序后,会直接影响到 实参 arr
//3. sort 重载的,也可以通过传入一个接口 Comparator 实现定制排序
//4. 调用 定制排序 时,传入两个参数 (1) 排序的数组 arr
// (2) 实现了 Comparator 接口的匿名内部类 , 要求实现 compare 方法
//5. 先演示效果,再解释
//6. 这里体现了接口编程的方式 , 看看源码,就明白
// 源码分析
//(1) Arrays.sort(arr, new Comparator()
//(2) 最终到 TimSort 类的 private static <T> void binarySort(T[] a, int lo, int hi, int start, // Comparator<? super T> c)()
//(3) 执行到 binarySort 方法的代码, 会根据动态绑定机制 c.compare()执行我们传入的
// 匿名内部类的 compare ()
// while (left < right) {
// int mid = (left + right) >>> 1;
// if (c.compare(pivot, a[mid]) < 0)
// right = mid;
// else
// left = mid + 1;
// }
//(4) new Comparator() {
// @Override
// public int compare(Object o1, Object o2) {
// Integer i1 = (Integer) o1;
// Integer i2 = (Integer) o2;
// return i2 - i1;
// }
// }
//(5) public int compare(Object o1, Object o2) 返回的值>0 还是 <0
// 会影响整个排序结果, 这就充分体现了 接口编程+动态绑定+匿名内部类的综合使用
// 将来的底层框架和源码的使用方式,会非常常见
//Arrays.sort(arr); // 默认排序方法
//定制排序
        Arrays.sort(arr, new Comparator() {
            @Override
            public int compare(Object o1, Object o2) {
                Integer i1 = (Integer) o1;
                Integer i2 = (Integer) o2;
                return i2 - i1;
            }
        });
        System.out.println("===排序后===");
        System.out.println(Arrays.toString(arr));//
    }
}
public class ArraysSortCustom {
    public static void main(String[] args) {
        int[] arr = {1, -1, 8, 0, 20};
//bubble01(arr);
        bubble02(arr, new Comparator() {
            @Override
            public int compare(Object o1, Object o2) {
                int i1 = (Integer) o1;
                int i2 = (Integer) o2;
                return i2 - i1;// return i2 - i1;
            }
        });
        System.out.println("==定制排序后的情况==");
        System.out.println(Arrays.toString(arr));
    }
    //使用冒泡完成排序
    public static void bubble01(int[] arr) {
        int temp = 0;
        for (int i = 0; i < arr.length - 1; i++) {
            for (int j = 0; j < arr.length - 1 - i; j++) {
//从小到大
                if (arr[j] > arr[j + 1]) {
                            temp = arr[j];
                    arr[j] = arr[j + 1];
                    arr[j + 1] = temp;
                }
            }
        }
    }
    //结合冒泡 + 定制
    public static void bubble02(int[] arr, Comparator c) {
        int temp = 0;
        for (int i = 0; i < arr.length - 1; i++) {
            for (int j = 0; j < arr.length - 1 - i; j++) {
//数组排序由 c.compare(arr[j], arr[j + 1])返回的值决定
                if (c.compare(arr[j], arr[j + 1]) > 0) {
                    temp = arr[j];
                    arr[j] = arr[j + 1];
                    arr[j + 1] = temp;
                }
            }
        }
    }
}
import java.util.Arrays;
import java.util.List;

public class ArraysMethod02 {
    public static void main(String[] args) {
        Integer[] arr = {1, 2, 90, 123, 567};
// binarySearch 通过二分搜索法进行查找,要求必须排好
//1. 使用 binarySearch 二叉查找
//2. 要求该数组是有序的. 如果该数组是无序的,不能使用 binarySearch
//3. 如果数组中不存在该元素,就返回 return -(low + 1); // key not found.
        int index = Arrays.binarySearch(arr, 567);
        System.out.println("index=" + index);
//copyOf 数组元素的复制
//1. 从 arr 数组中,拷贝 arr.length 个元素到 newArr 数组中
//2. 如果拷贝的长度 > arr.length 就在新数组的后面 增加 null
//3. 如果拷贝长度 < 0 就抛出异常 NegativeArraySizeException
//4. 该方法的底层使用的是 System.arraycopy()
        Integer[] newArr = Arrays.copyOf(arr, arr.length);
        System.out.println("==拷贝执行完毕后==");
        System.out.println(Arrays.toString(newArr));
//ill 数组元素的填充
        Integer[] num = new Integer[]{9, 3, 2};
//1. 使用 99 去填充 num 数组,可以理解成是替换原理的元素
        Arrays.fill(num, 99);
        System.out.println("==num 数组填充后==");
        System.out.println(Arrays.toString(num));
//equals 比较两个数组元素内容是否完全一致
        Integer[] arr2 = {1, 2, 90, 123};
//1. 如果 arr 和 arr2 数组的元素一样,则方法 true;
//2. 如果不是完全一样,就返回 false
        boolean equals = Arrays.equals(arr, arr2);
        System.out.println("equals=" + equals);
//asList 将一组值,转换成 list
//1. asList 方法,会将 (2,3,4,5,6,1)数据转成一个 List 集合
//2. 返回的 asList 编译类型 List(接口)
//3. asList 运行类型 java.util.Arrays#ArrayList, 是 Arrays 类的
// 静态内部类 private static class ArrayList<E> extends AbstractList<E>
// implements RandomAccess, java.io.Serializable
        List asList = Arrays.asList(2, 3, 4, 5, 6, 1);
        System.out.println("asList=" + asList);
        System.out.println("asList 的运行类型" + asList.getClass());
    }
}
12.8.2 练习

import java.util.Arrays;
import java.util.Comparator;

public class ArrayExercise {
    public static void main(String[] args) {
        Book1[] books = new Book1[4];
        books[0] = new Book1("红楼梦", 100);
        books[1] = new Book1("西游记", 90);
        books[2] = new Book1("青年文献20年", 5);
        books[3] = new Book1("Java从入门到放弃", 300);

        /*//(1)price 从大到小
        Arrays.sort(books, new Comparator() {
            //这里是对 Book 数组排序,因此 o1 和 o2 就是 Book 对象
            @Override
            public int compare(Object o1, Object o2) {
                Book1 book1 = (Book1) o1;
                Book1 book2 = (Book1) o2;
                double priceVal = book2.getPrice() - book1.getPrice();
        //如果发现返回结果和我们输出的不一致,就修改一下返回的 1 和 -1
                if (priceVal > 0) {
                    return 1;
                } else if (priceVal < 0) {
                    return -1;
                } else {
                    return 0;
                }
            }
        });*/

        /*//(2)price 从小到大
        Arrays.sort(books, new Comparator() {
            //这里是对 Book 数组排序,因此 o1 和 o2 就是 Book 对象
            @Override
            public int compare(Object o1, Object o2) {
                Book1 book1 = (Book1) o1;
                Book1 book2 = (Book1) o2;
                double priceVal = book2.getPrice() - book1.getPrice();
                //如果发现返回结果和我们输出的不一致,就修改一下返回的 1 和 -1
                if (priceVal > 0) {
                    return -1;
                } else if (priceVal < 0) {
                    return 1;
                } else {
                    return 0;
                }
            }
        });*/

        //(3)按照书名长度从大到小
        Arrays.sort(books, new Comparator() {
            //这里是对 Book 数组排序,因此 o1 和 o2 就是 Book 对象
            @Override
            public int compare(Object o1, Object o2) {
                Book1 book1 = (Book1) o1;
                Book1 book2 = (Book1) o2;
//要求按照书名的长度来进行排序
                return book2.getName().length() - book1.getName().length();
            }
        });
        System.out.println(Arrays.toString(books));
    }
}

class Book1 {

    private String name;
    private double price;

    public Book1(String name, double price) {
        this.name = name;
        this.price = price;
    }

    public String getName() {
        return name;
    }

    public void setName(String name) {
        this.name = name;
    }

    public double getPrice() {
        return price;
    }

    public void setPrice(double price) {
        this.price = price;
    }

    @Override
    public String toString() {
        return "Book1{" +
                "name='" + name + '\'' +
                ", price=" + price +
                '}';
    }
}
12.9 System类
12.9.1 System类常见方法
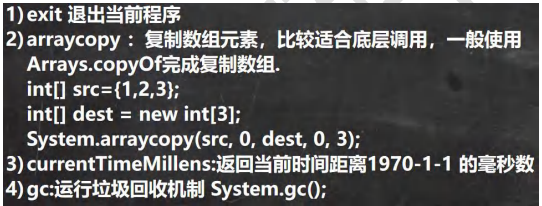
import java.util.Arrays;

public class System_ {
    public static void main(String[] args) {
//exit 退出当前程序
// System.out.println("ok1");
// //1. exit(0) 表示程序退出
// //2. 0 表示一个状态 , 正常的状态
// System.exit(0);//
// System.out.println("ok2");
//arraycopy :复制数组元素,比较适合底层调用,
// 一般使用 Arrays.copyOf 完成复制数组
        int[] src={1,2,3};
        int[] dest = new int[3];// dest 当前是 {0,0,0}
//1. 主要是搞清楚这五个参数的含义
//2. // 源数组
// * @param src the source array. // srcPos: 从源数组的哪个索引位置开始拷贝
// * @param srcPos starting position in the source array. // dest : 目标数组,即把源数组的数据拷贝到哪个数组
// * @param dest the destination array. // destPos: 把源数组的数据拷贝到 目标数组的哪个索引
// * @param destPos starting position in the destination data. // length: 从源数组拷贝多少个数据到目标数组
// * @param length the number of array elements to be copied. System.arraycopy(src, 0, dest, 0, src.length);
// int[] src={1,2,3};
        System.out.println("dest=" + Arrays.toString(dest));//[1, 2, 3]
//currentTimeMillens:返回当前时间距离 1970-1-1 的毫秒数
        System.out.println(System.currentTimeMillis());
    }
}
12.10 BigInteger 和 BigDecimal 类
12.10.1 BigInteger 和 BigDecimal 介绍

12.10.2 BigInteger 和 BigDecimal 常见方法
import java.math.BigInteger;

public class BigInteger_ {
    public static void main(String[] args) {
//当我们编程中,需要处理很大的整数,long 不够用
//可以使用 BigInteger 的类来搞定
// long l = 23788888899999999999999999999l;
// System.out.println("l=" + l);
        BigInteger bigInteger = new BigInteger("23788888899999999999999999999");
        BigInteger bigInteger2 = new
        BigInteger("10099999999999999999999999999999999999999999999999999999999999999999999999999999999");
        System.out.println(bigInteger);
//1. 在对 BigInteger 进行加减乘除的时候,需要使用对应的方法,不能直接进行 + - * /
//2. 可以创建一个 要操作的 BigInteger 然后进行相应操作
        BigInteger add = bigInteger.add(bigInteger2);
        System.out.println(add);//
        BigInteger subtract = bigInteger.subtract(bigInteger2);
        System.out.println(subtract);//减
        BigInteger multiply = bigInteger.multiply(bigInteger2);
        System.out.println(multiply);//乘
        BigInteger divide = bigInteger.divide(bigInteger2);
        System.out.println(divide);//除
    }
}
import java.math.BigDecimal;

public class BigDecimal_ {
    public static void main(String[] args) {
//当我们需要保存一个精度很高的数时,double 不够用
//可以是 BigDecimal
// double d = 1999.11111111111999999999999977788d;
// System.out.println(d);
        BigDecimal bigDecimal = new BigDecimal("1999.11");
        BigDecimal bigDecimal2 = new BigDecimal("3");
        System.out.println(bigDecimal);
//1. 如果对 BigDecimal 进行运算,比如加减乘除,需要使用对应的方法
//2. 创建一个需要操作的 BigDecimal 然后调用相应的方法即可
        System.out.println(bigDecimal.add(bigDecimal2));
        System.out.println(bigDecimal.subtract(bigDecimal2));
        System.out.println(bigDecimal.multiply(bigDecimal2));
//System.out.println(bigDecimal.divide(bigDecimal2));//可能抛出异常 ArithmeticException
//在调用 divide 方法时,指定精度即可. BigDecimal.ROUND_CEILING
//如果有无限循环小数,就会保留 分子 的精度
        System.out.println(bigDecimal.divide(bigDecimal2, BigDecimal.ROUND_CEILING));
    }
}
12.11 日期类
12.11.1 第一代日期类
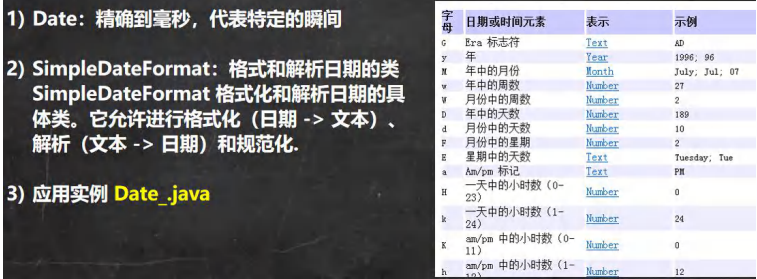
import java.text.ParseException;
import java.text.SimpleDateFormat;
import java.util.Date;

public class Date01 {
    public static void main(String[] args) throws ParseException {
//1. 获取当前系统时间
//2. 这里的 Date 类是在 java.util 包
//3. 默认输出的日期格式是国外的方式, 因此通常需要对格式进行转换
        Date d1 = new Date(); //获取当前系统时间
        System.out.println("当前日期=" + d1);
        Date d2 = new Date(9234567); //通过指定毫秒数得到时间
        System.out.println("d2=" + d2); //获取某个时间对应的毫秒数
//1. 创建 SimpleDateFormat 对象,可以指定相应的格式
//2. 这里的格式使用的字母是规定好,不能乱写
        SimpleDateFormat sdf = new SimpleDateFormat("yyyy 年 MM 月 dd 日 hh:mm:ss E");
        String format = sdf.format(d1); // format:将日期转换成指定格式的字符串
        System.out.println("当前日期=" + format);
//1. 可以把一个格式化的 String 转成对应的 Date
//2. 得到 Date 仍然在输出时,还是按照国外的形式,如果希望指定格式输出,需要转换
//3. 在把 String -> Date , 使用的 sdf 格式需要和你给的 String 的格式一样,否则会抛出转换异常
        String s = "1996 年 01 月 01 日 10:20:30 星期一";
        Date parse = sdf.parse(s);
        System.out.println("parse=" + sdf.format(parse));
    }
}
12.11.2 第二代日期类
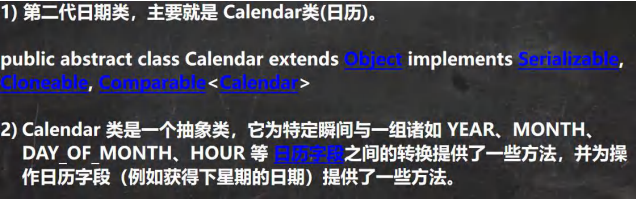
import java.util.Calendar;

public class Calendar_ {
    public static void main(String[] args) {
//1. Calendar 是一个抽象类, 并且构造器是 private
//2. 可以通过 getInstance() 来获取实例
//3. 提供大量的方法和字段提供给程序员
//4. Calendar 没有提供对应的格式化的类,因此需要程序员自己组合来输出(灵活)
//5. 如果我们需要按照 24 小时进制来获取时间, Calendar.HOUR ==改成=> Calendar.HOUR_OF_DAY
        Calendar c = Calendar.getInstance(); //创建日历类对象//比较简单,自由
        System.out.println("c=" + c);
//2.获取日历对象的某个日历字段
        System.out.println("年:" + c.get(Calendar.YEAR));
// 这里为什么要 + 1, 因为 Calendar 返回月时候,是按照 0 开始编号
        System.out.println("月:" + (c.get(Calendar.MONTH) + 1));
        System.out.println("日:" + c.get(Calendar.DAY_OF_MONTH));
        System.out.println("小时:" + c.get(Calendar.HOUR));
        System.out.println("分钟:" + c.get(Calendar.MINUTE));
        System.out.println("秒:" + c.get(Calendar.SECOND));
//Calender 没有专门的格式化方法,所以需要程序员自己来组合显示
        System.out.println(c.get(Calendar.YEAR) + "-" + (c.get(Calendar.MONTH) + 1) + "-" +
                c.get(Calendar.DAY_OF_MONTH) +
                " " + c.get(Calendar.HOUR_OF_DAY) + ":" + c.get(Calendar.MINUTE) + ":" + c.get(Calendar.SECOND) );
    }
}
12.11.3 第三代日期
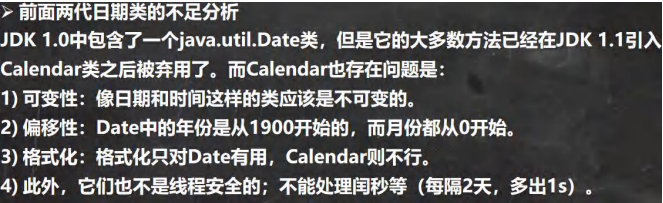
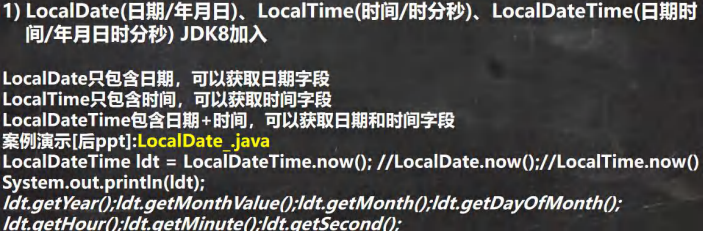
import java.time.LocalDate;
import java.time.LocalDateTime;
import java.time.LocalTime;
import java.time.format.DateTimeFormatter;

public class LocalDate_ {
    public static void main(String[] args) {
//第三代日期
//1. 使用 now() 返回表示当前日期时间的 对象
        LocalDateTime ldt = LocalDateTime.now(); //LocalDate.now();//LocalTime.now()
        System.out.println(ldt);
//2. 使用 DateTimeFormatter 对象来进行格式化
// 创建 DateTimeFormatter 对象
        DateTimeFormatter dateTimeFormatter = DateTimeFormatter.ofPattern("yyyy-MM-dd HH:mm:ss");
        String format = dateTimeFormatter.format(ldt);
        System.out.println("格式化的日期=" + format);
        System.out.println("年=" + ldt.getYear());
        System.out.println("月=" + ldt.getMonth());
        System.out.println("月=" + ldt.getMonthValue());
        System.out.println("日=" + ldt.getDayOfMonth());
        System.out.println("时=" + ldt.getHour());
        System.out.println("分=" + ldt.getMinute());
        System.out.println("秒=" + ldt.getSecond());
        LocalDate now = LocalDate.now(); //可以获取年月日
        LocalTime now2 = LocalTime.now();//获取到时分秒
//提供 plus 和 minus 方法可以对当前时间进行加或者减
//看看 890 天后,是什么时候 把 年月日-时分秒
        LocalDateTime localDateTime = ldt.plusDays(890);
        System.out.println("890 天后=" + dateTimeFormatter.format(localDateTime));
//看看在 3456 分钟前是什么时候,把 年月日-时分秒输出
        LocalDateTime localDateTime2 = ldt.minusMinutes(3456);
        System.out.println("3456 分钟前 日期=" + dateTimeFormatter.format(localDateTime2));
    }
}
12.11.4 DateTimeFormatter 格式日期类
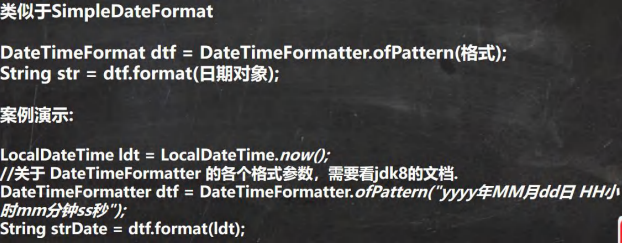
12.11.5 Instant时间戳
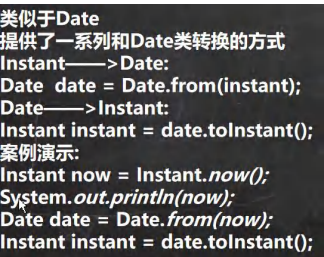
import java.time.Instant;
import java.util.Date;
public class Instant_ {
public static void main(String[] args) {
//1.通过 静态方法 now() 获取表示当前时间戳的对象
Instant now = Instant.now();
System.out.println(now);
//2. 通过 from 可以把 Instant 转成 Date
Date date = Date.from(now);
//3. 通过 date 的 toInstant() 可以把 date 转成 Instant 对象
Instant instant = date.toInstant();
}
}
12.11.6 第三代日期的更多方法
十三、集合
13.1 理解和好处
13.1.1 数组

13.1.2 集合

13.2 集合的框架体系
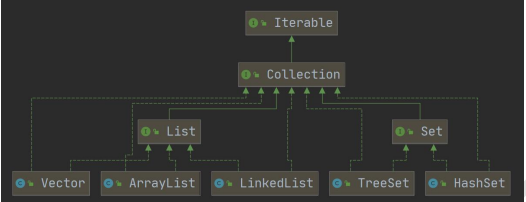
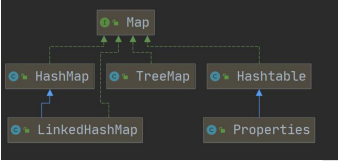
import java.util.ArrayList;
import java.util.HashMap;
public class Collection_ {
@SuppressWarnings({"all"})
public static void main(String[] args) {
//1. 集合主要是两组(单列集合, 双列集合)
//2. Collection 接口有两个重要的子接口 List Set, 他们的实现子类都是单列集合
//3. Map 接口的实现子类 是双列集合,存放的 K -V
//4. 把老师梳理的两张图记住
// Collection
//Map
ArrayList arrayList = new ArrayList();
arrayList.add("jack");
arrayList.add("tom");
HashMap hashMap = new HashMap();
hashMap.put("NO1", "北京");
hashMap.put("NO2", "上海");
}
}
13.3 Collection接口和常用方法
13.3.1 Collection接口实现类的特点
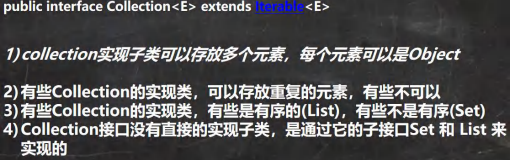
import java.util.ArrayList;
import java.util.List;
public class CollectionMethod {
@SuppressWarnings({"all"})
public static void main(String[] args) {
//以ArrayList实现类来演示
List list = new ArrayList();
// add:添加单个元素
list.add("jack");
list.add(10);//list.add(new Integer(10))
list.add(true);
System.out.println("list=" + list);
//remove:删除指定元素
//list.remove(0);//删除第一个元素
list.remove(true);//指定删除某个元素
System.out.println("list=" + list);
// contains:查找元素是否存在
System.out.println(list.contains("jack"));//T
// size:获取元素个数
System.out.println(list.size());//2
// isEmpty:判断是否为空
System.out.println(list.isEmpty());//F
// clear:清空
list.clear();
System.out.println("list=" + list);
// addAll:添加多个元素
ArrayList list2 = new ArrayList();
list2.add("红楼梦");
list2.add("三国演义");
list.addAll(list2);
System.out.println("list=" + list);
// containsAll:查找多个元素是否都存在
System.out.println(list.containsAll(list2));//T
// removeAll:删除多个元素
list.add("聊斋");
list.removeAll(list2);
System.out.println("list=" + list);
}
}
13.3.2 Collection接口遍历元素方法1-Iterator(迭代器)
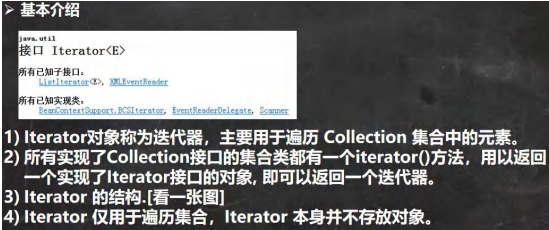
import java.util.ArrayList;
import java.util.Collection;
import java.util.Iterator;
public class CollectionIterator {
@SuppressWarnings({"all"})
public static void main(String[] args) {
Collection col = new ArrayList();
col.add(new Book("三国演义", "罗贯中", 10.1));
col.add(new Book("小李飞刀", "古龙", 5.1));
col.add(new Book("红楼梦", "曹雪芹", 34.6));
//System.out.println("col=" + col);
//现在遍历 col 集合
//1. 先得到 col 对应的 迭代器
Iterator iterator = col.iterator();
//2. 使用 while 循环遍历
// while (iterator.hasNext()) {//判断是否还有数据
// //返回下一个元素,类型是 Object
// Object obj = iterator.next();
// System.out.println("obj=" + obj);
// }
//快捷键,快速生成 while => itit
//显示所有的快捷键的的快捷键 ctrl + j
while (iterator.hasNext()) {
Object obj = iterator.next();
System.out.println("obj=" + obj);
}
//3. 当退出 while 循环后 , 这时 iterator 迭代器,指向最后的元素
// iterator.next();//NoSuchElementException
//4. 如果希望再次遍历,需要重置我们的迭代器
iterator = col.iterator();
System.out.println("===第二次遍历===");
while (iterator.hasNext()) {
Object obj = iterator.next();
System.out.println("obj=" + obj);
}
}
}
class Book {
private String name;
private String author;
private double price;
public Book(String name, String author, double price) {
this.name = name;
this.author = author;
this.price = price;
}
public String getName() {
return name;
}
public void setName(String name) {
this.name = name;
}
public String getAuthor() {
return author;
}
public void setAuthor(String author) {
this.author = author;
}
public double getPrice() {
return price;
}
public void setPrice(double price) {
this.price = price;
}
@Override
public String toString() {
return "Book{" +
"name='" + name + '\'' +
", author='" + author + '\'' +
", price=" + price +
'}';
}
}
13.3.3 Collection接口遍历对象方式2-增强for循环
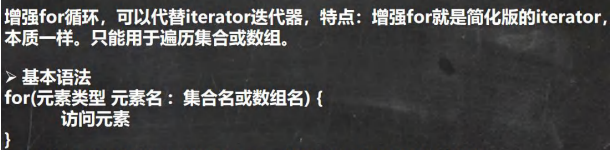
import java.util.ArrayList;
import java.util.Collection;
public class CollectionFor {
@SuppressWarnings({"all"})
public static void main(String[] args) {
Collection col = new ArrayList();
col.add(new Book("三国演义", "罗贯中", 10.1));
col.add(new Book("小李飞刀", "古龙", 5.1));
col.add(new Book("红楼梦", "曹雪芹", 34.6));
//增强for循环
//使用for增强,在Collection集合
//增强for,底层仍然是迭代器
//增强for可以理解成就是简化版本的迭代器变量
//快捷方式 I
for (Object b : col) {
System.out.println(b);
}
/*//增强for,也可以在数组使用
int[] nums = {1, 8, 10, 90};
for (int i : nums) {
System.out.println(i);
}*/
}
}
class Book {
private String name;
private String author;
private double price;
public Book(String name, String author, double price) {
this.name = name;
this.author = author;
this.price = price;
}
public String getName() {
return name;
}
public void setName(String name) {
this.name = name;
}
public String getAuthor() {
return author;
}
public void setAuthor(String author) {
this.author = author;
}
public double getPrice() {
return price;
}
public void setPrice(double price) {
this.price = price;
}
@Override
public String toString() {
return "Book{" +
"name='" + name + '\'' +
", author='" + author + '\'' +
", price=" + price +
'}';
}
}
13.3.4 练习

import java.util.ArrayList;
import java.util.Iterator;
import java.util.List;
public class CollectionExercise {
@SuppressWarnings({"all"})
public static void main(String[] args) {
List list = new ArrayList();
list.add(new Dog("小黑", 3));
list.add(new Dog("大黄", 100));
list.add(new Dog("大壮", 8));
//先使用 for 增强
for (Object dog : list) {
System.out.println("dog=" + dog);
}
//使用迭代器
System.out.println("===使用迭代器来遍历===");
Iterator iterator = list.iterator();
while (iterator.hasNext()) {
Object dog = iterator.next();
System.out.println("dog=" + dog);
}
}
}
/**
* 创建 3 个 Dog {name, age} 对象,放入到 ArrayList 中,赋给 List 引用
* 用迭代器和增强 for 循环两种方式来遍历
* 重写 Dog 的 toString 方法, 输出 name 和 age
*/
class Dog {
private String name;
private int age;
public Dog(String name, int age) {
this.name = name;
this.age = age;
}
public String getName() {
return name;
}
public void setName(String name) {
this.name = name;
}
public int getAge() {
return age;
}
public void setAge(int age) {
this.age = age;
}
@Override
public String toString() {
return "Dog{" +
"name='" + name + '\'' +
", age=" + age +
'}';
}
}
13.4 List接口和常用方法
13.4.1 List接口基本介绍
import java.util.ArrayList;
import java.util.List;
public class List_ {
@SuppressWarnings({"all"})
public static void main(String[] args) {
//1. List 集合类中元素有序(即添加顺序和取出顺序一致)、且可重复 [案例]
List list = new ArrayList();
list.add("jack");
list.add("tom");
list.add("mary");
list.add("hsp");
list.add("tom");
System.out.println("list=" + list);
//2. List 集合中的每个元素都有其对应的顺序索引,即支持索引
// 索引是从 0 开始的
System.out.println(list.get(3));
}
}
13.4.2 List接口的常用方法
import java.util.ArrayList;
import java.util.List;
public class ListMethod {
@SuppressWarnings({"all"})
public static void main(String[] args) {
List list = new ArrayList();
list.add("张三丰");
list.add("贾宝玉");
// void add(int index, Object ele):在 index 位置插入 ele 元素
//在 index = 1 的位置插入一个对象
list.add(1, "太乙真人");
System.out.println("list=" + list);
// boolean addAll(int index, Collection eles):从 index 位置开始将 eles 中的所有元素添加进来
List list2 = new ArrayList();
list2.add("jack");
list2.add("tom");
list.addAll(1, list2);
System.out.println("list=" + list);
// Object get(int index):获取指定 index 位置的元素
System.out.println(list.get(3));
// int indexOf(Object obj):返回 obj 在集合中首次出现的位置
System.out.println(list.indexOf("tom"));//2
// int lastIndexOf(Object obj):返回 obj 在当前集合中末次出现的位置
list.add("太乙真人");
System.out.println("list=" + list);
System.out.println(list.lastIndexOf("太乙真人"));
// Object remove(int index):移除指定 index 位置的元素,并返回此元素
list.remove(0);
System.out.println("list=" + list);
// Object set(int index, Object ele):设置指定 index 位置的元素为 ele , 相当于是替换. list.set(1, "玛丽亚");
System.out.println("list=" + list);
// List subList(int fromIndex, int toIndex):返回从 fromIndex 到 toIndex 位置的子集合
// 注意返回的子集合 fromIndex <= subList < toIndex
List returnlist = list.subList(0, 2);
System.out.println("returnlist=" + returnlist);
}
}
13.4.3 练习

import java.util.ArrayList;
import java.util.Iterator;
import java.util.List;
public class ListExercise {
public static void main(String[] args) {
List list = new ArrayList();
for (int i = 0; i < 13; i++) {
list.add("hello" + i);
}
System.out.println(list);
//在 2 号位插入一个元素"韩顺平教育"
list.add(1, "韩顺平教育");
System.out.println("list=" + list);
//获得第 5 个元素
System.out.println("第五个元素=" + list.get(4));
//删除第 6 个元素
list.remove(5);
System.out.println("list=" + list);
//修改第 7 个元素
list.set(6, "三国演义");
System.out.println("list=" + list);
//在使用迭代器遍历集合
Iterator iterator = list.iterator();
while (iterator.hasNext()) {
Object obj = iterator.next();
System.out.println("obj=" + obj);
}
}
}
13.4.4 List的三种变量方式

import java.util.*;
public class ListFor {
@SuppressWarnings({"all"})
public static void main(String[] args) {
//List 接口的实现子类 Vector LinkedList
// List list = new ArrayList();
// List list = new Vector();
List list = new LinkedList();
list.add("jack");
list.add("tom");
list.add("鱼香肉丝");
list.add("北京烤鸭子");
//遍历
// 1. 迭代器
Iterator iterator = list.iterator();
while (iterator.hasNext()) {
Object obj = iterator.next();
System.out.println(obj);
}
System.out.println("=====增强 for=====");
//2. 增强 for
for (Object o : list) {
System.out.println("o=" + o);
}
System.out.println("=====普通 for====");
//3. 用普通 for
for (int i = 0; i < list.size(); i++) {
System.out.println("对象=" + list.get(i));
}
}
}
13.4.5 练习
import java.util.ArrayList;
import java.util.LinkedList;
import java.util.List;
import java.util.Vector;
public class ListExercise02 {
public static void main(String[] args) {
//List list = new ArrayList();
//List list = new Vector();
List list = new LinkedList();
list.add(new Book("红楼梦", "曹雪芹", 89));
list.add(new Book("西游记", "吴承恩", 10));
list.add(new Book("水浒传", "施耐庵", 19));
list.add(new Book("三国演义", "罗贯中", 80));
//list.add(new Book("西游记", "吴承恩", 10));
// 如何对集合进行排序
// 遍历
for (Object o : list) {
System.out.println(o);
}
//冒泡排序
sort(list);
System.out.println("==排序后==");
for (Object o : list) {
System.out.println(o);
}
}
//静态方法
// 价格要求是从小到大
public static void sort(List list) {
int listSize = list.size();
for (int i = 0; i < listSize - 1; i++) {
for (int j = 0; j < listSize - 1 - i; j++) {
//取出对象 Book
Book book1 = (Book) list.get(j);
Book book2 = (Book) list.get(j + 1);
if (book1.getPrice() > book2.getPrice()) {//交换
list.set(j, book2);
list.set(j + 1, book1);
}
}
}
}
}
class Book {
private String name;
private String author;
private int price;
public Book(String name, String author, int price) {
this.name = name;
this.author = author;
this.price = price;
}
public String getName() {
return name;
}
public void setName(String name) {
this.name = name;
}
public String getAuthor() {
return author;
}
public void setAuthor(String author) {
this.author = author;
}
public int getPrice() {
return price;
}
public void setPrice(int price) {
this.price = price;
}
@Override
public String toString() {
return "Book{" +
"name='" + name + '\'' +
", author='" + author + '\'' +
", price=" + price +
'}';
}
}
13.5 ArrayList底层结构和源码分析
13.5.1 ArrayList的注意事项

import java.util.ArrayList;
public class ArrayListDetail {
public static void main(String[] args) {
ArrayList arrayList = new ArrayList();
arrayList.add(null);
arrayList.add("jack");
arrayList.add(null);
System.out.println(arrayList);
//ArrayList是线程不安全的,源码的方法里面没有 synchronized
/*public boolean add(E e) {
ensureCapacityInternal(size + 1); // Increments modCount!!
elementData[size++] = e;
return true;
}*/
}
}
13.5.2 ArrayList的底层操作机制源码分析
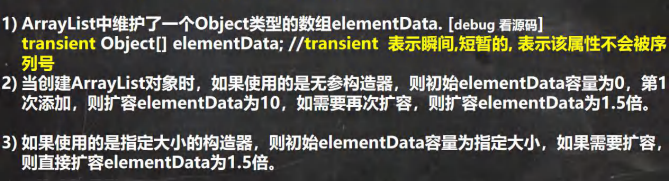
import java.util.ArrayList;
public class ArrayListSource {
public static void main(String[] args) {
//注意,注意,注意,Idea 默认情况下,Debug 显示的数据是简化后的,如果希望看到完整的数据
// 需要做设置. //使用无参构造器创建 ArrayList 对象
ArrayList list = new ArrayList();
//ArrayList list = new ArrayList(8);
//使用 for 给 list 集合添加 1-10 数据
for (int i = 1; i <= 10; i++) {
list.add(i);
}
//使用 for 给 list 集合添加 11-15 数据
for (int i = 11; i <= 15; i++) {
list.add(i);
}
list.add(100);
list.add(200);
list.add(null);
}
}
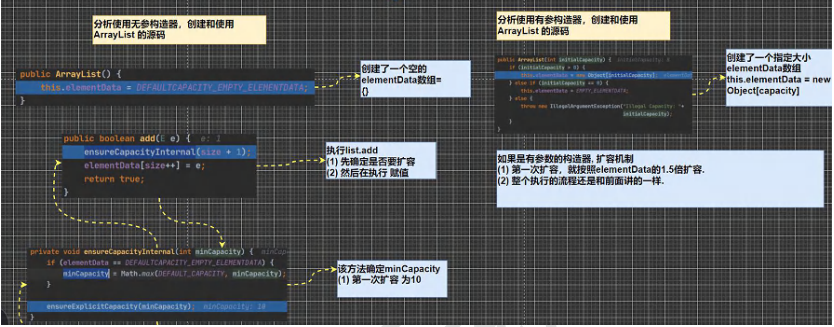
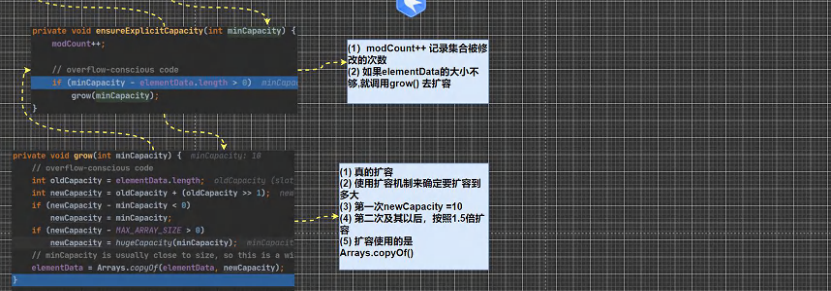
13.6 Vector底层结构和源码
13.6.1 Vector的基本介绍
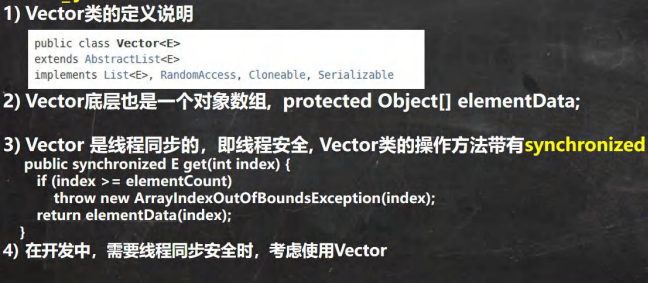
import java.util.Vector;
public class Vector_ {
public static void main(String[] args) {
//无参构造器
//Vector vector = new Vector();
//有参数的构造
Vector vector = new Vector(8);
for (int i = 0; i < 10; i++) {
vector.add(i);
}
vector.add(100);
System.out.println("vector=" + vector);
/* 1. new Vector() 底层
public Vector() {
this(10);
}
补充:如果是 Vector vector = new Vector(8);
走的方法:
public Vector( int initialCapacity){
this(initialCapacity, 0);
}
2. vector.add(i)
2.1 //下面这个方法就添加数据到 vector 集合
public synchronized boolean add (E e){
modCount++;
ensureCapacityHelper(elementCount + 1);
elementData[elementCount++] = e;
return true;
}
2.2 //确定是否需要扩容 条件 : minCapacity - elementData.length>0
private void ensureCapacityHelper ( int minCapacity){
// overflow-conscious code
if (minCapacity - elementData.length > 0) {
grow(minCapacity);
}
2.3 //如果 需要的数组大小 不够用,就扩容 , 扩容的算法
//newCapacity = oldCapacity + ((capacityIncrement > 0) ?
// capacityIncrement : oldCapacity);
//就是扩容两倍. private void grow(int minCapacity) {
// overflow-conscious code
int oldCapacity = elementData.length;
int newCapacity = oldCapacity + ((capacityIncrement > 0) ?
capacityIncrement : oldCapacity);
if (newCapacity - minCapacity < 0)
newCapacity = minCapacity;
if (newCapacity - MAX_ARRAY_SIZE > 0)
newCapacity = hugeCapacity(minCapacity);
elementData = Arrays.copyOf(elementData, newCapacity);
}*/
}
}
13.6.2 Vector和ArrayList的比较

13.7 LinkedList底层结构
13.7.1 LinkedList的全面说明

13.7.2 LinkedList的底层机制
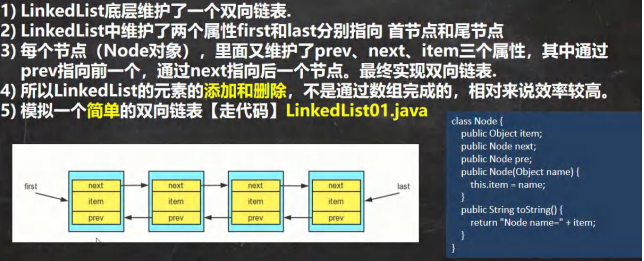
public class LinkedList01 {
public static void main(String[] args) {
//模拟一个简单的双向链表
Node jack = new Node("jack");
Node tom = new Node("tom");
Node hehe = new Node("hehe");
//连接三个结点,形成双向链表
//jack -> tom -> hehe
//jack.next = tom;
tom.next = hehe;
//hehe -> tom -> jack
hehe.pre = tom;
tom.pre = jack;
Node first = jack;//让 first 引用指向 jack,就是双向链表的头结点
Node last = hehe; //让 last 引用指向 hehe,就是双向链表的尾结点
//演示,从头到尾进行遍历
System.out.println("===从头到尾进行遍历===");
while (true) {
if (first == null) {
break;
}
//输出 first 信息
System.out.println(first);
first = first.next;
}
//演示, 从尾到头的遍历
System.out.println("====从尾到头的遍历====");
while (true) {
if (last == null) {
break;
}
//输出 last 信息
System.out.println(last);
last = last.pre;
}
//演示链表的添加对象 / 数据,是多么的方便
//要求,是在 tom ---------hehe直接,插入一个对象 smith
//1. 先创建一个 Node 结点,name 就是 smith
Node smith = new Node("smith");
//下面就把 smith 加入到双向链表了
smith.next = hehe;
smith.pre = tom;
hehe.pre = smith;
tom.next = smith;
//让 first 再次指向 jack
first = jack;//让 first 引用指向 jack,就是双向链表的头结点
System.out.println("===从头到尾进行遍历===");
while (true) {
if (first == null) {
break;
}
//输出 first 信息
System.out.println(first);
first = first.next;
}
last = hehe; //让 last 重新指向最后一个结点
//演示,从尾到头的遍历
System.out.println("====从尾到头的遍历====");
while (true) {
if (last == null) {
break;
}
//输出 last 信息
System.out.println(last);
last = last.pre;
}
}
}
//定义一个 Node 类,Node 对象 表示双向链表的一个结点
class Node {
public Object item; //真正存放数据
public Node next; //指向后一个结点
public Node pre; //指向前一个结点
public Node(Object name) {
this.item = name;
}
public String toString() {
return "Node name=" + item;
}
}
import java.util.Iterator;
import java.util.LinkedList;
public class LinkedListCRUD {
public static void main(String[] args) {
LinkedList linkedList = new LinkedList();
linkedList.add(1);
linkedList.add(2);
linkedList.add(3);
System.out.println(linkedList);
//删除
linkedList.remove();//默认删除第一个结点
//linkedList.remove(2);
System.out.println(linkedList);
//修改
linkedList.set(1,999);
System.out.println(linkedList);
//得到某个结点对象
//get(1)是得到双向链表的第二个 对象
Object o = linkedList.get(1);
System.out.println(o);
//遍历
System.out.println("迭代器");
Iterator iterator = linkedList.iterator();
while (iterator.hasNext()) {
Object next = iterator.next();
System.out.println(next);
}
System.out.println("增强for");
for (Object o1 : linkedList) {
System.out.println(o1);
}
System.out.println("普通for");
for(int i = 0; i < linkedList.size(); i++) {
System.out.println(linkedList.get(i));
}
/*
添加
* 1.LinkedList linkedList = new LinkedList();
* public LinkedList(){}
* 2.这时linkedList的属性first=null,last=null
* 3.执行 添加
*public boolean add(E e) {
linkLast(e);
return true;
}
* 4.将新的结点,加入到双向链表的最后
* void linkLast(E e) {
final Node<E> l = last;
final Node<E> newNode = new Node<>(l, e, null);
last = newNode;
if (l == null)
first = newNode;
else
l.next = newNode;
size++;
modCount++;
}
* */
/*
删除
* linkedList.remove();
1.执行 removeFirst
public E remove() {
return removeFirst();
}
2.
public E removeFirst() {
final Node<E> f = first;
if (f == null)
throw new NoSuchElementException();
return unlinkFirst(f);
}
3.执行unlinkFirst
private E unlinkFirst(Node<E> f) {
// assert f == first && f != null;
final E element = f.item;
final Node<E> next = f.next;
f.item = null;
f.next = null; // help GC
first = next;
if (next == null)
last = null;
else
next.prev = null;
size--;
modCount++;
return element;
}
* */
}
}
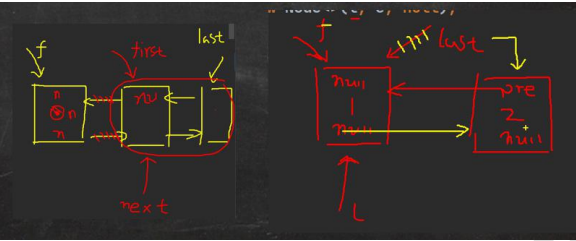
13.8 ArrayList和LinkedList比较
13.8.1 ArrayList和LinkedList的比较
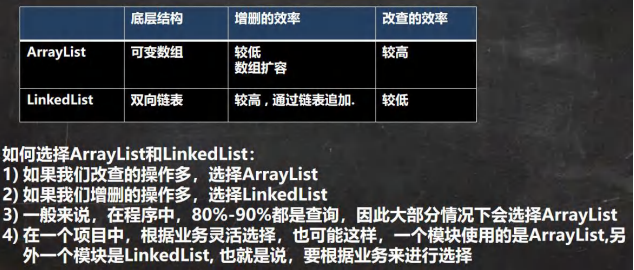
13.9 Set接口和常用方法
13.9.1 Set接口基本介绍
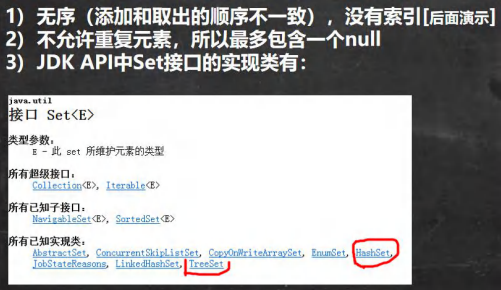
13.9.2 Set接口的常用方法
Set也是Collection的子接口,所有,常用方法和Conllection接口一样
13.9.3 Set接口的遍历方式

13.9.4 Set接口的常用方法
import java.util.HashSet;
import java.util.Iterator;
import java.util.Set;
public class SetMethod {
public static void main(String[] args) {
//1. 以 Set 接口的实现类 HashSet 来讲解 Set 接口的方法
//2. set 接口的实现类的对象 (Set 接口对象),不能存放重复的元素, 可以添加一个 null
//3. set 接口对象存放数据是无序 (即添加的顺序和取出的顺序不一致)
// 4. 注意:取出的顺序的顺序虽然不是添加的顺序,但是他的固定.
Set set = new HashSet();
set.add("john");
set.add("lucy");
set.add("john");//重复
set.add("jack");
set.add("zsf");
set.add("mary");
set.add(null);//
set.add(null);//再次添加 null
for (int i = 0; i < 10; i++) {
System.out.println("set=" + set);
}
//遍历
//方式 1:使用迭代器
System.out.println("=====使用迭代器====");
Iterator iterator = set.iterator();
while (iterator.hasNext()) {
Object obj = iterator.next();
System.out.println("obj=" + obj);
}
set.remove(null);
//方式 2:增强 for
System.out.println("=====增强 for====");
for (Object o : set) {
System.out.println("o=" + o);
}
//set 接口对象,不能通过索引来获取
}
}
13.10 Set接口实现类-HashSet
13.10.1 HashSet的全面说明
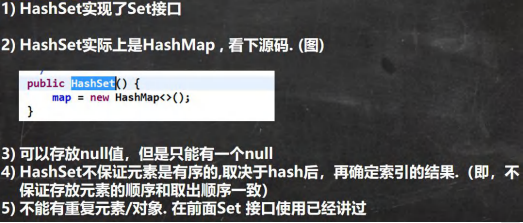
import java.util.HashSet;
import java.util.Set;
public class HashSet_ {
public static void main(String[] args) {
//1. 构造器走的源码
/*public HashSet() {
map = new HashMap<>();
}
2. HashSet 可以存放 null, 但是只能有一个 null, 即元素不能重复
*/
Set hashSet = new HashSet();
hashSet.add(null);
hashSet.add(null);
System.out.println("hashSet=" + hashSet);
}
}
13.10.2 HashSet案例说明
import java.util.HashSet;
public class HashSet01 {
public static void main(String[] args) {
HashSet set = new HashSet();
//1. 在执行 add 方法后,会返回一个 boolean 值
//2. 如果添加成功,返回 true, 否则返回 false
//3. 可以通过 remove 指定删除哪个对象
System.out.println(set.add("john"));//T
System.out.println(set.add("lucy"));//T
System.out.println(set.add("john"));//F
System.out.println(set.add("jack"));//T
System.out.println(set.add("Rose"));//T
set.remove("john");
System.out.println("set=" + set);//3 个
set = new HashSet();
System.out.println("set=" + set);//0
//4 Hashset 不能添加相同的元素/数据 ?
set.add("lucy");//添加成功
set.add("lucy");//加入不了
set.add(new Dog("tom"));//OK
set.add(new Dog("tom"));//Ok
System.out.println("set=" + set);
//去看他的源码,即 add 到底发生了什么 ? =>底层机制.
set.add(new String("zhangsna"));//ok
set.add(new String("zhangsna"));//加入不了.
System.out.println("set=" + set);
}
}
class Dog { //定义了 Dog 类
private String name;
public Dog(String name) {
this.name = name;
}
@Override
public String toString() {
return "Dog{" +
"name='" + name + '\'' +
'}';
}
}
13.10.3 HashSet底层机制说明
public class HashSetStructure {
public static void main(String[] args) {
//模拟一个HashSet的底层(HashMap 的底层结构)
//创建一个数值,类型是Node[]
//有人叫Node[]为表
Node[] tables = new Node[16];
System.out.println(tables);
//创建结点
Node john = new Node("john", null);
tables[2] = john;
Node jack = new Node("jack", null);
jack.next = jack;//将jack结点挂载到john
Node rose = new Node("rose", null);
jack.next = rose;
Node luck = new Node("luck", null);
tables[3] = luck;//把luck放到tables索引为3的位置
System.out.println(tables);
}
}
class Node { //结点,存储数据,可以指向下一个结点,从而形成链表
Object item;//存放数据
Node next;//指向下一个结点
public Node(Object item, Node next) {
this.item = item;
this.next = next;
}
}
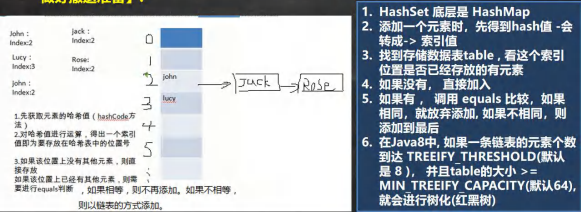
import java.util.HashSet;
public class HashSetSource {
public static void main(String[] args) {
HashSet hashSet = new HashSet();
hashSet.add("java");//到此位置,第 1 次 add 分析完毕.
hashSet.add("php");//到此位置,第 2 次 add 分析完毕
hashSet.add("java");
System.out.println("set=" + hashSet);
/*源码
*1.执行HashSet构造器
* public HashSet() {
map = new HashMap<>();
}
2.执行add()
* public boolean add(E e) {
return map.put(e, PRESENT)==null; //PRESENT == private static final Object PRESENT = new Object();
}
3.执行put(),该方法会执行hash(key)得到key对应的hash值,算法h = key.hashCode()) ^ (h >>> 16)
* public V put(K key, V value) { //key = 'java' value = PRESENT
return putVal(hash(key), key, value, false, true);
}
4.执行putVal()
* final V putVal(int hash, K key, V value, boolean onlyIfAbsent,
boolean evict) {
Node<K,V>[] tab; Node<K,V> p; int n, i;//定义了辅助变量
//table是HashMap的一个数组,类型是Node[]
//if语句表示如果table是null,或者大小=0
//就是第一次扩容,到16个空间
if ((tab = table) == null || (n = tab.length) == 0)
n = (tab = resize()).length;
//(1)根据key,得到hash去计算该key应该存到table表的哪个索引位置
//并且把这个位置的对象,赋给p
//(2)判断p是不是null
//(2.1)p为null,表示没有存放过元素,就创建一个Node(key = "java", value = PRESENT)
//(2.2)就放到该位置tab[i] = newNode(hash, key, value, null)
if ((p = tab[i = (n - 1) & hash]) == null)
tab[i] = newNode(hash, key, value, null);
else {
Node<K,V> e; K k;
//如果当前索引位置对应的链表的第一个元素和准备添加的key的hash值相同
//并且满足两个添加之一:
//(1)准备加入的key和p指向的Node结点的key是同一个
//(2)p指向的Node结点的key的equals()和准备加入的key比较后相同
//不然就不能加入
if (p.hash == hash &&
((k = p.key) == key || (key != null && key.equals(k))))
e = p;
//再判断p是不是红黑树
//如果是红黑树,就调用putTreeVal,来进行添加
else if (p instanceof TreeNode)
e = ((TreeNode<K,V>)p).putTreeVal(this, tab, hash, key, value);
else {//如果table对应索引位置,已经是一个链表了,就for循环比较
//(1)依次和该链表的每个元素比较,如果都不相同,就加入到该链表的最后
// 在把元素添加到链表后,立刻判断该链表是否定到了8个结点
// 如果达到了就调用treeifyBin()对当前这个链表进行树化
// 注意,在进行树化时,要进行判断,判断条件
if (tab == null || (n = tab.length) < MIN_TREEIFY_CAPACITY(64))
resize();
//如果上面条件成立,先扩容
//如果上面条件不成立,才转换成红黑树
//(2)如果在比较过程中有相同的情况,就直接break
for (int binCount = 0; ; ++binCount) {
if ((e = p.next) == null) {
p.next = newNode(hash, key, value, null);
if (binCount >= TREEIFY_THRESHOLD - 1) // -1 for 1st
treeifyBin(tab, hash);
break;
}
if (e.hash == hash &&
((k = e.key) == key || (key != null && key.equals(k))))
break;
p = e;
}
}
if (e != null) { // existing mapping for key
V oldValue = e.value;
if (!onlyIfAbsent || oldValue == null)
e.value = value;
afterNodeAccess(e);
return oldValue;
}
}
++modCount;
if (++size > threshold)
resize();
afterNodeInsertion(evict);
return null;
}
* */
}
}
分析HashSet的扩容和转成红黑树机制
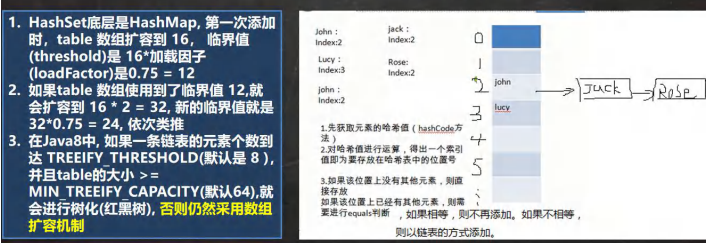
import java.util.HashSet;
public class HashSetIncrement {
public static void main(String[] args) {
/*HashSet 底层是 HashMap, 第一次添加时,table 数组扩容到 16,
临界值(threshold) 是 16 * 加载因子(loadFactor) 是 0.75 = 12
如果 table 数组使用到了临界值 12, 就会扩容到 16 * 2 = 32,
新的临界值就是 32 * 0.75 = 24, 依次类推*/
HashSet hashSet = new HashSet();
//for (int i = 1; i <= 100; i++) {
// hashSet.add(i);//1,2,3,4,5...100
//}
/*在 Java8 中, 如果一条链表的元素个数到达 TREEIFY_THRESHOLD(默认是 8),
并且 table 的大小 >= MIN_TREEIFY_CAPACITY(默认 64), 就会进行树化(红黑树), 否则仍然采用数组扩容机制*/
//for (int i = 1; i <= 12; i++) {
// hashSet.add(new A(i));//
//}
//当我们向 hashset 增加一个元素,->Node -> 加入 table, 就算是增加了一个 size++
for (int i = 1; i <= 7; i++) {//在 table 的某一条链表上添加了 7 个 A 对象
hashSet.add(new A(i));//
}
for (int i = 1; i <= 7; i++) {//在 table 的另外一条链表上添加了 7 个 B 对象
hashSet.add(new B(i));//
}
}
}
class B {
private int n;
public B(int n) {
this.n = n;
}
@Override
public int hashCode() {
return 200;
}
}
class A {
private int n;
public A(int n) {
this.n = n;
}
@Override
public int hashCode() {
return 100;
}
}
13.10.4 练习
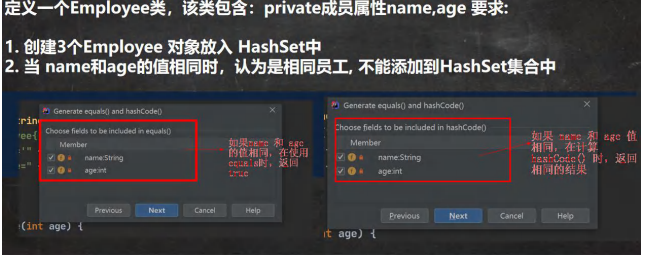
import java.util.HashSet;
import java.util.Objects;
public class HashSetExercise {
public static void main(String[] args) {
HashSet hashSet = new HashSet();
hashSet.add(new Employee("milan", 18));//ok
hashSet.add(new Employee("smith", 28));//ok
hashSet.add(new Employee("milan", 18));//加入不成功.
System.out.println(hashSet);
}
}
class Employee{
private String name;
private int age;
public Employee(String name, int age) {
this.name = name;
this.age = age;
}
public String getName() {
return name;
}
public void setName(String name) {
this.name = name;
}
public int getAge() {
return age;
}
public void setAge(int age) {
this.age = age;
}
@Override
public String toString() {
return "Employee{" +
"name='" + name + '\'' +
", age=" + age +
'}';
}
//如果 name 和 age 值相同,则返回相同的 hash 值
@Override
public boolean equals(Object o) {
if (this == o) return true;
if (o == null || getClass() != o.getClass()) return false;
Employee employee = (Employee) o;
return age == employee.age && Objects.equals(name, employee.name);
}
@Override
public int hashCode() {
return Objects.hash(name, age);
}
}
13.11 Set接口实现类-LinkedHashSet
13.11.1 LinkedHashSet的全面说明

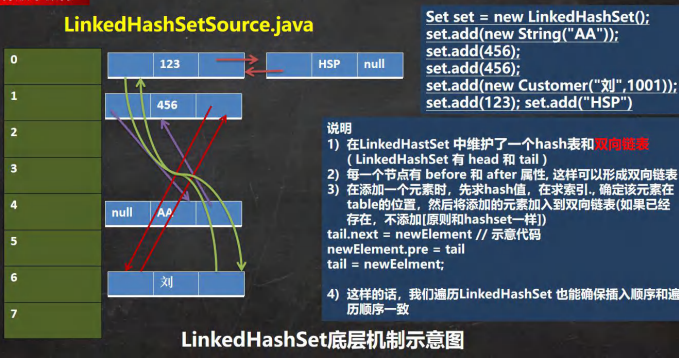
13.11.2 练习
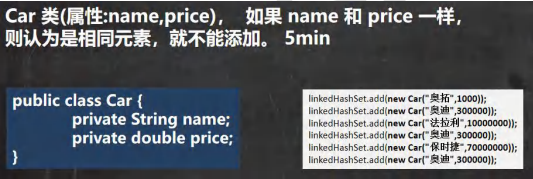
import java.util.LinkedHashSet;
import java.util.Objects;
public class LinkedHashSetExercise {
public static void main(String[] args) {
LinkedHashSet linkedHashSet = new LinkedHashSet();
linkedHashSet.add(new Car("奥拓", 1000));//OK
linkedHashSet.add(new Car("奥迪", 300000));//OK
linkedHashSet.add(new Car("法拉利", 10000000));//OK
linkedHashSet.add(new Car("奥迪", 300000));//加入不了
linkedHashSet.add(new Car("保时捷", 70000000));//OK
linkedHashSet.add(new Car("奥迪", 300000));//加入不了
System.out.println("linkedHashSet=" + linkedHashSet);
}
}
/**
* Car 类(属性:name,price), 如果 name 和 price 一样,
* 则认为是相同元素,就不能添加。
*/
class Car {
private String name;
private double price;
public Car(String name, double price) {
this.name = name;
this.price = price;
}
public String getName() {
return name;
}
public void setName(String name) {
this.name = name;
}
public double getPrice() {
return price;
}
public void setPrice(double price) {
this.price = price;
}
@Override
public String toString() {
return "\nCar{" +
"name='" + name + '\'' +
", price=" + price +
'}';
}
//重写 equals 方法 和 hashCode
//当 name 和 price 相同时, 就返回相同的 hashCode 值, equals 返回 t
@Override
public boolean equals(Object o) {
if (this == o) return true;
if (o == null || getClass() != o.getClass()) return false;
Car car = (Car) o;
return Double.compare(car.price, price) == 0 &&
Objects.equals(name, car.name);
}
@Override
public int hashCode() {
return Objects.hash(name, price);
}
}
13.12 Map接口和常用方法
13.12.1 Map接口实现类的特点
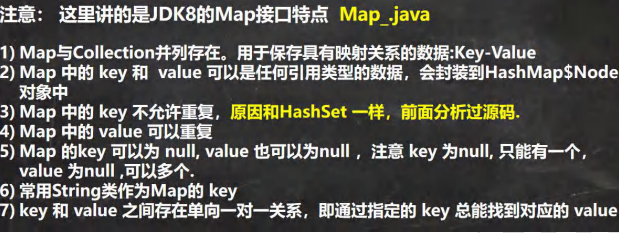
import java.util.HashMap;
import java.util.Map;
public class Map_ {
public static void main(String[] args) {
//Map 接口实现类的特点, 使用实现类 HashMap
//1. Map 与 Collection 并列存在。用于保存具有映射关系的数据:
//Key - Value(双列元素)
//2. Map 中的 key 和 value 可以是任何引用类型的数据,会封装到 HashMap$Node 对象中
//3. Map 中的 key 不允许重复,原因和 HashSet 一样,前面分析过源码. //4. Map 中的 value 可以重复
//5. Map 的 key 可以为 null, value 也可以为 null ,注意 key 为 null,
//只能有一个,value 为 null, 可以多个
//6. 常用 String 类作为 Map 的 key
//7. key 和 value 之间存在单向一对一关系,即通过指定的 key 总能找到对应的 value
Map map = new HashMap();
map.put("no1", "太乙真人");//k-v
map.put("no2", "张无忌");//k-v
map.put("no1", "张三丰");//当有相同的 k , 就等价于替换. map.put("no3", "张三丰");//k-v
map.put(null, null); //k-v
map.put(null, "abc"); //等价替换
map.put("no4", null); //k-v
map.put("no5", null); //k-v
map.put(1, "赵敏");//k-v
map.put(new Object(), "金毛狮王");//k-v
//通过 get 方法,传入 key, 会返回对应的 value
System.out.println(map.get("no2"));//张无忌
System.out.println("map=" + map);
}
}
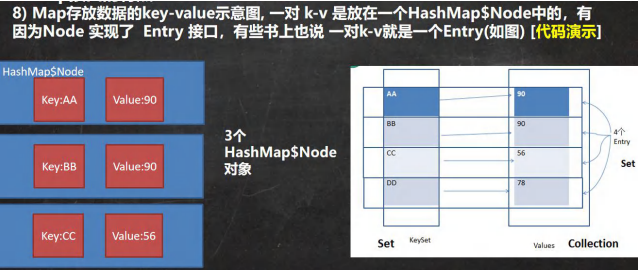
13.12.2 Map接口和常用方法
import java.util.HashMap;
import java.util.Map;
public class MapMethod {
public static void main(String[] args) {
//演示 map 接口常用方法
Map map = new HashMap();
map.put("邓超", new Book("", 100));//OK
map.put("邓超", "孙俪");//替换-> 一会分析源码
map.put("王宝强", "马蓉");//OK
map.put("宋喆", "马蓉");//OK
map.put("刘令博", null);//OK
map.put(null, "刘亦菲");//OK
map.put("鹿晗", "关晓彤");//OK
map.put("胡歌", "胡歌的老婆");
System.out.println("map=" + map);
//remove:根据键删除映射关系
map.remove(null);
System.out.println("map=" + map);
//get:根据键获取值
Object val = map.get("鹿晗");
System.out.println("val=" + val);
//size:获取元素个数
System.out.println("k-v=" + map.size());
//isEmpty:判断个数是否为 0
System.out.println(map.isEmpty());//F
clear:
//清除 k -v map.clear();
System.out.println("map=" + map);
//containsKey:查找键是否存在
System.out.println("结果=" + map.containsKey("hsp"));//T
}
}
class Book {
private String name;
private int num;
public Book(String name, int num) {
this.name = name;
this.num = num;
}
}
13.12.3 Map接口遍历方式
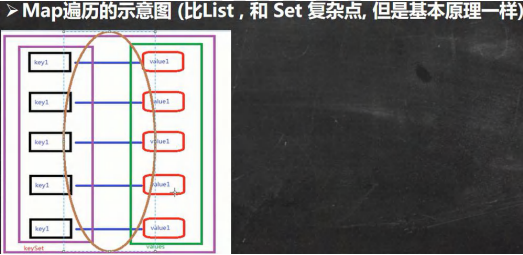
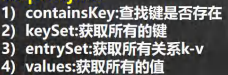
import java.util.*;
public class MapFor {
public static void main(String[] args) {
Map map = new HashMap();
map.put("邓超", "孙俪");
map.put("王宝强", "马蓉");
map.put("宋喆", "马蓉");
map.put("刘令博", null);
map.put(null, "刘亦菲");
map.put("鹿晗", "关晓彤");
//第一组:先取出 所有的 Key, 通过 Key 取出对应的 Value
Set keyset = map.keySet();
//(1) 增强 for
System.out.println("-----第一种方式-------");
for (Object key : keyset) {
System.out.println(key + "-" + map.get(key));
}
//(2) 迭代器
System.out.println("----第二种方式--------");
Iterator iterator = keyset.iterator();
while (iterator.hasNext()) {
Object key = iterator.next();
System.out.println(key + "-" + map.get(key));
}
//第二组:把所有的 values 取出
Collection values = map.values();
//这里可以使用所有的 Collections 使用的遍历方法
//(1) 增强 for
System.out.println("---取出所有的 value 增强 for----");
for (Object value : values) {
System.out.println(value);
}
//(2) 迭代器
System.out.println("---取出所有的 value 迭代器----");
Iterator iterator2 = values.iterator();
while (iterator2.hasNext()) {
Object value = iterator2.next();
System.out.println(value);
}
//第三组:通过 EntrySet 来获取 k -v
Set entrySet = map.entrySet();// EntrySet<Map.Entry<K,V>>
//(1) 增强 for
System.out.println("----使用 EntrySet 的 for 增强(第 3 种)----");
for (Object entry : entrySet) {
//将 entry 转成 Map.Entry
Map.Entry m = (Map.Entry) entry;
System.out.println(m.getKey() + "-" + m.getValue());
}
//(2) 迭代器
System.out.println("----使用 EntrySet 的 迭代器(第 4 种)----");
Iterator iterator3 = entrySet.iterator();
while (iterator3.hasNext()) {
Object entry = iterator3.next();
//System.out.println(next.getClass());//HashMap$Node -实现-> Map.Entry (getKey,getValue)
//向下转型 Map.Entry
Map.Entry m = (Map.Entry) entry;
System.out.println(m.getKey() + "-" + m.getValue());
}
}
}
13.12.4 练习
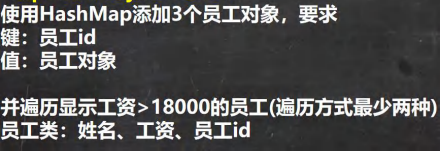
import java.util.*;
public class MapExercise {
public static void main(String[] args) {
Map hashMap = new HashMap();
hashMap.put(1, new Emp("jack", 300000, 1));
hashMap.put(2, new Emp("tom", 21000, 2));
hashMap.put(3, new Emp("milan", 12000, 3));
Set set = hashMap.keySet();
for (Object key : set) {
Emp emp = (Emp) hashMap.get(key);
if(emp.getSal() > 18000){
System.out.println(emp);
}
}
Set set1 = hashMap.entrySet();
Iterator iterator = set1.iterator();
while (iterator.hasNext()) {
Map.Entry next = (Map.Entry) iterator.next();
Emp value = (Emp) next.getValue();
if (value.getSal() > 18000){
System.out.println(value);
}
}
}
}
class Emp {
private String name;
private double sal;
private int id;
public Emp(String name, double sal, int id) {
this.name = name;
this.sal = sal;
this.id = id;
}
public String getName() {
return name;
}
public void setName(String name) {
this.name = name;
}
public double getSal() {
return sal;
}
public void setSal(double sal) {
this.sal = sal;
}
public int getId() {
return id;
}
public void setId(int id) {
this.id = id;
}
@Override
public String toString() {
return "Emp{" +
"name='" + name + '\'' +
", sal=" + sal +
", id=" + id +
'}';
}
}
13.13 Map接口实现类
13.13.1 HashMap
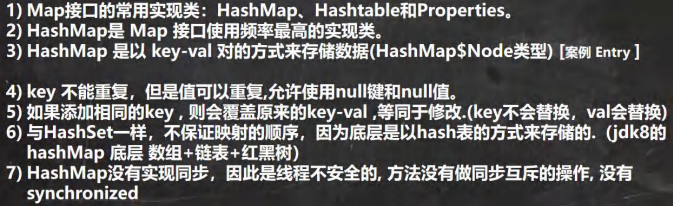
13.13.2 HashMap底层机制及源码(一)
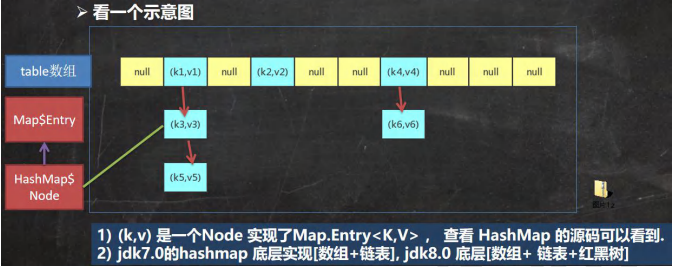
13.13.3 HashMap底层机制及源码(二)
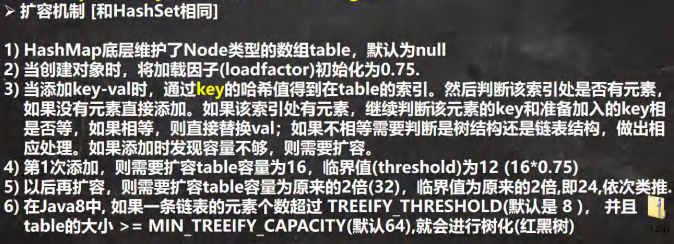
import java.util.HashMap;
public class HashMapSource1 {
public static void main(String[] args) {
HashMap map = new HashMap();
map.put("java", 10);//ok
map.put("php", 10);//ok
map.put("java", 20);//替换 value
System.out.println("map=" + map);//
/*源码:
1. 执行构造器 new HashMap()
初始化加载因子 loadfactor = 0.75
HashMap$Node[] table = null
2.执行put,调用hash方法,计算key的hash值(h = key.hashCode()) ^ (h >>> 16)
public V put(K key, V value) { K ="java" value = 10
return putVal(hash(key), key, value, false, true);
}
3.执行putVal
final V putVal(int hash, K key, V value, boolean onlyIfAbsent,
boolean evict) {
Node<K,V>[] tab; Node<K,V> p; int n, i; //辅助变量
//如果底层的table数组为null,或者length = 0,就扩容到16
if ((tab = table) == null || (n = tab.length) == 0)
n = (tab = resize()).length;
//取出hash值对应的table的索引位置的Node,然后为null,就直接把加入的k-v
//创建成一个Noode,加入该位置即可
if ((p = tab[i = (n - 1) & hash]) == null)
tab[i] = newNode(hash, key, value, null);
else {
Node<K,V> e; K k; //辅助变量
//如果table的索引位置的key的hash值和新的key的hash值相同,并满足(table现有的结点的key和准备添加的key是同一个对象 || equals返回真)就认为不能加入新的k-v
if (p.hash == hash &&
((k = p.key) == key || (key != null && key.equals(k))))
e = p;
else if (p instanceof TreeNode) //如果当前table的已有的Node是红黑树,就按照红黑树的方式
e = ((TreeNode<K,V>)p).putTreeVal(this, tab, hash, key, value);
else {
//如果找到的结点,后面是链表,就循环比较
for (int binCount = 0; ; ++binCount) {//死循环
if ((e = p.next) == null) { //如果整个链表,没有和他相同,就加入到链表的最后
p.next = newNode(hash, key, value, null);
//加入后,判断当前链表个数,是否已经到8个,到了后就调用treeifyBin方法进行红黑树树化
if (binCount >= TREEIFY_THRESHOLD - 1) // -1 for 1st
treeifyBin(tab, hash);
break;
}
if (e.hash == hash && //如果在循环过程中,发现相同,就结束,就只是替换value
((k = e.key) == key || (key != null && key.equals(k))))
break;
p = e;
}
}
if (e != null) { // existing mapping for key
V oldValue = e.value;
if (!onlyIfAbsent || oldValue == null)
e.value = value; //替换key对应的value
afterNodeAccess(e);
return oldValue;
}
}
++modCount; //每增加一个Node,就size++
if (++size > threshold) //如果size大于threshold就扩容
resize();
afterNodeInsertion(evict);
return null;
}
4.树化
//如果table为null,或者大小还没到64,暂时不树化,而是进行扩容
//满足的树化->剪枝
final void treeifyBin(Node<K,V>[] tab, int hash) {
int n, index; Node<K,V> e;
if (tab == null || (n = tab.length) < MIN_TREEIFY_CAPACITY)
resize();
*/
}
}
模拟HashMap出发扩容、树化情况
import java.util.HashMap;
public class HashMapSource2 {
public static void main(String[] args) {
HashMap hashMap = new HashMap();
for (int i = 1; i <= 12; i++) {
hashMap.put(i, "hello");
}
hashMap.put("aaa", "bbb");
System.out.println("hashMap=" + hashMap);//12 个 k-v
}
}
class A {
private int num;
public A(int num) {
this.num = num;
}
//所有的 A 对象的 hashCode 都是 100
//@Override
//public int hashCode() {
// return 100;
//}
@Override
public String toString() {
return "\nA{" +
"num=" + num +
'}';
}
}
13.14 Map接口实现类-Hashtable
13.14.1 Hashtable的基本介绍

import java.util.Hashtable;
public class HashTableExercise {
public static void main(String[] args) {
Hashtable hashtable = new Hashtable();
hashtable.put("john", 100);//ok
//hashtable.put(null,100);//异常 NullPointerException
//hashtable.put("john",null);//异常 NullPointerException
hashtable.put("lucy", 100);//ok
hashtable.put("lic", 100);//ok
hashtable.put("lic", 88);//替换
hashtable.put("hello1", 1);
hashtable.put("hello2", 1);
hashtable.put("hello3", 1);
hashtable.put("hello4", 1);
hashtable.put("hello5", 1);
hashtable.put("hello6", 1);
hashtable.put("hello7", 1);
System.out.println(hashtable);
}
/*
1.底层是数组 Hashtable$Entry[] 初始化大小为11
2.临界值 threshold = 8 = 11 * loadFactor(0.75)
3.执行方法 addEntry(hash, key, value, index); 添加到k-v 封装到Entry
4.当(count >= threshold)满足时,就按照int newCapacity = (oldCapacity << 1) + 1;扩容
*/
}
13.14.2 Hashtable和HashMap对比

13.15 Map接口实现类-Properties
13.15.1 基本介绍

13.15.2 使用
import java.util.Properties;
public class Properties_ {
public static void main(String[] args) {
//1. Properties 继承 Hashtable
//2. 可以通过 k -v 存放数据,当然 key 和 value 不能为 null
//增加
Properties properties = new Properties();
//properties.put(null, "abc");//抛出 空指针异常
//properties.put("abc", null); //抛出 空指针异常
properties.put("john", 100);//k-v
properties.put("lucy", 100);
properties.put("lic", 100);
properties.put("lic", 88);//如果有相同的 key , value 被替换
System.out.println("properties=" + properties);
//通过 k 获取对应值
System.out.println(properties.get("lic"));//88
//删除
properties.remove("lic");
System.out.println("properties=" + properties);
//修改
properties.put("john", "约翰");
System.out.println("properties=" + properties);
}
}
13.16 集合的选择
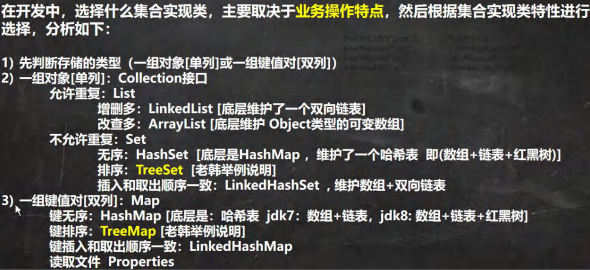
13.16.1 TreeSet和TreeMap
TreeSet
import java.util.Comparator;
import java.util.TreeMap;
public class TreeMap_ {
public static void main(String[] args) {
//使用默认的构造器,创建 TreeMap, 是无序的 (也没有排序)(个人感觉按字母升序排序)
//按照传入的 k(String) 的大小进行排序
//TreeMap treeMap = new TreeMap();
TreeMap treeMap = new TreeMap(new Comparator() {
@Override
public int compare(Object o1, Object o2) {
//按照传入的 k (String) 的大小进行排序
//按照 K (String) 的长度大小排序
//return ((String) o2).compareTo((String) o1);
return ((String) o2).length() - ((String) o1).length();
}
});
treeMap.put("jack", "杰克");
treeMap.put("tom", "汤姆");
treeMap.put("kristina", "克瑞斯提诺");
treeMap.put("smith", "斯密斯");
treeMap.put("zxc", "张晓晨");//加入不了
System.out.println("treemap=" + treeMap);
/*源码:
1. 构造器.把传入的实现了 Comparator 接口的匿名内部类(对象),传给给 TreeMap 的 comparator
public TreeMap(Comparator < ? super K > comparator) {
this.comparator = comparator;
}
2. 调用 put 方法
2.1 第一次添加, 把 k - v 封装到 Entry 对象,放入 root
Entry<K, V> t = root;
if (t == null) {
compare(key, key); // type (and possibly null) check
root = new Entry<>(key, value, null);
size = 1;
modCount++;
return null;
}
2.2 以后添加
Comparator<? super K> cpr = comparator;
if (cpr != null) { //cpr就是我们的匿名内部类(对象)
do { //遍历所有的 key , 给当前 key 找到适当位置
parent = t;
//动态绑定到我们的匿名内部类(对象)compare
cmp = cpr.compare(key, t.key);//动态绑定到我们的匿名内部类的 compare
if (cmp < 0)
t = t.left;
else if (cmp > 0)
t = t.right;
else //如果遍历过程中,发现准备添加 Key 和当前已有的 Key 相等,就不添加
return t.setValue(value);
} while (t != null);
}*/
}
}
TreeMap
import java.util.Comparator;
import java.util.TreeMap;
public class TreeMap_ {
public static void main(String[] args) {
//使用默认的构造器,创建 TreeMap, 是无序的 (也没有排序)(个人感觉按字母升序排序)
//按照传入的 k(String) 的大小进行排序
//TreeMap treeMap = new TreeMap();
TreeMap treeMap = new TreeMap(new Comparator() {
@Override
public int compare(Object o1, Object o2) {
//按照传入的 k (String) 的大小进行排序
//按照 K (String) 的长度大小排序
//return ((String) o2).compareTo((String) o1);
return ((String) o2).length() - ((String) o1).length();
}
});
treeMap.put("jack", "杰克");
treeMap.put("tom", "汤姆");
treeMap.put("kristina", "克瑞斯提诺");
treeMap.put("smith", "斯密斯");
treeMap.put("zxc", "张晓晨");//加入不了
System.out.println("treemap=" + treeMap);
/*源码:
1. 构造器.把传入的实现了 Comparator 接口的匿名内部类(对象),传给给 TreeMap 的 comparator
public TreeMap(Comparator < ? super K > comparator) {
this.comparator = comparator;
}
2. 调用 put 方法
2.1 第一次添加, 把 k - v 封装到 Entry 对象,放入 root
Entry<K, V> t = root;
if (t == null) {
compare(key, key); // type (and possibly null) check
root = new Entry<>(key, value, null);
size = 1;
modCount++;
return null;
}
2.2 以后添加
Comparator<? super K> cpr = comparator;
if (cpr != null) {
do { //遍历所有的 key , 给当前 key 找到适当位置
parent = t;
cmp = cpr.compare(key, t.key);//动态绑定到我们的匿名内部类的 compare
if (cmp < 0)
t = t.left;
else if (cmp > 0)
t = t.right;
else //如果遍历过程中,发现准备添加 Key 和当前已有的 Key 相等,就不添加
return t.setValue(value);
} while (t != null);
}*/
}
}
13.17 Collections工具类
13.17.1 Collections工具类介绍

13.17.2 排序操作

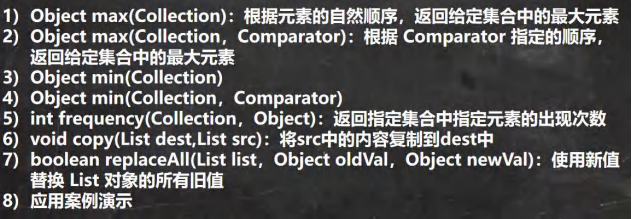
import java.util.*;
public class Collections_ {
public static void main(String[] args) {
//创建 ArrayList 集合,用于测试.
List list = new ArrayList();
list.add("tom");
list.add("smith");
list.add("king");
list.add("milan");
list.add("tom");
//reverse(List):反转 List 中元素的顺序
Collections.reverse(list);
System.out.println("list=" + list);
//shuffle(List):对 List 集合元素进行随机排序
//for (int i = 0; i < 5; i++) {
// Collections.shuffle(list);
// System.out.println("list=" + list);
//}
//sort(List):根据元素的自然顺序对指定 List 集合元素按升序排序
Collections.sort(list);
System.out.println("自然排序后");
System.out.println("list=" + list);
//sort(List,Comparator):根据指定的 Comparator 产生的顺序对 List 集合元素进行排序
//希望按照 字符串的长度大小排序
Collections.sort(list, new Comparator() {
@Override
public int compare(Object o1, Object o2) {
//可以加入校验代码
return ((String) o2).length() - ((String) o1).length();
}
});
System.out.println("字符串长度大小排序=" + list);
//swap(List, int,int):将指定 list 集合中的 i 处元素和 j 处元素进行交换
//比如
Collections.swap(list, 0, 1);
System.out.println("交换后的情况");
System.out.println("list=" + list);
//Object max (Collection);根据元素的自然顺序,返回给定集合中的最大元素
System.out.println("自然顺序最大元素=" + Collections.max(list));
//Object max (Collection,Comparator);根据 Comparator 指定的顺序, 返回给定集合中的最大元素
//比如, 我们要返回长度最大的元素
Object maxObject = Collections.max(list, new Comparator() {
@Override
public int compare(Object o1, Object o2) {
return ((String) o1).length() - ((String) o2).length();
}
});
System.out.println("长度最大的元素=" + maxObject);
//Object min (Collection)
//Object min(Collection,Comparator)
//上面的两个方法,参考 max 即可
//int frequency (Collection,Object):返回指定集合中指定元素的出现次数
System.out.println("tom 出现的次数=" + Collections.frequency(list, "tom"));
//void copy(List dest,List src);将 src 中的内容复制到 dest 中
ArrayList dest = new ArrayList();
//为了完成一个完整拷贝,我们需要先给 dest 赋值,大小和 list.size()一样
for (int i = 0; i < list.size(); i++) {
dest.add("");
}
//拷贝
Collections.copy(dest, list);
System.out.println("dest=" + dest);
//boolean replaceAll(List list,Object oldVal,Object newVal);使用新值替换 List 对象的所有旧值
//如果 list 中,有 tom 就替换成 汤姆
Collections.replaceAll(list, "tom", "汤姆");
System.out.println("list 替换后=" + list);
}
}
十四、泛型
14.1 泛型的理解和作用
14.1.1 案例

import java.util.ArrayList;
public class Generic01 {
public static void main(String[] args) {
//使用传统的方法来解决
ArrayList arrayList = new ArrayList();
arrayList.add(new Dog("旺财", 10));
arrayList.add(new Dog("发财", 1));
arrayList.add(new Dog("小黄", 5));
//假如我们的程序员,不小心,添加了一只猫
arrayList.add(new Cat("招财猫", 8));
//遍历
for (Object o : arrayList) {
//向下转型 Object ->Dog
Dog dog = (Dog) o;
System.out.println(dog.getName() + "-" + dog.getAge());
}
}
}
class Dog {
private String name;
private int age;
public Dog(String name, int age) {
this.name = name;
this.age = age;
}
public String getName() {
return name;
}
public void setName(String name) {
this.name = name;
}
public int getAge() {
return age;
}
public void setAge(int age) {
this.age = age;
}
}
class Cat { //Cat 类
private String name;
private int age;
public Cat(String name, int age) {
this.name = name;
this.age = age;
}
public String getName() {
return name;
}
public void setName(String name) {
this.name = name;
}
public int getAge() {
return age;
}
public void setAge(int age) {
this.age = age;
}
}
14.1.2 使用传统方法的问题

14.1.3 使用泛型来解决前面都问题
ArrayList
import java.util.ArrayList;
public class Generic02 {
public static void main(String[] args) {
//1. 当我们 ArrayList<Dog1> 表示存放到 ArrayList 集合中的元素是 Dog1 类型 (细节后面说...)
//2. 如果编译器发现添加的类型,不满足要求,就会报错
//3. 在遍历的时候,可以直接取出 Dog1 类型而不是 Object
//4. public class ArrayList<E> {
//}
//E 称为泛型, 那么 Dog -> E
ArrayList<Dog1> arrayList = new ArrayList<Dog1>();
arrayList.add(new Dog1("旺财", 10));
arrayList.add(new Dog1("发财", 1));
arrayList.add(new Dog1("小黄", 5));
//假如我们的程序员,不小心,添加了一只猫
//arrayList.add(new Cat1("招财猫", 8));
System.out.println("===使用泛型====");
for (Dog1 dog : arrayList) {
System.out.println(dog.getName() + "-" + dog.getAge());
}
}
}
class Dog1 {
private String name;
private int age;
public Dog1(String name, int age) {
this.name = name;
this.age = age;
}
public String getName() {
return name;
}
public void setName(String name) {
this.name = name;
}
public int getAge() {
return age;
}
public void setAge(int age) {
this.age = age;
}
}
class Cat1 { //Cat 类
private String name;
private int age;
public Cat1(String name, int age) {
this.name = name;
this.age = age;
}
public String getName() {
return name;
}
public void setName(String name) {
this.name = name;
}
public int getAge() {
return age;
}
public void setAge(int age) {
this.age = age;
}
}
14.2 泛型的理解和好处
14.2.1 泛型的好处
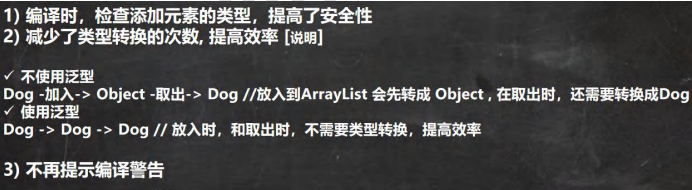
14.3 泛型的介绍
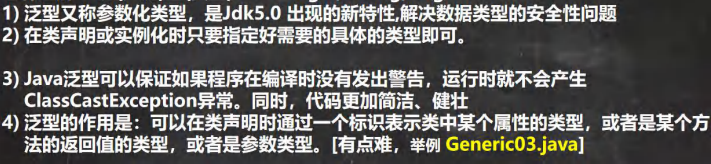
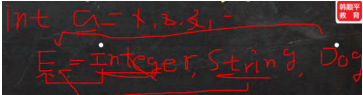
public class Generic03 {
public static void main(String[] args) {
//注意,特别强调;E 具体的数据类型在定义 Person 对象的时候指定, 即在编译期间,就确定 E 是什么类型
Person<String> person = new Person<String>("李四");
person.show(); //String
/*你可以这样理解,上面的 Person 类
class Person {
String s;//E 表示 s 的数据类型, 该数据类型在定义 Person 对象的时候指定,即在编译期间,就确定 E
是什么类型
public Person(String s) {//E 也可以是参数类型
this.s = s;
}
public String f() {//返回类型使用 E
return s;
}
}*/
Person<Integer> person2 = new Person<Integer>(100);
person2.show();//Integer
/*class Person {
Integer s;//E 表示 s 的数据类型, 该数据类型在定义 Person 对象的时候指定,即在编译期间,就确定 E
是什么类型
public Person(Integer s) {//E 也可以是参数类型
this.s = s;
}
public Integer f() {//返回类型使用 E
return s;
}
}*/
}
}
//泛型的作用是:可以在类声明时通过一个标识表示类中某个属性的类型,
// 或者是某个方法的返回值的类型,或者是参数类型
class Person<E> {
E s;//E 表示 s 的数据类型, 该数据类型在定义 Person 对象的时候指定,即在编译期间,就确定 E 是什么类型
public Person(E s) {//E 也可以是参数类型
this.s = s;
}
public E f() {//返回类型使用 E
return s;
}
public void show() {
System.out.println(s.getClass());//显示 s 的运行类型
}
}
14.4 泛型的语法
14.4.1 泛型的声明
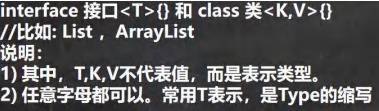
14.4.2 泛型的实例化

14.4.3 练习
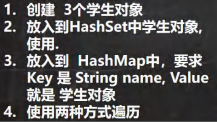
使用HashSet,HashMap
import java.util.*;
public class GenericExercise {
public static void main(String[] args) {
//使用泛型方式给 HashSet 放入 3 个学生对象
HashSet<Student> students = new HashSet<Student>();
students.add(new Student("jack", 18));
students.add(new Student("tom", 28));
students.add(new Student("mary", 19));
//遍历
for (Student student : students) {
System.out.println(student);
}
System.out.println("=========================");
//使用泛型方式给 HashMap 放入 3 个学生对象
// K -> String V->Student
HashMap<String, Student> hashMap = new HashMap<String, Student>();
/*
public class HashMap<K,V> {}
*/
hashMap.put("milan", new Student("milan", 38));
hashMap.put("smith", new Student("smith", 48));
hashMap.put("zls", new Student("zls", 28));
Set<Map.Entry<String, Student>> entries = hashMap.entrySet();
Iterator<Map.Entry<String, Student>> iterator = entries.stream().iterator();
while (iterator.hasNext()) {
Map.Entry<String, Student> next = iterator.next();
System.out.println(next.getKey() + "=" + next.getValue());
}
}
}
class Student {
private String name;
private int age;
public Student(String name, int age) {
this.name = name;
this.age = age;
}
public String getName() {
return name;
}
public void setName(String name) {
this.name = name;
}
public int getAge() {
return age;
}
public void setAge(int age) {
this.age = age;
}
@Override
public String toString() {
return "Student{" +
"name='" + name + '\'' +
", age=" + age +
'}';
}
}
14.4.4 注意事项和使用细节
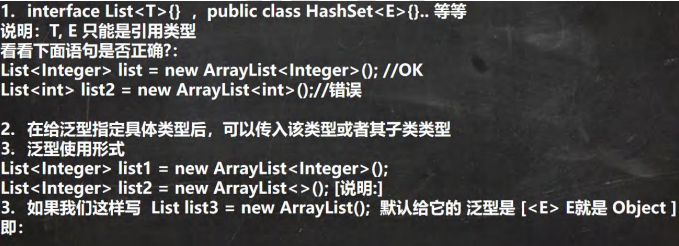
import java.util.ArrayList;
import java.util.List;
public class GenericDetail {
public static void main(String[] args) {
//1.给泛型指向数据类型是,要求是引用类型,不能是基本数据类型
List<Integer> list = new ArrayList<Integer>(); //OK
//List<int> list2 = new ArrayList<int>();//错误
//2. 说明
//因为 E 指定了 A 类型, 构造器传入了 new A()
//在给泛型指定具体类型后,可以传入该类型或者其子类类型
Pig<A> aPig = new Pig<A>(new A());
aPig.f();
Pig<A> aPig2 = new Pig<A>(new B());
aPig2.f();
//3. 泛型的使用形式
ArrayList<Integer> list1 = new ArrayList<Integer>();
List<Integer> list2 = new ArrayList<Integer>();
//在实际开发中,我们往往简写
//编译器会进行类型推断
ArrayList<Integer> list3 = new ArrayList<>();
List<Integer> list4 = new ArrayList<>();
ArrayList<Pig> pigs = new ArrayList<>();
//4. 如果是这样写 泛型默认是 Object
ArrayList arrayList = new ArrayList();//等价 ArrayList<Object> arrayList = new ArrayList<Object>();
/*public boolean add (Object e){
ensureCapacityInternal(size + 1); // Increments modCount!!
elementData[size++] = e;
return true;
}*/
Tiger tiger = new Tiger();
/*class Tiger {//类
Object e;
public Tiger() {
}
public Tiger(Object e) {
this.e = e;
}
}*/
}
}
class Tiger<E> {//类
E e;
public Tiger() {
}
public Tiger(E e) {
this.e = e;
}
}
class A {
}
class B extends A {
}
class Pig<E> {//
E e;
public Pig(E e) {
this.e = e;
}
public void f() {
System.out.println(e.getClass()); //运行类型
}
}
14.5 泛型的练习
14.5.1 练习
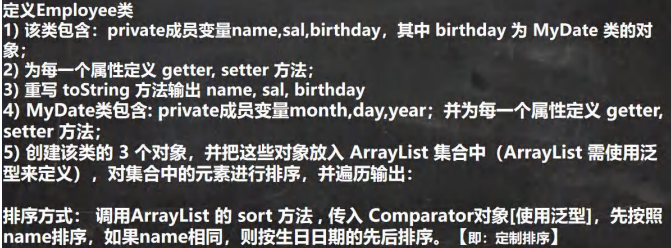
14.6 自定义泛型
14.6.1 自定义泛型类
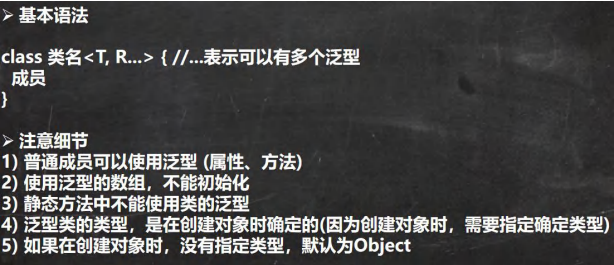
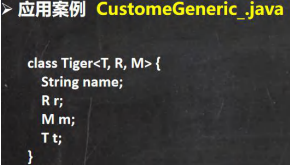
判断
import java.util.Arrays;
public class CustomGeneric_ {
public static void main(String[] args) {
//T=Double, R=String, M=Integer
Tiger1<Double, String, Integer> g = new Tiger1<>("john");
g.setT(10.9); //OK
//g.setT("yy"); //错误,类型不对
System.out.println(g);
Tiger1 g2 = new Tiger1("john~~");//OK T=Object R=Object M=Object
g2.setT("yy"); //OK ,因为 T=Object "yy"=String 是 Object 子类
System.out.println("g2=" + g2);
}
}
//1. Tiger 后面泛型,所以我们把 Tiger 就称为自定义泛型类
//2, T, R, M 泛型的标识符, 一般是单个大写字母
//3. 泛型标识符可以有多个. //4. 普通成员可以使用泛型 (属性、方法)
//5. 使用泛型的数组,不能初始化
//6. 静态方法中不能使用类的泛型
class Tiger1<T, R, M> {
String name;
R r; //属性使用到泛型
M m;
T t;
//因为数组在 new 不能确定 T 的类型,就无法在内存开空间
T[] ts;
public Tiger1(String name) {
this.name = name;
}
public Tiger1(R r, M m, T t) {//构造器使用泛型
this.r = r;
this.m = m;
this.t = t;
}
public Tiger1(String name, R r, M m, T t) {//构造器使用泛型
this.name = name;
this.r = r;
this.m = m;
this.t = t;
}
//因为静态是和类相关的,在类加载时,对象还没有创建
// 所以,如果静态方法和静态属性使用了泛型,JVM 就无法完成初始化
// static R r2;
// public static void m1(M m) {
// }
//方法使用泛型
public String getName() {
return name;
}
public void setName(String name) {
this.name = name;
}
public R getR() {
return r;
}
public void setR(R r) {//方法使用到泛型
this.r = r;
}
public M getM() {//返回类型可以使用泛型.
return m;
}
public void setM(M m) {
this.m = m;
}
public T getT() {
return t;
}
public void setT(T t) {
this.t = t;
}
@Override
public String toString() {
return "Tiger{" +
"name='" + name + '\'' +
", r=" + r +
", m=" + m +
", t=" + t +
", ts=" + Arrays.toString(ts) +
'}';
}
}
14.6.2 自定义泛型接口
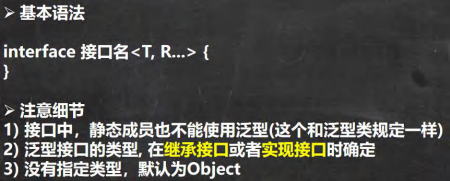
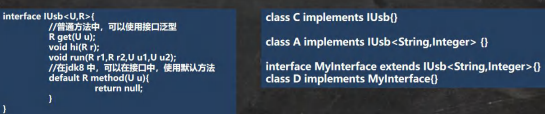
public class CustomInterfaceGeneric {
}
//在继承接口 指定泛型接口的类型
interface IA extends IUsb<String, Double> {
}
//当我们去实现 IA 接口时,因为 IA 在继承 IUsu 接口时,指定了 U 为 String R 为 Double
//,在实现 IUsu 接口的方法时,使用 String 替换 U, 是 Double 替换 R
class AA implements IA {
@Override
public Double get(String s) {
return null;
}
@Override
public void hi(Double aDouble) {
}
@Override
public void run(Double r1, Double r2, String u1, String u2) {
}
}
//实现接口时,直接指定泛型接口的类型
//给 U 指定 Integer 给 R 指定了 Float
//所以,当我们实现 IUsb 方法时,会使用 Integer 替换 U, 使用 Float 替换 R
class BB implements IUsb<Integer, Float> {
@Override
public Float get(Integer integer) {
return null;
}
@Override
public void hi(Float aFloat) {
}
@Override
public void run(Float r1, Float r2, Integer u1, Integer u2) {
}
}
//没有指定类型,默认为 Object
//建议直接写成 IUsb<Object,Object>
class CC implements IUsb { //等价 class CC implements IUsb<Object,Object> {
@Override
public Object get(Object o) {
return null;
}
@Override
public void hi(Object o) {
}
@Override
public void run(Object r1, Object r2, Object u1, Object u2) {
}
}
interface IUsb<U, R> {
int n = 10;
//U name; 不能这样使用
//普通方法中,可以使用接口泛型
R get(U u);
void hi(R r);
void run(R r1, R r2, U u1, U u2);
//在 jdk8 中,可以在接口中,使用默认方法, 也是可以使用泛型
default R method(U u) {
return null;
}
}
14.6.2 自定义泛型方法
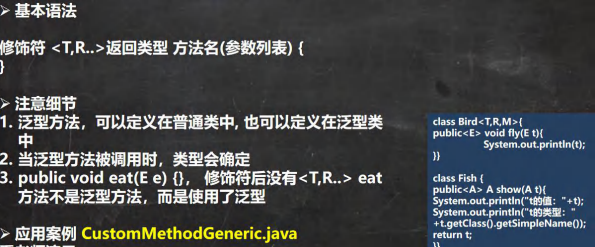
import java.util.ArrayList;
public class CustomMethodGeneric {
public static void main(String[] args) {
Car car = new Car();
car.fly("宝马", 100);//当调用方法时,传入参数,编译器,就会确定类型
System.out.println("=======");
car.fly(300, 100.1);//当调用方法时,传入参数,编译器,就会确定类型
//T->String, R-> ArrayList
Fish<String, ArrayList> fish = new Fish<>();
fish.hello(new ArrayList(), 11.3f);
}
}
//泛型方法,可以定义在普通类中, 也可以定义在泛型类中
class Car {//普通类
public void run() {//普通方法
}
//说明 泛型方法
//1. <T,R> 就是泛型
//2. 是提供给 fly 使用的
public <T, R> void fly(T t, R r) {//泛型方法
System.out.println(t.getClass());//String
System.out.println(r.getClass());//Integer
}
}
class Fish<T, R> {//泛型类
public void run() {//普通方法
}
public <U, M> void eat(U u, M m) {//泛型方法
}
//说明
//1. 下面 hi 方法不是泛型方法
//2. 是 hi 方法使用了类声明的 泛型
public void hi(T t) {
}
//泛型方法,可以使用类声明的泛型,也可以使用自己声明泛型
public <K> void hello(R r, K k) {
System.out.println(r.getClass());//ArrayList
System.out.println(k.getClass());//Float
}
}
14.7 泛型的继承和通配符
14.7.1 泛型的继承和通配符说明

14.7.2 案例
import java.util.ArrayList;
import java.util.List;
public class GenericExtends {
public static void main(String[] args) {
Object o = new String("xx");
//泛型没有继承性
//List<Object> list = new ArrayList<String>();
//举例说明下面三个方法的使用
List<Object> list1 = new ArrayList<>();
List<String> list2 = new ArrayList<>();
List<AA> list3 = new ArrayList<>();
List<BB> list4 = new ArrayList<>();
List<CC> list5 = new ArrayList<>();
//如果是 List<?> c ,可以接受任意的泛型类型
printCollection1(list1);
printCollection1(list2);
printCollection1(list3);
printCollection1(list4);
printCollection1(list5);
//List<? extends AA> c;表示 上限,可以接受 AA 或者 AA 子类
//printCollection2(list1);//×
//printCollection2(list2);//×
printCollection2(list3);//√
printCollection2(list4);//√
printCollection2(list5);//√
//List<? super AA> c:支持 AA 类以及 AA 类的父类,不限于直接父类
printCollection3(list1);//√
//printCollection3(list2);//×
printCollection3(list3);//√
//printCollection3(list4);//×
//printCollection3(list5);//×
}
// ? extends AA 表示 上限,可以接受 AA 或者 AA 子类
public static void printCollection2(List<? extends AA> c) {
for (Object object : c) {
System.out.println(object);
}
}
//说明: List<?> 表示 任意的泛型类型都可以接受
public static void printCollection1(List<?> c) {
for (Object object : c) { // 通配符,取出时,就是 Object
System.out.println(object);
}
}
// ? super 子类类名 AA:支持 AA 类以及 AA 类的父类,不限于直接父类,
//规定了泛型的下限
public static void printCollection3(List<? super AA> c) {
for (Object object : c) {
System.out.println(object);
}
}
}
class AA {
}
class BB extends AA {
}
class CC extends BB {
}
14.8 JUnit
14.8.1 为什么需要JUnit
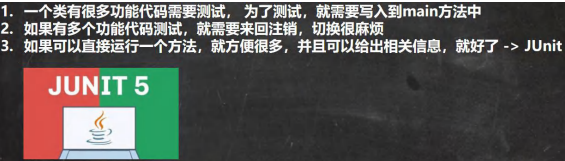
14.8.2 基本介绍

14.8.3 案例
import org.junit.jupiter.api.Test;
public class JUnit_ {
public static void main(String[] args) {
//传统方式
//new JUnit_().m1();
//new JUnit_().m2();
}
@Test
public void m1() {
System.out.println("m1 方法被调用");
}
@Test
public void m2() {
System.out.println("m2 方法被调用");
}
@Test
public void m3() {
System.out.println("m3 方法被调用");
}
}
14.9 练习
import org.junit.jupiter.api.Test;
import java.util.*;
public class Homework {
public static void main(String[] args) {
}
@Test
public void testList() {
DAO<User> dao = new DAO<>();
dao.save("001",new User(1,20,"jack"));
dao.save("002",new User(2,22,"king"));
dao.save("003",new User(3,24,"smith"));
List<User> list = dao.list();
System.out.println(list);
System.out.println("删除");
dao.delete("002");
System.out.println(list);
System.out.println("修改");
dao.update("003",new User(3,29,"zsfs"));
System.out.println(list);
System.out.println("查询");
System.out.println(dao.get("003"));
}
}
class User {
private int id;
private int age;
private String name;
public User(int id, int age, String name) {
this.id = id;
this.age = age;
this.name = name;
}
public int getId() {
return id;
}
public void setId(int id) {
this.id = id;
}
public int getAge() {
return age;
}
public void setAge(int age) {
this.age = age;
}
public String getName() {
return name;
}
public void setName(String name) {
this.name = name;
}
@Override
public String toString() {
return "User{" +
"id=" + id +
", age=" + age +
", name='" + name + '\'' +
'}';
}
}
class DAO<T> {
private Map<String, T> map = new HashMap<String, T>();
public T get(String id) {
return map.get(id);
}
public void update(String id, T entity) {
map.put(id, entity);
}
//返回map中存放的所有T对象
//遍历map(k-v),将value的所有value(T entity),封装到ArrayList返回即可
public List<T> list() {
List<T> list = new ArrayList<>();
Set<String> strings = map.keySet();
for (String key : strings) {
list.add(get(key));
}
return list;
}
public void delete(String id) {
map.remove(id);
}
public void save(String id, T entity) {//把entity保存到map
map.put(id, entity);
}
}
十五、事件
15.1 事件处理机制
15.1.1 事件处理机制-问题
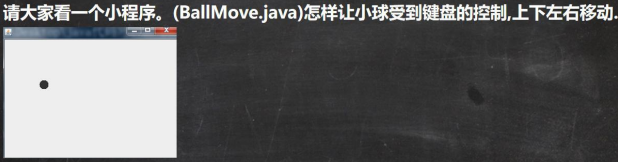
import javax.swing.*;
import java.awt.*;
import java.awt.event.KeyEvent;
import java.awt.event.KeyListener;
public class BallMove extends JFrame { //窗口
MyPanel mp = null;
public static void main(String[] args) {
BallMove ballMove = new BallMove();
}
//构造器
public BallMove() {
mp = new MyPanel();
this.add(mp);
this.setSize(400, 300);
//窗口 JFrame 对象可以监听键盘事件, 即可以监听到面板发生的键盘事件
this.addKeyListener(mp);
this.setDefaultCloseOperation(JFrame.EXIT_ON_CLOSE);
this.setVisible(true);
}
}
//面板, 可以画出小球
//KeyListener 是监听器, 可以监听键盘事件
class MyPanel extends JPanel implements KeyListener {
//为了让小球可以移动, 把他的左上角的坐标(x,y)设置变量
int x = 10;
int y = 10;
@Override
public void paint(Graphics g) {
super.paint(g);
g.fillOval(x, y, 20, 20); //默认黑色
}
//有字符输出时,该方法就会触发
@Override
public void keyTyped(KeyEvent e) {
}
//当某个键按下,该方法会触发
@Override
public void keyPressed(KeyEvent e) {
//System.out.println((char) e.getKeyCode() + "被按下..");
//根据用户按下的不同键,来处理小球的移动(上下左右的键)
//在 java 中,会给每一个键,分配一个值( int)
if (e.getKeyCode() == KeyEvent.VK_DOWN) {//KeyEvent.VK_DOWN 就是向下的箭头对应的 code
y++;
} else if (e.getKeyCode() == KeyEvent.VK_UP) {
y--;
} else if (e.getKeyCode() == KeyEvent.VK_LEFT) {
x--;
} else if (e.getKeyCode() == KeyEvent.VK_RIGHT) {
x++;
}
//让面板重绘
this.repaint();
}
//当某个键释放(松开),该方法会触发
@Override
public void keyReleased(KeyEvent e) {
}
}
15.1.2 基本说明

15.1.3 示意图

15.1.4 机制分析
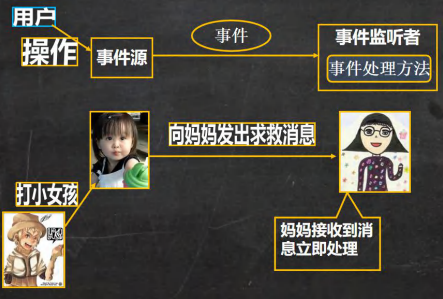
15.1.5 事件处理机制深入理解
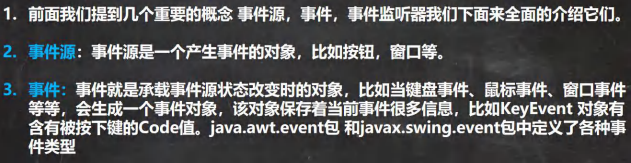
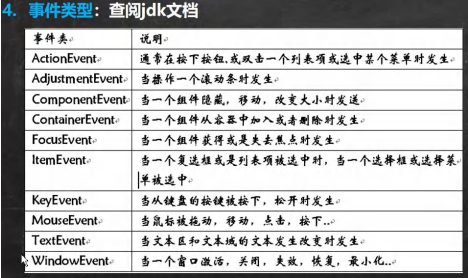
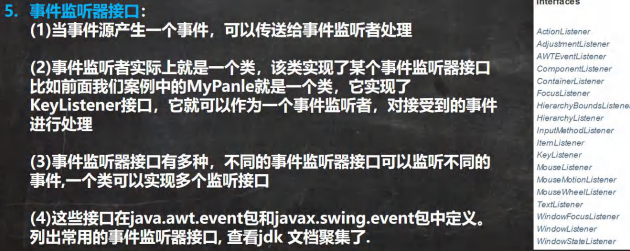
十六、多线程基础
16.1 线程的相关概念
16.1.1 程序

16.1.2 进程

16.1.3 线程
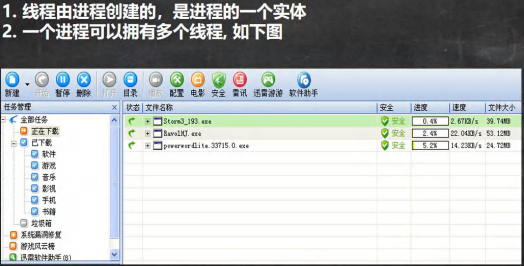
16.1.4 其他概念

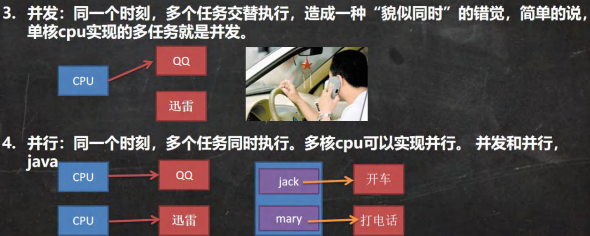
public class CpuNum {
public static void main(String[] args) {
Runtime runtime = Runtime.getRuntime();
//获取当前电脑的cpu数量/核心数
int cpuNums = runtime.availableProcessors();
System.out.println("当前cpu数=" + cpuNums);
}
}
16.2 线程的基本使用
16.2.1 创建线程的两种方式
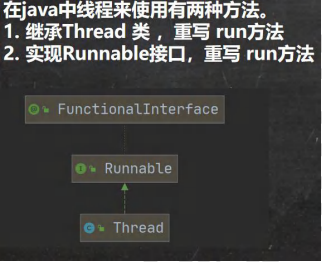
16.2.2 继承Thread类
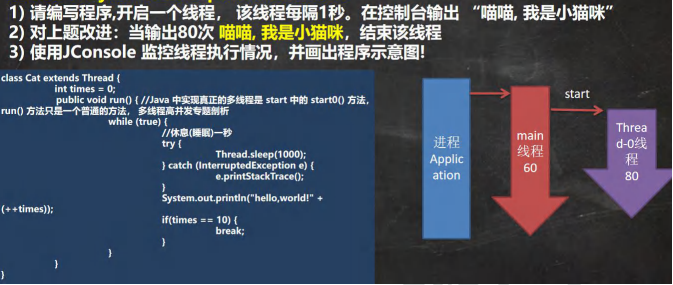
public class Thread01 {
public static void main(String[] args) throws InterruptedException {
//创建 Cat 对象,可以当做线程使用
Cat cat = new Cat();
/*(1)
public synchronized void start () {
start0();
}
(2)
//start0() 是本地方法,是 JVM 调用, 底层是 c/c++实现
//真正实现多线程的效果, 是 start0(), 而不是 run
private native void start0 ();*/
cat.start();//启动线程-> 最终会执行 cat 的 run 方法
//cat.run();//run 方法就是一个普通的方法, 没有真正的启动一个线程,就会把 run 方法执行完毕,才向下执行
//说明:
//当 main 线程启动一个子线程 Thread -0, 主线程不会阻塞, 会继续执行
//这时 主线程和子线程是交替执行..System.out.println("主线程继续执行" + Thread.currentThread().getName());//名字 main
for (int i = 0; i < 60; i++) {
System.out.println("主线程 i=" + i);
//让主线程休眠
Thread.sleep(1000);
}
}
}
//1.当一个类继承了 Thread 类, 该类就可以当做线程使用
//2.我们会重写 run 方法,写上自己的业务代码
//3.run Thread 类 实现了 Runnable 接口的 run 方法
/*@Override
public void run() {
if (target != null) {
target.run();
}
}*/
class Cat extends Thread {
int times = 0;
@Override
public void run() {//重写 run 方法,写上自己的业务逻辑
while (true) {
//该线程每隔 1 秒。在控制台输出 “喵喵, 我是小猫咪”
System.out.println("喵喵, 我是小猫咪" + (++times) + " 线程名=" + Thread.currentThread().getName());
//让该线程休眠 1 秒 ctrl+alt+t
try {
Thread.sleep(1000);
} catch (InterruptedException e) {
e.printStackTrace();
}
if (times == 80) {
break;//当 times 到 80, 退出 while, 这时线程也就退出.. }
}
}
}
}
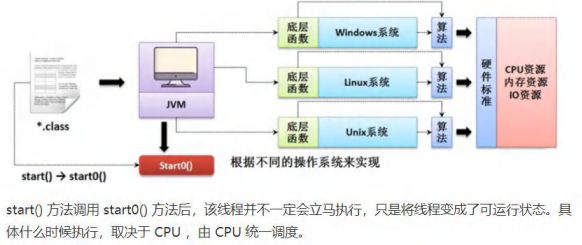
16.2.3 实现Ruannable接口


public class Thread02 {
public static void main(String[] args) {
Dog dog = new Dog();
//dog.start();这里不能调用 start
//创建了 Thread 对象,把 dog 对象(实现 Runnable), 放入 Thread
Thread thread = new Thread(dog);
thread.start();
//Tiger tiger = new Tiger();//实现了 Runnable
//ThreadProxy threadProxy = new ThreadProxy(tiger);
//threadProxy.start();
}
}
class Animal {
}
class Tiger extends Animal implements Runnable {
@Override
public void run() {
System.out.println("老虎嗷嗷叫....");
}
}
//线程代理类 , 模拟了一个极简的 Thread 类
class ThreadProxy implements Runnable {//你可以把 Proxy 类当做 ThreadProxy
private Runnable target = null;//属性,类型是 Runnable
@Override
public void run() {
if (target != null) {
target.run();//动态绑定(运行类型 Tiger)
}
}
public ThreadProxy(Runnable target) {
this.target = target;
}
public void start() {
start0();//这个方法时真正实现多线程方法
}
public void start0() {
run();
}
}
class Dog implements Runnable { //通过实现 Runnable 接口,开发线程
int count = 0;
@Override
public void run() { //普通方法
while (true) {
System.out.println("小狗汪汪叫..hi" + (++count) + Thread.currentThread().getName());
//休眠 1 秒
try {
Thread.sleep(1000);
} catch (InterruptedException e) {
e.printStackTrace();
}
if (count == 10) {
break;
}
}
}
}
16.2.4 多线程

public class Thread03 {
public static void main(String[] args) {
T1 t1 = new T1();
T2 t2 = new T2();
Thread thread1 = new Thread(t1);
Thread thread2 = new Thread(t2);
thread1.start();//启动第 1 个线程
thread2.start();//启动第 2 个线程
//... }
}
static class T1 implements Runnable {
int count = 0;
@Override
public void run() {
while (true) {
//每隔 1 秒输出 “hello,world”,输出 10 次
System.out.println("hello,world " + (++count));
try {
Thread.sleep(1000);
} catch (InterruptedException e) {
e.printStackTrace();
}
if (count == 60) {
break;
}
}
}
}
static class T2 implements Runnable {
int count = 0;
@Override
public void run() {
//每隔 1 秒输出 “hi”,输出 5 次
while (true) {
System.out.println("hi " + (++count));
try {
Thread.sleep(1000);
} catch (InterruptedException e) {
e.printStackTrace();
}
if (count == 50) {
break;
}
}
}
}
}
16.2.5 线程的理解
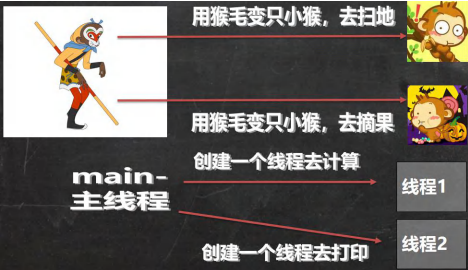
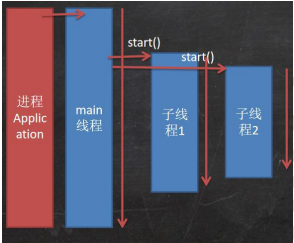
16.3 继承Thread和实现Runnable的区别


public class SellTicket {
public static void main(String[] args) {
//测试
//SellTicket01 sellTicket01 = new SellTicket01();
//SellTicket01 sellTicket02 = new SellTicket01();
//SellTicket01 sellTicket03 = new SellTicket01();
//这里我们会出现超卖.. // sellTicket01.start();//启动售票线程
//sellTicket02.start();//启动售票线程
//sellTicket03.start();//启动售票线程
System.out.println("===使用实现接口方式来售票=====");
SellTicket02 sellTicket02 = new SellTicket02();
new Thread(sellTicket02).start();//第 1 个线程-窗口
new Thread(sellTicket02).start();//第 2 个线程-窗口
new Thread(sellTicket02).start();//第 3 个线程-窗口
}
}
//使用 Thread 方式
class SellTicket01 extends Thread {
private static int ticketNum = 100;//让多个线程共享 ticketNum
@Override
public void run() {
while (true) {
if (ticketNum <= 0) {
System.out.println("售票结束...");
break;
}
//休眠 50 毫秒, 模拟
try {
Thread.sleep(50);
} catch (InterruptedException e) {
e.printStackTrace();
}
System.out.println("窗口 " + Thread.currentThread().getName() + " 售出一张票" + " 剩余票数=" + (--ticketNum));
}
}
}
//实现接口方式
class SellTicket02 implements Runnable {
private int ticketNum = 100;//让多个线程共享 ticketNum
@Override
public void run() {
while (true) {
if (ticketNum <= 0) {
System.out.println("售票结束...");
break;
}
//休眠 50 毫秒, 模拟
try {
Thread.sleep(50);
} catch (InterruptedException e) {
e.printStackTrace();
}
System.out.println("窗口 " + Thread.currentThread().getName() + " 售出一张票" + " 剩余票数=" + (--ticketNum));//1 - 0 - -1 - -2
}
}
}
16.4 线程终止
16.4.1 基本说明

16.4.2 案例

public class ThreadExit_ {
public static void main(String[] args) {
T t1 = new T();
t1.start();
try {
Thread.sleep(10 * 1000);
} catch (InterruptedException e) {
throw new RuntimeException(e);
}
t1.setLoop(false);
}
}
class T extends Thread {
private int count = 0;
private boolean loop = true;
@Override
public void run() {
while (loop) {
try {
Thread.sleep(50);
} catch (InterruptedException e) {
e.printStackTrace();
}
System.out.println("T 运行中..." + (++count));
}
}
public void setLoop(boolean loop) {
this.loop = loop;
}
}
16.5 线程常用的方法
16.5.1 常用方法第一组
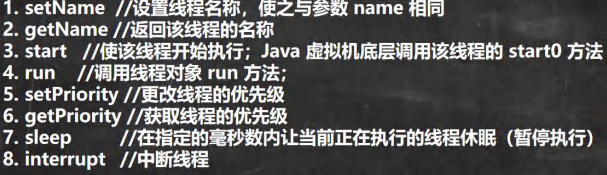
16.5.2 注意事项和细节

16.5.3 案例
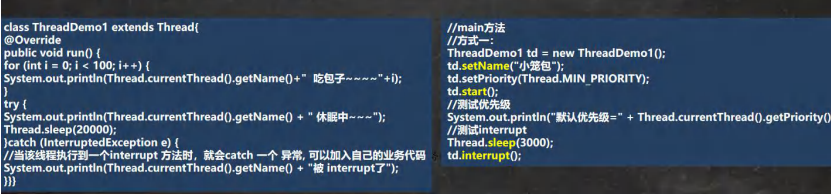
public class ThreadMethod01 {
public static void main(String[] args) throws InterruptedException {
T t = new T();
t.setName("张三");
t.setPriority(Thread.MIN_PRIORITY);
t.start();
//主线程打印5句hi,然后中断子线程的休眠
for (int i = 0; i < 5; i++) {
Thread.sleep(1000);
System.out.println("hi" + i );
}
System.out.println(t.getName() + "优先级=" + t.getPriority());
t.interrupt();
}
}
class T extends Thread {
@Override
public void run() {
while (true) {
for (int i = 0; i < 100; i++) {
//Thread.currentThread().getName()获取当前线程的名称
System.out.println(Thread.currentThread().getName() + "吃包子..." + i);
}
try {
System.out.println(Thread.currentThread().getName() + "休眠中...");
Thread.sleep(20000);
} catch (InterruptedException e) {
//当该线程执行到一个interrupt方法时,就会catch一个异常,可以加入自己的业务代码
//InterruptedException是捕获到一个中断异常
System.out.println(Thread.currentThread().getName() + "被interrupt了");
}
}
}
}
16.5.4 常用方法第二组
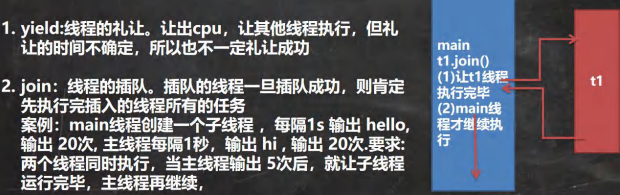
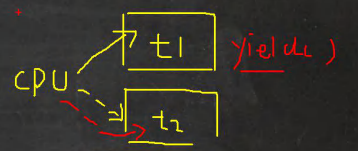
16.5.5 案例
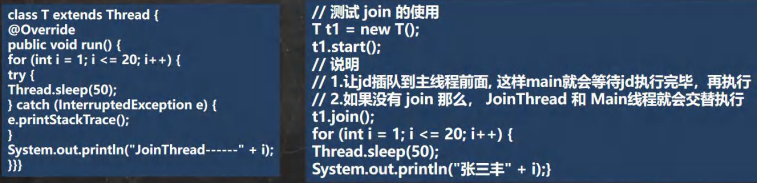
public class ThreadMethod02 {
public static void main(String[] args) throws InterruptedException {
T1 t1 = new T1();
t1.start();
for (int i = 0; i < 20; i++) {
Thread.sleep(1000);
System.out.println("主线程 吃了" + i + "包子");
if(i == 5) {
System.out.println("主线程让子线程先吃");
//t1.join();//相当于让t1先执行
Thread.yield();//礼让,不一定成功
System.out.println("子线程吃完了,主线程接着吃");
}
}
}
}
class T1 extends Thread {
@Override
public void run() {
for (int i = 0; i < 20; i++) {
try {
Thread.sleep(1000);
} catch (InterruptedException e) {
e.printStackTrace();
}
System.out.println("子线程 吃了" + i + "包子");
}
}
}
16.5.6 练习
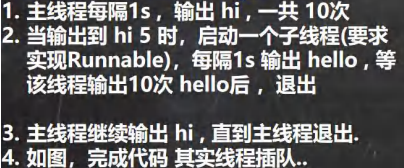
public class ThreadMethodExercise {
public static void main(String[] args) throws InterruptedException {
Thread t3 = new Thread(new T3());//创建子线程
for (int i = 1; i <= 10; i++) {
System.out.println("hi " + i);
if(i == 5) {//说明主线程输出了 5 次 hi
t3.start();//启动子线程 输出 hello... t3.join();//立即将 t3 子线程,插入到 main 线程,让 t3 先执行
}
Thread.sleep(1000);//输出一次 hi, 让 main 线程也休眠 1s
}
}
}
class T3 implements Runnable {
private int count = 0;
@Override
public void run() {
while (true) {
System.out.println("hello " + (++count));
try {
Thread.sleep(1000);
} catch (InterruptedException e) {
e.printStackTrace();
}
if (count == 10) {
break;
}
}
}
}
16.5.7 用户线程和守护线程

16.5.8 案例

public class ThreadMethod03 {
public static void main(String[] args) throws InterruptedException {
MyDaemonThread myDaemonThread = new MyDaemonThread();
//当我们主线程结束后,子线程自动结束
//只需子线程设为守护线程即可
myDaemonThread.setDaemon(true);
myDaemonThread.start();
for (int i = 0; i < 10; i++) {
System.out.println("看电影");
Thread.sleep(1000);
}
}
}
class MyDaemonThread extends Thread {
@Override
public void run() {
for (; ; ) {//无线循环
try {
Thread.sleep(50);
} catch (InterruptedException e) {
e.printStackTrace();
}
System.out.println("xx和yy快乐聊天,哈哈哈...");
}
}
}
16.6 线程的生命周期
16.6.1 JDK中用Thread.State枚举表示了线程的几种状态

16.6.2 线程状态转换图
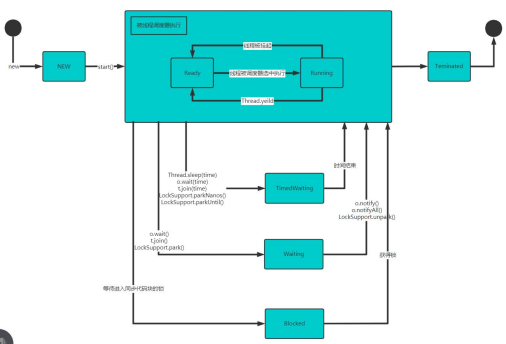
16.6.3 查看线程状态
public class ThreadState_ {
public static void main(String[] args) throws InterruptedException {
T t = new T();
System.out.println(t.getName() + " 状态 " + t.getState());
t.start();
while (Thread.State.TERMINATED != t.getState()) {
System.out.println(t.getName() + " 状态 " + t.getState());
Thread.sleep(500);
}
System.out.println(t.getName() + " 状态 " + t.getState());
}
}
class T extends Thread {
@Override
public void run() {
while (true) {
for (int i = 0; i < 10; i++) {
System.out.println("hi " + i);
try {
Thread.sleep(1000);
} catch (InterruptedException e) {
e.printStackTrace();
}
}
break;
}
}
}
16.7 线程的同步
16.7.1 问题
16.8 Synchronized
16.8.1 线程同步机制

16.8.2 同步具体方法-Synchronized
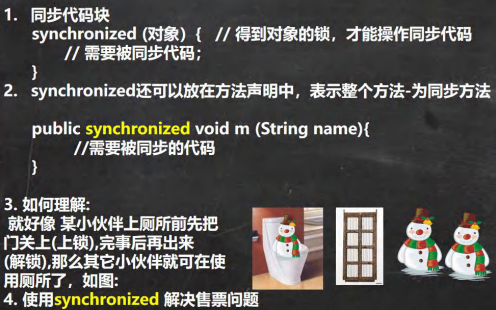
16.9 同步原理
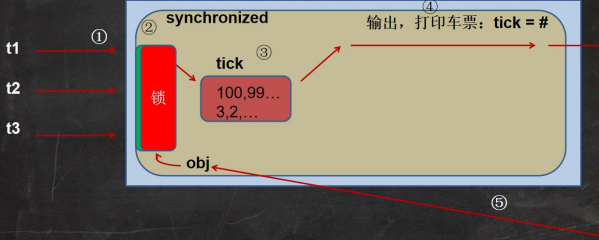
16.10 互斥锁
16.10.1 基本介绍
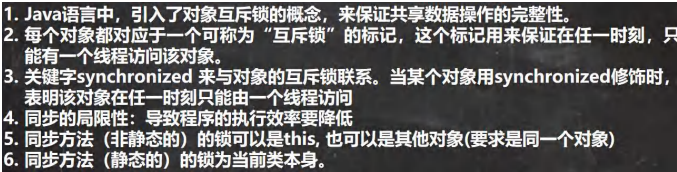
16.10.2 解决售票问题
public class SellTicket {
public static void main(String[] args) {
// SellTicket01 sellTicket01 = new SellTicket01();
// SellTicket01 sellTicket02 = new SellTicket01();
// SellTicket01 sellTicket03 = new SellTicket01();
//
// //这里我们会出现超卖.. // sellTicket01.start();//启动售票线程
// sellTicket02.start();//启动售票线程
// sellTicket03.start();//启动售票线程
// System.out.println("===使用实现接口方式来售票=====");
// SellTicket02 sellTicket02 = new SellTicket02();
// new Thread(sellTicket02).start();//第 1 个线程-窗口
// new Thread(sellTicket02).start();//第 2 个线程-窗口
// new Thread(sellTicket02).start();//第 3 个线程-窗口
//测试一把
SellTicket03 sellTicket03 = new SellTicket03();
new Thread(sellTicket03).start();//第 1 个线程-窗口
new Thread(sellTicket03).start();//第 2 个线程-窗口
new Thread(sellTicket03).start();//第 3 个线程-窗口
}
}
//实现接口方式, 使用 synchronized 实现线程同步
class SellTicket03 implements Runnable {
private int ticketNum = 100;//让多个线程共享 ticketNum
private boolean loop = true;//控制 run 方法变量
Object object = new Object();
//同步方法(静态的)的锁为当前类本身
//1. public synchronized static void m1() {} 锁是加在 SellTicket03.class
//2. 如果在静态方法中,实现一个同步代码块.
/*
synchronized (SellTicket03 .class)
{
System.out.println("m2");
}
*/
public synchronized static void m1() {
}
public static void m2() {
synchronized (SellTicket03.class) {
System.out.println("m2");
}
}
//1. public synchronized void sell() {} 就是一个同步方法
//2. 这时锁在 this 对象
//3. 也可以在代码块上写 synchronize ,同步代码块, 互斥锁还是在 this 对象
public /*synchronized*/ void sell() { //同步方法, 在同一时刻, 只能有一个线程来执行 sell 方法
synchronized (/*this*/ object) {
if (ticketNum <= 0) {
System.out.println("售票结束...");
loop = false;
return;
}
//休眠 50 毫秒, 模拟
try {
Thread.sleep(50);
} catch (InterruptedException e) {
e.printStackTrace();
}
System.out.println("窗口 " + Thread.currentThread().getName() + " 售出一张票" + " 剩余票数=" + (--ticketNum));//1 - 0 - -1 - -2
}
}
@Override
public void run() {
while (loop) {
sell();//sell 方法是一共同步方法
}
}
}
//使用 Thread 方式
// new SellTicket01().start()
// new SellTicket01().start();
class SellTicket01 extends Thread {
private static int ticketNum = 100;//让多个线程共享 ticketNum
//public void m1() {
// synchronized (this) {
// System.out.println("hello");
// }
//}
@Override
public void run() {
while (true) {
if (ticketNum <= 0) {
System.out.println("售票结束...");
break;
}
//休眠 50 毫秒, 模拟
try {
Thread.sleep(50);
} catch (InterruptedException e) {
e.printStackTrace();
}
System.out.println("窗口 " + Thread.currentThread().getName() + " 售出一张票" + " 剩余票数=" + (--ticketNum));
}
}
}
//实现接口方式
class SellTicket02 implements Runnable {
private int ticketNum = 100;//让多个线程共享 ticketNum
@Override
public void run() {
while (true) {
if (ticketNum <= 0) {
System.out.println("售票结束...");
break;
}
//休眠 50 毫秒, 模拟
try {
Thread.sleep(50);
} catch (InterruptedException e) {
e.printStackTrace();
}
System.out.println("窗口 " + Thread.currentThread().getName() + " 售出一张票" + " 剩余票数=" + (--ticketNum));//1 - 0 - -1 - -2
}
}
}
16.10.3 注意事项和细节
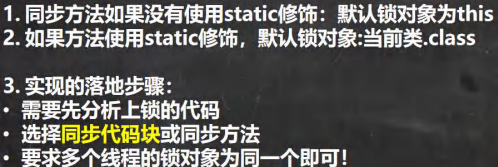
16.11 线程的死锁
16.11.1 基本介绍

16.11.2 案例

16.11.3 案例演示
public class DeadLock_ {
public static void main(String[] args) {
//模拟死锁现象
DeadLockDemo A = new DeadLockDemo(true);
A.setName("A 线程");
DeadLockDemo B = new DeadLockDemo(false);
B.setName("B 线程");
A.start();
B.start();
}
}
//线程
class DeadLockDemo extends Thread {
static Object o1 = new Object();// 保证多线程,共享一个对象,这里使用 static
static Object o2 = new Object();
boolean flag;
public DeadLockDemo(boolean flag) {//构造器
this.flag = flag;
}
@Override
public void run() {
//下面业务逻辑的分析
//1. 如果 flag 为 T, 线程 A 就会先得到/持有 o1 对象锁, 然后尝试去获取 o2 对象锁
//2. 如果线程 A 得不到 o2 对象锁,就会 Blocked
//3. 如果 flag 为 F, 线程 B 就会先得到/持有 o2 对象锁, 然后尝试去获取 o1 对象锁
//4. 如果线程 B 得不到 o1 对象锁,就会 Blocked
if (flag) {
synchronized (o1) {//对象互斥锁, 下面就是同步代码
System.out.println(Thread.currentThread().getName() + " 进入 1");
synchronized (o2) { // 这里获得 li 对象的监视权
System.out.println(Thread.currentThread().getName() + " 进入 2");
}
}
} else {
synchronized (o2) {
System.out.println(Thread.currentThread().getName() + " 进入 3");
synchronized (o1) { // 这里获得 li 对象的监视权
System.out.println(Thread.currentThread().getName() + " 进入 4");
}
}
}
}
}
16.12 释放锁
16.12.1 释放锁的操作

16.12.2 不会释放锁的操作
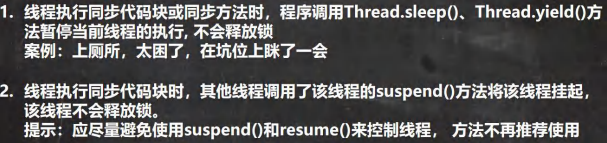
十七、IO流
17.1文件
17.1.1 什么是文件

17.1.2 文件流
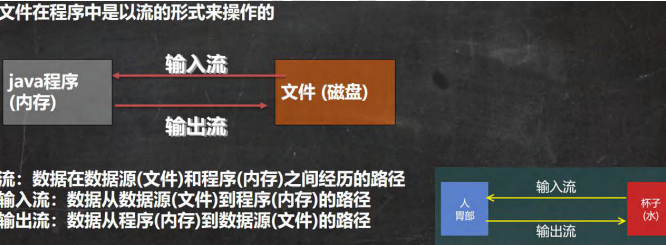
17.2 常见的文件操作
17.2.1 创建文件对象的相关构造器和方法
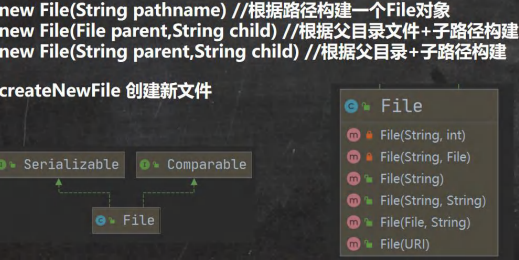

import org.junit.jupiter.api.Test;
import java.io.*;
public class FileCreate {
public static void main(String[] args) {
}
//方式 1 new File(String pathname)
@Test
public void create01() {
String filePath = "e:\\news1.txt";
File file = new File(filePath);
try {
file.createNewFile();
System.out.println("文件创建成功");
} catch (IOException e) {
e.printStackTrace();
}
}
//方式 2 new File(File parent,String child) //根据父目录文件+子路径构建
//e:\\news2.txt
@Test
public void create02() {
File parentFile = new File("e:\\");
String fileName = "news2.txt";
//这里的 file 对象,在 java 程序中,只是一个对象
//只有执行了 createNewFile 方法,才会真正的,在磁盘创建该文件
File file = new File(parentFile, fileName);
try {
file.createNewFile();
System.out.println("创建成功~");
} catch (IOException e) {
e.printStackTrace();
}
}
//方式 3 new File(String parent,String child) //根据父目录+子路径构建
@Test
public void create03() {
//String parentPath = "e:\\";
String parentPath = "e:\\";
String fileName = "news4.txt";
File file = new File(parentPath, fileName);
try {
file.createNewFile();
System.out.println("创建成功~");
} catch (IOException e) {
e.printStackTrace();
}
}
//下面四个都是抽象类
// InputStream
// OutputStream
// Reader //字符输入流
// Writer //字符输出流
}
17.2.2 获取文件的相关信息

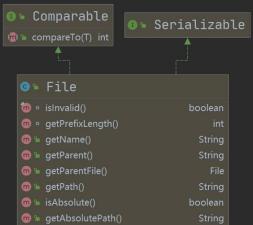
17.2.3 案例演示

import org.junit.jupiter.api.Test;
import java.io.File;
public class FileInformation {
public static void main(String[] args) {
}
//获取文件的信息
@Test
public void info() {
//先创建文件对象
File file = new File("e:\\news1.txt");
//调用相应的方法,得到对应信息
System.out.println("文件名字=" + file.getName());
//getName、getAbsolutePath、getParent、length、exists、isFile、isDirectory
System.out.println("文件绝对路径=" + file.getAbsolutePath());
System.out.println("文件父级目录=" + file.getParent());
System.out.println("文件大小(字节)=" + file.length());
System.out.println("文件是否存在=" + file.exists());//T
System.out.println("是不是一个文件=" + file.isFile());//T
System.out.println("是不是一个目录=" + file.isDirectory());//F
}
}
17.2.4 目录的操作和文件删除

17.2.5 演示

import org.junit.jupiter.api.Test;
import java.io.File;
public class Directory_ {
public static void main(String[] args) {
}
@Test
public void m1() {
//判断d:\\news1.txt是否存在,如果存在就删除
String filePath = "d:\\news1.txt";
File file = new File(filePath);
if (file.exists()) {
if (file.delete()) {
System.out.println("删除成功");
} else {
System.out.println("删除失败");
}
} else {
System.out.println("文件不存在...");
}
}
@Test
public void m2() {
//判断D:\\demo02是否存在,存在就删除,否则提示不存在
//目录也是当作文件
String filePath = "D:\\demo02";
File file = new File(filePath);
if (file.exists()) {
if (file.delete()) {
System.out.println("删除成功");
} else {
System.out.println("删除失败");
}
} else {
System.out.println("目录不存在...");
}
}
@Test
public void m3() {
//判断D:\\demo\\a\\b\\c目录是否存在,如果存在就提示已经存在,否则就创莲
String directoryPath = "D:\\demo\\a\\b\\c";
File file = new File(directoryPath);
if (file.exists()) {
System.out.println(directoryPath + "存在");
} else {
if(file.mkdirs()){//创建一级目录使用mkdir(),多级使用mkdirs()
System.out.println(directoryPath + "创建成功");
} else {
System.out.println(directoryPath + "创建失败");
}
}
}
}
17.3 IO流原理及流的分类
17.3.1 IO原理
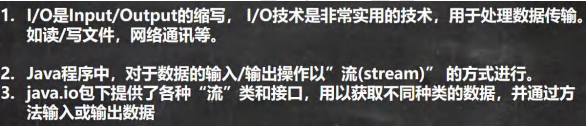
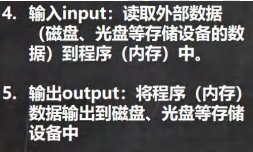
17.3.2 流的分类
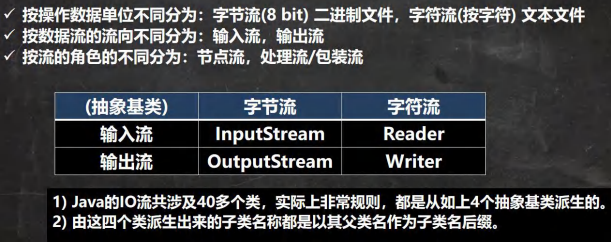
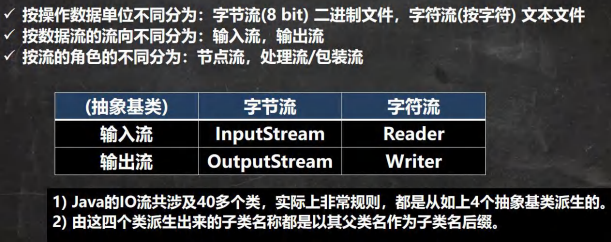
17.4 IO流体系图-常用的类
IO流程体系图
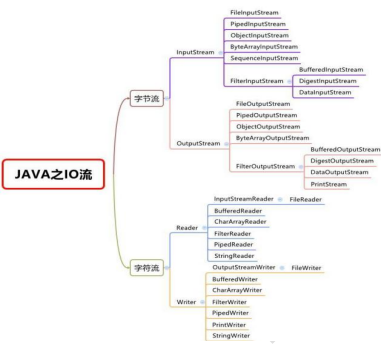
文件和流
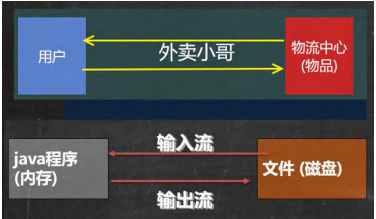
17.4.1 FileInptStream
17.4.2 FileInptStream案例
import org.junit.jupiter.api.Test;
import java.io.FileInputStream;
import java.io.IOException;
public class FileInputStream_ {
public static void main(String[] args) {
}
/**
* 演示读取文件... * 单个字节的读取,效率比较低
* -> 使用 read(byte[] b)
*/
@Test
public void readFile01() {
String filePath = "e:\\hello.txt";
int readData = 0;
FileInputStream fileInputStream = null;
try {
//创建 FileInputStream 对象,用于读取 文件
fileInputStream = new FileInputStream(filePath);
//从该输入流读取一个字节的数据。 如果没有输入可用,此方法将阻止。
//如果返回-1 , 表示读取完毕
while ((readData = fileInputStream.read()) != -1) {
System.out.print((char) readData);//转成 char 显示
}
} catch (IOException e) {
e.printStackTrace();
} finally {
//关闭文件流,释放资源.
try {
fileInputStream.close();
} catch (IOException e) {
e.printStackTrace();
}
}
}
/**
* 使用 read(byte[] b) 读取文件,提高效率
*/
@Test
public void readFile02() {
String filePath = "e:\\hello.txt";
//字节数组
byte[] buf = new byte[8]; //一次读取 8 个字节.
int readLen = 0;
FileInputStream fileInputStream = null;
try {
//创建 FileInputStream 对象,用于读取 文件
fileInputStream = new FileInputStream(filePath);
//从该输入流读取最多 b.length 字节的数据到字节数组。 此方法将阻塞,直到某些输入可用。
//如果返回-1 , 表示读取完毕
//如果读取正常, 返回实际读取的字节数
while ((readLen = fileInputStream.read(buf)) != -1) {
System.out.print(new String(buf, 0, readLen));//显示
}
} catch (IOException e) {
e.printStackTrace();
} finally {
//关闭文件流,释放资源.
try {
fileInputStream.close();
} catch (IOException e) {
e.printStackTrace();
}
}
}
}
17.4.3 FileOutputStream
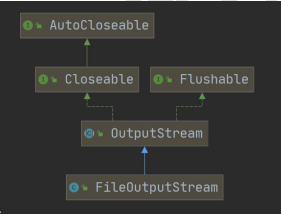
17.4.4 FileOutputStream案例1
要求: 请使用FileOutputStream在a.txt文件,中写入 “hello,world”. 如果文件不存在,会创建文件(注意:前提是目录已经存在.)
import org.junit.jupiter.api.Test;
import java.io.FileOutputStream;
import java.io.IOException;
public class FileOutputStream01 {
public static void main(String[] args) {
}
/**
* 演示使用 FileOutputStream 将数据写到文件中, * 如果该文件不存在,则创建该文件
*/
@Test
public void writeFile() {
//创建 FileOutputStream 对象
String filePath = "e:\\a.txt";
FileOutputStream fileOutputStream = null;
try {
//得到 FileOutputStream 对象 对象
//1. new FileOutputStream(filePath) 创建方式,当写入内容是,会覆盖原来的内容
//2. new FileOutputStream(filePath, true) 创建方式,当写入内容是,是追加到文件后面
fileOutputStream = new FileOutputStream(filePath, true);
//写入一个字节
//fileOutputStream.write('H');//
//写入字符串
String str = "hello,world!";
//str.getBytes() 可以把 字符串->字节数组
//fileOutputStream.write(str.getBytes());
/*
write( byte[] b, int off, int len)将 len 字节从位于偏移量 off 的指定字节数组写入此文件输出流
*/
fileOutputStream.write(str.getBytes(), 0, 3);
} catch (IOException e) {
e.printStackTrace();
} finally {
try {
fileOutputStream.close();
} catch (IOException e) {
e.printStackTrace();
}
}
}
}
17.4.5 案例2
import java.io.FileInputStream;
import java.io.FileOutputStream;
import java.io.IOException;
public class FileCopy {
public static void main(String[] args) {
//完成 文件拷贝,将 e:\\Koala.jpg 拷贝 c:\\
//1. 创建文件的输入流, 将文件读入到程序
//2. 创建文件的输出流,将读取到的文件数据,写入到指定的文件.
String srcFilePath = "e:\\Koala.jpg";
String destFilePath = "e:\\Koala3.jpg";
FileInputStream fileInputStream = null;
FileOutputStream fileOutputStream = null;
try {
fileInputStream = new FileInputStream(srcFilePath);
fileOutputStream = new FileOutputStream(destFilePath);
//定义一个字节数组, 提高读取效果
byte[] buf = new byte[1024];
int readLen = 0;
while ((readLen = fileInputStream.read(buf)) != -1) {
//读取到后,就写入到文件 通过 fileOutputStream
//即,是一边读,一边写
fileOutputStream.write(buf, 0, readLen);//一定要使用这个方法
}
System.out.println("拷贝 ok~");
} catch (IOException e) {
e.printStackTrace();
} finally {
try {
//关闭输入流和输出流,释放资源
if (fileInputStream != null) {
fileInputStream.close();
}
if (fileOutputStream != null) {
fileOutputStream.close();
}
} catch (IOException e) {
e.printStackTrace();
}
}
}
}
17.4.6 FileReader和FileWriter介绍
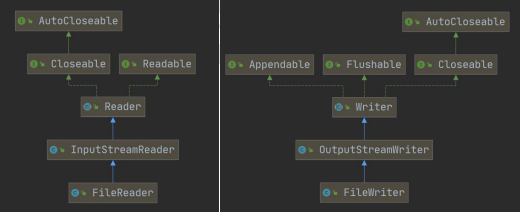
17.4.7 FileReader相关方法

17.4.8 FileWriter相关方法
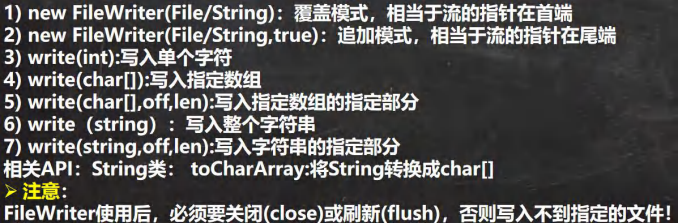
17.4.9 案例
FileReader
import org.junit.jupiter.api.Test;
import java.io.FileReader;
import java.io.IOException;
public class FileReader_ {
public static void main(String[] args) {
}
/**
* 单个字符读取文件
*/
@Test
public void readFile01() {
String filePath = "e:\\story.txt";
FileReader fileReader = null;
int data = 0;
//1. 创建 FileReader 对象
try {
fileReader = new FileReader(filePath);
//循环读取 使用 read, 单个字符读取
while ((data = fileReader.read()) != -1) {
System.out.print((char) data);
}
} catch (IOException e) {
e.printStackTrace();
} finally {
try {
if (fileReader != null) {
fileReader.close();
}
} catch (IOException e) {
e.printStackTrace();
}
}
}
/**
* 字符数组读取文件
*/
@Test
public void readFile02() {
System.out.println("~~~readFile02 ~~~");
String filePath = "e:\\story.txt";
FileReader fileReader = null;
int readLen = 0;
char[] buf = new char[8];
//1. 创建 FileReader 对象
try {
fileReader = new FileReader(filePath);
//循环读取 使用 read(buf), 返回的是实际读取到的字符数
//如果返回-1, 说明到文件结束
while ((readLen = fileReader.read(buf)) != -1) {
System.out.print(new String(buf, 0, readLen));
}
} catch (IOException e) {
e.printStackTrace();
} finally {
try {
if (fileReader != null) {
fileReader.close();
}
} catch (IOException e) {
e.printStackTrace();
}
}
}
}
FileWriter
import java.io.FileWriter;
import java.io.IOException;
public class FileWriter_ {
public static void main(String[] args) {
String filePath = "e:\\note.txt";
//创建 FileWriter 对象
FileWriter fileWriter = null;
char[] chars = {'a', 'b', 'c'};
try {
fileWriter = new FileWriter(filePath);//默认是覆盖写入
// 3) write(int):写入单个字符
fileWriter.write('H');
// 4) write(char[]):写入指定数组
fileWriter.write(chars);
// 5) write(char[],off,len):写入指定数组的指定部分
fileWriter.write("张三李四".toCharArray(), 0, 3);
// 6) write(string):写入整个字符串
fileWriter.write(" 你好北京~");
fileWriter.write("风雨之后,定见彩虹");
// 7) write(string,off,len):写入字符串的指定部分
fileWriter.write("上海天津", 0, 2);
//在数据量大的情况下,可以使用循环操作.
} catch (IOException e) {
e.printStackTrace();
} finally {
//对应 FileWriter , 一定要关闭流,或者 flush 才能真正的把数据写入到文件
/*
private void writeBytes () throws IOException {
this.bb.flip();
int var1 = this.bb.limit();
int var2 = this.bb.position();
assert var2 <= var1;
int var3 = var2 <= var1 ? var1 - var2 : 0;
if (var3 > 0) {
if (this.ch != null) {
assert this.ch.write(this.bb) == var3 : var3;
} else {
this.out.write(this.bb.array(), this.bb.arrayOffset() + var2, var3);
}
}
this.bb.clear();
}
*/
try {
//fileWriter.flush();
//关闭文件流,等价 flush() + 关闭
fileWriter.close();
} catch (IOException e) {
e.printStackTrace();
}
}
System.out.println("程序结束...");
}
}
17.5 节点流和处理流
17.5.1 基本介绍
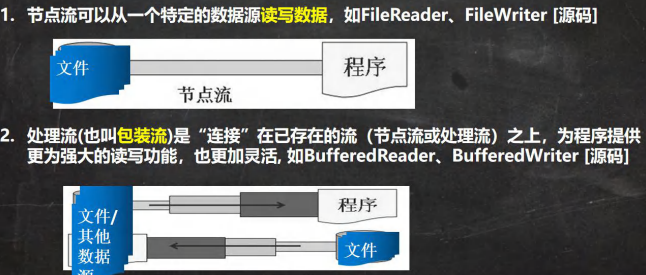
17.5.2 节点流和处理流-览图
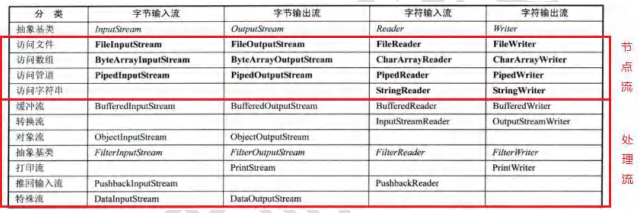
17.5.3 节点流和处理流的区别和联系

class Test {
public static void main(String[] args) {
BufferedReader_ bufferedReader_ = new BufferedReader_(new FileReader_());
bufferedReader_.readFiles(10);
//读取字符串
BufferedReader_ bufferedReader_01 = new BufferedReader_(new StringReader_());
bufferedReader_01.readString(5);
}
}
public abstract class Reader_ { //抽象类
public void readFile() {
}
public void readString() {
}
//在Reader_抽象类,使用read方法统一管理
//在调用的时候,调用动态绑定机制
//public abstract void read();
}
//节点流
class FileReader_ extends Reader_ {
public void readFile() {
System.out.println("对文件进行读取");
}
}
//节点流
class StringReader_ extends Reader_ {
public void readString() {
System.out.println("读取字符串");
}
}
//做成处理流(包装流)
class BufferedReader_ extends Reader_ {
private Reader_ reader_; //属性是Reader_类型
//接受Reader_子类对象
public BufferedReader_(Reader_ reader_) {
this.reader_ = reader_;
}
//让方法更加灵活,多次读取文件
public void readFiles(int num) {
for (int i = 0; i < num; i++) {
reader_.readFile();
}
}
//扩展readString,批量处理字符串数据
public void readString(int num) {
for (int i = 0; i < num; i++) {
reader_.readString();
}
}
}
17.5.4 处理流的功能主要体系在下面两个方面:

17.5.5 处理流—BufferedReader和BufferedWriter
BufferedReader
import java.io.BufferedReader;
import java.io.FileReader;
public class BufferedReader_ {
public static void main(String[] args) throws Exception {
String filePath = "e:\\a.java";
//创建 bufferedReader
BufferedReader bufferedReader = new BufferedReader(new FileReader(filePath));
//读取
String line; //按行读取, 效率高
//1. bufferedReader.readLine() 是按行读取文件
//2. 当返回 null 时,表示文件读取完毕
while ((line = bufferedReader.readLine()) != null) {
System.out.println(line);
}
//关闭流, 这里注意,只需要关闭 BufferedReader ,因为底层会自动的去关闭 节点流
//FileReader。
/*public void close () throws IOException {
synchronized (lock) {
if (in == null)
return;
try {
in.close();//in 就是我们传入的 new FileReader(filePath), 关闭了. } finally {
in = null;
cb = null;
}
}
}*/
bufferedReader.close();
}
}
BufferedWriter
import java.io.BufferedWriter;
import java.io.FileWriter;
import java.io.IOException;
public class BufferedWriter_ {
public static void main(String[] args) throws IOException {
String filePath = "e:\\ok.txt";
//创建 BufferedWriter
//说明:
//1. new FileWriter(filePath, true) 表示以追加的方式写入
//2. new FileWriter(filePath) , 表示以覆盖的方式写入
BufferedWriter bufferedWriter = new BufferedWriter(new FileWriter(filePath));
bufferedWriter.write("hello, java!");
bufferedWriter.newLine();//插入一个和系统相关的换行
bufferedWriter.write("hello2, java!");
bufferedWriter.newLine();
bufferedWriter.write("hello3, java!");
bufferedWriter.newLine();
//说明:关闭外层流即可 , 传入的 new FileWriter(filePath) ,会在底层关闭
bufferedWriter.close();
}
}
使用BufferedReader和BufferedWriter进行拷贝
import java.io.*;
public class BufferedCopy_ {
public static void main(String[] args) {
//1. BufferedReader 和 BufferedWriter 是安装字符操作
//2. 不要去操作 二进制文件[ 声音,视频,doc, pdf ],可能造成文件损坏
//BufferedInputStream
//BufferedOutputStream
String srcFilePath = "e:\\a.java";
String destFilePath = "e:\\a2.java";
BufferedReader br = null;
BufferedWriter bw = null;
String line;
try {
br = new BufferedReader(new FileReader(srcFilePath));
bw = new BufferedWriter(new FileWriter(destFilePath));
//说明: readLine 读取一行内容,但是没有换行
while ((line = br.readLine()) != null) {
//每读取一行,就写入
bw.write(line);
//插入一个换行
bw.newLine();
}
System.out.println("拷贝完毕...");
} catch (IOException e) {
e.printStackTrace();
} finally {
//关闭流
try {
if (br != null) {
br.close();
}
if (bw != null) {
bw.close();
}
} catch (IOException e) {
e.printStackTrace();
}
}
}
}
17.5.6 处理流—BufferedInputStream和BufferedOutputStream
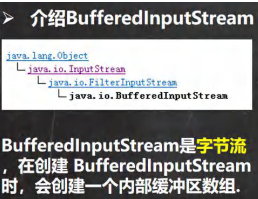
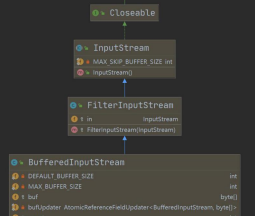
17.5.7 介绍BufferedOutputStream
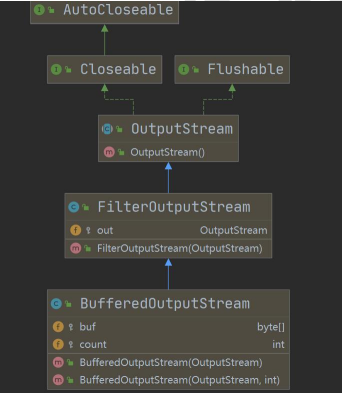
import java.io.*;
public class BufferedCopy02 {
public static void main(String[] args) {
//String srcFilePath = "e:\\Koala.jpg";
//String destFilePath = "e:\\hsp.jpg";
String srcFilePath = "e:\\a.java";
String destFilePath = "e:\\a3.java";
//创建 BufferedOutputStream 对象 BufferedInputStream 对象
BufferedInputStream bis = null;
BufferedOutputStream bos = null;
try {
//因为 FileInputStream 是 InputStream 子类
bis = new BufferedInputStream(new FileInputStream(srcFilePath));
bos = new BufferedOutputStream(new FileOutputStream(destFilePath));
//循环的读取文件,并写入到 destFilePath
byte[] buff = new byte[1024];
int readLen = 0;
//当返回 -1 时,就表示文件读取完毕
while ((readLen = bis.read(buff)) != -1) {
bos.write(buff, 0, readLen);
}
System.out.println("文件拷贝完毕~~~");
} catch (IOException e) {
e.printStackTrace();
} finally {
//关闭流 , 关闭外层的处理流即可,底层会去关闭节点流
try {
if (bis != null) {
bis.close();
}
if (bos != null) {
bos.close();
}
} catch (IOException e) {
e.printStackTrace();
}
}
}
}
17.5.8 对象流-ObjectInputStream 和 ObjectOutputStream
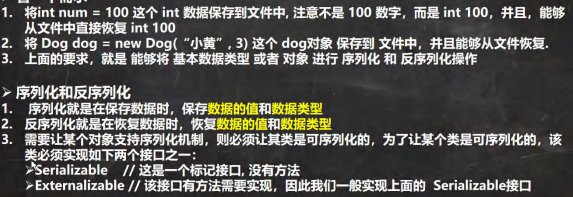
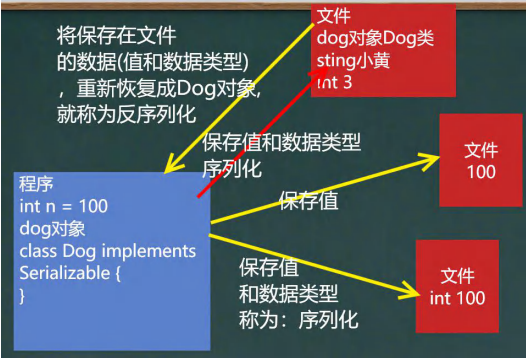
17.5.9 对象流介绍
功能:提供了对基本类型或对象类型的序列化和反序列化的方法
ObjectOutputStream 提供 序列化功能
ObjectInputStream 提供 反序列化功能
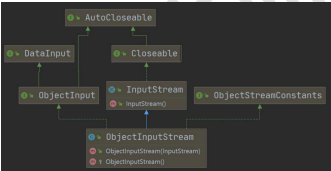
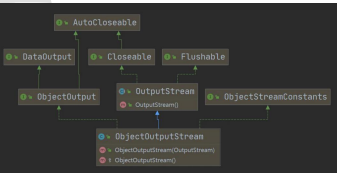
ObjectOutputStream
import java.io.FileOutputStream;
import java.io.ObjectOutputStream;
import java.io.Serializable;
public class ObjectOutStream_ {
public static void main(String[] args) throws Exception {
//序列化后,保存的文件格式,不是存文本,而是按照他的格式来保存
String filePath = "e:\\data.dat";
ObjectOutputStream oos = new ObjectOutputStream(new FileOutputStream(filePath));
//序列化数据到 e:\data.dat
oos.writeInt(100);// int -> Integer (实现了 Serializable)
oos.writeBoolean(true);// boolean -> Boolean (实现了 Serializable)
oos.writeChar('a');// char -> Character (实现了 Serializable)
oos.writeDouble(9.5);// double -> Double (实现了 Serializable)
oos.writeUTF("张三李四");//String
//保存一个 dog 对象
oos.writeObject(new Dog("旺财", 10));
oos.close();
System.out.println("数据保存完毕(序列化形式)");
}
}
//如果需要序列化某个类的对象,必须实现Serializable
class Dog implements Serializable {
private String name;
private int age;
public Dog(String name, int age) {
this.name = name;
this.age = age;
}
public String getName() {
return name;
}
public void setName(String name) {
this.name = name;
}
public int getAge() {
return age;
}
public void setAge(int age) {
this.age = age;
}
@Override
public String toString() {
return "Dog{" +
"name='" + name + '\'' +
", age=" + age +
'}';
}
}
ObjectInputStream
import java.io.FileInputStream;
import java.io.ObjectInputStream;
import java.io.Serializable;
public class ObjectInputStream_ {
public static void main(String[] args) throws Exception {
//指定反序列化文件
String filePath = "e:\\data.dat";
ObjectInputStream ois = new ObjectInputStream(new FileInputStream(filePath));
//读取
//反序列化的顺序要和保存的顺序一致
System.out.println(ois.readInt());
System.out.println(ois.readBoolean());
System.out.println(ois.readChar());
System.out.println(ois.readDouble());
System.out.println(ois.readUTF());
Object o = ois.readObject();
System.out.println(o.getClass());
System.out.println(o);
//如果希望调用dog方法,需要向下转型
//需要我们将dog类重新定义,拷贝到可以引用的位置
Dog dog1 = (Dog) o;
System.out.println(dog1.getName());
//关闭流
ois.close();
}
}
//如果需要序列化某个类的对象,必须实现Serializable
class Dog implements Serializable {
private String name;
private int age;
public Dog(String name, int age) {
this.name = name;
this.age = age;
}
public String getName() {
return name;
}
public void setName(String name) {
this.name = name;
}
public int getAge() {
return age;
}
public void setAge(int age) {
this.age = age;
}
@Override
public String toString() {
return "Dog{" +
"name='" + name + '\'' +
", age=" + age +
'}';
}
}
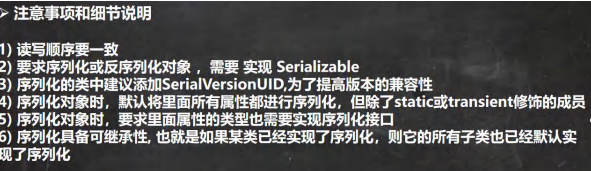
17.5.10 标准输入输出流
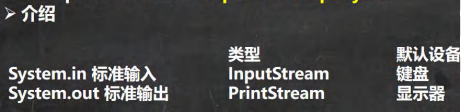

17.5.11 转换流—InputStreamReader 和 OutputStreamWriter
import java.io.BufferedReader;
import java.io.FileReader;
import java.io.IOException;
public class CodeQuestion {
public static void main(String[] args) throws IOException {
//读取 e:\\a.txt 文件到程序
//1. 创建字符输入流 BufferedReader[ 处理流]
//2. 使用 BufferedReader 对象读取 a.txt
//3. 默认情况下,读取文件是按照 utf -8 编码
String filePath = "e:\\a.txt";
BufferedReader br = new BufferedReader(new FileReader(filePath));
String s = br.readLine();
System.out.println("读取到的内容: " + s);
br.close();
//InputStreamReader
//OutputStreamWriter
}
}
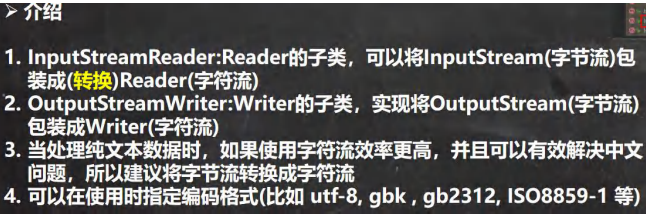

import java.io.BufferedReader;
import java.io.FileInputStream;
import java.io.IOException;
import java.io.InputStreamReader;
public class InputStreamReader_ {
public static void main(String[] args) throws IOException {
String filePath = "e:\\a.txt";
//1. 把 FileInputStream 转成 InputStreamReader
//2. 指定编码 gbk
//InputStreamReader isr = new InputStreamReader(new FileInputStream(filePath), "gbk");
//3. 把 InputStreamReader 传入 BufferedReader
//BufferedReader br = new BufferedReader(isr);
//将 2 和 3 合在一起
BufferedReader br = new BufferedReader(new InputStreamReader(
new FileInputStream(filePath), "gbk"));
//4. 读取
String s = br.readLine();
System.out.println("读取内容=" + s);
//5. 关闭外层流
br.close();
}
}

import java.io.*;
public class OutputStreamWriter_ {
public static void main(String[] args) throws IOException {
String filePath = "e:\\a.txt";
String charSet = "gbk";
OutputStreamWriter osw = new OutputStreamWriter(new FileOutputStream(filePath), "gbk");
osw.write("张三李四");
osw.close();
System.out.println("按照" + charSet + "保存");
}
}
17.6 打印流-PrintStream 和 PrintWriter

import java.io.IOException;
import java.io.PrintStream;
public class PrintWriter_ {
public static void main(String[] args) throws IOException {
PrintStream out = System.out;
//在默认情况下,PrintStream 输出数据的位置是 标准输出,即显示器
/* public void print (String s){
if (s == null) {
s = "null";
}
write(s);
}*/
out.print("john, hello");
//因为 print 底层使用的是 write , 所以我们可以直接调用 write 进行打印/输出
out.write("张三李四,你好".getBytes());
out.close();
//我们可以去修改打印流输出的位置 / 设备
//1. 输出修改成到 "e:\\f1.txt"
//2. "hello,张三李四" 就会输出到 e:\f1.txt
/*3. public static void setOut (PrintStream out){
checkIO();
setOut0(out); // native 方法,修改了 out
}*/
System.setOut(new PrintStream("e:\\f1.txt"));
System.out.println("hello,张三李四");
}
}
import java.io.FileWriter;
import java.io.IOException;
import java.io.PrintWriter;
public class PrintStream_ {
public static void main(String[] args) throws IOException {
//PrintWriter printWriter = new PrintWriter(System.out);
PrintWriter printWriter = new PrintWriter(new FileWriter("e:\\f2.txt"));
printWriter.print("hi, 北京你好~~~~");
printWriter.close();//flush + 关闭流, 才会将数据写入到文件.
}
}
17.7 Properties类
17.7.1 需求
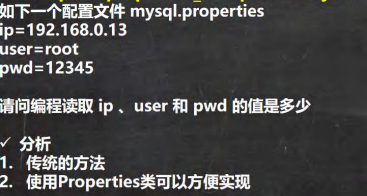
mysql.properties
ip=192.168.100.100
user=root
pwd=123
import java.io.BufferedReader;
import java.io.FileReader;
import java.io.IOException;
public class Properties01 {
public static void main(String[] args) throws IOException {
//读取 mysql.properties 文件,并得到 ip, user 和 pwd
BufferedReader br = new BufferedReader(new FileReader("javase/src/seventeenchapter/properties/mysql.properties"));
String line = "";
while ((line = br.readLine()) != null) { //循环读取
String[] split = line.split("=");
//如果我们要求指定的 ip 值
if("ip".equals(split[0])) {
System.out.println(split[0] + "值是: " + split[1]);
}
}
br.close();
}
}
17.7.2 基本介绍
17.7.3 案例

import java.io.FileReader;
import java.io.IOException;
import java.util.Properties;
public class Properties02 {
public static void main(String[] args) throws IOException {
//使用 Properties 类来读取 mysql.properties 文件
//1. 创建 Properties 对象
Properties properties = new Properties();
//2. 加载指定配置文件
properties.load(new FileReader("javase/src/seventeenchapter/properties/mysql.properties"));
//3. 把 k-v 显示控制台
properties.list(System.out);
//4. 根据 key 获取对应的值
String user = properties.getProperty("user");
String pwd = properties.getProperty("pwd");
System.out.println("用户名=" + user);
System.out.println("密码是=" + pwd);
}
}
import java.io.FileOutputStream;
import java.io.IOException;
import java.util.Properties;
public class Properties03 {
public static void main(String[] args) throws IOException {
//使用 Properties 类来创建 配置文件, 修改配置文件内容
Properties properties = new Properties();
//创建
//1.如果该文件没有 key 就是创建
//2.如果该文件有 key ,就是修改
/*Properties 父类是 Hashtable ,底层就是 Hashtable 核心方法
public synchronized V put (K key, V value){
// Make sure the value is not null
if (value == null) {
throw new NullPointerException();
}
// Makes sure the key is not already in the hashtable. Entry<?,?> tab[] = table;
int hash = key.hashCode();
int index = (hash & 0x7FFFFFFF) % tab.length;
@SuppressWarnings("unchecked")
Entry<K, V> entry = (Entry<K, V>) tab[index];
for (; entry != null; entry = entry.next) {
if ((entry.hash == hash) && entry.key.equals(key)) {
V old = entry.value;
entry.value = value;//如果 key 存在,就替换
return old;
}
}
addEntry(hash, key, value, index);//如果是新 k, 就 addEntry
return null;
}*/
properties.setProperty("charset", "utf8");
properties.setProperty("user", "汤姆");//注意保存时,是中文的 unicode 码值
properties.setProperty("pwd", "888888");
//将 k-v 存储文件中即可
properties.store(new FileOutputStream("javase/src/seventeenchapter/properties/mysql2.properties"), null);
System.out.println("保存配置文件成功~");
}
}
十八、网络编程
18.1 网络相关概念
18.1.1 网络通信
18.1.2 网络
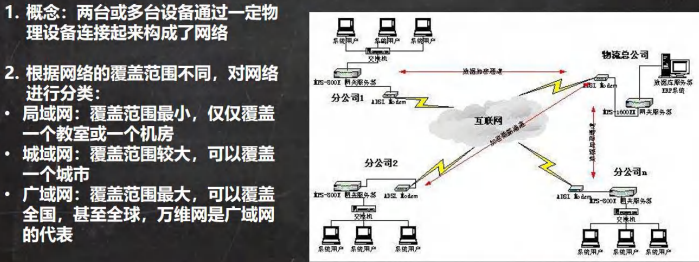
18.1.3 ip地址
18.1.4 ipv4地址分类
18.1.5 域名
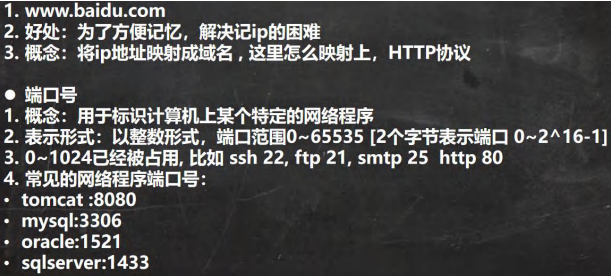
18.1.6 网络通信协议1
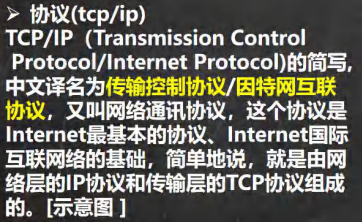
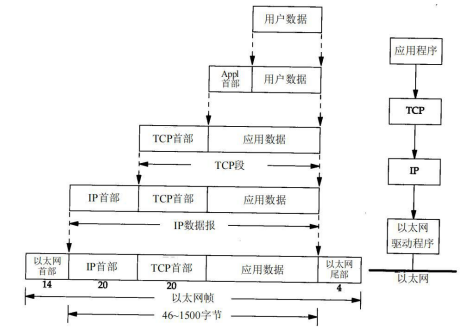
18.1.7 网络通信协议2
18.1.9 TCP和UDP
18.2 InetAddress类
18.2.1 相关方法
18.2.2 案例
import java.net.InetAddress;
import java.net.UnknownHostException;
public class API_ {
public static void main(String[] args) throws UnknownHostException {
//获取本机 InetAddress 对象 getLocalHost
InetAddress localHost = InetAddress.getLocalHost();
System.out.println(localHost);
//根据指定主机名/域名获取 ip 地址对象 getByName
InetAddress host1 = InetAddress.getByName("wmr");
System.out.println(host1);
//根据域名返回InetAddress对象
InetAddress host2 = InetAddress.getByName("www.baidu.com");
System.out.println(host2);
//通过InetAddress对象,获取到对应地址
String host3Address = host2.getHostAddress();
System.out.println(host3Address);
//获取 InetAddress 对象获取主机名 getHostName
String host3Name = host2.getHostName();
System.out.println(host3Name);
}
}
18.3 Socket
18.3.1 基本介绍
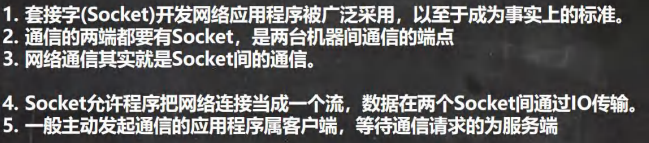
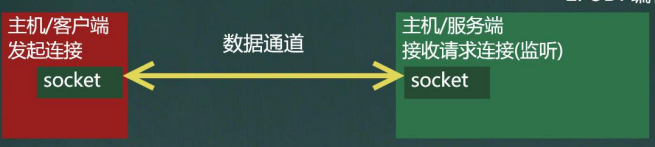
18.4 TCP网络通信编程
18.4.1 基本介绍

18.4.2 案例1(使用字节流)
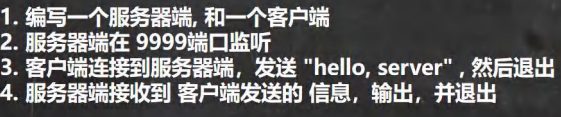
import java.io.IOException;
import java.io.InputStream;
import java.net.ServerSocket;
import java.net.Socket;
public class SocketTCP01Server {
public static void main(String[] args) throws IOException {
//1. 在本机 的 9999 端口监听, 等待连接
//细节:要求在本机没有其它服务在监听 9999
//细节:这个 ServerSocket 可以通过 accept () 返回多个 Socket[ 多个客户端连接服务器的并发]
ServerSocket serverSocket = new ServerSocket(9999);
System.out.println("服务端,在 9999 端口监听,等待连接..");
//2. 当没有客户端连接 9999 端口时,程序会 阻塞, 等待连接
// 如果有客户端连接,则会返回 Socket 对象,程序继续
Socket socket = serverSocket.accept();
System.out.println("服务端 socket =" + socket.getClass());
//3. 通过 socket.getInputStream() 读取客户端写入到数据通道的数据, 显示
InputStream inputStream = socket.getInputStream();
//4. IO 读取
byte[] buf = new byte[1024];
int readLen = 0;
while ((readLen = inputStream.read(buf)) != -1) {
System.out.println(new String(buf, 0, readLen));//根据读取到的实际长度,显示内容. }
//5.关闭流和 socket
inputStream.close();
socket.close();
serverSocket.close();//关闭
}
}
}
import java.io.IOException;
import java.io.OutputStream;
import java.net.InetAddress;
import java.net.Socket;
public class SocketTCP01Client {
public static void main(String[] args) throws IOException {
//1. 连接服务端 (ip , 端口)
//解读: 连接本机的 9999 端口, 如果连接成功,返回 Socket 对象
Socket socket = new Socket(InetAddress.getLocalHost(), 9999);
System.out.println("客户端 socket 返回=" + socket.getClass());
//2. 连接上后,生成 Socket, 通过 socket.getOutputStream()
// 得到 和 socket 对象关联的输出流对象
OutputStream outputStream = socket.getOutputStream();
//3. 通过输出流,写入数据到 数据通道
outputStream.write("hello, server".getBytes());
//4. 关闭流对象和 socket, 必须关闭
outputStream.close();
socket.close();
System.out.println("客户端退出.....");
}
}
18.4.3 案例2(使用字节流)

import java.io.IOException;
import java.io.InputStream;
import java.io.OutputStream;
import java.net.ServerSocket;
import java.net.Socket;
public class SocketTCP02Server {
public static void main(String[] args) throws IOException {
//1. 在本机 的 9999 端口监听, 等待连接
// 细节: 要求在本机没有其它服务在监听 9999
// 细节:这个 ServerSocket 可以通过 accept() 返回多个 Socket[多个客户端连接服务器的并发]
ServerSocket serverSocket = new ServerSocket(9999);
System.out.println("服务端,在 9999 端口监听,等待连接..");
//2. 当没有客户端连接 9999 端口时,程序会 阻塞, 等待连接
// 如果有客户端连接,则会返回 Socket 对象,程序继续
Socket socket = serverSocket.accept();
System.out.println("服务端 socket =" + socket.getClass());
//3. 通过 socket.getInputStream() 读取客户端写入到数据通道的数据, 显示
InputStream inputStream = socket.getInputStream();
//4. IO 读取
byte[] buf = new byte[1024];
int readLen = 0;
while ((readLen = inputStream.read(buf)) != -1) {
System.out.println(new String(buf, 0, readLen));//根据读取到的实际长度,显示内容. }
//5. 获取 socket 相关联的输出流
OutputStream outputStream = socket.getOutputStream();
outputStream.write("hello, client".getBytes());
// 设置结束标记
socket.shutdownOutput();
//6.关闭流和 socket
outputStream.close();
inputStream.close();
socket.close();
serverSocket.close();//关闭
}
}
}
import java.io.IOException;
import java.io.InputStream;
import java.io.OutputStream;
import java.net.InetAddress;
import java.net.Socket;
public class SocketTCP02Client {
public static void main(String[] args) throws IOException {
//1. 连接服务端 (ip , 端口)
//解读: 连接本机的 9999 端口, 如果连接成功,返回 Socket 对象
Socket socket = new Socket(InetAddress.getLocalHost(), 9999);
System.out.println("客户端 socket 返回=" + socket.getClass());
//2. 连接上后,生成 Socket, 通过 socket.getOutputStream()
// 得到 和 socket 对象关联的输出流对象
OutputStream outputStream = socket.getOutputStream();
//3. 通过输出流,写入数据到 数据通道
outputStream.write("hello, server".getBytes());
// 设置结束标记
socket.shutdownOutput();
//4. 获取和 socket 关联的输入流. 读取数据(字节),并显示
InputStream inputStream = socket.getInputStream();
byte[] buf = new byte[1024];
int readLen = 0;
while ((readLen = inputStream.read(buf)) != -1) {
System.out.println(new String(buf, 0, readLen));
}
//5. 关闭流对象和 socket, 必须关闭
inputStream.close();
outputStream.close();
socket.close();
System.out.println("客户端退出.....");
}
}
18.4.4 案例3(使用字符流)

import java.io.*;
import java.net.ServerSocket;
import java.net.Socket;
public class SocketTCP03Server {
public static void main(String[] args) throws IOException {
//1. 在本机 的 9999 端口监听, 等待连接
// 细节: 要求在本机没有其它服务在监听 9999
// 细节:这个 ServerSocket 可以通过 accept() 返回多个 Socket[多个客户端连接服务器的并发]
ServerSocket serverSocket = new ServerSocket(9999);
System.out.println("服务端,在 9999 端口监听,等待连接..");
//2. 当没有客户端连接 9999 端口时,程序会 阻塞, 等待连接
// 如果有客户端连接,则会返回 Socket 对象,程序继续
Socket socket = serverSocket.accept();
System.out.println("服务端 socket =" + socket.getClass());
//3. 通过 socket.getInputStream() 读取客户端写入到数据通道的数据, 显示
InputStream inputStream = socket.getInputStream();
//4. IO 读取, 使用字符流, 老师使用 InputStreamReader 将 inputStream 转成字符流
BufferedReader bufferedReader = new BufferedReader(new InputStreamReader(inputStream));
String s = bufferedReader.readLine();
System.out.println(s);//输出
//5. 获取 socket 相关联的输出流
OutputStream outputStream = socket.getOutputStream();
// 使用字符输出流的方式回复信息
BufferedWriter bufferedWriter = new BufferedWriter(new OutputStreamWriter(outputStream));
bufferedWriter.write("hello client 字符流");
bufferedWriter.newLine();// 插入一个换行符,表示回复内容的结束
bufferedWriter.flush();//注意需要手动的 flush
//6.关闭流和 socket
bufferedWriter.close();
bufferedReader.close();
socket.close();
serverSocket.close();//关闭
}
}
import java.io.*;
import java.net.InetAddress;
import java.net.Socket;
public class SocketTCP03Client {
public static void main(String[] args) throws IOException {
//1. 连接服务端 (ip , 端口)
//解读: 连接本机的 9999 端口, 如果连接成功,返回 Socket 对象
Socket socket = new Socket(InetAddress.getLocalHost(), 9999);
System.out.println("客户端 socket 返回=" + socket.getClass());
//2. 连接上后,生成 Socket, 通过 socket.getOutputStream()
// 得到 和 socket 对象关联的输出流对象
OutputStream outputStream = socket.getOutputStream();
//3. 通过输出流,写入数据到 数据通道, 使用字符流
BufferedWriter bufferedWriter = new BufferedWriter(new OutputStreamWriter(outputStream));
bufferedWriter.write("hello, server 字符流");
bufferedWriter.newLine();//插入一个换行符,表示写入的内容结束, 注意,要求对方使用 readLine()!!!!
bufferedWriter.flush();// 如果使用的字符流,需要手动刷新,否则数据不会写入数据通道
//4. 获取和 socket 关联的输入流. 读取数据(字符),并显示
InputStream inputStream = socket.getInputStream();
BufferedReader bufferedReader = new BufferedReader(new InputStreamReader(inputStream));
String s = bufferedReader.readLine();
System.out.println(s);
//5. 关闭流对象和 socket, 必须关闭
bufferedReader.close();//关闭外层流
bufferedWriter.close();
socket.close();
System.out.println("客户端退出.....");
}
}
18.4.5 案例4
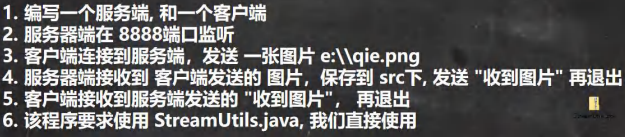
import java.io.BufferedReader;
import java.io.ByteArrayOutputStream;
import java.io.InputStream;
import java.io.InputStreamReader;
//工具类
public class StreamUtils {
/**
* 功能:将输入流转换成 byte[]
* @param is
* @return
* @throws Exception
*/
public static byte[] streamToByteArray(InputStream is) throws Exception{
ByteArrayOutputStream bos = new ByteArrayOutputStream();//创建输出流对象
byte[] b = new byte[1024];
int len;
while((len=is.read(b))!=-1){
bos.write(b, 0, len);
}
byte[] array = bos.toByteArray();
bos.close();
return array;
}
/**
* 功能:将 InputStream 转换成 String
* @param is
* @return
* @throws Exception
*/
public static String streamToString(InputStream is) throws Exception{
BufferedReader reader = new BufferedReader(new InputStreamReader(is));
StringBuilder builder= new StringBuilder();
String line;
while((line=reader.readLine())!=null){ //当读取到 null 时,就表示结束
builder.append(line+"\r\n");
}
return builder.toString();
}
}
import java.io.*;
import java.net.ServerSocket;
import java.net.Socket;
public class TCPFileUploadServer {
public static void main(String[] args) throws Exception {
//1. 服务端在本机监听 8888 端口
ServerSocket serverSocket = new ServerSocket(8888);
System.out.println("服务端在 8888 端口监听....");
//2. 等待连接
Socket socket = serverSocket.accept();
//3. 读取客户端发送的数据
// 通过 Socket 得到输入流
BufferedInputStream bis = new BufferedInputStream(socket.getInputStream());
byte[] bytes = StreamUtils.streamToByteArray(bis);
//4. 将得到 bytes 数组,写入到指定的路径,就得到一个文件了
String destFilePath = "src\\qie2.png";
BufferedOutputStream bos = new BufferedOutputStream(new FileOutputStream(destFilePath));
bos.write(bytes);
bos.close();
// 向客户端回复 "收到图片"
// 通过 socket 获取到输出流(字符)
BufferedWriter writer = new BufferedWriter(new OutputStreamWriter(socket.getOutputStream()));
writer.write("收到图片");
writer.flush();//把内容刷新到数据通道
socket.shutdownOutput();//设置写入结束标记
//关闭其他资源
writer.close();
bis.close();
socket.close();
serverSocket.close();
}
}
import java.io.BufferedInputStream;
import java.io.BufferedOutputStream;
import java.io.FileInputStream;
import java.io.InputStream;
import java.net.InetAddress;
import java.net.Socket;
public class TCPFileUploadClient {
public static void main(String[] args) throws Exception {
//客户端连接服务端 8888,得到 Socket 对象
Socket socket = new Socket(InetAddress.getLocalHost(), 8888);
//创建读取磁盘文件的输入流
String filePath = "e:\\qie.png";
BufferedInputStream bis = new BufferedInputStream(new FileInputStream(filePath));
//bytes 就是 filePath 对应的字节数组
byte[] bytes = StreamUtils.streamToByteArray(bis);
//通过 socket 获取到输出流, 将 bytes 数据发送给服务端
BufferedOutputStream bos = new BufferedOutputStream(socket.getOutputStream());
bos.write(bytes);//将文件对应的字节数组的内容,写入到数据通道
bis.close();
socket.shutdownOutput();//设置写入数据的结束标记
//=====接收从服务端回复的消息=====
InputStream inputStream = socket.getInputStream();
//使用 StreamUtils 的方法,直接将 inputStream 读取到的内容 转成字符串
String s = StreamUtils.streamToString(inputStream);
System.out.println(s);
//关闭相关的流
inputStream.close();
bos.close();
socket.close();
}
}
18.4.6 netstat指令
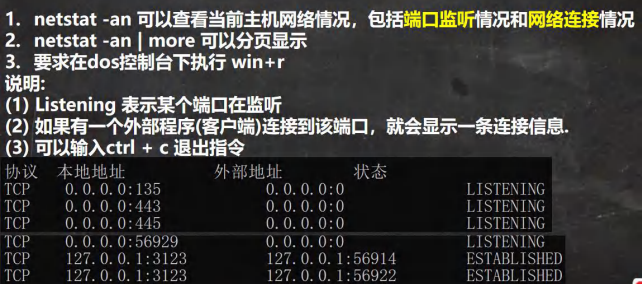
18.4.7 TCP连接的秘密
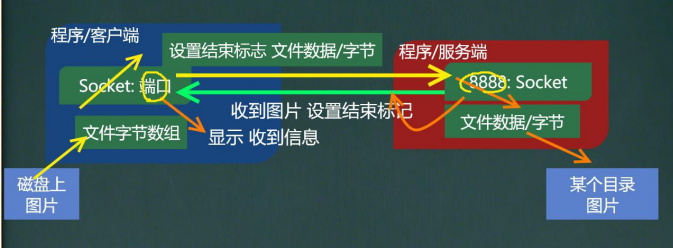

18.5 UDP网络通信编程
18.5.1 基本介绍
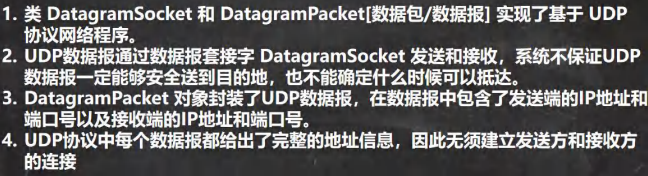
18.5.2 基本流程
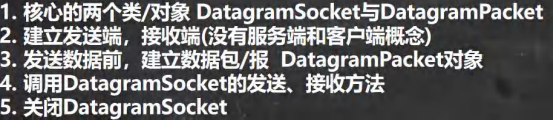
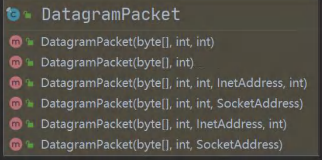
18.5.3 案例

import java.io.IOException;
import java.net.DatagramPacket;
import java.net.DatagramSocket;
import java.net.InetAddress;
public class UDPReceiverA {
public static void main(String[] args) throws IOException {
//1. 创建一个 DatagramSocket 对象,准备在 9999 接收数据
DatagramSocket socket = new DatagramSocket(9999);
//2. 构建一个 DatagramPacket 对象,准备接收数据
// 在前面讲解 UDP 协议时,一个数据包最大 64k
byte[] buf = new byte[1024];
DatagramPacket packet = new DatagramPacket(buf, buf.length);
//3. 调用 接收方法, 将通过网络传输的 DatagramPacket 对象
// 填充到 packet 对象
//当有数据包发送到 本机的 9999 端口时,就会接收到数据
// 如果没有数据包发送到 本机的 9999 端口, 就会阻塞等待. System.out.println("接收端 A 等待接收数据..");
socket.receive(packet);
//4. 可以把 packet 进行拆包,取出数据,并显示.
int length = packet.getLength();//实际接收到的数据字节长度
byte[] data = packet.getData();//接收到数据
String s = new String(data, 0, length);
System.out.println(s);
//===回复信息给 B 端
//将需要发送的数据,封装到 DatagramPacket 对象
data = "好的, 明天见".getBytes();
//说明: 封装的 DatagramPacket 对象 data 内容字节数组 , data.length , 主机(IP) , 端口
packet =
new DatagramPacket(data, data.length, InetAddress.getByName("192.168.12.1"), 9998);
socket.send(packet);//发送
//5. 关闭资源
socket.close();
System.out.println("A 端退出...");
}
}
import java.io.IOException;
import java.net.DatagramPacket;
import java.net.DatagramSocket;
import java.net.InetAddress;
public class UDPSenderB {
public static void main(String[] args) throws IOException {
//1.创建 DatagramSocket 对象,准备在 9998 端口 接收数据
DatagramSocket socket = new DatagramSocket(9998);
//2. 将需要发送的数据,封装到 DatagramPacket 对象
byte[] data = "hello 明天吃火锅~".getBytes(); //
//说明: 封装的 DatagramPacket 对象 data 内容字节数组 , data.length , 主机(IP) , 端口
DatagramPacket packet =
new DatagramPacket(data, data.length, InetAddress.getByName("192.168.12.1"), 9999);
socket.send(packet);
//3.=== 接收从 A 端回复的信息
//(1) 构建一个 DatagramPacket 对象,准备接收数据
// 在前面讲解 UDP 协议时,一个数据包最大 64k
byte[] buf = new byte[1024];
packet = new DatagramPacket(buf, buf.length);
//(2) 调用 接收方法, 将通过网络传输的 DatagramPacket 对象
// 填充到 packet 对象
//当有数据包发送到 本机的 9998 端口时,就会接收到数据
// 如果没有数据包发送到 本机的 9998 端口, 就会阻塞等待. socket.receive(packet);
//(3) 可以把 packet 进行拆包,取出数据,并显示.
int length = packet.getLength();//实际接收到的数据字节长度
data = packet.getData();//接收到数据
String s = new String(data, 0, length);
System.out.println(s);
//关闭资源
socket.close();
System.out.println("B 端退出");
}
}
十九、反射
19.1 需求引出反射
19.1.1 问题
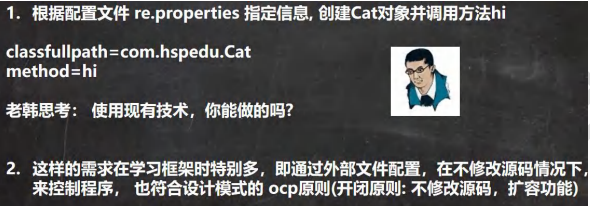
import java.io.FileInputStream;
import java.io.IOException;
import java.lang.reflect.InvocationTargetException;
import java.lang.reflect.Method;
import java.util.Properties;
public class ReflectionQuestion {
public static void main(String[] args) throws IOException, ClassNotFoundException, IllegalAccessException, InstantiationException, NoSuchMethodException, InvocationTargetException, NoSuchFieldException {
//根据配置文件 re.properties 指定信息, 创建 Cat 对象并调用方法 hi
//传统的方式 new 对象 -》 调用方法
// Cat cat = new Cat();
// cat.hi(); ===> cat.cry() 修改源码. //我们尝试做一做 -> 明白反射
//1. 使用 Properties 类, 可以读写配置文件
Properties properties = new Properties();
properties.load(new FileInputStream("javase/src/nineteenchapter/question/re.properties"));
String classfullpath = properties.get("classfullpath").toString();
String methodName = properties.get("method").toString();
System.out.println("classfullpath=" + classfullpath);
System.out.println("method=" + methodName);
//2. 创建对象 , 传统的方法,行不通 =》 反射机制
//new classfullpath();
//3. 使用反射机制解决
// (1) 加载类, 返回 Class 类型的对象 cls
Class cls = Class.forName(classfullpath);
//(2) 通过 cls 得到你加载的类 nineteenchapter.question.Cat 的对象实例
Object o = cls.newInstance();
System.out.println("o 的运行类型=" + o.getClass()); //运行类型
//(3) 通过 cls 得到你加载的类 com.hspedu.Cat 的 methodName"hi" 的方法对象
// 即:在反射中,可以把方法视为对象(万物皆对象)
Method method1 = cls.getMethod(methodName);
//(4) 通过 method1 调用方法: 即通过方法对象来实现调用方法
System.out.println("=============================");
method1.invoke(o); //传统方法 对象.方法() , 反射机制 方法.invoke(对象)
}
}
19.2 反射机制
19.2.1 Java Reflection
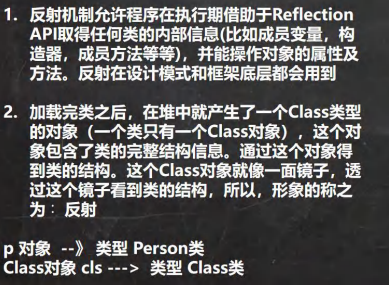
19.2.2 Java反射机制原理示意图
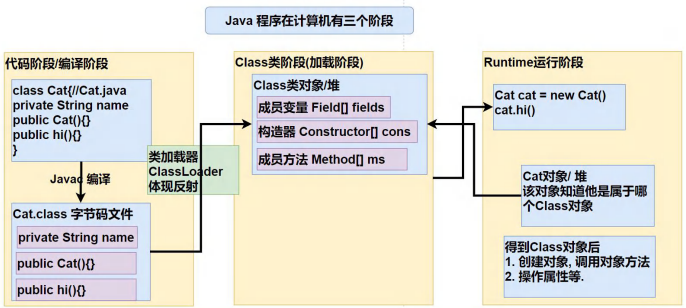
19.2.3 Java反射机制可以完成
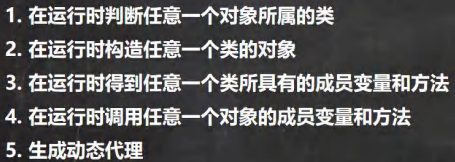
19.2.4 反射相关的主要类
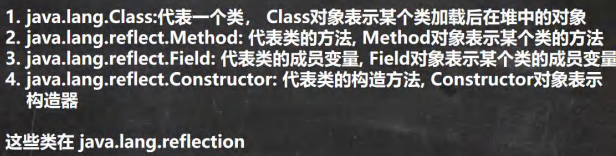
public class Cat {
private String name = "招财猫";
public int age = 10;
public Cat(){}
public Cat(String name) {
this.name = name;
}
public void hi() {
System.out.println("hi");
}
}
import java.io.FileInputStream;
import java.lang.reflect.Constructor;
import java.lang.reflect.Field;
import java.lang.reflect.Method;
import java.util.Properties;
public class Reflection01 {
public static void main(String[] args) throws Exception {
//1. 使用 Properties 类, 可以读写配置文件
Properties properties = new Properties();
properties.load(new FileInputStream("javase/src/nineteenchapter/question/re.properties"));
String classfullpath = properties.get("classfullpath").toString();//"nineteenchapter.question.Cat"
String methodName = properties.get("method").toString();//"hi"
//2. 使用反射机制解决
//(1) 加载类, 返回 Class 类型的对象 cls
Class cls = Class.forName(classfullpath);
//(2) 通过 cls 得到你加载的类 nineteenchapter.question.Cat 的对象实例
Object o = cls.newInstance();
System.out.println("o 的运行类型=" + o.getClass()); //运行类型
//(3) 通过 cls 得到你加载的类 com.hspedu.Cat 的 methodName"hi" 的方法对象
// 即:在反射中,可以把方法视为对象(万物皆对象)
Method method1 = cls.getMethod(methodName);
//(4) 通过 method1 调用方法: 即通过方法对象来实现调用方法
System.out.println("=============================");
method1.invoke(o); //传统方法 对象.方法() , 反射机制 方法.invoke(对象)
// java.lang.reflect.Field: 代表类的成员变量, Field 对象表示某个类的成员变量
//得到 name 字段
//getField 不能得到私有的属性
Field nameField = cls.getField("age"); //
System.out.println(nameField.get(o)); // 传统写法 对象.成员变量 , 反射 : 成员变量对象.get(对象)
//java.lang.reflect.Constructor: 代表类的构造方法, Constructor 对象表示构造器
Constructor constructor = cls.getConstructor(); //()中可以指定构造器参数类型, 返回无参构造器
System.out.println(constructor);//Cat()
Constructor constructor2 = cls.getConstructor(String.class); //这里传入的 String.class 就是 String 类的Class 对象
System.out.println(constructor2);//Cat(String name)
}
}
19.2.5 反射的优缺点

public class Cat {
private String name = "招财猫";
public int age = 10;
public Cat(){}
public Cat(String name) {
this.name = name;
}
public void hi() {
//System.out.println("hi");
}
}
import nineteenchapter.question.Cat;
import java.lang.reflect.InvocationTargetException;
import java.lang.reflect.Method;
public class Reflection02 {
public static void main(String[] args) throws ClassNotFoundException, NoSuchMethodException, InvocationTargetException, InstantiationException, IllegalAccessException {
m1();//传统
m2();//反射
}
//传统方法来调用 hi
public static void m1() {
Cat cat = new Cat();
long start = System.currentTimeMillis();
for (int i = 0; i < 90; i++) {
cat.hi();
}
long end = System.currentTimeMillis();
System.out.println("m1() 耗时=" + (end - start));
}
//反射机制调用方法 hi
public static void m2() throws ClassNotFoundException, IllegalAccessException, InstantiationException, NoSuchMethodException, InvocationTargetException {
Class cls = Class.forName("nineteenchapter.question.Cat");
Object o = cls.newInstance();
Method hi = cls.getMethod("hi");
long start = System.currentTimeMillis();
for (int i = 0; i < 900000000; i++) {
hi.invoke(o);//反射调用方法
}
long end = System.currentTimeMillis();
System.out.println("m2() 耗时=" + (end - start));
}
}
19.2.6 反射调用优化-关闭访问检查

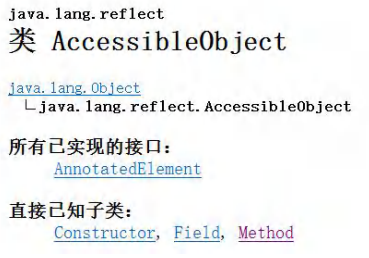
import nineteenchapter.question.Cat;
import java.lang.reflect.InvocationTargetException;
import java.lang.reflect.Method;
public class Reflection02 {
public static void main(String[] args) throws ClassNotFoundException, NoSuchMethodException, InvocationTargetException, InstantiationException, IllegalAccessException {
//Field
// Method
// Constructor
m1();//传统
m2();//反射
m3();//反射优化
}
//传统方法来调用 hi
public static void m1() {
Cat cat = new Cat();
long start = System.currentTimeMillis();
for (int i = 0; i < 90; i++) {
cat.hi();
}
long end = System.currentTimeMillis();
System.out.println("m1() 耗时=" + (end - start));
}
//反射机制调用方法 hi
public static void m2() throws ClassNotFoundException, IllegalAccessException, InstantiationException, NoSuchMethodException, InvocationTargetException {
Class cls = Class.forName("nineteenchapter.question.Cat");
Object o = cls.newInstance();
Method hi = cls.getMethod("hi");
long start = System.currentTimeMillis();
for (int i = 0; i < 900000000; i++) {
hi.invoke(o);//反射调用方法
}
long end = System.currentTimeMillis();
System.out.println("m2() 耗时=" + (end - start));
}
//反射调用优化 + 关闭访问检查
public static void m3() throws ClassNotFoundException, IllegalAccessException, InstantiationException, NoSuchMethodException, InvocationTargetException {
Class cls = Class.forName("nineteenchapter.question.Cat");
Object o = cls.newInstance();
Method hi = cls.getMethod("hi");
hi.setAccessible(true);//在反射调用方法时,取消访问检查
long start = System.currentTimeMillis();
for (int i = 0; i < 900000000; i++) {
hi.invoke(o);//反射调用方法
}
long end = System.currentTimeMillis();
System.out.println("m3() 耗时=" + (end - start));
}
}
19.3 Class类
19.3.1 基本介绍
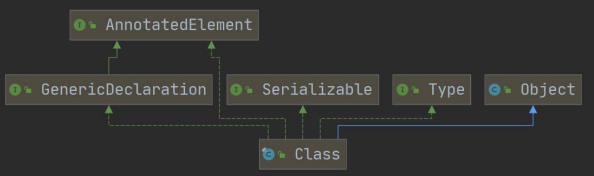
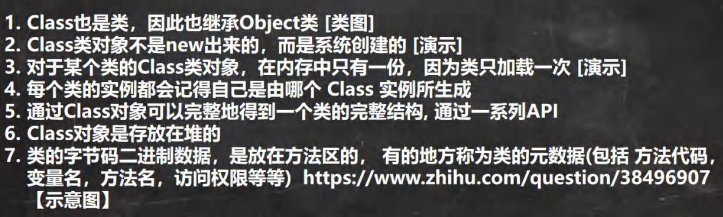
public class Class01 {
public static void main(String[] args) throws ClassNotFoundException {
//看看 Class 类图
/*1. Class 也是类,因此也继承 Object 类
Class*/
/*2. Class 类对象不是 new 出来的,而是系统创建的
(1) 传统 new 对象
ClassLoader 类
public Class<?> loadClass (String name) throws ClassNotFoundException {
return loadClass(name, false);
}
Cat cat = new Cat();*/
/*(2) 反射方式, 刚才老师没有 debug 到 ClassLoader 类的 loadClass, 原因是,我没有注销 Cat cat = ne
ClassLoader 类, 仍然是通过 ClassLoader 类加载 Cat 类的 Class 对象
public Class<?> loadClass (String name) throws ClassNotFoundException {
return loadClass(name, false);
}*/
Class cls1 = Class.forName("nineteenchapter.question.Cat");
//3. 对于某个类的 Class 类对象,在内存中只有一份,因为类只加载一次
Class cls2 = Class.forName("nineteenchapter.question.Cat");
System.out.println(cls1.hashCode());
System.out.println(cls2.hashCode());
Class cls3 = Class.forName("nineteenchapter.class_.Dog");
System.out.println(cls3.hashCode());
}
}
19.3.2 Class类的常用方法
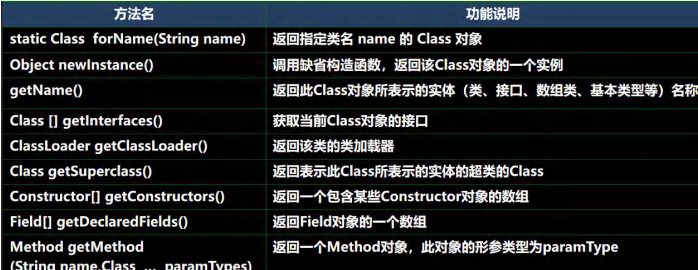
19.3.3 案例
public class Car {
public String brand;
public int price;
public String color;
@Override
public String toString() {
return "Car{" +
"brand='" + brand + '\'' +
", price=" + price +
", color='" + color + '\'' +
'}';
}
}
import java.lang.reflect.Field;
public class Class02 {
public static void main(String[] args) throws ClassNotFoundException, IllegalAccessException, InstantiationException, NoSuchFieldException {
String classAllPath = "nineteenchapter.class_.Car";
//1 . 获取到 Car 类 对应的 Class 对象
//<?> 表示不确定的 Java 类型
Class<?> cls = Class.forName(classAllPath);
//2. 输出 cls
System.out.println(cls); //显示 cls 对象, 是哪个类的 Class 对象 nineteenchapter.class_.Car
System.out.println(cls.getClass());//输出 cls 运行类型 java.lang.Class
//3. 得到包名
System.out.println(cls.getPackage().getName());//包名
//4. 得到全类名
System.out.println(cls.getName());
//5. 通过 cls 创建对象实例
Car car = (Car) cls.newInstance();
System.out.println(car);//car.toString()
//6. 通过反射获取属性 brand
Field brand = cls.getField("brand");
System.out.println(brand.get(car));//宝马
//7. 通过反射给属性赋值
brand.set(car, "奔驰");
System.out.println(brand.get(car));//奔驰
//8 得到所有的属性(字段)
System.out.println("=======所有的字段属性====");
Field[] fields = cls.getFields();
for (Field f : fields) {
System.out.println(f.getName());//名称
}
}
}
19.4 获取Class类对象
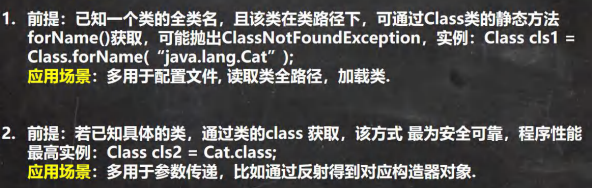
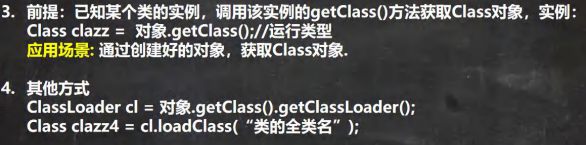

19.5 哪些类型有Class对象
19.5.1 如下
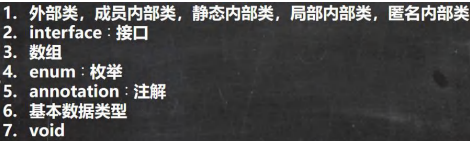
19.5.2 案例
import java.io.Serializable;
public class AllTypeClass {
public static void main(String[] args) {
Class<String> cls1 = String.class;//外部类
Class<Serializable> cls2 = Serializable.class;//接口
Class<Integer[]> cls3 = Integer[].class;//数组
Class<float[][]> cls4 = float[][].class;//二维数组
Class<Deprecated> cls5 = Deprecated.class;//注解
//枚举
Class<Thread.State> cls6 = Thread.State.class;
Class<Long> cls7 = long.class;//基本数据类型
Class<Void> cls8 = void.class;//void 数据类型
Class<Class> cls9 = Class.class;//
System.out.println(cls1);
System.out.println(cls2);
System.out.println(cls3);
System.out.println(cls4);
System.out.println(cls5);
System.out.println(cls6);
System.out.println(cls7);
System.out.println(cls8);
System.out.println(cls9);
}
}
19.6 类加载
19.6.1 基本说明

import java.lang.reflect.InvocationTargetException;
import java.lang.reflect.Method;
import java.util.Scanner;
public class ClassLoad_ {
public static void main(String[] args) throws ClassNotFoundException, InstantiationException, IllegalAccessException, NoSuchMethodException, InvocationTargetException {
Scanner scanner = new Scanner(System.in);
System.out.println("请输入:");
String key = scanner.next();
switch (key) {
case "1":
Dog1 dog = new Dog1();//静态加载,依赖性很强
dog.cry();
break;
case "2":
//反射——动态加载
Class cls = Class.forName("nineteenchapter.class_.Person");
Object o = cls.newInstance();
Method m = cls.getMethod("hi");
m.invoke(o);
System.out.println("ok");
break;
default:
System.out.println("do nothing..");
}
}
}
//因为new Dog()是静态加载,因此必须编写Dog
//Person是动态加载,所以没有编写Person类也不会报错,只有在动态加载类的时候才会报错
class Dog1 {
public void cry() {
System.out.println("汪汪叫");
}
}
class Person {
public void hi() {
System.out.println("打招呼");
}
}
19.6.2 类加载时机
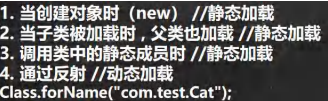
19.6.3 类加载过程
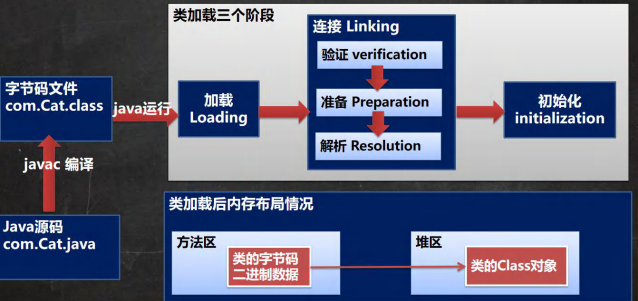
19.6.4 类加载各阶段完成任务
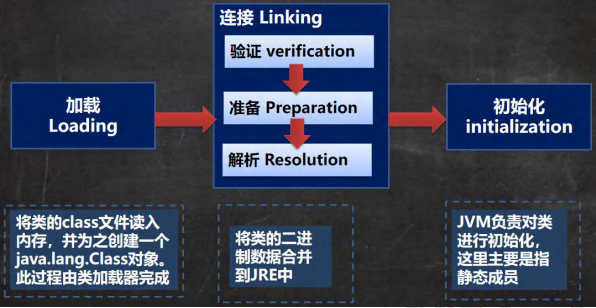
19.6.5 加载阶段
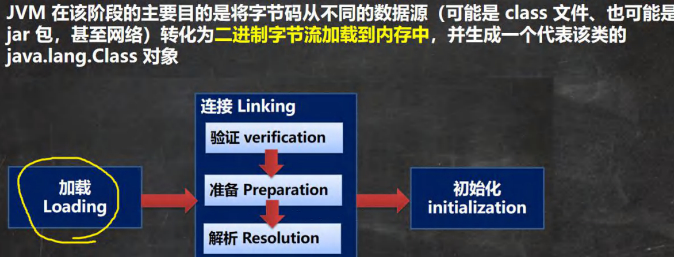
19.6.6 连接阶段—验证

19.6.7 连接阶段-准备

public class ClassLoad02 {
public static void main(String[] args) {
}
}
class A {
//属性-成员变量-字段
//1. n1 是实例属性, 不是静态变量,因此在准备阶段,是不会分配内存
// 2. n2 是静态变量,分配内存 n2 是默认初始化 0 ,而不是 20
// 3. n3 是 static final 是常量, 他和静态变量不一样, 因为一旦赋值就不变 n3 = 30
public int n1 = 10;
public static int n2 = 20;
public static final int n3 = 30;
}
19.6.8 连接阶段-解析
19.6.9 Initialization
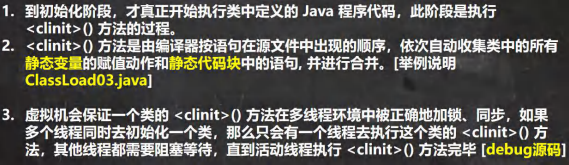
19.7 通过反射获取类的结构信息
19.7.1 第一组 java.lang.Class类
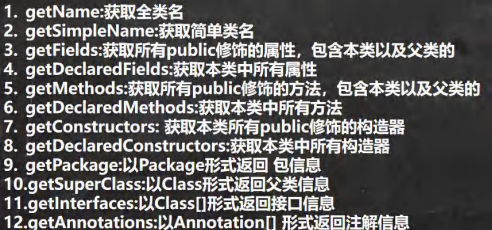
19.7.2 第二组 java.lang.reflect.Field 类

19.7.3 第三组 java.lang.reflect.Method 类
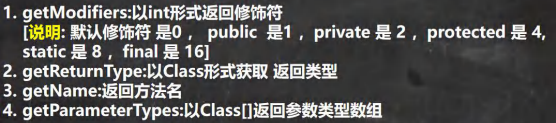
19.7.4 第四组 java.lang.reflect.Constructor 类

import org.junit.jupiter.api.Test;
import java.lang.annotation.Annotation;
import java.lang.reflect.Constructor;
import java.lang.reflect.Field;
import java.lang.reflect.Method;
public class ReflectionUtils {
public static void main(String[] args) {
}
@Test
public void api_02() throws ClassNotFoundException, NoSuchMethodException {
//得到 Class 对象
Class<?> personCls = Class.forName("nineteenchapter.reflection.Person");
//getDeclaredFields:获取本类中所有属性
//规定 说明: 默认修饰符 是 0 , public 是 1 ,private 是 2 ,protected 是 4 , static 是 8 ,final 是 16
Field[] declaredFields = personCls.getDeclaredFields();
for (Field declaredField : declaredFields) {
System.out.println("本类中所有属性=" + declaredField.getName()
+ " 该属性的修饰符值=" + declaredField.getModifiers()
+ " 该属性的类型=" + declaredField.getType());
}
//getDeclaredMethods:获取本类中所有方法
Method[] declaredMethods = personCls.getDeclaredMethods();
for (Method declaredMethod : declaredMethods) {
System.out.println("本类中所有方法=" + declaredMethod.getName()
+ " 该方法的访问修饰符值=" + declaredMethod.getModifiers()
+ " 该方法返回类型" + declaredMethod.getReturnType());
//输出当前这个方法的形参数组情况
Class<?>[] parameterTypes = declaredMethod.getParameterTypes();
for (Class<?> parameterType : parameterTypes) {
System.out.println("该方法的形参类型=" + parameterType);
}
}
//getDeclaredConstructors:获取本类中所有构造器
Constructor<?>[] declaredConstructors = personCls.getDeclaredConstructors();
for (Constructor<?> declaredConstructor : declaredConstructors) {
System.out.println("====================");
System.out.println("本类中所有构造器=" + declaredConstructor.getName());//这里老师只是输出名
Class<?>[] parameterTypes = declaredConstructor.getParameterTypes();
for (Class<?> parameterType : parameterTypes) {
System.out.println("该构造器的形参类型=" + parameterType);
}
}
}
//第一组方法 API
@Test
public void api_01() throws ClassNotFoundException, NoSuchMethodException {
//得到 Class 对象
Class<?> personCls = Class.forName("nineteenchapter.reflection.Person");
//getName:获取全类名
System.out.println(personCls.getName());//com.hspedu.reflection.Person
//getSimpleName:获取简单类名
System.out.println(personCls.getSimpleName());//Person
//getFields:获取所有 public 修饰的属性,包含本类以及父类的
Field[] fields = personCls.getFields();
for (Field field : fields) {//增强 for
System.out.println("本类以及父类的属性=" + field.getName());
}
//getDeclaredFields:获取本类中所有属性
Field[] declaredFields = personCls.getDeclaredFields();
for (Field declaredField : declaredFields) {
System.out.println("本类中所有属性=" + declaredField.getName());
}
//getMethods:获取所有 public 修饰的方法,包含本类以及父类的
Method[] methods = personCls.getMethods();
for (Method method : methods) {
System.out.println("本类以及父类的方法=" + method.getName());
}
//getDeclaredMethods:获取本类中所有方法
Method[] declaredMethods = personCls.getDeclaredMethods();
for (Method declaredMethod : declaredMethods) {
System.out.println("本类中所有方法=" + declaredMethod.getName());
}
//getConstructors: 获取所有 public 修饰的构造器,包含本类
Constructor<?>[] constructors = personCls.getConstructors();
for (Constructor<?> constructor : constructors) {
System.out.println("本类的构造器=" + constructor.getName());
}
//getDeclaredConstructors:获取本类中所有构造器
Constructor<?>[] declaredConstructors = personCls.getDeclaredConstructors();
for (Constructor<?> declaredConstructor : declaredConstructors) {
System.out.println("本类中所有构造器=" + declaredConstructor.getName());//这里老师只是输出名
}
//getPackage:以 Package 形式返回 包信息
System.out.println(personCls.getPackage());//com.hspedu.reflection
//getSuperClass:以 Class 形式返回父类信息
Class<?> superclass = personCls.getSuperclass();
System.out.println("父类的 class 对象=" + superclass);//
// getInterfaces:以 Class[]形式返回接口信息
Class<?>[] interfaces = personCls.getInterfaces();
for (Class<?> anInterface : interfaces) {
System.out.println("接口信息=" + anInterface);
}
//getAnnotations:以 Annotation[] 形式返回注解信息
Annotation[] annotations = personCls.getAnnotations();
for (Annotation annotation : annotations) {
System.out.println("注解信息=" + annotation);//注解
}
}
}
class A {
public String hobby;
public void hi() {
}
public A() {
}
public A(String name) {
}
}
interface IA {
}
interface IB {
}
@Deprecated
class Person extends A implements IA, IB {
//属性
public String name;
protected static int age; // 4 + 8 = 12
String job;
private double sal;
//构造器
public Person() {
}
public Person(String name) {
}
//私有的
private Person(String name, int age) {
}
//方法
public void m1(String name, int age, double sal) {
}
protected String m2() {
return null;
}
void m3() {
}
private void m4() {
}
}import org.junit.jupiter.api.Test;
import java.lang.annotation.Annotation;
import java.lang.reflect.Constructor;
import java.lang.reflect.Field;
import java.lang.reflect.Method;
public class ReflectionUtils {
public static void main(String[] args) {
}
@Test
public void api_02() throws ClassNotFoundException, NoSuchMethodException {
//得到 Class 对象
Class<?> personCls = Class.forName("nineteenchapter.reflection.Person");
//getDeclaredFields:获取本类中所有属性
//规定 说明: 默认修饰符 是 0 , public 是 1 ,private 是 2 ,protected 是 4 , static 是 8 ,final 是 16
Field[] declaredFields = personCls.getDeclaredFields();
for (Field declaredField : declaredFields) {
System.out.println("本类中所有属性=" + declaredField.getName()
+ " 该属性的修饰符值=" + declaredField.getModifiers()
+ " 该属性的类型=" + declaredField.getType());
}
//getDeclaredMethods:获取本类中所有方法
Method[] declaredMethods = personCls.getDeclaredMethods();
for (Method declaredMethod : declaredMethods) {
System.out.println("本类中所有方法=" + declaredMethod.getName()
+ " 该方法的访问修饰符值=" + declaredMethod.getModifiers()
+ " 该方法返回类型" + declaredMethod.getReturnType());
//输出当前这个方法的形参数组情况
Class<?>[] parameterTypes = declaredMethod.getParameterTypes();
for (Class<?> parameterType : parameterTypes) {
System.out.println("该方法的形参类型=" + parameterType);
}
}
//getDeclaredConstructors:获取本类中所有构造器
Constructor<?>[] declaredConstructors = personCls.getDeclaredConstructors();
for (Constructor<?> declaredConstructor : declaredConstructors) {
System.out.println("====================");
System.out.println("本类中所有构造器=" + declaredConstructor.getName());//这里老师只是输出名
Class<?>[] parameterTypes = declaredConstructor.getParameterTypes();
for (Class<?> parameterType : parameterTypes) {
System.out.println("该构造器的形参类型=" + parameterType);
}
}
}
//第一组方法 API
@Test
public void api_01() throws ClassNotFoundException, NoSuchMethodException {
//得到 Class 对象
Class<?> personCls = Class.forName("nineteenchapter.reflection.Person");
//getName:获取全类名
System.out.println(personCls.getName());//com.hspedu.reflection.Person
//getSimpleName:获取简单类名
System.out.println(personCls.getSimpleName());//Person
//getFields:获取所有 public 修饰的属性,包含本类以及父类的
Field[] fields = personCls.getFields();
for (Field field : fields) {//增强 for
System.out.println("本类以及父类的属性=" + field.getName());
}
//getDeclaredFields:获取本类中所有属性
Field[] declaredFields = personCls.getDeclaredFields();
for (Field declaredField : declaredFields) {
System.out.println("本类中所有属性=" + declaredField.getName());
}
//getMethods:获取所有 public 修饰的方法,包含本类以及父类的
Method[] methods = personCls.getMethods();
for (Method method : methods) {
System.out.println("本类以及父类的方法=" + method.getName());
}
//getDeclaredMethods:获取本类中所有方法
Method[] declaredMethods = personCls.getDeclaredMethods();
for (Method declaredMethod : declaredMethods) {
System.out.println("本类中所有方法=" + declaredMethod.getName());
}
//getConstructors: 获取所有 public 修饰的构造器,包含本类
Constructor<?>[] constructors = personCls.getConstructors();
for (Constructor<?> constructor : constructors) {
System.out.println("本类的构造器=" + constructor.getName());
}
//getDeclaredConstructors:获取本类中所有构造器
Constructor<?>[] declaredConstructors = personCls.getDeclaredConstructors();
for (Constructor<?> declaredConstructor : declaredConstructors) {
System.out.println("本类中所有构造器=" + declaredConstructor.getName());//这里老师只是输出名
}
//getPackage:以 Package 形式返回 包信息
System.out.println(personCls.getPackage());//com.hspedu.reflection
//getSuperClass:以 Class 形式返回父类信息
Class<?> superclass = personCls.getSuperclass();
System.out.println("父类的 class 对象=" + superclass);//
// getInterfaces:以 Class[]形式返回接口信息
Class<?>[] interfaces = personCls.getInterfaces();
for (Class<?> anInterface : interfaces) {
System.out.println("接口信息=" + anInterface);
}
//getAnnotations:以 Annotation[] 形式返回注解信息
Annotation[] annotations = personCls.getAnnotations();
for (Annotation annotation : annotations) {
System.out.println("注解信息=" + annotation);//注解
}
}
}
class A {
public String hobby;
public void hi() {
}
public A() {
}
public A(String name) {
}
}
interface IA {
}
interface IB {
}
@Deprecated
class Person extends A implements IA, IB {
//属性
public String name;
protected static int age; // 4 + 8 = 12
String job;
private double sal;
//构造器
public Person() {
}
public Person(String name) {
}
//私有的
private Person(String name, int age) {
}
//方法
public void m1(String name, int age, double sal) {
}
protected String m2() {
return null;
}
void m3() {
}
private void m4() {
}
}
19.8 通过反射创建对象
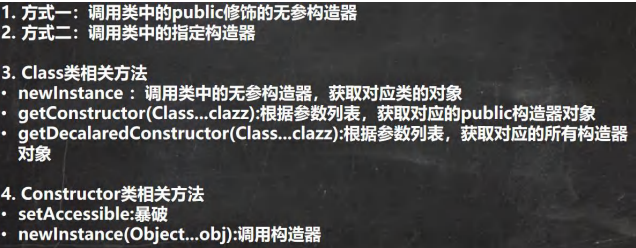
19.8.1 案例
测试 1:通过反射创建某类的对象,要求该类中必须有 public 的无参构造
测试 2:通过调用某个特定构造器的方式,实现创建某类的对象
import java.lang.reflect.Constructor;
import java.lang.reflect.InvocationTargetException;
public class ReflecCreateInstance {
public static void main(String[] args) throws ClassNotFoundException, IllegalAccessException, InstantiationException, NoSuchMethodException, InvocationTargetException {
//1. 先获取到 User 类的 Class 对象
Class<?> userClass = Class.forName("nineteenchapter.reflection.User");
//2. 通过 public 的无参构造器创建实例
Object o = userClass.newInstance();
System.out.println(o);
//3. 通过 public 的有参构造器创建实例
/*constructor 对象就是
public User(String name) {//public 的有参构造器
this.name = name;
}*/
//3.1 先得到对应构造器
Constructor<?> constructor = userClass.getConstructor(String.class);
//3.2 创建实例,并传入实参
Object zsf = constructor.newInstance("zsf");
System.out.println("zsf=" + zsf);
//4. 通过非 public 的有参构造器创建实例
// 4.1 得到 private 的构造器对象
Constructor<?> constructor1 = userClass.getDeclaredConstructor(int.class, String.class);
//4.2 创建实例
//暴破【暴力破解】 , 使用反射可以访问 private 构造器/方法/属性, 反射面前,都是纸老虎
constructor1.setAccessible(true);
Object user2 = constructor1.newInstance(100, "张三丰");
System.out.println("user2=" + user2);
}
}
class User { //User 类
private int age = 10;
private String name = "张三李四";
public User() {//无参 public
}
public User(String name) {//public 的有参构造器
this.name = name;
}
private User(int age, String name) {//private 有参构造器
this.age = age;
this.name = name;
}
public String toString() {
return "User [age=" + age + ", name=" + name + "]";
}
}
19.9 通过反射访问类中的成员
19.9.1 访问属性
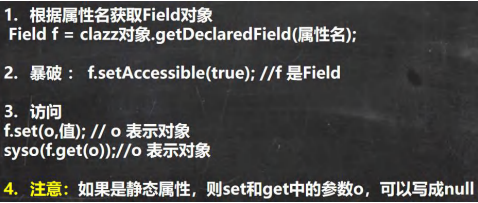
import java.lang.reflect.Field;
public class ReflecAccessProperty {
public static void main(String[] args) throws ClassNotFoundException, IllegalAccessException, InstantiationException, NoSuchFieldException {
//1. 得到 Student 类对应的 Class 对象
Class<?> stuClass = Class.forName("nineteenchapter.reflection.Student");
//2. 创建对象
Object o = stuClass.newInstance();//o 的运行类型就是 Student
System.out.println(o.getClass());//Student
//3. 使用反射得到 age 属性对象
Field age = stuClass.getField("age");
age.set(o, 88);//通过反射来操作属性
System.out.println(o);//
System.out.println(age.get(o));//返回 age 属性的值
//4. 使用反射操作 name 属性
Field name = stuClass.getDeclaredField("name");
//对 name 进行暴破, 可以操作 private 属性
name.setAccessible(true);
//name.set(o, "张三");
name.set(null, "张三~");//因为 name 是 static 属性,因此 o 也可以写出 null
System.out.println(o);
System.out.println(name.get(o)); //获取属性值
System.out.println(name.get(null));//获取属性值, 要求 name 是 static
}
}
class Student {//类
public int age;
private static String name;
public Student() {//构造器
}
public String toString() {
return "Student [age=" + age + ", name=" + name + "]";
}
}
19.9.2 访问方法
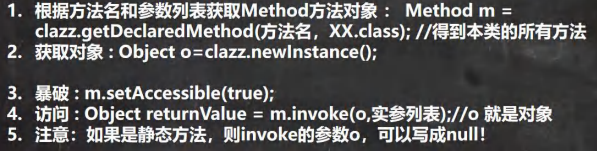
import java.lang.reflect.InvocationTargetException;
import java.lang.reflect.Method;
public class ReflecAccessMethod {
public static void main(String[] args) throws ClassNotFoundException, NoSuchMethodException, IllegalAccessException, InstantiationException, InvocationTargetException {
//1. 得到 Boss 类对应的 Class 对象
Class<?> bossCls = Class.forName("nineteenchapter.reflection.Boss");
//2. 创建对象
Object o = bossCls.newInstance();
//3. 调用 public 的 hi 方法
// Method hi = bossCls.getMethod("hi", String.class);//OK
// 3.1 得到 hi 方法对象
Method hi = bossCls.getDeclaredMethod("hi", String.class);//OK
// 3.2 调用
hi.invoke(o, "张三李四~");
//4. 调用 private static 方法
// 4.1 得到 say 方法对象
Method say = bossCls.getDeclaredMethod("say", int.class, String.class, char.class);
//4.2 因为 say 方法是 private, 所以需要暴破,原理和前面讲的构造器和属性一样
say.setAccessible(true);
System.out.println(say.invoke(o, 100, "张三", '男'));
//4.3 因为 say 方法是 static 的,还可以这样调用 ,可以传入 null
System.out.println(say.invoke(null, 200, "李四", '女'));
//5. 在反射中,如果方法有返回值,统一返回 Object , 但是他运行类型和方法定义的返回类型一致
Object reVal = say.invoke(null, 300, "王五", '男');
System.out.println("reVal 的运行类型=" + reVal.getClass());//String
// 在演示一个返回的案例
Method m1 = bossCls.getDeclaredMethod("m1");
Object reVal2 = m1.invoke(o);
System.out.println("reVal2 的运行类型=" + reVal2.getClass());//Monster
}
}
class Monster {}
class Boss {//类
public int age;
private static String name;
public Boss() {//构造器
}
public Monster m1() {
return new Monster();
}
private static String say(int n, String s, char c) {//静态方法
return n + " " + s + " " + c;
}
public void hi(String s) {//普通 public 方法
System.out.println("hi " + s);
}
}
二十、正则表达式
20.1 为什么学习正则表达式
20.1.1 感受正则
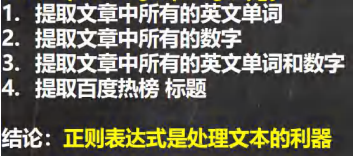
import java.util.regex.Matcher;
import java.util.regex.Pattern;
public class Regexp_ {
public static void main(String[] args) {
String context = "博士论文的题目是:\"The Algebraic Manipulation of Constraints\"。" +
"毕业后到IBM工作,设计IBM第一代工作站NeWS系统,但不受重视。后来转至Sun公司。" +
"1990年,与Patrick Naughton和Mike Sheridan等人合作“绿色计划”,后来发展一套语言叫做“Oak”,后改名为Java。" +
"1994年底,James Gosling在硅谷召开的“技术、教育和设计大会”上展示Java程式。2000年,Java成为世界上最流行的电脑语言。";
//提取文章的英语
Pattern compile = Pattern.compile("[a-zA-z]+");
//提起文章的数字
Pattern compile1 = Pattern.compile("[0-9]+");
//提前文章的英文和数字
Pattern compile2 = Pattern.compile("[a-zA-z0-9]+");
Matcher matcher = compile.matcher(context);
Matcher matcher1 = compile1.matcher(context);
Matcher matcher2 = compile2.matcher(context);
System.out.println("英文");
while (matcher.find()) {
System.out.println(matcher.group(0));
}
System.out.println("数字");
while (matcher1.find()) {
System.out.println(matcher1.group(0));
}
System.out.println("英文和数字");
while (matcher2.find()) {
System.out.println(matcher2.group(0));
}
}
}
20.2 问题


20.3 正则表达式
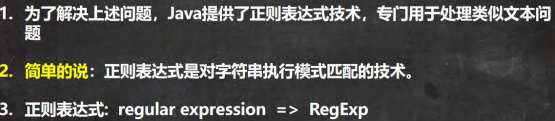
20.4 正则表达式基本介绍
20.4.1 介绍
20.5 正则表达式底层实现
20.5.1 实例分析
给你一段字符串(文本),请找出所有四个数字连在一起的子串, 比如: 应该找到 1998 1999 3443 9889 ===> 分析底层实现
import java.util.regex.Matcher;
import java.util.regex.Pattern;
public class RegTheory {
public static void main(String[] args) {
String content = "1998 年 12 月 8 日,第二代 Java 平台的企业版 J2EE 发布。1999 年 6 月,Sun 公司发布了" +
"第二代 Java 平台(简称为 Java2)的 3 个版本:J2ME(Java2 Micro Edition,Java2 平台的微型" +
"版),应用于移动、无线及有限资源的环境;J2SE(Java 2 Standard Edition,Java 2 平台的" +
"标准版),应用于桌面环境;J2EE(Java 2Enterprise Edition,Java 2 平台的企业版),应" +
"用 3443 于基于 Java 的应用服务器。Java 2 平台的发布,是 Java 发展过程中最重要的一个" +
"里程碑,标志着 Java 的应用开始普及 9889 ";
//匹配所有四个数字
// 1. \\d 表示一个任意的数字
String regStr = "(\\d\\d)(\\d\\d)";
//2. 创建模式对象[即正则表达式对象]
Pattern pattern = Pattern.compile(regStr);
//3. 创建匹配器
// 说明:创建匹配器 matcher,按照 正则表达式的规则 去匹配 content 字符串
Matcher matcher = pattern.matcher(content);
//4.开始匹配
/*
matcher.find() 完成的任务 (考虑分组)
什么是分组,比如(\d\d) (\d\d) ,正则表达式中有() 表示分组, 第 1 个() 表示第 1 组, 第 2 个() 表示第 2 组... *1. 根据指定的规则, 定位满足规则的子字符串(比如(19) (98))
2. 找到后,将 子字符串的开始的索引记录到 matcher 对象的属性 int[] groups;
2.1 groups[0] = 0, 把该子字符串的结束的索引 + 1 的值记录到 groups[ 1] =4
2.2 记录 1 组() 匹配到的字符串 groups[ 2] =0 groups[3] = 2
2.3 记录 2 组() 匹配到的字符串 groups[ 4] =2 groups[5] = 4
2.4.如果有更多的分组..... *3. 同时记录 oldLast 的值为 子字符串的结束的 索引 + 1 的值即 35, 即下次执行 find 时,就从 35 开始匹 配
matcher.group(0) 分析
源码:
public String group ( int group){
if (first < 0)
throw new IllegalStateException("No match found");
if (group < 0 || group > groupCount())
throw new IndexOutOfBoundsException("No group " + group);
if ((groups[group * 2] == -1) || (groups[group * 2 + 1] == -1))
return null;
return getSubSequence(groups[group * 2], groups[group * 2 + 1]).toString();
}
1. 根据 groups[ 0]=31 和 groups[ 1]=35 的记录的位置,从 content 开始截取子字符串返回
就是[31, 35)包含 31 但是不包含索引为 35 的位置
如果再次指向 find 方法.仍然安上面分析来执行*/
while (matcher.find()) {
//小结
// 1. 如果正则表达式有() 即分组
// 2. 取出匹配的字符串规则如下
// 3. group(0) 表示匹配到的子字符串
// 4. group(1) 表示匹配到的子字符串的第一组字串
// 5. group(2) 表示匹配到的子字符串的第 2 组字串
// 6. ... 但是分组的数不能越界.
System.out.println("找到: " + matcher.group(0));
System.out.println("第 1 组()匹配到的值=" + matcher.group(1));
System.out.println("第 2 组()匹配到的值=" + matcher.group(2));
//没有第三组会报越界异常
//System.out.println("第 2 组()匹配到的值=" + matcher.group(3));
}
}
}
20.6 正则表达式语法
20.6.1 基本介绍
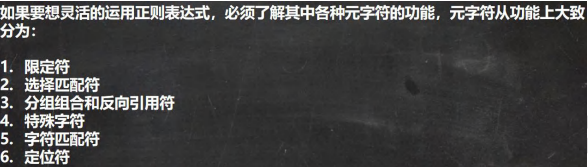
20.6.2 元字符-转义号

import java.util.regex.Matcher;
import java.util.regex.Pattern;
public class RegExp02 {
public static void main(String[] args) {
String content = "abc$(a.bc(123( )";
//匹配( => \\(
//匹配. => \\. //String regStr = "\\.";
//String regStr = "\\d\\d\\d";
String regStr = "\\d{3}";
Pattern pattern = Pattern.compile(regStr);
Matcher matcher = pattern.matcher(content);
while (matcher.find()) {
System.out.println("找到 " + matcher.group(0));
}
}
}
20.6.3 元字符-字符匹配符

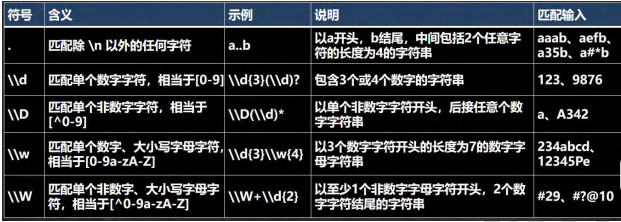
import java.util.regex.Matcher;
import java.util.regex.Pattern;
public class RegExp03 {
public static void main(String[] args) {
String content = "a11c8abc _ABCy @";
//String regStr = "[a-z]";//匹配 a-z 之间任意一个字符
//String regStr = "[A-Z]";//匹配 A-Z 之间任意一个字符
//String regStr = "abc";//匹配 abc 字符串[默认区分大小写]
//String regStr = "(?i)abc";//匹配 abc 字符串[不区分大小写]
//String regStr = "[0-9]";//匹配 0-9 之间任意一个字符
//String regStr = "[^a-z]";//匹配 不在 a-z 之间任意一个字符
//String regStr = "[^0-9]";//匹配 不在 0-9 之间任意一个字符
//String regStr = "[abcd]";//匹配 在 abcd 中任意一个字符
//String regStr = "\\D";//匹配 不在 0-9 的任意一个字符
//String regStr = "\\w";//匹配 大小写英文字母, 数字,下划线
//String regStr = "\\W";//匹配 等价于 [^a-zA-Z0-9_]
//\\s 匹配任何空白字符 (空格, 制表符等)
//String regStr = "\\s";
//\\S 匹配任何非空白字符, 和\\s 刚好相反
//String regStr = "\\S";
//.匹配出 \n 之外的所有字符, 如果要匹配.本身则需要使用 \\.
String regStr = ".";
//说明
//1. 当创建 Pattern 对象时,指定 Pattern.CASE_INSENSITIVE, 表示匹配是不区分字母大小写.
Pattern pattern = Pattern.compile(regStr/*, Pattern.CASE_INSENSITIVE*/);
Matcher matcher = pattern.matcher(content);
while (matcher.find()) {
System.out.println("找到 " + matcher.group(0));
}
}
}
20.6.4 元符号-选择匹配符

import java.util.regex.Matcher;
import java.util.regex.Pattern;
public class RegExp04 {
public static void main(String[] args) {
String content = "hanshunping 韩 寒冷";
String regStr = "han|韩|寒";
Pattern pattern = Pattern.compile(regStr/*, Pattern.CASE_INSENSITIVE*/);
Matcher matcher = pattern.matcher(content);
while (matcher.find()) {
System.out.println("找到 " + matcher.group(0));
}
}
}
20.6.5 元字符-限定符
用于指定其前面的字符和组合项连续出现多少次
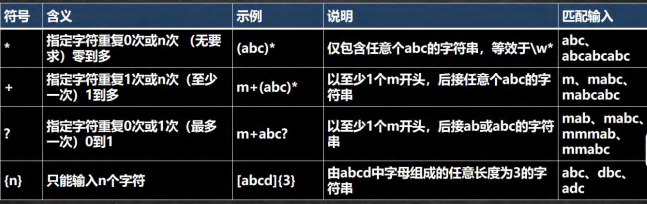

import java.util.regex.Matcher;
import java.util.regex.Pattern;
public class RegExp05 {
public static void main(String[] args) {
String content = "a211111aaaaaahello";
//a{3},1{4},\\d{2}
//String regStr = "a{3}";// 表示匹配 aaa
//String regStr = "1{4}";// 表示匹配 1111
//String regStr = "\\d{2}";// 表示匹配 两位的任意数字字符
//a{3,4},1{4,5},\\d{2,5}
//细节:java 匹配默认贪婪匹配,即尽可能匹配多的
//String regStr = "a{3,4}"; //表示匹配 aaa 或者 aaaa
//String regStr = "1{4,5}"; //表示匹配 1111 或者 11111
//String regStr = "\\d{2,5}"; //匹配 2 位数或者 3,4,5
//1 +
//String regStr = "1+"; //匹配一个 1 或者多个 1
//String regStr = "\\d+"; //匹配一个数字或者多个数字
//1 *
// String regStr = "1*"; //匹配 0 个 1 或者多个 1
//演示 ? 的使用, 遵守贪婪匹配
String regStr = "a1?"; //匹配 a 或者 a1
Pattern pattern = Pattern.compile(regStr/*, Pattern.CASE_INSENSITIVE*/);
Matcher matcher = pattern.matcher(content);
while (matcher.find()) {
System.out.println("找到 " + matcher.group(0));
}
}
}
20.6.6 元符号-定位符
定位符, 规定要匹配的字符串出现的位置,比如在字符串的开始还是在结束的位置.

import java.util.regex.Matcher;
import java.util.regex.Pattern;
public class RegExp06 {
public static void main(String[] args) {
String content = "hanshunping sphan nnhan";
//String content = "123-abc";
//以至少 1 个数字开头,后接任意个小写字母的字符串
//String regStr = "^[0-9]+[a-z]*";
//以至少 1 个数字开头, 必须以至少一个小写字母结束
//String regStr = "^[0-9]+\\-[a-z]+$";
//表示匹配边界的 han[ 这里的边界是指:被匹配的字符串最后, // 也可以是空格的子字符串的后面]
//String regStr = "han\\b";
//和\\b 的含义刚刚相反
String regStr = "han\\B";
Pattern pattern = Pattern.compile(regStr);
Matcher matcher = pattern.matcher(content);
while (matcher.find()) {
System.out.println("找到=" + matcher.group(0));
}
}
}
20.6.7 分组
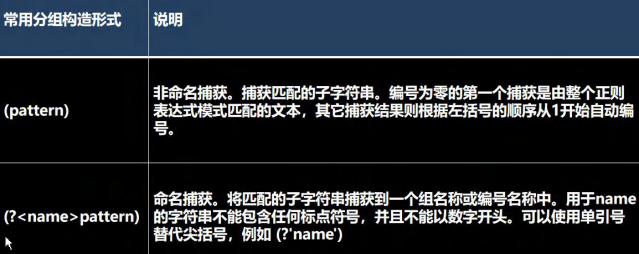
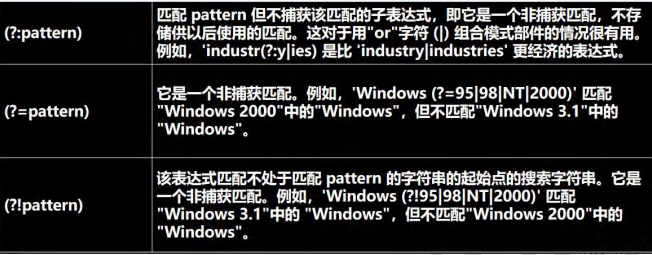
import java.util.regex.Matcher;
import java.util.regex.Pattern;
public class RegExp07 {
public static void main(String[] args) {
String content = "hanshunping s7789 nn1189han";
//下面就是非命名分组
//1. matcher.group(0) 得到匹配到的字符串
//2. matcher.group(1) 得到匹配到的字符串的第 1 个分组内容
//3. matcher.group(2) 得到匹配到的字符串的第 2 个分组内容
//String regStr = "(\\d\\d)(\\d\\d)";//匹配 4 个数字的字符串
//命名分组:即可以给分组取名
String regStr = "(?<g1>\\d\\d)(?<g2>\\d\\d)";//匹配 4 个数字的字符串
Pattern pattern = Pattern.compile(regStr);
Matcher matcher = pattern.matcher(content);
while (matcher.find()) {
System.out.println("找到=" + matcher.group(0));
System.out.println("第 1 个分组内容=" + matcher.group(1));
System.out.println("第 1 个分组内容[通过组名]=" + matcher.group("g1"));
System.out.println("第 2 个分组内容=" + matcher.group(2));
System.out.println("第 2 个分组内容[通过组名]=" + matcher.group("g2"));
}
}
}
import java.util.regex.Matcher;
import java.util.regex.Pattern;
public class RegExp08 {
public static void main(String[] args) {
String content = "hello 韩顺平教育 jack 韩顺平老师 韩顺平同学 hello 韩顺平学生";
//找到 韩顺平教育 、韩顺平老师、韩顺平同学 子字符串
//String regStr = "韩顺平教育|韩顺平老师|韩顺平同学";
//上面的写法可以等价非捕获分组, 注意:不能 matcher.group(1)
//String regStr = "韩顺平(?:教育|老师|同学)";
//找到 韩顺平 这个关键字, 但是要求只是查找韩顺平教育和 韩顺平老师 中包含有的韩顺平
//下面也是非捕获分组,不能使用 matcher.group(1)
//String regStr = "韩顺平(?=教育|老师)";
//找到 韩顺平 这个关键字, 但是要求只是查找 不是(韩顺平教育 和 韩顺平老师) 中包含有的韩顺平
//下面也是非捕获分组,不能使用 matcher.group(1)
String regStr = "韩顺平(?!教育|老师)";
Pattern pattern = Pattern.compile(regStr);
Matcher matcher = pattern.matcher(content);
while (matcher.find()) {
System.out.println("找到: " + matcher.group(0));
}
}
}
20.7 应用案例
20.7.1 对字符串进行如下验证
import java.util.regex.Matcher;
import java.util.regex.Pattern;
public class RegExp10 {
public static void main(String[] args) {
String content = "13588889999";
//汉字
//String regStr = "^[\u0391-\uffe5]+$";
//邮政编码
//要求:1. 是 1 - 9 开头的一个六位数.比如:123890
//2. // 3. //String regStr = "^[1-9]\\d{5}$";
//QQ 号码
//要求:
//是 1 - 9 开头的一个(5位数 - 10位数) 比如:
//12389, 1345687, 187698765
//String regStr = "^[1-9]\\d{4,9}$";
//手机号码
//要求:
//必须以 13, 14, 15, 18 开头的 11 位数, 比如 13588889999
String regStr = "^1[3|4|5|8]\\d{9}$";
Pattern pattern = Pattern.compile(regStr);
Matcher matcher = pattern.matcher(content);
if (matcher.find()) {
System.out.println("满足格式");
} else {
System.out.println("不满足格式");
}
}
}
import java.util.regex.Matcher;
import java.util.regex.Pattern;
public class RegExp11 {
public static void main(String[] args) {
//String content = "https://www.bilibili.com/video/BV1fh411y7R8?from=search&seid=1831060912083761326";
String content = "http://edu.3dsmax.tech/yg/bilibili/my6652/pc/qg/05-51/index.html#201211-1?track_id=jMc0jn-hm-yHrNfVad37YdhOUh41XY\n" +
"mjlss9zocM26gspY5ArwWuxb4wYWpmh2Q7GzR7doU0wLkViEhUlO1qNtukyAgake2jG1bTd23lR57XzV83E9bAXWkStcAh\n" +
"4j9Dz7a87ThGlqgdCZ2zpQy33a0SVNMfmJLSNnDzJ71TU68Rc-3PKE7VA3kYzjk4RrKU";
//思路
//1. 先确定 url 的开始部分 https:// | http://
//2. 然后通过([\w -]+\.)+[\w -]+匹配 www.bilibili.com
//3. / video / BV1fh411y7R8 ? from = sear 匹配(\ /[\w - ? =&/%.#]*)?
String regStr = "^((http|https)://)?([\\w-]+\\.)+[\\w-]+(\\/[\\w-?=&/%.#]*)?$";//注意:[. ? *]表示匹配就是.本身
Pattern pattern = Pattern.compile(regStr);
Matcher matcher = pattern.matcher(content);
if (matcher.find()) {
System.out.println("满足格式");
} else {
System.out.println("不满足格式");
}
//这里如果使用 Pattern 的 matches 整体匹配 比较简洁
System.out.println(Pattern.matches(regStr, content));//
}
}
20.8 正则表达式常用的三个类
import java.util.regex.Pattern;
public class PatternMethod {
public static void main(String[] args) {
String content = "hello abc hello, 扎昂三";
//String regStr = "hello";
String regStr = "hello.*";
boolean matches = Pattern.matches(regStr, content);
System.out.println("整体匹配= " + matches);
}
}
import java.util.regex.Matcher;
import java.util.regex.Pattern;
public class MatcherMethod {
public static void main(String[] args) {
String content = "hello edu jack zhangsantom hello smith hello zhangsan zhangsanu";
String regStr = "hello";
Pattern pattern = Pattern.compile(regStr);
Matcher matcher = pattern.matcher(content);
while (matcher.find()) {
System.out.println("=================");
System.out.println(matcher.start());
System.out.println(matcher.end());
System.out.println("找到: " + content.substring(matcher.start(), matcher.end()));
}
//整体匹配方法,常用于,去校验某个字符串是否满足某个规则
System.out.println("整体匹配=" + matcher.matches());
//完成如果 content 有 hspedu 替换成 韩顺平教育
regStr = "zhangsan";
pattern = Pattern.compile(regStr);
matcher = pattern.matcher(content);
//注意:返回的字符串才是替换后的字符串 原来的 content 不变化
String newContent = matcher.replaceAll("张三");
System.out.println("newContent=" + newContent);
System.out.println("content=" + content);
}
}
20.9 分组、捕获、反向引用
20.9.1 需求

20.9.2 介绍
20.9.3 案例
20.9.4 结巴程序
把类似:"我....我要....学学学学....编程 java!"; 通过正则表达式修改成"我要学编程 java"
import java.util.regex.Matcher;
import java.util.regex.Pattern;
public class RegExp13 {
public static void main(String[] args) {
String content = "我....我要....学学学学....编程 java!";
//1. 去掉所有的.
Pattern pattern = Pattern.compile("\\.");
Matcher matcher = pattern.matcher(content);
content = matcher.replaceAll("");
System.out.println("content=" + content);
//2. 去掉重复的字 我我要学学学学编程 java !
//(1) 使用(.)\\1 +
//(2) 使用 反向引用$1 来替换匹配到的内容
//注意:因为正则表达式变化,所以需要重置 matcher
//pattern = Pattern.compile("(.)\\1+");//分组的捕获内容记录到$1
//matcher = pattern.matcher(content);
//while (matcher.find()) {
// System.out.println("找到=" + matcher.group(0));
//}
//使用 反向引用$1 来替换匹配到的内容
//content = matcher.replaceAll("$1");
//System.out.println("content=" + content);
//3. 使用一条语句 去掉重复的字 我我要学学学学编程 java !
content = Pattern.compile("(.)\\1+").matcher(content).replaceAll("$1");
System.out.println("content=" + content);
}
}
20.10 String类中使用正则表达式
20.10.1 替换功能
String 类 public String replaceAll(String regex,String replacement)
20.10.2 判断功能
String 类 public boolean matches(String regex){} //使用 Pattern 和 Matcher 类
20.10.3 分割功能
String 类 public String[] split(String regex)
public class StringReg {
public static void main(String[] args) {
String content = "2000 年 5 月,JDK1.3、JDK1.4 和 J2SE1.3 相继发布,几周后其" +
"获得了 Apple 公司 Mac OS X 的工业标准的支持。2001 年 9 月 24 日,J2EE1.3 发" +
"布。" +
"2002 年 2 月 26 日,J2SE1.4 发布。自此 Java 的计算能力有了大幅提升";
//使用正则表达式方式,将 JDK1.3 和 JDK1.4 替换成 JDK
content = content.replaceAll("JDK1\\.3|JDK1\\.4", "JDK");
System.out.println(content);
//要求 验证一个 手机号, 要求必须是以 138 139 开头的
content = "13888889999";
if (content.matches("1(38|39)\\d{8}")) {
System.out.println("验证成功");
} else {
System.out.println("验证失败");
}
//要求按照 # 或者 - 或者 ~ 或者 数字 来分割
System.out.println("===================");
content = "hello#abc-jack12smith~北京";
String[] split = content.split("#|-|~|\\d+");
for (String s : split) {
System.out.println(s);
}
}
}

 浙公网安备 33010602011771号