前端使用json-server快速搭建服务
一、json-server概述
一个在前端本地运行,可以存储json数据的server。
通俗来说,就是模拟服务端接口数据,一般用在前后端分离后,前端人员可以不依赖API开发,而在本地搭建一个JSON服务,自己产生测试数据。
顾名思义,json-server就是个存储json数据的server~。
json-server网址:[json-server - npm](https://www.npmjs.com/package/json-server)
二、安装
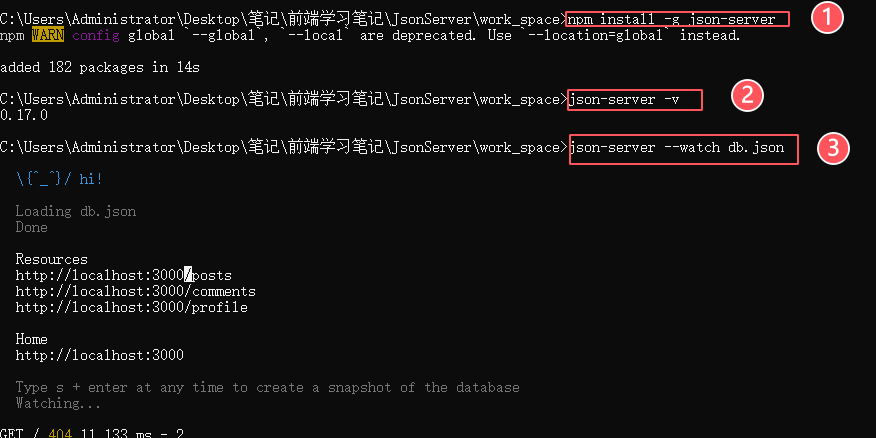
通过使用npm全局安装json-server
安装命令:npm install -g json-server
查看版本:json-serevr -v
启动服务:json-server --watch db.json

注意: 编辑过db.json(db.json数据有变动),都要关闭服务重新启动
三、搭建环境
-
创建JSON数据—修改db.json
既然是创建数据,就需要创建一个json数据,文件名为
db.json,内部的json数据,json文件中的key对应这请求的Route{ "posts": [ { "id": 1, "title": "json-server", "author": "typicode" } ], "comments": [ { "id": 1, "body": "some comment", "postId": 1 } ], "profile": { "name": "typicode" } } -
创建package.json,配置执行脚本命令等
配置信息文件,入配置启动服务脚本(默认端口是3000):
{
    "scripts": {
        "mock": "json-server db.json --port 3004"
    }
}
配置后,之后启动服务命令:
npm run mock -
创建public文件夹,存放静态资源
比如,请求的j静态文件,包括文本、图片、音频和视频资源,分目录存放到这个文件下
-
创建json_sever_config.json配置静态资源
主要是用来配置图片、音频、视频资源。通过命令行配置路由、数据文件、监控等会让命令变的很长,而且容易敲错;json-server允许我们把所有的配置放到一个配置文件中,这个配置文件一般命名为json_sever_config.json;
-
json_sever_config.json
{ "port": 3004, "watch": true, "static": "./public", "read-only": false, "no-cors": false, "no-gzip": false } -
package.json
{
    "scripts": {
        "mock": "json-server --c json_sever_config.json db.json"
    }
}
访问
public中静态资源:http://localhost:3000/1.png -
四、json-server 的相关启动参数
- 语法:
json-server [options] <source> - 选项列表:
| 参数 | 简写 | 默认值 | 说明 |
|---|---|---|---|
| --config | -c | 指定配置文件 | [默认值: "json-server.json"] |
| --port | -p | 设置端口 [默认值: 3000] | Number |
| --host | -H | 设置域 [默认值: "0.0.0.0"] | String |
| --watch | -w | Watch file(s) | 是否监听 |
| --routes | -r | 指定自定义路由 | |
| --middlewares | -m | 指定中间件 files | [数组] |
| --static | -s | Set static files directory | 静态目录,类比:express的静态目录 |
| --readonly | --ro | Allow only GET requests [布尔] | |
| --nocors | --nc | Disable Cross-Origin Resource Sharing [布尔] | |
| --no | gzip | , --ng Disable GZIP Content-Encoding [布尔] | |
| --snapshots | -S | Set snapshots directory [默认值: "."] | |
| --delay | -d | Add delay to responses (ms) | |
| --id | -i | Set database id property (e.g. _id) [默认值: "id"] | |
| --foreignKeySuffix | -- | fks Set foreign key suffix (e.g. _id as in post_id) | [默认值: "Id"] |
| --help | -h | 显示帮助信息 | [布尔] |
| --version | -v | 显示版本号 | [布尔] |
五、数据操作
测试数据:
{
  "posts": [
    {
      "id": 1,
      "title": "json-server",
      "author": "typicode"
    }
  ],
  "comments": [
    {
      "id": 1,
      "body": "some comment",
      "postId": 1
    }
  ],
  "profile": {
    "name": "typicode"
  },
   "fruits": [
        {
            "id": 1,
            "name": "糖心富士苹果",
            "price": 2.38
        },
        {
            "id": 2,
            "name": "橘子",
            "price": 3.88
        },
        {
            "id": 3,
            "name": "宁夏西瓜",
            "price": 1.98
        },
        {
            "id": 4,
            "name": "麒麟西瓜",
            "price": 3.98
        },
        {
            "id": 5,
            "name": "红蛇果",
            "price": 2.5
        },
        {
            "id": 6,
            "name": "黑皮西瓜",
            "price": 0.98
        },
        {
            "id": 7,
            "name": "红心火龙果",
            "price": 2.69
        },
        {
            "id": 8,
            "name": "国产火龙果",
            "price": 1.69
        },
        {
            "id": 9,
            "name": "海南荔枝",
            "price": 9.9
        },
        {
            "id": 10,
            "name": "陕西冬枣",
            "price": 5.39
        },
        {
            "id": 11,
            "name": "软籽石榴",
            "price": 2.39
        },
        {
            "id": 12,
            "name": "蜜橘",
            "price": 1.99
        },
        {
            "id": 13,
            "name": "海南香蕉",
            "price": 1.45
        }
    ],
    "users": [
        {
            "name": {
                "username":"admin",
                "nickname":"zhangsan"
            },
            "pwd": "123456"
        }
    ]
}
-
查询数据
-
查询所有数据:
http://localhost:3000/db -
查询某个对象:
http://localhost:3000/fruits -
根据id查询某个对象,方式1:
http://localhost:3000/fruits/1返回结果为对象
{ "id": 1, "name": "糖心富士苹果", "price": 2.38 } -
根据id查询某个对象,方式2:
http://localhost:3000/fruits?id=1返回结果为数组
[ { "id": 1, "name": "糖心富士苹果", "price": 2.38 } ] -
多条件查询,用&符号连接:
http://localhost:3000/fruits?id=1&price=2.38 -
分页查询:
http://localhost:3000/fruits?_page=2&_limit=5 -
排序查询:
http://localhost:3000/fruits?_sort=price&_order=desc -
多字段排序:
http://localhost:3000/fruits?_sort=price,id&_order=desc,asc -
截取局部数据:
slice的方式,和 Array.slice() 方法类似。采用
_start来指定开始位置,_end来指定结束位置。_end:
http://localhost:3000/fruits?_start=2&_end=4[ { "id": 3, "name": "宁夏西瓜", "price": 1.98 }, { "id": 4, "name": "麒麟西瓜", "price": 3.98 } ]用
_limit来指定从开始位置起往后取几个数据。_limit:
http://localhost:3000/fruits?_start=2&_limit=4[ { "id": 3, "name": "宁夏西瓜", "price": 1.98 }, { "id": 4, "name": "麒麟西瓜", "price": 3.98 }, { "id": 5, "name": "红蛇果", "price": 2.5 }, { "id": 6, "name": "黑皮西瓜", "price": 0.98 } ] -
范围查询:
- 采用
_gte和_lte来设置一个取值范围(range):http://localhost:3000/fruits?id_gte=4&id_lte=6
[ { "id": 4, "name": "麒麟西瓜", "price": 3.98 }, { "id": 5, "name": "红蛇果", "price": 2.5 }, { "id": 6, "name": "黑皮西瓜", "price": 0.98 } ]- 采用
_ne来设置不包含某个值(不包含id=1和id=10):http://localhost:3000/fruits?id_ne=1&id_ne=10
[ { "id": 2, "name": "橘子", "price": 3.88 }, { "id": 3, "name": "宁夏西瓜", "price": 1.98 }, { "id": 4, "name": "麒麟西瓜", "price": 3.98 }, { "id": 5, "name": "红蛇果", "price": 2.5 }, { "id": 6, "name": "黑皮西瓜", "price": 0.98 }, { "id": 7, "name": "红心火龙果", "price": 2.69 }, { "id": 8, "name": "国产火龙果", "price": 1.69 }, { "id": 9, "name": "海南荔枝", "price": 9.9 }, { "id": 11, "name": "软籽石榴", "price": 2.39 }, { "id": 12, "name": "蜜橘", "price": 1.99 }, { "id": 13, "name": "海南香蕉", "price": 1.45 } ] - 采用
-
模糊查询:
- 采用
_like来设置匹配某个字符串(或正则表达式):http://localhost:3000/fruits?name_like=果
[ { "id": 1, "name": "糖心富士苹果", "price": 2.38 }, { "id": 5, "name": "红蛇果", "price": 2.5 }, { "id": 7, "name": "红心火龙果", "price": 2.69 }, { "id": 8, "name": "国产火龙果", "price": 1.69 } ] - 采用
-
全文搜索:
- 采用
q来设置搜索内容,搜索所有字段中包含的关键字:http://localhost:3000/fruits?q=橘
[ { "id": 2, "name": "橘子", "price": 3.88 }, { "id": 12, "name": "蜜橘", "price": 1.99 } ] - 采用
-
-
数据新增
type:post
url:
http://localhost:3000/fruitsdata:
{ "name": "西红柿", "price": 1.38 } -
数据修改
type:put
url:
http://localhost:3000/fruits/14data:
{ "name": "大西红柿", "price": 1.38 } -
数据删除
type:delete
url:
http://localhost:3000/fruits/14
本文来自博客园,作者:码农阿亮,转载请注明原文链接:https://www.cnblogs.com/wml-it/p/16773220.html
技术的发展日新月异,随着时间推移,无法保证本博客所有内容的正确性。如有误导,请大家见谅,欢迎评论区指正!
开源库地址,欢迎点亮:
GitHub:https://github.com/ITMingliang
Gitee: https://gitee.com/mingliang_it
GitLab: https://gitlab.com/ITMingliang
建群声明: 本着技术在于分享,方便大家交流学习的初心,特此建立【编程内功修炼交流群】,为大家答疑解惑。热烈欢迎各位爱交流学习的程序员进群,也希望进群的大佬能不吝分享自己遇到的技术问题和学习心得!进群方式:扫码关注公众号,后台回复【进群】。


