27.指标监控功能
1.springboot Actuator
简介:
    未来每个微服务在云上部署以后,我们都会对其进行监控、追踪、审计、控制等。springboot就抽取了Actuator场景,使得每个微服务能快速的引用即可获得生产级别的应用监控


简单实用步骤:
    1.引入依赖:
        <!--引入监控功能-->
        <dependency>
            <groupId>org.springframework.boot</groupId>
            <artifactId>spring-boot-starter-actuator</artifactId>
            <version>2.4.0</version>
        </dependency>

    2.将监控节点以web形式暴露出来,即可以通过http请求获取到
        management:
          endpoints:
            enabled-by-default: true #默认开启所有的监控断点
            web:
              exposure:
                include: '*' #以web形式的去暴露所有的监控断点
    3.请求:参考地址为https://docs.spring.io/spring-boot/docs/current/reference/html/actuator.html#actuator
        此时就可以请求获取到所有的监控节点信息
        1.监控bean的信息
            http://localhost:8080/actuator/beans
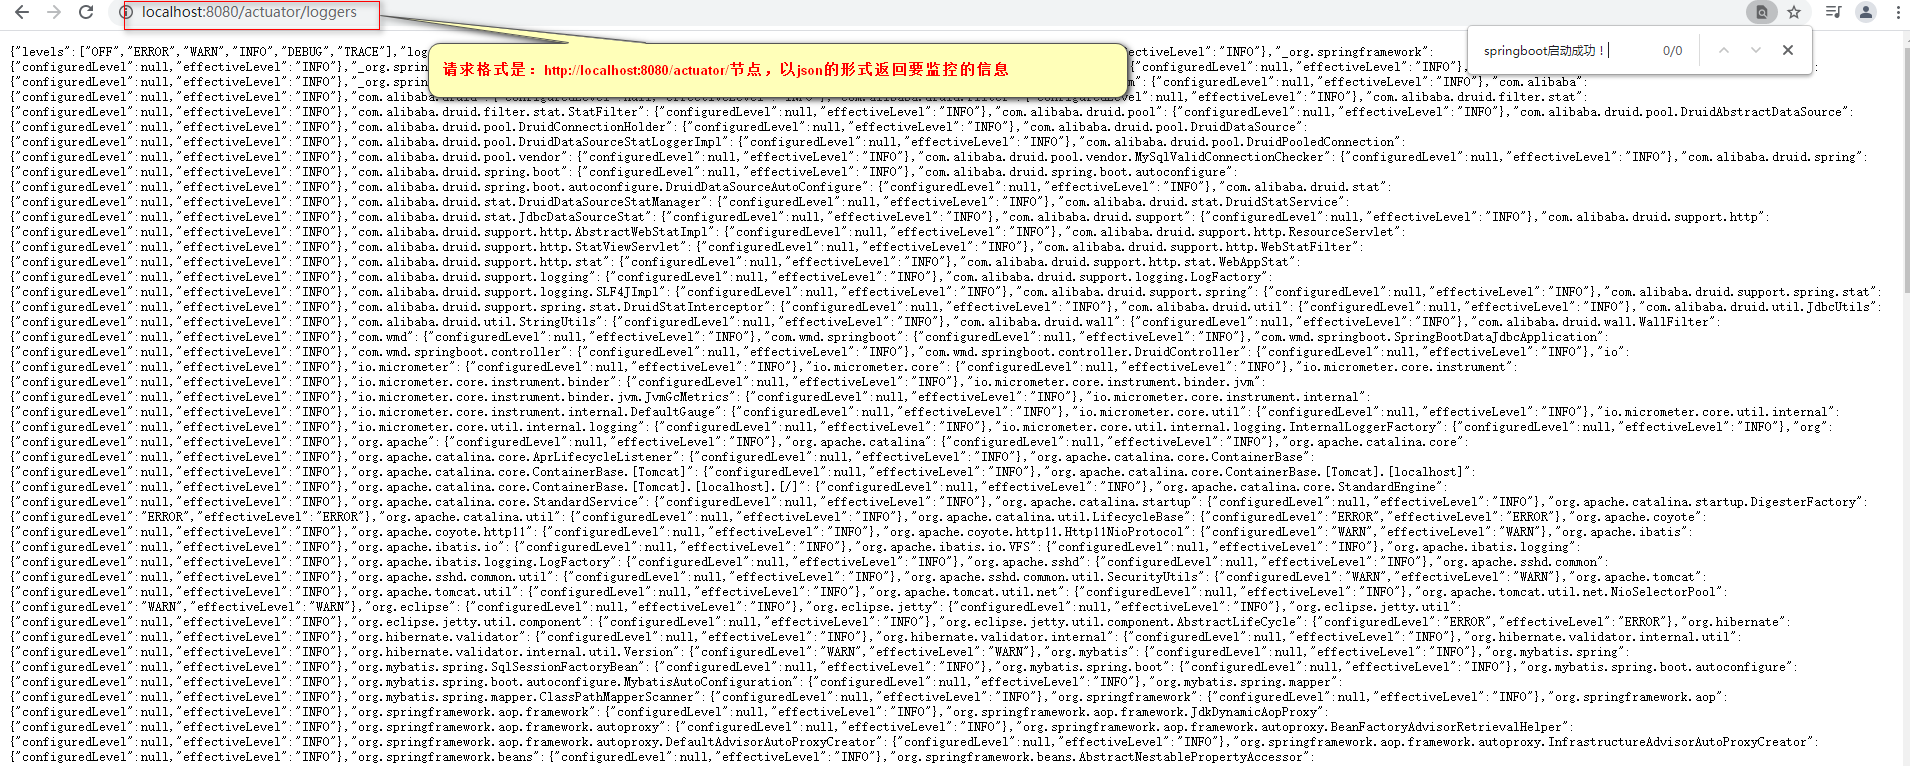
        2.只需要改actuator路径上的后缀就可以获取到各种监控信息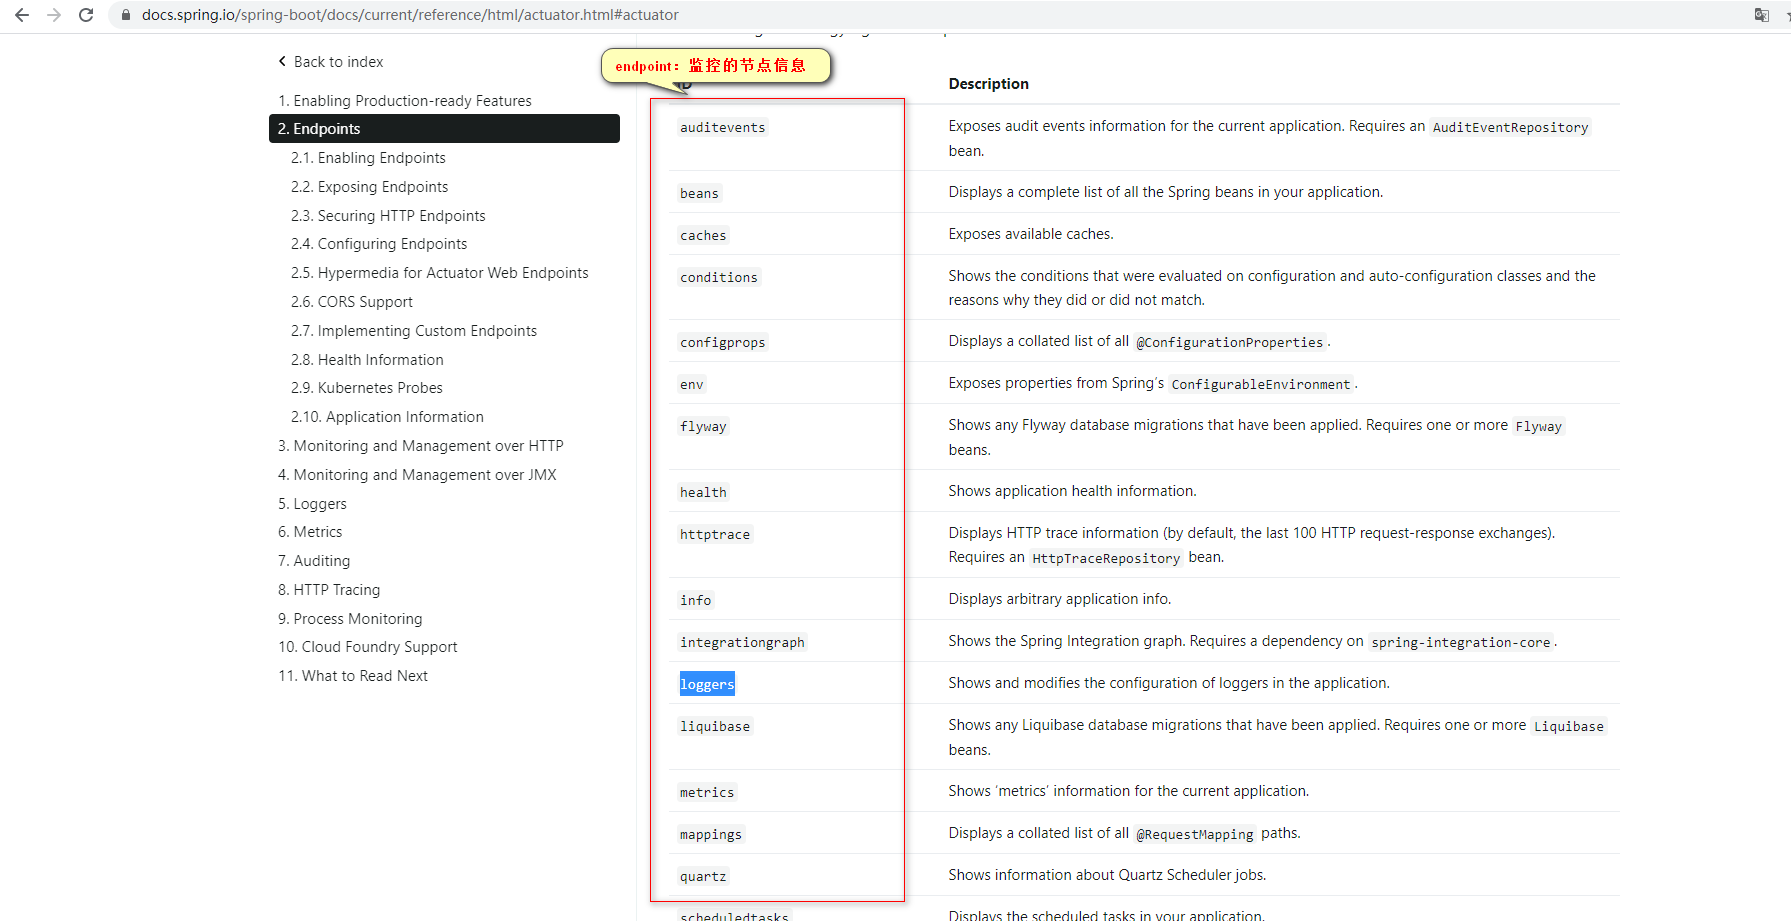
2.Actuator Endpoint(Actuator常用的监控断点)
|
ID
|
Description
|
|
auditevents
|
Exposes audit events information for the current application. Requires an AuditEventRepository bean.
|
|
beans
|
Displays a complete list of all the Spring beans in your application.
|
|
caches
|
Exposes available caches.
|
|
conditions
|
Shows the conditions that were evaluated on configuration and auto-configuration classes and the reasons why they did or did not match.
|
|
configprops
|
Displays a collated list of all @ConfigurationProperties.
|
|
env
|
Exposes properties from Spring’s ConfigurableEnvironment.
|
|
flyway
|
Shows any Flyway database migrations that have been applied. Requires one or more Flyway beans.
|
|
health(健康监控)
|
Shows application health information.
|
|
httptrace
|
Displays HTTP trace information (by default, the last 100 HTTP request-response exchanges). Requires an HttpTraceRepository bean.
|
|
info
|
Displays arbitrary application info.
|
|
integrationgraph
|
Shows the Spring Integration graph. Requires a dependency on spring-integration-core.
|
|
loggers(日志监控)
|
Shows and modifies the configuration of loggers in the application.
|
|
liquibase
|
Shows any Liquibase database migrations that have been applied. Requires one or more Liquibase beans.
|
|
metrics(运行时指标:例如磁盘,cpu占用率等)
|
Shows ‘metrics’ information for the current application.
|
|
mappings
|
Displays a collated list of all @RequestMapping paths.
|
|
quartz
|
Shows information about Quartz Scheduler jobs.
|
|
scheduledtasks
|
Displays the scheduled tasks in your application.
|
|
sessions
|
Allows retrieval and deletion of user sessions from a Spring Session-backed session store. Requires a Servlet-based web application using Spring Session.
|
|
shutdown
|
Lets the application be gracefully shutdown. Disabled by default.
|
|
startup
|
Shows the startup steps data collected by the ApplicationStartup. Requires the SpringApplication to be configured with a BufferingApplicationStartup.
|
|
threaddump
|
Performs a thread dump.
|
2.1监控监控(health)
用法示例:
    以健康监控为例:
        1.当配置文件中配置的是:配置的是整个的endpoints(所有端点)监控,并没有具体哪个端点时
                management:
                  endpoints:
                    enabled-by-default: true #默认开启所有的监控断点
                    web:
                      exposure:
                        include: '*' #以web形式的去暴露所有的监控断点
                路径访问:http://localhost:8080/actuator/health
                页面输出:只有简单的整体状态,并没有具体的细节
                    {"status":"UP"}

        2.在配置文件中具体配置helth节点:
            配置文件中写法:
                management:
                  endpoints:
                    enabled-by-default: true #默认开启所有的监控断点
                    web:
                      exposure:
                        include: '*' #以web形式的去暴露所有的监控断点
                  endpoint: #具体端点里的详细配置
                    health:
                      show-details: always  #health端点的展示细节,默认是never
              路径访问:http://localhost:8080/actuator/health
              页面输出:
                  {
                    #整体状态监控
                    "status":"UP",
                    #监控的详细信息
                    "components":{
                        #1.数据库监控:使用的是isValid方法判断数据库是否可用
                        "db":{
                            "status":"UP",
                            "details":{
                                "database":"MySQL",
                                "validationQuery":"isValid()"
                             }
                        },
                        #2.磁盘监控:分为整体,空闲,已用
                        "diskSpace":{
                            "status":"UP",
                            "details":{
                                "total":68249812992,
                                "free":59284303872,
                                "threshold":10485760,
                                "exists":true
                            }
                        },
                        #3.ping:判断程序是否可以对外访问
                        "ping":{
                            "status":"UP"
                        }
                        }
                    }
    结论:
        整体的健康状态是依据里面的各项状态,有一项状态为down,则整体的状态就为down
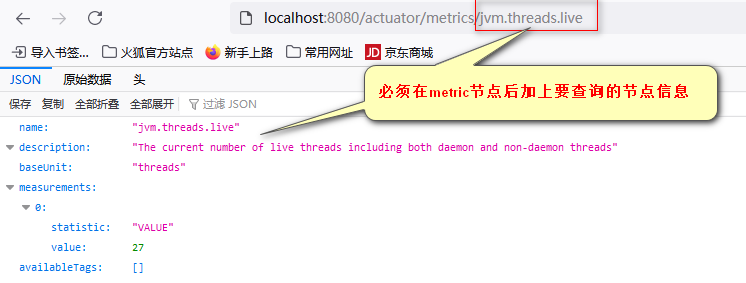
2.2运行时指标监控(Metrics Endpoint)
 提供详细的、层级的、空间指标信息,这些信息可以被push(主动推送)或者(被动获取)方式获得
     1.通过Metric对接多种监控系统
     2.简化核心Metric开发
     3.添加自定义的Metrics或者扩展已有的Metrics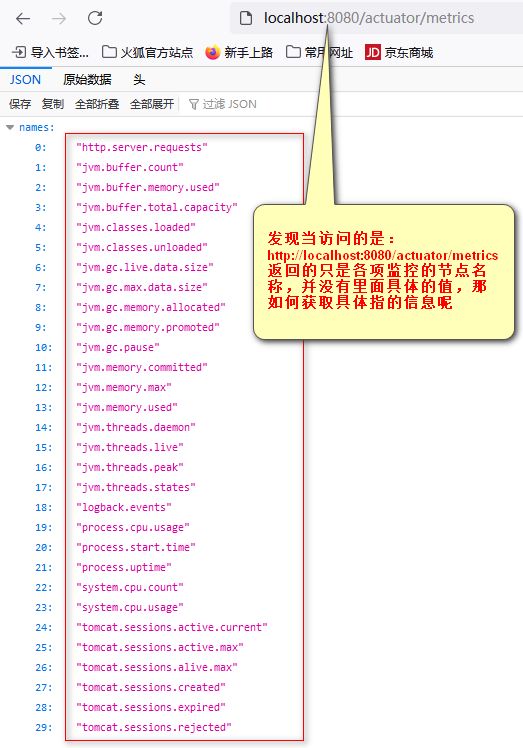
3.定制Endpoint
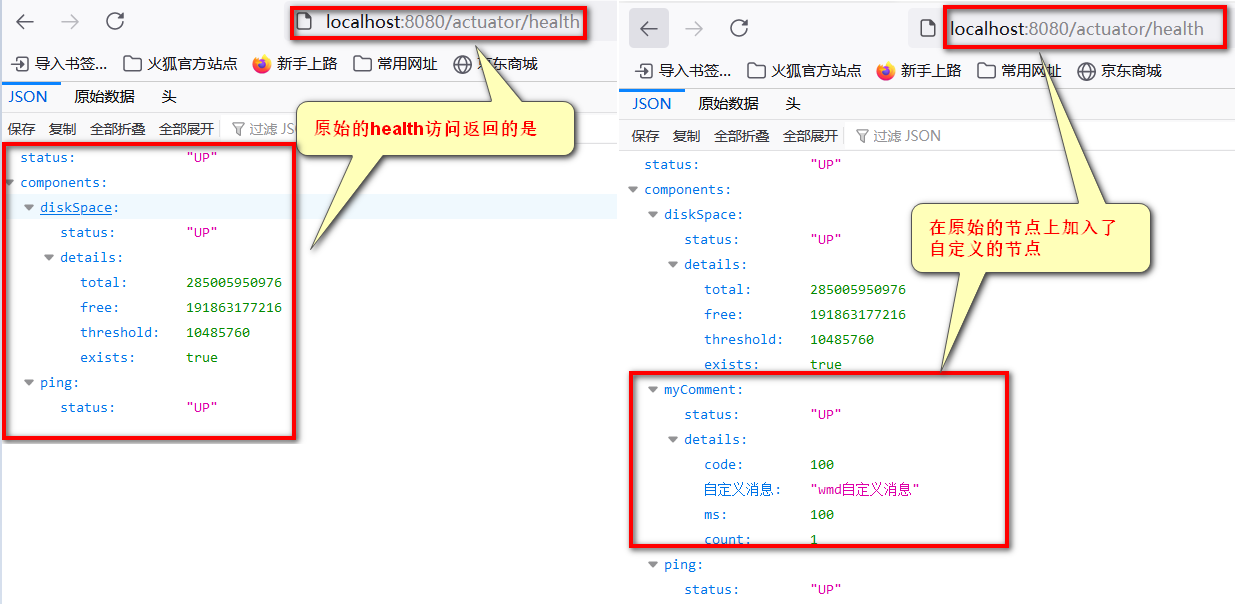
3.1定制health信息
步骤:
    1.编写类继承于AbstractHealthIndicator(定制health的检查)
        代码如下:
            //加载到容器中
            @Component
            //注意点1:类名必须是HealthIndicator结束
            public class MyCommentHealthIndicator extends AbstractHealthIndicator {
                /**
                 * 真实的检查方法
                 * @param builder
                 * @throws Exception
                 */
                @Override
                protected void doHealthCheck(Health.Builder builder) throws Exception {
                    //mongdb模拟:获取连接开始测试
                    Map<String,Object> map=new HashMap<>();
                    //模拟检查完成
                    if(1==1){
                        //1.第一种写法
                        //builder.up();
                        builder.status(Status.UP);
                        map.put("count",1);
                        map.put("ms",100);
                        map.put("自定义消息","wmd自定义消息");
                    }else {
                        builder.status(Status.OUT_OF_SERVICE);
                        map.put("er","连接超时");
                        map.put("ms","3000");
                    }
                    builder.withDetail("code",100).withDetails(map);
                }
            }
如何展示固定节点
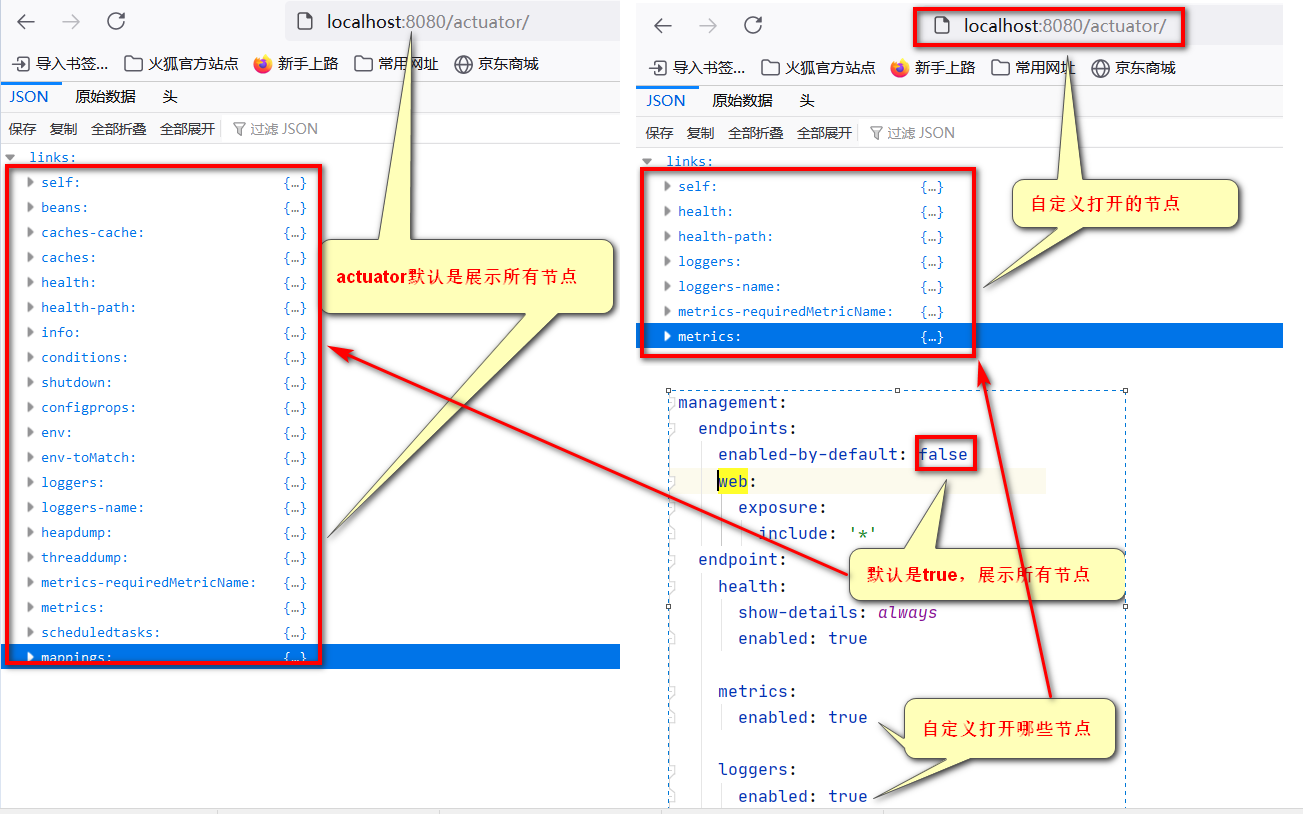
management:
  endpoints:
    #改为false,默认是true,打开所有节点
    enabled-by-default: false
    web:
      exposure:
        include: '*'
  endpoint:
    health:
      show-details: always
      enabled: true
    #分开打开某些节点
    metrics:
      enabled: true
    #打开logger的节点
    loggers:
      enabled: true
3.2定制info信息
定制info可以有两种办法:
    1.配置文件的形式进行配置
    2.代码的形式进行配置

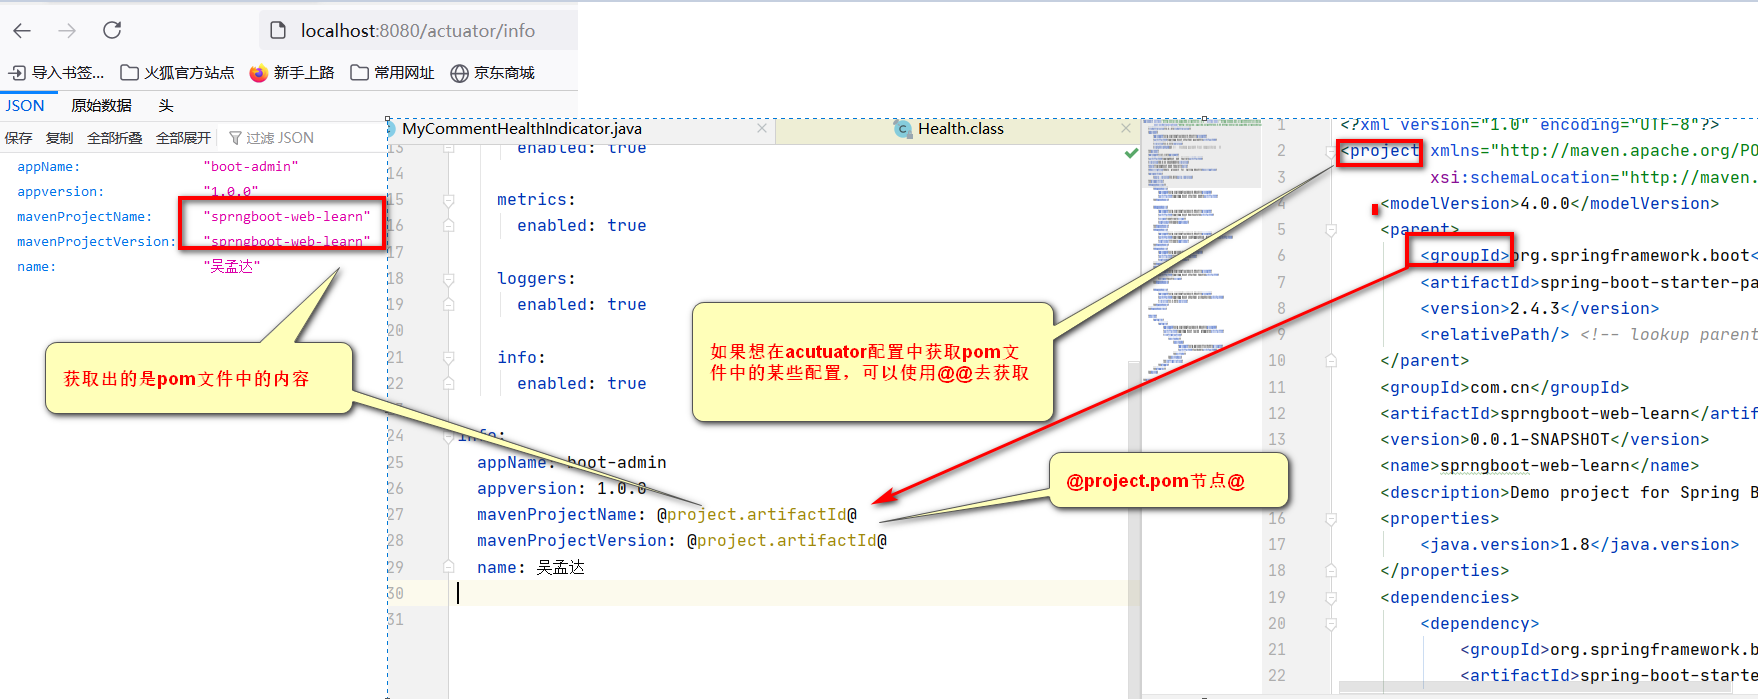
1.配置文件形式:注意目录层级很重要
management:
  endpoints:
    #注意点:1.关闭了默认的展示所有的节点,改为手动打开固定节点
    enabled-by-default: false
    web:
      exposure:
        include: '*'
  endpoint:
    health:
      show-details: always
      enabled: true
    metrics:
      enabled: true
    loggers:
      enabled: true
    #注意点2:打开指定的节点
    info:
      enabled: true
#注意点3:info节点的层级和management层级一样,下面是自定义的目录层级
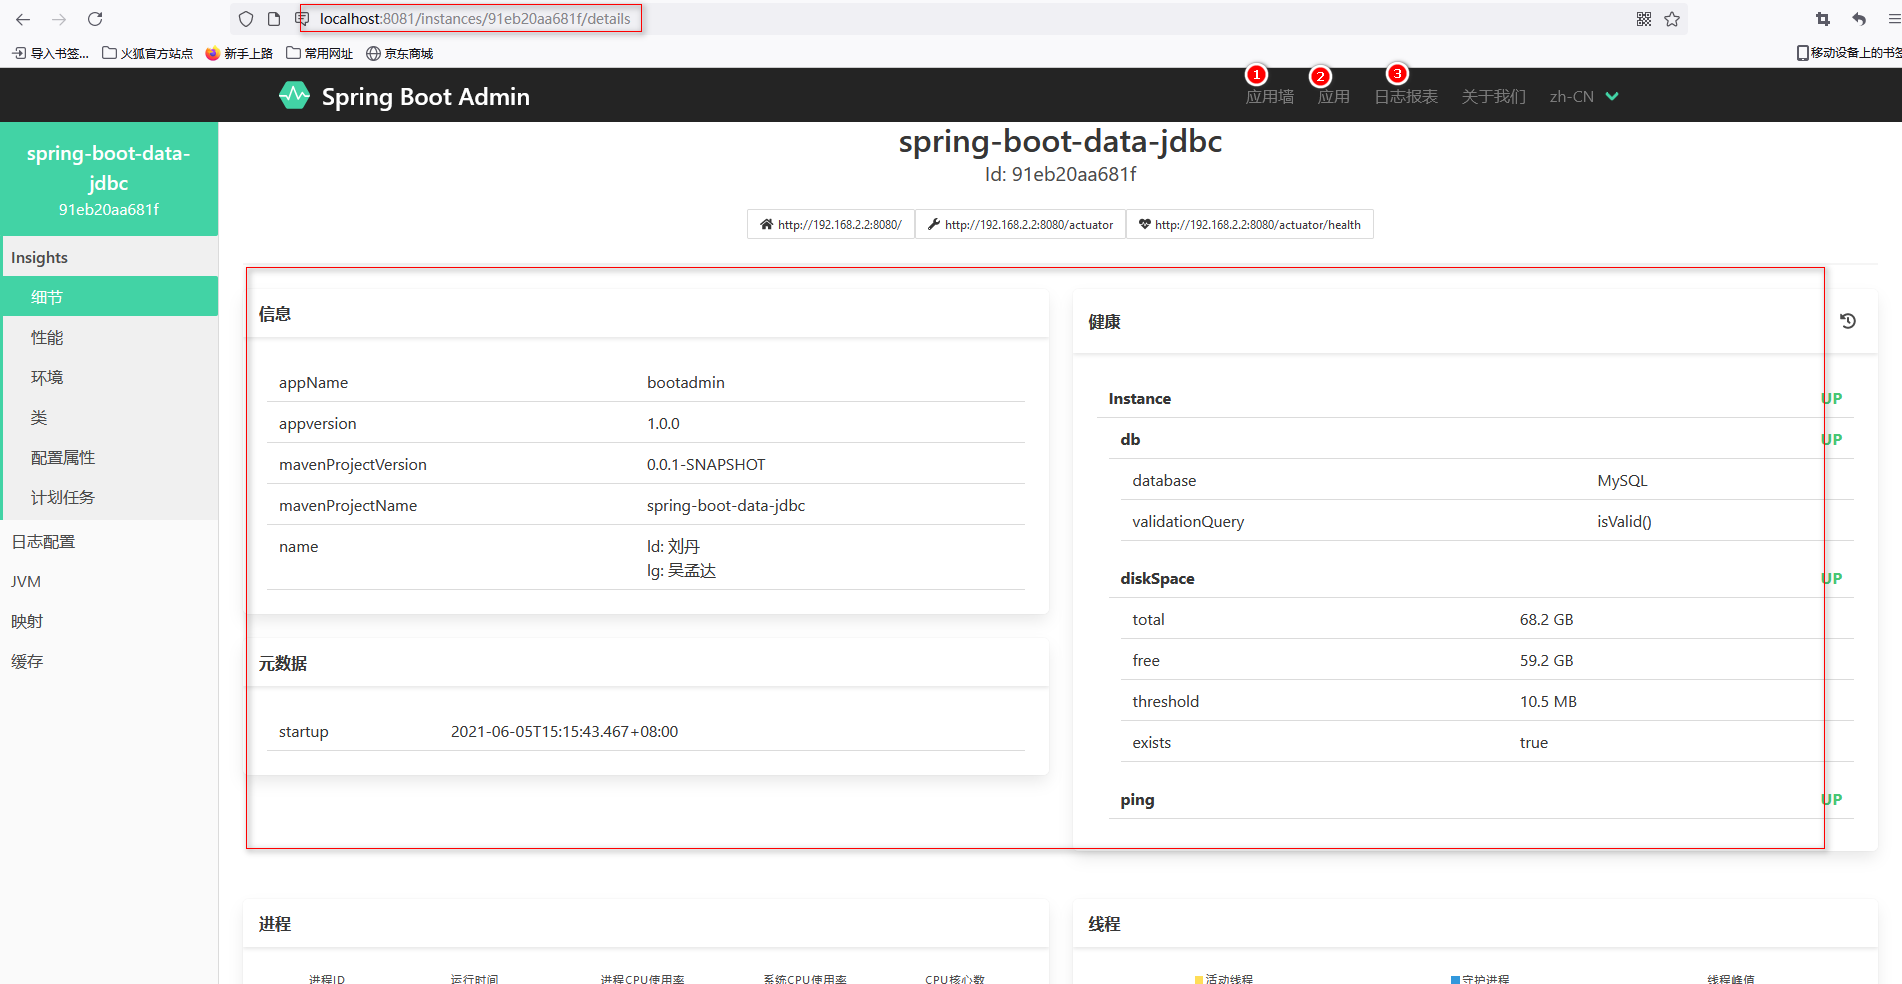
info:
  appName: boot-admin
  appversion: 1.0.0
  mavenProjectName: @project.artifactId@
  mavenProjectVersion: @project.artifactId@
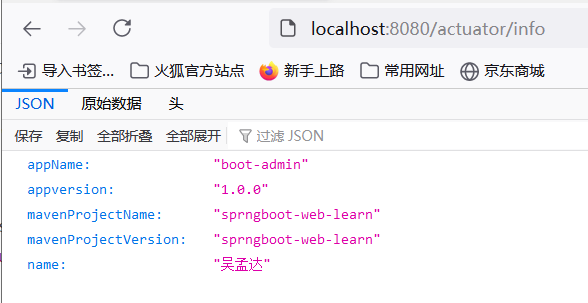
name: 吴孟达注意当没有配置时页面展示为空
2.第二种方式,代码方式
@Component
public class AppInfoContributor implements InfoContributor {
    @Override
    public void contribute(Info.Builder builder) {
        Map<String,Object> map=new HashMap<>();
        map.put("name","刘丹");
        map.put("age",18);
        builder.withDetail("msg","你好").withDetail("hello","world").withDetails(map);

    }
}
这时访问:http://localhost:8080/actuator/info
发现页面上的展示数据是配置文件和代码的结合,并且如果配置文件和代码重复设置,是以代码的为主,例如下述的name属性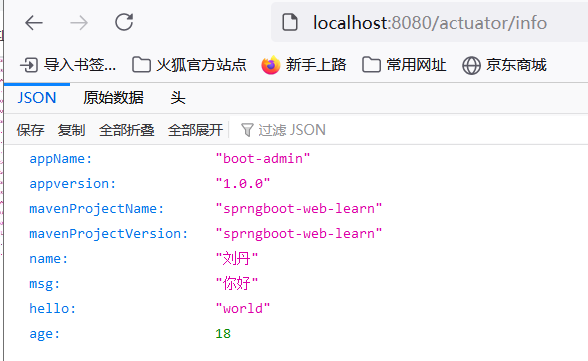
3.3定制Metrics信息
1.监控系统的各项指标

2.如何定制
业务场景,如何统计某个方法被调用多少次呢?例如统计getHello方法调用的次数
样例:
    @RestController
    @Slf4j
    public class DruidController {
         //重要点1:定义counter
        Counter counter;
        //重要点2:构造器里传入MeterRegistry(Metrics的注册表)
        public DruidController(MeterRegistry meterRegistry) {
            //重要点3:调用counter方法,传入的参数是在页面上展示的name值
            counter=meterRegistry.counter("DruidController.getHello.count");
        }

        @RequestMapping("/getHello")
        public String getHello(){
            //重要点:调用counter的increment,使调用次数+1
            counter.increment();
            return "hello";
        }
    }
效果:
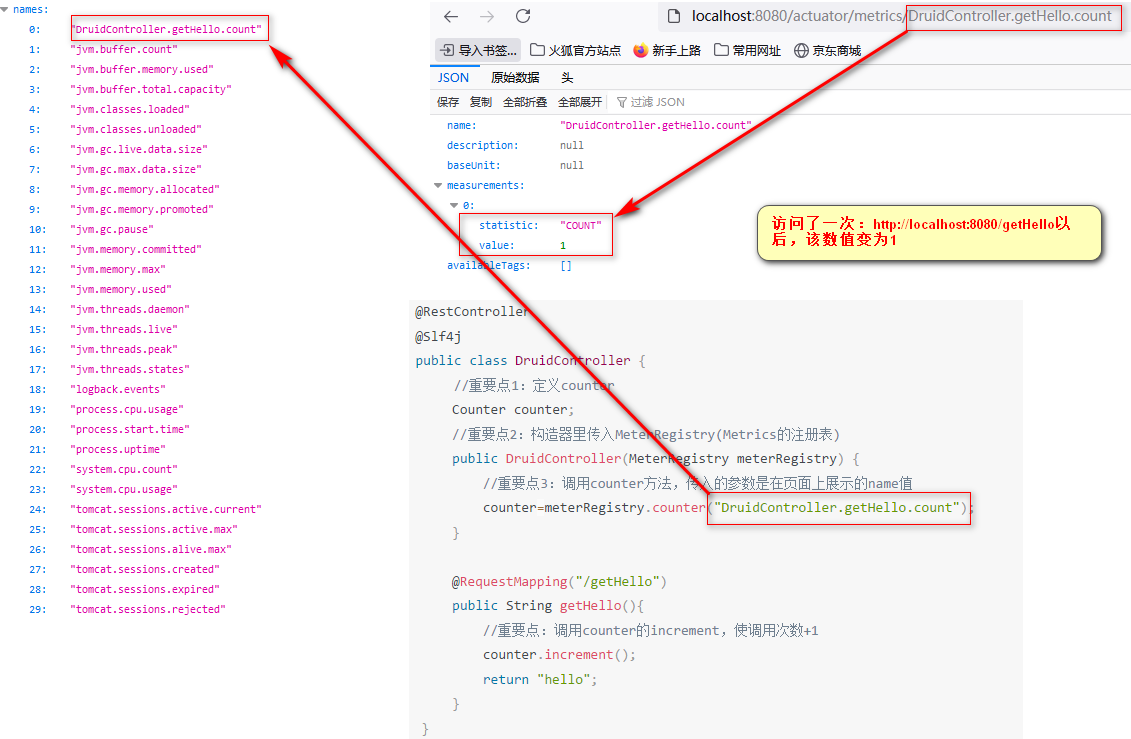
4.定制Endpoint
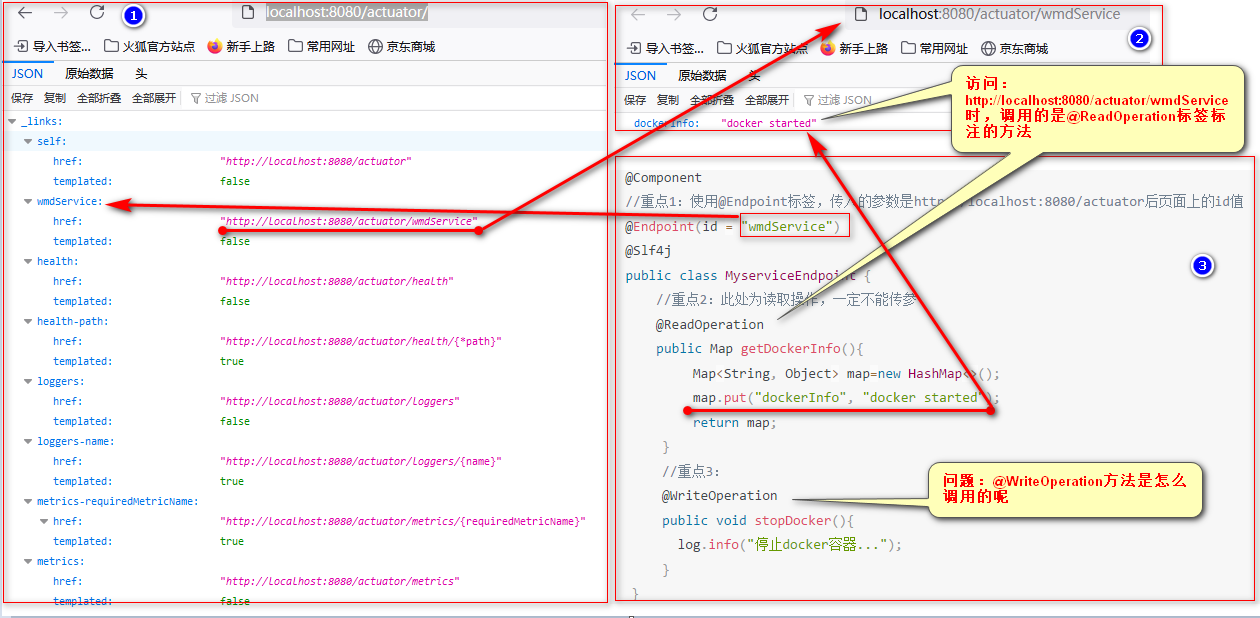
代码示例如下:
    @Component
    //重点1:使用@Endpoint标签,传入的参数是http://localhost:8080/actuator后页面上的id值
    @Endpoint(id = "wmdService")
    @Slf4j
    public class MyserviceEndpoint {
        //重点2:此处为读取操作,一定不能传参
        @ReadOperation
        public Map getDockerInfo(){
            Map<String, Object> map=new HashMap<>();
            map.put("dockerInfo", "docker started");
            return map;
        }
        //重点3:
        @WriteOperation
        public void stopDocker(){
          log.info("停止docker容器...");
        }
    }
上述结论:
    1.@Endpoint(id = "wmdService")标签标注的是http://localhost:8080/actuator路径访问时的大节点(和info、health、metric一个级别)
    2.继续深入访问时:http://localhost:8080/actuator,显示调用的是自定义的@ReadOperation标注的方法(@ReadOperation标注的方法不能传参)
    3.@WriteOperation标注的方法何时调用呢

Endpoints节点对外暴露时以两种方式暴露:
    1.web形式(即页面访问时以json的形式返回)
    2.JMX形式(只能通过jconsole方式去调用)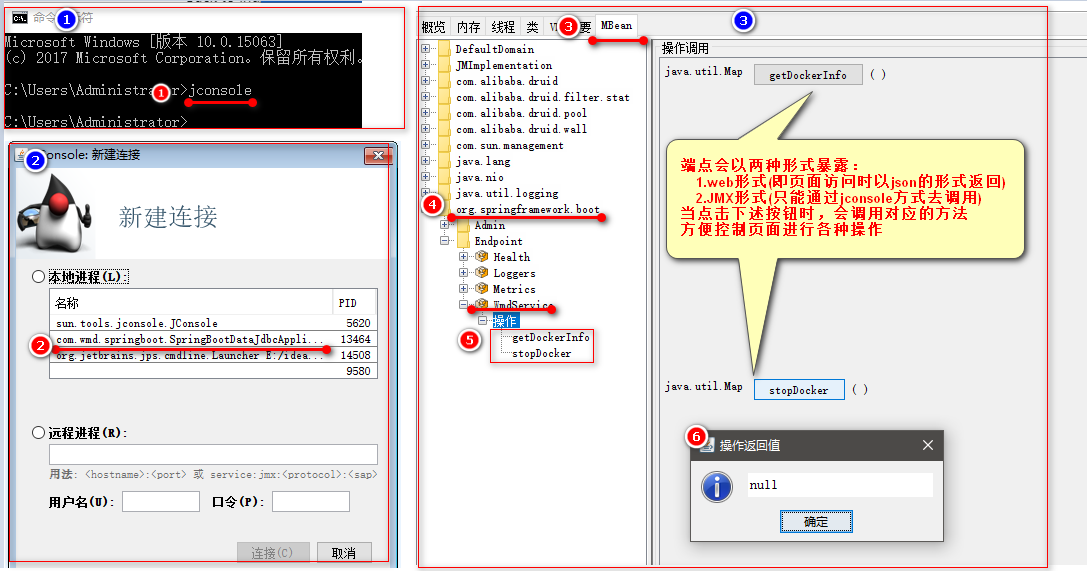
一个开源的springboot监控面板
参考地址:https://github.com/codecentric/spring-boot-admin
快速开始参考地址:https://codecentric.github.io/spring-boot-admin/2.3.1/#getting-started


1.创建一个springboot应用作为控制面板的服务端:
    1.1pom文件中导入:
        <dependency>
            <groupId>de.codecentric</groupId>
            <artifactId>spring-boot-admin-starter-server</artifactId>
            <version>2.3.1</version>
        </dependency>
    1.2在springboot的启动类上加上 @EnableAdminServer标签
        @SpringBootApplication
        @EnableAdminServer
        public class SpringbootAdminServerApplication {
            public static void main(String[] args) {
                SpringApplication.run(SpringbootAdminServerApplication.class, args);
            }
        }
    1.3在配置文件中配置server的启动端口,和客户端的区分开
        server:
          port: 8081

2.在各项应用中的配置:
    2.1在pom文件中引入客户端的包
        <!--在客户端节点上因为以下包-->
        <dependency>
            <groupId>de.codecentric</groupId>
            <artifactId>spring-boot-admin-starter-client</artifactId>
            <version>2.3.1</version>
        </dependency>
    2.2在配置文件中配置
        spring:
            boot:
              admin:
                client:
                  #重点1:服务端的地址
                  url: http://localhost:8081
                  重点2:该配置是以服务器的ip进行url注册,默认是false(以主机名称进行注册,可能会出现问题)
                  instance:
                    prefer-ip: true
            #重点三:设置该服务在控制面板的显示名称
            application:
name: spring-boot-data-jdbc页面访问服务端的地址:http://localhost:8081是会展示配置了服务端连接的所有客户端,并展示其详细信息


【推荐】国内首个AI IDE,深度理解中文开发场景,立即下载体验Trae
【推荐】编程新体验,更懂你的AI,立即体验豆包MarsCode编程助手
【推荐】抖音旗下AI助手豆包,你的智能百科全书,全免费不限次数
【推荐】轻量又高性能的 SSH 工具 IShell:AI 加持,快人一步
· winform 绘制太阳,地球,月球 运作规律
· AI与.NET技术实操系列(五):向量存储与相似性搜索在 .NET 中的实现
· 超详细:普通电脑也行Windows部署deepseek R1训练数据并当服务器共享给他人
· 【硬核科普】Trae如何「偷看」你的代码?零基础破解AI编程运行原理
· 上周热点回顾(3.3-3.9)