ElasticSearch集群搭建
搜索引擎相关框架比较
1、Lucene
Apache下面的一个提供搜索的基本架构;如果开发人员需用使用的话,需用自己进行开发,成本比较大,但是性能高
2、solr
Solr基于Lucene的全文搜索框架,实时索引搜索效率不高,数据量的增加,Solr的搜索效率会变得更低,适合小的搜索应用。
3、elasticSearch
基于Lucene的搜索框架,拓展节点方便,近实时搜索,海量数据量增加,搜索响应性能几乎不受影响;
使用场景:日志搜索,数据聚合,数据监控,报表统计分析
安装环境: 1核 2g jdk1.8+
1. 下载 wget https://artifacts.elastic.co/downloads/elasticsearch/elasticsearch-6.2.2.tar.gz
2. 解压 tar -zxvf elasticsearch-6.2.2.tar.gz
3. 设置权限 chmod -R 777 elasticsearch-6.2.2
4. 添加非root用户 adduser wulei && passwd wulei 参考https://blog.csdn.net/u010454261/article/details/70227164/
5. 切换登陆用户 su - wulei
6. 启动 cd elasticsearch-6.2.2/bin && ./elasticsearch
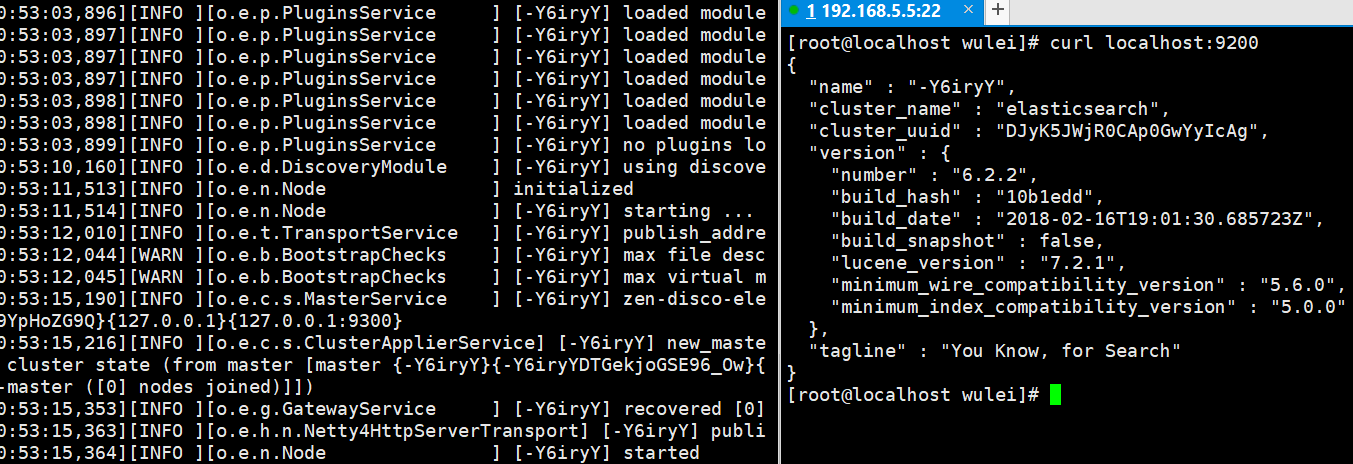
7. 检查是否启动成功 curl localhost:9200
启动es出现相关问题处理:
1、问题一
Java HotSpot(TM) 64-Bit Server VM warning: INFO: os::commit_memory(0x00000000c5330000, 986513408, 0) failed; error='Cannot allocate memory' (errno=12)
#
# There is insufficient memory for the Java Runtime Environment to continue.
# Native memory allocation (mmap) failed to map 986513408 bytes for committing reserved memory.
# An error report file with more information is saved as:
# /usr/local/software/temp/elasticsearch-6.2.2/hs_err_pid1912.log
解决:内存不够,增加服务器内存(2g以上)
2、问题二
[root@iZwz95j86y235aroi85ht0Z bin]# ./elasticsearch
[2018-02-22T20:14:04,870][WARN ][o.e.b.ElasticsearchUncaughtExceptionHandler] [] uncaught exception in thread [main]
org.elasticsearch.bootstrap.StartupException: java.lang.RuntimeException: can not run elasticsearch as root
at org.elasticsearch.bootstrap.Elasticsearch.init(Elasticsearch.java:125) ~[elasticsearch-6.2.2.jar:6.2.2]
at org.elasticsearch.bootstrap.Elasticsearch.execute(Elasticsearch.java:112) ~[elasticsearch-6.2.2.jar:6.2.2]
at org.elasticsearch.cli.EnvironmentAwareCommand.execute(EnvironmentAwareCommand.java:86) ~[elasticsearch-6.2.2.jar:6.2.2]
at org.elasticsearch.cli.Command.mainWithoutErrorHandling(Command.java:124) ~[elasticsearch-cli-6.2.2.jar:6.2.2]
解决:使用非root用户启动
3、问题三
./elasticsearch
Exception in thread "main" java.nio.file.AccessDeniedException: /usr/local/software/temp/elasticsearch-6.2.2/config/jvm.options
解决:权限不够 chmod 777 -R 当前es目录
常见配置问题资料:https://www.jianshu.com/p/c5d6ec0f35e0elasticsearch
ElasticSearch配置与性能优化:
1. es的jvm参数配置文件(只需要改xmx xms就好了)


## JVM configuration   JVM 配置
################################################################
## IMPORTANT: JVM heap size   重要信息:JVM堆大小
################################################################
# Xms和Xmx值最好一致,避免经常触发GC回收。大小一般为服务器运行内存的(1/2~2/3)
# Xms 初始堆大小
# Xmx 最大

-Xms1g
-Xmx1g

################################################################
## Expert settings
## 下面这些配置策略几乎不用动
################################################################

## GC configuration
-XX:+UseConcMarkSweepGC
-XX:CMSInitiatingOccupancyFraction=75
-XX:+UseCMSInitiatingOccupancyOnly

## optimizations

# pre-touch memory pages used by the JVM during initialization
-XX:+AlwaysPreTouch

## basic

# explicitly set the stack size
-Xss1m

# set to headless, just in case
-Djava.awt.headless=true

# ensure UTF-8 encoding by default (e.g. filenames)
-Dfile.encoding=UTF-8

# use our provided JNA always versus the system one
-Djna.nosys=true

# turn off a JDK optimization that throws away stack traces for common
# exceptions because stack traces are important for debugging
-XX:-OmitStackTraceInFastThrow

# flags to configure Netty
-Dio.netty.noUnsafe=true
-Dio.netty.noKeySetOptimization=true
-Dio.netty.recycler.maxCapacityPerThread=0

# log4j 2
-Dlog4j.shutdownHookEnabled=false
-Dlog4j2.disable.jmx=true

-Djava.io.tmpdir=${ES_TMPDIR}

## heap dumps
# ensure the directory exists and has sufficient space
#-XX:HeapDumpPath=/heap/dump/path

## JDK 8 GC logging

8:-XX:+PrintGCDetails
8:-XX:+PrintGCDateStamps
8:-XX:+PrintTenuringDistribution
8:-XX:+PrintGCApplicationStoppedTime
8:-Xloggc:logs/gc.log
8:-XX:+UseGCLogFileRotation
8:-XX:NumberOfGCLogFiles=32
8:-XX:GCLogFileSize=64m

# JDK 9+ GC logging
9-:-Xlog:gc*,gc+age=trace,safepoint:file=logs/gc.log:utctime,pid,tags:filecount=32,filesize=64m
# due to internationalization enhancements in JDK 9 Elasticsearch need to set the provider to COMPAT otherwise
# time/date parsing will break in an incompatible way for some date patterns and locals
9-:-Djava.locale.providers=COMPAT
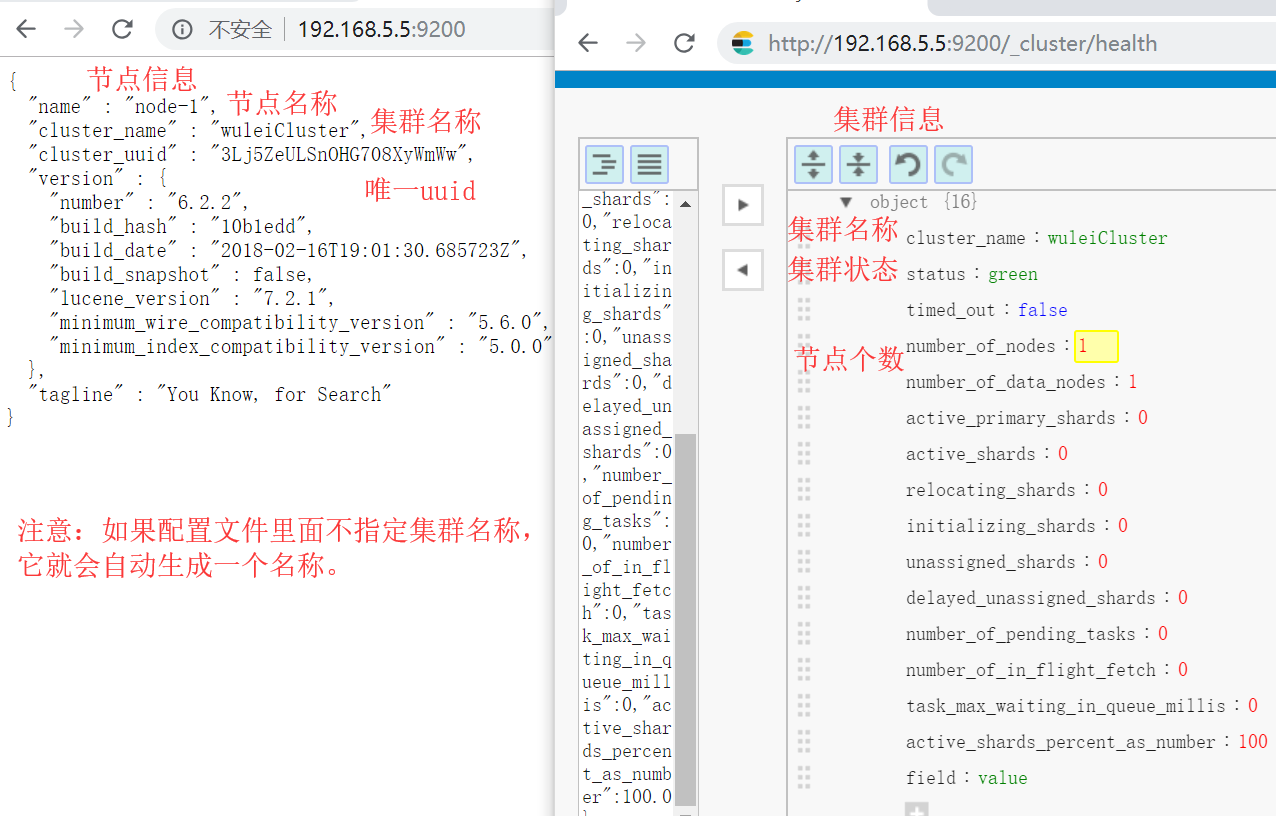
2. 主配置文件(自定义node.name节点名称 和 http.port端口 network.host服务器地址 就好了)
# ======================== Elasticsearch Configuration =========================
#
# NOTE: Elasticsearch comes with reasonable defaults for most settings.
# Before you set out to tweak and tune the configuration, make sure you
# understand what are you trying to accomplish and the consequences.
#
# The primary way of configuring a node is via this file. This template lists
# the most important settings you may want to configure for a production cluster.
#
# https://www.elastic.co/guide/en/elasticsearch/reference/index.html
#
# ---------------------------------- Cluster集群 -----------------------------------
#
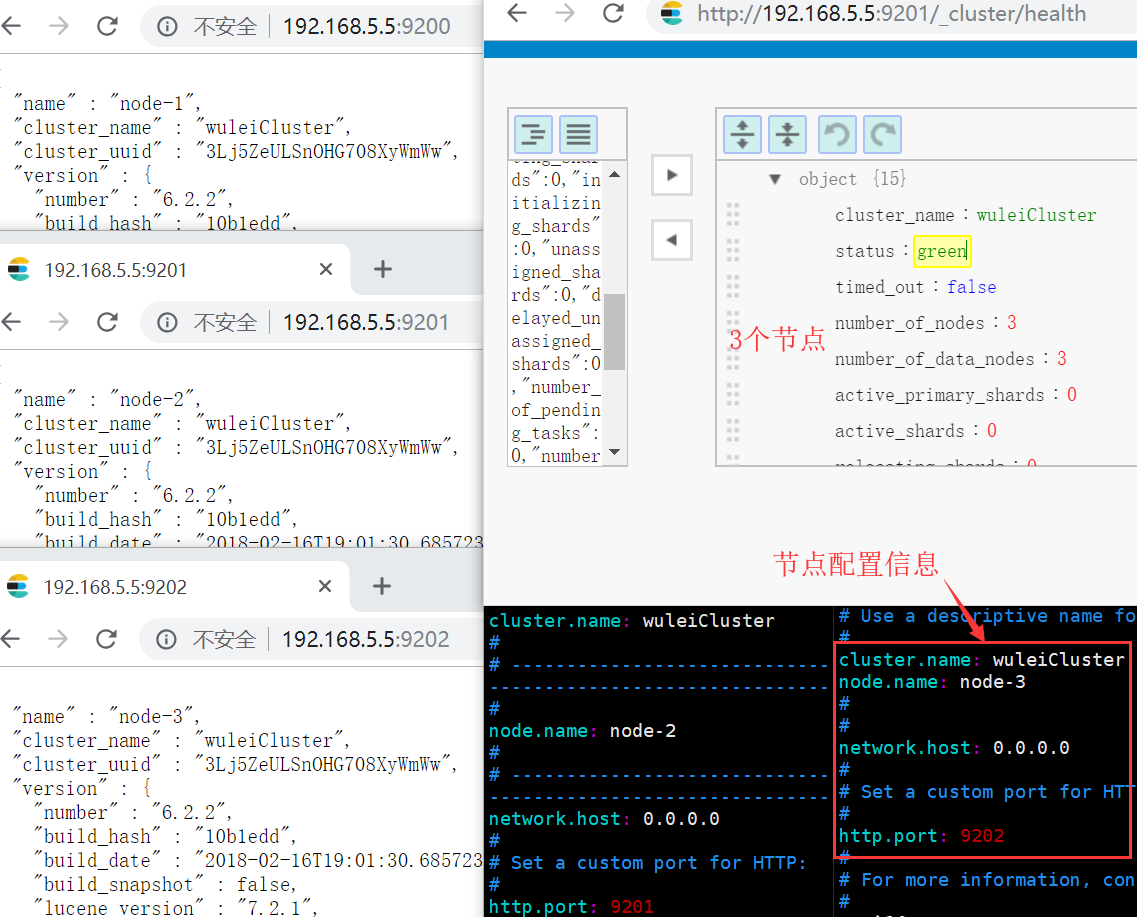
# 集群名称: 同一网段如果有多个节点,集群名称相同情况下,会自动加入成一个集群
cluster.name: wuleiCluster
#
# ------------------------------------ Node ------------------------------------
#
# 节点名称: 类似于pid
node.name: node-1
#
# Add custom attributes to the node:向节点添加自定义属性
#
#node.attr.rack: r1
#
# ----------------------------------- Paths ------------------------------------
#
# 存储数据的目录路径(用逗号分隔多个位置)
#
#path.data: /path/to/data
#
# 日志文件
#
#path.logs: /path/to/logs
#
# ----------------------------------- Memory -----------------------------------
#
# Lock the memory on startup:
#
#bootstrap.memory_lock: true
#
# Make sure that the heap size is set to about half the memory available
# on the system and that the owner of the process is allowed to use this
# limit.
#
# ---------------------------------- Network -----------------------------------
#
# 指定服务器ip,否则只能内网访问无法外网访问
network.host: 0.0.0.0
#
# 对外提供的端口
http.port: 9200
# 开启跨域访问
http.cors.enabled: true
http.cors.allow-origin: "*"
#
# --------------------------------- Discovery ----------------------------------
#
# Pass an initial list of hosts to perform discovery when new node is started:
# The default list of hosts is ["127.0.0.1", "[::1]"]
#
#discovery.zen.ping.unicast.hosts: ["host1", "host2"]
#
# Prevent the "split brain" by configuring the majority of nodes (total number of master-eligible nodes / 2 + 1):
#
#discovery.zen.minimum_master_nodes:
#
# For more information, consult the zen discovery module documentation.
#
# ---------------------------------- Gateway -----------------------------------
#
# Block initial recovery after a full cluster restart until N nodes are started:
#
#gateway.recover_after_nodes: 3
#
# For more information, consult the gateway module documentation.
#
# ---------------------------------- Various -----------------------------------
#
# Require explicit names when deleting indices:
#
#action.destructive_requires_name: true
如果仅仅只是修改节点名称和端口还是可以启动的,但是如果要外网(浏览器)可以访问,必须指定network.host。这个时候启动就会报错。
ERROR: [2] bootstrap checks failed
[1]: max file descriptors [4096] for elasticsearch process is too low, increase to at least [65536]
[2]: max virtual memory areas vm.max_map_count [65530] is too low, increase to at least [262144]

解决办法:
1. vim /etc/security/limits.conf在文件末尾追加下面配置
* soft nofile 65536
* hard nofile 65536
2. vim /etc/sysctl.conf在文件末尾追加 vm.max_map_count=655360保存后执行sysctl -p
3. 重启服务器   reboot
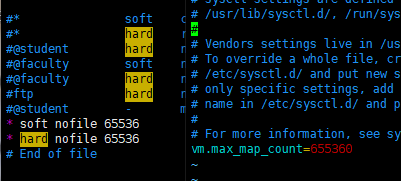
现在就可以外网访问了~
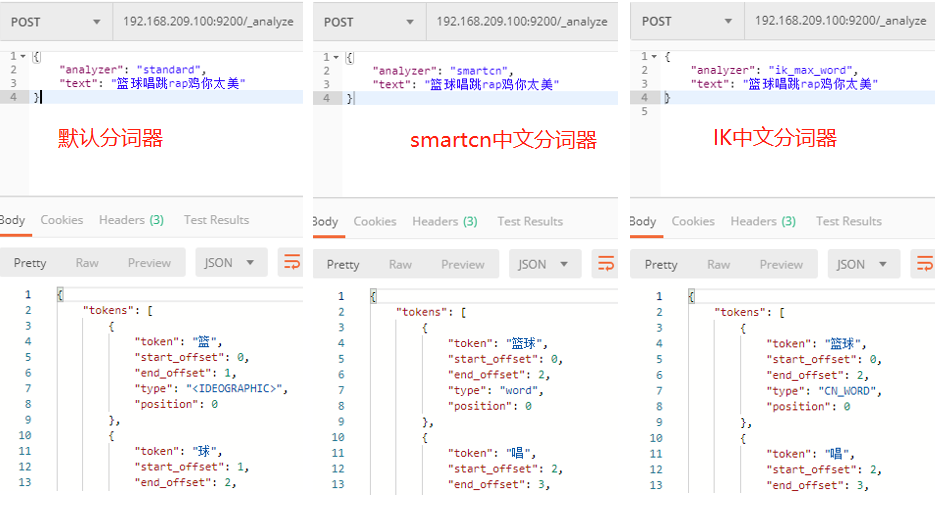
中文分词器安装:
smartcn中文分词器:
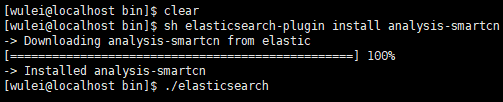
1. elasticsearch/bin目录下执行 sh elasticsearch-plugin install analysis-smartcn
2. 重启 elasticsearch
IK中文分词器:
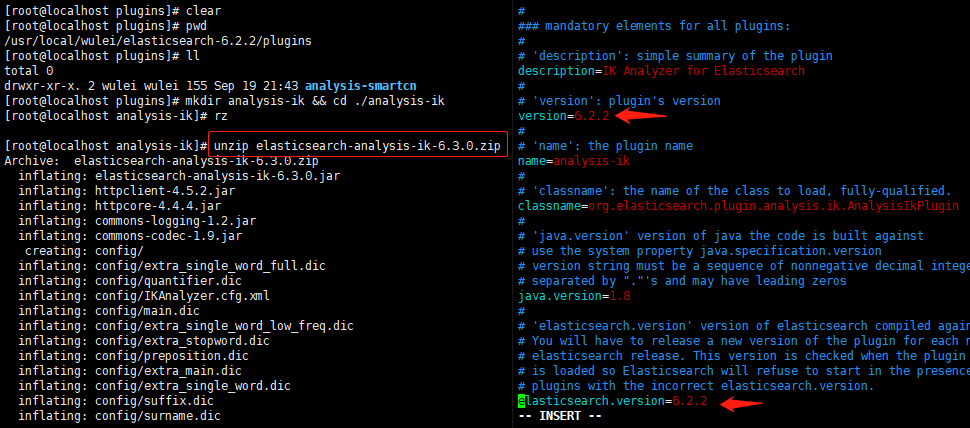
1. 下载 https://github.com/medcl/elasticsearch-analysis-ik/releases
2. 在 plugins目录下 创建 analysis-ik 文件夹
3. 直接解压文件,这时候会产生一个 plugin-descriptor.properties 配置文件
4. 需要把配置文件里面的版本信息改成elasticsearch的版本号
5. 重启elasticsearch
集群安装:集群安装其实很简单:只需要指定同一个 集群名称 ,修改每个节点的节点名称(唯一)就好了,我用伪集群为例。(伪集群还要修改端口)。真正上线不可能把ip设置为0.0.0.0让所有人都能访问,会指定具体访问ip。

 浙公网安备 33010602011771号