数据结构和算法
稀疏数组
实际需求与分析
先来看一个实际需求,比较好思考
编写五子棋程序中的 存盘退出 和 续上盘 功能
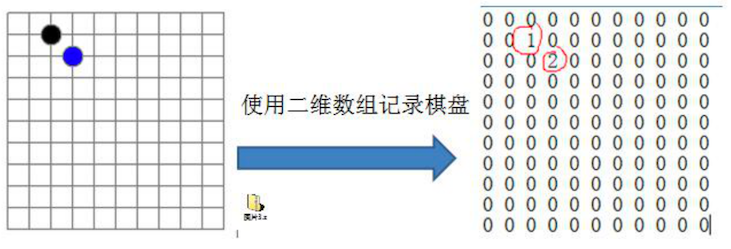
我们首先能想到的就是使用一个 二维数组,如上图所示:
- 0:表示没有棋子
- 1:表示黑棋
- 2:表示蓝棋
可以看到二维数组中很多值都是 0,因此记录了很多没有意义的数据。
因此当一个数组中 大部分元素为 0(或是同一个值) 时,可以使用 稀疏数组 来保存该数组
稀疏数组和二维数组的转换
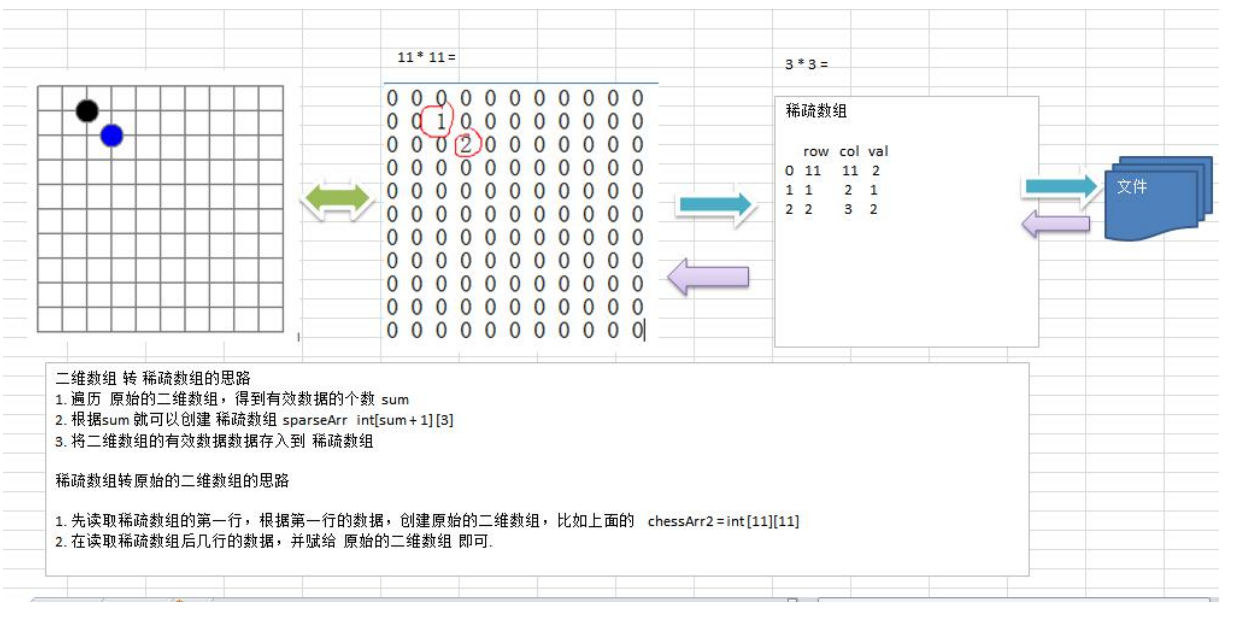
二维数组转稀疏数组的思路
- 遍历原始的二维数组,得到有效数据的个数 sum
- 根据sum 就可以创建稀疏数组 sparseArr int[sum+1][3]
- 将二维数组的有效数据数据存入到稀疏数组
稀疏数组转原始的二维数组的思路
- 先读取稀疏数组的第一行,根据第一行的数据,创建原始的二维数组,比如上面的 chesArr2=int[11][11]
- 在读取稀疏数组后几行的数据,并赋给 原始的二维数组 即可.
具体代码实现
package SparseArray;

import java.io.FileNotFoundException;
import java.io.PrintWriter;
import java.util.Arrays;

public class SparseArray {
    public static void main(String[] args) {
        try {
            // 棋盘问题
            // 创建一个 二维数组 存储棋子 11*11 0表示没有棋子 1表示黑色棋子 2表示蓝色棋子
            int chessArrs[][] = new int[11][11];
            chessArrs[1][2] = 1;
            chessArrs[2][3] = 2;
            chessArrs[3][4] = 2;
            // 遍历二维数组
            System.out.println("------------------------------二维数组--------------------------------------");
            for (int[] row : chessArrs) {
                for (int data : row) {
                    System.out.printf("%d\t", data);
                }
                System.out.println();
            }
            System.out.println("---------------------------------------------------------------------------");
            // 记录 非0 数据的 个数
            int sum = 0;
            for (int[] row : chessArrs) {
                for (int data : row) {
                    if (data != 0) {
                        sum++;
                    }
                }
            }
            System.out.println("有效数值(非0数值)" + sum);
            // 创建稀疏数组
            int count = 0;
            int sparseArray[][] = new int[sum + 1][3];
            // 第一行存放 二维数组的行 和列
            sparseArray[0][0] = 11;
            sparseArray[0][1] = 11;
            // 存放有效数字(非0数值)
            sparseArray[0][2] = sum;
            System.out.println("------------------------------稀疏数组--------------------------------------");
            for (int i = 0; i < chessArrs.length; i++) {
                for (int j = 0; j < chessArrs[i].length; j++) {
                    if (chessArrs[i][j] != 0) {
                        count++;
                        sparseArray[count][0] = i;
                        sparseArray[count][1] = j;
                        sparseArray[count][2] = chessArrs[i][j];
                    }
                }
            }
            // 存储稀疏数组 数据到 文件
            PrintWriter pw = new PrintWriter("src/sparseArray.txt");
            for (int[] s : sparseArray) {
                for (int data : s) {
                    pw.print(data + "\t");
                }
                pw.println();
            }
            pw.flush();
            pw.close();
            // 输出稀疏数组
            for (int i = 0; i < sum + 1; i++) {
                for (int j = 0; j < 3; j++) {
                    System.out.printf("%d\t", sparseArray[i][j]);
                }
                System.out.println();
            }
            // 将稀疏数组转化为二维数组
            int recover[][] = new int[sparseArray[0][0]][sparseArray[0][1]];
            // 给恢复的二维数组赋值
            for (int i = 1; i < sparseArray.length; i++) {
                recover[sparseArray[i][0]][sparseArray[i][1]] = sparseArray[i][2];
            }
            System.out.println("------------------------------恢复数组--------------------------------------");
            // 遍历恢复二维数组
            for (int[] recovers : recover) {
                for (int data : recovers) {
                    System.out.printf("%d\t", data);
                }
                System.out.println();
            }

        } catch (FileNotFoundException e) {
            e.printStackTrace();
        }
    }
}
队列
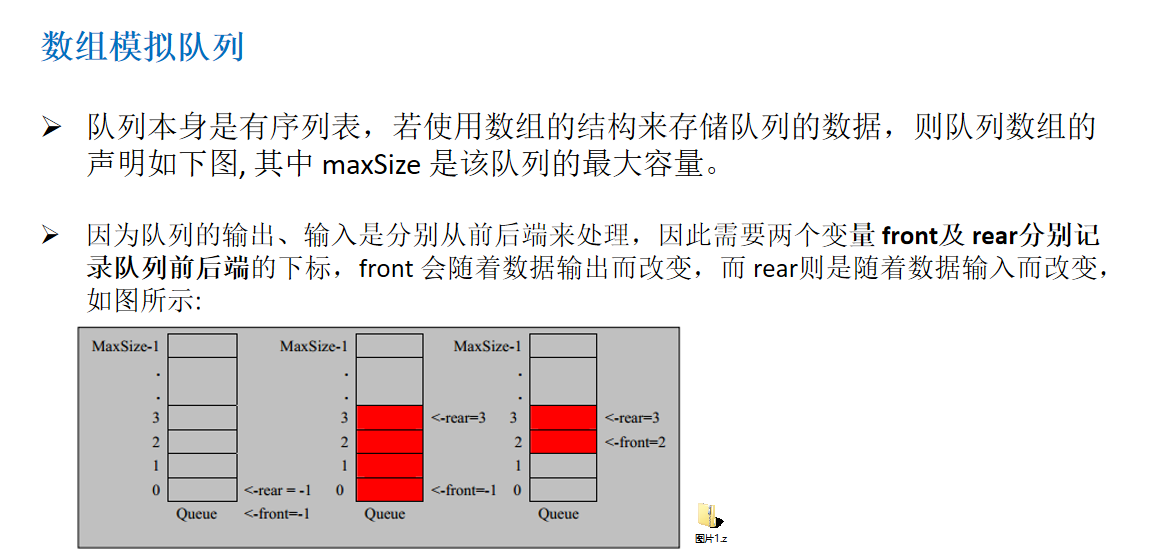
队列是一个有序的列表,特点是先进先出。
代码实现
package Queue;

import java.util.Scanner;
// 数组模拟使用队列 会导致 数组只被使用一次  而被遗弃 不能添加 数据  不能重复使用

public class QueueArray {
    public static void main(String[] args) {
        // 初始化队列
        queue queue = new queue(3);
        Scanner scanner = new Scanner(System.in);
        while (true) {
            System.out.println("---------------------------------队列----------------------------");
            System.out.println("请选择");
            System.out.println("s(show):显示队列数据");
            System.out.println("a(add): 添加队列数据");
            System.out.println("g(get): 出队列");
            System.out.println("h(header):显示头数据");
            String que = scanner.next();
            switch (que) {
                case "s":
                    try {
                        queue.showQueue();
                    } catch (Exception e) {
                        System.out.println(e.getMessage());
                    }
                    break;
                case "a":
                    System.out.println("请输入需要添加的数据");
                    int n = scanner.nextInt();
                    try {
                        queue.AddQueue(n);
                    } catch (Exception e) {
                    }
                    break;
                case "g":
                    try {
                        int queue1 = queue.getQueue();
                        System.out.println("取出的队列数据是" + queue1);
                    } catch (Exception e) {
                        System.out.println(e.getMessage());
                    }
                    break;
                case "h":
                    try {
                        int header = queue.getHeader();
                        System.out.println("头部的队列数据是" + header);
                    } catch (Exception e) {
                        System.out.println(e.getMessage());
                    }
                    break;
            }
        }

    }
}

class queue {
    private int maxSize; //队列的最大容量
    private int fronts; // 队列头 前面的一位
    private int rears; // 队列尾部
    private int[] queueArray; // 队列数组

    public queue(int maxSize) {
        this.maxSize = maxSize;
        queueArray = new int[maxSize];
        fronts = -1;
        rears = -1;
    }

    // 判断队列是否是满的
    public boolean isFull() {
        return rears == maxSize - 1;
    }

    // 判断队列是否为空
    public boolean isEmpty() {
        return rears == fronts;
    }

    // 添加数据到队列
    public void AddQueue(int n) {
        if (isFull()) {
            System.out.println("队列已经满了,暂时不能加入,请等待");
            return;
        }
        queueArray[++rears] = n;
    }

    // 出队列
    public int getQueue() {
        if (isEmpty()) {
            throw new RuntimeException("队列是空的");
        }
        return queueArray[++fronts];
    }

    // 获取队列的所有数据
    public void showQueue() {
        if (isEmpty()) {
            throw new RuntimeException("队列是空的");
        }
        for (int i = 0; i < queueArray.length; i++) {
            System.out.println("arr[" + i + "]=" + queueArray[i]);
        }
    }

    // 获取队列头数据 不是取出数据
    public int getHeader() {
        if (isEmpty()) {
            throw new RuntimeException("队列是空的");
        }
        return queueArray[fronts + 1];
    }
}
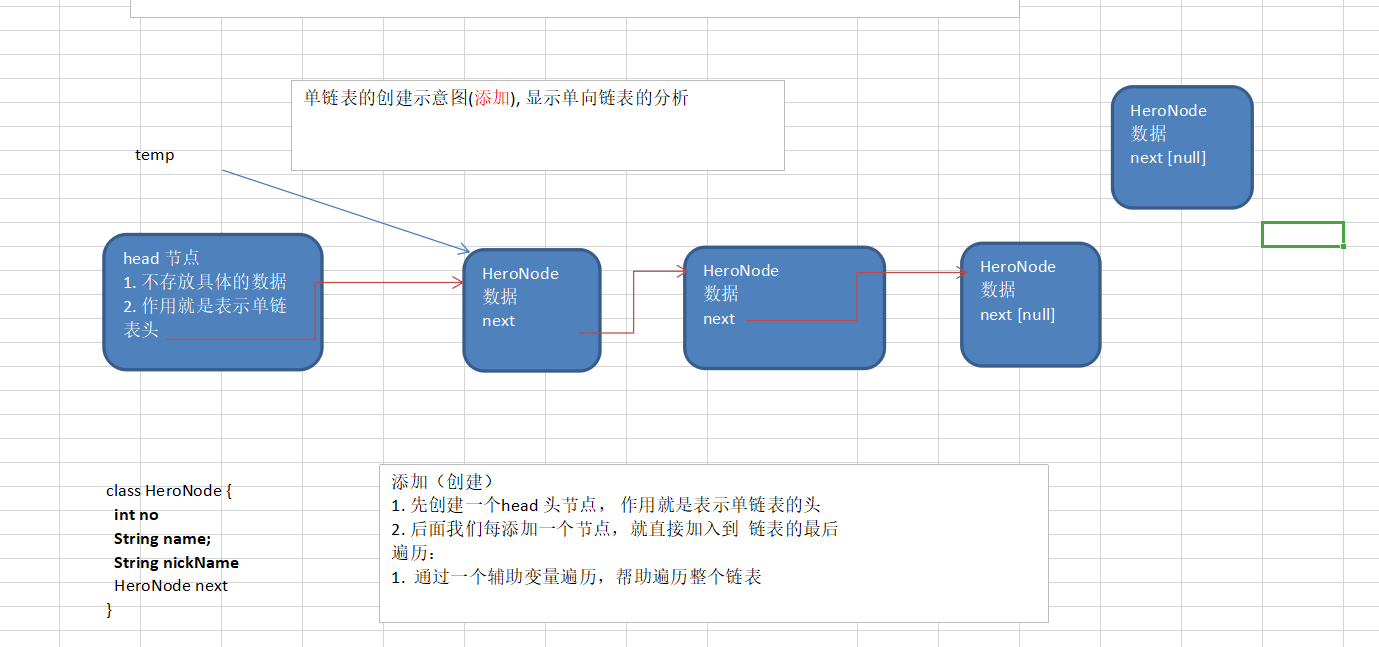
链表
链表是一个非连续存储的数据结构,特点是当前节点指向下一个节点,链式存储。
单链表
单链表添加以及遍历思路
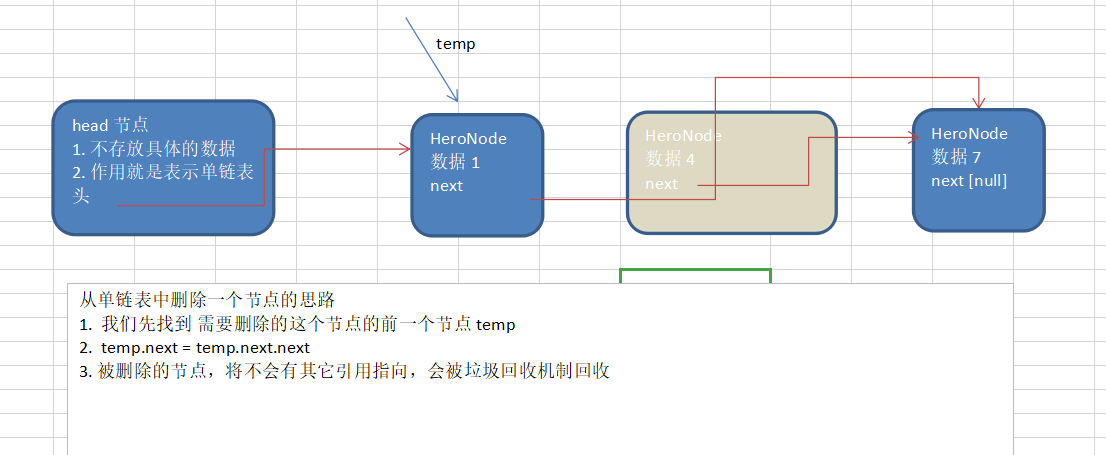
单链表删除思路
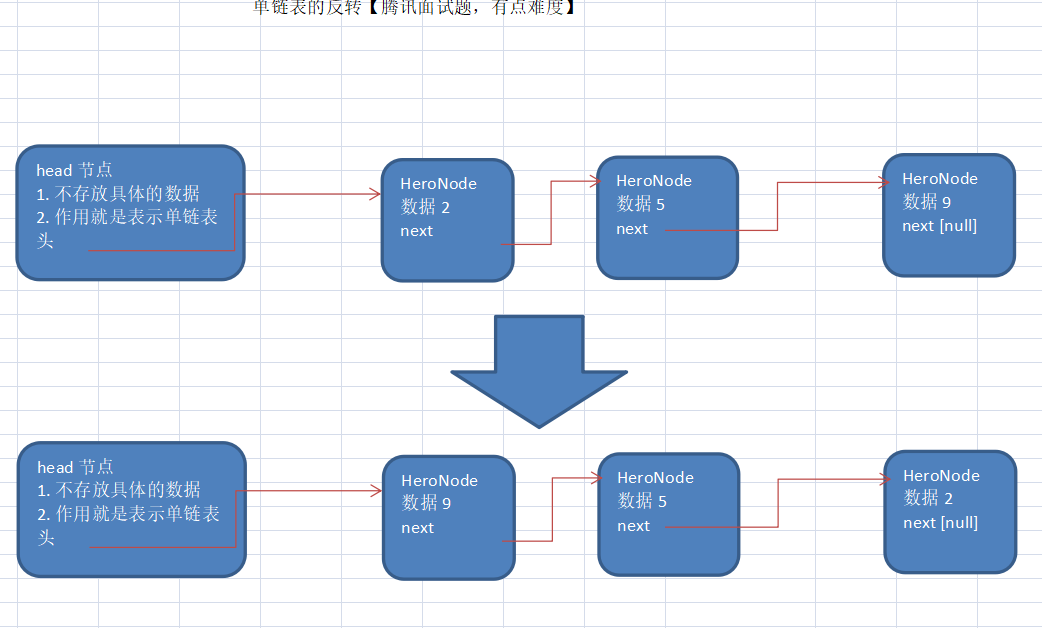
单链表反转思路(腾讯面试题)
单链表实现代码
package Linked.SingleLinked;

import java.util.Stack;

public class linked {
    public static void main(String[] args) {
        Animals animals1 = new Animals(1, "猫");
        Animals animals2 = new Animals(2, "狗");
        Animals animals3 = new Animals(3, "兔");
        Animals animals4 = new Animals(4, "鱼");
        SingleLinkedList list = new SingleLinkedList();
        list.add(animals1);
        list.add(animals3);
        list.add(animals2);
        list.add(animals4);
        // 修改节点
        list.update(new Animals(1, "猫咪"));
        // 删除节点
//        list.delete(1);
        list.list();
        // 获取链表长度
        System.out.println("有效节点个数:" + list.getLength(list.getHead()));
        // 获取倒数第n个节点[新浪面试题]
        System.out.println("倒数第2个节点:" + list.getLastIndex(list.getHead(), 2));

        System.out.println("---------------------------------反转链表-------------------------------");
        list.reverse(list.getHead());
        list.list();
        System.out.println("---------------------------------逆序打印-------------------------------");
        // 逆序打印链表
        list.reversePrint(list.getHead());
    }
}

class SingleLinkedList {
    // 初始化一个头节点
    private Animals head = new Animals(0, "");

    public Animals getHead() {
        return head;
    }

    // 修改节点的信息,根据node编号来修改
    public void update(Animals animals) {
        // 找到需要修改的节点, 根据node编号
        Animals temp = head.next;
        // 标志 是否找到该节点
        boolean flag = false;
        // 遍历链表
        while (true) {
            // 已经遍历完链表
            if (temp == null) {
                break;
            }
            if (temp.node == animals.node) {
                // 找到
                flag = true;
                break;
            }
            // 后移,遍历当前链表
            temp = temp.next;
        }
        // 根据flag判断是否找到要修改的节点
        if (flag) {
            temp.name = animals.name;
        } else {
            System.out.println("未找到");
        }
    }

    // 有序添加节点
    public void addOrder(Animals animals) {
        // 创建辅助变量
        Animals temp = head;
        // 标志 是否存在该节点
        boolean flag = false;
        // 遍历链表
        while (true) {
            if (temp.next == null) { // 已经到链表的最后
                break;
            } else if (temp.next.node > animals.node) {// 位置找到,就在temp的后面插入
                break;
            } else if (temp.next.node == animals.node) {
                // 说明希望添加的node已经存在
                flag = true;
                break;
            }
            // 后移,遍历当前链表
            temp = temp.next;
        }
        // 判断flag的值
        if (flag) { // 说明希望添加的node已经存在
            System.out.println("已经存在该节点");
            return;
        }
        // 插入到链表中,temp的后面
        animals.next = temp.next;
        temp.next = animals;
    }

    // 添加节点到链表
    public void add(Animals animals) {
        // 创建辅助变量,帮助定位到最后
        Animals temp = head;
        // 遍历链表,找到最后
        while (true) {
            if (temp.next == null) {
                break;
            }
            // 后移
            temp = temp.next;
        }
        // 将最后这个节点的next指向新的节点
        temp.next = animals;
    }

    // 删除节点
    public void delete(int node) {
        // 创建辅助变量
        Animals temp = head;
        // 标志 是否找到待删除节点的前一个节点
        boolean flag = false;
        while (true) {
            if (temp.next == null) {// 已经到链表的最后
                break;
            }
            if (temp.next.node == node) {// 找到待删除节点的前一个节点
                flag = true;
                break;
            }
            // 后移,遍历当前链表
            temp = temp.next;
        }
        // 判断flag
        if (flag) {// 找到
            temp.next = temp.next.next;
        } else {
            System.out.println("未找到该节点");
        }
    }

    // 显示链表[遍历]
    public void list() {
        // 判断链表是否为空
        if (head.next == null) {
            System.out.println("链表为空");
            return;
        }
        // 因为头节点,不能动,因此我们需要一个辅助变量来遍历
        Animals temp = head.next;
        while (true) {
            // 判断是否到链表最后
            if (temp == null) {
                break;
            }
            // 输出节点的信息
            System.out.println(temp);
            // 将temp后移,一定小心
            temp = temp.next;
        }
    }

    // 获取链表的长度
    public int getLength(Animals head) {
        // 判断链表是否为空
        if (head.next == null) {
            return 0;
        }
        int length = 0;
        // 定义一个辅助的变量, 这里我们没有统计头节点
        Animals cur = head.next;
        while (cur != null) {
            length++;
            cur = cur.next; // 遍历
        }
        return length;
    }

    // 查找单链表中的倒数第k个节点【新浪面试题】
    public Animals getLastIndex(Animals head, int index) {
        // 判断链表是否为空
        if (head.next == null) {
            return null;
        }
        // 第一个遍历得到链表的长度(节点个数)
        int size = getLength(head);
        // 第二次遍历 size-index位置,就是我们倒数的第k个节点
        // 先做一个index的校验
        if (index <= 0 || index > size) {
            return null;
        }
        // 定义辅助变量
        Animals cur = head.next;
        // 第三次遍历 size-index位置,就是我们倒数的第k个节点
        for (int i = 0; i < size - index; i++) {
            cur = cur.next;
        }
        return cur;
    }

    // 反转链表【腾讯面试题,有点难度】
    public void reverse(Animals head) {
        // 如果当前链表为空,或者只有一个节点,无需反转,直接返回
        if (head.next == null || head.next.next == null) {
            return;
        }
        // 定义一个辅助的指针(变量),帮助我们遍历原来的链表
        Animals cur = head.next;
        Animals next = null; // 指向当前节点[cur]的下一个节点
        Animals reverseHead = new Animals(0, "");
        // 遍历原来的链表,每遍历一个节点,就将其取出,并放在新的链表 reverseHead 的最前端
        while (cur != null) {
            next = cur.next; // 先暂时保存当前节点的下一个节点,因为后面需要使用
            cur.next = reverseHead.next; // 将cur的下一个节点指向新的链表的最前端
            reverseHead.next = cur; // 将cur连接到新的链表上
            cur = next; // 让cur后移
        }
        // 将head.next 指向 reverseHead.next , 实现单链表的反转
        head.next = reverseHead.next;
    }

    // 逆序打印链表【百度面试题】
    public void reversePrint(Animals head) {
        if (head.next == null) {
            return; // 空链表,不能打印
        }
        // 创建要给一个栈,将各个节点压入栈
        Stack<Animals> stack = new Stack<>();
        Animals cur = head.next;
        // 将链表的所有节点压入栈
        while (cur != null) {
            stack.push(cur);
            cur = cur.next; // cur后移,这样就可以压入下一个节点
        }
        // 将栈中的节点进行打印, pop 出栈
        while (stack.size() > 0) {
            System.out.println(stack.pop()); // stack的特点是先进后出
        }
    }
}
class Animals {
    // 节点编号
    public Integer node;
    public String name;
    // 指向下一个节点
    public Animals next;

    public Animals(Integer node, String name) {
        this.node = node;
        this.name = name;
    }

    @Override
    public String toString() {
        return "Animals{" +
                "node=" + node +
                ", name='" + name + '\'' +
                ", next=" + next +
                '}';
    }
}
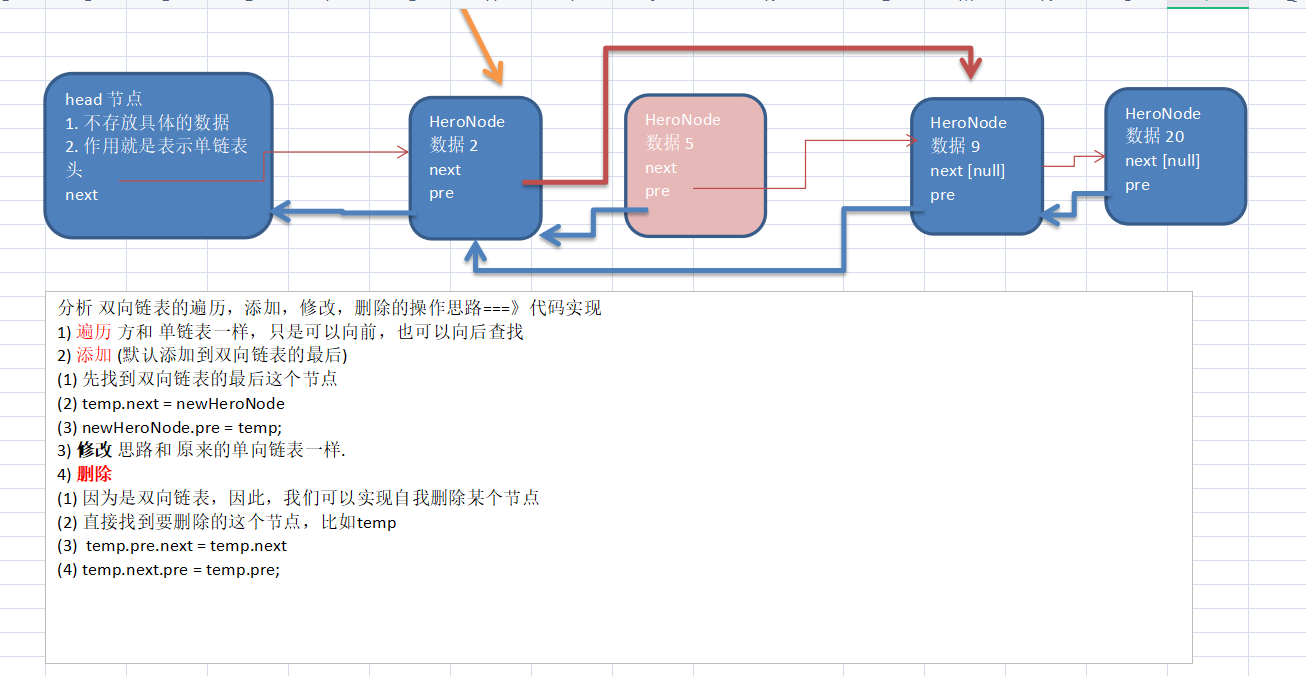
双向链表
双向链表不同于单向链表,由于指向是双向的它可以自我删除,不需要依赖辅助节点、可以向前向后查找。
代码实现
package Linked.DoubleLined;

public class DoubleLinkedDemo {
    public static void main(String[] args) {
        DoubleLinked db = new DoubleLinked();
        Fruit fruit = new Fruit(1, "苹果");
        Fruit fruit2 = new Fruit(2, "香蕉");
        Fruit fruit3 = new Fruit(3, "橙子");
        Fruit fruit4 = new Fruit(4, "葡萄");
        db.add(fruit);
        db.add(fruit2);
        db.add(fruit3);
        db.add(fruit4);
        db.delete(4);
        // 修改
        db.update(new Fruit(1, "梨子"));
        db.list();
    }
}


class DoubleLinked {
    // 初始化头节点
    private Fruit head = new Fruit(0, "");

    // 添加
    public void add(Fruit fruit) {
        // 找到最后一个节点
        Fruit temp = head;
        while (true) {
            if (temp.next == null) {
                break;
            }
            temp = temp.next;
        }
        // 将节点添加到链表末尾
        temp.next = fruit;
        fruit.pre = temp;
    }

    // 遍历
    public void list() {
        // 找到第一个节点
        Fruit temp = head.next;
        if (temp == null) {
            System.out.println("链表为空");
        }
        while (true) {
            if (temp == null) {
                break;
            }
            System.out.println(temp);
            temp = temp.next;
        }
    }

    // 删除,由于是双向链表,删除时只需要删除对应的节点
    public void delete(int id) {
        // 找到第一个节点
        Fruit temp = head.next;
        boolean flag = false;
        if (temp.next == null) {
            System.out.println("链表为空");
            return;
        }
        while (true) {
            if (temp == null) {
                break;
            }
            if (temp.id == id) {
                flag = true;
                break;
            }
            temp = temp.next;
        }
        // 根据标志进行删除操作
        if (flag) {
            temp.pre.next = temp.next;
            if (temp.next != null) {
                temp.next.pre = temp.pre;
            }
        } else {
            System.out.println("无效节点信息");
        }
    }

    // 修改
    public void update(Fruit fruit) {
        // 找到第一个节点
        Fruit temp = head;
        boolean flag = false;
        // 遍历
        while (true) {
            if (temp.next == null) {
                break;
            }
            if (fruit.id == head.next.id) {
                flag = true;
                break;
            }
            temp = temp.next;
        }
        if (flag) {
            temp.next.name = fruit.name;
        } else {
            System.out.println("无效节点信息");
        }
    }
}

class Fruit {
    public int id;
    public String name;
    public Fruit next;
    public Fruit pre;

    public Fruit(int id, String name) {
        this.id = id;
        this.name = name;
    }

    @Override
    public String toString() {
        return "Fruit{" +
                "id=" + id +
                ", name='" + name +
                '}';
    }
}
递归
递归就是方法自己调用自己,每次调用时 传入不同的变量。
案例
阶乘和打印
package Recursion.recursion;

public class recursion {
    public static void main(String[] args) {
        testRecursion(4);
        System.out.println(factorial(3));
    }

    // 打印
    public static void testRecursion(int n) {
        if (n > 2) {
            testRecursion(n - 1);
        }
        System.out.println("n=" + n);
    }

    // 阶乘
    public static int factorial(int n) {
        if (n == 1) {
            return 1;
        } else {
            return factorial(n - 1) * n;
        }
    }
}
递归本质上其实是一个压栈操作。
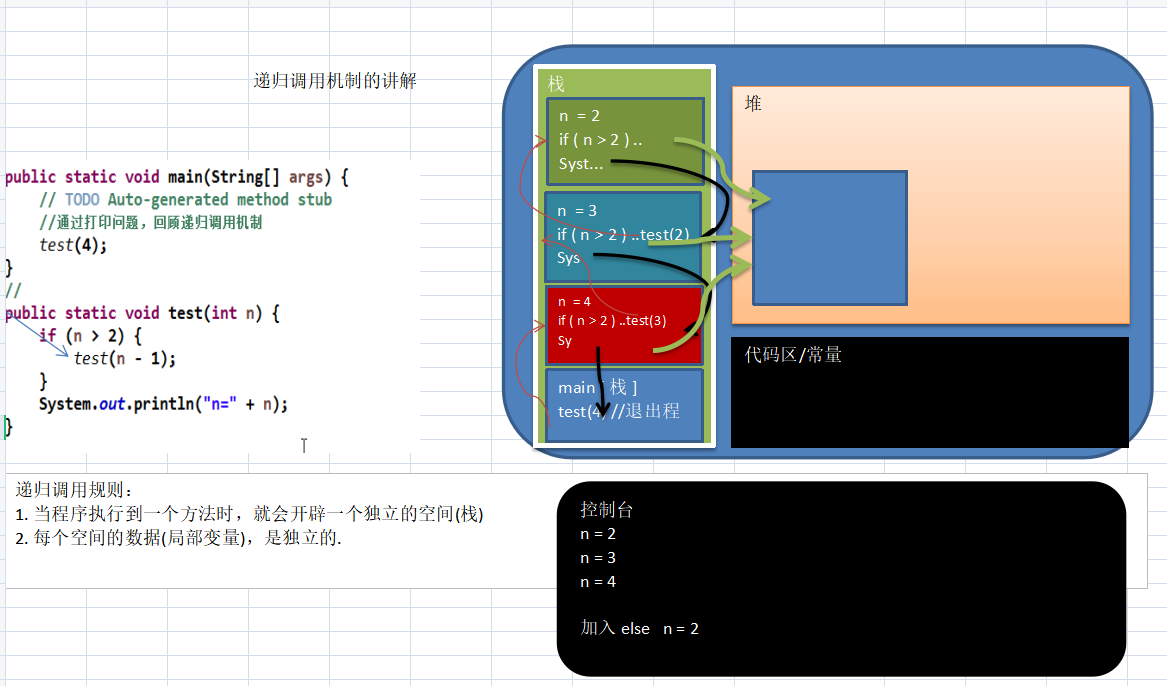
递归需要遵守的重要规则
-
执行一个方法时,就创建一个新的受保护的独立空间(栈空间)
-
从方法的局部变量是独立的,不会相互影响、比如 n 变量
-
如果方法中使用的是引用类型变量(比如数组),就会共享该引用类型的数据3
-
递归必须向退出递归的条件逼近,否则就是无限递归,出现 StackOverflowError,死龟了:)4)
-
当一个方法执行完毕,或者遇到 retun,就会返回,遵守谁调用,就将结果返回给谁,同时当方法执行完毕或5者返回时,该方法也就执行完毕
迷宫问题
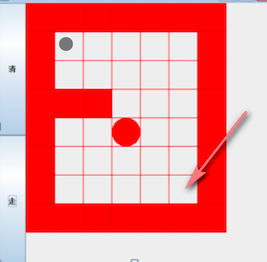
迷宫问题(回溯),上图说明:
- 红色的方块是围墙,是小球不能够走的
- 白色的方块是小球可以活动的范围
- 左上角是小球的起点,移动到右下角,就算走出了迷宫
package Recursion.MazeProblem;

public class MazeProblem {
    public static void main(String[] args) {
        // 创建一个迷宫 7行 8列
        int maze[][] = new int[8][7];
        maze[2][1] = 1;
        maze[2][2] = 1;
        // 设置边界墙壁
        for (int i = 0; i < 8; i++) {
            maze[i][0] = 1;
            maze[i][6] = 1;
        }
        for (int i = 0; i < 7; i++) {
            maze[0][i] = 1;
            maze[7][i] = 1;
        }
        for (int i = 0; i < 8; i++) {
            for (int j = 0; j < 7; j++) {
                System.out.print(maze[i][j] + "\t");
            }
            System.out.println();
        }
        System.out.println("-------------------------------------------------------------");
        // 实现迷宫寻路
        setWay(maze, 1, 1);
        for (int i = 0; i < 8; i++) {
            for (int j = 0; j < 8; j++) {
                System.out.print(maze[i][j] + "\t");
            }
            System.out.println();
        }

    }

    // 递归
    // 1. 墙壁表示1  0 表示未走过的路径 2表示走过的路径 3表示死路
    public static boolean setWay(int maze[][], int i, int j) {
        // 判断是否到达终点
        if (maze[6][5] == 2) {
            return true;
        } else {// 如果没有到达终点,则继续探索可行路径
            // 默认按照下右上左的顺序探索
            if (maze[i][j] == 0) {
                maze[i][j] = 2;
                if (setWay(maze, i + 1, j)) {//向下
                    return true;
                } else if (setWay(maze, i, j + 1)) {//向右
                    return true;
                } else if (setWay(maze, i - 1, j)) {//向上
                    return true;
                } else if (setWay(maze, i, j - 1)) {//向左
                    return true;
                } else {
                    maze[i][j] = 3;
                    return false;
                }
            } else {// 如果不为0,则为1、2、3
                return false;
            }
        }
    }
}
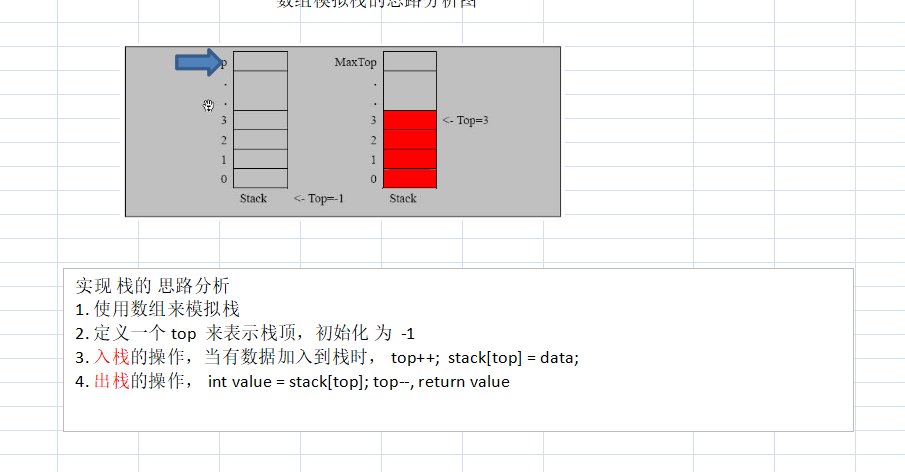
栈
相比于队列,栈的特征就是先进后出。
使用数组来模拟栈
代码实现
package Stack.ArrayStack;

import java.util.Scanner;

public class ArrayStackDemo {
    public static void main(String[] args) {
        Scanner scanner = new Scanner(System.in);
        // 初始化
        StackImpl stack = new StackImpl(5);
        while (true) {
            System.out.println("---------------------------------执行操作指令---------------------------------");
            System.out.println("1.压栈");
            System.out.println("2.弹栈");
            System.out.println("3.查看栈");
            int answer = scanner.nextInt();
            if (answer == 1) {
                System.out.println("请输入要压入的数据");
                int value = scanner.nextInt();
                stack.push(value);
            }
            if (answer == 2) {
                System.out.println("取出的数据为:" + stack.pop());

            }
            if (answer == 3) {
                stack.list();
            }
        }
    }
}

class StackImpl {
    private int maxSize;
    private int top; // 表示栈顶
    private int[] stack;

    public StackImpl(int maxSize) {
        this.maxSize = maxSize;
        top = -1;
        stack = new int[maxSize];
    }

    // 栈满
    public boolean isFull() {
        return top == maxSize - 1;
    }

    // 栈空
    public boolean isEmpty() {
        return top == -1;
    }

    // 压栈
    public void push(int n) {
        if (isFull()) {
            System.out.println("栈已满");
            return;
        }
        stack[++top] = n;
    }

    // 弹栈
    public int pop() {
        if (isEmpty()) {
            throw new RuntimeException("栈空");
        }
        return stack[top--];
    }

    // 打印栈
    public void list() {
        for (int i = top; i >= 0; i--) {
            System.out.println("arr[" + i + "]=" + stack[i]);
        }
    }
}
使用栈实现一个计算器
思路如下
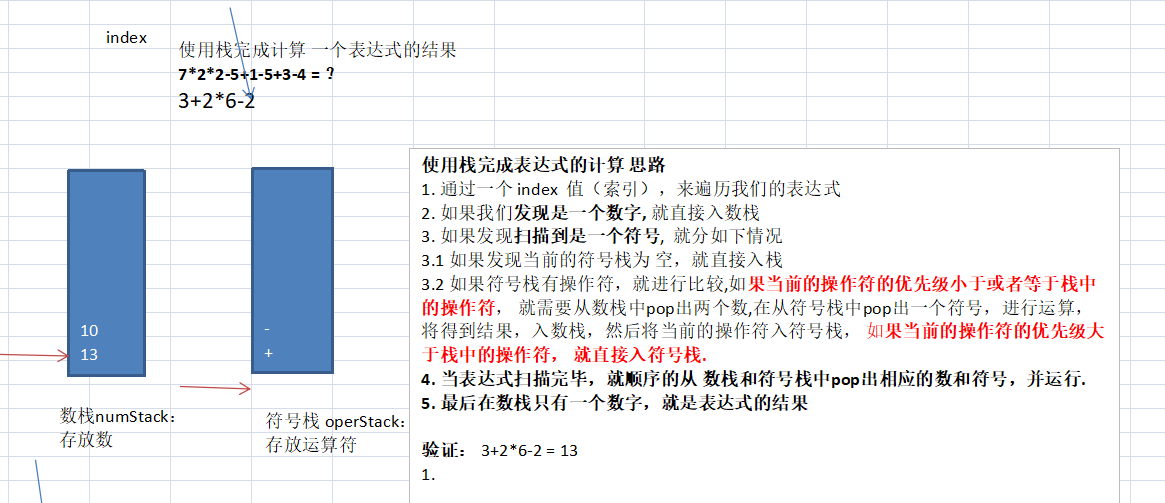
代码如下
package Stack.OperStack;

public class Calculator {
    public static void main(String[] args) {

        String expression = "15*3+6";
        // 创建两个栈,一个存放数值,一个存放运算符
        StackOper stackOper = new StackOper(10);
        StackOper stackNum = new StackOper(10);
        // 临时变量和结果变量
        int n1 = 0;
        int index = 0;
        int n2 = 0;
        int res = 0;
        int oper = 0;
        char ch = ' ';// 每次扫描得到的字符保存到ch
        String keepNum = "";
        while (true) {
            // 一次取出一个字符进行处理
            ch = expression.substring(index, index + 1).charAt(0);
            // 判断是否为运算符
            if (stackOper.isOper(ch)) {
                // 判断运算符栈是否为空
                if (!stackOper.isEmpty()) {
                    // 判断当前运算符的优先级是否小于等于栈顶运算符的优先级
                    if (stackOper.priority(ch) <= stackOper.priority(stackOper.peek())) {
                        // 弹出栈顶的数和运算符 进行运算
                        n1 = stackNum.pop();
                        n2 = stackNum.pop();
                        oper = stackOper.pop();
                        res = stackNum.cal(n1, n2, oper);
                        // 将运算结果压入数值栈
                        stackNum.push(res);
                        // 然后将当前的运算符压入运算符栈
                        stackOper.push(ch);

                    } else {// 当前运算符优先级大于栈顶运算符,直接入栈
                        stackOper.push(ch);
                    }
                } else { // 栈空直接入栈
                    stackOper.push(ch);
                }

            } else {// 数值直接入栈
                // stackNum.push(ch - 48);//因为 字符数字的Ascall值与 48 相差,所以需要字符数字减去 48 转为真正的数字
                keepNum += ch;

                if (index == expression.length() - 1) {
                    stackNum.push(Integer.parseInt(keepNum));
                } else {
                    if (stackNum.isOper(expression.substring(index + 1, index + 2).charAt(0))) {
                        stackNum.push(Integer.parseInt(keepNum));
                        keepNum = "";
                    }
                }

            }
            index++;
            // 判断是否扫描到表达式末尾
            if (index >= expression.length()) {
                break;
            }
        }
        // 对表达式进行扫描完毕,依次从运算符栈和数值栈取出对应的数据,进行计算
        while (true) {
            if (stackOper.isEmpty()) {
                break;
            }
            n1 = stackNum.pop();
            n2 = stackNum.pop();
            oper = stackOper.pop();
            res = stackNum.cal(n1, n2, oper);
            stackNum.push(res);
        }
        System.out.println(stackNum.pop());

    }

}

class StackOper {
    private int maxSize;
    private int top; // 表示栈顶
    private int[] stack;

    public StackOper(int maxSize) {
        this.maxSize = maxSize;
        top = -1;
        stack = new int[maxSize];
    }

    // 获取栈顶元素
    public int peek() {
        return stack[top];
    }

    // 栈满
    public boolean isFull() {
        return top == maxSize - 1;
    }

    // 栈空
    public boolean isEmpty() {
        return top == -1;
    }

    // 入栈
    public void push(int n) {
        if (isFull()) {
            System.out.println("栈已满");
            return;
        }
        stack[++top] = n;
    }

    // 出栈
    public int pop() {
        if (isEmpty()) {
            throw new RuntimeException("栈空");
        }
        return stack[top--];
    }

    // 遍历栈
    public void list() {
        for (int i = top; i >= 0; i--) {
            System.out.println("arr[" + i + "]=" + stack[i]);
        }
    }

    // 判断是否为运算符
    public boolean isOper(char ch) {
        return ch == '*' || ch == '/' || ch == '+' || ch == '-';
    }

    // 判断运算符的优先级
    public int priority(int ch) {
        if (ch == '*' || ch == '/') {
            return 2;
        } else if (ch == '+' || ch == '-') {
            return 1;
        } else {
            return 0;
        }
    }

    // 进行运算
    public int cal(int n1, int n2, int oper) {
        int res = 0;
        switch (oper) {
            case '*':
                res = n1 * n2;
                break;
            case '/':
                res = n2 / n1;
                break;
            case '+':
                res = n1 + n2;
                break;
            case '-':
                res = n2 - n1;
                break;
        }
        return res;
    }
}
后缀表达式模拟计算器
思路
代码实现
package Stack.SuffixStack;
import java.util.ArrayList;
import java.util.List;
import java.util.Stack;
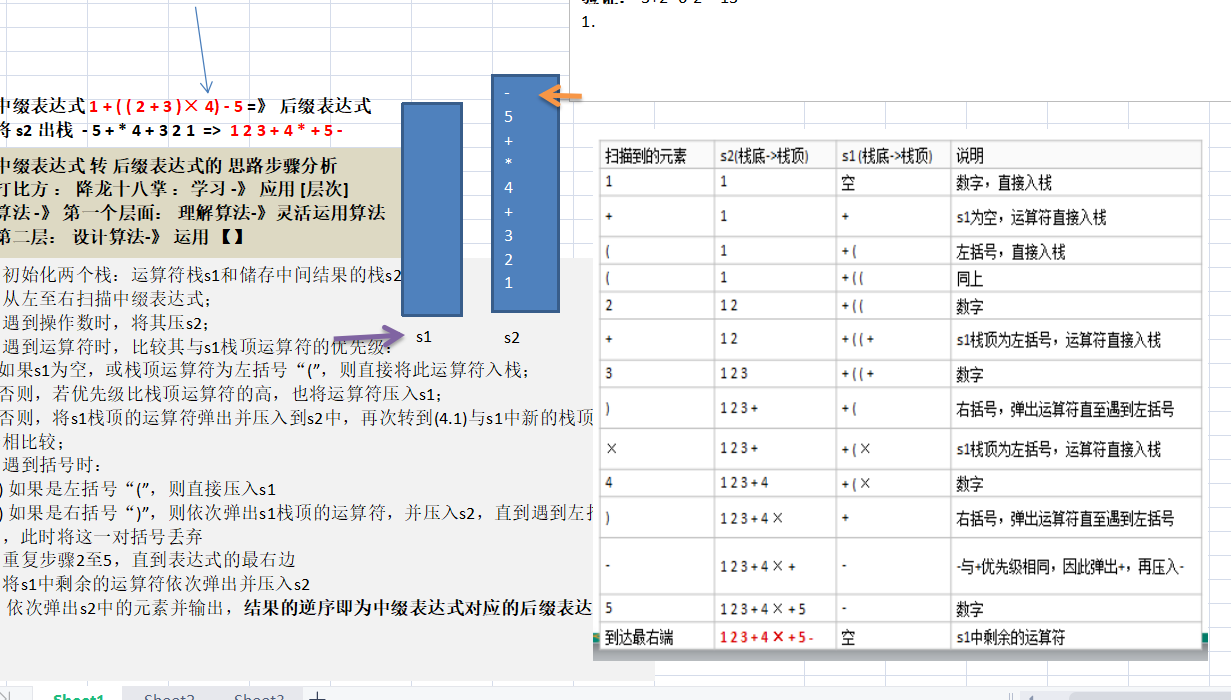
/**
* 后缀表达式转中缀表达式: 1+((2+3)*4)-5
* 1) 初始化两个栈:运算符栈s1和存储中间结果的栈s2
* 2) 从左至右扫描后缀表达式
* 3) 遇到操作数时,将其压入s2
* 4) 遇到运算符时,比较其与s1栈顶运算符的优先级:
* 1. 如果s1为空,或栈顶运算符为左括号"(",则直接将该运算符入栈
* 2. 否则,若优先级比栈顶运算符高,也将运算符压入s1
* 3. 否则,将s1栈顶运算符弹出并压入s2中,再次转到(4.1)与s1中新的栈顶运算符相比较
* 5) 遇到括号时:
* 1. 如果是左括号"(",则直接压入s1
* 2. 如果是右括号")",则依次弹出s1栈顶的运算符并压入s2,直到遇到左括号为止,此时将这一对括号丢弃
* 6) 重复步骤2至5,直到表达式的最右边
* 7) 将s1中剩余的运算符依次弹出并压入s2
* 8) 由于s2中存储的是逆序的中缀表达式,将s2中的元素逆序输出,即得到中缀表达式对应的后缀表达式
**/
// 后缀表达式模拟计算器
public class SuffixOper {
public static void main(String[] args) {
// 后缀表达式转中缀表达式
// 示例:1+((2+3)*4)-5
String expression = "1+((2+3)*4)-5";
List<String> list = toMiddleExpression(expression);
System.out.println(list);
// 中缀转后缀
List<String> suffix = getSuffix(list);
System.out.println(suffix);
// 计算结果
System.out.println("计算结果:" + cal(suffix));
// 示例:3 4 + 5 * 6 - >>> (3+4)*5-6
// 示例:4*5-8+60+8/2 >>>> 4 5 * 8 - 60 + 8 2 / +
// String SuffixExpression="3 4 + 5 * 6 -";
// String SuffixExpression="4 5 * 8 - 60 + 8 2 / +";
// List<String> list = SuffixOper.getExpression(SuffixExpression);
// System.out.println(SuffixOper.cal(list));
}
// 分割表达式(自定义)
public static List<String> getExpression(String expression) {
List<String> list = new ArrayList<>();
// 将表达式按空格分割并加入列表中
for (String element : expression.split(" ")) {
list.add(element);
}
return list;
}
// 计算结果
public static int cal(List<String> list) {
// 栈用于存储中间结果和运算符
Stack<String> stack = new Stack<>();
// 遍历列表
for (String el : list) {
// 判断是否为数字 3 4 + 5 * 6 -
if (el.matches("\\d+")) {
// 入栈
stack.push(el);
} else {
// 出栈
int num2 = Integer.parseInt(stack.pop());
int num1 = Integer.parseInt(stack.pop());
int res = 0;
// 根据运算符进行计算
if (el.equals("+")) {
res = num1 + num2;
} else if (el.equals("-")) {
res = num1 - num2;
} else if (el.equals("*")) {
res = num1 * num2;
} else if (el.equals("/")) {
res = num1 / num2;
} else {
throw new RuntimeException("运算符异常");
}
// 入栈
stack.push(res + "");
}
}
// 返回栈顶元素作为结果
return Integer.parseInt(stack.pop());
}
// 中缀表达式转换为列表
public static List<String> toMiddleExpression(String expression) {
// 创建一个列表用于存储中缀表达式的元素
List<String> list = new ArrayList<>();
char c = ' ';
char ch = ' ';
// 用于拼接数字的字符串
String str = "";
int i = 0;
do {
// 判断是否为数字
if ((c = expression.charAt(i)) < 48 || (c = expression.charAt(i)) > 57) {
list.add(c + "");
i++;
} else {
str = "";
// 拼接数字
while (i < expression.length() && (c = expression.charAt(i)) >= 48 && (c = expression.charAt(i)) <= 57) {
if (i < expression.length() - 1 && (ch = expression.charAt(i + 1)) >= 48 && (ch = expression.charAt(i + 1)) <= 57) {
str += ch;
i++;
} else {
str += c;
i++;
}
}
list.add(str);
}
} while (i < expression.length());
return list;
}
// 字符串转列表
public static List<String> toList(String expression) {
List<String> list = new ArrayList<>();
String[] split = expression.split(" ");
for (String s : split) {
list.add(s);
}
return list;
}
// 字符串分割
public static List<String> Sub(String expression) {
List<String> list = new ArrayList<>();
for (int i = 0; i < expression.length(); i++) {
String substring = expression.substring(i, i + 1);
list.add(substring);
}
return list;
}
// 中缀表达式转后
// 中缀转后缀
public static List<String> getSuffix(List<String> list) {
// 初始化栈s1用于存储运算符,s2用于存储后缀表达式
Stack<String> s1 = new Stack<>();
List<String> s2 = new ArrayList<>();
// 遍历列表
for (String s : list) {
// 判断是否为数字
if (s.matches("\\d+")) {
// 如果是数字直接加入s2
s2.add(s);
} else {
// 如果栈为空,直接将运算符压入栈s1
if (s1.size() == 0) {
s1.push(s);
} else {
// 如果栈不为空
if (s.equals("(")) {
// 如果是左括号,直接压入栈s1
s1.push(s);
} else if (s.equals(")")) {
// 如果是右括号,将s1中的运算符弹出并加入s2,直到遇到左括号为止,然后将左括号弹出
while (!s1.peek().equals("(")) {
s2.add(s1.pop());
}
s1.pop(); // 弹出左括号
} else {
// 其他情况,将s1中栈顶的运算符与当前运算符进行比较
// 如果栈顶运算符的优先级大于等于当前运算符,则将栈顶运算符弹出并加入s2,直到栈顶运算符的优先级小于当前运算符
while (s1.size() != 0 && SuffixPriority.getFirst(s1.peek()) >= SuffixPriority.getFirst(s)) {
// 将弹出的运算符加入s2
s2.add(s1.pop());
}
// 在退出循环后,将当前运算符压入s1
s1.push(s);
}
}
}
}
// 将s1中剩余的运算符依次弹出并加入s2
while (s1.size() != 0) {
s2.add(s1.pop());
}
return s2;
}
}
class SuffixPriority {
private static final int ADD = 1;
private static final int Dec = 1;
private static final int MUL = 2;
private static final int DIV = 2;
public static int getFirst(String Operation) {
int result = 0;
switch (Operation) {
case "+":
result = ADD;
break;
case "-":
result = Dec;
break;
case "/":
result = DIV;
break;
case "*":
result = MUL;
break;
}
return result;
}
}
8大排序
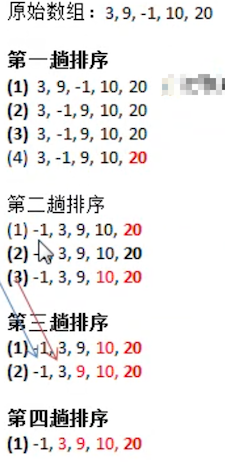
冒泡排序
冒泡排序的原理就是依次比较相邻的数,如果是从小到大,就将大数据往后沉。排序的过程就像水泡一样所以称之为冒泡排序。过程如下图
代码中演变过程:
package Test.bubble;

import java.util.Arrays;

public class bubble {
    public static void main(String[] args) {
        int arr[] = {1, 4, -1, 8, 6, 9, 3, 2, 7, 20};
        bubbleSort(arr);
        System.out.println("最终结果为"+Arrays.toString(arr));
    }

    public static void bubbleSort(int[] arr) {
        // 临时变量
        int temp = 0;
        // 控制变量
        // 第一轮排序,将最大值移动到最后
        for (int j = 0; j < arr.length - 1; j++) {
            if (arr[j] > arr[j + 1]) {
                temp = arr[j];
                arr[j] = arr[j + 1];
                arr[j + 1] = temp;
            }
        }
        System.out.println("第一次排序结果为:"+Arrays.toString(arr));
        // 第二轮排序,只需考虑到 arr.length-1 因为最大值已经确定
        for (int j = 0; j < arr.length - 2; j++) {
            if (arr[j] > arr[j + 1]) {
                temp = arr[j];
                arr[j] = arr[j + 1];
                arr[j + 1] = temp;
            }
        }
        System.out.println("第二次排序结果为:"+Arrays.toString(arr));
        // 依此类推
        for (int j = 0; j < arr.length - 3; j++) {
            if (arr[j] > arr[j + 1]) {
                temp = arr[j];
                arr[j] = arr[j + 1];
                arr[j + 1] = temp;
            }
        }
        System.out.println("第三次排序结果为:"+Arrays.toString(arr));
        for (int j = 0; j < arr.length - 4; j++) {
            if (arr[j] > arr[j + 1]) {
                temp = arr[j];
                arr[j] = arr[j + 1];
                arr[j + 1] = temp;
            }
        }
        System.out.println("第四次排序结果为:"+Arrays.toString(arr));
        for (int j = 0; j < arr.length - 5; j++) {
            if (arr[j] > arr[j + 1]) {
                temp = arr[j];
                arr[j] = arr[j + 1];
                arr[j + 1] = temp;
            }
        }
        System.out.println("第五次排序结果为:"+Arrays.toString(arr));
        for (int j = 0; j < arr.length - 6; j++) {
            if (arr[j] > arr[j + 1]) {
                temp = arr[j];
                arr[j] = arr[j + 1];
                arr[j + 1] = temp;
            }
        }
        System.out.println("第六次排序结果为:"+Arrays.toString(arr));
        for (int j = 0; j < arr.length - 7; j++) {
            if (arr[j] > arr[j + 1]) {
                temp = arr[j];
                arr[j] = arr[j + 1];
                arr[j + 1] = temp;
            }
        }
        System.out.println("第七次排序结果为:"+Arrays.toString(arr));
        for (int j = 0; j < arr.length - 8; j++) {
            if (arr[j] > arr[j + 1]) {
                temp = arr[j];
                arr[j] = arr[j + 1];
                arr[j + 1] = temp;
            }
        }
        System.out.println("第八次排序结果为:"+Arrays.toString(arr));
        for (int j = 0; j < arr.length - 9; j++) {
            if (arr[j] > arr[j + 1]) {
                temp = arr[j];
                arr[j] = arr[j + 1];
                arr[j + 1] = temp;
            }
        }
        System.out.println("第九次排序结果为:"+Arrays.toString(arr));
    }
}
运行结果如下
第一次排序结果为:[1, -1, 4, 6, 8, 3, 2, 7, 9, 20]
第二次排序结果为:[-1, 1, 4, 6, 3, 2, 7, 8, 9, 20]
第三次排序结果为:[-1, 1, 4, 3, 2, 6, 7, 8, 9, 20]
第四次排序结果为:[-1, 1, 3, 2, 4, 6, 7, 8, 9, 20]
第五次排序结果为:[-1, 1, 2, 3, 4, 6, 7, 8, 9, 20]
第六次排序结果为:[-1, 1, 2, 3, 4, 6, 7, 8, 9, 20]
第七次排序结果为:[-1, 1, 2, 3, 4, 6, 7, 8, 9, 20]
第八次排序结果为:[-1, 1, 2, 3, 4, 6, 7, 8, 9, 20]
第九次排序结果为:[-1, 1, 2, 3, 4, 6, 7, 8, 9, 20]
最终结果为[-1, 1, 2, 3, 4, 6, 7, 8, 9, 20]
简化写法的冒泡排序
 public static void bubbleSort(int arr[]) {
     // 临时变量,用于交换数据
     int temp = 0;
     // 第一层循环,控制比较的轮数
     for (int i = 0; i < arr.length - 1; i++) {
         for (int j = 0; j < arr.length - 1 - i; j++) {
             if (arr[j] > arr[j + 1]) {
                 temp = arr[j];
                 arr[j] = arr[j + 1];
                 arr[j + 1] = temp;
             }
         }
     }
 }
冒泡排序可以进行优化,如果在一轮交换后,数组中的数据都没有进行交换则可以跳出循环。
public static void bubbleSorts(int[] arr) {
    boolean flag = false;
    int temp = 0;
    for (int i = 0; i < arr.length - 1; i++) {
        for (int j = 0; j < arr.length - i - 1; j++) {
            if (arr[j] > arr[j + 1]) {
                flag = true;
                temp = arr[j];
                arr[j] = arr[j + 1];
                arr[j + 1] = temp;
            }
        }
        if (!flag) {
            break;
        }
        flag = false;
    }
}
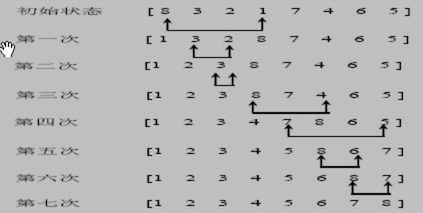
选择排序
基本思想为:
- 第一次从
arr[0]~arr[n-1]中选取最小值,与 arr[0] 交换 - 第二次从
arr[1]~arr[n-1]中选取最小值,与 arr[1] 交换 - 第 i 次从
arr[i-1]~arr[n-1]中选取最小值,与 arr[i-1] 交换
依次类图,总共通过 n - 1 次,得到一个按排序码从小到大排列的有序序列
代码推理过程
package Sort.SelectSort;

import java.util.Arrays;

public class SelectSort {
    public static void main(String[] args) {
        int []arr={5,3,7,1};
        selectSort(arr);
    }

    // 简单选择排序的实现
    public static void selectSort(int arr[]) {
        // 选择排序每次找到最小值的位置

        // 第一个最小值时arr[0]
        int minIndex = 0;
        int min = arr[0];
        // 第一次排序
        for (int j = 1; j < arr.length; j++) {
            if (arr[j] < min) {
                min = arr[j];
                minIndex = j;
            }
        }
        // 将最小值交换到arr[0]
        if (minIndex != 0) {
            arr[minIndex] = arr[0];
            arr[0] = min;
        }
        System.out.println("第一次排序后:" + Arrays.toString(arr));
        // 第二次排序
        minIndex = 1;
        min = arr[1];
        for (int j = 2; j < arr.length; j++) {
            if (arr[j] < min) {
                min = arr[j];
                minIndex = j;
            }
        }
        // 将最小值交换到arr[1]
        if (minIndex != 1) {
            arr[minIndex] = arr[1];
            arr[1] = min;
        }
        System.out.println("第二次排序后:" + Arrays.toString(arr));
        // 第三次排序
        minIndex = 2;
        min = arr[2];
        for (int j = 3; j < arr.length; j++) {
            if (arr[j] < min) {
                min = arr[j];
                minIndex = j;
            }
        }
        // 将最小值交换到arr[2]
        if (minIndex != 2) {
            arr[minIndex] = arr[2];
            arr[2] = min;
        }
        System.out.println("第三次排序后:" + Arrays.toString(arr));
    }
}
计算结果
第一次排序后:[1, 3, 7, 5]
第二次排序后:[1, 3, 7, 5]
第三次排序后:[1, 3, 5, 7]
简化写法
 public static void selectSorts(int[] arr) {
     for (int i = 0; i < arr.length - 1; i++) {
         int min = arr[i];
         int minIndex = i;
         for (int j = i + 1; j < arr.length; j++) {
             if (arr[j] < min) {
                 min = arr[j];
                 minIndex = j;
             }
         }
         arr[minIndex] = arr[i];
         arr[i] = min;
         System.out.println("第"+(i+1)+"轮交换数据:"+Arrays.toString(arr));
     }
 }
运行结果
第1轮交换数据:[1, 3, 7, 5]
第2轮交换数据:[1, 3, 7, 5]
第3轮交换数据:[1, 3, 5, 7]
可以发现第2轮交换时,3本身就是最小的,但是还是进行了一次交换,所以我们可以从这个地方进行优化
 public static void selectSorts(int[] arr) {
     for (int i = 0; i < arr.length - 1; i++) {
         int min = arr[i];
         int minIndex = i;
         for (int j = i + 1; j < arr.length; j++) {
             if (arr[j] < min) {
                 min = arr[j];
                 minIndex = j;
             }
         }
         // 选择排序优化 如果这一轮中自己就是最小值则不需要交换
         if (minIndex != i) {
             // 在选择排序中找到最小值的索引并进行交换
             arr[minIndex] = arr[i];
             arr[i] = min;
             System.out.println("第" + (i + 1) + "轮交换数据:" + Arrays.toString(arr));
         }
     }
 }
运行结果
第1轮交换数据:[1, 3, 7, 5]
第3轮交换数据:[1, 3, 5, 7]
希尔排序
插入排序存在一个缺点,例如数组arr = {2,3,4,5,6,1}
展示的是要移动 1 这个数,的过程,由于在最后,需要前面的所有数都往后移动一位
{2,3,4,5,6,6}
{2,3,4,5,5,6}
{2,3,4,4,5,6}
{2,3,3,4,5,6}
{2,2,3,4,5,6}
{1,2,3,4,5,6}
当需要插入的数是较小的数时,后移的次数明显增多,对效率有影响,希尔排序是对插入排序的一个增强。
原始数组

初始步长为 gap=length/2,那么意味着整个数组被分为五组,分别是[8,3],[9,5],[1,4],[7,6],[2,0],因为步长是5,所以 数组 索引0 和5 对应的值分为一组,以此类推。
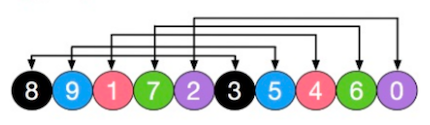
对以上五组数据分别插入排序,得到以下结果
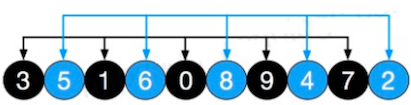
然后缩小增量 gap = 5 / 2 = 2,则数组被分为 2 组 [3,1,0,9,7] 和 [5,6,8,4,2]
对以上两组数据进行插入排序

然后再缩小增量 gap = 2 / 2 = 1,则整个数组被当成一组,再进行一次直接插入排序。由于基本上是有序的了,所以少了很多次的调整
希尔排序的推演过程
 // 希尔排序的实现
    public static void ShellSort(int[] arr) {
        // 根据步长进行分组,初始步长为数组长度的一半
        // 通过交换实现每个分组内的插入排序,逐渐减小步长直到为1

        int temp = 0;
        // 第一次分组,步长为10/2=5
        for (int i = 5; i < arr.length; i++) {
            for (int j = i - 5; j >= 0; j -= 5) {
                if (arr[j] > arr[j + 5]) {
                    temp = arr[j];
                    arr[j] = arr[j + 5];
                    arr[j + 5] = temp;
                }
            }
        }
        System.out.println("第一次分组后:" + Arrays.toString(arr));
        // 第二次分组,步长为5/2=2
        for (int i = 2; i < arr.length; i++) {
            for (int j = i - 2; j >= 0; j -= 2) {
                if (arr[j] > arr[j + 2]) {
                    temp = arr[j];
                    arr[j] = arr[j + 2];
                    arr[j + 2] = temp;
                }
            }
        }
        System.out.println("第二次分组后:" + Arrays.toString(arr));
        // 第三次分组,步长为2/2=1
        for (int i = 1; i < arr.length; i++) {
            for (int j = i - 1; j >= 0; j--) {
                if (arr[j] > arr[j + 1]) {
                    temp = arr[j];
                    arr[j] = arr[j + 1];
                    arr[j + 1] = temp;
                }
            }
        }
        System.out.println("第三次分组后:" + Arrays.toString(arr));
    }
结果为
第一次分组后:[3, 5, 1, 6, 0, 8, 9, 4, 7, 2]
第二次分组后:[0, 2, 1, 4, 3, 5, 7, 6, 9, 8]
第三次分组后:[0, 1, 2, 3, 4, 5, 6, 7, 8, 9]
希尔排序-交换法代码
    public static void ShellSort3(int[] arr) {
        int temp = 0;
        // 希尔排序
        for (int gap = arr.length / 2; gap > 0; gap /= 2) {
            for (int i = gap; i < arr.length; i++) {
                for (int j = i - gap; j >= 0; j -= gap) {
                    if (arr[j] > arr[j + gap]) {
                        temp = arr[j];
                        arr[j] = arr[j + gap];
                        arr[j + gap] = temp;
                    }
                }
            }
        }
    }
希尔排序-移动法
    // 希尔排序的实现
    public static void ShellSort2(int[] arr) {
        // 根据步长进行分组,初始步长为数组长度的一半
        // 通过插入排序实现每个分组内的排序,逐渐减小步长直到为1

        for (int gap = arr.length / 2; gap > 0; gap /= 2) {
            for (int i = gap; i < arr.length; i++) {
                // 保存当前元素
                int j = i;
                int temp = arr[j];
                if (arr[j] < arr[j - gap]) {
                    while (j - gap >= 0 && temp < arr[j - gap]) {
                        // 向前移动元素
                        arr[j] = arr[j - gap];
                        j -= gap;
                    }
                    // 将temp插入到正确位置
                    arr[j] = temp;
                }
            }
        }
    }

 浙公网安备 33010602011771号