vue+antv g6+element-ui完整流程图
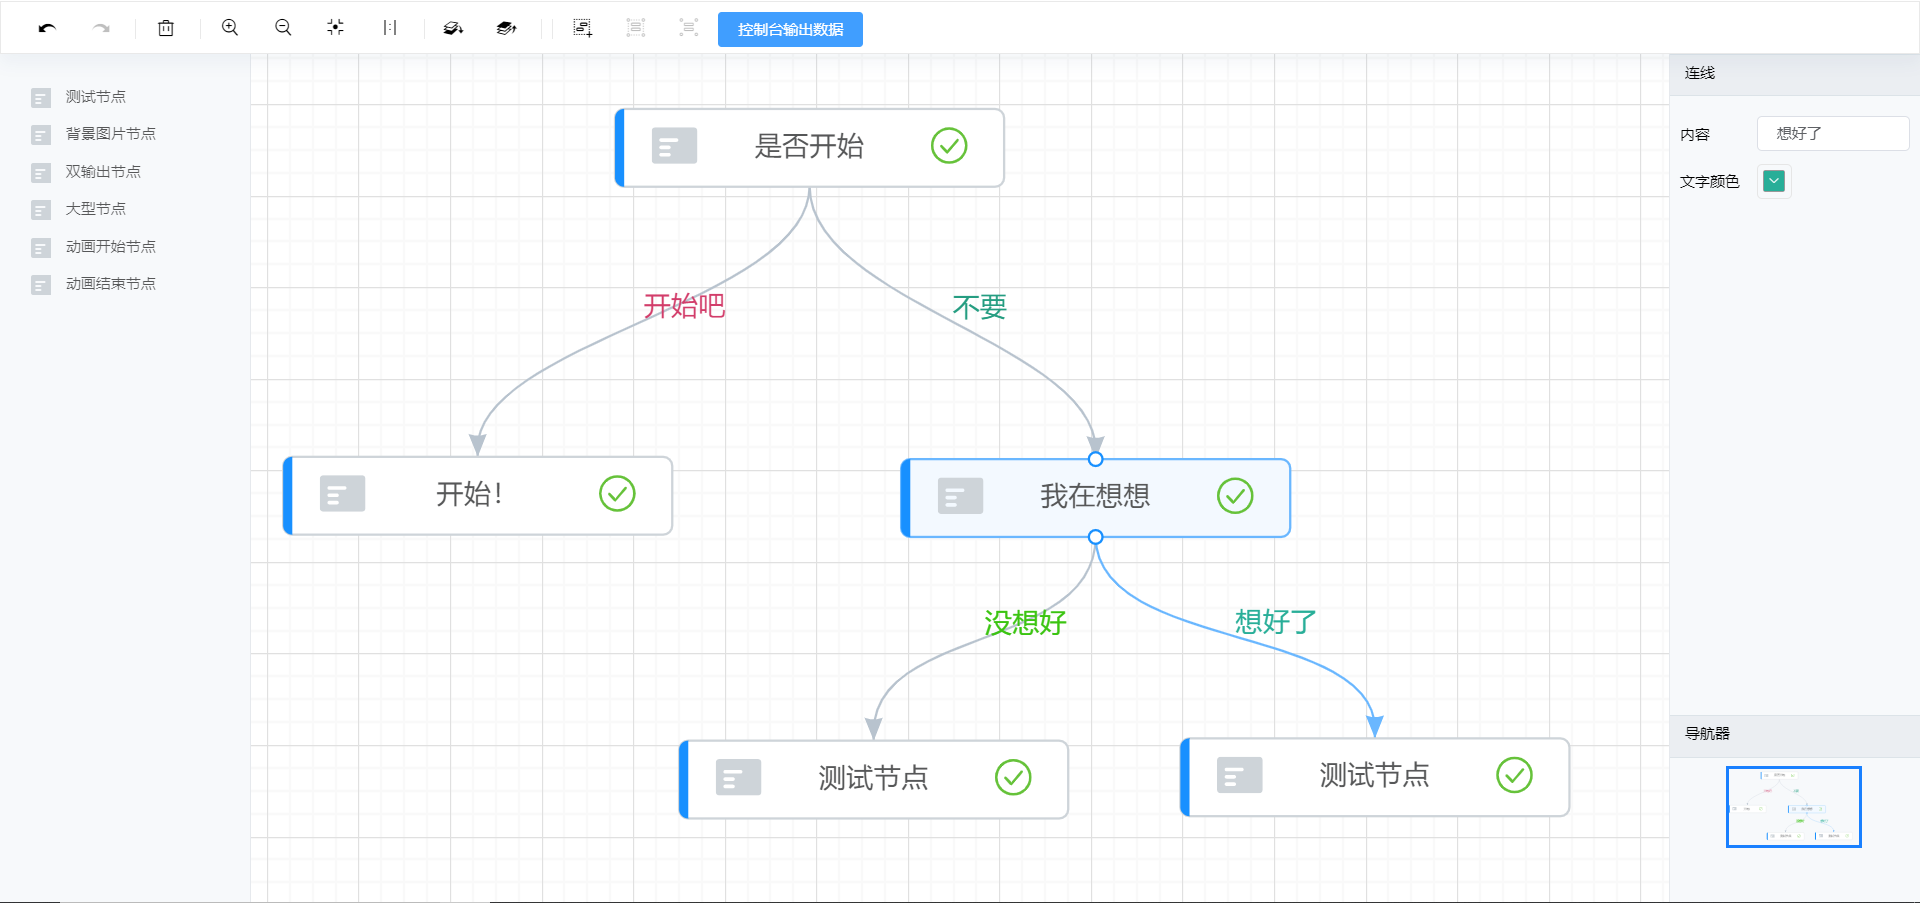
最近一直在研究流程图相关的技术,一次在逛GitHub时发现了一个技术栈为vue+g6+element-ui的项目,基础功能完好,如node与edge的托拉拽,主界面如下:
GitHub链接为:https://github.com/caoyu48/vue-g6-editor
线上访问地址为:http://62.234.69.136/
g6官方API文档:https://antv-g6.gitee.io/zh/docs/manual/introduction
但由于作者没有写代码的说明文档,本文仅仅只是我本人对读该源码的一些理解,如有不同理解还希望各位朋友指出订正。
一、本地运行
首先从上面的GitHub网址下载该项目,下载该项目需要的依赖包。这里很多人下载完依赖包之后发现启动报错无法运行,需要注意的是这里
不要使用cnpm install,一定要使用npm install!!!具体为什么cnpm不行,我也不知道。
二、给连线加上文字[本人自己增加]

1、修改src/components/DetailPanel/index.vue
<template>
  <div class="detailpannel">
    <div>
      <div v-if="status=='node-selected'" class="pannel" id="node_detailpannel">
        <div class="pannel-title">模型详情</div>
        <div class="block-container">
          <el-row :gutter="10">
            <el-col :span="8">名称</el-col>
            <el-col :span="16">
              <el-input v-model="node.label" @change="handleChangeName" />
            </el-col>
            <el-col :span="8">任意属性</el-col>
            <el-col :span="16">
              <el-input v-model="node.xxx" />
            </el-col>
          </el-row>
        </div>
      </div>
      <div v-if="status==='canvas-selected'" class="pannel" id="canvas_detailpannel">
        <div class="pannel-title">画布</div>
        <div class="block-container">
          <el-checkbox v-model="showGrid" @change="changeGridState">网格对齐</el-checkbox>
        </div>
      </div>
   <!--我添加的-->
      <div v-if="status === 'edge-selected'" id="edge_detailpannel" class="pannel">
        <div class="pannel-title">连线</div>
        <div class="block-container">
          <el-col :span="8">内容</el-col>
          <el-col :span="16">
            <el-input v-model="edge.label" @change="handleChange" />
          </el-col>
          <el-col :span="8">文字颜色</el-col>
          <el-col :span="16">
            <el-color-picker v-model="textColor" @change="handleChangeColor" />
          </el-col>
        </div>
      </div>
      <!-- <div v-if="status==='group-selected'" class="pannel" id="node_detailpannel">
        <div class="pannel-title">群组详情</div>
        <div class="block-container">
          <div class="p">
            名称:
            <el-input v-model="name" />
          </div>
          <div class="p">
            任意属性:
            <el-input v-model="color" />
          </div>
        </div>
      </div>
      -->
    </div>
  </div>
</template>

<script>
import eventBus from "@/utils/eventBus";
import Grid from "@antv/g6/build/grid";
export default {
  data() {
    return {
      status: "canvas-selected",
      showGrid: false,
      page: {},
      graph: {},
      item: {},
      node: {},
    //【我添加的】
      edge:{},
      grid: null,
      //【我添加的】
      textColor: 'rgba(19, 206, 102, 0.8)'
    };
  },
  created() {
    this.init();
    this.bindEvent();
  },
  methods: {
    init() {},
    bindEvent() {
      let self = this;
      eventBus.$on("afterAddPage", page => {
        self.page = page;
        self.graph = self.page.graph;
        eventBus.$on("nodeselectchange", item => {
          if (item.select === true && item.target.getType() === "node") {
            self.status = "node-selected";
            self.item = item.target;
            self.node = item.target.getModel();
          }
      //【我添加的】
      else if (item.select === true && item.target.getType() === "edge") {
            self.status = "edge-selected";
            self.item = item.target;
            self.edge = item.target.getModel();
          }
       else {
            self.status = "canvas-selected";
            self.item = null;
            self.node = null;
          }
        });
      });
    },
    handleChangeName(e) {
      const model = {
        label: e
      };
      this.graph.update(this.item, model);
    },
    changeGridState(value) {
      if (value) {
        this.grid = new Grid();
        this.graph.addPlugin(this.grid);
      } else {
        this.graph.removePlugin(this.grid);
      }
    },
  //【我添加的】
    handleChange(e) {
      const model = {
        label: e
      };
      console.log(model)
      this.graph.update(this.item, model);
    },
    handleChangeColor(e) {
      const model = {
        textColor: e
      };
      this.graph.update(this.item, model);
    }
  }
};
</script>

<style scoped>
.detailpannel {
  height: 100%;
  position: absolute;
  right: 0px;
  z-index: 2;
  background: #f7f9fb;
  width: 200px;
  border-left: 1px solid #e6e9ed;
}
.detailpannel .block-container {
  padding: 16px 8px;
}
.block-container .el-col {
  height: 28px;
  display: flex;
  align-items: center;
  margin-bottom: 10px;
}
.pannel-title {
  height: 32px;
  border-top: 1px solid #dce3e8;
  border-bottom: 1px solid #dce3e8;
  background: #ebeef2;
  color: #000;
  line-height: 28px;
  padding-left: 12px;
}
</style>
2、修改src/components/Flow/customEdge.js
import G6 from "@antv/g6/build/g6";
import { uniqueId } from '@/utils'
const MIN_ARROW_SIZE = 3

const customEdge = {
  init() {
    const dashArray = [
      [0, 1],
      [0, 2],
      [1, 2],
      [0, 1, 1, 2],
      [0, 2, 1, 2],
      [1, 2, 1, 2],
      [2, 2, 1, 2],
      [3, 2, 1, 2],
      [4, 2, 1, 2]
    ];

    const lineDash = [4,2,1,2];
    const interval = 9;
    G6.registerEdge('customEdge', {
      draw(cfg, group) {
        let sourceNode, targetNode, start, end
        if (typeof (cfg.souxrce) === 'string') {
          cfg.source = cfg.sourceNode
        }
        if(!cfg.start){
          cfg.start={
            x:0,
            y:17
          }
        }
        if(!cfg.end){
          cfg.end={
            x:0,
            y:-17
          }
        }
        if (!cfg.source.x) {
          sourceNode = cfg.source.getModel()
          start = { x: sourceNode.x + cfg.start.x, y: sourceNode.y + cfg.start.y }
        } else {
          start = cfg.source
        }
        if (typeof (cfg.target) === 'string') {
          cfg.target = cfg.targetNode
        }
        if (!cfg.target.x) {

          targetNode = cfg.target.getModel()
          end = { x: targetNode.x + cfg.end.x, y: targetNode.y +  cfg.end.y }
        } else {
          end = cfg.target
        }

        let path = []
        let hgap = Math.abs(end.x - start.x)
        if (end.x > start.x) {
          path = [
            ['M', start.x, start.y],
            [
              'C',
              start.x,
              start.y + hgap / (hgap / 50),
              end.x,
              end.y - hgap / (hgap / 50),
              end.x,
              end.y - 4
            ],
            [
              'L',
              end.x,
              end.y
            ]
          ]
        } else {
          path = [
            ['M', start.x, start.y],
            [
              'C',
              start.x,
              start.y + hgap / (hgap / 50),
              end.x,
              end.y - hgap / (hgap / 50),
              end.x,
              end.y - 4
            ],
            [
              'L',
              end.x,
              end.y
            ]
          ]
        }
        let lineWidth = 1;
        lineWidth = lineWidth > MIN_ARROW_SIZE ? lineWidth : MIN_ARROW_SIZE;
        const width = lineWidth * 10 / 3;
        const halfHeight = lineWidth * 4 / 3;
        const radius = lineWidth * 4;
        const endArrowPath = [
          ['M', -width, halfHeight],
          ['L', 0, 0],
          ['L', -width, -halfHeight],
          ['A', radius, radius, 0, 0, 1, -width, halfHeight],
          ['Z']
        ];
        const keyShape = group.addShape('path', {
          attrs: {
            id: 'edge' + uniqueId(),
            path: path,
            stroke: '#b8c3ce',
            lineAppendWidth: 10,
            endArrow: {
              path: endArrowPath,
            }
          }
        });
     //此处是我修改的,增加连线的样式即线上文本
        if (cfg.label) {
          group.addShape('text', {
            attrs: {
              id: 'edgeText' + uniqueId(),
              x: end.x - (end.x - start.x) / 2,
              y: end.y - (end.y - start.y) / 2,
              text: cfg.label,
              fill: cfg.textColor ? cfg.textColor : '#000000'
            }
          })
        }
        return keyShape
      },
      afterDraw(cfg, group) {
        if (cfg.source.getModel().isDoingStart && cfg.target.getModel().isDoingEnd) {
          const shape = group.get('children')[0];
          const length = shape.getTotalLength(); // G 增加了 totalLength 的接口
          let totalArray = [];
          for (var i = 0; i < length; i += interval) {
            totalArray = totalArray.concat(lineDash);
          }
          let index = 0;
          shape.animate({
            onFrame() {
              const cfg = {
                lineDash: dashArray[index].concat(totalArray)
              };
              index = (index + 1) % interval;
              return cfg;
            },
            repeat: true
          }, 3000);
        }
      },
      setState(name, value, item) {
        const group = item.getContainer();
        const shape = group.get("children")[0];
        const selectStyles = () => {
          shape.attr("stroke", "#6ab7ff");
        };
        const unSelectStyles = () => {
          shape.attr("stroke", "#b8c3ce");
        };

        switch (name) {
          case "selected":
          case "hover":
            if (value) {
              selectStyles()
            } else {
              unSelectStyles()
            }
            break;
        }
      }
    });
    G6.registerEdge('link-edge', {
      draw(cfg, group) {
        let sourceNode, targetNode, start, end
        if (!cfg.source.x) {
          sourceNode = cfg.source.getModel()
          start = { x: sourceNode.x + cfg.start.x, y: sourceNode.y + cfg.start.y }
        } else {
          start = cfg.source
        }
        if (!cfg.target.x) {
          targetNode = cfg.target.getModel()
          end = { x: targetNode.x + cfg.end.x, y: targetNode.y + cfg.end.y }
        } else {
          end = cfg.target
        }

        let path = []
        path = [
          ['M', start.x, start.y],
          ['L', end.x, end.y]
        ]
        const keyShape = group.addShape('path', {
          attrs: {
            id: 'edge' + uniqueId(),
            path: path,
            stroke: '#1890FF',
            strokeOpacity: 0.9,
            lineDash: [5, 5]
          }
        });
        return keyShape
      },
    });
  }
}

export default customEdge
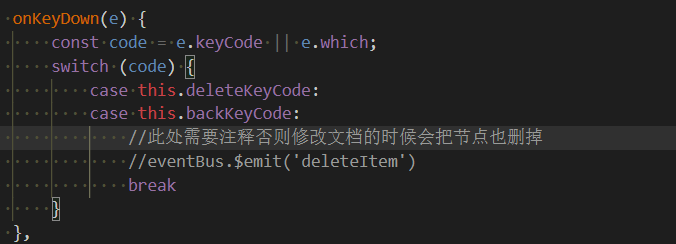
三、发现的BUG

当删除文本框中的内容时,会发现连节点也删除了,解决办法就是修改src/behavior/keyboard.js

本文来自博客园,作者:sum墨,转载请注明原文链接:https://www.cnblogs.com/wlovet/p/12660214.html

