


JDK1.8HashMap源码深入解析
此版本的HashMap在Hash函数上进行了改造
来对比代码:
JDK1.6 下面是放入entry的put方法,重点是标红的这句;hashCode()是Object的方法,是个本地native,我们看不到,只要晓得返回一个hash码就好
    public V put(K key, V value) {
        if (key == null)
            return putForNullKey(value);
        int hash = hash(key.hashCode());
        int i = indexFor(hash, table.length);
        for (Entry<K,V> e = table[i]; e != null; e = e.next) {
            Object k;
            if (e.hash == hash && ((k = e.key) == key || key.equals(k))) {
                V oldValue = e.value;
                e.value = value;
                e.recordAccess(this);
                return oldValue;
            }
        }

        modCount++;
        addEntry(hash, key, value, i);
        return null;
    }
HashMap内部自带的hash方法如下:
   static int hash(int h) {
        // This function ensures that hashCodes that differ only by
        // constant multiples at each bit position have a bounded
        // number of collisions (approximately 8 at default load factor).
        h ^= (h >>> 20) ^ (h >>> 12);
        return h ^ (h >>> 7) ^ (h >>> 4);
    }
这个hash函数的使用效率还是很高,内部各种位移及逻辑运输,读者不用纠结其具体的含义,函数函数本来就如同一个搅拌器一样,就是想要将你搞晕,给出一个签名而已。
-----------------------------------------------------------------分割-----------------------------------------------------------------------------------------------
下面是JDK1.8的hash函数
 static final int hash(Object key) {
        int h;
        return (key == null) ? 0 : (h = key.hashCode()) ^ (h >>> 16);
    }
这个hash函数的计算效率比JDK1.6的高出很多,其中的计算逻辑也简洁了许多
-----------------------------------------------------------------分割-----------------------------------------------------------------------------------------------
JDK1.8的put源码
 public V put(K key, V value) {
        return putVal(hash(key), key, value, false, true);
    }
重点就是这个putVal,继续看
final V putVal(int hash, K key, V value, boolean onlyIfAbsent,
                   boolean evict) {//hash是上面hash函数搅拌后给出的签名,k v不解释,
                   //onlyIfAbsent----如果为true,则不更改现有值,默认是false,这是默认的,你改不了
                   //evict  如果为false,则表处于创建模式,默认为true,你改不了
        Node<K,V>[] tab; //tab就是Hash表了,这个东西很关键,其中的结构很精巧
        Node<K,V> p; //大家都知道,这个是节点,放k v 值的,不解释
        int n, i;
        //1. 如果hash表是个处女(为null),那么来完成一次扩容吧
        if ((tab = table) == null || (n = tab.length) == 0)
            n = (tab = resize()).length;
        //2. 获取当前key对应的节点,若木有,那就new呗,使用 newNode
        if ((p = tab[i = (n - 1) & hash]) == null)
            tab[i] = newNode(hash, key, value, null);
        else {//如果有了这个节点,那就放入值
            Node<K,V> e; K k;
            //key的hash相同,key的引用相同或者key equals,则覆盖
            if (p.hash == hash &&
                ((k = p.key) == key || (key != null && key.equals(k))))
                e = p;
            //如果当前节点是一个红黑树的树节点,那么就添加树节点
            else if (p instanceof TreeNode)
                e = ((TreeNode<K,V>)p).putTreeVal(this, tab, hash, key, value);
            //不是红黑树节点,也不是相同节点,那就是有hash碰撞后的使用链表模式了
            else {
                for (int binCount = 0; ; ++binCount) {//使用循环找到最后那个节点,放心这个for的量不会很大
                    if ((e = p.next) == null) {
                        p.next = newNode(hash, key, value, null);
                        //如果链表长度大等于7,那么转成红黑树,TREEIFY_THRESHOLD是个默认值8
                        if (binCount >= TREEIFY_THRESHOLD - 1) // -1 for 1st
                            treeifyBin(tab, hash);
                        break;
                    }
                    //如果链表中有相同的节点,就做覆盖
                    if (e.hash == hash &&
                        ((k = e.key) == key || (key != null && key.equals(k))))
                        break;
                    p = e;
                }
            }
            if (e != null) { // existing mapping for key
                V oldValue = e.value;
                是否替换掉value值
                if (!onlyIfAbsent || oldValue == null)
                    e.value = value;
                afterNodeAccess(e);
                return oldValue;
            }
        }
        //记录修改的次数
        ++modCount;
        //是否超过容量,万一过了,每关系,扩容
        if (++size > threshold)
            resize();
        afterNodeInsertion(evict);
        return null;
    }//这就完成了put代码的基本解释
有的公司的面试官可能问你,来来来,谈一下JDK1.8HashMap中的扩容问题,没关系,看图(笔者认为,看懂一张图比看文字更容易记忆)
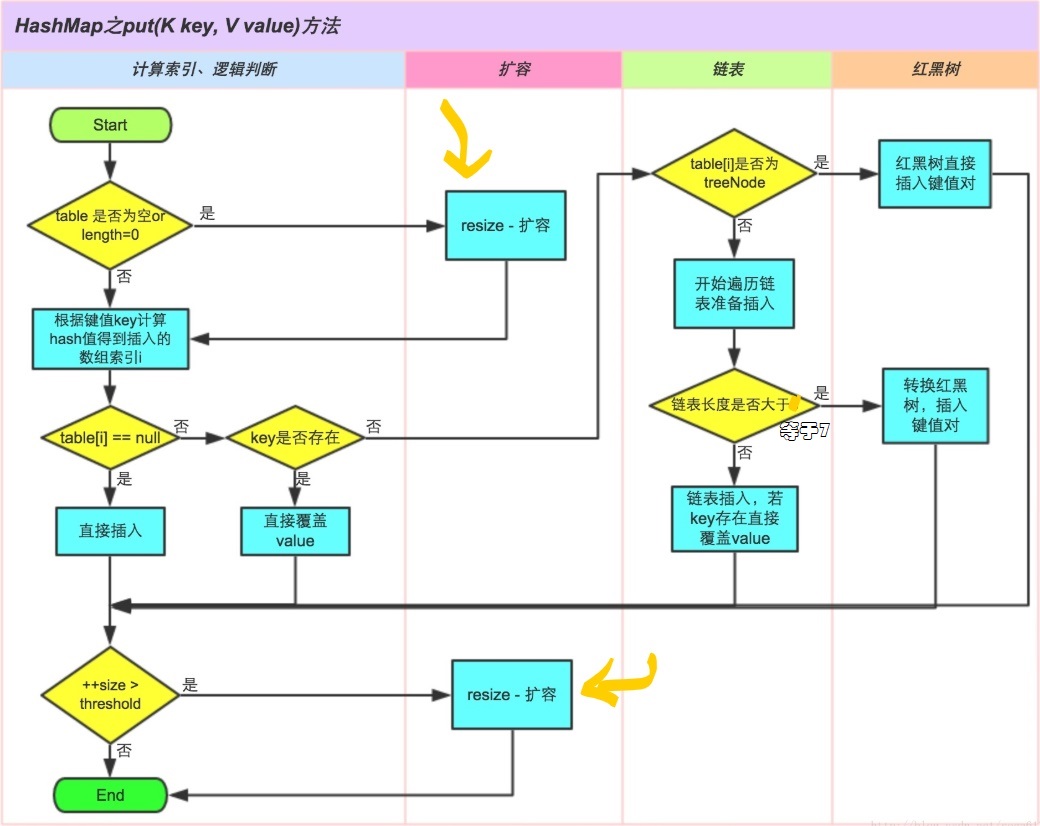
put中有两次扩容判定,一前一后,可谓攻守兼备,非常科学。
