NET Core【IdentityServer4单点登录】+【退出登录】
第一天接触NetCore,感觉坑很多,其他都还良好

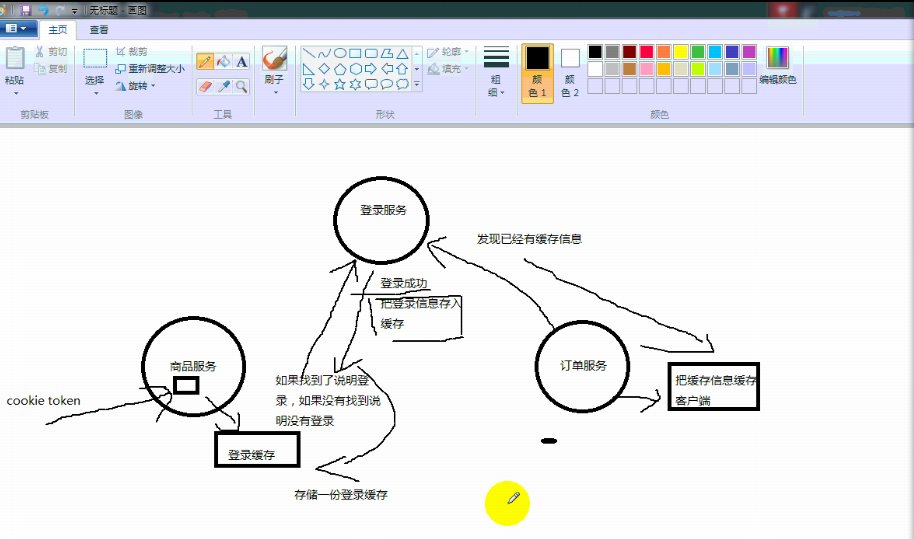
比如说我们现在有三个系统,一个是商品系统,一个是订单系统,另外一个就是单独的登录系统,
当我们要访问商品系统或者订单系统的时候,我们首先得判断一下我们的本地客户端是否有登录缓存,
如果没有的话就会再到统一的认证中心去找,如果还是没有,就会自动跳转到登录页面,登录成功后,
我们要访问订单系统或者商品系统时,就直接在自己本地客户端取出登录缓存即可,
但是得做一下相关的操作,在订单和商品服务的StartUp.cs里面都要添加一下服务记录登录状态
- services.AddAuthentication(options =>
- {
- options.DefaultScheme = "Cookies";
- options.DefaultChallengeScheme = "oidc";
- })
- .AddCookie("Cookies")
- .AddOpenIdConnect("oidc", options =>
- {
- options.SignInScheme = "Cookies";
- options.Authority = "http://localhost:56772"; //登陆中心的地址
- options.RequireHttpsMetadata = false;
- options.ClientId = ".net58_Order";
- options.SaveTokens = true;
- });
以及添加身份验证和session中间件
- //身份验证
- app.UseAuthentication();
- //启用session中间件
- app.UseSession();
这几样都是必不可少的,另外我们还得在登录系统里面加一个Config.cs类
- public class Config
- {
- // scopes define the resources in your system
- public static IEnumerable<IdentityResource> GetIdentityResources()
- {
- return new List<IdentityResource>
- {
- new IdentityResources.OpenId(),
- new IdentityResources.Profile(),
- };
- }
- // clients want to access resources (aka scopes)
- public static IEnumerable<Client> GetClients()
- {
- return new List<Client>
- {
- // OpenID Connect隐式流客户端(MVC)
- new Client
- {
- ClientId = ".net58_Order", //订单系统
- ClientName = "MVC Client",
- AllowedGrantTypes = GrantTypes.Implicit,//隐式方式
- RequireConsent=false,//如果不需要显示否同意授权 页面 这里就设置为false
- RedirectUris = { "http://localhost:56574/signin-oidc" },//登录成功后返回的订单系统客户端地址
- //PostLogoutRedirectUris = { "http://localhost:56574/signout-callback-oidc" },//注销登录后返回的客户端地址
- AllowedScopes =
- {
- IdentityServerConstants.StandardScopes.OpenId,
- IdentityServerConstants.StandardScopes.Profile
- }
- },
- new Client
- {
- ClientId = ".net58_product", //商品系统
- ClientName = "MVC Client",
- AllowedGrantTypes = GrantTypes.Implicit,//隐式方式
- RequireConsent=false,//如果不需要显示否同意授权 页面 这里就设置为false
- RedirectUris = { "http://localhost:55447/signin-oidc" },//登录成功后返回的商品系统客户端地址
- //PostLogoutRedirectUris = { "http://localhost:55447/signout-callback-oidc" },//注销登录后返回的客户端地址
- AllowedScopes =
- {
- IdentityServerConstants.StandardScopes.OpenId,
- IdentityServerConstants.StandardScopes.Profile
- }
- }
- };
- }
- }
一定要记得在订单和商品将属性[Authorize]置于整个Controller之上。当用户有操作时,进入控制器前都会先验证用户是否登录,或者存储用户信息过期从而返回登录界面。
- [Authorize]
//查询用户名和密码
- public class UserDAL : IUserDAL
- {
- private readonly MyContext myContext;
- //构造函数注入
- public UserDAL(MyContext myContext2)
- {
- myContext = myContext2;
- }
- public Users Login(string UserName, string Userpwd)
- {
- Users users = myContext.Users.Where(a => a.UserName == UserName && a.UserPwd == Userpwd).FirstOrDefault();
- return users;
- }
- //异步
- public Task<Users> LoginAsync(string UserName, string Userpwd)
- {
- Task.Run(() =>
- {
- Users users = myContext.Users.Where(a => a.UserName == UserName && a.UserPwd == Userpwd).FirstOrDefault();
- return users;
- });
- return null;
- }
- }
IUserDAL接口
- namespace LoginSystem.DAL.Interface
- {
- public interface IUserDAL
- {
- Users Login(string UserName, string Userpwd);
- Task<Users> LoginAsync(string UserName, string Userpwd);
- }
- }
在登录系统的StartUp.cs类里面的这个ConfigureServices方法里面添加点配置
- //配置依赖注入关系
- services.AddTransient<IUserDAL, UserDAL>();
- services.AddDbContext<MyContext>(option => {
- option.UseSqlServer("Data Source =.; Initial Catalog =My; User ID = sa; Password = 123456");
- });
- services.AddIdentityServer()//Ids4服务
- .AddDeveloperSigningCredential()//添加开发人员签名凭据
- .AddInMemoryIdentityResources(Config.GetIdentityResources()) //添加内存apiresource
- .AddInMemoryClients(Config.GetClients());//把配置文件的Client配置资源放到内存
另外在登录系统里面启用一下id这个服务,这个服务也需要我们自己下载,版本根据个人需求下就可以啦
- 下载包:install-package identityServer4 -version 2.1.1
- //启用id4
- app.UseIdentityServer();
再来说一下关于登录系统里面的登录,
NetCore里面是没有Session,我们要使用的话,得自己下载一下,需要哪种版本根据自己需求下
- 下载包:Install-package Microsoft.AspNetCore.Session -Version 2.1.1
- public class AccountController : Controller
- {
- /// <summary>
- /// 登录页面
- /// </summary>
- [HttpGet]
- public IActionResult Login(string returnUrl = null)
- {
- ViewData["returnUrl"] = returnUrl;
- return View();
- }
- //依赖注入
- private readonly IIdentityServerInteractionService _interaction;
- private readonly IUserDAL _userDAL;
- public AccountController(IIdentityServerInteractionService interaction, IUserDAL userDAL )
- {
- _interaction = interaction;
- _userDAL = userDAL;
- }
- //内部跳转
- private IActionResult RedirectToLocal(string returnUrl)
- {
- if (Url.IsLocalUrl(returnUrl))
- {
- //如果是本地
- return Redirect(returnUrl);
- }
- return RedirectToAction(nameof(HomeController.Index), "Home");
- }
- /// <summary>
- /// 登录post回发处理
- /// </summary>
- [HttpPost]
- public async Task<IActionResult> Login(string userName, string password, string returnUrl = null)
- {
- ViewData["returnUrl"] = returnUrl;
- Users users = _userDAL.Login(userName, password);
- //判断是否为空
- if (users != null)
- {
- AuthenticationProperties props = new AuthenticationProperties
- {
- IsPersistent = true,
- ExpiresUtc = DateTimeOffset.UtcNow.Add(TimeSpan.FromDays(1)),
- };
- //注意这里应该引用Microsoft.AspNetCore.Http这个下面的
- await HttpContext.SignInAsync("2123", userName, props);
- //HttpContext.SignOutAsync();
- if (returnUrl != null)
- {
- return RedirectToLocal(returnUrl);//登陆成功跳转原地址
- //return Redirect("http://localhost:44396/home/index");
- }
- return View();
- }
- else
- {
- return Content("登录失败");
- }
- }
- }
登录页面的代码
- @{
- Layout = null;
- }
- <html>
- <head>
- <meta name="viewport" content="width=device-width" />
- <title>Login</title>
- <script>
- new Oidc.UserManager().signinRedirectCallback().then(function (user) {
- alert("登录成功后跳转");
- alert(user.state);
- window.location = user.state;
- }).catch(function (e) {
- console.error(e);
- });
- </script>
- </head>
- <body>
- <div align="center">
- <h1>登录认证中心</h1>
- <form method="post" action="/Account/Login">
- 用户名:<input type="text" name="userName" /><br />
- 密 码:<input type="password" name="password" />
- <input type="hidden" name="returnUrl" value="@ViewData["returnUrl"]" /> <br />
- <input type="submit" value="登录" />
- </form>
- </div>
- </body>
- </html>
如果没有登录,订单系统和商品系统都会自动跳转回到登录界面

登录成功后的订单页面和商品页面


再来说一下退出登录
首先在商品系统的index.cshtml页面,写一个退出登录的a标签事件
- <a href="/account/Logout" style="float:right;color:#ff0000;font-size:30px">退出登录</a>
接下来就是在登录系统里边写相关操作
- //退出登录
- private readonly IIdentityServerInteractionService _interaction;
- public AccountController(IIdentityServerInteractionService interaction)
- {
- _interaction = interaction;
- }
- [
- public async Task<IActionResult> Logout(string logoutId)
- {
- //做如下改动,则会动态的跳转到原来的地址
- var logout = await _interaction.GetLogoutContextAsync(logoutId);
- await HttpContext.SignOutAsync();
- if (logout.PostLogoutRedirectUri != null)
- {
- return Redirect(logout.PostLogoutRedirectUri);
- }
- var refererUrl = Request.Headers["Referer"].ToString();
- return Redirect(refererUrl);
- }
再到Home控制器里边向IdentityServer进行往返,目的清除单点登录会话
- public IActionResult Logout()
- {
- return SignOut("Cookies", "oidc");
- }
步骤有点多,会被绕晕,得慢慢来,特别是那些地址,千万不能填错,坑也很多,得踩过之后才知道!


【推荐】国内首个AI IDE,深度理解中文开发场景,立即下载体验Trae
【推荐】编程新体验,更懂你的AI,立即体验豆包MarsCode编程助手
【推荐】抖音旗下AI助手豆包,你的智能百科全书,全免费不限次数
【推荐】轻量又高性能的 SSH 工具 IShell:AI 加持,快人一步
· 记一次.NET内存居高不下排查解决与启示
· 探究高空视频全景AR技术的实现原理
· 理解Rust引用及其生命周期标识(上)
· 浏览器原生「磁吸」效果!Anchor Positioning 锚点定位神器解析
· 没有源码,如何修改代码逻辑?
· 分享4款.NET开源、免费、实用的商城系统
· 全程不用写代码,我用AI程序员写了一个飞机大战
· MongoDB 8.0这个新功能碉堡了,比商业数据库还牛
· 白话解读 Dapr 1.15:你的「微服务管家」又秀新绝活了
· 上周热点回顾(2.24-3.2)