博客园如何自定义博客皮肤和主题
当我们对博客园默认的主题产生审美疲劳的时候,都希望自己的博客拥有一个特殊的主题背景,厌倦了花里胡哨的我终于弄出了一个自己的博客主题,这个简约的主题设置过程如下:
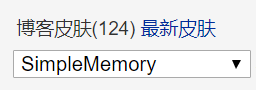
首先需要把博客皮肤设置成一个最简约的模板"SimpleMemory",方便进行之后的设置:
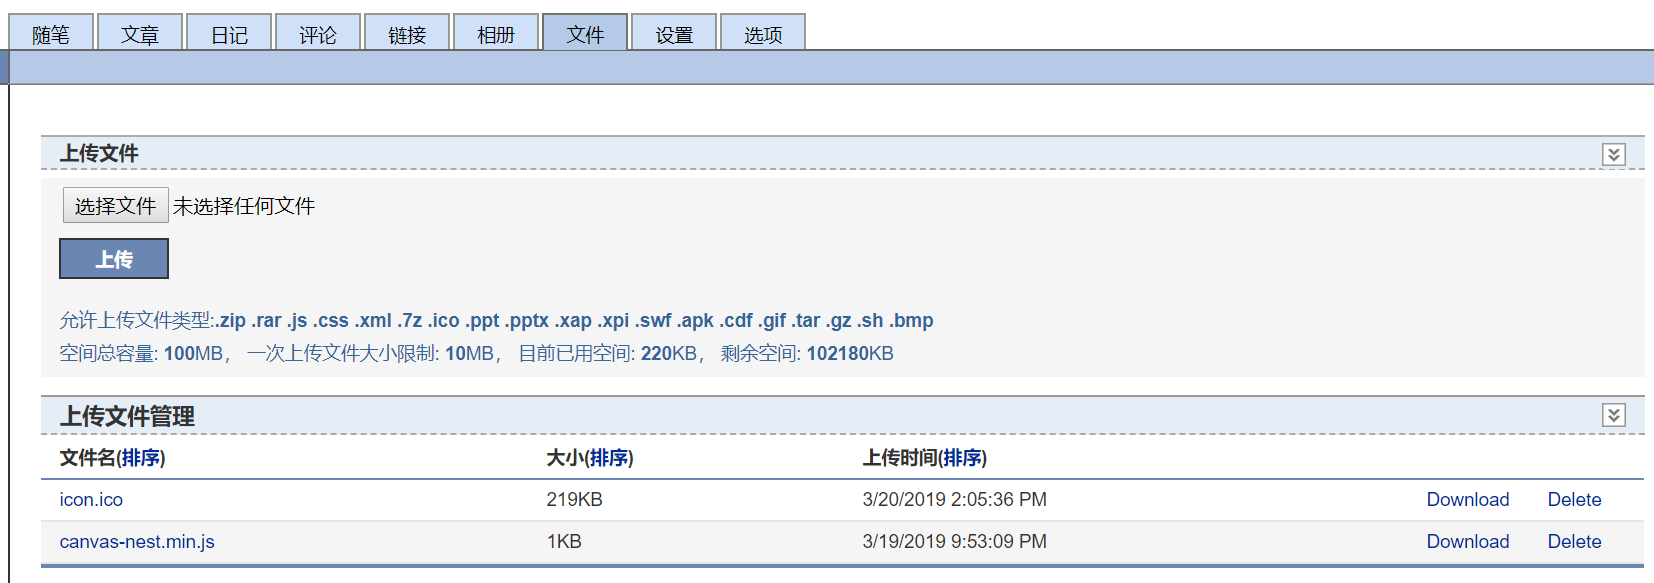
然后在文件选项中上传自己想要的博客图标(ico格式且背景透明)和一个js动态交互背景文件:
这是我的QQ头像:

必须在Photoshop中把该图片的白色背景去掉变透明,保存转换成ico图标,因为博客园目前只支持上传bmp和ico格式的图片,而bmp是不能让背景透明的,所以必须转化一下。但是如果你不介意自己的博客图标有白底,是不用转换的,而我比较注重一体感,透明图标看起来更舒服,一体感更强
js文件中的代码如下:
!function(){function o(w,v,i){return w.getAttribute(v)||i}function j(i){return document.getElementsByTagName(i)}function l(){var i=j("script"),w=i.length,v=i[w-1];return{l:w,z:o(v,"zIndex",-1),o:o(v,"opacity",1),c:o(v,"color","255,0,0"),n:o(v,"count",99)}}function k(){r=u.width=window.innerWidth||document.documentElement.clientWidth||document.body.clientWidth,n=u.height=window.innerHeight||document.documentElement.clientHeight||document.body.clientHeight}function b(){e.clearRect(0,0,r,n);var w=[f].concat(t);var x,v,A,B,z,y;t.forEach(function(i){i.x+=i.xa,i.y+=i.ya,i.xa*=i.x>r||i.x<0?-1:1,i.ya*=i.y>n||i.y<0?-1:1,e.fillRect(i.x-0.5,i.y-0.5,1,1);for(v=0;v<w.length;v++){x=w[v];if(i!==x&&null!==x.x&&null!==x.y){B=i.x-x.x,z=i.y-x.y,y=B*B+z*z;y<x.max&&(x===f&&y>=x.max/2&&(i.x-=0.03*B,i.y-=0.03*z),A=(x.max-y)/x.max,e.beginPath(),e.lineWidth=A/2,e.strokeStyle="rgba("+s.c+","+(A+0.2)+")",e.moveTo(i.x,i.y),e.lineTo(x.x,x.y),e.stroke())}}w.splice(w.indexOf(i),1)}),m(b)}var u=document.createElement("canvas"),s=l(),c="c_n"+s.l,e=u.getContext("2d"),r,n,m=window.requestAnimationFrame||window.webkitRequestAnimationFrame||window.mozRequestAnimationFrame||window.oRequestAnimationFrame||window.msRequestAnimationFrame||function(i){window.setTimeout(i,1000/45)},a=Math.random,f={x:null,y:null,max:20000};u.id=c;u.style.cssText="position:fixed;top:0;left:0;z-index:"+s.z+";opacity:"+s.o;j("body")[0].appendChild(u);k(),window.onresize=k;window.onmousemove=function(i){i=i||window.event,f.x=i.clientX,f.y=i.clientY},window.onmouseout=function(){f.x=null,f.y=null};for(var t=[],p=0;s.n>p;p++){var h=a()*r,g=a()*n,q=2*a()-1,d=2*a()-1;t.push({x:h,y:g,xa:q,ya:d,max:6000})}setTimeout(function(){b()},100)}();
最后到设置选项中添加以下代码:
子标题中添加:
<a href="https://github.com/TristesseWang" target="_blank">点击跳转到皮皮嘉的github</a>
页面定制CSS代码中添加:
#home {
    background-color: #fff;
    box-shadow: 0 2px 6px rgba(100, 100, 100, 0.3);
    margin: 50px auto;
    min-width: 950px;
    padding: 30px;
    width: 85%;
}

#blogTitle h1
{
        font-size: 40px;
        font-weight: bold;
        line-height: 1.5em;
        margin-top: 10px;
}
#navigator {
    border-bottom: 1px solid #ededed;
    border-top: 1px solid #ededed;
    clear: both;
    font-size: 16px;
    height: 60px;
    margin-top: 25px;
}

#blogTitle h1 a {
    color: #473c8b;
}
#blogTitle h1 a:hover{
color:#ff6347;
}

#blogTitle h2 {
    color: #4682b4;
    float: left;
    font-size: 1.2rem;
    font-weight: normal;
    line-height: 1.84615;
}
#blogTitle h2:hover {
    color: #ff6347;
    float: left;
    font-size: 1.2rem;
    font-weight: normal;
    line-height: 1.84615;
}
#navList a:link, #navList a:visited, #navList a:active {
    color: #21759b;
    font-weight: bold;
}

#navList a:hover {
    color: #ff6347;
    font-size: 17px;
    font-weight: bold;
}
.postTitle a:hover {
    color: #ff6347;
    margin-left: 30px;
    text-decoration: none;
}
body {
    background-color: #ddffff;
    color: #000;
    font-family: "Helvetica Neue",Helvetica,Verdana,Arial,sans-serif;
    font-size: 12px;
    min-height: 101%;
}
/*
canvas{
background-color: #ffffff;
background-image: linear-gradient(180deg, #ffffff 6%, #f7eb54 31%, #f56c6c 49%, #f924dd 75%, #1b60fb 100%);
}
*/
页首Html代码中添加:
<!-- 背景动画 -->
<canvas id="c_n9" width="1920" height="990" style="position: fixed; top: 0px; left: 0px; z-index: -1; opacity: 1;"></canvas>
<script src="https://files.cnblogs.com/files/wjw2018/canvas-nest.min.js"></script>
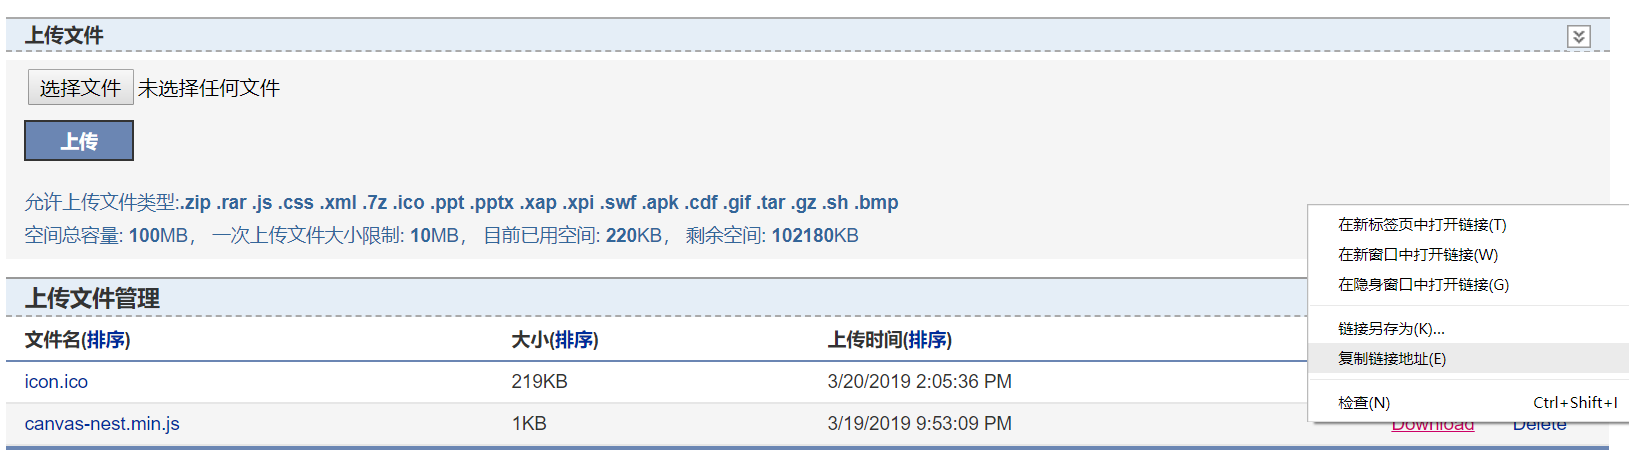
鼠标右击之前上传的js文件的Download,选则复制链接地址,即可得到js文件的链接地址"https://files.cnblogs.com/files/wjw2018/canvas-nest.min.js"
页脚Html代码中添加:
<script type="text/javascript" language="javascript">
  //Setting ico for cnblogs
  var linkObject = document.createElement('link');
  linkObject.rel = "shortcut icon";
  linkObject.href = "https://files.cnblogs.com/files/wjw2018/icon.bmp";
  document.getElementsByTagName("head")[0].appendChild(linkObject);
</script>
鼠标右击之前上传的ico文件的Download,选则复制链接地址,即可得到ico文件的链接地址"https://files.cnblogs.com/files/wjw2018/icon.ico"
