

TICK/TIGK运维栈安装运行【上】
TICK/TIGK运运维metrics栈包括
InfuluxDB:为时间序列数据专门定制的高性能数据存储。TSM引擎允许高速接收和数据压缩。完全go语言编写。编译成一个单一的二进制,没有外部依赖。简单,高效写入和查询HTTP(S) APIs。
Telegraf:TICK运维栈的在目标机器上的Agent采集工具,作为服务而言它很轻量级,并且扩展性也强,支持在linux系统下使用脚本对应用,容器等进行监控,监控采集的数据会发送给InfluxDB。
Chronograf:管理员用户界面和平台可视化引擎。它使你的基础设施的监视和告警变得易于设置和维护。它使用起来很简单,包括模板和库,可以让您快速构建仪表板,实现数据的实时可视化,并且可以轻松创建告警和自动化规则。Grafana更成熟,用Grafana替代它。
Grafana:一个功能齐全的度量仪表盘软件,支持从多种数据源读取数据用图表显示,界面美观,有冲击力,功能设计方便实用。多用于可视化基础实施和应用分析的时间序列数据,也可应用在其它领域,包括工业传感器、家庭自动化、天气和过程控制。
Kapacitor:用于时序数据分析、处理引擎。它可以处理来自InfluxDB的流数据和批量数据。Kapacitor允许插入用户自定义的逻辑或用户自定义的函数来处理基于动态门限的告警,匹配模式指标,计算统计异常,并根据这些告警执行特定动作,比如动态负载均衡。支持多种方式告警。
本文基于Centos
influxdb
添加源
cat <<EOF | sudo tee /etc/yum.repos.d/influxdb.repo
[influxdb]
name = InfluxDB Repository - RHEL \$releasever
baseurl = https://repos.influxdata.com/rhel/\$releasever/\$basearch/stable
enabled = 1
gpgcheck = 1
gpgkey = https://repos.influxdata.com/influxdb.key
EOF
安装
yum -y install influxdb
默认没有用户名密码,需创建
influx
CREATE USER "root" WITH PASSWORD 'root' WITH ALL PRIVILEGES
注:先设置用户名密码再改如下配置,因为涉及auth-enabled = true
vim /etc/influxdb/influxdb.conf
[http]下
enabled = true
bind-address = ":8086"
auth-enabled = true
[Http]模块上方加入
[admin]
# 是否启用该模块,默认值 : false
enabled = true
# 绑定地址,默认值 :":8083"
bind-address = ":8083"
启动
systemctl start influxdb
接口进行访问
curl -G http://localhost:8086/query --data-urlencode "q=show databases"
开机启动
systemctl enable influxdb
卸载
yum -y remove influxdb
备份出配置文件
mkdir /opt/influxdb-docker/
cp /etc/influxdb/influxdb.conf /opt/influxdb-docker/
用于下篇docker
telegraf
前面安装influxdb时已经添加了源
yum -y install telegraf
修改配置
vim /etc/telegraf/telegraf.conf
[[outputs.influxdb]]模块下
解锁urls = ["http://127.0.0.1:8086"]
解锁database = "telegraf"
解锁timeout = "5s"
若influxdb设置了auth-enabled = true,这里需要设置用户名密码
username = "root"
password = "root"
配置官方文档见:https://docs.influxdata.com/telegraf
设置后auth-enabled=true后在linux操作influx需要用户名密码,命令为auth
influx
auth
show databases
先运行influxdb
然后启动telegraf
systemctl start telegraf
启用
systemctl enable telegraf
查看运行状态
systemctl status telegraf
卸载
yum -y remove telegraf
备份出配置文件
mkdir /opt/telegraf-docker/
cp /etc/telegraf/telegraf.conf /opt/telegraf-docker/
用于下篇docker
kapacitor
yum -y install kapacitor
vim /etc/kapacitor/kapacitor.conf
配置[[influxdb]]模块
由于该配置后面会用于docker,urls不能是localhost改成influxdb的内网ip
username=root
password=root
后面还可以配置[smtp]等
备份出配置文件
mkdir /opt/kapacitor-docker/
cp /etc/kapacitor/kapacitor.conf /opt/kapacitor-docker/
用于下篇docker
systemctl start kapacitor
systemctl enable kapacitor
web端口9092
配置(略)
Chronograf
为influxdb添加界面
前面已经添加了源
yum -y install chronograf
修改端口为8083(可选)
vim /usr/lib/systemd/system/chronograf.service
systemctl daemon-reload
systemctl start chronograf
systemctl enable chronograf
grafana
添加源
见https://grafana.com/docs/installation/rpm/
cat <<EOF | sudo tee /etc/yum.repos.d/grafana.repo
[grafana]
name=grafana
baseurl=https://packages.grafana.com/oss/rpm
repo_gpgcheck=1
enabled=1
gpgcheck=1
gpgkey=https://packages.grafana.com/gpg.key
sslverify=1
sslcacert=/etc/pki/tls/certs/ca-bundle.crt
EOF
yum -y install grafana
启动
systemctl start grafana-server
启用
systemctl enable grafana-server
卸载
yum -y remove grafana-server
进入网站 用户名密码都是admin
第一步创建datasource
Name为telegraf与上面telegraf配置的数据库名一致
influxdb开启了auth-enabled = true
需要勾选Basic Auth 数据库用户名密码都是root
见图: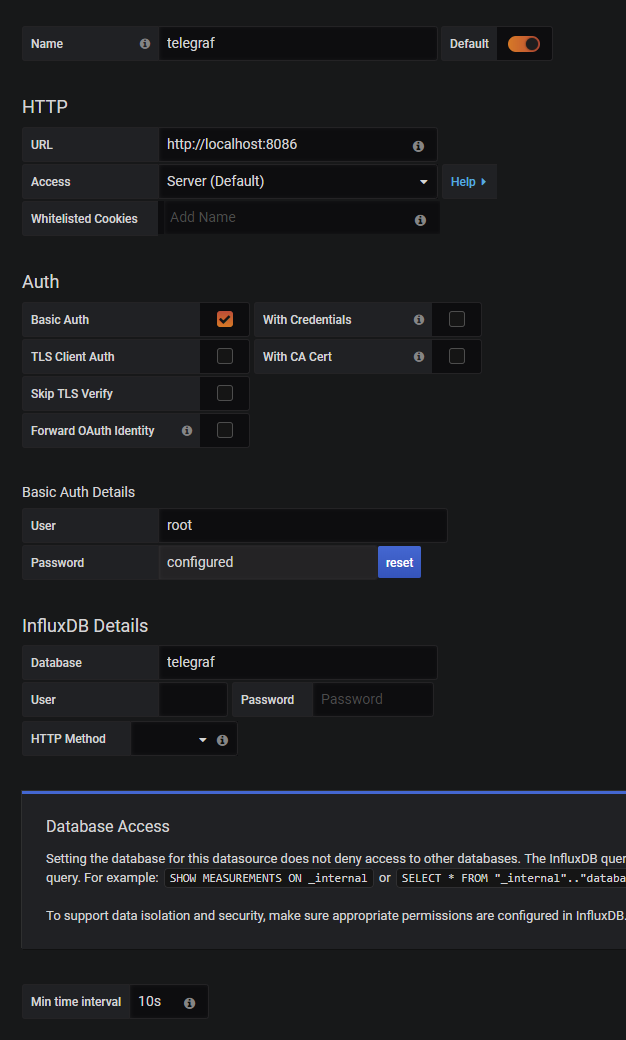
后面的dashboard随意了,记得在sql语句中选择表和列,部分列可以按*显示,否则不会展示数据。

 浙公网安备 33010602011771号