
CENTOS7.6 编译安装NGINX1.8+MYSQL5.7+PHP7.9+ZABBIX5.0
LNMP系统安装环境准备:
[root@zabbixserver ~]# tar -zxvf nginx-1.18.0.tar.gz

[root@zabbixserver ~]# tar -zxvf php-7.4.9.tar.gz

[root@zabbixserver ~]# tar -zxvf zabbix-5.0.3.tar.gz
[root@zabbixserver tar]# ll
总用量 37100
drwxr-xr-x.  8 root     root         4096 10月 12 18:48 libzip-1.3.2
-rw-r--r--.  1 root     root      1523449 10月 12 18:47 libzip-1.3.2.tar.gz
drwxr-xr-x.  9 zabbix   zabbix        186 10月 12 15:33 nginx-1.18.0
-rw-r--r--.  1 root     root      1039530 4月  21 2020 nginx-1.18.0.tar.gz
drwxrwxr-x. 19 root     root         4096 10月 12 18:55 php-7.4.9
-rw-r--r--.  1 root     root     16516067 8月   4 2020 php-7.4.9.tar.gz
drwxr-xr-x. 13 www-data www-data     4096 10月 12 17:09 zabbix-5.0.3
-rw-r--r--.  1 root     root     18893485 8月  24 2020 zabbix-5.0.3.tar.gz
安装相对应依赖(nginx+php依赖)
yum install -y zlib zlib-devel pcre pcre-devel gcc gcc-c++ libxml2-devel libsqlite3x-devel sqlite-devel gd zlib zlib-devel openssl openssl-devel libxml2 libxml2-devel libjpeg libjpeg-devel libpng libpng-devel freetype freetype-devel libmcrypt libmcrypt-devel oniguruma oniguruma-devel libxslt libxslt-devel
yum安装时找不到oniguruma oniguruma-devel 依赖包的话可以使用一下方法
yum -y install http://down.24kplus.com/linux/oniguruma/oniguruma-6.7.0-1.el7.x86_64.rpm
yum -y install http://down.24kplus.com/linux/oniguruma/oniguruma-devel-6.7.0-1.el7.x86_64.rpm
进入nginx目录
[root@zabbixserver tar]# cd nginx-1.18.0/
执行configure会检查所需的库,成功后会生成一个Makefile文件,--prefix是执行安装的路径,--with-http_ssl_module是添加ssl模块支持,这里不会用到
[root@zabbixserver nginx-1.18.0]# ./configure --prefix=/usr/local/nginx --with-http_ssl_module
编译,make -j 8 -j为--job,开启8个工作任务 执行安装,这里会把编译生成的程序文件拷贝到安装目录下并创建相关的文件夹
[root@zabbixserver nginx-1.18.0]# make -j 8 && make install
配置nginx配置文件,实现Nginx转发到PHP处理
[root@zabbixserver nginx-1.18.0]# cd /usr/local/nginx
[root@zabbixserver nginx]# vim conf/nginx.conf
worker_processes 1;

events{
   worker_connections 1024;
}

http {
   server_tokens off;
   proxy_buffer_size 128k;
   proxy_buffers  32 32k;
   proxy_busy_buffers_size 128k;
   include     mime.types;

   default_type application/octet-stream;
   sendfile    on;
   keepalive_timeout 65;
   server {
      listen   80;
      access_log /usr/local/nginx/logs/ssl.access.log;
      error_log /usr/local/nginx/logs/ssl.error.log;
      location / {
      root html;
      index index.php index.html index.htm;
   }

   error_page 500 502 503 504 /50x.html;
   location = /50x.html {
         root  html;
   }

   location ~ \.php$ {
      root    /usr/local/nginx/html;
      fastcgi_buffer_size 128k;
      fastcgi_buffers 4 256k;
      fastcgi_busy_buffers_size 256k;
      fastcgi_pass  127.0.0.1:9000;
      fastcgi_index  index.php;
      fastcgi_param SCRIPT_FILENAME
      $document_root$fastcgi_script_name;
      include     fastcgi_params;
   }
  }
}
安装PHP libzip依赖包 libzip的版本必须大于0.11 且 不能等于1.3.1或者1.7.0 yum装的包版本太低
进入目录
cd libzip-1.3.2
编译安装
./configure
make && make install
设置环境变量
export PKG_CONFIG_PATH="/usr/local/lib/pkgconfig/"
安装PHP 进入PHP目录
[root@zabbixserver tar]# cd php-7.4.9/
创建安装目录
[root@zabbixserver php-7.4.9]# mkdir /usr/local/php7
执行配置检查,--enable-fpm是开启PHP的fpm资源管理,关于fpm可以查阅资料了解一下
[root@zabbixserver php-7.4.9]# ./configure --with-curl --with-freetype --enable-gd --with-jpeg --with-gettext --with-kerberos --with-libdir=lib64 --with-libxml --with-mysqli --with-openssl --with-pdo-mysql --with-pdo-sqlite --with-pear --enable-sockets --with-mhash --with-mhash --with-ldap-sasl --with-xsl --with-zlib --enable-fpm --enable-bcmath --enable-mbregex --enable-mbstring --enable-opcache --enable-pcntl --enable-shmop --enable-soap --enable-sockets --enable-sockets --enable-xml --with-zip --with-bz2 --enable-sysvsem --prefix=/usr/local/php7 -with-config-file-path=/usr/local/php7/etc --enable-fpm
编译,make -j 8 -j为--job,开启8个工作任务 执行安装,这里会把编译生成的程序文件拷贝到安装目录下并创建相关的文件夹
[root@zabbixserver php-7.4.9]# make -j 8 && make install
拷贝php初始化配置文件,这个文件负责配置PHP行为的许多方面。
[root@zabbixserver php-7.4.9]# cp php.ini-development /usr/local/php/php.ini
配置PHP配置文件
[root@zabbixserver php-7.4.9]# cd /usr/local/php
优化PHP文件,根据一下配置修改
[root@zabbixserver ~]# vim /usr/local/php/php.ini
post_max_size = 16M
max_execution_time = 300
max_input_time = 300
date.timezone = Asia/Shanghai
memory_limit = 128M
upload_max_filesize = 2M
拷贝默认的的配置文件,相当于执行了cp etc/php-fpm.d/www.conf.default etc/php-fpm.d/www.conf,配置包括了php解析器的IP和端口,用户和用户组等配置
[root@zabbixserver php]# cp etc/php-fpm.d/www.conf{.default,}
拷贝默认的php-fpm的启动配置文件
[root@zabbixserver php]# cp etc/php-fpm.conf.default /usr/local/php/etc/php-fpm.conf
创建www-data用户组
[root@zabbixserver php]# groupadd www-data
创建www-data用户,属于www-data用户组(-g --group),类型为不可登录(-s --shell)
[root@zabbixserver php]# useradd -g www-data -s /sbin/nologin www-data
再修改php www的用户和用户组,设置为www-data,www.conf文件
[root@zabbixserver php]# vim etc/php-fpm.d/www.conf
; Unix user/group of processes
; Note: The user is mandatory. If the group is not set, the default user's group
;       will be used.
user = www-data
group = www-data
再修改php-fpm的配置文件,设置启动的进程pid文件存储位置,后面设置服务需要用到进程运行IDpid,php-fpm.conf文件
[root@zabbixserver php]# vim etc/php-fpm.conf
[global]
; Pid file
; Note: the default prefix is /usr/local/php/var
; Default Value: none
 pid = /usr/local/php/var/run/php-fpm.pid
编写测试的php页面
删除nginx默认的首页文件
[root@zabbixserver ~]# rm /usr/local/nginx/html/index.html
创建测试文件,使用php的信息函数显示信息
[root@zabbixserver ~]# echo "<?php phpinfo(); ?>" >> /usr/local/nginx/html/index.php
启动php和nginx
[root@zabbixserver ~]# /usr/local/php/sbin/php-fpm
[root@zabbixserver ~]# /usr/local/nginx/sbin/nginx
接着,就可以浏览器输入nginx的服务器ip进行http访问了,我的这里是输入http://192.168.2.10,如下图所示:

设置Nginx、PHP开机自启,切换目录到关于系统进程的目录
[root@zabbixserver ~]# cd /lib/systemd/system/
在目录下新建nginx.service文件,填入以下内容
[root@zabbixserver system]# vim nginx.service
[Unit]
Description=nginx service
After=network.target

[Service]
Type=forking
ExecStart=/usr/local/nginx/sbin/nginx
ExecReload=/usr/local/nginx/sbin/nginx -s reload
ExecStop=/usr/local/nginx/sbin/nginx -s quit
PrivateTmp=true

[Install]
WantedBy=multi-user.target
在目录下新建php-fpm.service文件,填入以下内容
[root@zabbixserver system]# vim php-fpm.service
[Unit]
Description=php-fpm service
After=network.target

[Service]
Type=forking
ExecStart=/usr/local/php/sbin/php-fpm
ExecReload=kill -USR2 $(cat /usr/local/php/var/run/php-fpm.pid)
ExecStop=kill -INT $(cat /usr/local/php/var/run/php-fpm.pid)
PrivateTmp=true

[Install]
WantedBy=multi-user.target
开启开机自启服务
[root@zabbixserver system]# systemctl enalbe nginx.service
[root@zabbixserver system]# systemctl enable php-fpm.service
[root@mysql ~]# yum remove -y mariadb
[root@mysql ~]# yum list installed | grep mariadb
[root@mysql ~]# yum remove -y mariadb-libs
删除MariaDB所有文件和所有包含mysql的文件
[root@mysql ~]# rm -rf /etc/my.cnf
[root@mysql ~]# rm -rf $(find / -name mysql)
解压mysql安装包到 /usr/local/ 下
[root@mysql ~]# tar -zxvf mysql-5.7.43-linux-glibc2.12-x86_64.tar.gz -C /usr/local/
mysql安装包名字太长,为了方便输入,我们更改一下文件夹的名字
[root@mysql ~]# mv mysql-5.7.43-linux-glibc2.12-x86_64.tar.gz mysql
添加mysql用户组和mysql用户
[root@mysql mysql]# groupadd mysql    #添加mysql用户组
[root@mysql mysql]# useradd -r -g mysql mysql    #在mysql用户组里面添加一个mysql用户
在mysql下面创建data数据库文件目录
[root@mysql mysql]# mkdir data
安装数据库
[root@mysql ~]# cd /usr/local/mysql/bin
[root@mysql bin]# ./mysqld --user=mysql --basedir=/usr/local/mysql --datadir=/usr/local/mysql/data --initialize
输出信息如下:
2023-10-11T07:54:25.617755Z 0 [Warning] TIMESTAMP with implicit DEFAULT value is deprecated. Please use --explicit_defaults_for_timestamp server option (see documentation for more details).
2023-10-11T07:54:26.321587Z 0 [Warning] InnoDB: New log files created, LSN=45790
2023-10-11T07:54:26.615392Z 0 [Warning] InnoDB: Creating foreign key constraint system tables.
2023-10-11T07:54:26.893755Z 0 [Warning] No existing UUID has been found, so we assume that this is the first time that this server has been started. Generating a new UUID: 668444e5-680b-11ee-b3b3-000c29df21d8.
2023-10-11T07:54:26.894245Z 0 [Warning] Gtid table is not ready to be used. Table 'mysql.gtid_executed' cannot be opened.
2023-10-11T07:54:27.718088Z 0 [Warning] A deprecated TLS version TLSv1 is enabled. Please use TLSv1.2 or higher.
2023-10-11T07:54:27.718141Z 0 [Warning] A deprecated TLS version TLSv1.1 is enabled. Please use TLSv1.2 or higher.
2023-10-11T07:54:27.720712Z 0 [Warning] CA certificate ca.pem is self signed.
2023-10-11T07:54:27.922739Z 1 [Note] A temporary password is generated for root@localhost: lOyRva;oq2,_
初始化成功。
牢记上面的随机密码, 如上lOyRva;oq2,_ 下面我们修改密码时需要用到。
修改mysql目录中除了data目录外的其他所有目录和文件均修改为root用户所有。
[root@mysql ~]# cd /usr/local/mysql/
[root@mysql mysql]# chown -R root .
[root@mysql mysql]# chown -R mysql data
配置启动文件,使得mysql可以通过执行/etc/init.d/mysql.server start启动
[root@mysql mysql]# cp support-files/mysql.server /etc/init.d/mysql
编辑目录/etc/init.d下的mysql文件,添加路径设置:
[root@mysql mysql]# vim /etc/init.d/mysql
basedir=/usr/local/mysql        #在第46行
datadir=/usr/local/mysql/data    #在第47行
配置结束后重新启动
[root@mysql mysql]# reboot
启动MySQL服务,设置开机启动
[root@mysql ~]# systemctl enable mysql
[root@mysql ~]# systemctl start mysql

#老版本可以使用下面的命令
[root@localhost root]# chkconfig --add mysql
[root@localhost root]# chkconfig mysql on   //重启后永久生效

# 上面命令不起作用可以使用如下命令
[root@localhost root]# cd /etc/init.d
[root@localhost init.d]# update-rc.d mysql defaults 99
配置环境变量
[root@mysql ~]# vim /etc/bashrc
在文件最后添加如下内容
export MYSQL_HOME=/usr/local/mysql
export PATH=$PATH:$MYSQL_HOME/bin
刷新环境变量
[root@mysql ~]# source /etc/bashrc
使用命令进入mysql
[root@mysql ~]# mysql -u root -p
Enter password:
这里输入我们刚才记下的密码lOyRva;oq2,_ 成功进入mysql
输出信息如下:
Welcome to the MySQL monitor.  Commands end with ; or \g.
Your MySQL connection id is 2
Server version: 5.7.43

Copyright (c) 2000, 2023, Oracle and/or its affiliates.

Oracle is a registered trademark of Oracle Corporation and/or its
affiliates. Other names may be trademarks of their respective
owners.

Type 'help;' or '\h' for help. Type '\c' to clear the current input statement.
mysql>
修改root用户密码方便使用 #123456是修改后的密码,请自行替换
mysql> set password for 'root'@'localhost'=password('123456');
创建zabbixserver服务器用户密码,请自行替换
mysql> CREATE USER 'zabbix'@'192.168.2.10' IDENTIFIED BY 'password';
创建zabbix数据库
mysql> create database zabbix character set utf8 collate utf8_bin;
mysql> alter user 'zabbix'@'192.168.2.10' IDENTIFIED BY 'password';
mysql> grant all privileges on zabbix.* to 'zabbix'@'192.168.2.10';
mysql>flush privileges;
导入zabbix数据
mysql>use zabbix;
mysql>source /root/zabbix-5.0.3/database/mysql/schema.sql
mysql>source /root/zabbix-5.0.3/database/mysql/data.sql
mysql>source /root/zabbix-5.0.3/database/mysql/images.sql
mysql>exit
安装zabbix 进入目录
[root@zabbixserver ~]# cd zabbix-5.0.3/
创建安装目录并赋予权限
# 创建用户和群组
[root@zabbixserver zabbix-5.0.3]# groupadd zabbix
[root@zabbixserver zabbix-5.0.3]# useradd -g zabbix -s /sbin/nologin zabbix
# 给文件设置用户和群组
[root@zabbixserver zabbix-5.0.3]# chown zabbix:zabbix /usr/local/zabbix
安装依赖
[root@zabbixserver zabbix-5.0.3]# yum install -y mysql-devel net-snmp libevent-devel
编译安装
[root@zabbixserver zabbix-5.0.3]# ./configure --prefix=/usr/local/zabbix --enable-server --enable-agent --with-mysql --enable-ipv6 --with-net-snmp --with-libcurl --with-libxml2
[root@zabbixserver zabbix-5.0.3]# make -j 8 && make install
修改zabbix-server配置文件
[root@zabbixserver ~]# grep -Ev '^#|^$' /usr/local/zabbix/etc/zabbix_server.conf
LogFile=/tmp/zabbix_server.log
DBHost=192.168.2.12
DBName=zabbix
DBUser=zabbix
DBPassword=123456
ListenIP=127.0.0.1
Timeout=4
LogSlowQueries=3000
StatsAllowedIP=127.0.0.1
修改zabbix-agentd配置
[root@zabbixserver ~]# grep -v ^# /usr/local/zabbix/etc/zabbix_agentd.conf
LogFile=/tmp/zabbix_agentd.log
Server=127.0.0.1
ServerActive=127.0.0.1
Hostname=Zabbixserver
拷贝源码包把启动脚本复制到系统/etc/init.d/ 下 就可以启动和重启zabbix了
[root@zabbixserver zabbix-5.0.3]# cp ./misc/init.d/fedora/core/zabbix_* /etc/init.d/
设置开机自启动
[root@zabbixserver zabbix-5.0.3]# systemctl enable zabbix_server
[root@zabbixserver zabbix-5.0.3]# systemctl enable zabbix_agentd
拷贝zabbix前端到nginx目录
[root@zabbixserver zabbix-5.0.3]# cp -R ./ui/*  /usr/local/nginx/html/
[root@zabbixserver zabbix-5.0.3]# cp /usr/local/nginx/html/conf/zabbix.conf.php.example /usr/local/nginx/html/zabbix.conf.php
[root@zabbixserver zabbix-5.0.3]# grep -Ev '^#|^$' /usr/local/nginx/html/conf/zabbix.conf.php
<?php
// Zabbix GUI configuration file.
$DB['TYPE']                             = 'MYSQL';
$DB['SERVER']                   = '192.168.2.12';
$DB['PORT']                             = '3306';
$DB['DATABASE']                 = 'zabbix';
$DB['USER']                             = 'zabbix';
$DB['PASSWORD']                 = '123456';
访问zabbix前端http://IP进入安装界面
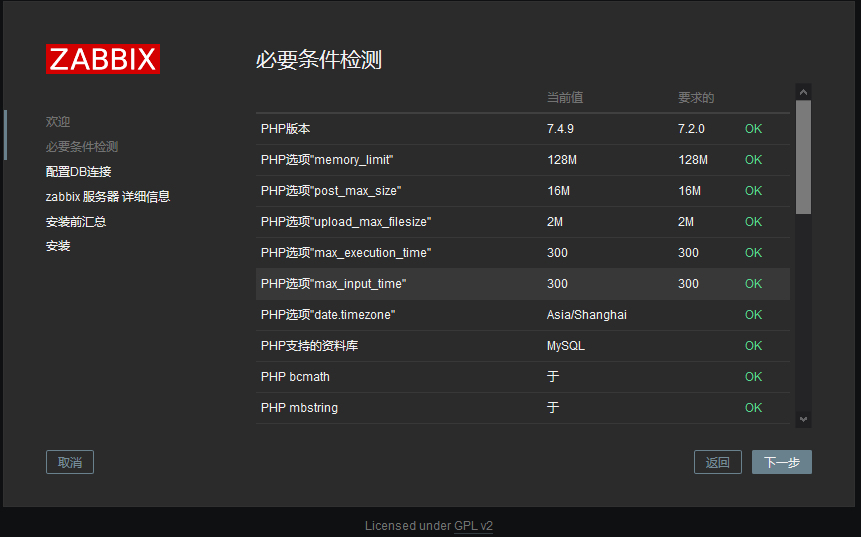
检测依赖和配置文件是否安装正确
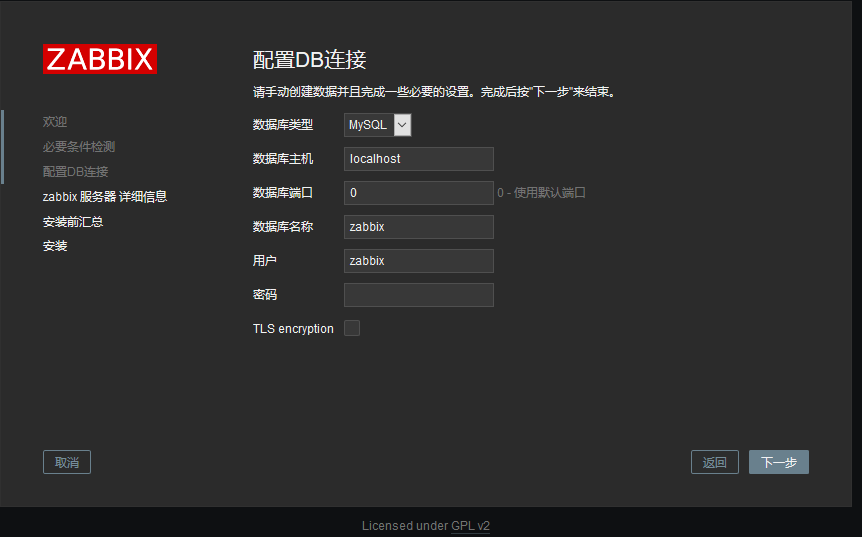
连接数据库是否正常
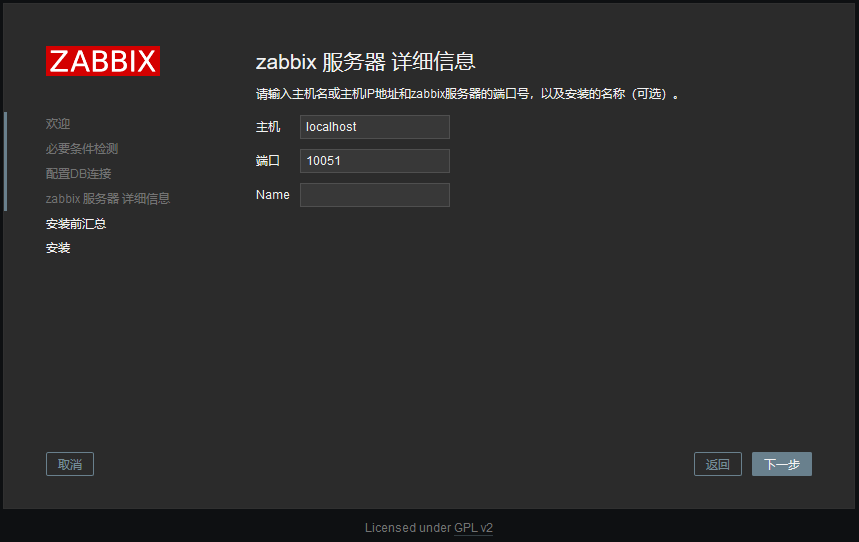
最后贴上一张安装好后的图


 浙公网安备 33010602011771号