

springboot+cloud 学习(一)高可用服务注册中心(Eureka)
先说说Eureka
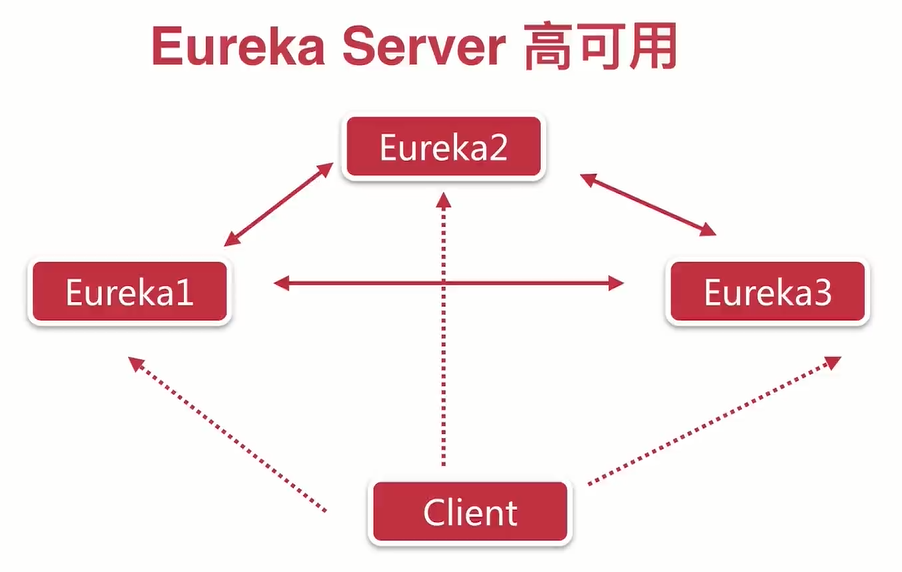
服务注册中心高可用
简单点说就是启用多个Eureka Server(一般2个就可以了,我这里用了3个),然后让3个Server 互相注册。
创建服务注册中心

创建一个普通的Spring Boot工程
首先我们需要创建一个普通的Spring Boot工程,命名为eureka-server。
添加Eureka依赖
工程创建成功之后,向pom.xml文件中添加eureka-server的依赖(这里有个javaJDK的坑,1.8版本以上的会有报错,需要额外添加依赖),添加完依赖之后,pom.xml文件如下所示:
<project xmlns="http://maven.apache.org/POM/4.0.0"
    xmlns:xsi="http://www.w3.org/2001/XMLSchema-instance"
    xsi:schemaLocation="http://maven.apache.org/POM/4.0.0 http://maven.apache.org/xsd/maven-4.0.0.xsd">
    <modelVersion>4.0.0</modelVersion>
    <groupId>eureka-server</groupId>
    <artifactId>eureka-server</artifactId>
    <version>0.0.1-SNAPSHOT</version>
    <!-- 必须要引入 springboot parent ,帮我们实现了很多jar包的依赖管理 -->
    <parent>
        <groupId>org.springframework.boot</groupId>
        <artifactId>spring-boot-starter-parent</artifactId>
        <version>2.0.1.RELEASE</version>
        <relativePath /> <!-- lookup parent from repository -->
    </parent>
    <dependencyManagement>
        <dependencies>
            <!-- https://mvnrepository.com/artifact/org.springframework.cloud/spring-cloud-dependencies -->
            <dependency>
                <groupId>org.springframework.cloud</groupId>
                <artifactId>spring-cloud-dependencies</artifactId>
                <version>Finchley.RELEASE</version>
                <type>pom</type>
                <scope>import</scope>
            </dependency>
        </dependencies>
    </dependencyManagement>
        <dependencies>
        <dependency>
            <groupId>org.springframework.boot</groupId>
            <artifactId>spring-boot-starter-test</artifactId>
            <scope>test</scope>
        </dependency>
        <dependency>
            <groupId>org.springframework.cloud</groupId>
            <artifactId>spring-cloud-starter-netflix-eureka-server</artifactId>
        </dependency>
<!-- 用于安全校验 -->
<dependency>
<groupId>org.springframework.boot</groupId>
<artifactId>spring-boot-starter-security</artifactId>
</dependency>
        <!-- JDK 版本1.8以上的需要额外添加依赖 -->
        <dependency>
            <groupId>javax.xml.bind</groupId>
            <artifactId>jaxb-api</artifactId>
        </dependency>
        <dependency>
            <groupId>com.sun.xml.bind</groupId>
            <artifactId>jaxb-impl</artifactId>
            <version>2.3.0</version>
        </dependency>
        <dependency>
            <groupId>org.glassfish.jaxb</groupId>
            <artifactId>jaxb-runtime</artifactId>
            <version>2.3.0</version>
        </dependency>
        <dependency>
            <groupId>javax.activation</groupId>
            <artifactId>activation</artifactId>
            <version>1.1.1</version>
        </dependency>
    </dependencies>
    <build>
        <plugins>
            <plugin>
                <groupId>org.springframework.boot</groupId>
                <artifactId>spring-boot-maven-plugin</artifactId>
            </plugin>
        </plugins>
    </build>
</project>
启动一个服务注册中心
启动一个服务注册中心的方式很简单,就是在Spring Boot的入口类上添加一个@EnableEurekaServer注解,如下:
@EnableEurekaServer
@SpringBootApplication
public class Application {
    public static void main(String[] args) {
        SpringApplication.run(Application.class, args);
    }
}
配置服务注册中心
在Spring Boot的配置文件application.yml中(如果3个Eureka Server的端口分别是8761、8762、8763,以8761为例,这里有个坑,开始yml配置里,
serviceUrl没有用驼峰式的,服务一直注册不上去),另外这里配置的hostname,记得改系统的host文件,配置对应的ip地址,server 端yml写法如下:
spring:
  application:
    name: eureka-server2
  #安全登入用户设置
  security:
    user:
      name: skyworth
      password: skyworth2
server:
  port: 8762
eureka:
  instance:
    hostname: eureka-server2
  client:
    #表示是否将自己注册到Eureka Server
    register-with-eureka: false
    #表示是否从Eureka Server获取注册信息
    fetch-registry: false
    serviceUrl:
      #设置与Eureka Server交互的地址,查询服务和注册服务都需要依赖这个地址
      defaultZone: http://skyworth:skyworth1@eureka-server:8761/eureka/,http://skyworth:skyworth3@eureka-server3:8763/eureka/
到这里 Server 端就差不多了,下面是Cline端,Cline端的依赖基本是一样的,主要区别在启动类和配置文件的区别
client端yml配置如下:
spring:
  application:
    name: eureka-client
server:
  port: 8760
eureka:
  instance:
    hostname: eureka-client
  client:
    serviceUrl:
      defaultZone: http://skyworth:skyworth1@eureka-server:8761/eureka/,http://skyworth:skyworth2@eureka-server2:8762/eureka/,http://skyworth:skyworth3@eureka-server3:8763/eureka/
client端启动类:
@SpringBootApplication
@EnableDiscoveryClient
public class Application {
    public static void main(String[] args) {
        SpringApplication.run(Application.class, args);
    }
}
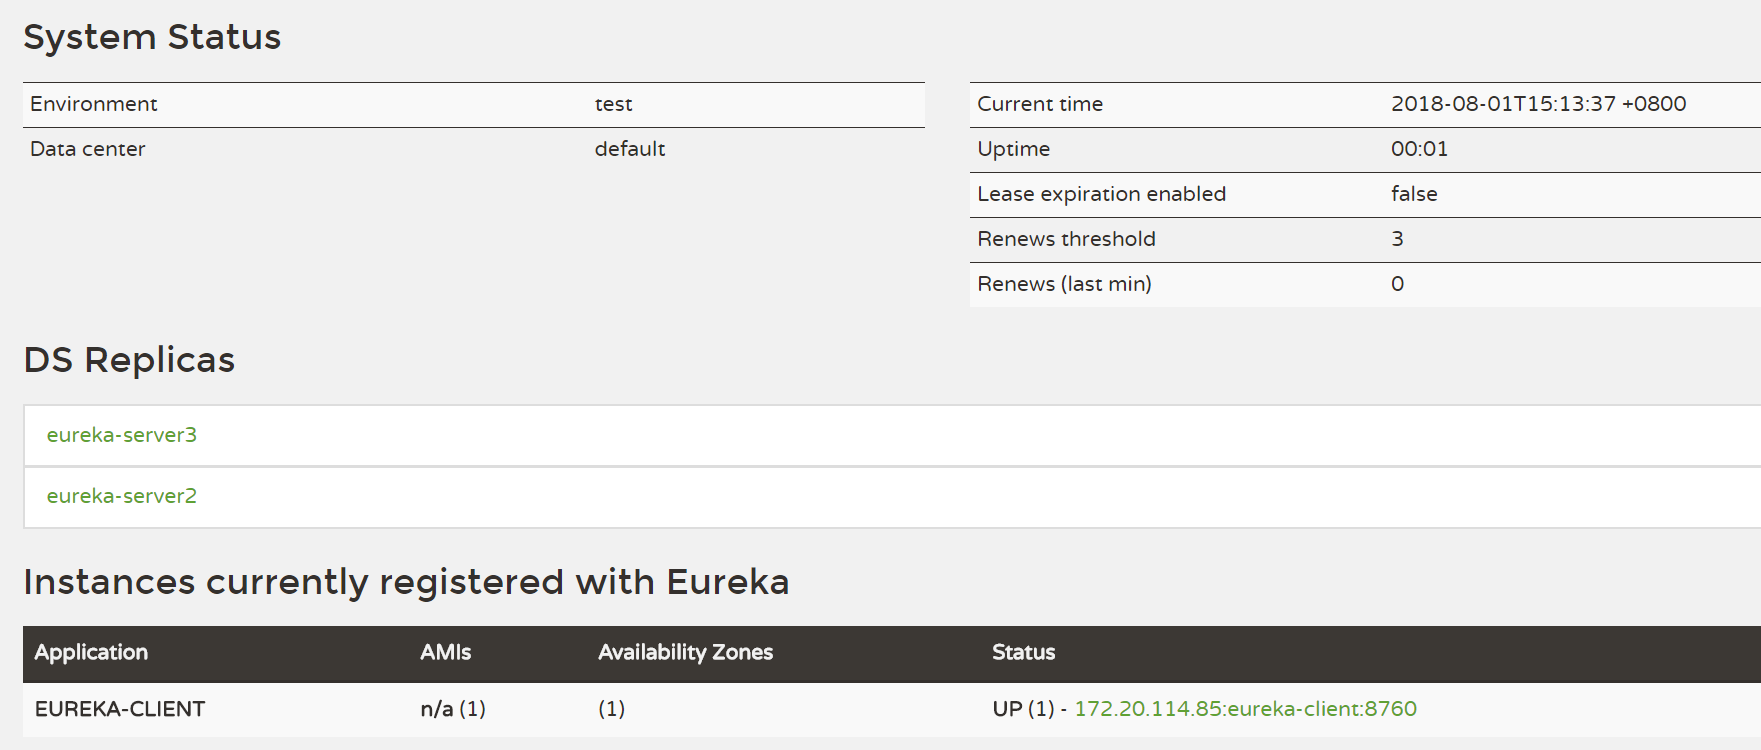
测试
项目启动后 查看eureka-server: http://localhost:8761/,http://localhost:8762/,http://localhost:8763/,发现服务已经注册进去。
另外提一下,为了安全,client端可以增加至多个,并增加用户名,密码的登入验证。
注:当增加用户密码的登入模式后,可能会出现服务注册不进去的情况,解决方案,在eurka服务中添加一个安全认证类
/**
 *
 */
package com.skyworth.config;

import org.springframework.context.annotation.Configuration;
import org.springframework.security.config.annotation.web.builders.HttpSecurity;
import org.springframework.security.config.annotation.web.configuration.EnableWebSecurity;
import org.springframework.security.config.annotation.web.configuration.WebSecurityConfigurerAdapter;
import org.springframework.security.config.http.SessionCreationPolicy;

/**
* Copyright: Copyright (c) 2018 skyworth
*
* @ClassName: WebSecurityConfig.java
* @Description: 该类的功能描述
*
* @version: v1.0.0
* @author: Administrator
* @date: 2018年8月1日 下午4:14:12
*
* Modification History:
* Date         Author          Version            Description
*---------------------------------------------------------*
* 2018年8月1日     Administrator           v1.0.0               修改原因
*/
@Configuration
@EnableWebSecurity
public class WebSecurityConfig extends WebSecurityConfigurerAdapter {

    /**
     * 高版本的丢弃了
     *
     * security:
     *   basic:
     *    enabled: true
     *
     * 配置,应该使用以下方式开启
     *
     * @param http
     * @throws Exception
     */
    @Override
    protected void configure(HttpSecurity http) throws Exception {
        // Configure HttpSecurity as needed (e.g. enable http basic).
        http.sessionManagement().sessionCreationPolicy(SessionCreationPolicy.NEVER);
        http.csrf().disable();
        //注意:为了可以使用 http://${user}:${password}@${host}:${port}/eureka/ 这种方式登录,所以必须是httpBasic,
        // 如果是form方式,不能使用url格式登录
        http.authorizeRequests().anyRequest().authenticated().and().httpBasic();
    }
}
