EaselJS 源码分析系列--第二篇
在 第一篇 中我们大致分析了从: 创建舞台 -> 添加显示对象-> 更新显示对象 的源码实现
这一篇将主要分析几个常用显示对象自各 draw 方法的实现
让我们看向例子 examples/Text_simple.html
这个例子中使用了三个显示对象类 Bitmap 、Text 、 Shape
Bitmap draw
以下例子中添加了一个 image
var image = new createjs.Bitmap("imagePath.png");
stage.addChild(image);
当调用 stage.update 后,会调用显示对象的 draw 方法,如果是 Container 类,则继续递归调用其 draw 方法
这样所有 stage 舞台上的显示对象的 draw 方法都会被调用到,注意 canvas 的上下文对象 ctx 参数都会被传入
分两步:
-
如果 DisplayObject 类内有缓存,则绘制缓存
-
如果没有缓存则循环显示列表调用每个 child 的 draw 方法 child 都为 DisplayObject 实例,还判断了 DisplayObject 实例的 isVisible 如果不可见则不绘制
// Container 类 源码 160 - 176 行
p.draw = function(ctx, ignoreCache) {
	if (this.DisplayObject_draw(ctx, ignoreCache)) { return true; }
	// 用 slice 的原因是防止绘制过程中 children 发生变更导致出错
	var list = this.children.slice();
	for (var i=0,l=list.length; i<l; i++) {
		var child = list[i];
		if (!child.isVisible()) { continue; }

		// draw the child:
		ctx.save();
		child.updateContext(ctx);
		child.draw(ctx);
		ctx.restore();
	}
	return true;
};
child 就为一个 Bitmap 对象
直接看 Bitmap 类实现的 draw 方法如下:
// Bitmap 类 源码 142-159
p.draw = function(ctx, ignoreCache) {
	if (this.DisplayObject_draw(ctx, ignoreCache)) { return true; }
	var img = this.image, rect = this.sourceRect;
	if (img.getImage) { img = img.getImage(); }
	if (!img) { return true; }
	if (rect) {
		// some browsers choke on out of bound values, so we'll fix them:
		var x1 = rect.x, y1 = rect.y, x2 = x1 + rect.width, y2 = y1 + rect.height, x = 0, y = 0, w = img.width, h = img.height;
		if (x1 < 0) { x -= x1; x1 = 0; }
		if (x2 > w) { x2 = w; }
		if (y1 < 0) { y -= y1; y1 = 0; }
		if (y2 > h) { y2 = h; }
		ctx.drawImage(img, x1, y1, x2-x1, y2-y1, x, y, x2-x1, y2-y1);
	} else {
		ctx.drawImage(img, 0, 0);
	}
	return true;
};
就三步:
-
有缓存则绘制缓存
-
如果有 rect 限制,有目标尺寸 rect 限制,则绘制成 rect 尺寸,调用 canvas 的 drawImage 原生方法并传入目标尺寸
-
如果没有 rect 限制,则直接调用 canvas 的 drawImage 原生方法
先不管 ctx.drawImage(img, x1, y1, x2-x1, y2-y1, x, y, x2-x1, y2-y1); 这一句,
具体语法可以查询 https://developer.mozilla.org/zh-CN/docs/Web/API/CanvasRenderingContext2D/drawImage
注意: ctx.drawImage(img, 0, 0); 后两个参数值是图象的 x, y 坐标,
都传了 0 好家伙直接 "hardcode" 了,绘制时不用考虑图像的位置吗?
都画在了 0, 0 位置画在左上角?
这不科学,如果用户指定了图像位置比如 x = 100, y = 80 那怎么办?
如果我来实现,直觉上就会想要把此处改为 ctx.drawImage(img, 0 + x, 0 + y);
但 EaselJS 并没有,但却又能正常工作?,先搁置,继续往下看就会明白
Text draw
绘制文本
创建一个文本 txt
txt = new createjs.Text("text on the canvas... 0!", "36px Arial", "#FFF");
直接看向 Text 的 draw 实例方法:
// Text 类 源码 208 - 217 行
p.draw = function(ctx, ignoreCache) {
	if (this.DisplayObject_draw(ctx, ignoreCache)) { return true; }

	var col = this.color || "#000";
	if (this.outline) { ctx.strokeStyle = col; ctx.lineWidth = this.outline*1; }
	else { ctx.fillStyle = col; }

	this._drawText(this._prepContext(ctx));
	return true;
};
依然先判断缓存
文本默认为黑色
如果有 outline 则 lineWidth 被设置限制宽度,用显示文本周边的框
调用 this._drawText(this._prepContext(ctx));
_prepContext 存着的上下文中预设的默认样式
Text 的 _drawText 方法是真正执行绘制文本的的逻辑(支持换行)
// Text 类 源码 339 - 390 行
p._drawText = function(ctx, o, lines) {
	var paint = !!ctx;
	if (!paint) {
		ctx = Text._workingContext;
		ctx.save();
		this._prepContext(ctx);
	}
	var lineHeight = this.lineHeight||this.getMeasuredLineHeight();

	var maxW = 0, count = 0;
	var hardLines = String(this.text).split(/(?:\r\n|\r|\n)/);
	for (var i=0, l=hardLines.length; i<l; i++) {
		var str = hardLines[i];
		var w = null;

		if (this.lineWidth != null && (w = ctx.measureText(str).width) > this.lineWidth) {
			// text wrapping:
			var words = str.split(/(\s)/);
			str = words[0];
			w = ctx.measureText(str).width;

			for (var j=1, jl=words.length; j<jl; j+=2) {
				// Line needs to wrap:
				var wordW = ctx.measureText(words[j] + words[j+1]).width;
				if (w + wordW > this.lineWidth) {
					if (paint) { this._drawTextLine(ctx, str, count*lineHeight); }
					if (lines) { lines.push(str); }
					if (w > maxW) { maxW = w; }
					str = words[j+1];
					w = ctx.measureText(str).width;
					count++;
				} else {
					str += words[j] + words[j+1];
					w += wordW;
				}
			}
		}

		if (paint) { this._drawTextLine(ctx, str, count*lineHeight); }
		if (lines) { lines.push(str); }
		if (o && w == null) { w = ctx.measureText(str).width; }
		if (w > maxW) { maxW = w; }
		count++;
	}

	if (o) {
		o.width = maxW;
		o.height = count*lineHeight;
	}
	if (!paint) { ctx.restore(); }
	return o;
	};
步骤:
-
paint为 false 即没有传 ctx 时 仅用于测量文本的尺寸,并不实际绘制到舞台上 -
通过
String(this.text).split(/(?:\r\n|\r|\n)/);这一句将通过回车与换行符得到多行文本 -
循环分解出的文本数组,ctx.measureText 测量文本宽度后判断是否大于 lineWidth 如果加上后面一断文本大于,则需新启一行
-
调用
_drawTextLine()方法绘制文本
调用 canvas 真实 api ctx.fillText 绘制文本
// Text 类 源码 399 - 403 行
p._drawTextLine = function(ctx, text, y) {
	// Chrome 17 will fail to draw the text if the last param is included but null, so we feed it a large value instead:
	if (this.outline) { ctx.strokeText(text, 0, y, this.maxWidth||0xFFFF); }
	else { ctx.fillText(text, 0, y, this.maxWidth||0xFFFF); }
};
发现没有 ctx.fillText 处传的 x 还是 hardcode 硬编码 0 而坐标 y 还是相对坐标,都绘制到 canvas 上了还不是绝对坐标能行吗?
不科学啊
是时候探究了!
updateContext
draw 方法内使用的坐标都是硬编码或相对坐标,但又可以如期绘制正确的绝对坐标位置
是时候看一下之前遗留的 updateContext 方法了
还记得第一篇中 stage.update 内 draw 方法前的一句 this.updateContext(ctx); 吗
实际上最终调用的是 DisplayObject 类的 updateContext 实例方法如下:
// DisplayObject.js 源码 787-810 行
p.updateContext = function(ctx) {
	var o=this, mask=o.mask, mtx= o._props.matrix;

	if (mask && mask.graphics && !mask.graphics.isEmpty()) {
		mask.getMatrix(mtx);
		ctx.transform(mtx.a,  mtx.b, mtx.c, mtx.d, mtx.tx, mtx.ty);

		mask.graphics.drawAsPath(ctx);
		ctx.clip();

		mtx.invert();
		ctx.transform(mtx.a,  mtx.b, mtx.c, mtx.d, mtx.tx, mtx.ty);
	}

	this.getMatrix(mtx);
	var tx = mtx.tx, ty = mtx.ty;
	if (DisplayObject._snapToPixelEnabled && o.snapToPixel) {
		tx = tx + (tx < 0 ? -0.5 : 0.5) | 0;
		ty = ty + (ty < 0 ? -0.5 : 0.5) | 0;
	}
	ctx.transform(mtx.a,  mtx.b, mtx.c, mtx.d, tx, ty);
	ctx.globalAlpha *= o.alpha;
	if (o.compositeOperation) { ctx.globalCompositeOperation = o.compositeOperation; }
	if (o.shadow) { this._applyShadow(ctx, o.shadow); }
};
o._props 是 src/easeljs/geom/DisplayProps.js DisplayProps 类的实例
DisplayProps 主要负责了显示对象的以下属性操作
visible、alpha、shadow、compositeOperation、matrix
mtx= o._props.matrix 在 DisplayObject 实例属性 _props 对象中得到 matrix
updateContext 就是在上下文中应用不同的 matrix 实现上下文中的“变幻”
首先就是对 mask 遮罩的处理,遮罩是通过绘制 Graphics 后对上下文进行 ctx.clip 实现的
如果存在 mask 当前显示对象有遮罩,通过 mask.getMatrix 把遮罩的 matrix
ctx.transform 将上下文变化至遮罩所在的“状态”
绘制遮罩 mask.graphics.drawAsPath(ctx)
还原矩阵 mtx.invert(); 回到当前显示对象的“状态”
至此 mask 部分处理完毕
回到当前显示对象的 getMatrix 获取矩阵后应用矩阵变化
getMatrix 做了两件事
- 如果显示对象有明确指定的 matrix 则应用 matrix
- 如果没有明确指定,则将显示对象的,x,y,scaleX, scaleY, rotation, skewW, skewY, regX, regY 合到 matrix上
// DisplayObject.js 源码 1020-1024 行
p.getMatrix = function(matrix) {
	var o = this, mtx = matrix || new createjs.Matrix2D();
	return o.transformMatrix ?  mtx.copy(o.transformMatrix) :
		(mtx.identity() && mtx.appendTransform(o.x, o.y, o.scaleX, o.scaleY, o.rotation, o.skewX, o.skewY, o.regX, o.regY));
};
注意这一句 mtx.appendTransform(o.x, o.y, o.scaleX, o.scaleY, o.rotation, o.skewX, o.skewY, o.regX, o.regY))
就是将当前显示对象的变幻属性合到矩阵中
得到新的 matrix 后调用 ctx.transform(mtx.a, mtx.b, mtx.c, mtx.d, tx, ty); 实现一系列变化
至于 src/easeljs/geom/Matrix2D.js 矩阵类
平时在 css 中的使用的变化 scale, rotate, translateX, translateY 最后都是矩阵变幻实现的
矩阵变幻的好处一次可以实现多种变化,只是不那么直观
至于矩阵为什么可以实现变幻,我这小学数学水平可讲不清楚,推荐 3blue1brown 的视频看完肯定会醍醐灌顶
我的总结是矩阵实现的是对坐标轴的线性变幻,直接将坐标轴原点变幻到绘制点!!
所以在具体 draw 绘制时 x,y 坐标可以硬编码或使用相对坐标,因为 draw 之前已经使用矩阵把整体坐标轴变幻到位了
绘制完后又会重置回来开始新的对象的变幻
Shape draw
Shape 类代码非常少,实现绘制的是 Graphics 类
Shape 只是作为 Graphics 实例的载体
使用 shape.graphics 属性即可访问
Shape.js 源码 106-110 行
p.draw = function(ctx, ignoreCache) {
	if (this.DisplayObject_draw(ctx, ignoreCache)) { return true; }
	this.graphics.draw(ctx, this);
	return true;
};
Graphics
矢量图形类 Graphics 在 src/easeljs/display/Graphics.js
通常 Graphics 用于绘制矢量图形
可单独使用,也可以在 Shape 实例内调用
var g = new createjs.Graphics();
g.setStrokeStyle(1);
g.beginStroke("#000000");
g.beginFill("red");
g.drawCircle(0,0,30);
要实现 Grapihcs 绘制,就得组合一系列绘图命令
一系列绘制命令被存储在了 _instructions 数组属性内
这些命令被称为 Command Objects 命令对象
源码 1653 行 - 2459 行都是命令对象
命令对象分别都暴露了一个 exec 方法
比如 MoveTo 命令
// Graphics.js 源码 1700 - 1702 行
(G.MoveTo = function(x, y) {
	this.x = x; this.y = y;
}).prototype.exec = function(ctx) { ctx.moveTo(this.x, this.y); };
比如圆形绘制命令
// Graphics.js 源码 2292 - 2295 行
(G.Circle = function(x, y, radius) {
	this.x = x; this.y = y;
	this.radius = radius;
}).prototype.exec = function(ctx) { ctx.arc(this.x, this.y, this.radius, 0, Math.PI*2); };
下面是圆角矩形的也是在 Graphics 静态方法
(G.RoundRect = function(x, y, w, h, radiusTL, radiusTR, radiusBR, radiusBL) {
		this.x = x; this.y = y;
		this.w = w; this.h = h;
		this.radiusTL = radiusTL; this.radiusTR = radiusTR;
		this.radiusBR = radiusBR; this.radiusBL = radiusBL;
	}).prototype.exec = function(ctx) {
		var max = (this.w<this.h?this.w:this.h)/2;
		var mTL=0, mTR=0, mBR=0, mBL=0;
		var x = this.x, y = this.y, w = this.w, h = this.h;
		var rTL = this.radiusTL, rTR = this.radiusTR, rBR = this.radiusBR, rBL = this.radiusBL;

		if (rTL < 0) { rTL *= (mTL=-1); }
		if (rTL > max) { rTL = max; }
		if (rTR < 0) { rTR *= (mTR=-1); }
		if (rTR > max) { rTR = max; }
		if (rBR < 0) { rBR *= (mBR=-1); }
		if (rBR > max) { rBR = max; }
		if (rBL < 0) { rBL *= (mBL=-1); }
		if (rBL > max) { rBL = max; }

		ctx.moveTo(x+w-rTR, y);
		ctx.arcTo(x+w+rTR*mTR, y-rTR*mTR, x+w, y+rTR, rTR);
		ctx.lineTo(x+w, y+h-rBR);
		ctx.arcTo(x+w+rBR*mBR, y+h+rBR*mBR, x+w-rBR, y+h, rBR);
		ctx.lineTo(x+rBL, y+h);
		ctx.arcTo(x-rBL*mBL, y+h+rBL*mBL, x, y+h-rBL, rBL);
		ctx.lineTo(x, y+rTL);
		ctx.arcTo(x-rTL*mTL, y-rTL*mTL, x+rTL, y, rTL);
		ctx.closePath();
	};
exec 方法才是真正调用 canvas context 绘制的地方
G 就是 Graphics 的简写,在 250 行 var G = Graphics;
这些单独的绘图命令其实就是 G 的一些静态方法,只是这些静态方法又拥有各自不同的 exec 实例方法实现具体的绘图
而 Graphics 的实例方法又会将绘图命令 append 一个 “静态方法的实例” 存储数组内
比如 lineTo , 注意是 new G.MoveTo(x,y) 一个命令
// Graphics.js 源码 469 - 471 行
p.moveTo = function(x, y) {
	return this.append(new G.MoveTo(x,y), true);
};
下面是 append 源码,命令都存在 _activeInstructions 数组内
// Graphics.js 源码 1024 - 1029 行
p.append = function(command, clean) {
	this._activeInstructions.push(command);
	this.command = command;
	if (!clean) { this._dirty = true; }
	return this;
};
再看通用的 draw 方法
// Graphics.js 源码 434-440 行
p.draw = function(ctx, data) {
	this._updateInstructions();
	var instr = this._instructions;
	for (var i=this._storeIndex, l=instr.length; i<l; i++) {
		instr[i].exec(ctx, data);
	}
};
draw 内的主要逻辑就是用循环调用 _instructions 存储的“命令对象”执行命令对象的 exec 方法
_instructions 的命令是通过 _updateInstructions 方法从 _activeInstructions 数组内复制的
// Graphics.js 源码 1593-1627 行
p._updateInstructions = function(commit) {
	var instr = this._instructions, active = this._activeInstructions, commitIndex = this._commitIndex;
	debugger
	if (this._dirty && active.length) {
		instr.length = commitIndex; // remove old, uncommitted commands
		instr.push(Graphics.beginCmd);

		var l = active.length, ll = instr.length;
		instr.length = ll+l;
		for (var i=0; i<l; i++) { instr[i+ll] = active[i]; }

		if (this._fill) { instr.push(this._fill); }
		if (this._stroke) {
			// doesn't need to be re-applied if it hasn't changed.
			if (this._strokeDash !== this._oldStrokeDash) {
				instr.push(this._strokeDash);
			}
			if (this._strokeStyle !== this._oldStrokeStyle) {
				instr.push(this._strokeStyle);
			}
			if (commit) {
				this._oldStrokeStyle = this._strokeStyle;
				this._oldStrokeDash = this._strokeDash;
			}
			instr.push(this._stroke);
		}

		this._dirty = false;
	}
	// 如果 commit 了,把 _activeInstructions 当前命令集合清空,且游标指向 this._instructions 的最后位置
	if (commit) {
		active.length = 0;
		this._commitIndex = instr.length;
	}
};
还有一些方法(如:beginStroke beginFill) 内调用了 _updateInstructions(true) 注意传的是 true
比如:
p.beginStroke = function(color) {
	return this._setStroke(color ? new G.Stroke(color) : null);
};
p._setStroke = function(stroke) {
	this._updateInstructions(true);
	if (this.command = this._stroke = stroke) {
		stroke.ignoreScale = this._strokeIgnoreScale;
	}
	return this;
};
注意: 这里收集的命令暂时不会被放到 this._instructions 数组内
直到有 append 方法执行过 dirty 为 true 了 才会把 stroke 命令添加到 this._instructions 数组
因为没有 append 任何实质的内容(圆,线,矩形等),则不需要执行 stroke ,beginFill 等命令,因为无意义
p._updateInstructions 到底干了啥?
主要是在 draw 之前不断收集命令, 在多处都有调用 _updateInstructions
这些操作 commit 均为 true 表明后面的绘制是新的开始,将之前的一系列绘制命令归为一个路径绘制,下一个得新启一个路径绘制
使用 this._commitIndex 游标重新指示命令数组内的位置
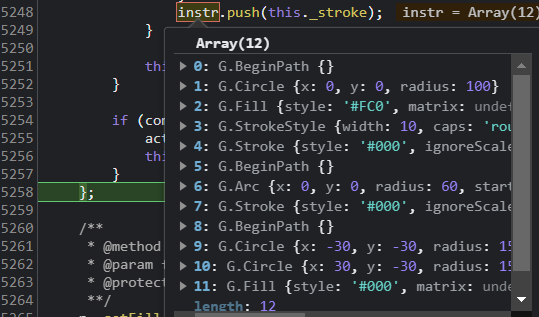
debugger 调试一下看看
在 easeljs-NEXT.js 的 5226 行加上 debugger
浏览器中打开 examples/Graphics_simple.html 文件,并打开浏览器调试工具
Graphics_simple.html 文件的 javascript 代码内有一个 drawSmiley 方法
function drawSmiley() {
	var s = new createjs.Shape();
	var g = s.graphics;

	//Head
	g.setStrokeStyle(10, 'round', 'round');
	g.beginStroke("#000");
	g.beginFill("#FC0");
	g.drawCircle(0, 0, 100); //55,53

	//Mouth
	g.beginFill(); // no fill
	g.arc(0, 0, 60, 0, Math.PI);

	//Right eye
	g.beginStroke(); // no stroke
	g.beginFill("#000");
	g.drawCircle(-30, -30, 15);

	//Left eye
	g.drawCircle(30, -30, 15);

	return s;
}
很明显通过 debugger 先调用了 setStrokeStyle

当调用 setStrokeStyle、beginStroke、beginFill 等都会执行 _updateInstructions 命令
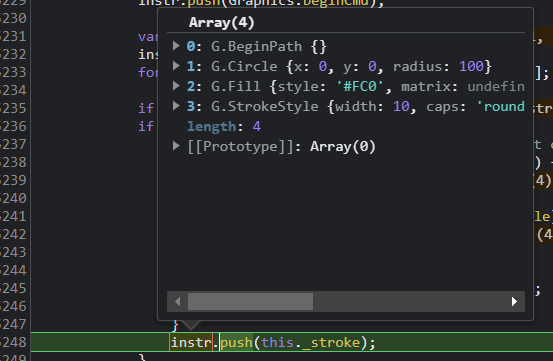
当执行到 g.drawCircle(0, 0, 100); 此时命令才会被一起收集顺序如下

发现没有,与我们在调用顺序不一样
g.setStrokeStyle(10, 'round', 'round');
g.beginStroke("#000");
g.beginFill("#FC0");
g.drawCircle(0, 0, 100); //55,53
BeginPath -> Circle -> Fill -> StrokeStyle
这是 Canvas 真正正常执行的顺序
BeginPath 也在每次 dirty (append 方法导至 dirty 为 true) 时添加,beginPath 当然是另启一个新的路径绘制了

小结
这一篇分析的是,最常用的三个显示对象
下一篇分析另三个稍显高级的显示对象
博客园: http://cnblogs.com/willian/
github: https://github.com/willian12345/


 浙公网安备 33010602011771号