MySQL Router
2019-08-13 17:35 WilliamZheng 阅读(19729) 评论(4) 收藏 举报- 一、介绍
- 二、环境准备
- 三、安装和配置MySQL Router
- 四、功能测试
- 五、运维相关
- 六、问题汇总
- 6.1初始化MySQL Router前,需要停止group_replication
- 6.2使用--bootstrap初始化MySQL Router报错
Unable to connect to the metadata server - 6.3使用--bootstrap初始化MySQL Router报错缺少
mysql_innodb_cluster_metadata.schema_version表 - 6.4启动MySQL Router hang住不动,查看日志报错
Error: bootstrap_server_addresses is not allowed when dynamic state file is used,具体如下: - 6.5启动MySQL Router hang住不动,查看日志报错
Unable to fetch live group_replication member data from any server in replicaset 'default',具体如下:
- 七、个人总结
MySQL InnoDB CLuster系列文章:
- MySQL Group Replication:https://www.cnblogs.com/williamzheng/p/11365235.html
- MySQL Router:https://www.cnblogs.com/williamzheng/p/11347362.html
- MySQL Shell:https://www.cnblogs.com/williamzheng/p/11598826.html
- MySQL InnoDB Cluster:https://www.cnblogs.com/williamzheng/p/11340604.html
一、介绍
1.1MySQL Router简介
MySQL Router是MySQL官方提供的一个轻量级中间件,是InnoDB Cluster的一部分,可在应用程序和后端MySQL服务器之间提供透明路由。主要用以解决MySQL主从库集群的高可用、负载均衡、易扩展等问题。Router作为一个流量转发层,位于应用与MySQL服务器之间,其功能类似于LVS。
1.2为什么要用MySQL Router?
基于组复制(MGR)的机制,当主节点宕机离开集群,剩余的其他节点会基于paxos协议选举一个新的主节点。这里有一个问题,应用程序端如果连接到了主节点,这时主节点宕机离开集群,可用的数据库IP地址发生变化,客户端应用程序这个时候还是会向失败的节点尝试连接,虽然可以修改客户端应用程序的连接配置,但是这种情况基本是不现实的。
1.3MySQL Router关系图
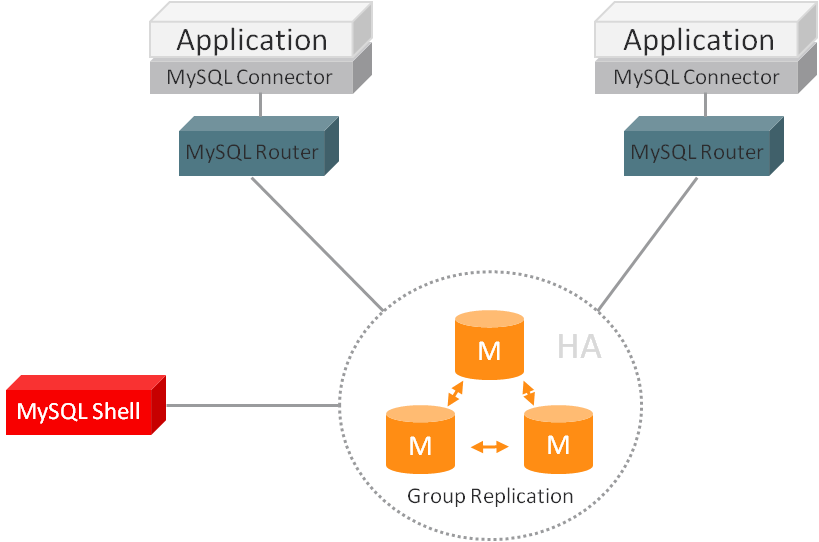
结合MySQL Group Replication和MySQL Shel如下:

上图充分说明了MySQL Router在InnoDB集群里面的角色,主要作用是为数据库集群提供一个虚拟IP作为应用程序单一连接点,通过这个单一的连接点实现负载均衡,读写分离,故障转移等数据库高可用方案。
MySQL Router推荐安装在应用程序所在的机器上,原因包括:
- 通过本地Unix套接字连接,而不是TCP/IP,提升性能
- 降低网络延迟
- MySQL实例不需要额外的账号,只需要一个router@198.51.100.45, 而不是myapp@%
- 提升应用程序服务器的可扩展性
1.4MySQL Cluster简介
Cluster是这个高可用方案中的一个虚拟节点,它会在MGR的所有成员上创建一个名为MySQL_innodb_cluster_metadata的数据库,存储集群的元数据信息,包括集群信息、集群成员、组复制信息、连接的MySQL Router等信息,以提供MySQL Router查询。它相当于对组复制上的成员做了一层逻辑上的封装,以一个集群的模式展现出来,各节点的状态与对应实例在组复制中成员的状态实时同步,但是集群的节点与组复制的成员只在创建集群时同步,后期组复制的成员变更并不自动同步到集群中,可以在集群中做手动的节点增减,这样使得面向应用端的具体实例实现了更可控更灵活的高可用。
二、环境准备
| 主机名 | IP地址 | 角色 |
|---|---|---|
| oratest51 | 172.16.9.51 | primary |
| oratest52 | 172.16.9.52 | seconde |
| test61 | 172.16.9.61 | seconde |
| node4 | 172.16.8.68 | MySQL Router |
操作系统:CentOS Linux release 7.2.1511
MySQL版本:mysql-5.7.26-linux-glibc2.12-x86_64
MySQL Router版本:mysql-router-8.0.17-linux-glibc2.12-x86_64
MySQL Shell版本:mysql-shell-8.0.17-linux-glibc2.12-x86-64bit
三、安装和配置MySQL Router
MySQL Router有两种部署模式:
- bootstrap模式:支持failover,必须结合InnoDB Cluster使用,在
--directory指定的路径下自动生成安装目录,配置文件里的端口为6446和6447。 - 简单模式:不支持failover,无需结合InnoDB Cluster使用,一般在主从复制或者主主复制等模式下使用,使用
/usr/local/mysqlrouter/share/doc/mysqlrouter/sample_mysqlrouter.conf这个配置文件部署。
3.1bootstrap模式安装MySQL Router
注意: 使用bootstrap的方式安装MySQL Router的前提条件是MGR已装好,MySQL Shell已装好,InnoDB Cluster已经配置好
3.1.1使用yum源的方式安装MySQL Router
# wget -P /software/ https://repo.mysql.com//mysql80-community-release-el7-3.noarch.rpm
# rpm -Uvh /software/mysql80-community-release-el7-3.noarch.rpm
# yum -y install mysql-router
3.1.2查看MySQL Router的默认配置
[root@node4 yum.repos.d]# mysqlrouter --help
MySQL Router  Ver 8.0.16 for Linux on x86_64 (MySQL Community - GPL)
Copyright (c) 2015, 2019, Oracle and/or its affiliates. All rights reserved.

Oracle is a registered trademark of Oracle Corporation and/or its
affiliates. Other names may be trademarks of their respective
owners.

Configuration read from the following files in the given order (enclosed
in parentheses means not available for reading):
  /etc/mysqlrouter/mysqlrouter.conf
  (/root/.mysqlrouter.conf)
Plugins Path:
  /usr/lib64/mysqlrouter

Default Log Directory:
  /var/log/mysqlrouter

Default Persistent Data Directory:
  /var/lib/mysqlrouter

Default Runtime State Directory:
  /run/mysqlrouter
通过mysqlrouter --help可以看到默认的一些路径:
- 配置文件:/etc/mysqlrouter/mysqlrouter.conf
- 插件路径:/usr/lib64/mysqlrouter
- 日志路径:/var/log/mysqlrouter
- 持久化数据路径:/var/lib/mysqlrouter
- 运行时状态路径:/run/mysqlrouter
如果在mysqlrouter命令行使用--config或-c选项传入用户定义的配置文件,则不会加载默认配置文件。
3.1.3初始化MySQL Router,地址填primary的地址
[root@node4 tmp]# mysqlrouter --bootstrap root@172.16.9.51:3306 --directory /data/mysqlrouter --conf-use-sockets --user=root
Please enter MySQL password for root:
WARNING: The MySQL server does not have SSL configured and metadata used by the router may be transmitted unencrypted.
# Bootstrapping MySQL Router instance at '/data/mysqlrouter'...

- Checking for old Router accounts
  - No prior Router accounts found
- Creating mysql account mysql_router1_zhi3m2uhudci@'%' for cluster management
- Storing account in keyring
- Adjusting permissions of generated files
- Creating configuration /data/mysqlrouter/mysqlrouter.conf

# MySQL Router configured for the InnoDB cluster 'st'    #InnoDB集群名

After this MySQL Router has been started with the generated configuration

    $ mysqlrouter -c /data/mysqlrouter/mysqlrouter.conf

the cluster 'st' can be reached by connecting to:

## MySQL Classic protocol

- Read/Write Connections: localhost:6446, /data/mysqlrouter/mysql.sock
- Read/Only Connections:  localhost:6447, /data/mysqlrouter/mysqlro.sock

## MySQL X protocol

- Read/Write Connections: localhost:64460, /data/mysqlrouter/mysqlx.sock
- Read/Only Connections:  localhost:64470, /data/mysqlrouter/mysqlxro.sock
--bootstrap:引导并配置Router以便与MySQL InnoDB集群一起运行。
3.1.4编辑配置文件,一般只需要配置bootstrap_server_addresses这一行即可
# File automatically generated during MySQL Router bootstrap
[DEFAULT]
user=root
logging_folder=/data/mysqlrouter/log
runtime_folder=/data/mysqlrouter/run
data_folder=/data/mysqlrouter/data
keyring_path=/data/mysqlrouter/data/keyring
master_key_path=/data/mysqlrouter/mysqlrouter.key
connect_timeout=15
read_timeout=30
#dynamic_state=/data/mysqlrouter/data/state.json

[logger]
level = INFO

[metadata_cache:st]
router_id=14
bootstrap_server_addresses=mysql://oratest51:3306,mysql://oratest52:3306,mysql://test61:3306
user=mysql_router14_ebhje7bsnckc
metadata_cluster=st
ttl=300
use_gr_notifications=0

[routing:st_default_rw]
bind_address=0.0.0.0
bind_port=6446
socket=/data/mysqlrouter/mysql.sock
destinations=metadata-cache://st/default?role=PRIMARY
routing_strategy=first-available
protocol=classic

[routing:st_default_ro]
bind_address=0.0.0.0
bind_port=6447
socket=/data/mysqlrouter/mysqlro.sock
destinations=metadata-cache://st/default?role=SECONDARY
routing_strategy=round-robin-with-fallback
protocol=classic

[routing:st_default_x_rw]
bind_address=0.0.0.0
bind_port=64460
socket=/data/mysqlrouter/mysqlx.sock
destinations=metadata-cache://st/default?role=PRIMARY
routing_strategy=first-available
protocol=x

[routing:st_default_x_ro]
bind_address=0.0.0.0
bind_port=64470
socket=/data/mysqlrouter/mysqlxro.sock
destinations=metadata-cache://st/default?role=SECONDARY
routing_strategy=round-robin-with-fallback
protocol=x
3.1.5启动MySQL Router
[root@node2 mysqlrouter]# cd /data/mysqlrouter/
[root@node2 mysqlrouter]# sh start.sh
启动过程较慢,日志里可以看到启动信息
3.1.6测试连接MySQL Router
默认情况下,使用6446作为RW端口,使用6447作为RO端口
# mysql -uroot -p123456 -h172.16.8.68 -P6446
# mysql -uroot -p123456 -h172.16.8.68 -P6447
# netstat -ntlp |grep mysqlrouter
3.2简单模式安装MySQL Router
3.2.1下载软件包并上传到服务器
[root@node4 etc]# mkdir /software;cd /software
[root@node4 etc]# wget https://cdn.mysql.com//Downloads/MySQL-Router/mysql-router-8.0.17-linux-glibc2.12-x86_64.tar.xz
3.2.2解压到指定目录
[root@node4 etc]# tar -Jxvf /software/mysql-router-8.0.17-linux-glibc2.12-x86_64.tar.xz -C /usr/local/
[root@node4 etc]# cd /usr/local
[root@node4 etc]# mv mysql-router-8.0.17-linux-glibc2.12-x86_64/ mysqlrouter
3.2.3设置环境变量
[root@node4 etc]# echo 'export PATH=/usr/local/mysqlrouter/bin/:$PATH' >> /etc/profile
[root@node4 etc]# source /etc/profile
3.2.4编辑配置文件
# mkdir -p /usr/local/mysqlrouter/etc
# cp /usr/local/mysqlrouter/share/doc/mysqlrouter/sample_mysqlrouter.conf /usr/local/mysqlrouter/etc
# mv /usr/local/mysqlrouter/etc/sample_mysqlrouter.conf /usr/local/mysqlrouter/etc/mysqlrouter.conf
# vim /usr/local/mysqlrouter/etc/mysqlrouter.conf
##部分省略
[DEFAULT]
logging_folder =/usr/local/mysqlrouter/log/
plugin_folder = /usr/local/mysqlrouter/lib/mysqlrouter/
config_folder = /usr/local/mysqlrouter/etc/
runtime_folder = /usr/local/mysqlrouter/run/
data_folder = /usr/local/mysqlrouter/data/
keyring_path = /var/lib/keyring-data
master_key_path = /var/lib/keyring-key

[logger]
level = INFO

[routing:masters]
bind_address = 172.16.8.68:7002
destinations = 172.16.9.61:3306
mode = read-write
connect_timeout = 2

[routing:slaves]
bind_address = 172.16.8.68:7001
destinations = 172.16.9.51:3306,172.16.9.52:3306
mode = read-only
connect_timeout = 1
##部分省略
/usr/local/mysqlrouter/share/doc/mysqlrouter/sample_mysqlrouter.conf这个是MySQL Router的参照配置文件,所以这里先把模板复制出来。
mysql router默认会寻找安装目录下的"mysqlrouter.conf"和家目录下的".mysqlrouter.conf"。也可以在二进制程序mysqlrouter命令下使用"-c"或者"--config"手动指定配置文件。
MySQL Router的配置文件是片段式的,常用的就3个片段:[DEFAULT]、[logger]、[routing:NAME],片段名称区分大小写,且只支持单行"#"或";"注释。
- bind_address:添加MySQL Router所在机器的IP
- destinations:后端的mysql服务器IP+端口
- mode:提供两种mode,read-only和read-write,read-write的调度方式为first-available,read-only的调度方式为round-robin
- connect_timeout:连接超时时间
- routing_strategy:路由策略,有round-robin和first-available策略
- 更多配置选项可以参考:https://dev.mysql.com/doc/mysql-router/8.0/en/mysql-router-conf-options.html
如果是多主模式,配置文件如下
[routing:mutili_rw]
bind_address=172.16.8.68
bind_port=7003
destinations=172.16.9.51:3306,172.16.9.52:3306,172.16.9.61:3306
mode=read-write
connect_timeout=2
protocol=classic
3.2.5创建上一步中配置文件里指定的目录
[root@node4 etc]# mkdir -p /usr/local/mysqlrouter/run/
[root@node4 etc]# mkdir -p /usr/local/lib/mysqlrouter
[root@node4 etc]# mkdir -p /usr/local/mysqlrouter/etc/
[root@node4 etc]# mkdir -p /usr/local/mysqlrouter/run/
[root@node4 etc]# mkdir -p /usr/local/mysqlrouter/data/
[root@node4 etc]# mkdir -p /usr/local/mysqlrouter/log/
3.2.6启动MySQL Router
[root@node4 etc]# mysqlrouter --config /usr/local/mysqlrouter/etc/mysqlrouter.conf &
3.2.7查看MySQL Router的端口监听是否已开启
[root@node4 etc]# netstat -ntlp |grep mysqlrouter
tcp        0      0 172.16.8.68:7001        0.0.0.0:*               LISTEN      9221/mysqlrouter
tcp        0      0 172.16.8.68:7002        0.0.0.0:*               LISTEN      9221/mysqlrouter
MySQL Router的停止暂时没有停止脚本,如果要停止需要用kill -9的方式杀掉进程
四、功能测试
以下测试都是在InnoDB Cluster下,MySQL Router的安装模式是bootstrap
4.1路由验证
4.1.1测试通过MySQL Router连接6446 RW端口,查看连接的是否为primary
[root@node4 mysqlrouter]# for ((i=0;i<=5;i++));do mysql -h172.16.8.101 -uroot -p123456 -P6446 -e"select @@hostname;";done;
mysql: [Warning] Using a password on the command line interface can be insecure.
+------------+
| @@hostname |
+------------+
| oratest51  |
+------------+
mysql: [Warning] Using a password on the command line interface can be insecure.
+------------+
| @@hostname |
+------------+
| oratest51  |
+------------+
mysql: [Warning] Using a password on the command line interface can be insecure.
+------------+
| @@hostname |
+------------+
| oratest51  |
+------------+
mysql: [Warning] Using a password on the command line interface can be insecure.
+------------+
| @@hostname |
+------------+
| oratest51  |
+------------+
mysql: [Warning] Using a password on the command line interface can be insecure.
+------------+
| @@hostname |
+------------+
| oratest51  |
+------------+
mysql: [Warning] Using a password on the command line interface can be insecure.
+------------+
| @@hostname |
+------------+
| oratest51  |
+------------+
测试结果: 使用6446 RW端口会访问到后端InnoDB Cluster的primary
4.1.2测试通过MySQL Router连接6447 RO端口,查看连接的是否为seconde节点,rr算法是否生效
[root@node4 mysqlrouter]# for ((i=0;i<=5;i++));do mysql -h172.16.8.101 -uroot -p123456 -P6447 -e"select @@hostname;";done;
mysql: [Warning] Using a password on the command line interface can be insecure.
+------------+
| @@hostname |
+------------+
| oratest52  |
+------------+
mysql: [Warning] Using a password on the command line interface can be insecure.
+------------+
| @@hostname |
+------------+
| test61     |
+------------+
mysql: [Warning] Using a password on the command line interface can be insecure.
+------------+
| @@hostname |
+------------+
| oratest52  |
+------------+
mysql: [Warning] Using a password on the command line interface can be insecure.
+------------+
| @@hostname |
+------------+
| test61     |
+------------+
测试结果: 使用6447 RO端口会连接到后端InnoDB Cluster集群中所有的seconde节点,并且以rr(round-robin)的策略调度
4.2高可用测试
4.2.1模拟其中一台seconde节点宕机,查看MySQL Router是否会自动取消该节点的路由
(1) 停掉一台seconde节点
[root@oratest52 ~]# systemctl status mysql
[root@oratest52 ~]# systemctl stop mysql
[root@oratest52 ~]# systemctl status mysql
(2) 在InnoDB Cluster中查看集群状态,可以看到oratest52已经处于MISSING状态
 MySQL  172.16.9.51:3306  JS > cluster.status()
{
    "clusterName": "st",
    "defaultReplicaSet": {
        "name": "default",
        "primary": "oratest51:3306",
        "ssl": "DISABLED",
        "status": "OK_NO_TOLERANCE",
        "statusText": "Cluster is NOT tolerant to any failures. 1 member is     not active",
        "topology": {
            "oratest51:3306": {
                "address": "oratest61:3306",
                "mode": "R/O",
                "readReplicas": {},
                "role": "HA",
                "status": "ONLINE"
            },
            "oratest52:3306": {
                "address": "oratest52:3306",
                "mode": "n/a",
                "readReplicas": {},
                "role": "HA",
                "shellConnectError": "MySQL Error 2003 (HY000): Can't connect     to MySQL server on 'oratest52' (111)",
                "status": "(MISSING)"
            },
            "test61:3306": {
                "address": "test51:3306",
                "mode": "R/W",
                "readReplicas": {},
                "role": "HA",
                "status": "ONLINE"
            }
        },
        "topologyMode": "Single-Primary"
    },
    "groupInformationSourceMember": "test61:3306"
}
(3) 在MGR中查看GR状态,可以看到已经没有oratest52这台机器
mysql> select * from performance_schema.replication_group_members;
+---------------------------+--------------------------------------+-------------+-------------+--------------+
| CHANNEL_NAME              | MEMBER_ID                            | MEMBER_HOST | MEMBER_PORT | MEMBER_STATE |
+---------------------------+--------------------------------------+-------------+-------------+--------------+
| group_replication_applier | 48cdca42-a386-11e9-95f1-0050569d2587 | test61      |        3306 | ONLINE       |
| group_replication_applier | e9ee5267-a386-11e9-ac35-0050569d9ef5 | oratest51   |        3306 | ONLINE       |
+---------------------------+--------------------------------------+-------------+-------------+--------------+
(4) 测试通过6447 RO端口连接,查看是否会自动剔除宕机的oratest52节点
[root@node4 ~]# for ((i=0;i<=5;i++));do mysql -h172.16.8.101 -uroot -p123456 -P6447 -e"select @@hostname;";done;
mysql: [Warning] Using a password on the command line interface can be insecure.
+------------+
| @@hostname |
+------------+
| test61  |
+------------+
mysql: [Warning] Using a password on the command line interface can be insecure.
+------------+
| @@hostname |
+------------+
| test61  |
+------------+
mysql: [Warning] Using a password on the command line interface can be insecure.
+------------+
| @@hostname |
+------------+
| test61  |
+------------+
mysql: [Warning] Using a password on the command line interface can be insecure.
+------------+
| @@hostname |
+------------+
| test61     |
+------------+
mysql: [Warning] Using a password on the command line interface can be insecure.
+------------+
| @@hostname |
+------------+
| test61     |
+------------+
测试结果: MySQL Router会自动剔除宕机的oratest52节点,read请求只会转发到后端正常的MySQL实例,过程无需人工干预。
4.2.2启动上一步中停止的MySQL实例,确认MGR和InnoDB Cluster一切正常后,查看MySQL Router是否会自动加入这台已恢复的实例进行转发
(1) 启动oratest52的MySQL服务
[root@oratest52 ~]# systemctl start mysql
(2)启动MGR,并确认MGR状态正常
mysql> start group_replication;
Query OK, 0 rows affected (2.92 sec)

mysql> select * from performance_schema.replication_group_members;
+---------------------------+--------------------------------------+-------------+-------------+--------------+
| CHANNEL_NAME              | MEMBER_ID                            | MEMBER_HOST | MEMBER_PORT | MEMBER_STATE |
+---------------------------+--------------------------------------+-------------+-------------+--------------+
| group_replication_applier | 48cdca42-a386-11e9-95f1-0050569d2587 | test61      |        3306 | ONLINE       |
| group_replication_applier | 50bc1160-a386-11e9-92c9-0050569dc0da | oratest52   |        3306 | ONLINE       |
| group_replication_applier | e9ee5267-a386-11e9-ac35-0050569d9ef5 | oratest51   |        3306 | ONLINE       |
+---------------------------+--------------------------------------+-------------+-------------+--------------+
(3) 检查InnoDB Cluster是否正常
 MySQL  172.16.9.51:3306  JS > cluster.status()
{
    "clusterName": "st",
    "defaultReplicaSet": {
        "name": "default",
        "primary": "oratest51:3306",
        "ssl": "DISABLED",
        "status": "OK",
        "statusText": "Cluster is ONLINE and can tolerate up to ONE failure.",
        "topology": {
            "oratest51:3306": {
                "address": "oratest61:3306",
                "mode": "R/O",
                "readReplicas": {},
                "role": "HA",
                "status": "ONLINE"
            },
            "oratest52:3306": {
                "address": "oratest52:3306",
                "mode": "R/O",
                "readReplicas": {},
                "role": "HA",
                "status": "ONLINE"
            },
            "test61:3306": {
                "address": "test51:3306",
                "mode": "R/W",
                "readReplicas": {},
                "role": "HA",
                "status": "ONLINE"
            }
        },
        "topologyMode": "Single-Primary"
    },
    "groupInformationSourceMember": "test61:3306"
}
(4) 查看恢复正常的实例,能不能自动加入MySQL Router进行转发,可以看到oratest52可以被正常调度
[root@node4 mysqlrouter]# for ((i=0;i<=5;i++));do mysql -h172.16.8.101 -uroot -p123456 -P6447 -e"select @@hostname;";done;
mysql: [Warning] Using a password on the command line interface can be insecure.
+------------+
| @@hostname |
+------------+
| oratest52  |
+------------+
mysql: [Warning] Using a password on the command line interface can be insecure.
+------------+
| @@hostname |
+------------+
| test61     |
+------------+
mysql: [Warning] Using a password on the command line interface can be insecure.
+------------+
| @@hostname |
+------------+
| oratest52  |
+------------+
mysql: [Warning] Using a password on the command line interface can be insecure.
+------------+
| @@hostname |
+------------+
| test61     |
+------------+
mysql: [Warning] Using a password on the command line interface can be insecure.
+------------+
| @@hostname |
+------------+
| oratest52  |
+------------+
mysql: [Warning] Using a password on the command line interface can be insecure.
+------------+
| @@hostname |
+------------+
| test61     |
+------------+
测试结果: 恢复正常的MySQL实例可以自动加入MySQL Router并进行转发,无需人工干预。
4.2.3模拟停掉primary节点,测试MySQL Router如何处理发送RW端口的请求,MySQL Router怎样获取新的primary节点
(1) 当前primary节点是oratest51,在primary节点上停止MySQL,确认停止成功
[root@oratest51 data]# systemctl status mysql
[root@oratest51 data]# systemctl stop mysql
[root@oratest51 data]# systemctl status mysql
[root@oratest51 data]# ps -ef |grep mysql
(2) 查看InnoDB Cluster状态,可以看到oratest51已经处于MISSING状态,primary节点已经切换到了test61
 MySQL  172.16.9.61:3306  JS > cluster.status();
{
    "clusterName": "st",
    "defaultReplicaSet": {
        "name": "default",
        "primary": "test61:3306",
        "ssl": "DISABLED",
        "status": "OK_NO_TOLERANCE",
        "statusText": "Cluster is NOT tolerant to any failures. 1 member is not active",
        "topology": {
            "oratest51:3306": {
                "address": "oratest51:3306",
                "mode": "n/a",
                "readReplicas": {},
                "role": "HA",
                "shellConnectError": "MySQL Error 2003 (HY000): Can't connect to MySQL server on 'oratest51' (111)",
                "status": "(MISSING)"
            },
            "oratest52:3306": {
                "address": "oratest52:3306",
                "mode": "R/O",
                "readReplicas": {},
                "role": "HA",
                "status": "ONLINE"
            },
            "test61:3306": {
                "address": "test61:3306",
                "mode": "R/W",
                "readReplicas": {},
                "role": "HA",
                "status": "ONLINE"
            }
        },
        "topologyMode": "Single-Primary"
    },
    "groupInformationSourceMember": "test61:3306"
}
(3) 测试连接到RW 6446端口,查看是否可以正常连接到新的primary节点test61,并且写入数据否正常
[root@node2 mysqlrouter]# for ((i=0;i<=5;i++));do mysql -h172.16.8.101 -uroot -p123456 -P6446 -e"select @@hostname;";done;
mysql: [Warning] Using a password on the command line interface can be insecure.
+------------+
| @@hostname |
+------------+
| test61     |
+------------+
mysql: [Warning] Using a password on the command line interface can be insecure.
+------------+
| @@hostname |
+------------+
| test61     |
+------------+
mysql: [Warning] Using a password on the command line interface can be insecure.
+------------+
| @@hostname |
+------------+
| test61     |
+------------+
mysql: [Warning] Using a password on the command line interface can be insecure.
+------------+
| @@hostname |
+------------+
| test61     |
+------------+
mysql: [Warning] Using a password on the command line interface can be insecure.
+------------+
| @@hostname |
+------------+
| test61     |
+------------+
mysql: [Warning] Using a password on the command line interface can be insecure.
+------------+
| @@hostname |
+------------+
| test61     |
+------------+
测试结果: 当primary节点挂掉之后,MySQL Router会自动去连接新的primary节点
4.2.4启动上一步中停掉的oratest51,将状态恢复正常,测试MySQL Router能不能自动加入这台已恢复的节点并调度
(1) 启动oratest51,将状态恢复正常
[root@oratest51 ~]# systemctl start mysql
[root@oratest51 ~]# systemctl status mysql
[root@oratest51 ~]# mysql -uroot -p123456
mysql> start group_replication;
mysql> select * from performance_schema.replication_group_members;
+---------------------------+--------------------------------------+------------+-------------+--------------+
| CHANNEL_NAME              | MEMBER_ID                            |MEMBER_HOST | MEMBER_PORT | MEMBER_STATE |
+---------------------------+--------------------------------------+------------+-------------+--------------+
| group_replication_applier | 48cdca42-a386-11e9-95f1-0050569d2587 |test61      |        3306 | ONLINE       |
| group_replication_applier | 50bc1160-a386-11e9-92c9-0050569dc0da |oratest52   |        3306 | ONLINE       |
| group_replication_applier | e9ee5267-a386-11e9-ac35-0050569d9ef5 |oratest51   |        3306 | ONLINE       |
+---------------------------+--------------------------------------+------------+-------------+--------------+
3 rows in set (0.00 sec)
mysql> quit
[root@oratest51 local]# mysqlsh
 MySQL  JS > shell.connect('root@172.16.9.51:3306')
 MySQL  172.16.9.51:3306  JS > var cluster = dba.getCluster()
 MySQL  172.16.9.51:3306  JS > cluster.status();
{
    "clusterName": "st",
    "defaultReplicaSet": {
        "name": "default",
        "primary": "test61:3306",
        "ssl": "DISABLED",
        "status": "OK",
        "statusText": "Cluster is ONLINE and can tolerate up to ONE failure.",
        "topology": {
            "oratest51:3306": {
                "address": "oratest51:3306",
                "mode": "R/O",
                "readReplicas": {},
                "role": "HA",
                "status": "ONLINE"
            },
            "oratest52:3306": {
                "address": "oratest52:3306",
                "mode": "R/O",
                "readReplicas": {},
                "role": "HA",
                "status": "ONLINE"
            },
            "test61:3306": {
                "address": "test61:3306",
                "mode": "R/W",
                "readReplicas": {},
                "role": "HA",
                "status": "ONLINE"
            }
        },
        "topologyMode": "Single-Primary"
    },
    "groupInformationSourceMember": "test61:3306"
}
(2) 测试RO端口的Router调度
[root@node4 mysqlrouter]# for ((i=0;i<=5;i++));do mysql -h172.16.8.101 -uroot -p123456 -P6447 -e"select @@hostname;";done;
mysql: [Warning] Using a password on the command line interface can be insecure.
+------------+
| @@hostname |
+------------+
| oratest52  |
+------------+
mysql: [Warning] Using a password on the command line interface can be insecure.
+------------+
| @@hostname |
+------------+
| oratest51     |
+------------+
mysql: [Warning] Using a password on the command line interface can be insecure.
+------------+
| @@hostname |
+------------+
| oratest52  |
+------------+
mysql: [Warning] Using a password on the command line interface can be insecure.
+------------+
| @@hostname |
+------------+
| test61     |
+------------+
测试结果: 恢复正常的实例加入集群后,会自动加入到MySQL Router并进行调度
五、运维相关
5.1数据库节点变更
MySQL Router在初始化配置的时候是连接到集群节点读取集群的元数据的。如果在集群中新增或减少节点,需要同步更新MySQL Router的配置,否则无法生效
# mysqlrouter --bootstrap 172.16.9.51:3306 --directory /data/mysqlrouter --user=root --conf-use-sockets --force
更新了MySQL Router的配置的配置,需要重启MySQL Router:
#systemctl restart mysqlrouter
#systemctl status mysqlrouter
六、问题汇总
6.1初始化MySQL Router前,需要停止group_replication
6.2使用--bootstrap初始化MySQL Router报错Unable to connect to the metadata server
报错如下
[root@oratest51 data]# mysqlrouter --bootstrap root@172.16.9.51:3310 --directory /data/mysqlrouter --conf-use-sockets --user=root
Please enter MySQL password for root:
Error: Unable to connect to the metadata server: Error connecting to MySQL server at 172.16.9.51:3310: Can't connect to MySQL server on '172.16.9.51' (111) (2003)

原因: 需要配置连接用户的权限
解决办法: 给连接用户配置所有权限,如下:
mysql> grant all privileges  on *.* to root@'%' identified by "123456";
mysql> flush privileges;
6.3使用--bootstrap初始化MySQL Router报错缺少mysql_innodb_cluster_metadata.schema_version表
[root@oratest51 data]# mysqlrouter --bootstrap root@172.16.9.51:3306 --directory /data/mysqlrouter --conf-use-sockets --user=root
Please enter MySQL password for root:
Error: Expected MySQL Server '172.16.9.51:3306' to contain the metadata of MySQL InnoDB Cluster, but the schema does not exist.
Checking version of the metadata schema failed with: Error executing MySQL query: Table 'mysql_innodb_cluster_metadata.schema_version' doesn't exist (1146)

See https://dev.mysql.com/doc/refman/en/mysql-innodb-cluster-creating.html for instructions on setting up a MySQL Server to act as an InnoDB Cluster Metadata server

原因: 没有创建InnoDB Cluster集群,创建InnoDB Cluster集群后会自动生成这张表。mysql_innodb_cluster_metadata.schema_version表的用途是MySQL Router在进行调度分配的时候,需要读取这张表的内容来做调度策略。
解决办法: 创建InnoDB Cluster集群
6.4启动MySQL Router hang住不动,查看日志报错Error: bootstrap_server_addresses is not allowed when dynamic state file is used,具体如下:
[root@node2 log]# tailf /root/mysqlrouter/log/mysqlrouter.log
2019-08-02 15:37:52 routing INFO [7f9721e2d700] [routing:st_default_ro] started: listening using /root/mysqlrouter/mysqlro.sock
2019-08-02 15:37:52 routing INFO [7f972162c700] [routing:st_default_rw] started: listening using /root/mysqlrouter/mysql.sock
2019-08-02 15:37:52 routing INFO [7f9720e2b700] [routing:st_default_x_ro] started: listening using /root/mysqlrouter/mysqlxro.sock
2019-08-02 15:37:52 routing INFO [7f9713fff700] [routing:st_default_x_rw] started: listening on 0.0.0.0:64460, routing strategy = first-available
2019-08-02 15:37:52 routing INFO [7f9713fff700] [routing:st_default_x_rw] started: listening using /root/mysqlrouter/mysqlx.sock
2019-08-02 15:37:52 routing INFO [7f9713fff700] [routing:st_default_x_rw] stopped
2019-08-02 15:37:52 routing INFO [7f9721e2d700] [routing:st_default_ro] stopped
2019-08-02 15:37:52 routing INFO [7f972162c700] [routing:st_default_rw] stopped
2019-08-02 15:37:52 routing INFO [7f9720e2b700] [routing:st_default_x_ro] stopped
2019-08-02 15:37:52 main ERROR [7f9726f1b880] Error: bootstrap_server_addresses is not allowed when dynamic state file is used
原因: 开启了dynamic_state
解决办法: 在配置文件中注释掉dynamic_state所在行,例如下列第11行
 1 # File automatically generated during MySQL Router bootstrap
 2 [DEFAULT]
 3 user=root
 4 logging_folder=/root/mysqlrouter/log
 5 runtime_folder=/root/mysqlrouter/run
 6 data_folder=/root/mysqlrouter/data
 7 keyring_path=/root/mysqlrouter/data/keyring
 8 master_key_path=/root/mysqlrouter/mysqlrouter.key
 9 connect_timeout=15
10 read_timeout=30
11 #dynamic_state=/root/mysqlrouter/data/state.json
6.5启动MySQL Router hang住不动,查看日志报错Unable to fetch live group_replication member data from any server in replicaset 'default',具体如下:
[root@node2 log]# tailf /root/mysqlrouter/log/mysqlrouter.log
2019-08-02 15:46:41 metadata_cache WARNING [7f3030405700] While updating metadata, could not establish a connection to replicaset 'default' through test61:3306
2019-08-02 15:46:51 metadata_cache WARNING [7f3030405700] While updating metadata, could not establish a connection to replicaset 'default' through oratest52:3306
2019-08-02 15:47:01 metadata_cache WARNING [7f3030405700] While updating metadata, could not establish a connection to replicaset 'default' through oratest51:3306
2019-08-02 15:47:01 metadata_cache ERROR [7f3030405700] Unable to fetch live group_replication member data from any server in replicaset 'default'
原因: MySQL Router所在节点没有配置本机DNS解析
解决办法: 在/etc/hosts中添加MGR实例的解析
七、个人总结
- MySQL Router有两种部署模式:
- bootstrap模式:支持failover,必须结合InnoDB Cluster使用,在
--directory指定的路径下自动生成安装目录,配置文件里的端口为6446和6447。 - 简单模式:不支持failover,无需结合InnoDB Cluster使用,一般在主从复制或者主主复制等模式下使用,使用
/usr/local/mysqlrouter/share/doc/mysqlrouter/sample_mysqlrouter.conf这个配置文件部署。
- bootstrap模式:支持failover,必须结合InnoDB Cluster使用,在
- MySQL Router使用的是一个IP地址(可以理解为VIP)加一个RW端口和一个RO端口实现读写分离,Router自身不能判断应用程序的请求是读还是写,因此做读写分离时,必须指定两个端口,如果应用程序不便指定两个端口,也可以全部指定RW端口,这样的话从节点就只作高可用,不做读写分离。
- MySQL Router自身存在单点故障隐患,官方推荐在每个应用程序所在机器上部署Router,本机器连接本机器的Router。也可以在Router的上层在搭建一个高可用服务,如果是自建机房可以选择Keepalived、pacemaker等方案;
- 通过bootstrap生成的配置文件,只需要在
bootstrap_server_addresses这一栏里配置就可以了,格式如下:bootstrap_server_addresses=mysql://oratest51:3306,mysql://oratest52:3306,mysql://test61:3306 - MySQL Router的后端MySQL实例挂掉之后,无需人工干预,MySQL Router会自动剔除挂了的MySQL实例,当挂了的MySQL实例恢复后会自动加入MySQL Router的后端服务器,也无需人工干预。
- MGR架构可以实现高可用,但是要实现failover,则需要安装InnoDB Cluster了。MySQL Shell和MySQL Router是InnoDB Cluster集群的一部分
- MySQL Router非常轻量级,性能损耗小于1%,官方建议每台应用上部署一个mysqlrouter节点,优点是节省网络带宽。缺点是mysqlrouter太轻量级了,只能提供简单的基于端口的读写路由(Port based routing)和基于权重轮询的负载均衡(Weighted Balance),不支持基于SQL的读写分离(Query based routing)和空闲优先的负载均衡(Application Layer balancer)

 浙公网安备 33010602011771号