
爬虫篇:scrapy爬虫框架
目录
一、scrapy介绍和安装
# requests,selenium,bs4(模块)--->专业爬虫:爬虫框架(scrapy),在固定位置写固定代码,就能完成爬虫的功能

# Scrapy是一个开源和协作的框架,其最初是为了页面抓取 (更确切来说, 网络抓取 )所设计的,使用它可以以快速、简单、可扩展的方式从网站中提取所需的数据。但目前Scrapy的用途十分广泛,可用于如数据挖掘、监测和自动化测试等领域,也可以应用在获取API所返回的数据(例如 Amazon Associates Web Services ) 或者通用的网络爬虫

# 安装:
    -mac,linux:
        pip3 install scrapy
    -win:看人品
        1、pip3 install wheel #安装后,便支持通过wheel文件安装软件,wheel文件官网:https://www.lfd.uci.edu/~gohlke/pythonlibs
        2、pip3 install lxml
        3、pip3 install pyopenssl
        4、下载并安装pywin32:https://sourceforge.net/projects/pywin32/files/pywin32/
        6、下载twisted的wheel文件:http://www.lfd.uci.edu/~gohlke/pythonlibs/#twisted
        7、执行pip3 install 下载目录\Twisted-17.9.0-cp36-cp36m-win_amd64.whl
        8、pip3 install scrapy
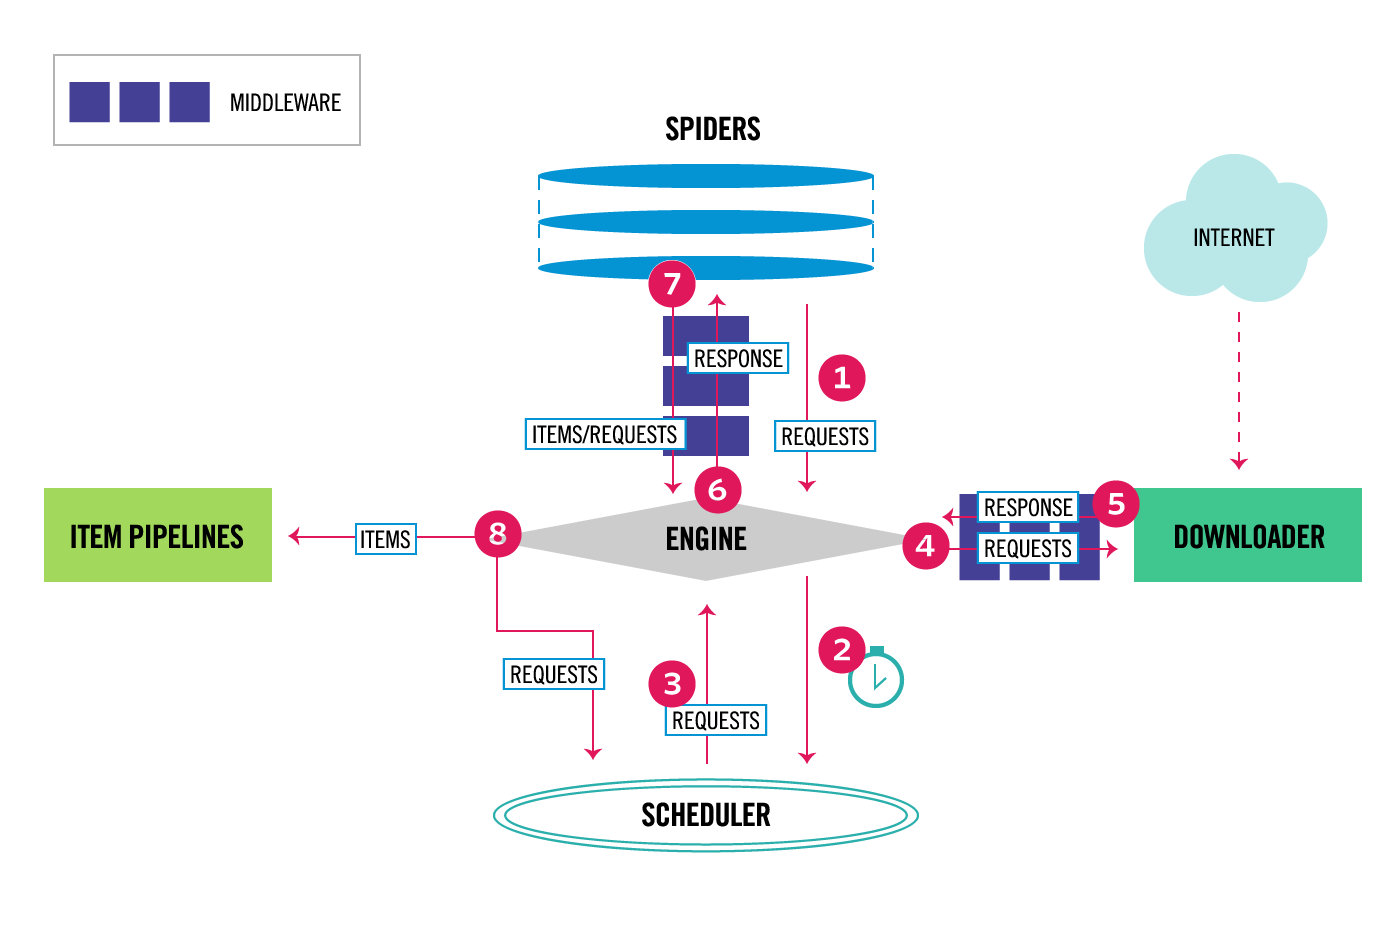
二、scrapy架构介绍
# 框架---》架构
# 1 spiders:爬虫(咱们的代码)
# 2 engin :引擎(大总管)
# 3 scheduler:调度器(排队,谁先爬谁后爬,去重)
# 4 downloader:下载器(真正的负责发送http请求,获取数据,性能很高,基于twisted,性能很高的网络框架)
# 5 piplines:管道(保存数据)


# 引擎(EGINE)
    引擎负责控制系统所有组件之间的数据流,并在某些动作发生时触发事件。

# 调度器(SCHEDULER)
    用来接受引擎发过来的请求, 压入队列中, 并在引擎再次请求的时候返回. 可以想像成一个URL的优先级队列, 由它来决定下一个要抓取的网址是什么, 同时去除重复的网址

# 下载器(DOWLOADER)
    用于下载网页内容, 并将网页内容返回给EGINE,下载器是建立在twisted这个高效的异步模型上的

# 爬虫(SPIDERS)
    SPIDERS是开发人员自定义的类,用来解析responses,并且提取items,或者发送新的请求

# 项目管道(ITEM PIPLINES)
    在items被提取后负责处理它们,主要包括清理、验证、持久化(比如存到数据库)等操作

# 下载器中间件(Downloader Middlewares)
    位于Scrapy引擎和下载器之间,主要用来处理从EGINE传到DOWLOADER的请求request,已经从DOWNLOADER传到EGINE的响应response

# 爬虫中间件(Spider Middlewares)
    位于EGINE和SPIDERS之间,主要工作是处理SPIDERS的输入(即responses)和输出(即requests)
三、scrapy目录介绍
# 目录介绍
firstscrapy         # 项目名
    firstscrapy     # 文件夹
        spiders     # 文件夹,一个个的爬虫
            cnblogs.py # 其中一个爬虫,重点写代码的地方(解析数据,发起请求) *****
        items.py    # 类比djagno的models,表模型--》类                     ***
        middlewares.py # 中间件:爬虫中间件和下载中间件都在里面              ***
        pipelines.py   # 管道,做持久化需要在这写代码                       ***
        settings.py    # 配置文件                                         **
    scrapy.cfg    # 上线配置,开发阶段不用
四、scrapy项目创建,爬虫创建,启动爬虫
# scrapy是爬虫界的django
# 1 创建scrapy项目  ---》对比django
    scrapy startproject myfirstscrapy

# 2 创建爬虫----》对比django创建app
    scrapy genspider cnblogs cnblogs.com

# 3 启动爬虫,爬取数据
    # 方式1:命令形式
    scrapy crawl 爬虫名字  --nolog

    # 方式2:在项目路径下新建main.py--->右键运行
    from scrapy.cmdline import execute
    execute(['scrapy','crawl','cnblogs','--nolog'])  # nolog代表不记录日志
五、scrapy解析数据
# CSS 和 XPATH
1 response对象有css方法和xpath方法
	-css中写css选择器
    -xpath中写xpath选择
2 重点1:
	-xpath取文本内容
	'.//a[contains(@class,"link-title")]/text()'
    -xpath取属性
    './/a[contains(@class,"link-title")]/@href'
    -css取文本
    'a.link-title::text'
    -css取属性
    'img.image-scale::attr(src)'
3 重点2:
	.extract_first()  取一个
    .extract()        取所有
使用css和xpath解析代码演示
    # def parse(self, response):
    #     print(type(response))
    #     # print(response.text)  相应的body体的内容字符串
    #     # 一般不用bs4再去解析了
    #     # soup=BeautifulSoup(response.text,'html.parser')
    #     # soup.find()
    #     # 使用自带的css,xpath
    #     # 第一种解析方式:使用xpath
    #     # article_list=response.xpath('//*[@id="post_list"]//article[@class="post-item"]')
    #     article_list = response.xpath('//article[@class="post-item"]')
    #     print(len(article_list))
    #     for article in article_list:
    #         title = article.xpath('.//a/text()').extract_first()
    #         desc = article.xpath('./section/div/p/text()').extract()
    #         real_desc = desc[0].replace('\n', '').replace(' ', '')
    #         if not real_desc:
    #             real_desc = desc[1].replace('\n', '').replace(' ', '')
    #         pub_time=article.xpath('.//footer/span/span/text()').extract_first()
    #         author=article.xpath('.//footer/a/span/text()').extract_first()
    #         url = article.xpath('./section/div/a/@href').extract_first()
    #         print(title)
    #         print(real_desc)
    #         print(pub_time)
    #         print(author)
    #         print(url)
    #         print('--------')

    def parse(self, response):
        article_list = response.css('article.post-item')
        print(len(article_list))
        for article in article_list:
            # 获取标题、简述、出版时间、作者、跳转url
            title = article.css('a.post-item-title::text').extract_first()  # 标题
            desc = article.css('p.post-item-summary::text').extract()
            real_desc = desc[0].replace('\n', '').replace(' ', '')
            if not real_desc:
                real_desc = desc[1].replace('\n', '').replace(' ', '')  # 简述
            pub_time = article.css('span.post-meta-item>span::text').extract_first()  # 出版时间
            author = article.css('footer.post-item-foot span::text').extract_first()  # 作者
            url = article.css('a.post-item-title::attr(href)').extract_first()  # 跳转url
            print(title)
            print(real_desc)
            print(pub_time)
            print(author)
            print(url)
            print('--------')
六、settings相关配置,提高爬取效率
6.1 基础的一些
#1  是否遵循爬虫协议
ROBOTSTXT_OBEY = False
#2 LOG_LEVEL 日志级别
LOG_LEVEL='ERROR'  # 报错如果不打印日志,在控制台看不到错误

# 3 USER_AGENT
USER_AGENT = 'Mozilla/5.0 (Windows NT 10.0; Win64; x64) AppleWebKit/537.36 (KHTML, like Gecko) Chrome/103.0.0.0 Safari/537.36'

# 4 DEFAULT_REQUEST_HEADERS 默认请求头
DEFAULT_REQUEST_HEADERS = {
   'Accept': 'text/html,application/xhtml+xml,application/xml;q=0.9,*/*;q=0.8',
   'Accept-Language': 'en',
}

# 5 SPIDER_MIDDLEWARES 爬虫中间件
SPIDER_MIDDLEWARES = {
    'cnblogs.middlewares.CnblogsSpiderMiddleware': 543,
}
# 6 DOWNLOADER_MIDDLEWARES  下载中间件
DOWNLOADER_MIDDLEWARES = {
    'cnblogs.middlewares.CnblogsDownloaderMiddleware': 543,
}

# 7 ITEM_PIPELINES 持久化配置
ITEM_PIPELINES = {
    'cnblogs.pipelines.CnblogsPipeline': 300,
}
6.2 增加爬虫的爬取效率
#1 增加并发:
    默认scrapy开启的并发线程为32个,可以适当进行增加。在settings配置文件中修改
    CONCURRENT_REQUESTS = 100
    值为100,并发设置成了为100。

#2 降低日志级别:
    在运行scrapy时,会有大量日志信息的输出,为了减少CPU的使用率。可以设置log输出信息为INFO或者ERROR即可。在配置文件中编写:
    LOG_LEVEL = 'INFO'

# 3 禁止cookie:
    如果不是真的需要cookie,则在scrapy爬取数据时可以禁止cookie从而减少CPU的使用率,提升爬取效率。在配置文件中编写:
    COOKIES_ENABLED = False

# 4 禁止重试:
    对失败的HTTP进行重新请求(重试)会减慢爬取速度,因此可以禁止重试。在配置文件中编写:
    RETRY_ENABLED = False

# 5 减少下载超时:
    如果对一个非常慢的链接进行爬取,减少下载超时可以能让卡住的链接快速被放弃,从而提升效率。在配置文件中进行编写:
    DOWNLOAD_TIMEOUT = 10 超时时间为10s
七 、持久化方案
# 第一种:(不用)
    -解析函数中parse,要return [{},{},{}]
    -scrapy crawl cnblogs -o 文件名(json,pkl,csv结尾)

# 第二种:(通用的)---》pipline模式
    -1 在items.py中写一个类,继承scrapy.Item
    -2 在类中写属性
    	import scrapy
        class CnblogsItem(scrapy.Item):
            title = scrapy.Field()
            desc = scrapy.Field()
            pub_time = scrapy.Field()
            author = scrapy.Field()
            url = scrapy.Field()
            content = scrapy.Field() # 这个往后放,目前先协商

    -3 在爬虫文件中导入类,实例化得到对象,把要保存的数据放到对象中
    	# 文章解析类中:
        item = CnblogsItem()
        for循环:
    	    item['title'] = title
            item['desc'] = real_desc
            item['pub_time'] = pub_time
            item['author'] = author
            item['url'] = url
        # 文章详情解析类中:
        	item['content']=content
        	yield item  # 全部数据都放入item后,统一返回,如果还有数据未存入,可以先不yield item,可以yield Request重新发请求,将item当作参数放进去,参考4.1

    -4 修改配置文件,指定pipline,数字表示优先级,越小越大
    	ITEM_PIPELINES = {
   	'crawl_cnblogs.pipelines.CrawlCnblogsPipeline': 300,
		}

    -5 写一个pipline:CrawlCnblogsPipeline
    	-open_spider:数据初始化,打开文件,打开数据库链接
            def open_spider(self, spider): # spilder就是爬虫类的对象
                print('open')
                # (1)使用文件存储
                self.f = open('cnblogs.txt', 'w', encoding='utf-8')
                # (2)或者链接数据库
                self.conn = pymysql.connect(user='root',
                                    password="123",
                                    host='127.0.0.1',
                                    port=3306,
                                    database='cnblogs')
        	    self.cursor = self.conn.cursor()

        -process_item:真正存储的地方
        	def process_item(self, item, spider):
                # 具体存数据,存文件
                self.f.write('标题:%s,作者:%s\n' % (item['title'], item['author']))
                return item  # 一定不要忘了返回,交给后续的pipline继续使用

        -close_spider:销毁资源,关闭文件,关闭数据库链接
		   def close_spider(self, spider):
                print('close')
                # (1)关闭文件
                self.f.close()
                # (2)或者关闭数据库
                self.cursor.close()
                self.conn.close()
八、全站爬取cnblogs文章
8.1 request和response对象传递参数
1 在request对象中
    def parse(self, response):
        article_list = response.css('article.post-item')
        for article in article_list:
            item = CnblogsItem()
            title = article.css('a.post-item-title::text').extract_first()
            desc = article.css('p.post-item-summary::text').extract()
            real_desc = desc[0].replace('\n', '').replace(' ', '')
            if not real_desc:
                real_desc = desc[1].replace('\n', '').replace(' ', '')
            pub_time = article.css('span.post-meta-item>span::text').extract_first()
            author = article.css('footer.post-item-foot span::text').extract_first()
            url = article.css('a.post-item-title::attr(href)').extract_first()
            item['title'] = title
            item['desc'] = real_desc
            item['pub_time'] = pub_time
            item['author'] = author
            item['url'] = url
            # yield item
            ---------------------------------------------------------------
            yield Request(url=url,callback=self.parser_detail,meta={'item':item})  # 分析:因为yield的是Request所以会再次请求里面的url,而item在meta参数中传入,在下方的parser_detail文章详情中接收,然后再统一返回到管道中
            ---------------------------------------------------------------

        # 解析下一页并继续爬取
        next = response.css('div.pager>a:last-child::attr(href)').extract_first()
        next = 'https://www.cnblogs.com' + next
        print(next)
        yield Request(url=next,callback=self.parse)


2 在response对象中
    def parser_detail(self,response):
        -----------------------------------------------
        item=response.meta.get('item')
        -----------------------------------------------
        content=response.css('#cnblogs_post_body').extract_first()
        item['content']=content
        print(item)
        print('================')
        yield item
8.2 解析下一页并继续爬取(具体代码见4.1)
next='https://www.cnblogs.com'+response.css('.pager a:last-child::attr(href)').extract_first()
print(next)
# yield Request(url=next,callback=self.parse)
yield Request(url=next)
九、爬虫和下载中间件
# settings.py中

# SPIDER_MIDDLEWARES 爬虫中间件 (了解即可,用的少)
    SPIDER_MIDDLEWARES = {
        'cnblogs.middlewares.CnblogsSpiderMiddleware': 543,
    }


# DOWNLOADER_MIDDLEWARES  下载中间件(用的多)
    DOWNLOADER_MIDDLEWARES = {
        'cnblogs.middlewares.CnblogsDownloaderMiddleware': 543,
    }


# 最终要的是下载中间件,里面的两个方法
class CnblogsDownloaderMiddleware:

    # 请求来的时候
    def process_request(self, request, spider):
        # - return None: 继续执行下一个中间件的process_request
        # - return a Response object :直接返回给engin,去解析
        # - return a Request object :给engin,再次被放到调度器中
        # - raise IgnoreRequest: 执行 process_exception()方法
        return None

    # 响应走的时候
    def process_response(self, request, response, spider):
        # - return a Response :继续走下一个中间件的process_response,给engin,进爬虫解析
        # - return a Request :给engin,进入调度器,等待下一次爬取
        # - raise IgnoreRequest:抛异常
        return response
十、加代理,cookie,header,加入selenium
10.1 加代理
# 下载中间件
    def process_request(self, request, spider):
        print('下载中间件:',request)
        request.meta['proxy'] = 'http://221.6.215.202:9091'
        return None
10.2 加cookie,修改请求头,随机生成UserAgent
0 在下载中间件的process_reqeust方法中

1 加cookie
	   request.cookies['name']='lqz'
       request.cookies= {}

2 修改header
	   request.headers['Auth']='asdfasdfasdfasdf'
       request.headers['USER-AGENT']='ssss'

3 fake_useragent模块,可以随机生成user-aget
	    from fake_useragent import UserAgent
        ua = UserAgent()
        print(ua.ie)   #随机打印ie浏览器任意版本
        print(ua.firefox) #随机打印firefox浏览器任意版本
        print(ua.chrome)  #随机打印chrome浏览器任意版本
        print(ua.random)  #随机打印任意厂家的浏览器

# 代码
    def process_request(self, request, spider):
        print('下载中间件:',request)
        #1 加代理
        request.meta['proxy'] = 'http://221.6.215.202:9091'

        # 2 加cookie
        request.cookies['name']='lqz'
        print(request.cookies)
        request.cookies={}

        # 3 加header
        request.headers['Auth']='asdfasdfasdfasdf'
        request.headers['USER-AGENT']='ssss'

        # 4 USER-AGENT--->随机产生USER-AGENT的模块

        # 5 集成selenium
        url=request.url
        if 'sitehome' in url:
            spider.bro.get(url)
            response=HtmlResponse(url=url,body=spider.bro.page_source.encode('utf-8'))
            return response
        else:
            return None
10.3 集成selenium
-在爬虫类中类属性
	driver = webdriver.Chrome(executable_path='')

-在爬虫类中方法:
   def close(spider, reason):
      spider.driver.close()

-在中间件中的process_reqeust中
    from scrapy.http import HtmlResponse
    spider.driver.get(url=request.url)
    response=HtmlResponse(url=request.url,body=spider.driver.page_source.encode('utf-8'),request=request)
    return response

-注意:有的地址使用selenium,有的地址不用,根据url判断
十一、去重规则源码分析(布隆过滤器)
# scrapy 实现了去重,爬过的网址不会再爬了
	-使用集合去重
    -DUPEFILTER_CLASS = 'scrapy.dupefilters.RFPDupeFilter'
    -只要爬取过的地址,就不爬了,原因就是这个方法返回了True
    class RFPDupeFilter(BaseDupeFilter)
    	def request_seen(self, request: Request) -> bool:
            # 把request生成指纹,如果request对象的url一样,指纹就一样
            fp = self.request_fingerprint(request)
            if fp in self.fingerprints:
                return True
            self.fingerprints.add(fp)
            if self.file:
                self.file.write(fp + '\n')
            return False


    -爬虫开始爬取时,执行了爬虫类对象的:start_requests方法---》start_urls是起始爬取的地址
    -爬虫去重的规则应该在scrapy.core.scheduler调度器源码中---》enqueue_request---》调用了去重类(RFPDupeFilter)对象的,request_seen方法来完成去重,本质是使用集合去重的

    # 每次爬取的地址对象request生成一个指纹,判断是否在集合中,如果在集合中,就不爬取了,如果不在,就爬取并且把生成的指纹放到集合中
    # 为什么要生成指纹:把下面这种地址生成指纹后,生成的是一样的
    	www.cnblogs.com?name=lqz&age=19
        www.cnblogs.com?age=19&name=lqz
    # 测试生成指纹
    from scrapy.utils.request import request_fingerprint
    from scrapy import Request
    ur1=Request(url='http://www.cnblogs.com?name=lqz&age=19')
    ur2=Request(url='http://www.cnblogs.com?age=20&name=lqz')
    print(request_fingerprint(ur1))
    print(request_fingerprint(ur2))


# 爬取的网址少还行,如果特别多 ,如果有1亿条网址,会占非常大的内存空间
	-放在集合中得字符串:a6af0a0ffa18a9b2432550e1914361b6bffcff1a

# 大数据量的去重:布隆过滤器,极小空间实现去重
	-https://zhuanlan.zhihu.com/p/94668361


#### python 中实现布隆过滤器
# python 中实现布隆过滤器
# from pybloom_live import ScalableBloomFilter
# bloom = ScalableBloomFilter(initial_capacity=100, error_rate=0.001, mode=ScalableBloomFilter.LARGE_SET_GROWTH)
# url = "www.cnblogs.com"
# url2 = "www.liuqingzheng.top"
# bloom.add(url)
# print(url in bloom)
# print(url2 in bloom)

from pybloom_live import BloomFilter
bf = BloomFilter(capacity=1000)
url='www.baidu.com'
bf.add(url)
print(url in bf)
print("www.liuqingzheng.top" in bf)


# 后期你可以自己写一个类,替换掉内置的去重
	-重写
    class MyRFPDupeFilter(RFPDupeFilter):
    	fingerprints=布隆过滤器
	-布隆过滤器:极小内存校验是否重复
十二、scrapy-redis实现分布式爬虫
# 使用步骤
    第一步:安装scrapy-redis  ---》pip3 install scrapy-redis
    第二步:改造爬虫类
    from scrapy_redis.spiders import RedisSpider
    class CnblogSpider(RedisSpider):
        name = 'cnblog_redis'
        allowed_domains = ['cnblogs.com']
        # 写一个key:redis列表的key,起始爬取的地址
        redis_key = 'myspider:start_urls'

    第三步:配置文件配置
    # 分布式爬虫配置
    # 去重规则使用redis
    REDIS_HOST = 'localhost'                            # 主机名
    REDIS_PORT = 6379                                   # 端口
    -------------------------------核心功能---------------------------------
    DUPEFILTER_CLASS = "scrapy_redis.dupefilter.RFPDupeFilter"
    SCHEDULER = "scrapy_redis.scheduler.Scheduler"
    ------------------------------------------------------------------------
    # 持久化:文件,mysql,redis
    ITEM_PIPELINES = {
       'cnblogs.pipelines.CnblogsFilePipeline': 300,
       'cnblogs.pipelines.CnblogsMysqlPipeline': 100,
       'scrapy_redis.pipelines.RedisPipeline': 400,
    }
    第四步:在多台机器上启动scrapy项目

    第五步:把起始爬取的地址放到redis的列表中
    lpush myspider:start_urls value http://www.cnblogs.com/
补充
fake_useragent模块
可以生成随机请求头中的ie浏览器版本,可以在爬虫中使用,防止被反扒;
另外该模块还可以随机生成很多其他的东西
from fake_useragent import UserAgent

ua = UserAgent()
print(ua.ie)  # 随机打印ie浏览器任意版本
print(ua.firefox)  # 随机打印firefox浏览器任意版本
print(ua.chrome)  # 随机打印chrome浏览器任意版本
print(ua.random)  # 随机打印任意厂家的浏览器
......

 浙公网安备 33010602011771号