Spring Boot+Eureka+Spring Cloud微服务快速上手项目实战
说明
我看了一些教程要么写的太入门、要么就是写的太抽象。真正好的文章应该是快速使人受益的而不是浪费时间。本文通过一个包括组织、部门、员工等服务交互的案例让刚接触spring cloud微服务的朋友快速上手。内容收集改造自网络,希望对大家有所帮助:)
本文涵盖以下知识点:
- 使用Spring Boot 2.6.x开发各个微服务模块。
- Spring Cloud Config提供配置中心
- Spring Cloud Eureka提供服务注册和发现服务
- Spring Cloud Gateway提供API网关
- Spring Cloud Sleuth提供服务日志(可选)
- Spring Cloud openfeign提供服务接口调用
- springdoc-openapi提供接口API文档
有关各个组件的,不在过多介绍。
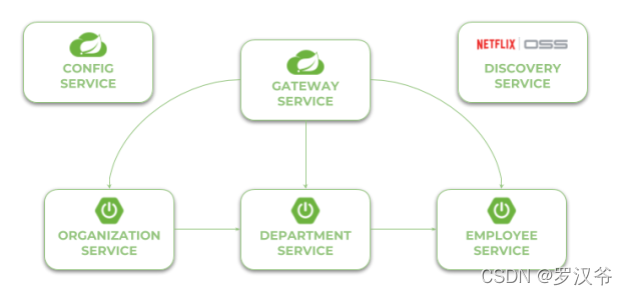
系统架构
有三个独立的Spring Boot微服务,它们在服务发现中注册自己,从配置服务中获取属性,并相互通信。整个系统隐藏在API网关后面。服务调用采用
项目源码
https://gitee.com/indexman/spring_cloud_sample
开发步骤
只展示部分关键代码,详细请看源码。
1.搭建父工程
创建一个父工程:spring_cloud_sample,添加pom.xml:
<project xmlns="http://maven.apache.org/POM/4.0.0" xmlns:xsi="http://www.w3.org/2001/XMLSchema-instance" xsi:schemaLocation="http://maven.apache.org/POM/4.0.0 http://maven.apache.org/maven-v4_0_0.xsd">
	<modelVersion>4.0.0</modelVersion>
	<groupId>com.laoxu.java</groupId>
	<artifactId>spring_cloud_sample</artifactId>
	<version>0.0.1-SNAPSHOT</version>
	<name>spring_cloud_sample</name>
	<packaging>pom</packaging>

	<parent>
		<groupId>org.springframework.boot</groupId>
		<artifactId>spring-boot-starter-parent</artifactId>
		<version>2.6.1</version>
		<relativePath />
	</parent>

	<properties>
		<java.version>1.8</java.version>
		<spring-cloud.version>2021.0.0</spring-cloud.version>
		<project.build.sourceEncoding>UTF-8</project.build.sourceEncoding>
	</properties>

	<dependencyManagement>
		<dependencies>
			<dependency>
				<groupId>org.springframework.cloud</groupId>
				<artifactId>spring-cloud-dependencies</artifactId>
				<version>${spring-cloud.version}</version>
				<type>pom</type>
				<scope>import</scope>
			</dependency>
		</dependencies>
	</dependencyManagement>

	<modules>
		<module>config-service</module>
		<module>discovery-service</module>
		<module>employee-service</module>
		<module>department-service</module>
		<module>organization-service</module>
		<module>gateway-service</module>
	</modules>
</project>
2.创建配置中心config-service
2.1 添加依赖
<dependency>
	<groupId>org.springframework.cloud</groupId>
	<artifactId>spring-cloud-config-server</artifactId>
</dependency>
2.2 添加配置
启用读取本地配置文件需要设置:spring.profiles.active=native
server:
  port: 8088
spring:
  profiles:
    active: native
2.3 添加启动类
@SpringBootApplication
@EnableConfigServer
public class ConfigApplication {

	public static void main(String[] args) {
		new SpringApplicationBuilder(ConfigApplication.class).run(args);
	}
}
- 本地配置文件
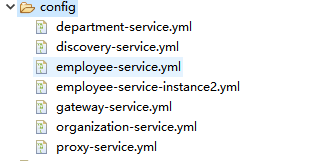
各服务的配置都放在这个config文件夹下,启动后会自动读取。
3.创建服务发现discovery-service
3.1 添加依赖
<dependencies>
		<dependency>
			<groupId>org.springframework.cloud</groupId>
			<artifactId>spring-cloud-starter-netflix-eureka-server</artifactId>
		</dependency>
		<dependency>
			<groupId>org.springframework.cloud</groupId>
			<artifactId>spring-cloud-starter-config</artifactId>
		</dependency>
	</dependencies>
3.2 添加配置文件
注意:启动配置文件都在配置中心config-service resources目录下,此处都是去读取配置中心的各个配置,name一定不要配错!
spring:
  application:
    name: discovery-service
  config:
    import: "optional:configserver:http://localhost:8088"
3.3 添加启动类
@SpringBootApplication
@EnableEurekaServer
public class DiscoveryApplication {

	public static void main(String[] args) {
		new SpringApplicationBuilder(DiscoveryApplication.class).run(args);
	}

}
4.创建员工服务employee-service
注意每个微服务必须在启动期间执行一些操作。
- 从 config-service 获取配置,
- 在 discovery-service 中注册自己
- 暴露 HTTP API 并自动生成 API 文档。
为了实现以上操作,我们需要在 pom.xml 中包含一些依赖项。 要读取配置中心,需要依赖starter spring-cloud-starter-config。 依赖spring-cloud-starter-netflix-eureka-client并使用 @EnableDiscoveryClient 注释主类后,微服务就能注册到发现服务。 此外 Spring Boot 应用程序生成 API 文档,此处我们使用Spring REST Docs
4.1 添加依赖
<dependencies>
		<dependency>
			<groupId>org.springframework.cloud</groupId>
			<artifactId>spring-cloud-starter-netflix-eureka-client</artifactId>
		</dependency>
		<dependency>
			<groupId>org.springframework.cloud</groupId>
			<artifactId>spring-cloud-starter-config</artifactId>
		</dependency>
		<dependency>
			<groupId>org.springframework.boot</groupId>
			<artifactId>spring-boot-starter-web</artifactId>
		</dependency>
		<dependency>
			<groupId>org.springframework.boot</groupId>
			<artifactId>spring-boot-starter-actuator</artifactId>
		</dependency>
		<dependency>
		    <groupId>org.springframework.cloud</groupId>
		    <artifactId>spring-cloud-starter-sleuth</artifactId>
		</dependency>
		<dependency>
			<groupId>org.springdoc</groupId>
			<artifactId>springdoc-openapi-webmvc-core</artifactId>
			<version>1.5.13</version>
		</dependency>
		<dependency>
			<groupId>org.springframework.boot</groupId>
			<artifactId>spring-boot-starter-test</artifactId>
			<scope>test</scope>
		</dependency>
	</dependencies>
4.2 添加启动类
注意启动类主要做了2件事:
- 启用api文档配置
- 初始化employee数据
后续的部门和组织模块与此类似。
@SpringBootApplication
@OpenAPIDefinition(info =
	@Info(title = "Employee API", version = "1.0", description = "Documentation Employee API v1.0")
)
public class EmployeeApplication {

	public static void main(String[] args) {
		SpringApplication.run(EmployeeApplication.class, args);
	}

	@Bean
	EmployeeRepository repository() {
		EmployeeRepository repository = new EmployeeRepository();
		repository.add(new Employee(1L, 1L, "John Smith", 34, "Analyst"));
		repository.add(new Employee(1L, 1L, "Darren Hamilton", 37, "Manager"));
		repository.add(new Employee(1L, 1L, "Tom Scott", 26, "Developer"));
		repository.add(new Employee(1L, 2L, "Anna London", 39, "Analyst"));
		repository.add(new Employee(1L, 2L, "Patrick Dempsey", 27, "Developer"));
		repository.add(new Employee(2L, 3L, "Kevin Price", 38, "Developer"));
		repository.add(new Employee(2L, 3L, "Ian Scott", 34, "Developer"));
		repository.add(new Employee(2L, 3L, "Andrew Campton", 30, "Manager"));
		repository.add(new Employee(2L, 4L, "Steve Franklin", 25, "Developer"));
		repository.add(new Employee(2L, 4L, "Elisabeth Smith", 30, "Developer"));
		return repository;
	}

}
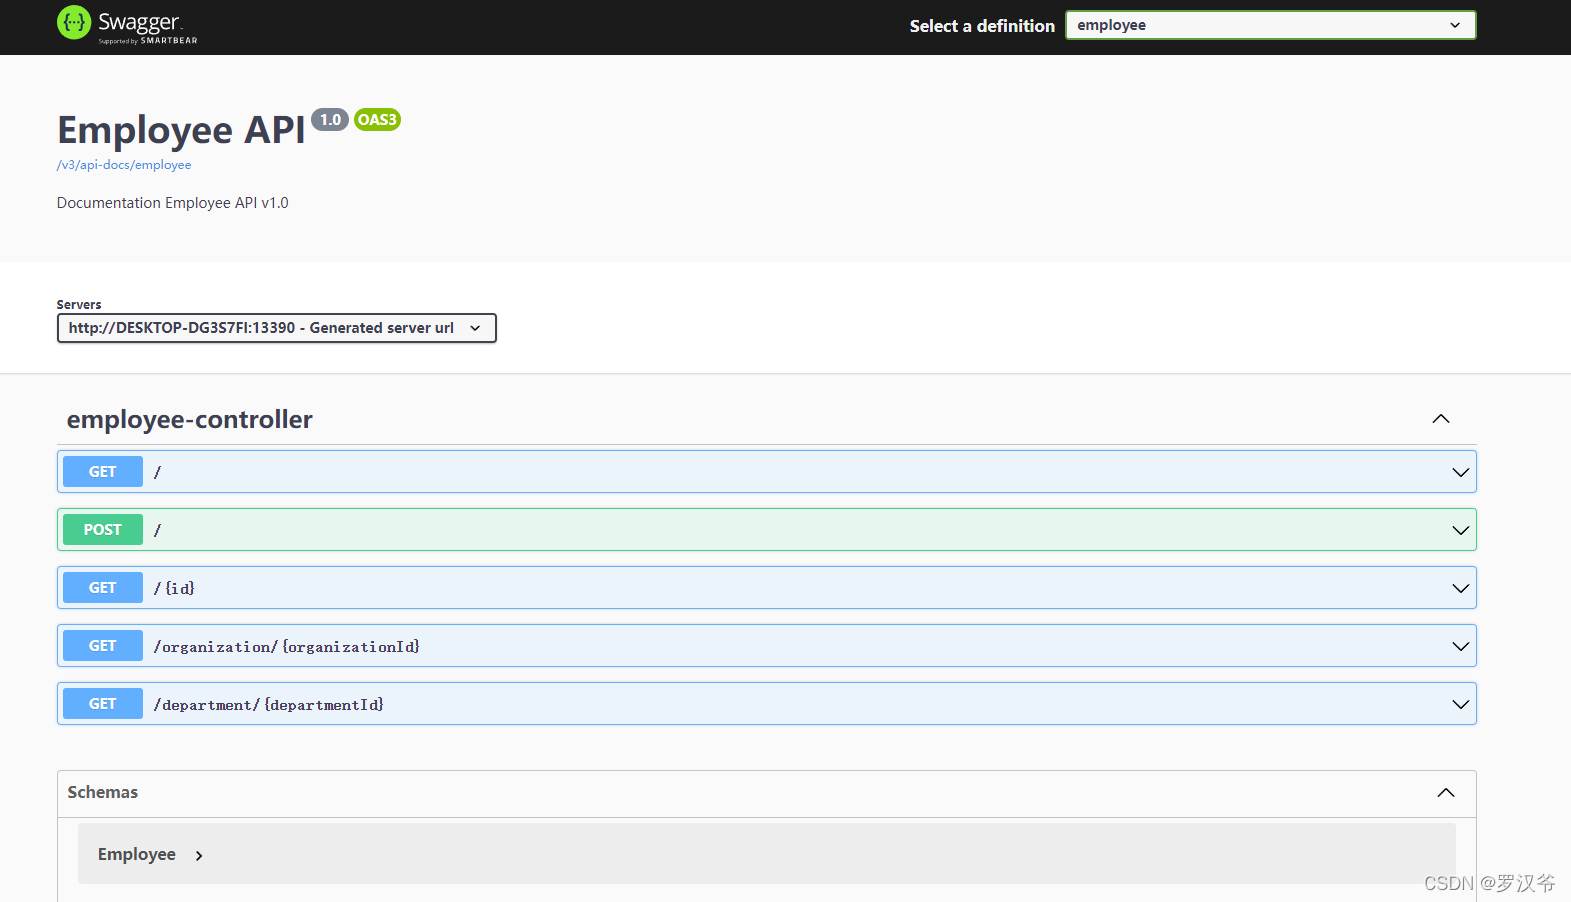
4.3 添加接口
@RestController
public class EmployeeController {

	private static final Logger LOGGER = LoggerFactory.getLogger(EmployeeController.class);

	@Autowired
	EmployeeRepository repository;

	@PostMapping("/")
	public Employee add(@RequestBody Employee employee) {
		LOGGER.info("Employee add: {}", employee);
		return repository.add(employee);
	}

	@GetMapping("/{id}")
	public Employee findById(@PathVariable("id") Long id) {
		LOGGER.info("Employee find: id={}", id);
		return repository.findById(id);
	}

	@GetMapping("/")
	public List<Employee> findAll() {
		LOGGER.info("Employee find");
		return repository.findAll();
	}

	@GetMapping("/department/{departmentId}")
	public List<Employee> findByDepartment(@PathVariable("departmentId") Long departmentId) {
		LOGGER.info("Employee find: departmentId={}", departmentId);
		return repository.findByDepartment(departmentId);
	}

	@GetMapping("/organization/{organizationId}")
	public List<Employee> findByOrganization(@PathVariable("organizationId") Long organizationId) {
		LOGGER.info("Employee find: organizationId={}", organizationId);
		return repository.findByOrganization(organizationId);
	}

}
5.创建部门服务department-service
5.1 添加依赖
同4.1,略
5.2 添加启动类
@SpringBootApplication
@EnableFeignClients
@OpenAPIDefinition(info =
	@Info(title = "Department API", version = "1.0", description = "Documentation Department API v1.0")
)
public class DepartmentApplication {

	public static void main(String[] args) {
		SpringApplication.run(DepartmentApplication.class, args);
	}

	@Bean
	DepartmentRepository repository() {
		DepartmentRepository repository = new DepartmentRepository();
		repository.add(new Department(1L, "Development"));
		repository.add(new Department(1L, "Operations"));
		repository.add(new Department(2L, "Development"));
		repository.add(new Department(2L, "Operations"));
		return repository;
	}

}
5.3 添加接口
@RestController
public class DepartmentController {

	private static final Logger LOGGER = LoggerFactory.getLogger(DepartmentController.class);

	DepartmentRepository repository;
	EmployeeClient employeeClient;

	public DepartmentController(DepartmentRepository repository, EmployeeClient employeeClient) {
		this.repository = repository;
		this.employeeClient = employeeClient;
	}

	@PostMapping("/")
	public Department add(@RequestBody Department department) {
		LOGGER.info("Department add: {}", department);
		return repository.add(department);
	}

	@GetMapping("/{id}")
	public Department findById(@PathVariable("id") Long id) {
		LOGGER.info("Department find: id={}", id);
		return repository.findById(id);
	}

	@GetMapping("/")
	public List<Department> findAll() {
		LOGGER.info("Department find");
		return repository.findAll();
	}

	@GetMapping("/organization/{organizationId}")
	public List<Department> findByOrganization(@PathVariable("organizationId") Long organizationId) {
		LOGGER.info("Department find: organizationId={}", organizationId);
		return repository.findByOrganization(organizationId);
	}

	@GetMapping("/organization/{organizationId}/with-employees")
	public List<Department> findByOrganizationWithEmployees(@PathVariable("organizationId") Long organizationId) {
		LOGGER.info("Department find: organizationId={}", organizationId);
		List<Department> departments = repository.findByOrganization(organizationId);
		departments.forEach(d -> d.setEmployees(employeeClient.findByDepartment(d.getId())));
		return departments;
	}

}
6.创建组织服务organization-service
6.1 添加依赖
同4.1,略
6.2 添加启动类
@SpringBootApplication
@EnableFeignClients
@OpenAPIDefinition(info =
	@Info(title = "Organization API", version = "1.0", description = "Documentation Organization API v1.0")
)
public class OrganizationApplication {

	public static void main(String[] args) {
		SpringApplication.run(OrganizationApplication.class, args);
	}

	@Bean
	OrganizationRepository repository() {
		OrganizationRepository repository = new OrganizationRepository();
		repository.add(new Organization("Microsoft", "Redmond, Washington, USA"));
		repository.add(new Organization("Oracle", "Redwood City, California, USA"));
		return repository;
	}

}
6.3 添加接口
@RestController
public class OrganizationController {

	private static final Logger LOGGER = LoggerFactory.getLogger(OrganizationController.class);

	@Autowired
	OrganizationRepository repository;
	@Autowired
	DepartmentClient departmentClient;
	@Autowired
	EmployeeClient employeeClient;

	@PostMapping
	public Organization add(@RequestBody Organization organization) {
		LOGGER.info("Organization add: {}", organization);
		return repository.add(organization);
	}

	@GetMapping
	public List<Organization> findAll() {
		LOGGER.info("Organization find");
		return repository.findAll();
	}

	@GetMapping("/{id}")
	public Organization findById(@PathVariable("id") Long id) {
		LOGGER.info("Organization find: id={}", id);
		return repository.findById(id);
	}

	@GetMapping("/{id}/with-departments")
	public Organization findByIdWithDepartments(@PathVariable("id") Long id) {
		LOGGER.info("Organization find: id={}", id);
		Organization organization = repository.findById(id);
		organization.setDepartments(departmentClient.findByOrganization(organization.getId()));
		return organization;
	}

	@GetMapping("/{id}/with-departments-and-employees")
	public Organization findByIdWithDepartmentsAndEmployees(@PathVariable("id") Long id) {
		LOGGER.info("Organization find: id={}", id);
		Organization organization = repository.findById(id);
		organization.setDepartments(departmentClient.findByOrganizationWithEmployees(organization.getId()));
		return organization;
	}

	@GetMapping("/{id}/with-employees")
	public Organization findByIdWithEmployees(@PathVariable("id") Long id) {
		LOGGER.info("Organization find: id={}", id);
		Organization organization = repository.findById(id);
		organization.setEmployees(employeeClient.findByOrganization(organization.getId()));
		return organization;
	}

}
7.创建网关服务gateway-service
- 关于网关gateway
Spring Cloud Gateway 提供了三个用于配置的基本组件:路由(routes)、谓词(predicates )和过滤器(filters)。 路由是网关的基本构建块。 它包含一个目标 URI 和定义的谓词和过滤器列表。 Predicate 负责匹配来自传入 HTTP 请求的任何内容,例如请求头或参数。 过滤器可以在发送到下游服务之前和之后修改请求和响应。 所有这些组件都可以使用配置属性进行设置。 我们为示例微服务定义的路由创建并放置在配置服务器文件 gateway-service.yml。
7.1 添加依赖
<dependencies>
		<dependency>
			<groupId>org.springframework.cloud</groupId>
			<artifactId>spring-cloud-starter-gateway</artifactId>
		</dependency>
		<dependency>
			<groupId>org.springframework.cloud</groupId>
			<artifactId>spring-cloud-starter-netflix-eureka-client</artifactId>
		</dependency>
		<dependency>
			<groupId>org.springframework.cloud</groupId>
			<artifactId>spring-cloud-starter-config</artifactId>
		</dependency>
		<dependency>
		    <groupId>org.springframework.cloud</groupId>
		    <artifactId>spring-cloud-starter-sleuth</artifactId>
		</dependency>
		<dependency>
			<groupId>org.springdoc</groupId>
			<artifactId>springdoc-openapi-webflux-core</artifactId>
			<version>1.5.13</version>
		</dependency>
		<dependency>
			<groupId>org.springdoc</groupId>
			<artifactId>springdoc-openapi-webflux-ui</artifactId>
			<version>1.5.13</version>
		</dependency>
	</dependencies>
7.2 添加启动类
@SpringBootApplication
@EnableDiscoveryClient
public class GatewayApplication {

	private static final Logger LOGGER = LoggerFactory.getLogger(GatewayApplication.class);

	public static void main(String[] args) {
		SpringApplication.run(GatewayApplication.class, args);
	}

	@Autowired
	RouteDefinitionLocator locator;

	@Bean
	public List<GroupedOpenApi> apis() {
		List<GroupedOpenApi> groups = new ArrayList<>();
		List<RouteDefinition> definitions = locator.getRouteDefinitions().collectList().block();
		assert definitions != null;
		definitions.stream().filter(routeDefinition -> routeDefinition.getId().matches(".*-service")).forEach(routeDefinition -> {
			String name = routeDefinition.getId().replaceAll("-service", "");
			groups.add(GroupedOpenApi.builder().pathsToMatch("/" + name + "/**").group(name).build());
		});
		return groups;
	}

}
7.3 添加中心化配置
server:
  port: 8060

eureka:
  client:
    serviceUrl:
      defaultZone: http://localhost:8061/eureka/

logging:
  pattern:
    console: "%d{yyyy-MM-dd HH:mm:ss} ${LOG_LEVEL_PATTERN:-%5p} %m%n"

spring:
  cloud:
    gateway:
      discovery:
        locator:
          enabled: true
      routes:
      - id: employee-service
        uri: lb://employee-service
        predicates:
        - Path=/employee/**
        filters:
        - RewritePath=/employee/(?<path>.*), /$\{path}
      - id: department-service
        uri: lb://department-service
        predicates:
        - Path=/department/**
        filters:
        - RewritePath=/department/(?<path>.*), /$\{path}
      - id: organization-service
        uri: lb://organization-service
        predicates:
        - Path=/organization/**
        filters:
        - RewritePath=/organization/(?<path>.*), /$\{path}
      - id: openapi
        uri: http://localhost:${server.port}
        predicates:
        - Path=/v3/api-docs/**
        filters:
        - RewritePath=/v3/api-docs/(?<path>.*), /$\{path}/v3/api-docs

springdoc:
  swagger-ui:
    urls:
      - name: employee
        url: /v3/api-docs/employee
      - name: department
        url: /v3/api-docs/department
      - name: organization
        url: /v3/api-docs/organization
8.运行测试
8.1 启动服务
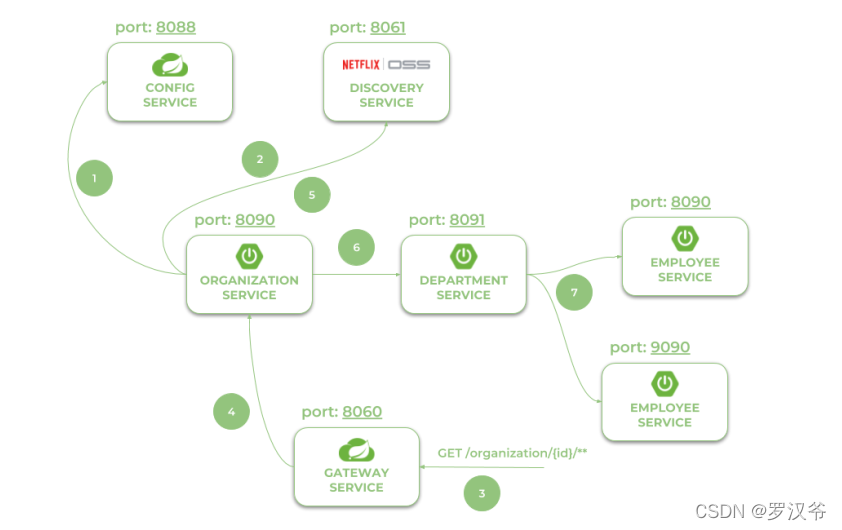
- 依次启动:
config-service、discovery-service
剩下的服务顺序无限制。 - 程序的运行逻辑参考下图:
8.1 访问api doc
访问:http://localhost:8060/swagger-ui.html
8.2 访问接口
注意:由于数据在启动时初始化到内存,所以多次查询后会发生填充,重启后才会重置。当然你也可以去修改Repository中的方法去重置,此处对于整个项目无关紧要。
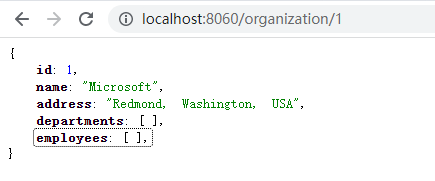
- 查询单个组织
http://localhost:8060/organization/1
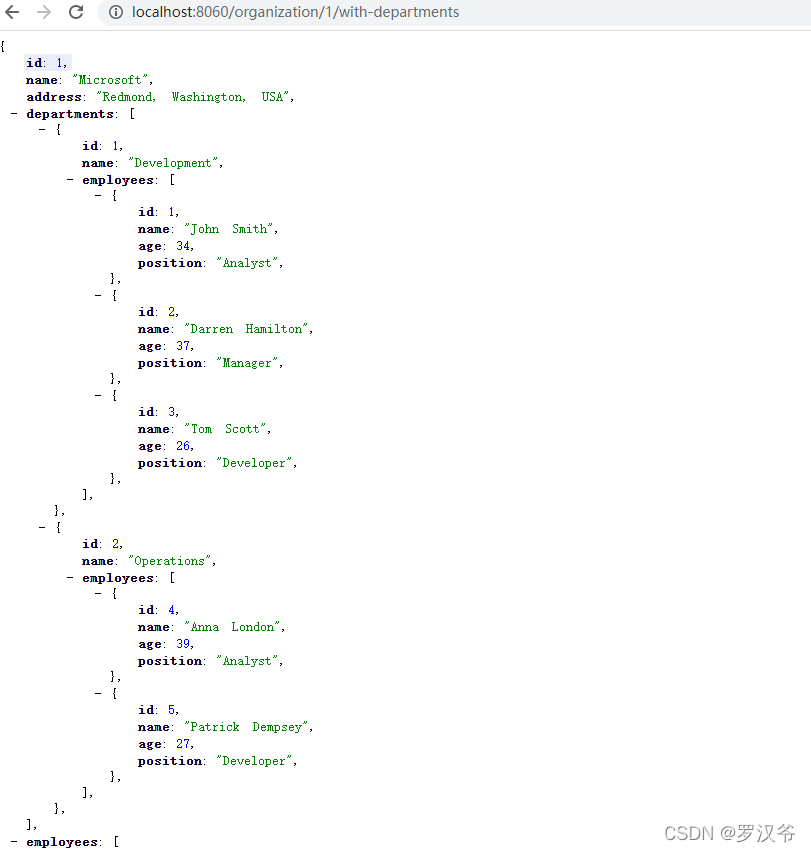
- 查询组织下的部门列表
http://localhost:8060/organization/1/with-departments

 浙公网安备 33010602011771号