gitlab+jenkins+docker持续集成环境搭建实战
介绍

什么是持续集成?
持续集成(CI)是在源代码变更后自动检测、拉取、构建和(在大多数情况下)进行单元测试的过程。持续集成是启动管道的环节(尽管某些预验证 —— 通常称为 上线前检查(pre-flight checks) —— 有时会被归在持续集成之前)。
本篇简明扼要,直击痛点,可以让急需构建CI/DI环境而无从下手的小伙伴。

步骤
准备服务器
4台centos7虚拟机:
192.168.182.131 gitlab服务器
192.168.182.132 jenkins服务器
192.168.182.133 java应用发布服务器
192.168.182.134 docker发布服务器
可以先搭建1台基础的包含docker和jdk环境的虚拟机。其余的3台采用克隆方式创建。
准备1个springboot项目
主要用于演示代码提交和自动化构建,代码很简单:
<?xml version="1.0" encoding="UTF-8"?>
<project xmlns="http://maven.apache.org/POM/4.0.0"
         xmlns:xsi="http://www.w3.org/2001/XMLSchema-instance"
         xsi:schemaLocation="http://maven.apache.org/POM/4.0.0 http://maven.apache.org/xsd/maven-4.0.0.xsd">
    <modelVersion>4.0.0</modelVersion>

    <parent>
        <groupId>org.springframework.boot</groupId>
        <artifactId>spring-boot-starter-parent</artifactId>
        <version>2.4.5</version>
        <relativePath/>
    </parent>

    <groupId>com.test.java</groupId>
    <artifactId>helloci</artifactId>
    <version>1.0-SNAPSHOT</version>

    <properties>
        <java.version>1.8</java.version>
        <project.build.sourceEncoding>UTF-8</project.build.sourceEncoding>
        <!-- 跳过测试 -->
        <skipTests>true</skipTests>
    </properties>

    <dependencies>
        <dependency>
            <groupId>org.springframework.boot</groupId>
            <artifactId>spring-boot-starter-web</artifactId>
        </dependency>

        <dependency>
            <groupId>org.springframework.boot</groupId>
            <artifactId>spring-boot-starter-test</artifactId>
            <scope>test</scope>
        </dependency>
    </dependencies>

    <!--打包-->
    <build>
        <plugins>
            <plugin>
                <groupId>org.springframework.boot</groupId>
                <artifactId>spring-boot-maven-plugin</artifactId>
            </plugin>
        </plugins>
    </build>
</project>
@RestController
public class HelloController {
    @GetMapping
    public String hello(){
        return "hello ci/cd test docker auto build using pipeline";
    }
}
搭建docker环境
- centos7如何安装docker请参考:
https://blog.csdn.net/IndexMan/article/details/128495994
搭建gitlab环境
docker方式启动gitlab
请参考:
https://blog.csdn.net/IndexMan/article/details/103319871
rpm方式安装
- 下载rpm
https://mirrors.tuna.tsinghua.edu.cn/gitlab-ce/yum/el7/选一个版本 - 安装
rpm -ivh gitlab-ce-15.7.0-ce.0.el7.x86_64.rpm

- 修改
external_url配置
改成自己的ip,端口自定义。
vim /etc/gitlab/gitlab.rb

- 启动
gitlab-ctl reconfigure
gitlab-ctl restart

- 访问系统
http://192.168.182.131:8009/
注意:我安装的是gitlab15,root用户默认密码存储在一个配置文件中,这个文件在安装24小时后自动删除!

cat /etc/gitlab/initial_root_password

- 修改管理员密码

搭建jenkins环境
安装jdk11
https://www.oracle.com/java/technologies/downloads/#java11
- 安装
rpm -ivh jdk-11.0.17_linux-x64_bin.rpm
java -version
运行jenkins
- 下载
注意:我下载的是最新版本,需要安装jdk11才能运行。
https://get.jenkins.io/war-stable/2.375.1/jenkins.war - 运行
java -jar jenkins.war
记下密码。

- 访问
http://192.168.182.132:8080/
填入管理员密码。

- 解决jenkins离线提示

修改配置文件:
vim /root/.jenkins/hudson.model.UpdateCenter.xml
将其中的地址改为国内可访问地址,

然后重启再次访问:


注意:这一步先停一下,因为jenkins官方插件安装地址是国外的,这个地方我们要换成国内的。去修改配置文件:
# 修改default.json
cd /root/.jenkins/updates
sed -i 's#updates.jenkins.io/download/plugins#mirrors.tuna.tsinghua.edu.cn/jenkins/plugins#g' default.json && sed -i 's#www.google.com#www.baidu.com#g' default.json
- 然后继续安装推荐插件,最后设置管理员账号密码后进入系统首页

安装插件
maven、ssh、auth插件


配置maven
- 官网下载解压到/usr/local/maven
- 配置环境变量
# 配置Maven环境变量
vi /etc/profile

# 在配置文件末尾加上maven路径
# maven
export MAVEN_HOME=/soft/apache-maven-3.8.6
export PATH=$PATH:$MAVEN_HOME/bin

# 使配置文件立即生效
source /etc/profile
- 配置阿里云仓库
<mirror>
  <id>alimaven</id>
  <mirrorOf>central</mirrorOf>
  <name>aliyun maven</name>
  <url>http://maven.aliyun.com/nexus/content/groups/public/</url>
</mirror>
安装git
yum install git
构建maven任务

- 添加之前新建好的git项目地址

- 开始构建


构建后发送到测试服务器

- 修改maven任务配置
添加构建后动作:


- 执行构建
- 到测试服务器查看应用已经在后台运行

解决publisher超时
将构建后执行的命令修改一下:
nohup java -jar /home/helloci/helloci-1.0-SNAPSHOT.jar > /tmp/helloci.log 2>&1 &
构建前置清理脚本
在133服务器 /home/helloci目录下新建脚本clear.sh
#!/bin/bash

rm -f helloci*.jar
appname=$1
echo "arg:$1"
# get pid
pid=`ps -ef | grep $1 |grep 'java -jar' | awk '{printf $2}'`
echo $pid

if [ -z $pid ]
then
  echo "$appname not start"
else
  kill -9 $pid
fi

配置钩子实现自动构建

浏览器输入以下地址测试:
http://192.168.182.132:8080/buildByToken/build?job=helloci&token=123123
发现可以自动触发构建。
- 在gitlab工程中配置
先解除配置本地URL的限制!

在工程上配置webhook


- 测试,再次提交代码
发现jenkins触发了自动构建:


自动化构建docker镜像
手工构建测试
准备一台docker环境服务器:192.168.182.134
将之前打包好的helloci.jar上传到/home目录,并创建一个Dockerfile文件:
FROM openjdk:8
EXPOSE 9001
WORKDIR /root
COPY *.jar /root/app.jar
ENTRYPOINT ["java","-jar","/root/app.jar"]
- 执行构建命令
docker build -t helloci .

- 解决WARNING: IPv4 forwarding is disabled. Networking will not work
echo "net.ipv4.ip_forward=1" >>/usr/lib/sysctl.d/00-system.conf
systemctl restart network && systemctl restart docker
- 运行镜像
docker run -d -p 9001:9001 --name helloci helloci:latest
访问到9001地址,说明构建没问题。
自动化构建
- 创建新jenkins任务
helloci-docker - 配置pre steps

- 配置传输文件动作
将打包好的jar文件和工程根目录下的Dockerfile传输到134服务器的/home路径下。


- 执行构建
查看134服务器上相关构建结果

使用pipeline构建
使用blue ocean ui

- 创建1个测试pipeline item

pipeline {
    agent any

    stages {
        stage('pull code') {
            steps {
                echo 'pull success.'
            }
        }
        stage('exec build') {
            steps {
                echo 'build success.'
            }
        }
    }
}

自动打包docker镜像
- 创建1个新的pipeline item
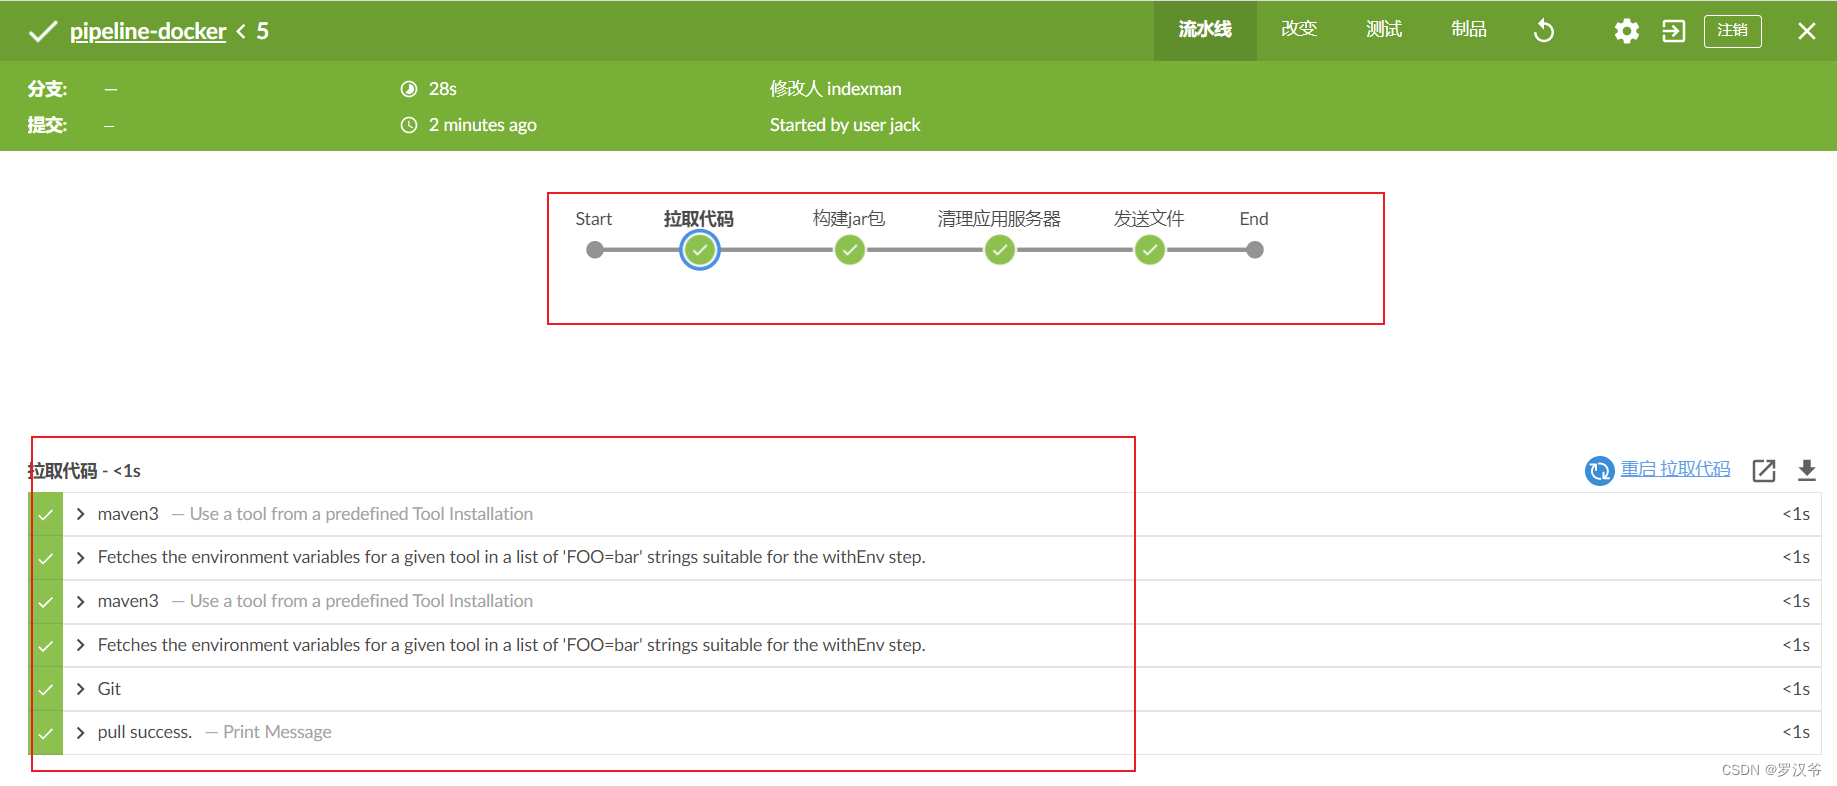
pipeline-docker - 利用片段生成器,生成git拉取代码脚本、发送文件、执行远程服务器命令脚本,填入到流水线 脚本中:

具体脚本如下:
pipeline {
    agent any

    tools {
        maven "maven3"
    }

    stages {
        stage('拉取代码') {
            steps {
                git branch: 'main', credentialsId: 'gitlab', url: 'http://192.168.182.131:8009/root/helloci.git'
                echo 'pull success.'
            }
        }
        stage('构建jar包') {
            steps {
                // sh "mvn --version"
                sh """
                    mvn clean package
                   """
                echo 'build success.'
            }
        }
        stage('清理应用服务器'){
            steps {
                sshPublisher(publishers: [sshPublisherDesc(configName: '134dockerserver', transfers: [sshTransfer(cleanRemote: false, excludes: '', execCommand: '''cd /home
rm -rf *
docker stop helloci
docker rm helloci
docker rmi helloci''', execTimeout: 120000, flatten: false, makeEmptyDirs: false, noDefaultExcludes: false, patternSeparator: '[, ]+', remoteDirectory: '', remoteDirectorySDF: false, removePrefix: '', sourceFiles: '')], usePromotionTimestamp: false, useWorkspaceInPromotion: false, verbose: false)])
            echo 'clear success'
            }
        }
        stage('发送文件') {
            steps {
                sshPublisher(publishers: [sshPublisherDesc(configName: '134dockerserver', transfers: [sshTransfer(cleanRemote: false, excludes: '', execCommand: '', execTimeout: 120000, flatten: false, makeEmptyDirs: false, noDefaultExcludes: false, patternSeparator: '[, ]+', remoteDirectory: '', remoteDirectorySDF: false, removePrefix: 'target', sourceFiles: '**/helloci*.jar'), sshTransfer(cleanRemote: false, excludes: '', execCommand: '''cd /home
docker build -t helloci .
docker run -d -p 9001:9001 --name helloci helloci:latest''', execTimeout: 120000, flatten: false, makeEmptyDirs: false, noDefaultExcludes: false, patternSeparator: '[, ]+', remoteDirectory: '', remoteDirectorySDF: false, removePrefix: '', sourceFiles: '**/Dockerfile')], usePromotionTimestamp: false, useWorkspaceInPromotion: false, verbose: false)])
                echo 'build success.'
            }
        }
    }
}
- 执行构建,后访问发现镜像已更新,配置成功!


