
【转】Android之Spinner下拉列表 使用详解
原文网址:(56条消息) Android之Spinner使用详解_浪漫主义码农的博客-CSDN博客_android spinner
Spinner(列表选择框)的基本使用
当我们的app需要用户输入数据时,除了让用户自己打字以外,还有一种比较贴心的设计: 列出一组选项让用户从中挑选,从而方便了我们的用户!
Spinner组件一共有两个,一个是本身的Spinner,一个是android.support.v7.widget.AppCompatSpinner
两者的区别在于v7内的Spinner是兼容低版本的,Spinner再高版本中才能使用的方法换了v7下的Spinner后可以一直兼容到2.1 (v7兼容到api7),初次之外两者的使用没有其他差别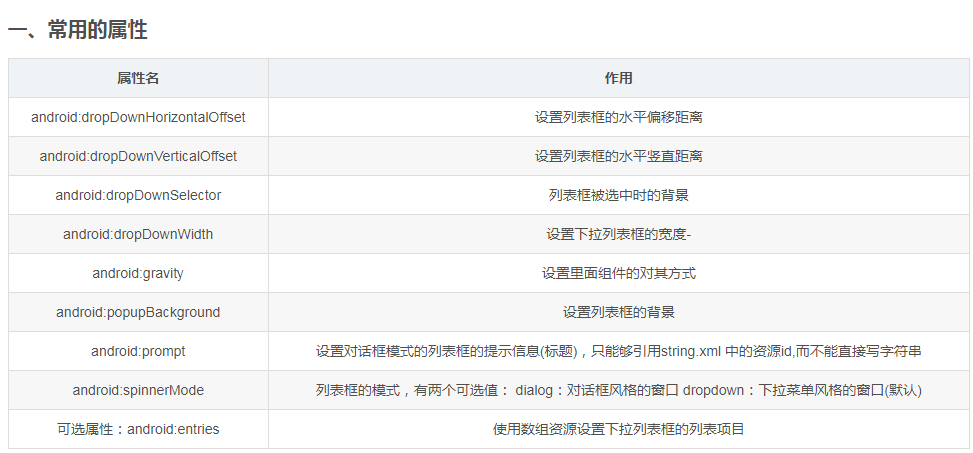
二、使用步骤
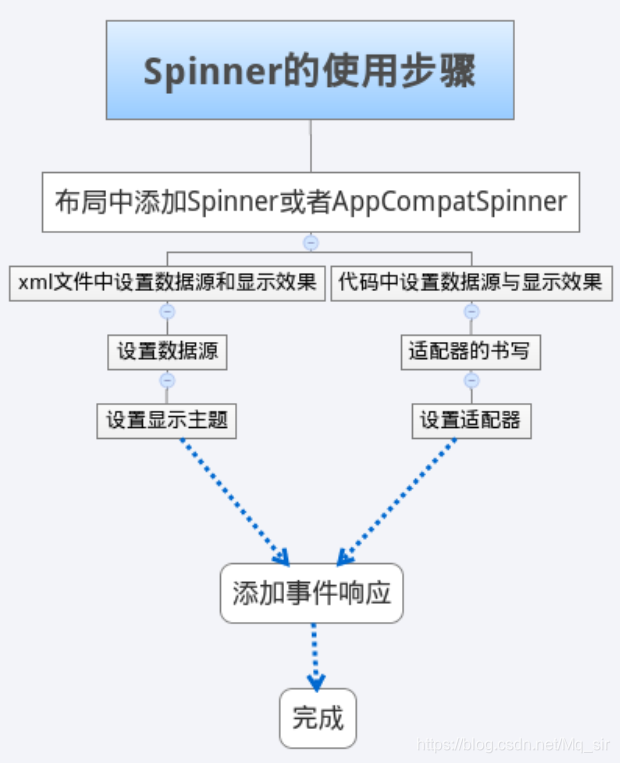
三、实例

项目结构:
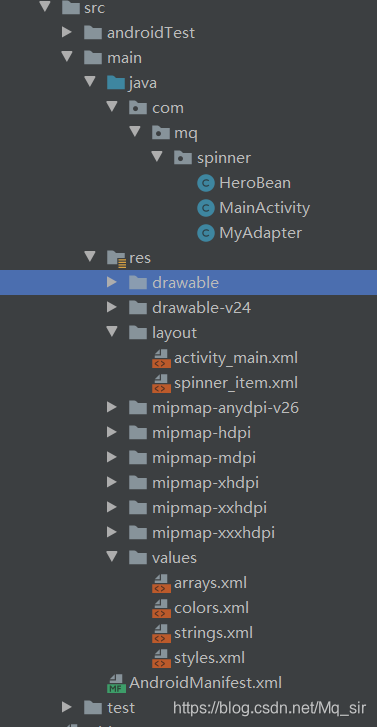
在values文件夹下新建arrays.xml,来存放数组
1 2 3 4 5 6 7 8 9 10 11 12 13 | <?xml version="1.0" encoding="utf-8"?><resources> <string-array name="data"> <item>倔强青铜</item> <item>秩序白银</item> <item>荣耀黄金</item> <item>尊贵铂金</item> <item>永恒钻石</item> <item>至尊星耀</item> <item>最强王者</item> <item>荣耀王者</item> </string-array></resources> |
编写布局文件
1 2 3 4 5 6 7 8 9 10 11 12 13 14 15 16 17 18 19 20 21 22 23 24 25 26 27 28 29 30 31 32 33 34 35 36 37 38 39 40 41 42 43 44 45 46 47 48 49 50 51 52 53 54 55 56 57 58 59 60 61 62 63 64 65 66 67 68 69 70 71 72 73 74 75 76 77 78 79 80 81 82 83 84 | <?xml version="1.0" encoding="utf-8"?><LinearLayout xmlns:android="http://schemas.android.com/apk/res/android" xmlns:app="http://schemas.android.com/apk/res-auto" xmlns:tools="http://schemas.android.com/tools" android:layout_width="match_parent" android:layout_height="match_parent" tools:context=".MainActivity" android:orientation="vertical" android:gravity="center"> <ImageView android:layout_width="fill_parent" android:layout_height="100dp" android:src="@drawable/bg"/> <TextView android:layout_marginTop="20dp" android:layout_width="200dp" android:layout_height="wrap_content" android:text="选择您的排位分段" android:textColor="#44BDED" android:textSize="18sp" /> <Spinner android:id="@+id/spinner_rank" android:layout_width="220dp" android:layout_height="64dp" android:entries="@array/data" android:prompt="@string/title" android:spinnerMode="dialog" /> <TextView android:textStyle="bold" android:layout_width="wrap_content" android:layout_height="wrap_content" android:layout_marginTop="10dp" android:text="选择你的拿手英雄~" android:textColor="#F5684A" android:textSize="18sp" /> <Spinner android:id="@+id/spinner_hero" android:layout_width="match_parent" android:layout_height="64dp" /> <LinearLayout android:layout_marginTop="30dp" android:layout_width="wrap_content" android:layout_height="40dp" android:gravity="center_vertical"> <TextView android:textSize="20sp" android:layout_width="wrap_content" android:layout_height="wrap_content" android:text="你的段位是:"/> <TextView android:textSize="20sp" android:id="@+id/rank" android:layout_width="wrap_content" android:layout_height="wrap_content" android:text="倔强青铜"/> </LinearLayout> <LinearLayout android:layout_width="wrap_content" android:layout_height="50dp" android:gravity="center_vertical"> <TextView android:textSize="20sp" android:layout_width="wrap_content" android:layout_height="wrap_content" android:text="你的擅长的英雄是:"/> <TextView android:id="@+id/hero" android:textSize="20sp" android:layout_width="wrap_content" android:layout_height="wrap_content" android:text="亚瑟"/> <ImageView android:id="@+id/im_hero" android:layout_width="48dp" android:layout_height="48dp" android:src="@drawable/yase"/> </LinearLayout></LinearLayout> |
编写实体类HeroBean,来进行动态的注入存放我们的选择英雄的名字和图片
1 2 3 4 5 6 7 8 9 10 11 12 13 14 15 16 17 18 19 20 21 22 23 24 25 26 27 28 29 30 | package com.mq.spinner;public class HeroBean { private int icon; private String name; public HeroBean() { } public HeroBean(int icon, String name) { this.icon = icon; this.name = name; } public int getIcon() { return icon; } public String getName() { return name; } public void setIcon(int icon) { this.icon = icon; } public void seName(String name) { this.name = name; }} |
添加一个Spinner 的 item 的布局,命名为spinner_item.xml
1 2 3 4 5 6 7 8 9 10 11 12 13 14 15 16 17 18 19 20 21 22 23 | <?xml version="1.0" encoding="utf-8"?><LinearLayout xmlns:android="http://schemas.android.com/apk/res/android" android:layout_width="match_parent" android:layout_height="match_parent" android:padding="5dp"> <ImageView android:id="@+id/icon" android:layout_width="48dp" android:layout_height="48dp" android:src="@drawable/yase"/> <TextView android:id="@+id/name" android:layout_width="wrap_content" android:layout_height="wrap_content" android:layout_marginLeft="10dp" android:layout_marginTop="15dp" android:text="德玛西亚" android:textSize="16sp" /></LinearLayout> |
编写一个MyAdapter适配器,让Spinner返回选择的视图
Spinner 继承自 AdapterView,也就是说它也通过 Adapter 来提供数据支持
Spinner 默认会选中第一个值,就是默认调用 spinner.setSection(0),我们也通过这个设置默认的选中值
1 2 3 4 5 6 7 8 9 10 11 12 13 14 15 16 17 18 19 20 21 22 23 24 25 26 27 28 29 30 31 32 33 34 35 36 37 38 39 40 41 42 43 44 45 46 47 48 49 50 | package com.mq.spinner;import android.content.Context;import android.view.LayoutInflater;import android.view.View;import android.view.ViewGroup;import android.widget.BaseAdapter;import android.widget.ImageView;import android.widget.TextView;import java.util.List;public class MyAdapter extends BaseAdapter { private List<HeroBean> mHeroBeans; private Context mContext; public MyAdapter(List<HeroBean> heroBeans, Context context) { this.mHeroBeans = heroBeans; this.mContext = context; } @Override public int getCount() { return mHeroBeans.size(); } @Override public Object getItem(int i) { return mHeroBeans.get(i); } @Override public long getItemId(int i) { return i; } @Override public View getView(int position, View view, ViewGroup viewGroup) { LayoutInflater _LayoutInflater=LayoutInflater.from(mContext); view=_LayoutInflater.inflate(R.layout.spinner_item, null); if(view!=null) { TextView textView=(TextView)view.findViewById(R.id.name); ImageView imageView=view.findViewById(R.id.icon); textView.setText(mHeroBeans.get(position).getName()); imageView.setImageResource(mHeroBeans.get(position).getIcon()); } return view; }} |
编写活动MainActivity代码,代码有注释
1 2 3 4 5 6 7 8 9 10 11 12 13 14 15 16 17 18 19 20 21 22 23 24 25 26 27 28 29 30 31 32 33 34 35 36 37 38 39 40 41 42 43 44 45 46 47 48 49 50 51 52 53 54 55 56 57 58 59 60 61 62 63 64 65 66 67 | public class MainActivity extends AppCompatActivity { private Spinner scope; private Spinner hero; private TextView t_rank,t_hero; private ImageView m_hero; private ArrayList<HeroBean> mData = null;//存放英雄的名字和图片的实体类数组 @Override protected void onCreate(Bundle savedInstanceState) { super.onCreate(savedInstanceState); setContentView(R.layout.activity_main); initView(); } private void initView() { scope=findViewById(R.id.spinner_rank); hero=findViewById(R.id.spinner_hero); t_hero=findViewById(R.id.hero); t_rank=findViewById(R.id.rank); m_hero=findViewById(R.id.im_hero); mData=new ArrayList<HeroBean>(); mData.add(new HeroBean(R.drawable.sunwukong,"孙悟空")); mData.add(new HeroBean(R.drawable.zixia,"紫霞仙子")); mData.add(new HeroBean(R.drawable.diaocan,"貂蝉")); mData.add(new HeroBean(R.drawable.hanxin,"韩信")); mData.add(new HeroBean(R.drawable.machao,"马超")); mData.add(new HeroBean(R.drawable.bailixuance,"百里玄策")); MyAdapter adapter = new MyAdapter(mData, this);//实例化适配器 hero.setAdapter(adapter);//给hero设置适配器 //给选择段位的spinner添加监听 scope.setOnItemSelectedListener(new AdapterView.OnItemSelectedListener() { @Override public void onItemSelected(AdapterView<?> adapterView, View view, int i, long l) { t_rank.setText(scope.getSelectedItem().toString()); } @Override public void onNothingSelected(AdapterView<?> adapterView) { } }); //给选择英雄的spinner添加监听 hero.setOnItemSelectedListener(new AdapterView.OnItemSelectedListener() { @Override //选中的时候执行的方法 public void onItemSelected(AdapterView<?> adapterView, View view, int i, long l) { Toast.makeText(MainActivity.this, mData.get(i).getName(), Toast.LENGTH_SHORT).show(); t_hero.setText(mData.get(i).getName());//给TextView设置上选择的英雄名字 m_hero.setImageResource(mData.get(i).getIcon());//给Imageview上选择的英雄图片 } @Override public void onNothingSelected(AdapterView<?> adapterView) { } }); }} |
小结
- Spinner会默认选中第一个值,就是默认调用spinner.setSection(0), 你可以通过这个设置默认的选中值
- 会触发一次OnItemSelectedListener 事件,暂时没找到解决方法,下面折衷的处理是:添加一个boolean值,然后设置 为false,在onItemSelected时进行判断,false说明是默认触发的,不做任何操作 将boolean值设置为true;true的话则正常触发事件!
- 加载数据源有两种方式:
通过xml加载,在实例中第一个选择段位就是使用xml来加载的,通过android:entries
通过代码来加载数据源,在实例中的第二种选择英雄就是使用代码来加载数据源,可以用一个Arrays数组来存等。
XML特点是方便快捷,缺点是不能动态改变要显示的数据,使用适配器特点是灵活多变,针对项目需求来选择.
- android:prompt 属性使用常见问题
设置之后不起作用:prompt属性只有在dialog状态才有用,所以要在xml中,将style设置为Widget.Spinner
prompt属性要用string下资源,不支持字符直接输入,否则会报错误
- Spinner的菜单显示方式有两种,实例中两种都使用了
弹出框形式,通过属性android:spinnerMode="dialog"设置
下拉框形式,通过属性android:spinnerMode="dropdown"设置,默认是下拉框


【推荐】国内首个AI IDE,深度理解中文开发场景,立即下载体验Trae
【推荐】编程新体验,更懂你的AI,立即体验豆包MarsCode编程助手
【推荐】抖音旗下AI助手豆包,你的智能百科全书,全免费不限次数
【推荐】轻量又高性能的 SSH 工具 IShell:AI 加持,快人一步
· 震惊!C++程序真的从main开始吗?99%的程序员都答错了
· 【硬核科普】Trae如何「偷看」你的代码?零基础破解AI编程运行原理
· 单元测试从入门到精通
· 上周热点回顾(3.3-3.9)
· Vue3状态管理终极指南:Pinia保姆级教程
2019-11-01 【转】ReactNative与iOS原生交互方式汇总
2019-11-01 【转】哪种开源许可证下的软件可以用于商业
2019-11-01 【转】iOS实现一个颜色渐变的弧形进度条
2019-11-01 【转】iOS 实现一个颜色渐变的弧形进度条 CAShapeLayer CAGradientLayer UIBezierPath
2019-11-01 【转】iOS圆弧渐变进度条的实现
2018-11-01 Apple ID 的双重认证
2017-11-01 【转】Android蓝牙自动配对和Pin码设置 ---- 不错,自动配对的方法,把pin值设为“0000”