centos下如何安装MySQL5.7
1、查看rpm包
rpm-qa|grep mysql 若有可用 rpm-e卸载
[root@4WAN_1LAN_IPSec_VPN_Router ~]# rpm -qa|grep mysql
查找是否有mysql
[root@4WAN_1LAN_IPSec_VPN_Router ~]# find / -name mysql
/run/lock/subsys/mysql
/etc/rc.d/init.d/mysql
/usr/bin/mysql
/usr/local/mysql-5.7.35-el7-x86_64/bin/mysql
/usr/local/mysql-5.7.35-el7-x86_64/include/mysql
/usr/local/mysql
/usr/local/mysql/bin/mysql
/usr/local/mysql/include/mysql
/data/mysql
/data/mysql/data/mysql
[root@4WAN_1LAN_IPSec_VPN_Router ~]# whereis mysql
mysql: /usr/bin/mysql /usr/local/mysql /usr/local/mysql/bin/mysql
2、卸载CentOS7系统自带mariadb
# 查看系统自带的Mariadb
# rpm -qa|grep mariadb
mariadb-libs-5.5.44-2.el7.centos.x86_64
# 卸载系统自带的Mariadb
# rpm -e --nodeps mariadb-libs-5.5.44-2.el7.centos.x86_64
# 删除etc目录下的my.cnf ,一定要删掉,等下再重新建,之前我将就用这个文件,后面改配置各种不生效
# rm /etc/my.cnf
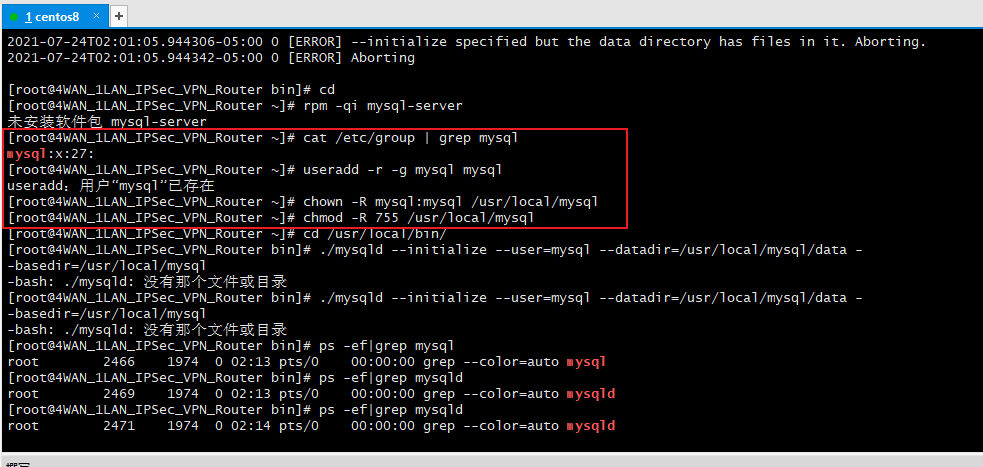
3、检查有无安装过mysql 用户组,没有的话创建
//检查mysql 用户组是否存在
cat /etc/group | grep mysql
cat /etc/passwd |grep mysql

// 创建mysql 用户组和用户
groupadd mysql
useradd -r -g mysql mysql
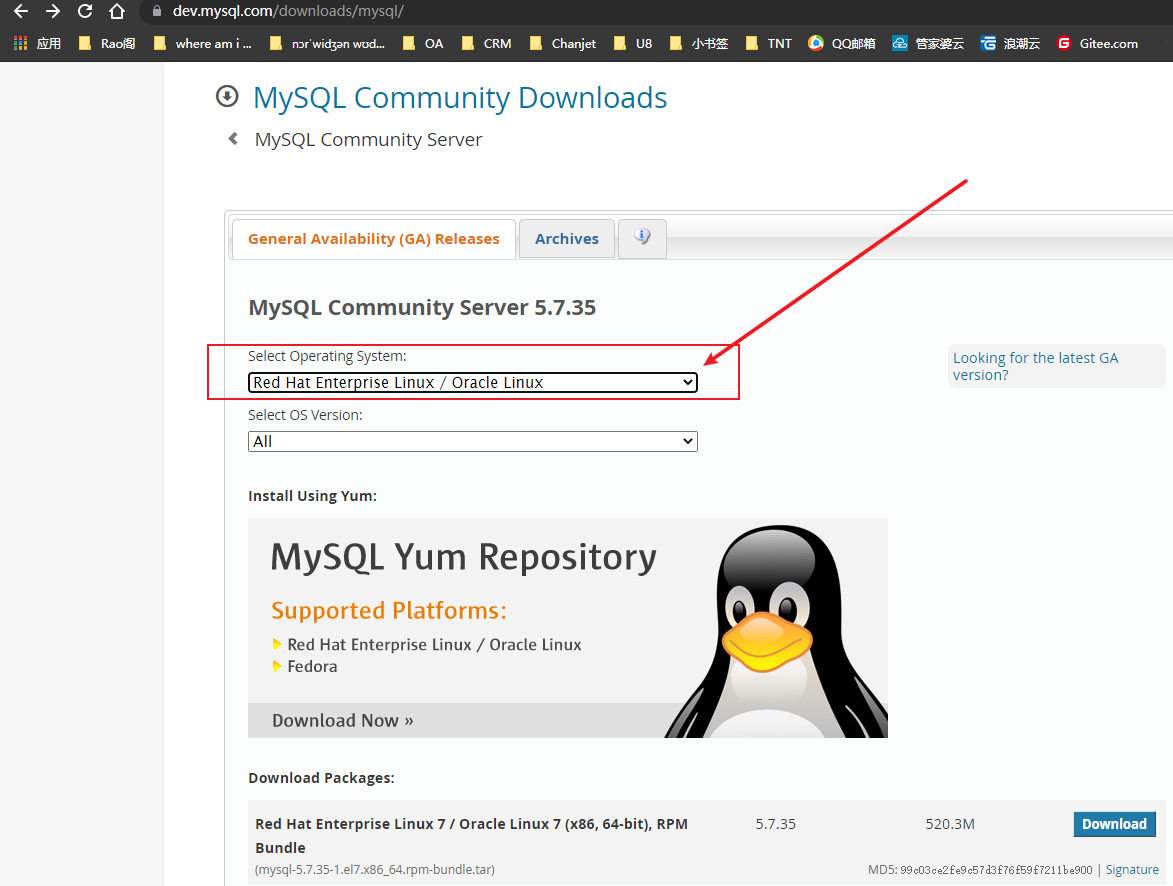
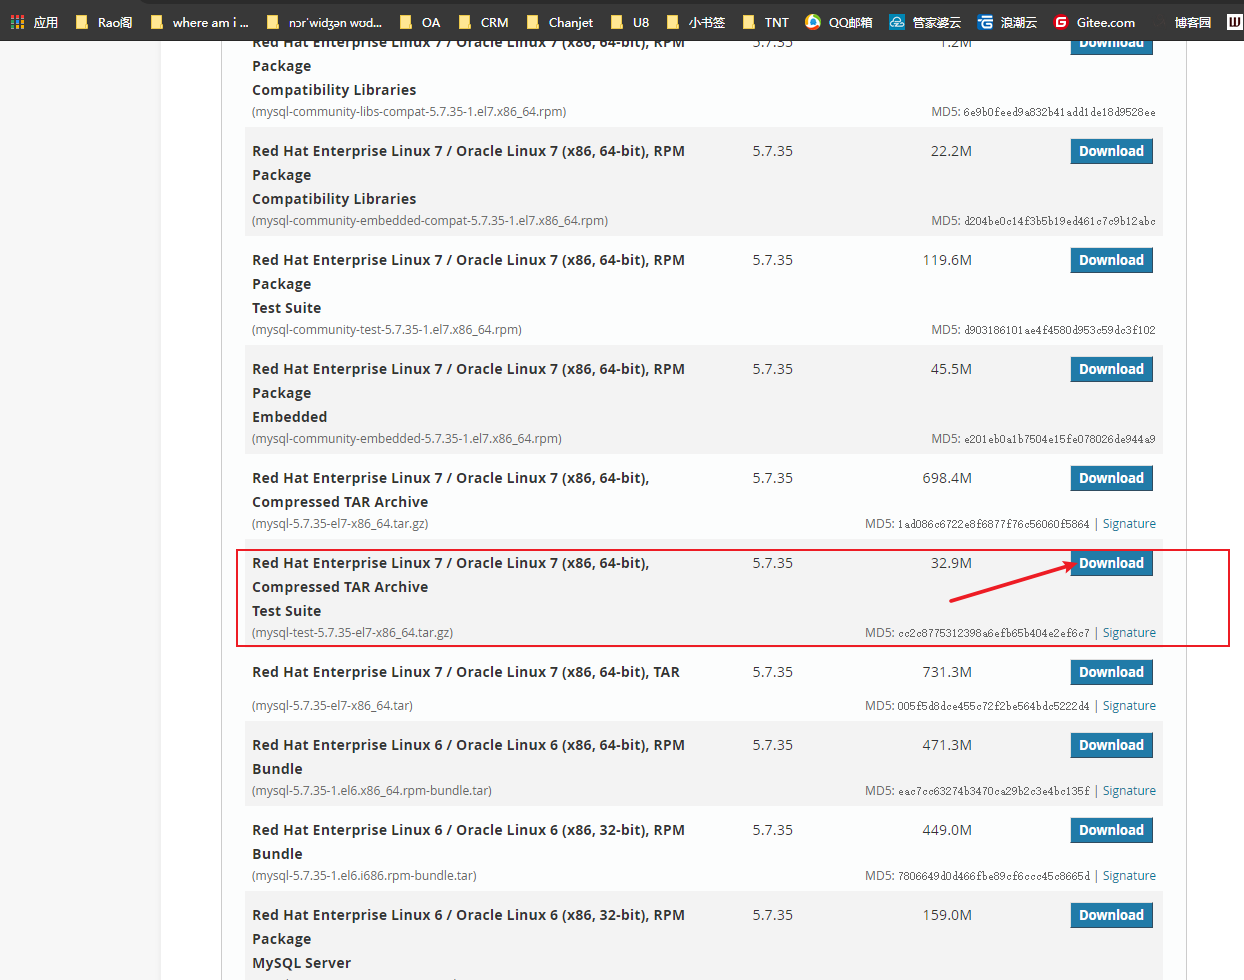
4、下载安装,从官网安装下载mysql包
-
cd /usr/local/ -- 进入local目录,下载mysql tar.gz包 -
# wget下载或者本地下载后上传
wget https://cdn.mysql.com//Downloads/MySQL-5.7/mysql-5.7.35-el7-x86_64.tar.gz
这里的下载连接:https://cdn.mysql.com//Downloads/MySQL-5.7/mysql-5.7.35-el7-x86_64.tar.gz,去mysql官网下获取
|
|

5、解压安装mysql
tar -zxvf mysql-5.7.31-linux-glibc2.12-x86_64.tar.gz
6、将解压的文件做文件改名
mv mysql-5.7.31-linux-glibc2.12-x86_64 mysql
7、更改mysql 目录下所有文件夹所属的用户组和用户,以及权限
chown -R mysql:mysql /usr/local/mysql
chmod -R 755 /usr/local/mysql
8、创建mysql相关目录
-
mkdir -p /data/mysql/{data,logs,tmp} -
# 更改文件夹所属 -
chown -R mysql.mysql /data/mysql/
9、创建mysql配置文件my.cnf
vi /etc/my.cnf
# 简单模板如下:
[client]
port = 3306
socket = /data/mysql/tmp/mysql.sock
[mysqld]
user = mysql
basedir = /usr/local/mysql
datadir = /data/mysql/data
port = 3306
socket = /data/mysql/tmp/mysql.sock
pid-file = /data/mysql/tmp/mysqld.pid
tmpdir = /data/mysql/tmp
skip_name_resolve = 1
symbolic-links=0
max_connections = 2000
group_concat_max_len = 1024000
sql_mode = NO_AUTO_CREATE_USER,NO_ENGINE_SUBSTITUTION
lower_case_table_names = 1
log_timestamps=SYSTEM
character-set-server = utf8
interactive_timeout = 1800
wait_timeout = 1800
max_allowed_packet = 32M
binlog_cache_size = 4M
sort_buffer_size = 2M
read_buffer_size = 4M
join_buffer_size = 4M
tmp_table_size = 96M
max_heap_table_size = 96M
max_length_for_sort_data = 8096
#logs
server-id = 1003306
log-error = /data/mysql/logs/error.log
slow_query_log = 1
slow_query_log_file = /data/mysql/logs/slow.log
long_query_time = 3
log-bin = /data/mysql/logs/binlog
binlog_format = row
expire_logs_days = 15
log_bin_trust_function_creators = 1
relay-log = /data/mysql/logs/relay-bin
relay-log-recovery = 1
relay_log_purge = 1
#innodb
innodb_file_per_table = 1
innodb_log_buffer_size = 16M
innodb_log_file_size = 256M
innodb_log_files_in_group = 2
innodb_io_capacity = 2000
innodb_io_capacity_max = 4000
innodb_flush_neighbors = 0
innodb_flush_method = O_DIRECT
innodb_autoinc_lock_mode = 2
innodb_read_io_threads = 8
innodb_write_io_threads = 8
innodb_buffer_pool_size = 2G
10、配置mysql.server
cd /usr/local/mysql/support-files
cp mysql.server /etc/init.d/mysql
vi /etc/init.d/mysql
# 修改目录位置
basedir=/usr/local/mysql
datadir=/data/mysql/data
# 注册开机启动服务
chkconfig --add mysql
chkconfig --list
11、添加环境变量
echo "PATH=$PATH:/usr/local/mysql/bin " >> /etc/profile
source /etc/profile
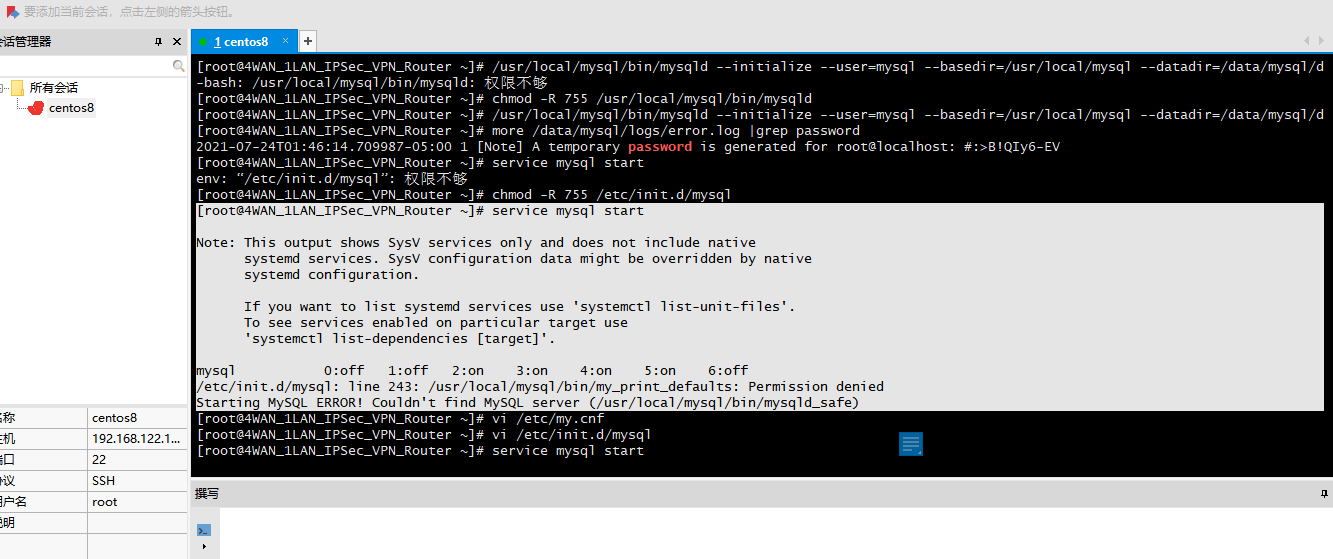
12、初始化mysql
/usr/local/mysql/bin/mysqld --initialize --user=mysql --basedir=/usr/local/mysql --datadir=/data/mysql/data
# 临时密码保存在errlog中
# 获取临时密码
more /data/mysql/logs/error.log |grep password

13、启动mysql服务,并修改密码
# 启动mysql服务
service mysql start
# 使用初始密码登录mysql服务 并修改密码
mysql -uroot -p
alter user 'root'@'localhost' identified by 'root';
flush privileges;
[root@4WAN_1LAN_IPSec_VPN_Router ~]# /usr/local/mysql/support-files/mysql.server start
Starting MySQL.. SUCCESS!
[root@4WAN_1LAN_IPSec_VPN_Router ~]# ln -s /usr/local/mysql/bin/mysql /usr/bin/mysql
[root@4WAN_1LAN_IPSec_VPN_Router ~]# service mysql restart
/etc/init.d/mysql: line 46: /usr/local/mysql: Is a directory
/etc/init.d/mysql: line 47: /data/mysql/data: Is a directory
/etc/init.d/mysql: line 46: /usr/local/mysql: Is a directory
/etc/init.d/mysql: line 47: /data/mysql/data: Is a directory
Shutting down MySQL.. SUCCESS!
/etc/init.d/mysql: line 46: /usr/local/mysql: Is a directory
/etc/init.d/mysql: line 47: /data/mysql/data: Is a directory
Starting MySQL.. SUCCESS!
[root@4WAN_1LAN_IPSec_VPN_Router ~]# mysql -u root -p
mysql: error while loading shared libraries: libncurses.so.5: cannot open shared object file: No such file or directory
[root@4WAN_1LAN_IPSec_VPN_Router ~]# yum install libncurses*
上次元数据过期检查:1:29:23 前,执行于 2021年07月24日 星期六 00时50分20秒。
软件包 ncurses-libs-6.1-9.20180224.el8.x86_64 已安装。
依赖关系解决。
===========================================================================================================
 软件包                         架构              版本                             仓库               大小
===========================================================================================================
安装:
 ncurses-c++-libs               x86_64            6.1-9.20180224.el8               baseos             58 k
 ncurses-compat-libs            x86_64            6.1-9.20180224.el8               baseos            328 k

事务概要
===========================================================================================================
安装  2 软件包

总下载:386 k
安装大小:1.1 M
确定吗?[y/N]: y
下载软件包:
(1/2): ncurses-c++-libs-6.1-9.20180224.el8.x86_64.rpm                      188 kB/s |  58 kB     00:00
(2/2): ncurses-compat-libs-6.1-9.20180224.el8.x86_64.rpm                   394 kB/s | 328 kB     00:00
-----------------------------------------------------------------------------------------------------------
总计                                                                       288 kB/s | 386 kB     00:01
运行事务检查
事务检查成功。
运行事务测试
事务测试成功。
运行事务
  准备中  :                                                                                            1/1
  安装    : ncurses-compat-libs-6.1-9.20180224.el8.x86_64                                              1/2
  安装    : ncurses-c++-libs-6.1-9.20180224.el8.x86_64                                                 2/2
  运行脚本: ncurses-c++-libs-6.1-9.20180224.el8.x86_64                                                 2/2
  验证    : ncurses-c++-libs-6.1-9.20180224.el8.x86_64                                                 1/2
  验证    : ncurses-compat-libs-6.1-9.20180224.el8.x86_64                                              2/2

已安装:
  ncurses-c++-libs-6.1-9.20180224.el8.x86_64         ncurses-compat-libs-6.1-9.20180224.el8.x86_64

完毕!
[root@4WAN_1LAN_IPSec_VPN_Router ~]# mysql -u root -p
Enter password:
Welcome to the MySQL monitor.  Commands end with ; or \g.
Your MySQL connection id is 2
Server version: 5.7.35-log

Copyright (c) 2000, 2021, Oracle and/or its affiliates.

Oracle is a registered trademark of Oracle Corporation and/or its
affiliates. Other names may be trademarks of their respective
owners.

Type 'help;' or '\h' for help. Type '\c' to clear the current input statement.

mysql> alter user 'root'@'localhost' identified by 'Admin@2020@#!';
Query OK, 0 rows affected (0.01 sec)

mysql> flush privileges;
Query OK, 0 rows affected (0.06 sec)
参看文档:http://www.xiaoguan.net/posts/show/426
https://mp.weixin.qq.com/s/ybdY6cJNG2lC4FzBsc19ag

 浙公网安备 33010602011771号