springboot security book
spring security几个概念
这个概念是通用的, 而不仅仅在Spring Security中 , 在Shiro中也是一样的.
1、框架介绍
Spring 是一个非常流行和成功的 Java 应用开发框架。Spring Security 基于 Spring 框架,提供了一套 Web 应用安全性的完整解决方案。一般来说,Web 应用的安全性包括
"认证"(Authentication) 验证某个用户是否为系统中的合法主体,也就是说用户能否访问该系统。用户认证一般要求用户提供用户名和密码。系统通过校验用户名和密码来完成认证过程。
"授权"(Authorization) 用户授权指的是验证某个用户是否有权限执行某个操作。在一个系统中,不同用户所具有的权限是不同的。比如对一个文件来说,有的用户只能进行读取,而有的用户可以进行修改。一般来说,系统会为不同的用户分配不同的角色,而每个角色则对应一系列的权限。
记忆小窍门:e 在o 之前,所以先有Authentication再有Authorization ,认证在前,授权在后
Spring Security其实就是用filter,多请求的路径进行过滤。
(1)如果是基于Session,那么Spring-security会对cookie里的sessionid进行解析,找到服务器存储的sesion信息,然后判断当前用户是否符合请求的要求。
(2)如果是token,则是解析出token,然后将当前请求加入到Spring-security管理的权限信息中去
Spring Security的几个Web安全关键点
1. 登陆/注销
HttpSecurity配置登陆、注销功能
2. Thymeleaf提供的SpringSecurity标签支持
需要引入thymeleaf-extras-springsecurity4
sec:authentication ="name" 获得当前用户的用户名
sec:authorize = "hasRole('ADMIN')" 当前用户必须拥有ADMIN权限时才会显示标签内容
3. remember me
表单添加remember-me的checkbox
配置启用remember-me功能
4. CSRF(Cross-site request forgery)跨站请求伪造
HttpSecurity启用csrf功能,会为表单添加_csrf的值,提交携带来预防CSRF;
我们仅需引入spring-boot-starter-security模块,进行少量的配置,即可实现强大的安全管理。
security中几个重要的类如下:
WebSecurityConfigurerAdapter:自定义Security策略
AuthenticationManagerBuilder:自定义认证策略
@EnableWebSecurity:开启WebSecurity模式 (在@Controller注解的类上追加)
SpringSecurity在SpringBoot中使用
springsecurity在什么都不配的情况下,默认帐号是user, 密码在启动日志中随机生成uuid,如下形式
2019-06-04 09:44:52.852  INFO 33512 --- [           main] b.a.s.AuthenticationManagerConfiguration :

Using default security password: bc4c813c-b8f9-4cdb-9ca9-b406d3492da9
配置MySecurityConfig.java
官方说明自定义SecurityConfig替换默认配置参考链接: https://docs.spring.io/spring-security/site/docs/5.2.0.BUILD-SNAPSHOT/reference/htmlsingle/#oauth2resourceserver-sansboot
protected void configure(HttpSecurity http) {
    http
        .authorizeRequests()
            .anyRequest()
       .authenticated()
            .and()
           .oauth2ResourceServer()
            .jwt();
}
自定义MySecurityConfig.java
@EnableWebSecurity //该注解本身就包含@Configuration
public class MySecurityConfig extends WebSecurityConfigurerAdapter {

    @Override
    protected void configure(HttpSecurity http) throws Exception {
        //super.configure(http);
        //定制授权规则
        http.authorizeRequests().antMatchers("/").permitAll().
                antMatchers("/level1/**").hasRole("VIP1").
                antMatchers("/level2/**").hasRole("VIP2").
                antMatchers("/level3/**").hasRole("VIP3");
    }

}
anonymous( )匿名的意思是未登录可以访问, 登录了反而不能访问
配置自动生成的登录页
开启自动配置的 /login 登录页面,如果不配置, 那么无授权时会报403 Access is denied错误,且页面也不知道跳哪,因为还没有开启自动配置的login登录页面
,默认使用的是/login 和 /login?error, 现在改成/userlogin,会经过 @GetMapping("/userlogin")注解的方法.
也可以配置登录页及登录时的帐号密码字段是什么等.
http.formLogin().loginPage("/login").usernameParameter("username").passwordParameter("password");
配置登出界面
开启自动配置的注销功能,默认访问/logout表示注销,会清空session及cookie,注销成功后返回/login?logout页面
http.logout().logoutSuccessUrl("/");//自定义注销成功后跳转到/页面
配置认证规则
/**
 * 定义认证规则,管理帐号/密码
 *
 * @param auth
 * @throws Exception
 */
@Override
protected void configure(AuthenticationManagerBuilder auth) throws Exception {
    //auth.jdbcAuthentication(); //一般用jdbc

    //学习用内存认证
    auth.inMemoryAuthentication()
            .withUser("bobo").password("123456").roles("VIP1")
            .and().withUser("sisi").password("123456").roles("VIP1", "VIP2")
            .and().withUser("xixi").password("123456").roles("VIP1", "VIP2", "VIP3")
            .and().passwordEncoder(new CustomPasswordEncoder());
}
在Spring Security 5.0(不包括)之前,PasswordEncoder 的默认值为 NoOpPasswordEncoder 既表示为纯文本密码,在实际的开发过程中 PasswordEncoder 大多数都会设置为 BCryptPasswordEncoder
但在spring security5开始默认使用了加密规则 , 如果仍要使用明文密码, 则需要新建一个 PasswordEncoder 并实现 PasswordEncoder 接口,重新 里面的两个方法,并定义为明文的加密方式,具体内容如下:
public class CustomPasswordEncoder implements PasswordEncoder {

    @Override
    public String encode(CharSequence charSequence) {
        return charSequence.toString();
    }

    @Override
    public boolean matches(CharSequence charSequence, String s) {
        return s.equals(charSequence.toString());
    }
}
然后再加上该自定义密码编码器
/**
 * 定义认证规则,管理帐号/密码
 *
 * @param auth
 * @throws Exception
 */
@Override
protected void configure(AuthenticationManagerBuilder auth) throws Exception {
    //auth.jdbcAuthentication(); //一般用jdbc

    //学习用内存认证
    auth.inMemoryAuthentication()
            .withUser("bobo").password("123456").roles("VIP1")
            .and().withUser("sisi").password("123456").roles("VIP1", "VIP2")
            .and().withUser("xixi").password("123456").roles("VIP1", "VIP2", "VIP3")
            .and().passwordEncoder(new CustomPasswordEncoder());
}
使用springSecurity标签
在pom.xml中引入thymeleaf依赖的springSecurity标签的插件
        <!--在thymeleaf中使用认证标签需要的额外依赖-->
        <dependency>
            <groupId>org.thymeleaf.extras</groupId>
            <artifactId>thymeleaf-extras-springsecurity4</artifactId>
            <version>3.0.2.RELEASE</version>
        </dependency>
具体的最新版本号可以根据maven仓库来查询,特别注意的是thymeleaf-extras-springsecurity有3、4、5的版本区别,具体需要看项目使用到的Spring Security版本
|
thymeleaf-extras-springsecurity3 |
for |
integration with Spring Security 3.x |
|
thymeleaf-extras-springsecurity4 |
for |
integration with Spring Security 4.x |
|
thymeleaf-extras-springsecurity5 |
for |
integration with Spring Security 5.x |
html标签体中引入security规范
<html xmlns:th="http://www.thymeleaf.org" xmlns:sec="http://www.thymeleaf.org/thymeleaf-extras-springsecurity4">
thymeleaf中显示用户信息
<div sec:authorize="isAuthenticated()">
    <h2> 您好 , <span sec:authentication="name"></span> 您的角色是 <span sec:authentication="principal.authorities"></span>
    </h2>
</div>
thymeleaf中显示判断是否有权限
<div sec:authorize="hasRole('VIP1')">
        <h3>普通武功秘籍</h3>
        <ul>
            <li><a th:href="@{/level1/1}">罗汉拳</a></li>
            <li><a th:href="@{/level1/2}">武当长拳</a></li>
            <li><a th:href="@{/level1/3}">全真剑法</a></li>
        </ul>
    </div>
开启记住我功能
开启记住我功能登录成功,会从服务器返回添加名为remember-me的cookie指令, 以后访问页面都会带上该cookie, 只要服务器通过检查就可以免登录了,默认14天后失效
http.rememberMe().rememberMeParameter("remember-me");

此时使用/logout会一并清除名为remember-me的cookie , 因为/logout请求在header头中携带了Max-Age=0参数

自定义登录页,使用/userlogin
        //默认使用的是/login 和 /login?error, 现在改成/userlogin,会经过KungfuController的 @GetMapping("/userlogin")注解的方法
        http.formLogin().loginPage("/userlogin");//.usernameParameter("username").passwordParameter("password");
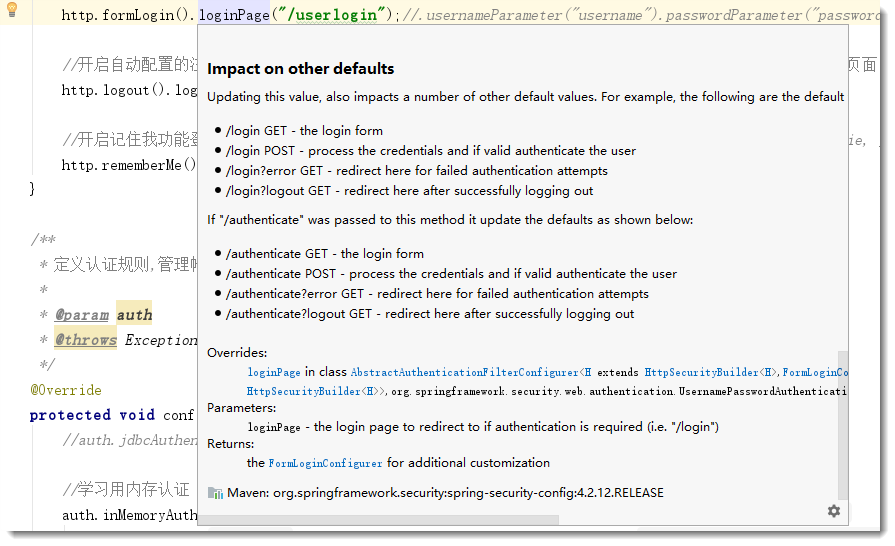
默认get形式的/login来到登录页, post形式的/login用来表单登录.
当自定义了登录页面/userlogin后,那么get形式的/userlogin来到登录页, post形式的/userlogin用来表单登录. 见源码注释说明如下:

最终项目结构

核心配置类MySecurityConfig.java内容
package com.example.security.config;

import org.springframework.context.annotation.Configuration;
import org.springframework.security.config.annotation.authentication.builders.AuthenticationManagerBuilder;
import org.springframework.security.config.annotation.web.builders.HttpSecurity;
import org.springframework.security.config.annotation.web.configuration.EnableWebSecurity;
import org.springframework.security.config.annotation.web.configuration.WebSecurityConfigurerAdapter;
import org.springframework.security.config.annotation.web.configurers.ExpressionUrlAuthorizationConfigurer;

@EnableWebSecurity //该注解本身就包含@Configuration
public class MySecurityConfig extends WebSecurityConfigurerAdapter {

    @Override
    protected void configure(HttpSecurity http) throws Exception {
        //super.configure(http);

        //定制授权规则
        http.authorizeRequests().antMatchers("/").permitAll().
                antMatchers("/level1/**").hasRole("VIP1").
                antMatchers("/level2/**").hasRole("VIP2").
                antMatchers("/level3/**").hasRole("VIP3");

        //参见 HttpSecurity 类的    public FormLoginConfigurer<HttpSecurity> formLogin() 方法注解
        //开启自动配置的 /login 登录页面,如果不配置, 那么无授权时会报403 Access is denied错误,且页面也不知道跳哪,因为还没有开启自动配置的login登录页面
        //默认使用的是/login 和 /login?error, 现在改成/userlogin,会经过KungfuController的 @GetMapping("/userlogin")注解的方法
        http.formLogin().loginPage("/userlogin");//.usernameParameter("username").passwordParameter("password");

        //开启自动配置的注销功能,默认访问/logout表示注销,会清空session及cookie,注销成功后返回/login?logout页面
        http.logout().logoutSuccessUrl("/");//自定义注销成功后跳转到/页面

        //开启记住我功能登录成功,会从服务器返回添加名为remember-me的cookie指令, 以后访问页面都会带上该cookie, 只要服务器通过检查就可以免登录了,默认14天后失效
        http.rememberMe().rememberMeParameter("remember-me");
    }

    /**
     * 定义认证规则,管理帐号/密码
     *
     * @param auth
     * @throws Exception
     */
    @Override
    protected void configure(AuthenticationManagerBuilder auth) throws Exception {
        //auth.jdbcAuthentication(); //一般用jdbc

        //学习用内存认证
        auth.inMemoryAuthentication()
                .withUser("bobo").password("123456").roles("VIP1")
                .and().withUser("sisi").password("123456").roles("VIP1", "VIP2")
                .and().withUser("xixi").password("123456").roles("VIP1", "VIP2", "VIP3");
    }


}
直接关闭所有Security的所有拦截功能
http.headers().frameOptions().disable().and().authorizeRequests().antMatchers("/**", "/login*").permitAll(); // 所有用户都可以访问
http.csrf().disable().authorizeRequests().anyRequest().permitAll().and().logout().permitAll(); //禁用security的 csrf功能
SpringSecurity默认是禁止接收POST请求的,而GET是默认可以的,官网给出两个解决方案:1是发送请求时带上CSRF的token,2是不推荐的做法(把SpringSecurity的CSRF功能关掉),不然很有可能是get请求正常, 但post请求报403 forbidden
springboot security版本差异
帐号密码配置差异(亲测)
在security 4版本中(springboot1.5中使用), application.yml中简易帐号密码配置如下,没有spring:
security:
  user:
    name: bobo
    password: 123456
而在security 5版本中(springboot2开始使用), application.yml中帐号密码配置如下, 多了一层spring:
spring:
  security:
    user:
      name: bobo
      password: 123456
禁用security
pom.xml中如果存在以下依赖
<dependency>
           <groupId>org.springframework.boot</groupId>
           <artifactId>spring-boot-starter-security</artifactId>
</dependency>
启动时控制台会随机生成登录密码, 打印如下:
Using generated security password: 17718027-34f3-444c-9623-7243038d0af9
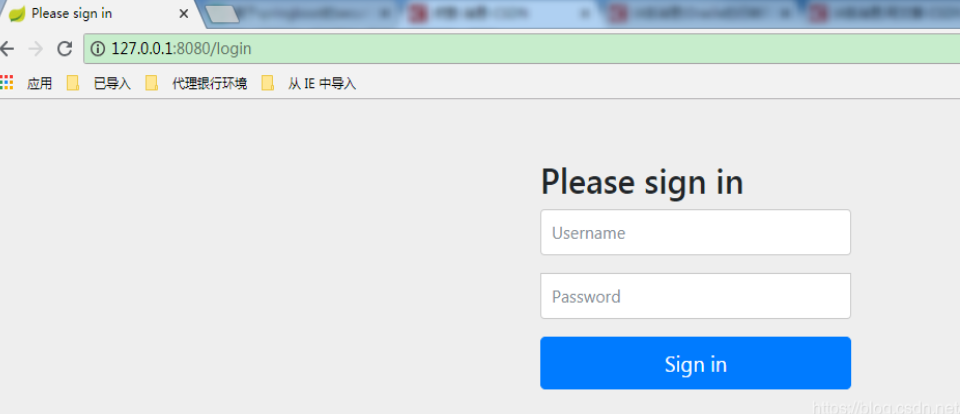
请求接口时会跳到登录页 Please sign in

禁用spring security两种方法, 配置类或启动类上加上如下(二选一)
@EnableAutoConfiguration(exclude = {SecurityAutoConfiguration.class}) 或者 @SpringBootApplication(exclude = {SecurityAutoConfiguration.class })
SpringSecurity导致同一页面不同http请求session.getId()不一致的问题
@date20210706 from zq
/**
* ALWAYS:总是创建HttpSession
* IF_REQUIRED:Spring Security只会在需要时创建一个HttpSession
* NEVER:Spring Security不会创建HttpSession,但如果它已经存在,将可以使用HttpSession
* STATELESS:Spring Security永远不会创建HttpSession,它不会使用HttpSession来获取SecurityContext
*/
http.sessionManagement().sessionCreationPolicy(SessionCreationPolicy.IF_REQUIRED); // 之前将SpringSecurity的session策图换成了STATELESS, 永不使用httpsession,导致了session不一致, 需要改回SessionCreationPolicy.IF_REQUIRED
package com.rosellete.iescp.web.starter.configuration;

import java.io.IOException;
import java.util.ArrayList;
import java.util.List;
import java.util.Properties;

import org.apache.commons.lang3.StringUtils;
import org.slf4j.Logger;
import org.slf4j.LoggerFactory;
import org.springframework.beans.factory.annotation.Autowired;
import org.springframework.context.annotation.Bean;
import org.springframework.context.annotation.Configuration;
import org.springframework.http.HttpMethod;
import org.springframework.security.authentication.AuthenticationManager;
import org.springframework.security.config.annotation.method.configuration.EnableGlobalMethodSecurity;
import org.springframework.security.config.annotation.web.builders.HttpSecurity;
import org.springframework.security.config.annotation.web.builders.WebSecurity;
import org.springframework.security.config.annotation.web.configuration.EnableWebSecurity;
import org.springframework.security.config.annotation.web.configuration.WebSecurityConfigurerAdapter;
import org.springframework.security.config.annotation.web.configurers.ExpressionUrlAuthorizationConfigurer;
import org.springframework.security.config.http.SessionCreationPolicy;
import org.springframework.security.web.authentication.UsernamePasswordAuthenticationFilter;

import com.xxx.web.starter.filter.JwtAuthenticationTokenFilter;
import com.xxx.web.starter.handler.SimpleAuthenticatingEntryPointHandler;
import com.xxx.web.starter.handler.SimpleAuthenticatingFailureHandler;

/**
 * Spring Security 配置
 * 通过SpringSecurity的配置,将JWTLoginFilter,JWTAuthenticationFilter组合在一起
 *
 *
 *
 */
@Configuration
@EnableWebSecurity
@EnableGlobalMethodSecurity(securedEnabled = true)
public class WebSecurityConfig extends WebSecurityConfigurerAdapter {
    private static final Logger logger = LoggerFactory.getLogger(WebSecurityConfig.class);

    @Autowired
    private SimpleAuthenticatingEntryPointHandler simpleAuthenticatingEntryPointHandler;

    @Autowired
    private SimpleAuthenticatingFailureHandler simpleAuthenticatingFailureHandler;

    private static String[] AUTH_WHITELIST = {};
    private static String[] STATIC_AUTH_WHITELIST = {};
    static {
        Properties props = new Properties();
        try {
            props.load(WebSecurityConfigurerAdapter.class.getResourceAsStream("/matcherspermit.properties"));
            String authWhiteList = props.getProperty("AUTH_WHITELIST");
            String staticAuthWhiteList = props.getProperty("STATIC_AUTH_WHITELIST");
            logger.info("读取Properties中AUTH_WHITELIST值为:{}" , authWhiteList);
            logger.info("读取Properties中STATIC_AUTH_WHITELIST值为:{}" , staticAuthWhiteList);
            if(StringUtils.isNotBlank(authWhiteList)) {
                String [] ss = authWhiteList.split(";");
                List<String> arr = new ArrayList<>();
                for(String s : ss) {
                    if(s.trim().length() > 0) {
                        arr.add(s.trim());
                    }
                }
                AUTH_WHITELIST = arr.toArray(new String[arr.size()]);
            }
            if(StringUtils.isNotBlank(staticAuthWhiteList)) {
                String [] ss = staticAuthWhiteList.split(";");
                List<String> arr = new ArrayList<>();
                for(String s : ss) {
                    if(s.trim().length() > 0) {
                        arr.add(s.trim());
                    }
                }
                STATIC_AUTH_WHITELIST = arr.toArray(new String[arr.size()]);
            }
        } catch (IOException e) {
            logger.error("读取配置文件MatchersPermit.properties错误" , e);
        }
    }
    /**
     * HTTP 验证规则
     */
    @Override
    protected void configure(HttpSecurity http) throws Exception {
        ExpressionUrlAuthorizationConfigurer<HttpSecurity>.ExpressionInterceptUrlRegistry registry = http
                .antMatcher("/**").authorizeRequests();

        // 禁用CSRF 开启跨域
        http.csrf().disable().cors();

        // 未登录认证异常
        http.exceptionHandling().authenticationEntryPoint(simpleAuthenticatingEntryPointHandler);
        // 登录过后访问无权限的接口时自定义403响应内容
        http.exceptionHandling().accessDeniedHandler(simpleAuthenticatingFailureHandler);

        // 不创建会话 - 即通过前端传token到后台过滤器中验证是否存在访问权限
        /**
         * ALWAYS:总是创建HttpSession
         * IF_REQUIRED:Spring Security只会在需要时创建一个HttpSession
         * NEVER:Spring Security不会创建HttpSession,但如果它已经存在,将可以使用HttpSession
         * STATELESS:Spring Security永远不会创建HttpSession,它不会使用HttpSession来获取SecurityContext
         */
        http.sessionManagement().sessionCreationPolicy(SessionCreationPolicy.IF_REQUIRED);
        // 允许匿名的url - 可理解为放行接口 - 除配置文件忽略url以外,其它所有请求都需经过认证和授权
        registry.antMatchers(AUTH_WHITELIST).permitAll();
        // 其余所有请求都需要认证
        registry.anyRequest().authenticated();
        // 自动登录 - cookie储存方式
        registry.and().rememberMe();
        // 防止iframe 造成跨域
        registry.and().headers().frameOptions().disable();
        // 自定义过滤器在登录时认证用户名、密码
        http.addFilterBefore(this.getJwtAuthenticationTokenFilter(), UsernamePasswordAuthenticationFilter.class);
        // 禁用缓存
        http.headers().cacheControl();
    }

    @Bean
    public AuthenticationManager getManagerBean() throws Exception {
        return super.authenticationManagerBean();
    }

    @Bean
    public JwtAuthenticationTokenFilter getJwtAuthenticationTokenFilter() throws Exception {
        return new JwtAuthenticationTokenFilter();
    }

    /**
     * 忽略拦截url或静态资源文件夹
     */
    @Override
    public void configure(WebSecurity web) throws Exception {
        web.ignoring().antMatchers(HttpMethod.GET, STATIC_AUTH_WHITELIST);
    }
}
spring redis session导致的session.hashCode()不一致问题
在使用了了 EnableRedisHttpSession 之后 session的getId()仍是一致的, 但是session.hashCode()已不一致, 是因为每次从redis中反序列化后重新生成了session对象,所以不一致,但是对getId()没有任何影响.
spring redis session==>https://www.cnblogs.com/whatlonelytear/p/14976390.html
SpringSecurity - 整合JWT使用 Token 认证授权
https://www.yuque.com/aaliyubo/mohgoq/qy1809
登录问题
Spring Security在登录验证中增加额外数据(如验证码)==>https://www.cnblogs.com/phoenix-smile/p/5666686.html
spring security前台登录如何传递多个参数要后台验证==>https://bbs.csdn.net/topics/390493958 (在username里用_分割啊哈哈哈)
$$$$$$$$$$spring security controller层实现登陆==>https://blog.csdn.net/qq_34675369/article/details/91499798
我的项目git地址
https://gitee.com/KingBoBo/springboot-05-security
最好的教程
在SpringBoot 中使用Security安全框架==>https://blog.csdn.net/qwe86314/article/details/89509765
SpringSecurity系列学习(三):认证流程和源码解析==>zhuanlan.zhihu.com/p/458853290
相关系列文章
SpringBoot 整合 oauth2(三)实现 token 认证==>https://www.jianshu.com/p/19059060036b
SpringBoot 整合 Security(一)实现用户认证并判断返回json还是view==>https://www.jianshu.com/p/18875c2995f1
SpringBoot 整合 Security(二)实现验证码登录==>https://www.jianshu.com/p/9d08c767b33e
相关系列文章2
- SpringSecurity系列学习(一):初次见面
- SpringSecurity系列学习(二):密码验证
- SpringSecurity系列学习(三):认证流程和源码解析
- SpringSecurity系列学习(四):基于JWT的认证
- SpringSecurity系列学习(四-番外):多因子验证和TOTP
- SpringSecurity系列学习(五):授权流程和源码分析
- SpringSecurity系列学习(六):基于RBAC的授权
优质教程
Spring Security-5-认证流程梳理==>https://zhouze-java.github.io/2019/09/10/Spring-Security-5-认证流程梳理/


