java基础之单元测试
1|0准备工作
springboot使用单元测试需要先引入以下依赖
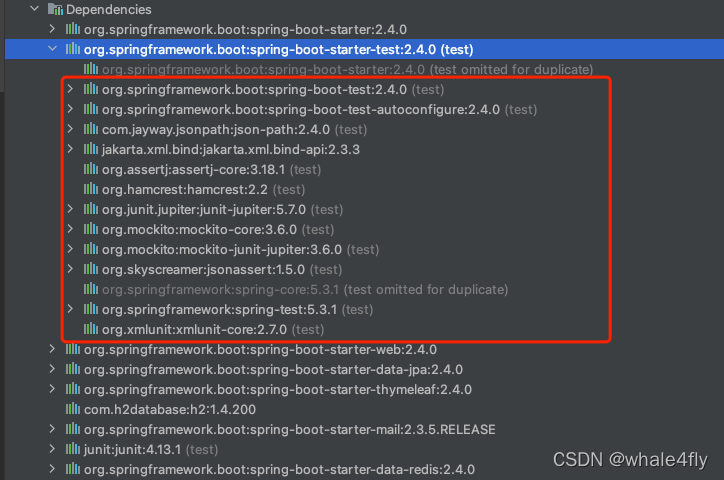
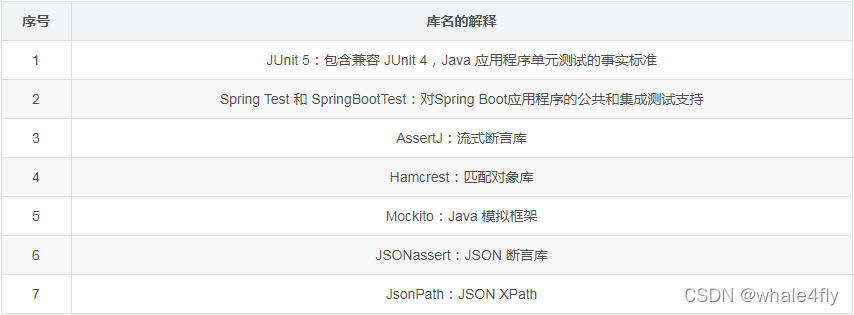
test依赖会引入如下的jar包
2|0service单元测试
springboot中单元测试类写在src/test/java目录下,可以进行手动创建测试类,或者通过idea自动创建测试类ctrl+shift+T(shift+command+T)或者菜单栏鼠标点击创建:
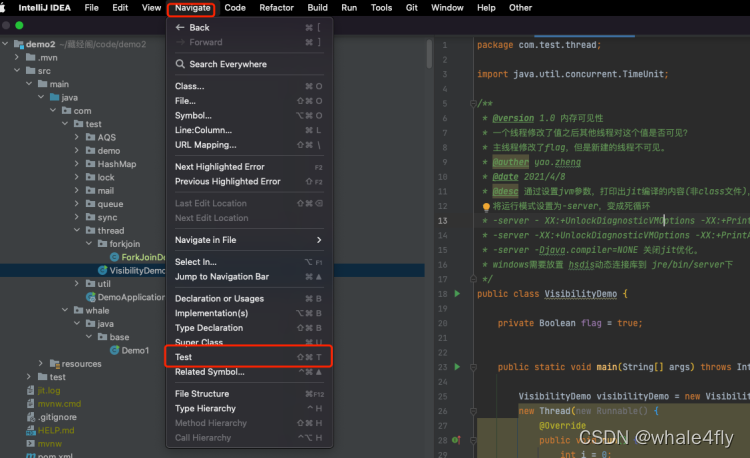
上面就是最简单的单元测试写法,想要执行的时候,鼠标放在对应的方法,右键选择run该方法即可。
3|0controller单元测试
对controller进行单元测试时,需要使用到MockMvc了。这样就可以不必启动项目就可以测试这些接口了。
MockMvc实现了对Http请求的模拟,能够直接使用网络的形式,转换到Controller的调用,这样可以使得测试速度快、不依赖网络环境,而且提供了一套验证的工具,这样可以使得请求的验证统一而且很方便。
示例代码如下:
4|0SpringBoot引入MockMvc
- 什么是Mock?
在面向对象的程序设计中,模拟对象(mock object)是以可控的方式模拟真实对象行为的假对象。在编程过程中,通常通过模拟一些输入数据,来验证程序是否达到预期结果。 - 为什么使用Mock对象
使用模拟对象,可以模拟复杂的、真实的对象行为。如果在单元测试中无法使用真实对象,可采用模拟对象进行替代。 - MockMvc的概念
MockMvc是由spring-test包提供,实现了对http请求的模拟,能够直接使用网络的形式,转换到Controller的调用,使得测试速度快、不依赖网络环境。同时提供了一套验证的工具,结果的验证十分方便。
接口MockMvcBuilder,提供一个唯一的build方法,用来构造MockMvc。主要有两个实现StandaloneMockMvcBuilder和DefaultMockMvcBuilder。 - MockMvc的基本步骤
(1)mockMvc.perform执行一个请求
(2)MockMvcRequestBuilders.get("xxx")构造一个请求
(3)ResultActions.param添加请求传值
(4)ResultActions.accept()设置返回类型
(5)ResultActions.addExpect添加执行完成后的断言
(6)ResultActions.andDo添加一个结果处理器,表示要对结果做的事情,例如使用print()输出相应信息
(7)ResultActions.andReturn 表示执行完成后返回相应的结果
5|0注解解释
- @SpringBootTest:获取启动类,加载配置,寻找主配置启动类(@SpringBootApplication注解的)
- @RunWith(SpringRunner.class):让JUnit运行Spring的测试环境,获取Spring环境的上下文支持
- @AutoConfigureMockMvc:用于自动配置MockMvc,配置后MockMvc类可以直接注入,相当于new MockMvc
- @Before:初始化方法,对于每一个测试方法都要执行一次。
断言的概念 - 断言(assert),编程术语,表示为一些布尔表达式,在程序中的某个特定点该表达式值为真。可以在任何时候启用或者禁用断言验证。因此可以在测试时启用断言而在部署的时候禁用断言
- 断言用来判断一个函数或者对象的一个方法所产生的结果是否符合期望的值
6|0assertThat使用
JUnit 4.4 结合 Hamcrest 提供了一个全新的断言语法——assertThat。可以只使用 assertThat 一个断言语句,结合 Hamcrest 提供的匹配符,就可以表达全部的测试思想。
assertThat的优点:
- 以前 JUnit 提供了很多的 assertion 语句,如:assertEquals,assertNotSame,assertFalse,assertTrue,assertNotNull,assertNull 等,现在有了 JUnit 4.4,一条 assertThat 即可以替代所有的 assertion 语句,这样可以在所有的单元测试中只使用一个断言方法,使得编写测试用例变得简单,代码风格变得统一,测试代码也更容易维护。
- assertThat 使用了 Hamcrest 的 Matcher 匹配符,用户可以使用匹配符规定的匹配准则精确的指定一些想设定满足的条件,具有很强的易读性,而且使用起来更加灵活。
- assertThat 不再像 assertEquals 那样,使用比较难懂的“谓宾主”语法模式(如:assertEquals(3, x);),相反,assertThat 使用了类似于“主谓宾”的易读语法模式(如:assertThat(x,is(3));),使得代码更加直观、易读。
基本语法:
assertThat( [value], [matcher statement] );
value :接下来想要测试的变量值; matcher statement :使用 Hamcrest 匹配符来表达的对前面变量所期望的值的声明,如果 value 值与 matcher statement 所表达的期望值相符,则测试成功,否则测试失败。
__EOF__
本文作者:飞翔的鲸
本文链接:https://www.cnblogs.com/whaletail/p/16100685.html
关于博主:评论和私信会在第一时间回复。或者直接私信我。
版权声明:本博客所有文章除特别声明外,均采用 BY-NC-SA 许可协议。转载请注明出处!
声援博主:如果您觉得文章对您有帮助,可以点击文章右下角【推荐】一下。您的鼓励是博主的最大动力!
本文链接:https://www.cnblogs.com/whaletail/p/16100685.html
关于博主:评论和私信会在第一时间回复。或者直接私信我。
版权声明:本博客所有文章除特别声明外,均采用 BY-NC-SA 许可协议。转载请注明出处!
声援博主:如果您觉得文章对您有帮助,可以点击文章右下角【推荐】一下。您的鼓励是博主的最大动力!


【推荐】国内首个AI IDE,深度理解中文开发场景,立即下载体验Trae
【推荐】编程新体验,更懂你的AI,立即体验豆包MarsCode编程助手
【推荐】抖音旗下AI助手豆包,你的智能百科全书,全免费不限次数
【推荐】轻量又高性能的 SSH 工具 IShell:AI 加持,快人一步
· DeepSeek 开源周回顾「GitHub 热点速览」
· 物流快递公司核心技术能力-地址解析分单基础技术分享
· .NET 10首个预览版发布:重大改进与新特性概览!
· AI与.NET技术实操系列(二):开始使用ML.NET
· .NET10 - 预览版1新功能体验(一)