Nginx---笔记五
Nginx的HTTPS服务:
为什么需要?
1.传输数据被中间人盗用,信息泄露
2.数据内容劫持、篡改
HTTPs协议的实现:
1.对传输内容进行加密以及身份验证
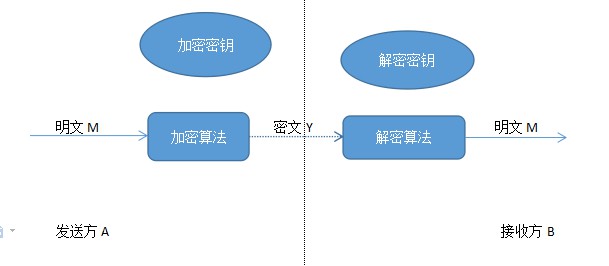
对称加密和非对称加密:
对称
非对称加密:
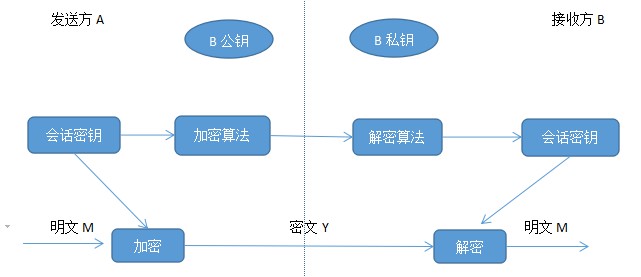
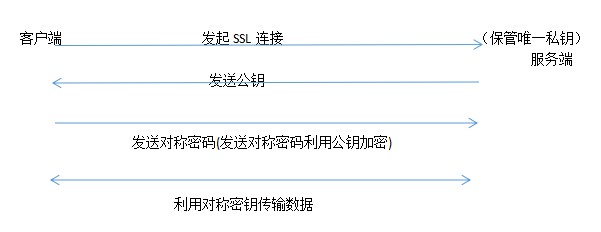
2.HTTPS加密协议原理:
3.中间人伪造客户端和服务端:
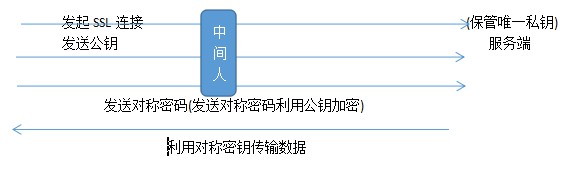
如何解决中间人劫持呢?
CA签名证书:
客户端对数字证书进行CA校验:
1.如果检验成功则利用公钥加密
2.如果校验失败则停止会话
4.生成密钥和CA证书:
# 确认安装openssl
>> openssl version
>> rpm -qa|grep open
# 确认Nginx已经编译http_ssl_module
>> nginx -V
>> cd /etc/nginx
>> mkdir ssl_key
>> cd ssl_key
步骤1.生成key密钥
>> openssl genrsa -idea -out wgw.key 1024
>> ls
步骤2.生成证书签名请求文件(csr文件)
>> openssl req -new -key wgw.key -out wgw.csr
步骤3.生成证书签名文件(CA文件)
>> openssl x509 -req -days 3650(如果不写的话默认一个月到期) -in wgw.csr -signkey wgw.key -out wgw.crt
5.Nginx的HTTPs语法配置:
Syntax:ssl on | off;
Default: ssl off;
Context: http,server
Syntax:ssl_certificate file;
Default: ---;
Context: http,server
Syntax:ssl_certificate_key file;
Default: ----;
Context: http,server
eg:
>> cd conf.d/
>> vi test_httos.conf
server {
listen 443;
server_name 192.168.205.10 phantom.wgw.io;
ssl on;
ssl_certificate /etc/nginx/ssl_key/wgw.crt;
ssl_certificate_key /etc/nginx/ssl_key/wgw.key;
index index.html index.htm;
location / {
root /opt/LearningNginx/app/code;
}
}
>> nginx -tc /etc/nginx/nginx.conf
>> nginx -c /etc/nginx/nginx.conf
>> nginx -s reload
>> netstat -luntp|grep 443 # 查看本地是否启用了443
6.场景-配置苹果要求的证书
6.1 服务器所有的连接使用TLS1.2以上版本(openssl 1.0.2)
>> openssl version
6.2 HTTPS证书必须使用SHA256以上哈希算法签名
>> openssl x509 -noout -text -in ./wgw.crt
6.3 HTTPS证书必须使用RSA 2048位或ECC 256位以上公钥算法
6.4 使用前向加密技术
>> openssl genrsa -idea -out phantom.key 1024
附加;如何生成一个去掉密码保护码的key?
>> openssl -rsa -in ./phantom.key -out ./phantom_nopass.key
>> openssl req -days 36500 -x509 -sha256 -nodes -newkey rsa:2048 -keyout phantom.key -out phantom_apple.crt
>> vi test_https.conf
server {
listen 443 ssl;
resolver 8.8.8.8;
server_name localhost phantom.wgw.io;
ssl_certificate /etc/nginx/ssl_key/phantom_apple.crt;
ssl_certificate_key /etc/nginx/ssl_key/phantom.key;
index index.html index.htm;
location / {
root /etc/nginx/conf.d;
}
}
>> netstat -luntp | grep 443
7.HTTPS服务优化
方法一:激活keepalive长连接
方法二:设置ssl session缓存
eg:
server {
listen 443 ssl;
resolver 8.8.8.8;
server_name localhost phantom.wgw.io;
keepalive_timeout 100;
ssl_session_cache shared:SSL:10m; # 大约可以存8000-10000个session会话
ssl_session_timeout 10m;
ssl_certificate /etc/nginx/ssl_key/phantom_apple.crt;
ssl_certificate_key /etc/nginx/ssl_key/phantom.key;
index index.html index.htm;
location / {
root /etc/nginx/conf.d;
}
}
Nginx与lua开发:
1.lua基础语法:
1.1 lua:
是一个简洁、轻量、可扩展的脚本语言
1.2 Nginx+lua优势:
充分的结合Nginx的并发处理epoll优势和Lua的轻量实现简单的功能且高并发的场景
1.3 语法:
1.3.1安装:
yum install lua
1.3.2 语法:
交互式:
>> lua
> print("hello world")
脚本:test.lua
# !/usr/bin/lua
print("hello world")
运行:
>> chmod a+rx ./test.lua
>> ./test.lua
注释:
--行注释
--[[
块注释
]]
变量:
a = 'wgw\n123"'
a = "wgw\n123""
a = '\971o\10\04923'
a = [[alo123"]]
布尔类型:只有nil-->空
false --->false
数字0或者空字符串--->都是true
lua变量没有做特殊说明,全是全局变量
while循环:
sum = 0
num = 1
while num <= 100 do
sum = sum + num
num = num + 1
end
print("sum=",sum)
注:lua不支持++,或+=这样的操作
for循环:
sum = 0
for i=1,100 do
sum = sum + i
end
if-else判断语句:
if age == 40 and sex == "Male" then
print("大于40的男人")
elseif age > 60 and sex ~="Female" then
print("非女人而且大于60")
else
local age = io.read()
--[[io.read:表示从屏幕的终端读取用户的输入信息,
io.write:读取输出的信息,
~=:表示不等于,
字符串拼接:".."
io库的分别从stdin和stdout读写的read和write函数]]
print("your age is"..age)
end
2.nginx 与lua开发
1.LuaJIT
>> wget http://luajit.org/download/LuaJIT-2.0.2.tar.gz
>>make install PREFIX=/usr/local/LuaJIT
>>export LUAJIT_LIB=/usr/local/LuaJIT/lib
>>export LUAJIT_INC=/usr/local/LuaJIT/include/luajit-2.0
2.ngx_devel_kit和lua-nginx-module
>> cd /opt/download
>> wget https://github.com/simpl/ngx_devel_kit/archive/v0.3.0.tar.gz
>> wget https://github.com/openresty/lua-nginx-module/archive/v0.10.9rc7.tar.gz
3.重新编译Nginx
>> cd /opt/download
>> wget http://nginx.org/download/nginx-1.12.1.tar.gz
>> ./configure --prefix=/etc/nginx --sbin-path=/usr/sbin/nginx --modules-path=/usr/lib64/nginx/modules --conf-path=/etc/nginx/nginx.conf --error-log-path=/var/log/nginx/error.log --http-log-path=/var/log/nginx/access.log --pid-path=/var/run/nginx.pid --lock-path=/var/run/nginx.lock --http-client-body-temp-path=/var/cache/nginx/client_temp --http-proxy-temp-path=/var/cache/nginx/proxy_temp --http-fastcgi-temp-path=/var/cache/nginx/fastcgi_temp --http-uwsgi-temp-path=/var/cache/nginx/uwsgi_temp --http-scgi-temp-path=/var/cache/nginx/scgi_temp --user=nginx --group=nginx --with-compat --with-file-aio --with-threads --with-http_addition_module --with-http_auth_request_module --with-http_dav_module --with-http_flv_module --with-http_gunzip_module --with-http_gzip_static_module --with-http_mp4_module --with-http_random_index_module --with-http_realip_module --with-http_secure_link_module --with-http_slice_module --with-http_ssl_module --with-http_stub_status_module --with-http_sub_module --with-http_v2_module --with-mail --with-mail_ssl_module --with-stream --with-stream_realip_module --with-stream_ssl_module --with-stream_ssl_preread_module --with-cc-opt='-O2 -g -pipe -Wall -Wp,-D_FORTIFY_SOURCE=2 -fexceptions -fstack-protector-strong --param=ssp-buffer-size=4 -grecord-gcc-switches -m64 -mtune=generic -fPIC' --with-ld-opt='-Wl,-z,relro -Wl,-z,now -pie' --add-module=/opt/download/ngx_devel_kit-0.3.0 --add-module=/opt/download/lua-nginx-module-0.10.9rc7
>> make -j 4 && make install
4、加载lua库,加入到ld.so.conf文件
>>echo "/usr/local/LuaJIT/lib" >> /etc/ld.so.conf
然后执行如下命令:
>>ldconfig
5.nginx调用lua指令
Nginx的可插拔模块化加载执行,共11个处理阶段
set_by_lua ,set_by_lua_file(后面加lua脚本文件):
设置nginx变量可以实现复杂的复制逻辑
access_by_lua,access_by_lua_file:
请求访问阶段处理,用于访问控制
content_by_lua,content_by_lua_file:
内容处理器,接收请求处理并输出响应
6.NGINX lua API:
ngx.var :nginx变量
ngx.req.get_headers:获取请求头
ngx.req.get_uri_args:获取url请求参数
ngx.redirect:重定向
ngx.print:输出响应内容体
ngx.say:通ngx.print,但是会最后输出一个换行符
ngx.header:输出响应头
...
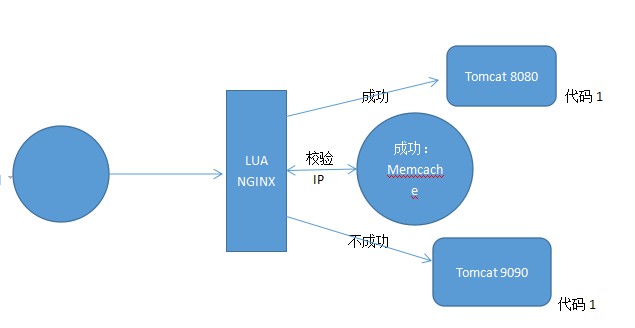
3.场景:用nginx结合lua实现代码的灰度发布
灰度发布:
按照一定的关系区别,分部分的代码进行上线,使代码的发布能平滑过渡上线
3.1 用户的信息cookie等信息区别
3.2 根据用户的IP地址
3.2.1 如图:
3.2.2 安装memcached
>> yum install memcached
3.2.3 启动tomcat
>> mv tomcat tomcat8080
>> cp tomcat8080 tomcat9090
>> cd tomcat9090/conf
>> vi server.xml # 修改端口
>> sh catalina.sh start;tail -f ../logs/catalina.out # 启动这两个tomcat
>> nestat -luntp
3.2.4启动memcached
>> memcached -p11222 -u nobody -d
>> netstat -luntp|grep 11222
3.2.5 lua脚本
>> wget https://github.com/agentzh/lua-resty-memcached/archive/v0.11.tar.gz
>> tar -zxvf v0.11.tar.gz
>> cp -r lua-resty-memcached-0.11/lib/resty /usr/local//share/lua/5.1/
>> cd /etc/nginx/conf.d
>> vim dep.conf
server {
listen 80;
server_name localhost phantom.wgw.io;
location /hello {
default_type 'text/plain';
content_by_lua 'ngx.say("hello,lua")';
}
location /myip {
default_type 'text/plain';
content_by_lua '
clientIP = ngx.req.get_headers()["x_forwarded_for"]
ngx.say("IP:",clientIP)
';
}
location / {
default_type "text/html";
content_by_lua_file /opt/LearnNginx/app/lua/dep.lua;
#add_after_body "$http_x_forwarded_for";
}
location @server {
proxy_pass http://127.0.0.1:9090;
}
location @server {
proxy_pass http://127.0.0.1:8080;
}
error page 500 502 503 504 404 /50x.html;
location = /50x.html{
root /usr/share/nginx/html;
}
}
>> telnet 127.0.0.1 11222
set 192.168.205.10 0 0 1
1
stored
get 192.168.205.10
>>
