Spring基础使用三
Spring基础使用三
为属性中的数组赋值
   <property name="hobby">
            <array>
                <value>唱跳</value>
                <value>Rap</value>
                <value>篮球</value>
            </array>
        </property>
通过
标签进行赋值
为list属性的集合进行赋值
第一种方式:
        <bean id="classOne" class="com.wfy.pojo.Clazz">
            <property name="cid" value="1"></property>
            <property name="cname" value="宏志班"></property>

            <property name="students">
                <list>
                    <ref bean="studentTwo" ></ref>
                    <ref bean="studentThree"></ref>
                    <ref bean="studentFour"></ref>
                </list>
            </property>
        </bean>
第二种方式:
        <bean id="classOne" class="com.wfy.pojo.Clazz">
            <property name="cid" value="1"></property>
            <property name="cname" value="宏志班"></property>
            <property name="students" ref="studentList"></property>
        </bean>
    <util:list id="studentList">
        <ref bean="studentTwo"></ref>
        <ref bean="studentThree"></ref>
        <ref bean="studentFour"></ref>
    </util:list>
配置一个集合类型的bean,需要使用util的约束
为Map属性的集合进行赋值
第一种方式:
    <bean id="student" class="com.wfy.pojo.Student">
        <property name="sid" value="1001"></property>
        <property name="name" value="任凌飞"></property>
        <property name="age" value="20"></property>
        <property name="gender" value="男"></property>
        <property name="hobby">
            <array>
                <value>唱跳</value>
                <value>Rap</value>
                <value>篮球</value>
            </array>
        </property>
        <property name="teacherMap">
            <map>
                <entry key="8888" value-ref="teacherOne"></entry>
                <entry key="6666" value-ref="teacherTwo"></entry>
            </map>
        </property>
    </bean>
    <bean id="teacherOne" class="com.wfy.pojo.Teacher">
        <property name="tid" value="8888"></property>
        <property name="tname" value="喵三三"></property>
    </bean>
    <bean id="teacherTwo" class="com.wfy.pojo.Teacher">
        <property name="tid" value="6666"></property>
        <property name="tname" value="夏目玲子"></property>
    </bean>
第二种方式:
    <bean id="student" class="com.wfy.pojo.Student">
        <property name="sid" value="1001"></property>
        <property name="name" value="任凌飞"></property>
        <property name="age" value="20"></property>
        <property name="gender" value="男"></property>
        <property name="hobby">
            <array>
                <value>唱跳</value>
                <value>Rap</value>
                <value>篮球</value>
            </array>
        </property>
        <property name="teacherMap" ref="teacherMap"></property>
    </bean>
    <bean id="teacherOne" class="com.wfy.pojo.Teacher">
        <property name="tid" value="8888"></property>
        <property name="tname" value="喵三三"></property>
    </bean>
    <bean id="teacherTwo" class="com.wfy.pojo.Teacher">
        <property name="tid" value="6666"></property>
        <property name="tname" value="夏目玲子"></property>
    </bean>
    <util:map id="teacherMap">
        <entry key="8888" value-ref="teacherOne"></entry>
        <entry key="6666" value-ref="teacherTwo"></entry>
    </util:map>
配置一个集合类型的bean,需要使用util的约束
通过P命名空间来为属性进行赋值
  <bean id="studentTest" class="com.wfy.pojo.Student"
          p:sid="1001" p:name="任凌飞" p:teacherMap-ref="teacherMap" ></bean>
Spring管理数据源和引入外部属性文件
第一步:创建xml映射文件,导入项目依赖
<!--mysql驱动-->
    <dependency>
        <groupId>mysql</groupId>
        <artifactId>mysql-connector-java</artifactId>
        <version>5.1.34</version>
    </dependency>
<!--数据源-->
    <dependency>
        <groupId>com.alibaba</groupId>
        <artifactId>druid</artifactId>
        <version>1.2.13</version>
    </dependency>
<?xml version="1.0" encoding="UTF-8"?>
<beans xmlns="http://www.springframework.org/schema/beans"
       xmlns:xsi="http://www.w3.org/2001/XMLSchema-instance"
       xmlns:context="http://www.springframework.org/schema/context"
       xsi:schemaLocation="http://www.springframework.org/schema/beans http://www.springframework.org/schema/beans/spring-beans.xsd http://www.springframework.org/schema/context https://www.springframework.org/schema/context/spring-context.xsd">


<!--引入jdbc.properties,之后就可以通过${key}的方式访问value-->
  <context:property-placeholder location="jdbc.properties"></context:property-placeholder>
    <bean id="dataSource" class="com.alibaba.druid.pool.DruidDataSource">
        <property name="driverClassName" value="${jdbc.driver}"></property>
        <property name="url" value="${jdbc.url}"></property>
        <property name="username" value="${jdbc.username}"></property>
        <property name="password" value="${jdbc.password}"></property>

    </bean>

</beans>
第二步:引入外部属性文件
jdbc.driver=com.mysql.jdbc.Driver
jdbc.url=jdbc:mysql://localhost:3306?ssm
jdbc.username=root
jdbc.password=root
Bean的生命周期影响和后置处理器
Bean生命周期的步骤:
- 实例化
- 依赖注入
- 初始化,需要通过bean中的init-method属性来指定初始化的方法
- IOC容器关闭后销毁,需要通过bean中destroy-method来指定销毁的方法
注意:
- 若bean的作用域为单例时,生命周期的前三个步骤会在获取IOC容器时执行
- 若bean的作用域为多例时,生命周期的前三个步骤会在获取bean时执行
第一步:创建一个User实体类
package com.wfy.pojo;
public class User {
private Integer id;
private String username;
private String password;
private Integer age;
public User() {
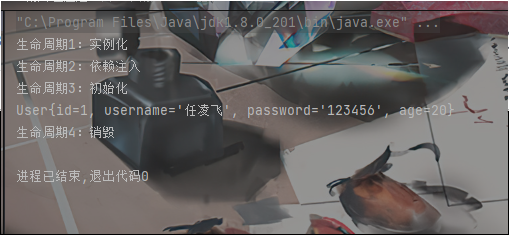
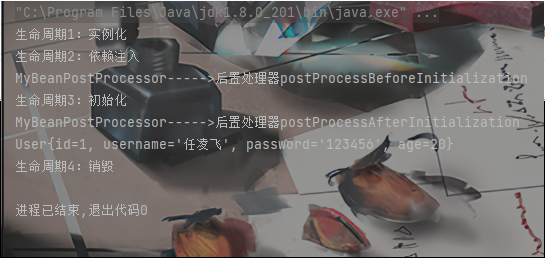
System.out.println("生命周期1:实例化");
}
public User(Integer id, String username, String password, Integer age) {
this.id = id;
this.username = username;
this.password = password;
this.age = age;
}
public Integer getId() {
return id;
}
public void setId(Integer id) {
System.out.println("生命周期2:依赖注入");
this.id = id;
}
public String getUsername() {
return username;
}
public void setUsername(String username) {
this.username = username;
}
public String getPassword() {
return password;
}
public void setPassword(String password) {
this.password = password;
}
public Integer getAge() {
return age;
}
public void setAge(Integer age) {
this.age = age;
}
@Override
public String toString() {
return "User{" +
"id=" + id +
", username='" + username + '\'' +
", password='" + password + '\'' +
", age=" + age +
'}';
}
public void initMethod(){
System.out.println("生命周期3:初始化");
}
public void destoryMethod(){
System.out.println("生命周期4:销毁");
}
}
第二步:创建一个生命周期的xml文件
<?xml version="1.0" encoding="UTF-8"?>
<beans xmlns="http://www.springframework.org/schema/beans"
       xmlns:xsi="http://www.w3.org/2001/XMLSchema-instance"
       xsi:schemaLocation="http://www.springframework.org/schema/beans http://www.springframework.org/schema/beans/spring-beans.xsd">

    <bean id="user" class="com.wfy.pojo.User" init-method="initMethod" destroy-method="destoryMethod">
        <property name="id" value="1"></property>
        <property name="username" value="任凌飞"></property>
        <property name="password" value="123456"></property>
        <property name="age" value="20"></property>
    </bean>
</beans>
第三步:测试案例
package com.wfy.spring;

import com.wfy.pojo.User;
import org.junit.Test;
import org.springframework.context.ApplicationContext;
import org.springframework.context.ConfigurableApplicationContext;
import org.springframework.context.support.ClassPathXmlApplicationContext;

public class LifeCycleTest {
    @Test
    public void test(){
      //ConfigurableApplicationContext是ApplicationContext的子接口,其中扩展了刷新和关闭容器的方法
        ConfigurableApplicationContext ioc = new ClassPathXmlApplicationContext("spring-lifecycle.xml");
        User bean = ioc.getBean(User.class);
        System.out.println(bean);
        ioc.close();
    }
}
结果:
添加Bean的后置处理器
第一步:添加PostProcessor实例化
package com.wfy.process;

import org.springframework.beans.BeansException;
import org.springframework.beans.factory.config.BeanPostProcessor;

public class MyBeanPostProcessor implements BeanPostProcessor {
    @Override
    //此方法在bean的生命周期初始化之前执行
    public Object postProcessBeforeInitialization(Object bean, String beanName) throws BeansException {
        System.out.println("MyBeanPostProcessor----->后置处理器postProcessBeforeInitialization");
        return BeanPostProcessor.super.postProcessBeforeInitialization(bean, beanName);
    }

    @Override
    //此方法在bean的初始化之后执行
    public Object postProcessAfterInitialization(Object bean, String beanName) throws BeansException {
        System.out.println("MyBeanPostProcessor----->后置处理器postProcessAfterInitialization");
        return BeanPostProcessor.super.postProcessAfterInitialization(bean, beanName);
    }
}
第二步: 在xml文件中添加bean属性配置
<bean id="MyBeanPostProcessor" class="com.wfy.process.MyBeanPostProcessor"></bean>
第三步:测试案例
package com.wfy.spring;

import com.wfy.pojo.User;
import org.junit.Test;
import org.springframework.context.ApplicationContext;
import org.springframework.context.ConfigurableApplicationContext;
import org.springframework.context.support.ClassPathXmlApplicationContext;

public class LifeCycleTest {
    @Test
    public void test(){
        //ConfigurableApplicationContext是ApplicationContext的子接口,其中扩展了刷新和关闭容器的方法
        ConfigurableApplicationContext ioc = new ClassPathXmlApplicationContext("spring-lifecycle.xml");
        User bean = ioc.getBean(User.class);
        System.out.println(bean);
        ioc.close();
    }
}
结果:
现在Bean生命周期的步骤变为:
- 实例化
- 依赖注入
- 后置处理器的postProcessBeforeInitialization方法
- 初始化,需要通过bean中的init-method属性来指定初始化的方法
- IOC容器关闭后销毁,需要通过bean中destroy-method来指定销毁的方法
- 后置处理器的postProcessAfterInitialization方法
Bean的后置处理器:
- bean的后置处理器会在生命周期的初始化前后添加额外的操作,需要实现BeanPostProcessor接口,且配置到IOC容器中,需要注意的时,bean后置处理器不是单独对某一个bean生效,而是针对IOC容器中所有bean都会执行


