MIT_JOS_Lab3_PartA
Lab3 以后内存出现的问题
对于GCC 7.0 以上的版本在Lab3以后, 会出现 kernel panic at kern/pmap.c:147: PADDR called with invalid kva 00000000 这个错误, 我本身也很疑惑, 明明在 Lab2 代码是正确的, 这里为什么是错的呢?
从错误的结果来看是
boot_alloc memory at f018e000, next memory allocate at f018f000
kernel panic at kern/pmap.c:154: PADDR called with invalid kva 00000000
错误的部分是在 boot_alloc 函数中.
static void *
boot_alloc(uint32_t n)
{
	static char *nextfree;	// virtual address of next byte of free memory
	char *result;
	if (!nextfree) {
		extern char end[];
		// 将地址 end 向上以页面大小对齐
		nextfree = ROUNDUP((char *) end, PGSIZE);
	}
	result = nextfree;
	nextfree = ROUNDUP((char *) result+n, PGSIZE);
	cprintf("boot_alloc memory at %x, next memory allocate at %x\n", result, nextfree);
	return result;
}
然后我发现,在
// 分配一个物理页大小的虚拟空间, 对于页目录来说, 这里使用 boot_alloc
	kern_pgdir = (pde_t *) boot_alloc(PGSIZE);
	// 初始化页目录
	memset(kern_pgdir, 0, PGSIZE);
删除 memset 之后, 可以得到部分正确, 而且在 memset 之前, kern_pgdir 都是 f018e000, 那么这一步到底发生了什么呢? 其实错误的真正原因不在这里, 而是在 end 这里, 我们知道, end是链接器设置的, 表示内核 bss 段的末尾, 同时我们知道 xv6 的end地址是0xf018f000 , 但是, 根据 objdump -h obj/kern/kernel 可知, bss 段在内存的位置是:
Idx Name          Size      VMA       LMA       File off  Algn
  9 .bss        00000f14  f018d100  0018d100   0008e100   2**5
                CONTENTS,   ALLOC,    LOAD,       DATA
bss 段的起始位置是 f018d100 , 大小为 00000f14, 所以虚拟内存范围是 0xf018d100 到 0xf018e014 ,而 end 的地址为 f018e000, 在bss 的范围内, 然后我们使用 objdump -t obj/kern/kernel | grep kern_pgdir 查看一下 kern_pgdir 的情况可以得到:
f018e00c g O .bss 00000004 kern_pgdir
kern_pgdir 存储的地址 f018e00c 恰好就在 end 后面, 这里 kern_pgdir是一个未初始化的全局变量, 这里的f018e00c 是 &kern_pgdir 表示指针, 这会导致什么呢? 主要是0xf018e000 恰好是 PAGESIZE 对齐的.所以会发生下面的问题:
// kern_pgdir == NULL, &kern_pgdir == 0xf018f00c
// in mem_init()
kern_pgdir = (pde_t *) boot_alloc(PGSIZE);  // call boot_alloc(4096)
// in boot_alloc()
if (!nextfree) {
    extern char end[];  // end == 0xf018e000
    nextfree = ROUNDUP((char *) end, PGSIZE);  // nextfree == 0xf018e000
}
// ...
// 0xf018f000 is returned to to mem_init()
// 这里 0xf018f000 是页目录的地址
kern_pgdir = (pde_t *) boot_alloc(PGSIZE);  // kern_pgdir == 0xf018e000,
// 问题就在这里, 全局变量 kern_pgdir 的地址是0xf018e00c, 我们要初始化页目录的时候, 清空了它
memset(kern_pgdir, 0, PGSIZE);  // Damn! 0xf018e000 to 0xf0180000 are set to 0, including 0xf018e00c
                                // Now kern_pgdir == 0
kern_pgdir[PDX(UVPT)] = PADDR(kern_pgdir) | PTE_U | PTE_P; // call PADDR(0), panic!
为什么 end 会设置错误呢? 以及 Lab2 为什么没有出现这个错误呢? 因为 Lab2的内核文件大小不一样, 所以 end 的位置与 bss 的位置也不一样, 在 lab2 中, ROUNDUP向上对齐的时候保护了 kern_pgdir,所以不会出现错误. 其实这个错误就是一个十分有趣的巧合.
我们可以看下 kern/kernel.ld , 这个文件是内核的各个段的描述, 解决方法就是添加了 *(COMMON) 段, 这样就修改了end的位置, 在此之前, COMMON 的段在 end 之后, 这里修改为在 bss之后, end 之前, 就可以了.
.bss : {
    PROVIDE(edata = .);
    *(.bss)
    *(COMMON)
    PROVIDE(end = .);
    BYTE(0)
}
JOS 的一个进程可以看作是一个线程与地址空间的结合, 因为运行一个进程需要将 CPU 建立在保存的寄存器与用户空间之上.
Lab3 的 GNUmakefile 会产生大量的二进制文件在 /obj/user/ 目录下, kern/Makefrag 会将链接 /obj/user/ 文件下面的 .o 文件得到一个可执行文件. 这是一种得到可执行文件的方式, 是将可执行文件嵌入到内核中去.
Creating and Running Environments
这里的 env 表示的是进程, 因为进程的本质就是 CPU + 运行环境, 用 env 表示进程完全没有问题, 这里需要注意的问题是启动的过程是下面这个树形结构,
start (kern/entry.S)
i386_init (kern/init.c)
	cons_init(控制台初始化)
	mem_init(内存初始化)
	env_init(进程初始化)
	trap_init (still incomplete at this point)
	env_create(创建进程)
	env_run
		env_pop_tf
初始化进程
那么在 xv6 中, 进程是如何表示的呢? 在Lab2中, 我们用一个 PageInfo结构体来描述一个物理页, 在这里, 我们用 Env 这个结构体来描述一个进程.
struct Env {
	struct Trapframe env_tf;	// Saved registers
	struct Env* env_link;		// Next free Env
	envid_t env_id;			// Unique environment identifier
	envid_t env_parent_id;		// env_id of this env's parent
	enum EnvType env_type;		// Indicates special system environments
	unsigned env_status;		// Status of the environment
	uint32_t env_runs;		// Number of times environment has run
	// Address space
	pde_t* env_pgdir;		// Kernel virtual address of page dir
};
根据进程在运行时需要的环境, 以及可能发生的事情, 上面结构体比较容易理解, 我觉得最重要的是 env_pgdir 表示进程的页目录. 我们再来看一下第一个结构体, 他表示进程异常或者中断的时候, 需要存储哪些寄存器的值, 这些寄存器和页目录就是进程当前正在执行的状态
// Trap 的时候需要存储的寄存器, 也就是描述进程的主要内容, 参数
struct Trapframe {
	struct PushRegs tf_regs;
	uint16_t tf_es;
	uint16_t tf_padding1;
	uint16_t tf_ds;
	uint16_t tf_padding2;
	uint32_t tf_trapno;
	/* below here defined by x86 hardware */
	uint32_t tf_err;
	uintptr_t tf_eip;
	uint16_t tf_cs;
	uint16_t tf_padding3;
	uint32_t tf_eflags;
	/* below here only when crossing rings, such as from user to kernel */
	uintptr_t tf_esp;
	uint16_t tf_ss;
	uint16_t tf_padding4;
} __attribute__((packed));
然后我们按照i386_init() 函数的顺利, 初始化进程. 其实这部分最开始的地方是在 mem_init()中初始化的时候, 也就是
// Make 'envs' point to an array of size 'NENV' of 'struct Env'.
	// LAB 3: Your code here.
	envs = (struct Env*)boot_alloc(sizeof(struct Env) * NENV);
	memset(envs, 0, sizeof(struct Env) * NENV);
这里和页表的初始化类似, 然后就是 env_init() 函数了, 其实构建 envs 空闲链表也不是很难, 就是下面这个函数
struct Env *envs = NULL;		// All environments
struct Env *curenv = NULL;		// The current env
// 这里空闲链表的形式是, env_free_list 指向空闲的 envs[i] 结构体,
// 然后使用 env_link 连接起来
static struct Env *env_free_list;	// Free environment list
					// (linked by Env->env_link)

void env_init(void)
{
	// Set up envs array
	// LAB 3: Your code here.
	// 初始化的时候, env_free_list 指向第一个 envs 结构体
	env_free_list = &envs[0];
	int i = 0;
	for(i = 0; i<NENV-1; i++) {
		envs[i].env_link = &envs[i+1];
	}
	envs[NENV-1].env_link = NULL;
	// Per-CPU part of the initialization
	env_init_percpu();
}
初始化全局描述表
然后env_init_percpu(); 初始化全局描述表与段描述符, 这里需要回顾一下 /inc/mmu.h 中的内容, 也就是对于目标的可执行文件而言, ELF 的构成以及各个段的结构, 这里我推荐下面这篇博客, 讲的很清楚, 传送门 . 为什么需要全局描述表呢? 简而言之, 举个例子, 在执行程序的时候, 程序的指令段(代码段在哪里呢?) 通常我们用两个寄存器 %cs, %ip 获得, 这个 cs 就是code segment, 代码段, ip 是偏移, 可见, 没有全局描述表, 我们就不知道从哪里开始执行, 另一方面就是不同segment, 用户与内核的权限也不同.
在xv6中, 这里我还是花了一点时间去理解这个段表的, 构建全局描述表是下面这个初始化,
// Global descriptor table.
//
// Set up global descriptor table (GDT) with separate segments for
// kernel mode and user mode.  Segments serve many purposes on the x86.
// We don't use any of their memory-mapping capabilities, but we need
// them to switch privilege levels.
// 由于我们在全局描述表中设置的基地址为0, 所以内存与之相关甚少
//
// The kernel and user segments are identical except for the DPL.
// To load the SS register, the CPL must equal the DPL.  Thus,
// we must duplicate the segments for the user and the kernel.
//
// In particular, the last argument to the SEG macro used in the
// definition of gdt specifies the Descriptor Privilege Level (DPL)
// of that descriptor: 0 for kernel and 3 for user.
//
// 构建全局描述表, SEG 函数是构建一个段,
struct Segdesc gdt[] =
{
	// 0x0 - unused (always faults -- for trapping NULL far pointers)
	SEG_NULL,

	// 0x8 - kernel code segment
	// SEG 的参数分别表示 段的名称, 基地址, 大小限制, 优先级
	[GD_KT >> 3] = SEG(STA_X | STA_R, 0x0, 0xffffffff, 0),

	// 0x10 - kernel data segment
	[GD_KD >> 3] = SEG(STA_W, 0x0, 0xffffffff, 0),

	// 0x18 - user code segment
	[GD_UT >> 3] = SEG(STA_X | STA_R, 0x0, 0xffffffff, 3),

	// 0x20 - user data segment
	[GD_UD >> 3] = SEG(STA_W, 0x0, 0xffffffff, 3),

	// 0x28 - tss, initialized in trap_init_percpu()
	[GD_TSS0 >> 3] = SEG_NULL
};
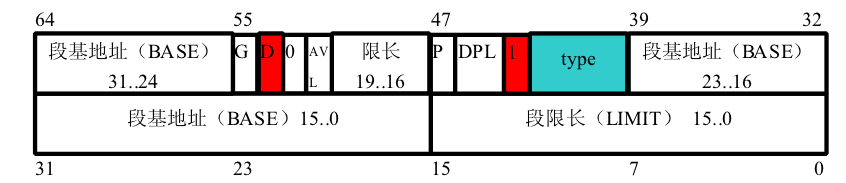
第一眼把这里看成了一个函数, 怎么都不对头, 实际上这里不是函数, 而是一个struct Segdesc 结构体数组的初始化, 这个结构体的表示是:
 // Segment Descriptors
struct Segdesc {
	unsigned sd_lim_15_0 : 16;  // Low bits of segment limit
	unsigned sd_base_15_0 : 16; // Low bits of segment base address
	unsigned sd_base_23_16 : 8; // Middle bits of segment base address
	unsigned sd_type : 4;       // Segment type (see STS_ constants)
	unsigned sd_s : 1;          // 0 = system, 1 = application
	unsigned sd_dpl : 2;        // Descriptor Privilege Level
	unsigned sd_p : 1;          // Present
	unsigned sd_lim_19_16 : 4;  // High bits of segment limit
	unsigned sd_avl : 1;        // Unused (available for software use)
	unsigned sd_rsv1 : 1;       // Reserved
	unsigned sd_db : 1;         // 0 = 16-bit segment, 1 = 32-bit segment
	unsigned sd_g : 1;          // Granularity: limit scaled by 4K when set
	unsigned sd_base_31_24 : 8; // High bits of segment base address
};
一共 13 个部分, 这 13个元素和下图是一模一样的,
在构建全局描述表的时候, 使用下面的宏定义
#define SEG(type, base, lim, dpl) 					\
{ ((lim) >> 12) & 0xffff, (base) & 0xffff, ((base) >> 16) & 0xff,	\
    type, 1, dpl, 1, (unsigned) (lim) >> 28, 0, 0, 1, 1,		\
    (unsigned) (base) >> 24 }
就是构建一个全局描述表(GDT[])的一个表项, 也就是一个段(segment)描述符, 还有一点, 就是在 xv6 中, 我们需要知道指向全局描述表(GDT)的指针, 或者说GDT的地址, 但是这里并不是直接使用上面声明的 gdt[] 数组的地址, 而是使用了一个伪地址作为中间地址, 就是下面这样,
struct Pseudodesc gdt_pd = {
  // 这里分别是 gdt 的大小和基地址
	sizeof(gdt) - 1, (unsigned long)gdt
};
最后就是程序开始执行的时候, 我们先导入全局描述表(全局描述表的表项是段描述符), 然后初始化一些相关的寄存器, 就是下面这个函数了. env_init_percpu()加载全局描述符表并且初始化段寄存器 gs, fs, es, ds, ss, 这样, 我们的进程才知道从哪里开始运行.
void env_init_percpu(void)
{
	lgdt(&gdt_pd);
	// 将 GDT 的入口地址存入 gdtr寄存器
	// The kernel never uses GS or FS, so we leave those set to
	// the user data segment.
	asm volatile("movw %%ax,%%gs" : : "a" (GD_UD|3));
	asm volatile("movw %%ax,%%fs" : : "a" (GD_UD|3));
	// The kernel does use ES, DS, and SS.  We'll change between
	// the kernel and user data segments as needed.
	asm volatile("movw %%ax,%%es" : : "a" (GD_KD));
	asm volatile("movw %%ax,%%ds" : : "a" (GD_KD));
	asm volatile("movw %%ax,%%ss" : : "a" (GD_KD));
	// Load the kernel text segment into CS.
	// 在 x86中使用的是 IP 与 CS 寄存器实现指令寻址
	asm volatile("ljmp %0,$1f\n 1:\n" : : "i" (GD_KT));
	// For good measure, clear the local descriptor table (LDT),
	// since we don't use it.
	// lldt 导入 0, 表示不使用 LDT
	lldt(0);
}
剩下的内容其实就很好理解了, 我都放在一起了, 主要就是进程建立的过程, 只要知道进程的本质是虚拟环境➕CPU就可以了
static int
env_setup_vm(struct Env *e)
{
	int i;
	struct PageInfo *p = NULL;
	// Allocate a page for the page directory
	if (!(p = page_alloc(ALLOC_ZERO)))
		return -E_NO_MEM;
	// 通过返回的物理页得到虚拟地址
	e->env_pgdir = (pde_t*)page2kva(p);
	// 这一部分相当于初始化进程的虚拟空间, 对于所有进程而言, UTOP上面的部分是内核空间, 对所有用户来说是一样的
	memcpy(e->env_pgdir, kern_pgdir, PGSIZE);
	p->pp_ref += 1;
	// LAB 3: Your code here.

	// UVPT maps the env's own page table read-only.
	// Permissions: kernel R, user R
	// 这里和设置内核页表的方法是一样的, 设置 UVPT为页目录, 在物理内存中分配页目录,
	e->env_pgdir[PDX(UVPT)] = PADDR(e->env_pgdir) | PTE_P | PTE_U;
	return 0;
}

int env_alloc(struct Env **newenv_store, envid_t parent_id)
{
	int32_t generation;
	int r;
	struct Env *e;
	// 如果 env_free_list 指向 NULL, 表示进程数目满了
	if (!(e = env_free_list))
		return -E_NO_FREE_ENV;
	// 初始化一个用户进程虚拟空间, 也就是分配页目录
	// Allocate and set up the page directory for this environment.
	if ((r = env_setup_vm(e)) < 0)
		return r;
	// Generate an env_id for this environment.
	generation = (e->env_id + (1 << ENVGENSHIFT)) & ~(NENV - 1);
	if (generation <= 0)	// Don't create a negative env_id.
		generation = 1 << ENVGENSHIFT;
	e->env_id = generation | (e - envs);
	// Set the basic status variables. 设置新进程的一些状态变量
	e->env_parent_id = parent_id;
	e->env_type = ENV_TYPE_USER;
	e->env_status = ENV_RUNNABLE;
	e->env_runs = 0;
	// 清空进程寄存器部分
	memset(&e->env_tf, 0, sizeof(e->env_tf));
	// 手动构建出段寄存器的内容, 这里没有使用 LDT表, 这里的内容使用的是段描述符, 也就是描述不同的段,
    // 是对于一个用户程序而言的
	e->env_tf.tf_ds = GD_UD | 3;
	e->env_tf.tf_es = GD_UD | 3;
	e->env_tf.tf_ss = GD_UD | 3;
	e->env_tf.tf_esp = USTACKTOP;
	e->env_tf.tf_cs = GD_UT | 3;
	// You will set e->env_tf.tf_eip later.
	// 将 env_free_list 向后移动
	// commit the allocation
	env_free_list = e->env_link;
	*newenv_store = e;

	cprintf("[%08x] new env %08x\n", curenv ? curenv->env_id : 0, e->env_id);
	return 0;
}

// 对于输入虚拟地址, 在物理内存上分配 len 字节的内存, 使用 page_alloc, 可以得到返回的物理页描述符
// 同时将分配的物理页使用 page_insert 使之与虚拟地址对应我来
static void
region_alloc(struct Env *e, void *va, size_t len)
{
	// LAB 3: Your code here.
	// (But only if you need it for load_icode.)
	struct PageInfo *temp;
	// 这里必须是向下对齐, 向上的话会导致 va 起始地址空白
	uintptr_t start = ROUNDDOWN((uintptr_t)va, PGSIZE);
	uintptr_t end = ROUNDUP((uintptr_t)va+len, PGSIZE);
	// 得到需要分配多少个页面, 而分配页面的方法就是, 先分配物理页, 然后将物理页与虚拟地址进行对应
	size_t num = (end - start) >> PGSHIFT;
	size_t i = 0;
	for(i = 0; i< num; i++) {
		if ((temp = page_alloc(0)) == NULL) {
            panic("region_alloc: %e", -E_NO_MEM);
        }
		int r = page_insert(e->env_pgdir, temp, (void*)(start + i * PGSIZE), PTE_W | PTE_U);
        if (r < 0) {
            panic("region_alloc: %e", r);
        }
	}
}
// obj/kern/kernel.sym中类似_binary_obj_user_hello_start,_binary_obj_user_hello_end,_binary_obj_user_hello_size
// 这种符号就是用户程序的起始线性地址,终止线性地址, 在内核启动一个用户进程的过程中的调用顺序就是:
// 在 init.c 里面的 ENV_CREATE(user_hello, ENV_TYPE_USER); -->> env_create(_binary_obj_user_hello_start, ENV_TYPE_USER)
// -->> env_create(uint8_t *binary, enum EnvType type) -->> load_icode(new_env, binary);
// 所以 uint8_t *binary:就是可执行用户代码的起始地址
static void load_icode(struct Env *e, uint8_t *binary)
{
	// LAB 3: Your code here.
	// ELF 头部的地址
	struct Elf* elf = (struct Elf*)binary;
	// 段表的开头与结尾
	struct Proghdr *ph, *eph;
	ph = (struct Proghdr*)(elf->e_phoff + binary);
	// Segment 表的尾部, 也就是 end_of_Proghdr;
	eph = ph + elf->e_phnum;
	// 判断 ELF 文件的魔数是否正确
	if (elf->e_magic != ELF_MAGIC) {
        panic("load_icode: not an ELF file");
    }
	// 将 e->env_pgdir 的物理地址存入 cr3 寄存器, 表明当前正在运行的进程
	lcr3(PADDR(e->env_pgdir));
	// 对于 ELF 中每一个 Segment
	while(ph < eph) {
		// ph 是最终的可执行文件段表
		if(ph->p_type == ELF_PROG_LOAD) {
			if(ph->p_filesz > ph->p_memsz) {
				panic("load_icode: p_filesz > p_memsz");
			}
			// 将程序段加载进物理内存, 同理会在物理内存上分配这一块段大小的空间, p_memsz 表示允许段的最大大小
			region_alloc(e, (void*)(ph->p_va), ph->p_memsz);
			// 这一步相当于对物理空间的初始化, 初始化了整个程序的各个段在物理内存中的内容
			memcpy((void*)(ph->p_va), (void*)(binary + ph->p_offset), ph->p_filesz);
			memset((void*)(ph->p_va + ph->p_filesz), 0 , ph->p_memsz - ph->p_filesz);
		}
		ph++;
	}
	e->env_tf.tf_eip = elf->e_entry;
	// Now map one page for the program's initial stack
	// at virtual address USTACKTOP - PGSIZE.
	// LAB 3: Your code here.
	region_alloc(e, (void*)(USTACKTOP - PGSIZE), PGSIZE);
    lcr3(PADDR(kern_pgdir));
}

void env_create(uint8_t *binary, enum EnvType type)
{
	// LAB 3: Your code here.
	// 创建一个新的进程
	struct Env *new_env = NULL;
	// 分配一个进程, 同时分配了进程必须的部分, 页目录, 设置了进程的状态等
	int result = env_alloc(&new_env, 0);
	if(result < 0) {
		panic("env_create: %e", result);
	}
	new_env->env_type = type;
	// 在物理内存中构建出程序环境
	load_icode(new_env, binary);
}

void env_free(struct Env *e)
{
	pte_t *pt;
	uint32_t pdeno, pteno;
	physaddr_t pa;

	// If freeing the current environment, switch to kern_pgdir
	// before freeing the page directory, just in case the page
	// gets reused.
	if (e == curenv)
		lcr3(PADDR(kern_pgdir));

	// Note the environment's demise.
	cprintf("[%08x] free env %08x\n", curenv ? curenv->env_id : 0, e->env_id);

	// Flush all mapped pages in the user portion of the address space
	static_assert(UTOP % PTSIZE == 0);
	// 将每一个页表对应的空间清空, 但是也不是全部, 而是在 UTOP下面的部分, 所以页表自身要手动清空
	for (pdeno = 0; pdeno < PDX(UTOP); pdeno++) {

		// only look at mapped page tables, 只删除 mapped 虚拟地址与物理地址的页表项
		if (!(e->env_pgdir[pdeno] & PTE_P))
			continue;

		// find the pa and va of the page table
		// e->env_pgdir[pdeno] 是页目录项的内容,所以这里是页表的物理地址
		pa = PTE_ADDR(e->env_pgdir[pdeno]);
		pt = (pte_t*) KADDR(pa);

		// unmap all PTEs in this page table
		// 将页表中的每一页删除 mapped, 也就是从物理地址中删除,
		for (pteno = 0; pteno <= PTX(~0); pteno++) {
			if (pt[pteno] & PTE_P)
				// 将虚拟地址与物理页的对应关系在页表中删除
				// PGADDR 可以按顺序构建出虚拟地址
				page_remove(e->env_pgdir, PGADDR(pdeno, pteno, 0));
		}
		// free the page table itself, 页目录中, 该页表项的内容为空
		e->env_pgdir[pdeno] = 0;
		page_decref(pa2page(pa));
	}

	// free the page directory
	pa = PADDR(e->env_pgdir);
	e->env_pgdir = 0;
	page_decref(pa2page(pa));

	// return the environment to the free list, 进程状态改变
	e->env_status = ENV_FREE;
	e->env_link = env_free_list;
	env_free_list = e;
}

void env_run(struct Env *e)
{
	// LAB 3: Your code here.
	if(curenv && curenv->env_status == ENV_RUNNING) {
		curenv->env_status = ENV_RUNNABLE;
	}
	curenv = e;
	e->env_status = ENV_RUNNING;
	e->env_runs++;
	// 需要注意的是, 这里 e->env_pgdir 是在KERNBASE 上面的, 是 boot alloc 分配的
	lcr3(PADDR(e->env_pgdir));
	env_pop_tf(&(e->env_tf));
}
JOS 处理中断与异常
Basics of Protected Control Transfer
中断与异常都需要 CPU 从用户态进入内核态, 其本质是将 CPU 的控制权交给内核, 操作系统需要保证这个交接过程的正确执行. 中断通常是由外部程序异步造成的, 而异常是由一些内部程序造成的. 对于正在运行的进程遇到中断或者异常的时候, 操作系统中处理中断与异常的机制需要谨慎的控制内核.这里面有两个机制:
The Interrupt Descriptor Table.
中断描述符表: 中断与异常导致陷入内核的时候, 陷入内核的地址必须是内核事先指明的一些特定地址, 对于 x86 来说, 支持 256 种基于不同情况的中断与异常, 对于这 256 种来说, 可以使用 8 位bit 的向量来唯一表示, 所以就构成了中断(描述符)向量表, 使用这个向量作为中断(描述符)向量表的索引, 中断向量表与全局描述表类似, 全局描述表是段描述符的数组, 中断向量表是中断描述符的数组. 中断描述符用下面的结构体来表示(我在文中将中断与trap表示为相同的).
// Gate descriptors for interrupts and traps
struct Gatedesc {
	unsigned gd_off_15_0 : 16;   // low 16 bits of offset in segment
	unsigned gd_sel : 16;        // segment selector
	unsigned gd_args : 5;        // # args, 0 for interrupt/trap gates
	unsigned gd_rsv1 : 3;        // reserved(should be zero I guess)
	unsigned gd_type : 4;        // type(STS_{TG,IG32,TG32})
	unsigned gd_s : 1;           // must be 0 (system)
	unsigned gd_dpl : 2;         // descriptor(meaning new) privilege level
	unsigned gd_p : 1;           // Present
	unsigned gd_off_31_16 : 16;  // high bits of offset in segment
};
它的结构如下图的Interrupt GATE 所示:

然后是中断描述表(IDT)
// Pseudo-descriptors used for LGDT, LLDT and LIDT instructions.
struct Pseudodesc {
	uint16_t pd_lim;		// Limit
	uint32_t pd_base;		// Base address
} __attribute__ ((packed));
/* The kernel's interrupt descriptor table */
extern struct Gatedesc idt[]; 	// 中断描述符数组
extern struct Pseudodesc idt_pd;	// 和全局描述表一样, 使用的是基地址与大小表示全局描述表
The Task State Segment
异常或者中断发生的时候, CPU会从用户态立刻切换到内核态, 这里的意思也就是当前进程从用户态切换到内核态, 切换到内核态到底是怎么做的. 直观上来说, 对于内核页表, 我们已经copy了, 然后执行内核部分的代码, 中断的时候就会跳转, 最后是进入内核态, 就要用内核栈, 我们怎么知道内核栈现在在哪里呢?
任务状态段(TSS) 的作用就是指定内核栈的位置, 这个位置是在初始化的时候确定的.
那我们考虑一下, 要完成中断的任务, 我们需要初始化那些东西呢? 全局描述表是全局初始化的, 在这里我们肯定要初始化中断向量表(IDT), 然后就是上面所说的 任务状态段(TSS). 初始化的代码如下:
// Initialize and load the per-CPU TSS and IDT, 加载 IDT 到ELF文件正确的位置
void
trap_init_percpu(void)
{
	// Setup a TSS so that we get the right stack
	// when we trap to the kernel.
	ts.ts_esp0 = KSTACKTOP;
	ts.ts_ss0 = GD_KD;
	ts.ts_iomb = sizeof(struct Taskstate);

	// Initialize the TSS slot of the gdt. 初始化ELF文件的 TSS 段
	gdt[GD_TSS0 >> 3] = SEG16(STS_T32A, (uint32_t) (&ts),
					sizeof(struct Taskstate) - 1, 0);
	gdt[GD_TSS0 >> 3].sd_s = 0;

	// Load the TSS selector (like other segment selectors, the
	// bottom three bits are special; we leave them 0)
	ltr(GD_TSS0);

	// Load the IDT, 导入中断描述表
	lidt(&idt_pd);
}
中断处理流程
我们用中断处理的流程结合内核的代码来完成接下来的任务:
-
中断(或者异常)发生, 判断发生了哪种中断, 进入内核处理中断的函数,
-
将栈切换到TSS的SS0和ESP0字段定义的内核栈中(也就是加载 TSS 段的信息),在JOS中两个值分别是
GD_KD和KSTACKTOP. -
处理器在内核栈中压入如下参数:
                        +--------------------+ KSTACKTOP
                        | 0x00000 | old SS   |     " - 4
                        |      old ESP       |     " - 8
                        |     old EFLAGS     |     " - 12
                        | 0x00000 | old CS   |     " - 16
                        |      old EIP       |     " - 20 <---- ESP
                        +--------------------+
-
根据中断或者异常的号码, 判断内核处理函数的地址, 例如除以0的异常中断号是0,处理器读取IDT的第0项,从中解析出
CS:EIP, 也就是段基地址与指令地址, 就是中断处理函数的地址, 因为要跳转到这里执行. 到这里, 前面部分的代码都没有出现在源码中, 源码中我们是测试中断, 所以没有出现这部分发生中断的情况. -
接下来跳转到
CS:EIP处的异常处理函数执行
对于一些异常来说,除了压入上图五个word,还会压入错误代码,如下所示
                        +--------------------+ KSTACKTOP
                        | 0x00000 | old SS   |     " - 4
                        |      old ESP       |     " - 8
                        |     old EFLAGS     |     " - 12
                        | 0x00000 | old CS   |     " - 16
                        |      old EIP       |     " - 20
                        |     trap numbers   |     " - 24 <---- ESP
                        +--------------------+
-
接下来是在
trapentry.S中的.global _alltraps函数, 这个函数是进入trap()函数之前的函数, 我们还会仔细分析 -
进入
trap()函数之后就是处理不同的 trap, 处理完之后要 free 当前的内核进程, 并且切换到用户进程
Setting Up the IDT(设置中断向量表)
在上面的流程中, 我们已经提到, 1~4是没有出现的, 或者说已经提供了的, 对于第5步来说, 我们要做的就是从中断向量表中找到中断处理函数的地址, 所以我们要初始化中断向量表, 在代码中就是下面这一步,
void trap_init(void)
{
    extern struct Segdesc gdt[];
		// 中断处理函数的地址, 这里只有声明, 具体的操作其实是在 trap_dispatch() 函数中
  	// 根据 Trap numbers 决定的, 这里的这个函数的功能就是在栈中压入这个 number,
  	// 这个步骤的实现是 trapentry.S 中的宏定义 TRAPHANDLER(th_dblflt, T_DBLFLT)
    void th_divide();
    void th_debug();
    void th_nmi();
    void th_brkpt();
    void th_oflow();
    void th_bound();
    void th_illop();
    void th_device();
    void th_dblflt();
    void th_tss();
    void th_segnp();
    void th_stack();
    void th_gpflt();
    void th_pgflt();
    void th_fperr();
    void th_align();
    void th_mchk();
    void th_simderr();
	  void th_syscall();

  	// off 就是中断处理函数的地址
    SETGATE(idt[T_DIVIDE], 0, GD_KT, &th_divide, 0);
    SETGATE(idt[T_DEBUG], 0, GD_KT, &th_debug, 0);
    SETGATE(idt[T_NMI], 0, GD_KT, &th_nmi, 0);
    SETGATE(idt[T_BRKPT], 0, GD_KT, &th_brkpt, 3);
    SETGATE(idt[T_OFLOW], 0, GD_KT, &th_oflow, 0);
    SETGATE(idt[T_BOUND], 0, GD_KT, &th_bound, 0);
    SETGATE(idt[T_ILLOP], 0, GD_KT, &th_illop, 0);
    SETGATE(idt[T_DEVICE], 0, GD_KT, &th_device, 0);
    SETGATE(idt[T_DBLFLT], 0, GD_KT, &th_dblflt, 0);
    SETGATE(idt[T_TSS], 0, GD_KT, &th_tss, 0);
    SETGATE(idt[T_SEGNP], 0, GD_KT, &th_segnp, 0);
    SETGATE(idt[T_STACK], 0, GD_KT, &th_stack, 0);
    SETGATE(idt[T_GPFLT], 0, GD_KT, &th_gpflt, 0);
    SETGATE(idt[T_PGFLT], 0, GD_KT, &th_pgflt, 0);
    SETGATE(idt[T_FPERR], 0, GD_KT, &th_fperr, 0);
    SETGATE(idt[T_ALIGN], 0, GD_KT, &th_align, 0);
    SETGATE(idt[T_MCHK], 0, GD_KT, &th_mchk, 0);
    SETGATE(idt[T_SIMDERR], 0, GD_KT, &th_simderr, 0);
	// 对于系统调用, 原进程是处于用户态
	SETGATE(idt[T_SYSCALL], 0, GD_KT, &th_syscall, 3);

    // Per-CPU setup
    trap_init_percpu();
}
这里设置中断向量表的函数 SETGATE 函数就是,
// Set up a normal interrupt/trap gate descriptor.
// - istrap: 1 for a trap (= exception) gate, 0 for an interrupt gate.
	//   see section 9.6.1.3 of the i386 reference: "The difference between
	//   an interrupt gate and a trap gate is in the effect on IF (the
	//   interrupt-enable flag). An interrupt that vectors through an
	//   interrupt gate resets IF, thereby preventing other interrupts from
	//   interfering with the current interrupt handler. A subsequent IRET
	//   instruction restores IF to the value in the EFLAGS image on the
	//   stack. An interrupt through a trap gate does not change IF."
// - sel: Code segment selector for interrupt/trap handler
// - off: Offset in code segment for interrupt/trap handler
// - dpl: Descriptor Privilege Level -
//	  the privilege level required for software to invoke
//	  this interrupt/trap gate explicitly using an int instruction.
// 构建了中断向量描述符的内容, 执行到这里的时候就会直接跳转到 trap,
#define SETGATE(gate, istrap, sel, off, dpl)			\
{								\
	(gate).gd_off_15_0 = (uint32_t) (off) & 0xffff;		\
	(gate).gd_sel = (sel);					\
	(gate).gd_args = 0;					\
	(gate).gd_rsv1 = 0;					\
	(gate).gd_type = (istrap) ? STS_TG32 : STS_IG32;	\
	(gate).gd_s = 0;					\
	(gate).gd_dpl = (dpl);					\
	(gate).gd_p = 1;					\
	(gate).gd_off_31_16 = (uint32_t) (off) >> 16;		\
}
这里是通过传入中断向量表的地址来修改中断向量表的表项, 也就是中断描述符.
现在我们知道了这个函数的位置了, 这个函数干了啥呢? 其实这部分在 trapentry.S 中,
/* TRAPHANDLER defines a globally-visible function for handling a trap.
 * It pushes a trap number onto the stack, then jumps to _alltraps.
 * Use TRAPHANDLER for traps where the CPU automatically pushes an error code.
 *
 * You shouldn't call a TRAPHANDLER function from C, but you may
 * need to _declare_ one in C (for instance, to get a function pointer
 * during IDT setup).  You can declare the function with
 *   void NAME();
 * where NAME is the argument passed to TRAPHANDLER.
 */
#define TRAPHANDLER(name, num)						\
	.globl name;		/* define global symbol for 'name' */	\
	.type name, @function;	/* symbol type is function */		\
	.align 2;		/* align function definition */		\
	name:			/* function starts here */		\
	pushl $(num);							\
	jmp _alltraps
这里的name 就是我们上面声明的函数的地址, num 是 trap numbers, 是 trap的唯一标识符. 这里才是真正的声明了trap 处理函数, (为什么这么说呢? 因为我们从中断向量表中找到并跳转的地址其实就是这里, 而不是前面的 void handler()) ,以及将 trap numbers 压栈. 最后调用了 _alltraps函数, 表示所有 traps 都是从这里进入 trap() 函数.
我们要解决的一个问题就是完成_alltraps 函数, 完成这个函数, 我们还需要知道一点, 那就是中断发生的时候, 我们需要保存所有的寄存器(为了处理完之后恢复用户进程), 那么到目前为 ,哪些寄存器被存入栈中, 哪些没有呢? tf_ss,tf_esp,tf_eflags,tf_cs,tf_eip,tf_err 这些寄存器在中断发生时由处理器压入, 是最开始压入栈中的, (现在我们是在内核栈了哦), 在上面的第3步, 和第5步又压入了 SS, ESP, EFLAGS, CS, EIP, trap numbers, 还剩下的就是 ds, es 和其他的通用寄存器了, 这就是_alltraps 要压入的内容了,
.global _allt		raps
_alltraps:
    pushl %ds
    pushl %es
    pushal
    movw $GD_KD, %ax
    movw %ax, %ds
    movw %ax, %es
    pushl %esp
    call trap
进入 Trap
至此我们终于进入 Trap()了, Trap的函数并不是很复杂, 但是奇怪的是,
// Trapframe 在 Env 中的定义是保存当前环境, 这里传入的参数是中断处理程序的寄存器信息
// 表示开始处理中断或者异常
void trap(struct Trapframe* tf)
{
	// The environment may have set DF and some versions
	// of GCC rely on DF being clear
	asm volatile("cld" ::: "cc");

	// Check that interrupts are disabled.  If this assertion
	// fails, DO NOT be tempted to fix it by inserting a "cli" in
	// the interrupt path., 进入内核之后要先关中断, 不允许其他中断
	assert(!(read_eflags() & FL_IF));
	// 输出了 trap 的信息,
	cprintf("Incoming TRAP frame at %p\n", tf);

	if ((tf->tf_cs & 3) == 3) {
		// Trapped from user mode.
		assert(curenv);
		// Copy trap frame (which is currently on the stack) into 'curenv->env_tf',
		//  so that running the environment will restart at the trap point.
    // 注意当前内核进程存储的不是改进程的 Trapframe, 而是需要恢复的用户进程的 Trapframe,
		curenv->env_tf = *tf;
		// The trapframe on the stack should be ignored from here on.
		tf = &curenv->env_tf;
	}

	// Record that tf is the last real trapframe so
	// print_trapframe can print some additional information.
	last_tf = tf;

	// Dispatch based on what type of trap occurred, 为 tf 分配一个 handler,
	// 并进行了 trap 处理
	trap_dispatch(tf);
	// 在 trap_dispatch 函数的末尾, 使用了 env_destroy(curenv);
	// Return to the current environment, which should be running.
	assert(curenv && curenv->env_status == ENV_RUNNING);
	// 返回到用户进入内核之前执行的指令
	env_run(curenv);
}
这里 void trap(struct Trapframe* tf) 中的 Trapframe是啥呢??? 如果你仔细观察就会发现, 在中断发生后的一系列压栈过程, 刚好压栈出了一个 Trapframe, 这个 Trapframe 就是用户环境啊, 就是我们要恢复的用户环境.
然后就是进入 trap_dispatch 处理这个trap了, 这里实际上根据 case 不难实现,
static void
trap_dispatch(struct Trapframe* tf)
{
	// Handle processor exceptions.
	switch (tf->tf_trapno) {
		// 这里是判断 trap 的类型, 对于不同的 trap, 有不同的处理函数
	case T_PGFLT: page_fault_handler(tf); return;
	case T_BRKPT: monitor(tf); return;
	case T_SYSCALL:
		tf->tf_regs.reg_eax = syscall(tf->tf_regs.reg_eax,
			tf->tf_regs.reg_edx, tf->tf_regs.reg_ecx,
			tf->tf_regs.reg_ebx, tf->tf_regs.reg_edi,
			tf->tf_regs.reg_esi);
		return;
	default:
		// 未知的 trap
		// Unexpected trap: The user process or the kernel has a bug.
		print_trapframe(tf);
		if (tf->tf_cs == GD_KT)
			panic("unhandled trap in kernel");
		else {
			env_destroy(curenv);
			return;
		}
	}
}
这里还有一点需要理解的是, 缺页中断的时候, 这里我们直接 env_destroy(curenv);, 但是系统调用和其他中断不会直接destory 当前进程.

 浙公网安备 33010602011771号