SpringCloud(Greenwich版)Config分布式统一配置中心
推荐以下稳定版本号:
Spring Cloud: Greenwich.SR3
一、关于配置中心
分布式系统面临的配置--问题:
Spring Cloud 提供了 Config Server 来解决这个问题,我们每一个微服务自己携带着一个 application.yaml 配置文件,如果有上百个配置文件需要管理的话......o(╥﹏╥)o
是什么:
Spring Cloud Config 是用来为分布式系统中的微服务应用提供集中化的外部配置支持。
如何使用:
它分为服务端(Config Server)与客户端(Config Client)两个部分。其中服务端也称为分布式配置中心,它是一个独立的微服务应用,用来连接配置仓库并为客户端提供获取配置信息,加密/解密信息等;而客户端则是微服务架构中的各个微服务应用,他们通过指定的配置中心来管理应用资源,并在启动的时候从配置中心获取和加载配置信息。Spring Cloud Config 的分布式配置中心默认采用 Git 来存储配置信息,天然就支持对微服务应用配置信息的版本管理,并且可以通过 Git 客户端工具来方便地管理和访问配置内容。
如下特点:
-
集中管理配置文件
-
不同环境不同配置,动态化的配置更新
-
运行期间,不需要去服务器修改配置文件,服务会向配置中心拉取自己的信息
-
当配置发生变动时,服务不需要重启即可感知到配置的变化并应用新的配置
-
将配置信息以REST接口的形式暴露
二、与GitHub整合配置
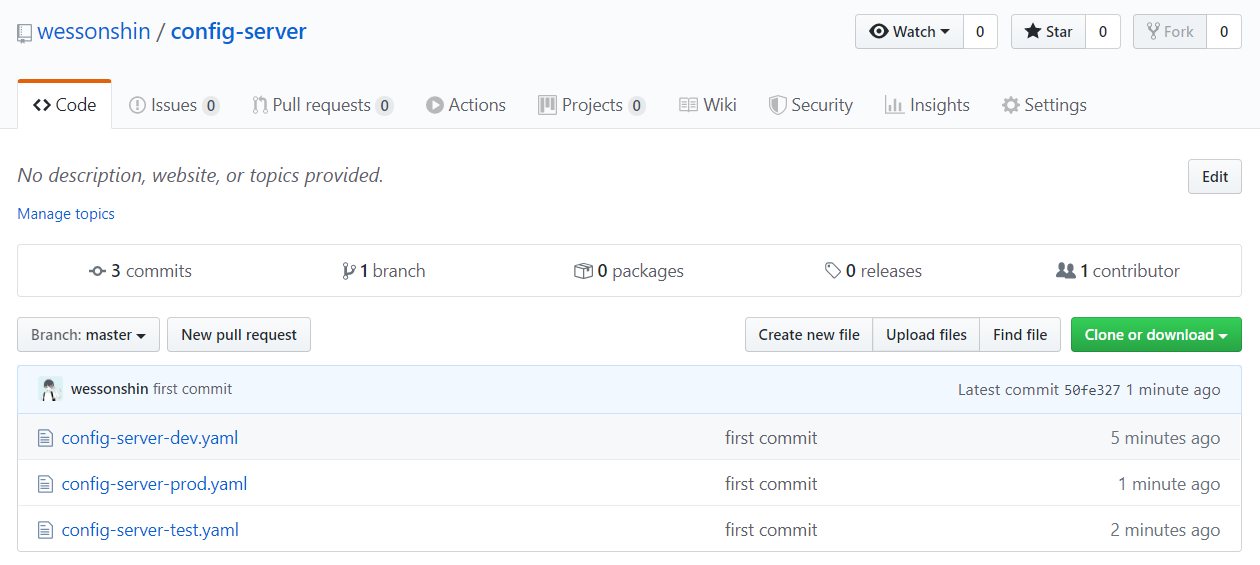
由于Spring Cloud Config 默认使用 Git 来存储配置文件 (也有其他方式,例如支持SVN和本地文件),但是最推荐的还是 Git,而且使用的是 https 访问的形式。用自己的账号在GitHub上创建一个名为 config-sever 的远程仓库 (repository) ,获得Git仓库地址为 https://github.com/wessonshin/config-server.git。
本地硬盘目录上新建git仓库并克隆下来。(我的:D:\Java Code\githubcode\repository)
下面是配置远程仓库目录结构:

master分支下的配置信息:
-
config-server-dev.yaml,开发环境:
config:
  info: config info for dev(master), version 1.0
-
config-server-prod.yaml,生产环境:
config:
  info: config info for prod(master), version 1.0
-
config-server-test.yaml,测试环境:
config:
  info: config info for test(master), version 1.0
三、创建Config Server端
1)build.gradle项目依赖
创建gradle模块config-server并添加config服务端与eureka客户端依赖
dependencies {
    compile group: 'org.springframework.cloud', name: 'spring-cloud-config-server'

    compile group: 'org.springframework.cloud', name: 'spring-cloud-starter-netflix-eureka-client'
}

server:
  port: 7001
spring:
  application:
    name: config-server
  cloud:
    config:
      server:
        git:
          uri: https://github.com/wessonshin/config-server.git
          username: your git username
          password: your git password
          clone-on-start: true
          search-paths:
            - config-server
eureka:
  client:
    service-url:
      defaultZone: http://localhost:8761/eureka/
其中 Git 的配置存储信息分别表示如下内容:
-
spring.cloud.config.server.git.uri:远程 Git 仓库的地址 (GitHub/Gitee)
-
spring.cloud.config.server.git.username:远程 Git 仓库的用户名 (GitHub/Gitee)
-
spring.cloud.config.server.git.password:远程 Git 仓库的密码 (GitHub/Gitee)
-
spring.cloud.config.server.git.clone-on-start:启动时直接从远程 Git 仓库获取配置 (GitHub/Gitee)
-
spring.cloud.config.server.git.search-paths:搜索 Github/Gitee 上名为 config-server 仓库的目录
在启动类上添加@EnableConfigServer注解,标记开启Spring Cloud Config的服务端功能。

package org.wesson.springcloud.config;

import org.springframework.boot.SpringApplication;
import org.springframework.boot.autoconfigure.SpringBootApplication;
import org.springframework.cloud.client.discovery.EnableDiscoveryClient;
import org.springframework.cloud.config.server.EnableConfigServer;

@EnableConfigServer
@EnableDiscoveryClient
@SpringBootApplication
public class ConfigServerApplication {

    public static void main(String[] args) {
        SpringApplication.run(ConfigServerApplication.class, args);
    }

}
Step1:运行 eureka-server 启动类,端口为8761
Step2:运行 config-server 启动类,端口为7001
Step3:先访问http://localhost:8761/,注册到的服务如下图:

Step4:测试通过config-server微服务是否可以从GitHub上获取配置内容,然后访问一个开发环境http://localhost:7001/master/config-server-dev.yaml
-
不带 label 分支信息,默认访问 master 分支,可使用:
-
/{application}-{profile}.yml
-
/{application}-{profile}.properties
-
-
带 label 分支信息,可使用:
-
/{label}/{application}-{profile}.yml
-
/{label}/{application}-{profile}.properties
-
/{application}/{profile}[/{label}]
-
小总结:
application:应用名 (config-server),profile:环境名 (dev/test/prod),label:分支名 (Branch),默认master
四、创建Config Client端
1)build.gradle项目依赖
dependencies {
   compile group: 'org.springframework.boot', name: 'spring-boot-starter-web'

   compile group: 'org.springframework.cloud', name: 'spring-cloud-starter-netflix-eureka-client'

   compile group: 'org.springframework.cloud', name: 'spring-cloud-starter-config'
}
application.yaml(properties):是用户级的资源配置项。bootstrap.yaml(properties):是系统级的资源配置项,优先级别更高

server:
  port: 7071
spring:
  application:
    name: config-client
  cloud:
    config:
      label: master
      name: config-server
      profile: dev
      uri: http://localhost:7001
eureka:
  client:
    service-url:
      defaultZone: http://localhost:8761/eureka/
-
spring.cloud.config.label:读取分支名称
-
spring.cloud.config.name:读取配置文件名称
-
spring.cloud.config.profile:读取后缀(环境)名称
-
spring.cloud.config.uri:指定配置中心地址,默认 http://localhost:8888
上述综合:从GitHub远程仓库的master分支找到名为config-server-dev.yaml的配置文件被读取,相当于访问http://localhost:7001/master/config-server-dev.yaml路径。

package org.wesson.springcloud.config;

import org.springframework.boot.SpringApplication;
import org.springframework.boot.autoconfigure.SpringBootApplication;
import org.springframework.cloud.client.discovery.EnableDiscoveryClient;

@EnableDiscoveryClient
@SpringBootApplication
public class ConfigClientApplication {

    public static void main(String[] args) {
        SpringApplication.run(ConfigClientApplication.class, args);
    }

}
4)Controller
创建一个 RESTful

package org.wesson.springcloud.config;

import org.springframework.beans.factory.annotation.Value;
import org.springframework.web.bind.annotation.GetMapping;
import org.springframework.web.bind.annotation.RestController;

@RestController
public class ConfigController {

    @Value("${config.info}")
    private String configInfo;

    @GetMapping("/getInfo")
    public String getConfigInfo() {
        return configInfo;
    }

}
Step5:运行 config-client 启动类,端口为7071
Step6:访问http://localhost:8761/

Step7:访问http://localhost:7071/getInfo

成功实现了 Config 客户端访问配置中心,通过 GitHub 获取配置信息内容。
1)补充build.gradle项目依赖
修改config-client模块并添加actuator依赖。其中包含了refresh端点的实现
compile group: 'org.springframework.boot', name: 'spring-boot-starter-actuator'
2)补充bootstrap.yaml配置文件
management:
  endpoints:
    web:
      exposure:
        include: 'refresh'
3)补充Controller

package org.wesson.springcloud.config.controller;

import org.springframework.beans.factory.annotation.Value;
import org.springframework.cloud.context.config.annotation.RefreshScope;
import org.springframework.web.bind.annotation.GetMapping;
import org.springframework.web.bind.annotation.RestController;

@RestController
@RefreshScope
public class ConfigController {

    @Value("${config.info}")
    private String configInfo;

    @GetMapping("/getInfo")
    public String getConfigInfo() {
        return configInfo;
    }

}
Step8:
Step11:
-
curl -X POST "http://localhost:7071/actuator/refresh"
Step12:最后,浏览器刷新Config客户端访问连接,不用重启该服务能够获取到最新版本了。


