

Linux Rsync+Inotify 实时同步文件
源主机: 192.168.1.111
目的主机: 192.168.1.28(rsync服务端)
实时监控源主机的某个目录,有更新则立即同步到目标主机
1. 在目的主机192.168.1.28安装配置Rsync服务端
# yum install rsync -y
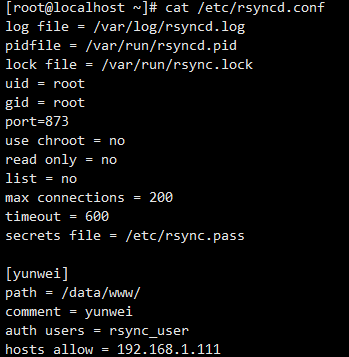
创建配置文件 /etc/rsyncd.conf
log file = /var/log/rsyncd.log

pidfile = /var/run/rsyncd.pid

lock file = /var/run/rsync.lock

uid = root

gid = root

port=873

use chroot = no

read only = no

list = no

max connections = 200

timeout = 600

secrets file = /etc/rsync.pass

[yunwei]

path = /data/www/

comment = yunwei

auth users = rsync_user

hosts allow = 192.168.1.111

服务端的密码文件保存 用户名:密码
客户端的密码文件只需要保存密码
权限都要设置为600
启动rsync服务
# rsync --config=/etc/rsyncd.conf --daemon
2. 在源主机192.168.1.111上安装inotify和rsync客户端
# cd /usr/local/src

# wget http://github.com/downloads/rvoicilas/inotify-tools/inotify-tools-3.14.tar.gz

# yum install make  gcc gcc-c++

# tar zxvf inotify-tools-3.14.tar.gz

# cd inotify-tools-3.14

# ./configure --prefix=/usr/local/inotify

# make && make install


# yum install rsync -y
配置密码文件

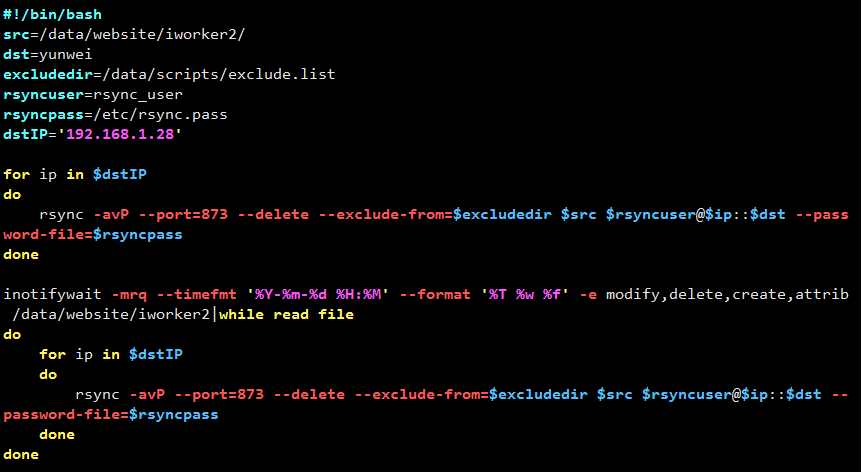
同步脚本如下,后台运行 nohup sh rsync.sh &
#!/bin/bash
src=/data/website/iworker2/
dst=yunwei
excludedir=/data/scripts/exclude.list
rsyncuser=rsync_user
rsyncpass=/etc/rsync.pass
dstIP='192.168.1.28'

for ip in $dstIP
do
   rsync -avP --port=873 --delete --exclude-from=$excludedir $src $rsyncuser@$ip::$dst --password-file=$rsyncpass
done

inotifywait -mrq --timefmt '%Y-%m-%d %H:%M' --format '%T %w %f' -e modify,delete,create,attrib /data/website/iworker2 | while read file
do
  for ip in $dstIP
     do
         rsync -avP --port=873 --delete --exclude-from=$excludedir $src $rsyncuser@$ip::$dst --password-file=$rsyncpass
     done
done
excludedir=/data/scripts/exclude.list 不需要同步的文件,目录,如果有多个,每一行写一个目录,使用相对路径

inotify 排除子目录
--fromfile 从文件读取要监控的目录和要排除的目录
/data/website/iworker2/ 要监控的目录
@/data/website/iworker2/log/ @开头的是要排除的目录
@/data/website/iworker2/document/log/

用法:
inotifywait -mrq --timefmt '%Y-%m-%d %H:%M' --format '%T %w %f' -e modify,delete,create,attrib,move --fromfile "/data/scripts/inotify-file-list"
