青云KubeSphere 容器平台部署教程
1.安装环境
操作系统版本:
#cat /etc/redhat-release
CentOS Linux release 7.6.1810 (Core)
内核版本:
#uname -a
Linux master01 3.10.0-1127.el7.x86_64 #1 SMP Tue Mar 31 23:36:51 UTC 2020 x86_64 x86_64 x86_64 GNU/Linux
机器配置:  8CPU      16G内存     100G磁盘
主机名 IP           地址
192.168.26.1    #集群VIP
192.168.26.2    lb1
192.168.26.3    lb2
192.168.26.4   master01
192.168.26.5   master02
192.168.26.6   master03
2.修改master和node的hosts文件
# cat /etc/hosts
127.0.0.1   localhost localhost.localdomain localhost4 localhost4.localdomain4
::1         localhost localhost.localdomain localhost6 localhost6.localdomain6
192.168.26.1    #集群VIP
192.168.26.2    lb1
192.168.26.3    lb2
192.168.26.4   master01
192.168.26.5   master02
192.168.26.6   master03
3.安装chrony实现所有服务器间的时间同步
# yum install chrony -y
# systemctl  start chronyd
# sed -i -e '/^server/s/^/#/' -e '1a server ntp.aliyun.com iburst' /etc/chrony.conf
# systemctl  restart chronyd
# timedatectl set-timezone Asia/Shanghai
# timedatectl
      Local time: Fri 2020-11-27 16:06:42 CST
  Universal time: Fri 2020-11-27 08:06:42 UTC
        RTC time: Fri 2020-11-27 08:06:42
       Time zone: Asia/Shanghai (CST, +0800)
     NTP enabled: yes
NTP synchronized: yes
 RTC in local TZ: no
      DST active: n/a
4.关闭所有节点的防火墙和selinux
# systemctl stop firewalld && systemctl disable  firewalld
# sed -ri 's/SELINUX=enforcing/SELINUX=disabled/' /etc/selinux/config
# 主要查看SELINUX=disabled,如果SELINUX=eabled 需要修改为disabled
# setenforce 0
# getenforce
# 关掉swap
# swapoff -a
# 要永久禁掉swap分区,打开如下文件注释掉swap那一行
# vi /etc/fstab
5.配置系统内核参数和调优
配置sysctl内核参数
$ cat > /etc/sysctl.conf <<EOF
vm.max_map_count=262144
net.ipv4.ip_forward = 1
net.bridge.bridge-nf-call-ip6tables = 1
net.bridge.bridge-nf-call-iptables = 1
EOF
生效文件
$ sysctl -p
修改Linux 资源配置文件,调高ulimit最大打开数和systemctl管理的服务文件最大打开数
$ echo "* soft nofile 655360" >> /etc/security/limits.conf
$ echo "* hard nofile 655360" >> /etc/security/limits.conf
$ echo "* soft nproc 655360"  >> /etc/security/limits.conf
$ echo "* hard nproc 655360"  >> /etc/security/limits.conf
$ echo "* soft  memlock  unlimited"  >> /etc/security/limits.conf
$ echo "* hard memlock  unlimited"  >> /etc/security/limits.conf
$ echo "DefaultLimitNOFILE=1024000"  >> /etc/systemd/system.conf
$ echo "DefaultLimitNPROC=1024000"  >> /etc/systemd/system.conf
6.集群节点上安装docker
# 安装依赖包
# yum install -y yum-utils device-mapper-persistent-data lvm2
# 添加docker软件包的yum源
# yum-config-manager --add-repo https://download.docker.com/linux/centos/docker-ce.repo
# 关闭测试版本list(只显示稳定版)
# yum-config-manager --enable docker-ce-edge
# yum-config-manager --enable docker-ce-test
# 更新yum包索引
#  yum makecache fast
# 安装docker
# 直接安装Docker CE
#  yum install docker-ce
# 若需要安装指定版本的Docker CE
# yum list docker-ce --showduplicates|sort -r      #找到需要安装的
# yum install docker-ce-18.06.0.ce -y
#启动docker
# systemctl start docker & systemctl enable docker


#配置docker 使用阿里云加速
#vi /etc/docker/daemon.json
{
 "registry-mirrors": ["https://q2hy3fzi.mirror.aliyuncs.com"]
}
#systemctl daemon-reload && systemctl restart docker
7. 配置节点间ssh互信
配置ssh互信,那么节点之间就能无密访问,方便日后执行自动化部署
# ssh-keygen     # 每台机器执行这个命令, 一路回车即可
# ssh-copy-id  node      # 到master上拷贝公钥到其他节点,这里需要输入 yes和密码
8.先来认识一下青云的kubesphere
官网地址: https://kubesphere.com.cn/
KubeSphere 是在 Kubernetes 之上构建的面向云原生应用的 容器混合云,支持多云与多集群管理,提供全栈的 IT 自动化运维的能力,简化企业的 DevOps 工作流。
KubeSphere 提供了运维友好的向导式操作界面,帮助企业快速构建一个强大和功能丰富的容器云平台。
KubeSphere 愿景是打造一个基于 Kubernetes 的云原生分布式操作系统,它的架构可以很方便地与云原生生态进行即插即用(plug-and-play)的集成。

9.配置高可用负载均衡节点(在两个lb节点执行)
在两个lb 节点上分别安装haproxy 和 keepalived
#yum install haproxy -y
#systemctl restart haproxy && systemctl enable haproxy
#修改haproxy 的配置文件
# cat /etc/haproxy/haproxy.cfg
#---------------------------------------------------------------------
# Example configuration for a possible web application. See the
# full configuration options online.
#
# http://haproxy.1wt.eu/download/1.4/doc/configuration.txt
#
#---------------------------------------------------------------------
#---------------------------------------------------------------------
# Global settings
#---------------------------------------------------------------------
global
# to have these messages end up in /var/log/haproxy.log you will
# need to:
#
# 1) configure syslog to accept network log events. This is done
# by adding the '-r' option to the SYSLOGD_OPTIONS in
# /etc/sysconfig/syslog
#
# 2) configure local2 events to go to the /var/log/haproxy.log
# file. A line like the following can be added to
# /etc/sysconfig/syslog
#
# local2.* /var/log/haproxy.log
#
log 127.0.0.1 local2
chroot /var/lib/haproxy
pidfile /var/run/haproxy.pid
maxconn 4000
user haproxy
group haproxy
daemon
# turn on stats unix socket
stats socket /var/lib/haproxy/stats
listen stats
mode http
bind 0.0.0.0:9000
stats enable
stats hide-version
stats uri /
stats realm Haproxy\ Statistics
stats admin if TRUE #启用管理功能
stats hide-version
stats refresh 30s
#---------------------------------------------------------------------
# common defaults that all the 'listen' and 'backend' sections will
# use if not designated in their block
#---------------------------------------------------------------------
defaults
log global
option httplog
option dontlognull
timeout connect 5000
timeout client 5000
timeout server 5000
#---------------------------------------------------------------------
# main frontend which proxys to the backends
#---------------------------------------------------------------------
frontend kube-apiserver
bind *:6443
mode tcp
option tcplog
default_backend kube-apiserver
#---------------------------------------------------------------------
# static backend for serving up images, stylesheets and such
#---------------------------------------------------------------------
backend kube-apiserver
mode tcp
option tcplog
balance roundrobin
default-server inter 10s downinter 5s rise 2 fall 2 slowstart 60s maxconn 250 maxqueue 256 weight 100
server kube-apiserver-1 192.168.26.4:6443 check
server kube-apiserver-2 192.168.26.5:6443 check
server kube-apiserver-3 192.168.26.6:6443 check
#---------------------------------------------------------------------
# round robin balancing between the various backends
#---------------------------------------------------------------------
frontend ingress-http
bind *:80
default_backend ingress-http
mode tcp
option tcplog
backend ingress-http
balance source
mode tcp
server master1 192.168.26.4:30880 check
server master2 192.168.26.5:30880 check
server master3 192.168.26.6:30880 check
#重启haproxy服务
#yum install keepalived -y
#systemctl restart keepalived && systemctl enable keepalived
修改keepalived 的 配置文件:
主节点的配置为:
[root@lb1 ~]# cat /etc/keepalived/keepalived.conf
global_defs {
notification_email {
}
router_id LVS_DEVEL02
vrrp_skip_check_adv_addr
vrrp_garp_interval 0
vrrp_gna_interval 0
}
vrrp_script chk_haproxy {
script "killall -0 haproxy"
interval 2
weight 2
}
vrrp_instance haproxy-vip {
state BACKUP
priority 90
interface eth0
virtual_router_id 60
advert_int 1
authentication {
auth_type PASS
auth_pass 1111
}
unicast_src_ip 192.168.26.2
unicast_peer {
192.168.26.3
}
virtual_ipaddress {
192.168.26.1/20
}
track_script {
chk_haproxy
}
}
[root@lb1 ~]#
#备节点的配置为:
[root@lb2 ~]# cat /etc/keepalived/keepalived.conf
global_defs {
notification_email {
}
smtp_connect_timeout 30
router_id LVS_DEVEL01
vrrp_skip_check_adv_addr
vrrp_garp_interval 0
vrrp_gna_interval 0
}
vrrp_script chk_haproxy {
script "killall -0 haproxy"
interval 2
weight 2
}
vrrp_instance haproxy-vip {
state MASTER
priority 100
interface eth0
virtual_router_id 60
advert_int 1
authentication {
auth_type PASS
auth_pass 1111
}
unicast_src_ip 192.168.26.3
unicast_peer {
192.168.26.2
}
virtual_ipaddress {
#vip
192.168.26.1/20
}
track_script {
chk_haproxy
}
}
[root@lb2 ~]#
#重启两个节点的keepalived
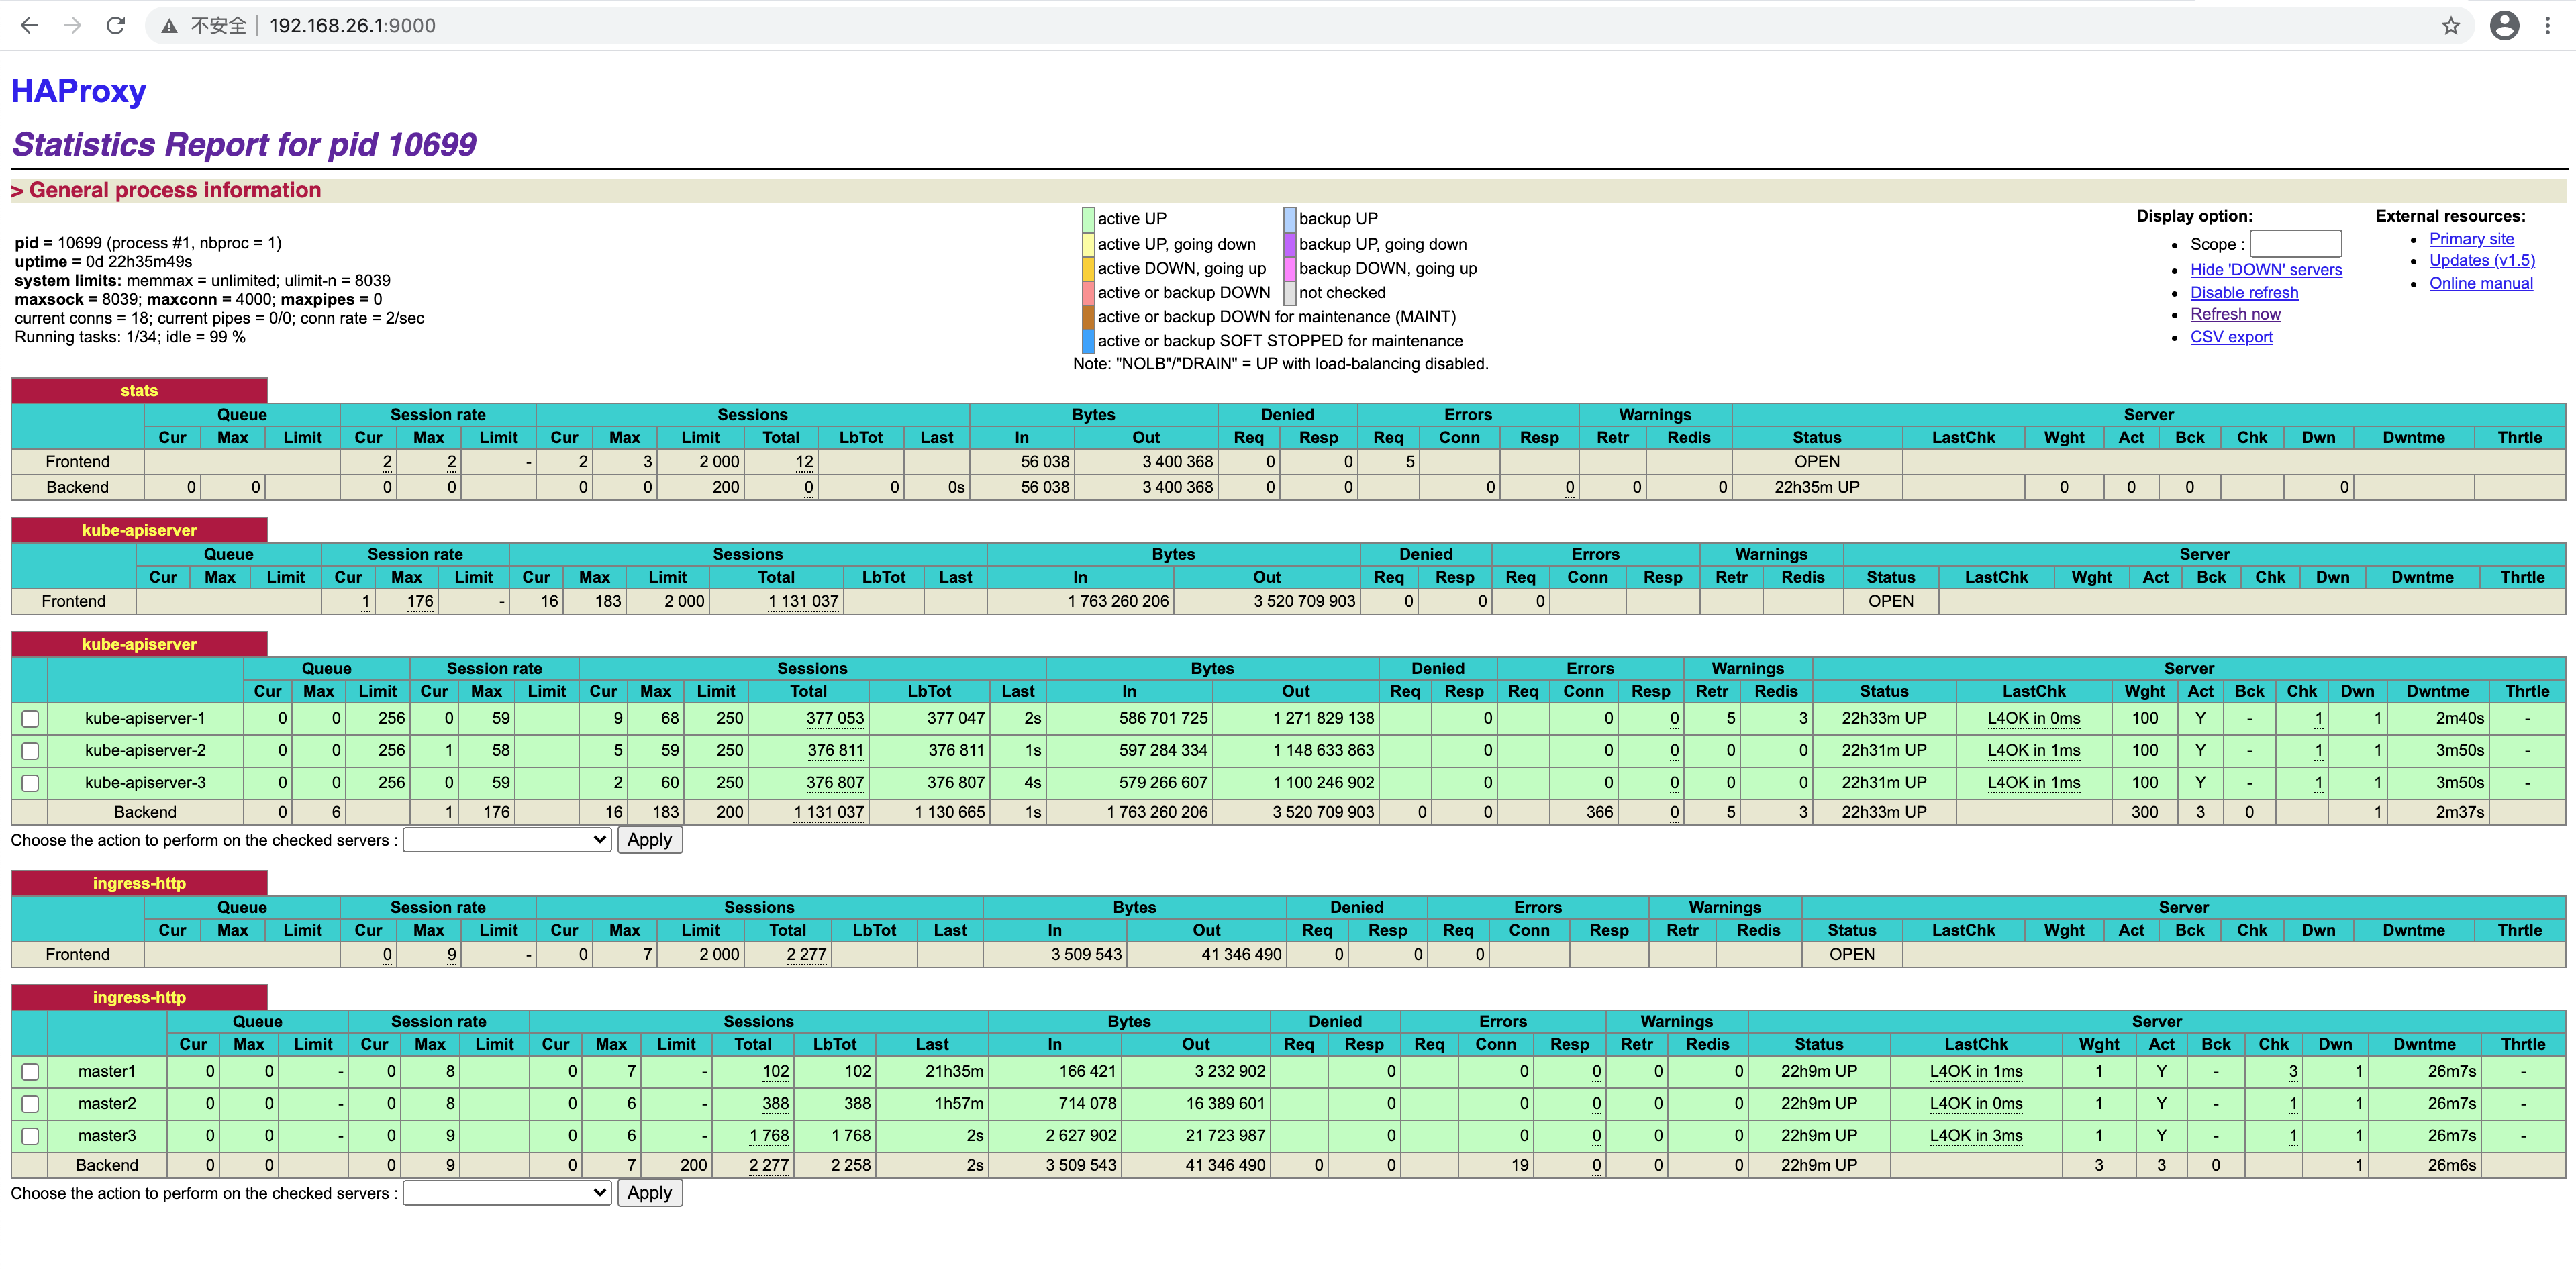
#打开浏览器访问haproxy 的监控信息
#http://192.168.26.1:9000/ 我的截图是后截的,默认负载到后端是红色的。
10.开始部署青云KubeSphere 容器平台(在master01 三操作)
从 v3.0.0 开始,KubeSphere 将基于 ansible 的安装程序更改为使用 Go 语言开发的名为 KubeKey 的新安装程序。使用 KubeKey,可以轻松、高效、灵活地单独或整体安装 Kubernetes 和 KubeSphere。
有三种情况可以使用 KubeKey。
1.仅安装 Kubernetes
2.用一个命令中安装 Kubernetes 和 KubeSphere
3.首先安装 Kubernetes,然后使用 ks-installer 在其上部署 KubeSphere
重要提示:Kubekey 将会帮您安装 Kubernetes,若已有 Kubernetes 集群请参考 在 Kubernetes 之上安装 KubeSphere。
优势
1.基于 Ansible 的安装程序具有大量软件依赖性,例如 Python。KubeKey 是使用 Go 语言开发的,可以消除在各种环境中出现的问题,从而提高安装成功率。
2.KubeKey 使用 Kubeadm 在节点上尽可能多地并行安装 K8s 集群,以降低安装复杂性并提高效率。与较早的安装程序相比,它将大大节省安装时间。
3.KubeKey 支持将群集从 all-in-one 扩展到多节点群集甚至 HA 集群。
4.KubeKey 旨在将群集当作一个对象操作,即 CaaO。
支持的环境
Linux 发行版 Ubuntu 16.04, 18.04 Debian Buster, Stretch CentOS/RHEL 7 SUSE Linux Enterprise Server 15
Kubernetes 版本
v1.15: v1.15.12
v1.16: v1.16.13
v1.17: v1.17.9 (默认)
v1.18: v1.18.6
注意: KubeSphere目前暂不支持运行在k8s 1.19.x之上。
最低资源要求(仅对于最小安装 KubeSphere):
2 核虚拟 CPU 4 GB 内存 20 GB 储存空间
/var/lib/docker 主要用于存储容器数据,在使用和操作过程中会逐渐增大。对于生产环境,建议 /var/lib/docker 单独挂盘。
操作系统要求:
1.SSH 可以访问所有节点。
2.所有节点的时间同步。
3.sudo/curl/openssl 应在所有节点使用。
4.docker 可以自己安装,也可以通过 KubeKey 安装。
5.Red Hat 在其 Linux 发行版本中包括了SELinux,建议关闭SELinux或者将SELinux的模式切换为Permissive[宽容]工作模式
7.建议您的操作系统环境足够干净 (不安装任何其他软件),否则可能会发生冲突。
8.如果在从 dockerhub.io 下载镜像时遇到问题,建议准备一个容器镜像仓库 (加速器)。为 Docker 守护程序配置镜像加速。
9.默认情况下,KubeKey 将安装 OpenEBS 来为开发和测试环境配置 LocalPV,这对新用户来说非常方便。对于生产,请使用 NFS/Ceph/GlusterFS 或商业化存储作为持久化存储,并在所有节点中安装相关的客户端 。
10.如果遇到拷贝时报权限问题Permission denied,建议优先考虑查看SELinux的原因。
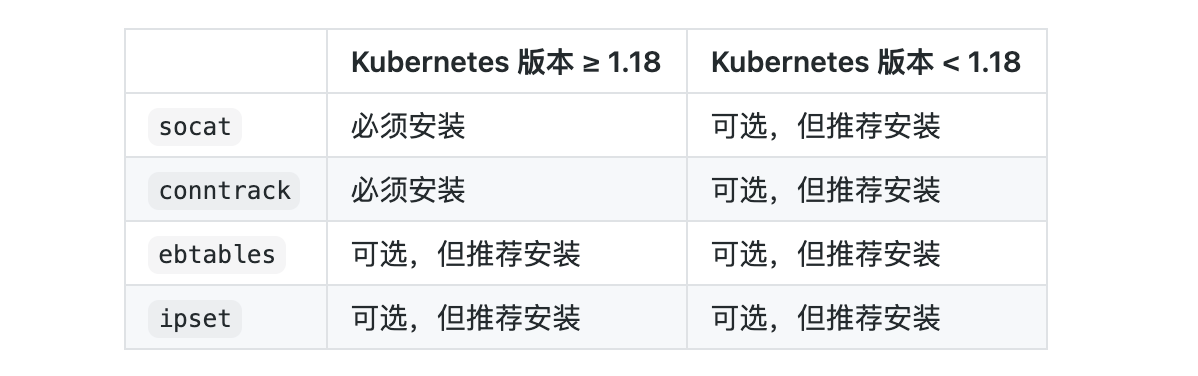
依赖要求:
KubeKey 可以同时安装 Kubernetes 和 KubeSphere。根据 KubeSphere 所安装版本的不同,您所需要安装的依赖可能也不同。请参考以下表格查看您是否需要提前在节点上安装有关的依赖。
网络和 DNS 要求:
确保 /etc/resolv.conf 中的 DNS 地址可用。否则,可能会导致群集中出现某些 DNS 问题。
如果您的网络配置使用防火墙或安全组,则必须确保基础结构组件可以通过特定端口相互通信。建议您关闭防火墙或遵循链接配置:网络访问。
获取安装程序可执行文件
# yum install -y git
# git clone https://github.com/kubesphere/kubekey.git
#cd  kubekey-1.0.1
#./build.sh  -p

注意:
#在构建之前,需要先安装 Docker。
#如果无法访问  https://proxy.golang.org/ ,比如在大陆,请执行 build.sh -p
创建集群
这里我们使用高级用法:
#mkdir   /root/kubekey-1.0.1/myfolder/
#cd  /root/ kubekey-1.0.1
#./output/kk create config --with-kubesphere -f /root/kubekey-1.0.1/myfolder/config.yaml
创建出来的文件可按照如下的模版修改:

apiVersion: kubekey.kubesphere.io/v1alpha1
kind: Cluster
metadata:
  name: kubesphere
spec:
  hosts:
  - {name: master01, address: 192.168.26.4, internalAddress: 192.168.26.4, user: root, password: hcy3R0vs0rHhibnfgLvr}
  - {name: master02, address: 192.168.26.5, internalAddress: 192.168.26.5, user: root, password: hcy3R0vs0rHhibnfgLvr}
  - {name: master03, address: 192.168.26.6, internalAddress: 192.168.26.6, user: root, password: hcy3R0vs0rHhibnfgLvr}
  roleGroups:
    etcd:
    - master01
    - master02
    - master03
    master:
    - master01
    - master02
    - master03
    worker:
    - master01
    - master02
    - master03
  controlPlaneEndpoint:
    domain: kubesphere.alauda.cn
    address: "192.168.26.1"
    port: "6443"
  kubernetes:
    version: v1.17.9
    imageRepo: kubesphere
    clusterName: cluster.local
  network:
    plugin: calico
    kubePodsCIDR: 10.233.64.0/18
    kubeServiceCIDR: 10.233.0.0/18
  registry:
    registryMirrors: []
    insecureRegistries: []
  addons: []

---
apiVersion: installer.kubesphere.io/v1alpha1
kind: ClusterConfiguration
metadata:
  name: ks-installer
  namespace: kubesphere-system
  labels:
    version: v3.0.0
spec:
  local_registry: ""
  persistence:
    storageClass: ""
  authentication:
    jwtSecret: ""
  etcd:
    monitoring: true
    endpointIps: 192.168.26.4,192.168.26.5,192.168.26.6
    port: 2379
    tlsEnable: true
  common:
    es:
      elasticsearchDataVolumeSize: 20Gi
      elasticsearchMasterVolumeSize: 4Gi
      elkPrefix: logstash
      logMaxAge: 7
    mysqlVolumeSize: 20Gi
    minioVolumeSize: 20Gi
    etcdVolumeSize: 20Gi
    openldapVolumeSize: 2Gi
    redisVolumSize: 2Gi
  console:
    enableMultiLogin: false  # enable/disable multi login
    port: 30880
  alerting:
    enabled: true
  auditing:
    enabled: true
  devops:
    enabled: true
    jenkinsMemoryLim: 2Gi
    jenkinsMemoryReq: 1500Mi
    jenkinsVolumeSize: 8Gi
    jenkinsJavaOpts_Xms: 512m
    jenkinsJavaOpts_Xmx: 512m
    jenkinsJavaOpts_MaxRAM: 2g
  events:
    enabled: true
    ruler:
      enabled: true
      replicas: 2
  logging:
    enabled: true
    logsidecarReplicas: 2
  metrics_server:
    enabled: true
  monitoring:
    prometheusMemoryRequest: 400Mi
    prometheusVolumeSize: 20Gi
  multicluster:
    clusterRole: none  # host | member | none
  networkpolicy:
    enabled: true
  notification:
    enabled: true
  openpitrix:
    enabled: true
  servicemesh:
    enabled: true


#注意: 由于 Kubernetes 暂不支持大写 NodeName, worker 节点名中包含大写字母将导致后续安装过程无法正常结束
#当指定安装KubeSphere时,要求集群中有可用的持久化存储。默认使用localVolume,如果需要使用其他持久化存储,请参阅 addons 配置。


#使用配置文件创建集群。
#./output/kk create cluster -f /root/kubekey-1.0.1/myfolder/config.yaml

#使用如下命令可查看部署日志
# kubectl logs -n kubesphere-system $(kubectl get pod -n kubesphere-system -l app=ks-install -o jsonpath='{.items[0].metadata.name}') -f

#当出现如下的日志时候就代表已经部署完成了。(保存图片中的登录的地址,用户名和密码,默认为Account: admin    Password: P@88w0rd)

11.启用 kubectl 自动补全
KubeKey 不会启用 kubectl 自动补全功能。请参阅下面的指南并将其打开:
先决条件:确保已安装 bash-autocompletion 并可以正常工作。

# 安装 bash-completion
yum -y  install bash-completion

# 将 completion 脚本添加到你的 ~/.bashrc 文件
echo 'source <(kubectl completion bash)' >>~/.bashrc

# 将 completion 脚本添加到 /etc/bash_completion.d 目录
kubectl completion bash >/etc/bash_completion.d/kubectl
**12.登录青云KubeSphere 容器平台 **
#浏览器打开: http://kubesphere.alauda.cn/ 使用 Account: admin Password: P@88w0rd 进行登录。


 浙公网安备 33010602011771号