Spring之IOC(容器,控制反转)
1、IOC(容器)
什么是容器?容器是一种为某种特定组件的运行提供必要支持的一个软件环境。例如,Tomcat就是一个Servlet容器,它可以为Servlet的运行提供运行环境。通常来说,使用容器运行组件,除了提供一个组件运行环境之外,容器还提供了许多底层服务。例如,Servlet容器底层实现了TCP连接,解析HTTP协议等非常复杂的服务,如果没有容器来提供这些服务,我们就无法编写像Servlet这样代码简单,功能强大的组件。
Spring的核心就是提供了一个IoC容器,它可以管理所有轻量级的JavaBean组件,提供的底层服务包括组件的生命周期管理、配置和组装服务、AOP支持,以及建立在AOP基础上的声明式事务服务等。
1.1、IOC的基本介绍
Spring提供的容器又称为IoC容器,IoC全称Inversion of Control,直译为控制反转。IOC 是面向对象编程中的一种设计原则,可以用来减低代码之间的耦合度。在 spring 中,控制反转把对象创建和对象之间的调用过程,交给 spring 进行管理,减低了代码的耦合度。
谁控制谁,控制什么:传统Java SE程序设计,我们直接在对象内部通过new进行创建对象,是程序主动去创建依赖对象;而IoC是有专门一个容器来创建这些对象,即由Ioc容器来控制对象的创建;谁控制谁?当然是IoC 容器控制了对象;控制什么?那就是主要控制了外部资源获取(不只是对象包括比如文件等)。
为何是反转,哪些方面反转了:有反转就有正转,传统应用程序是由我们自己在对象中主动控制去直接获取依赖对象,也就是正转;而反转则是由容器来帮忙创建及注入依赖对象;为何是反转?因为由容器帮我们查找及注入依赖对象,对象只是被动的接受依赖对象,所以是反转;哪些方面反转了?依赖对象的获取被反转了。
在IoC模式下,控制权发生了反转,即从应用程序转移到了IoC容器,所有组件不再由应用程序自己创建和配置,而是由IoC容器负责,这样,应用程序只需要直接使用已经创建好并且配置好的组件。
用图例说明一下,传统程序设计如图2-1,都是主动去创建相关对象然后再组合起来:
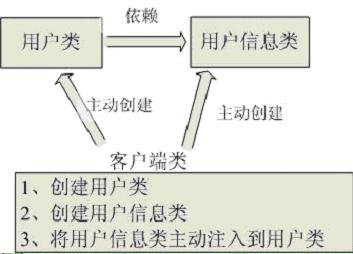
当有了IoC/DI的容器后,在客户端类中不再主动去创建这些对象了,如图2-2所示:

IoC不是一种技术,只是一种思想,一个重要的面向对象编程的法则,它能指导我们如何设计出松耦合、更优良的程序。传统应用程序都是由我们在类内部主动创建依赖对象,从而导致类与类之间高耦合,难于测试;有了IoC容器后,把创建和查找依赖对象的控制权交给了容器,由容器进行注入组合对象,所以对象与对象之间是松散耦合,这样也方便测试,利于功能复用,更重要的是使得程序的整个体系结构变得非常灵活。
参考:https://www.cnblogs.com/NancyStartOnce/p/6813162.html
1.2、IOC的基本使用
下载完 sprig 解压文件后可以看到很多jar 包,将 spring 所必需的四个包和 commons-logging 包导入项目当中:

spring 框架依赖的jar包有 commons-logging,如果不添加的话会报错。
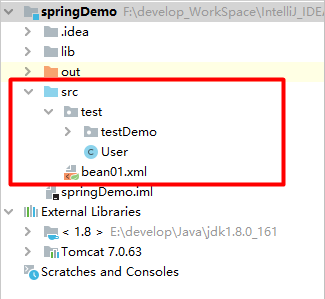
先编写一个简单的 User 类,然后在 src 目录下新建一个spring的配置文件即 xml 文件,该配置文件可自定义,比如 bean01.xml。
User 类:

- package test;
- public class User {
- public void add() {
- System.out.println("add。。。");
- }
- }
spring 配置文件 bean01.xml 如下,class 里面写的是完整类名。
- <?xml version="1.0" encoding="UTF-8"?>
- <beans xmlns="http://www.springframework.org/schema/beans"
- xmlns:xsi="http://www.w3.org/2001/XMLSchema-instance"
- xsi:schemaLocation="http://www.springframework.org/schema/beans http://www.springframework.org/schema/beans/spring-beans.xsd">
- <!-- 配置创建的对象-->
- <bean id="user" class="test.User"></bean>
- </beans>
然后就可以随便建一个测试类来进行测试:
- package test.testDemo;
- import org.springframework.context.ApplicationContext;
- import org.springframework.context.support.ClassPathXmlApplicationContext;
- import test.User;
- public class Test01 {
- public static void main(String[] args) {
- //加载spring配置文件,并创建了配置文件中配置的类的实例对象)
- ApplicationContext context = new ClassPathXmlApplicationContext("bean01.xml");
- //获取bean,即配置创建的对象
- User user = (User) context.getBean("user"); //getBean()方法里面的参数是 xml 配置文件中的bean节点的id
//调用- user.add();
- }
- }
执行上面代码可以看到输出 User 类中的 add() 方法。
默认情况下,通过 bean 获取到的实例对象是单例的,即多次通过 getBean() 方法获取同一个 bean 时(在不同配置文件中,即使 bean 标签的 class 指向的是同一个类,也不是同一个bean,此时创建的不是同一个实例对象),获取到的实例对象实际上都是同一个对象。
1.3、IOC底层原理
原理:通过解析 xml 配置文件获取类名,然后通过反射来创建该类的一个实例对象并返回。
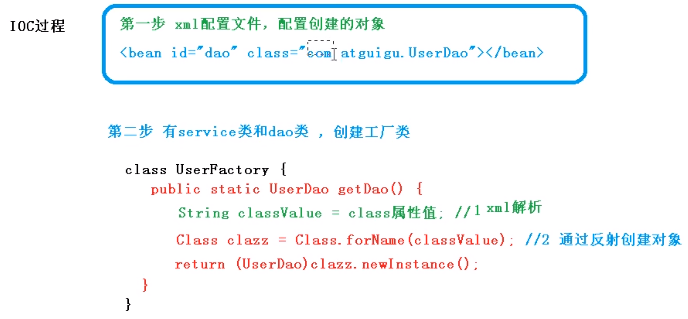
如果后面类发生了改变,比如类名改了,只需修改配置文件即可,所以大大降低了耦合度。(因为如果是传统程序,类名发生修改,在所有引用到该类的地方都需要进行修改)
2、Spring 中Bean相关基本介绍
在 Spring 框架中,Bean 是由 Spring IoC(Inversion of Control,控制反转)容器管理的对象。Spring 容器负责创建、初始化、配置和销毁这些 Bean。一个 Java 类只要被 Spring 容器管理,就可以被称为 Spring Bean。
(只要是一个普通的 Java 类,Spring 就可以对其进行管理,并不要求该类严格遵循 JavaBean 规范。)
2.1、spring对于bean的操作
bean 管理指的是两个操作:
- spring 创建对象
- spring 注入属性
IoC又称为依赖注入(DI:Dependency Injection),依赖注入就是注入属性,注入属性是在创建对象的基础之上完成的,先创建对象,实际上是然后再注入属性。
bean 实现上述两个操作有两种方式:
- 基于xml配置文件方式实现
- 基于注解方式实现
Spring 的 IoC 容器同时支持属性注入和构造方法注入,并允许混合使用。
在设计上,Spring的IoC容器是一个高度可扩展的无侵入容器。所谓无侵入,是指应用程序的组件无需实现Spring的特定接口,或者说,组件根本不知道自己在Spring的容器中运行。这种无侵入的设计有以下好处:
- 应用程序组件既可以在Spring的IoC容器中运行,也可以自己编写代码自行组装配置;
- 测试的时候并不依赖Spring容器,可单独进行测试,大大提高了开发效率。
2.2、FactoryBean(工厂bean)
在普通的 bean 当中,class属性指的是什么类,则取到的就是该类的实例对象。但通过 FactoryBean 我们可以自定义 bean 的创建过程,包括自定义返回的类、是否单例、bean的类型。
定义一个工厂 bean,MyBean.java如下,可以看到,实际返回的是 User bean:
- package test;
- import org.springframework.beans.factory.FactoryBean;
- public class Mybean implements FactoryBean {
- @Override
- public User getObject() throws Exception { //实际返回的对象实例
- User user = new User();
- return user;
- }
- @Override
- public Class<?> getObjectType() { //Bean的类型
- return null;
- }
- @Override
- public boolean isSingleton() { //是否为单例,true为单例,false为非单例
- return false;
- }
- }
配置文件:
- <?xml version="1.0" encoding="UTF-8"?>
- <beans xmlns="http://www.springframework.org/schema/beans"
- xmlns:xsi="http://www.w3.org/2001/XMLSchema-instance"
- xsi:schemaLocation="http://www.springframework.org/schema/beans http://www.springframework.org/schema/beans/spring-beans.xsd">
- <bean id="mybean" class="test.Mybean"></bean>
- </beans>
测试代码:
定义FactoryBean后,Spring创建的Bean实际上是这个FactoryBean的getObject()方法返回的Bean。
- package test.testDemo;
- import dao.UserDao;
- import dao.impl.UserDaoImpl;
- import org.springframework.context.ApplicationContext;
- import org.springframework.context.support.ClassPathXmlApplicationContext;
- import service.UserService;
- import service.impl.UserServiceImpl;
- import test.Mybean;
- import test.User;
- import test.User02;
- public class Test01 {
- public static void main(String[] args) {
- //加载spring配置文件
- ApplicationContext context = new ClassPathXmlApplicationContext("bean04.xml");
- //获取配置创建的对象,实际将返回User类实例。这里的 getBean() 方法要同时写上 id 和类.class,否则可能报错
- User user = context.getBean("mybean", User.class);
- user.setName("wen");
- System.out.println(user);
- }
- }
2.3、bean的作用域(作用范围)
bean 的作用域可以理解为 bean 的作用范围。Spring3 中为 Bean 定义了5种作用域,分别为 singleton(单例,默认值)、prototype、request、session 和 global session。

2.3.1、singleton作用域(单例,默认值)
singleton:单例模式,Singleton 作用域是Spring 中的默认作用域。在单例模式下,多次通过 getBean() 方法获取同一个 bean 时,获取到的实例对象实际上都是同一个对象。在不同配置文件中,即使 bean 标签的 class 指向的是同一个类,也不是同一个bean,此时创建的不是同一个实例对象。在同一个配置文件中,指向的是不同的class,也不会是同一个实例对象。
Singleton 是单例类型,在加载配置文件时即创建 bean 对象,不管你是否使用,他都存在了,每次获取到的对象都是同一个对象。
该模式在多线程下是不安全的。Singleton 作用域是Spring 中的缺省作用域,也可以显示的将 Bean 定义为 singleton 模式,配置为:
- <bean id="..." class="..." scope="singleton"></bean>
2.3.1、prototype作用域
prototype:原型模式,多实例。在每次通过 Spring 容器获取 prototype 定义的 bean 时,容器都会创建一个新的 Bean 实例,每个 Bean 实例都有自己的属性和状态。跟单例 singleton 不同, singleton 全局只有一个对象。
- <bean id="SingletonBean" class="com.spring.demo.SingletonBean" scope="prototype"></bean>
2.4、bean的生命周期
bean 的生命周期,即 bean 从创建到销毁的过程。
bean 的生命周期如下:
- 实例化。通过构造器创建 bean 实例
- 属性赋值。设置 bean 的属性(依赖注入)
- 调用后置处理器的 postProcessBeforeInitialization() 方法(需在 xml 中配置后置处理器,跟配置一个bean一样,class指向后置处理器即可。后置处理器实际上就是一个实现了BeanPostProcessor接口的类)
- 初始化。调用 bean 标签 init-method 指定的类的方法,init-method 指定的方法由类定义,可进行一些初始化操作(需手动配置)。初始化完成后 bean 就可以使用了
- 调用后置处理器的 postProcessAfterInitialization() 方法
- 销毁。当容器关闭时,调用 bean 标签 destroy-method 指定的类的方法,destroy-method 指定的方法由类定义。(可调用ApplicationContextObj.close()方法来手动销毁bean)
3、IOC创建对象
3.1、基于XML配置文件创建对象
在spring配置文件中,使用 bean 标签就可以实现对象的创建。如下:
- <bean id="user" class="test.User"></bean>
基于 xml 配置文件创建对象时,默认情况下是执行该类的无参数构造函数来创建对象的,所以如果该类没有无参构造函数程序将会报错。
bean 标签常见属性:
- id:给该类指定一个唯一标识。每个
<bean ...>都有一个id标识,相当于Bean的唯一ID。 - class:类的完整类名
3.2、注解方式创建对象(@Component、@Service、@Controller、@Repository)
使用Spring的IoC容器,实际上就是通过类似XML这样的配置文件,把我们自己的Bean的依赖关系描述出来,然后让容器来创建并装配Bean。一旦容器初始化完毕,我们就直接从容器中获取Bean使用它们。使用XML配置的优点是所有的Bean都能一目了然地列出来,并通过配置注入能直观地看到每个Bean的依赖。它的缺点是写起来非常繁琐,每增加一个组件,就必须把新的Bean配置到XML中。我们可以使用注解的方式进行配置,让Spring自动扫描Bean并组装它们。
spring 针对 bean 管理中创建对象提供了四种注解:
- @Component
- @Service 业务层
- @Controller web层
- @Repository 持久层
创建对象有四种注解,但目前来说,这四个注解的功能都是一样的。只是建议 @Service 用在业务层,@Controller 用在 web 层,@Repository 用在持久层,但并不是强制的,可以混用。有四个注解只是为了后续的版本当中进行功能扩展 。
使用注解创建对象:
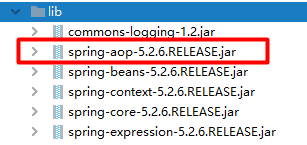
先导入依赖包,除了 spring 的几个基本包外,还需要导入 aop 包:
然后需要开启组件扫描。开启组件扫描需要先引入命名空间,然后就可以使用 <context:component-scan base-package="要扫描的包路径"></context:component-scan> 标签开启组件扫描:
- <?xml version="1.0" encoding="UTF-8"?>
- <beans xmlns="http://www.springframework.org/schema/beans"
- xmlns:xsi="http://www.w3.org/2001/XMLSchema-instance"
- xmlns:context="http://www.springframework.org/schema/context"
- xsi:schemaLocation="http://www.springframework.org/schema/beans http://www.springframework.org/schema/beans/spring-beans.xsd
- http://www.springframework.org/schema/context http://www.springframework.org/schema/context/spring-context.xsd">
- <!--开启组件扫描。base-package写包名,若要扫描多个包,可以用逗号隔开,或者直接写多个包共用的上级目录-->
- <context:component-scan base-package="test, service.impl"></context:component-scan>
- </beans>
开启组件扫描后就可以给类添加注解了,下面的@Component可以换成 @Service等其它的几个注解,效果都一样。
- package test;
- import org.springframework.stereotype.Component;
- //注解里面value属性名及值都可以省略不写,即写成@Compnent,此时bean的id默认是类名首字母小写后的名称
- @Component(value = "user") //相当于<bean id="user" class="完整类名"></bean>
- public class User {
- public void add() {
- System.out.println("add...");
- }
- }
验证,使用bean:
- import org.springframework.context.ApplicationContext;
- import org.springframework.context.support.ClassPathXmlApplicationContext;
- import test.User;
- public class Test {
- public static void main(String[] args) {
- //加载spring配置文件
- ApplicationContext context = new ClassPathXmlApplicationContext("bean01.xml");
- //获取配置创建的对象
- User user = (User) context.getBean("user");
- System.out.println(user);
- user.add();
- }
- }
3.2.1、组件扫描配置
开启组件扫描后,默认情况是配置的包下的所有类、所有注解都会扫描。我们可以配置只扫描哪些注解,或者不扫描哪些注解。
配置只扫描 @Controller 注解,注意,要加上user-default-filters标签:
- <?xml version="1.0" encoding="UTF-8"?>
- <beans xmlns="http://www.springframework.org/schema/beans"
- xmlns:xsi="http://www.w3.org/2001/XMLSchema-instance"
- xmlns:context="http://www.springframework.org/schema/context"
- xsi:schemaLocation="http://www.springframework.org/schema/beans http://www.springframework.org/schema/beans/spring-beans.xsd
- http://www.springframework.org/schema/context http://www.springframework.org/schema/context/spring-context.xsd">
- <context:component-scan base-package="test, service" use-default-filters="false"> <!--use-default-filters表示不使用默认filter-->
- <context:include-filter type="annotation" expression="org.springframework.stereotype.Controller"/>
- </context:component-scan>
- </beans>
配置了只扫描 @Controller 注解后,其他注解将不会被扫描到,如果使用其他注解的 bean 程序将会报错:No bean named 'xxx' available...
配置不扫描@Controller 注解,注意,不能加上user-default-filters标签:
- <?xml version="1.0" encoding="UTF-8"?>
- <beans xmlns="http://www.springframework.org/schema/beans"
- xmlns:xsi="http://www.w3.org/2001/XMLSchema-instance"
- xmlns:context="http://www.springframework.org/schema/context"
- xsi:schemaLocation="http://www.springframework.org/schema/beans http://www.springframework.org/schema/beans/spring-beans.xsd
- http://www.springframework.org/schema/context http://www.springframework.org/schema/context/spring-context.xsd">
- <context:component-scan base-package="test, service">
- <context:exclude-filter type="annotation" expression="org.springframework.stereotype.Controller"/>
- </context:component-scan>
- </beans>
3.2.2、注解配置bean作用域(@Scope())
对于Spring容器来说,当我们把一个Bean标记为添加注解比如@Component后,它就会自动为我们创建一个单例(Singleton),即容器初始化时创建Bean,容器关闭前销毁Bean。在容器运行期间,我们调用getBean(Class)获取到的Bean总是同一个实例。
我们可以通过 @Scope() 注解来配置 bean 的作用域:
比如声明为 prototype 作用域:
- @Component
- @Scope(ConfigurableBeanFactory.SCOPE_PROTOTYPE) // @Scope("prototype")
- public class MailSession {
- ...
- }
4、IOC依赖注入(注入属性)
4.1、基于XML配置文件的依赖注入
我们可以在 xml 文件中直接配置在创建该类的对象时,同时给该类配置属性。
基于 xml 配置文件来注入类属性有两种方式:
- 通过类的 set() 方法注入属性。类似 setName() 等等
- 通过类的有参构造函数注入属性
4.1.1、通过set()方法注入属性(property标签)
我们在类中定义了 setter,就可以在 spring 的配置文件中通过配置直接给该类实例指定属性值。代码示例如下:
User类:
- public class User {
- private String name;
- private int age;
- public String getName() {
- return name;
- }
- public void setName(String name) {
- this.name = name;
- }
- public int getAge() {
- return age;
- }
- public void setAge(int age) {
- this.age = age;
- }
- }
配置文件:
- <?xml version="1.0" encoding="UTF-8"?>
- <beans xmlns="http://www.springframework.org/schema/beans"
- xmlns:xsi="http://www.w3.org/2001/XMLSchema-instance"
- xsi:schemaLocation="http://www.springframework.org/schema/beans http://www.springframework.org/schema/beans/spring-beans.xsd">
- <!-- 配置创建的对象-->
- <bean id="user" class="springtest.User">
- <property name="name" value="wen"></property>
- <property name="age" value="12"></property>
- </bean>
- </beans>
使用上述配置后,在创建 User 类时会自动给该类注入属性。
测试代码:
- package test;
- import org.springframework.context.ApplicationContext;
- import org.springframework.context.support.ClassPathXmlApplicationContext;
- import springtest.User;
- public class test01 {
- public static void main(String[] args) {
- ApplicationContext context = new ClassPathXmlApplicationContext("bean01.xml");
- //获取配置创建的对象
- User user = (User) context.getBean("user");
- System.out.println(user.getName() + user.geAge()); //输出 wen12
- }
- }
4.1.2、通过有参构造函数注入属性(constructor-arg标签)
如果一个类中有有参构造函数,我们就可以通过有参构造来给该类的实例注入属性。当类中有有参构造函数,我们也只能使用有参构造来注入属性,否则将会报错。
代码示例如下:
User 类:
- package springtest;
- public class User {
- private String name;
- private int age;
- public String getName() {
- return name;
- }
- public void setName(String name) {
- this.name = name;
- }
- public int getAge() {
- return age;
- }
- public void setAge(int age) {
- this.age = age;
- }
- //有参构造。定义了有参构造则编译器不会自动创建无参构造,所以配置文件中如果不使用有参构造来注入属性的话程序会报错
- public User(String name, int age) {
- this.name = name;
- this.age = age;
- }
- }
配置文件:
- <?xml version="1.0" encoding="UTF-8"?>
- <beans xmlns="http://www.springframework.org/schema/beans"
- xmlns:xsi="http://www.w3.org/2001/XMLSchema-instance"
- xsi:schemaLocation="http://www.springframework.org/schema/beans http://www.springframework.org/schema/beans/spring-beans.xsd">
- <bean id="user" class="springtest.User">
- <!-- 也可以使用索引的形式 <constructor-arg index="0" value="wen"></constructor-arg> -->
- <constructor-arg name="name" value="wen"></constructor-arg>
- <constructor-arg name="age" value="11"></constructor-arg>
- </bean>
- </beans>
使用上述配置后,在创建 User 类时会自动调用该类的有参构造来给该类注入属性。
测试代码:
- package test;
- import org.springframework.context.ApplicationContext;
- import org.springframework.context.support.ClassPathXmlApplicationContext;
- import springtest.User;
- public class test01 {
- public static void main(String[] args) {
- ApplicationContext context = new ClassPathXmlApplicationContext("bean01.xml");
- //获取配置创建的对象
- User user = (User) context.getBean("user");
- System.out.println(user.getName() + user.geAge()); //输出 wen11
- }
- }
4.1.3、注入外部bean(注入类)
如果注入的属性值是boolean、int、String这样的数据类型,可以通过value注入。如果注入的属性值是类,则可以通过 ref 注入。
示例:
UserServiceImpl 类中有一个 setter 需要设置 userDao 属性为 UserDao 类:
- public class UserServiceImpl implements UserService {
- private UserDao userDao;
- public void setUserDao(UserDao userDao) {
- this.userDao = userDao;
- }
- public void add() {
- this.userDao.add();
- }
- }
在传统程序中,需要调用 setUserDao() 方法来主动将一个 UserDao 类注入。写法如下:
- public class Test01 {
- public static void main(String[] args) {
- UserServiceImpl userServiceImpl = new UserServiceImpl();
- UserDao userDao = new UserDaoImpl();
- userServiceImpl.setUserDao(userDao); //调用 setUserDao 注入UserDao类
- userServiceImpl.add();
- }
- }
使用spring配置文件可以直接将 UserDao bean作为属性注入 UserService当中,实际上相当于调用了 setUserDao() 方法。配置文件如下:
- <?xml version="1.0" encoding="UTF-8"?>
- <beans xmlns="http://www.springframework.org/schema/beans"
- xmlns:xsi="http://www.w3.org/2001/XMLSchema-instance"
- xsi:schemaLocation="http://www.springframework.org/schema/beans http://www.springframework.org/schema/beans/spring-beans.xsd">
- <bean name="userdao" class="dao.impl.UserDaoImpl"></bean>
- <bean name="userservice" class="service.impl.UserServiceImpl">
- <property name="userDao" ref="userdao"></property>
- </bean>
- </beans>
Bean的顺序不重要,Spring根据依赖关系会自动正确初始化。
测试代码:
- package test.testDemo;
- import dao.UserDao;
- import dao.impl.UserDaoImpl;
- import org.springframework.context.ApplicationContext;
- import org.springframework.context.support.ClassPathXmlApplicationContext;
- import service.UserService;
- import service.impl.UserServiceImpl;
- import test.User;
- public class Test01 {
- public static void main(String[] args) {
- //加载spring配置文件
- ApplicationContext context = new ClassPathXmlApplicationContext("bean02.xml");
- UserServiceImpl userServiceImpl = context.getBean(UserServiceImpl.class);
- userServiceImpl.add();
- }
- }
4.1.4、内部bean注入类
上面注入外部bean,实际上就是在外部建一个bean,然后将该bean赋值给 UserService bean的属性。除了上面的写法,我们还可以采用内部bean的写法来将一个类注入给另一个类的属性。
- <?xml version="1.0" encoding="UTF-8"?>
- <beans xmlns="http://www.springframework.org/schema/beans"
- xmlns:xsi="http://www.w3.org/2001/XMLSchema-instance"
- xsi:schemaLocation="http://www.springframework.org/schema/beans http://www.springframework.org/schema/beans/spring-beans.xsd">
- <bean name="userservice" class="service.impl.UserServiceImpl">
- <property name="userDao">
- <bean id="userdao" class="dao.impl.UserDaoImpl"></bean> <!-- 如果该内部bean还需要注入属性,可以再给该内部bean配置property -->
- </property>
- </bean>
- </beans>
4.1.5、注入集合
给类注入集合,示例如下:
- package test;
- import java.util.*;
- public class User02 {
- private String[] myArr;
- private List<String> myList;
- private Set<String> mySet;
- private Map<String, String> myMap;public void setMyArr(String[] myArr) {
- this.myArr = myArr;
- }
- public void setMyList(List<String> myList) {
- this.myList = myList;
- }
- public void setMySet(Set<String> mySet) {
- this.mySet = mySet;
- }
- public void setMyMap(Map<String, String> myMap) {
- this.myMap = myMap;
- }
- }
配置文件:
- <?xml version="1.0" encoding="UTF-8"?>
- <beans xmlns="http://www.springframework.org/schema/beans"
- xmlns:xsi="http://www.w3.org/2001/XMLSchema-instance"
- xsi:schemaLocation="http://www.springframework.org/schema/beans http://www.springframework.org/schema/beans/spring-beans.xsd">
- <bean id="user02" class="test.User02">
- <!-- 给数组注入数据 -->
- <property name="myArr">
- <array>
- <value>AAA</value>
- <value>BBB</value>
- </array>
- </property>
- <!-- 注入 list 集合数据 -->
- <property name="myList">
- <list>
- <value>AAA</value>
- <value>BBB</value>
- </list>
- </property>
- <!-- 注入 set 集合数据 -->
- <property name="mySet">
- <set>
- <value>AAA</value>
- <value>BBB</value>
- </set>
- </property>
- <!-- 注入 Map 数据 -->
- <property name="myMap">
- <map>
- <entry key="testA" value="aaa"></entry>
- <entry key="testB">
- <value>bbb</value>
- </entry>
- </map>
- </property>
- </bean>
- </beans>
上面的集合当中的元素的值都是字符串,如果集合当中的元素是类的话,我们可以使用 ref 标签来注入:
- <?xml version="1.0" encoding="UTF-8"?>
- <beans xmlns="http://www.springframework.org/schema/beans"
- xmlns:xsi="http://www.w3.org/2001/XMLSchema-instance"
- xsi:schemaLocation="http://www.springframework.org/schema/beans http://www.springframework.org/schema/beans/spring-beans.xsd">
- <bean id="user" class="test.User02">
- <!-- myList2集合的元素是User类实例对象 -->
- <property name="myList2">
- <list>
- <ref bean="user01"></ref>
- <ref bean="user02"></ref>
- </list>
- </property>
- </bean>
- <bean id="user01" class="test.User"></bean>
- <bean id="user02" class="test.User"></bean>
- </beans>
上面将集合注入属性只是注入了某个类当中,我们可以把集合提取出来,多个类就可以重用这些集合。
首先我们需要先导入 util 命名空间,util命名空间提供了集合相关的配置,在使用命名空间前要导入util命名空间,如下:
- <?xml version="1.0" encoding="UTF-8"?>
- <beans xmlns="http://www.springframework.org/schema/beans"
- xmlns:xsi="http://www.w3.org/2001/XMLSchema-instance"
- xmlns:util="http://www.springframework.org/schema/util"
- xsi:schemaLocation="http://www.springframework.org/schema/beans http://www.springframework.org/schema/beans/spring-beans.xsd
- http://www.springframework.org/schema/util http://www.springframework.org/schema/util/spring-util-4.1.xsd">
- </beans>
下面提取出一个 List 并在 bean 中注入,代码示例:
- <?xml version="1.0" encoding="UTF-8"?>
- <beans xmlns="http://www.springframework.org/schema/beans"
- xmlns:xsi="http://www.w3.org/2001/XMLSchema-instance"
- xmlns:util="http://www.springframework.org/schema/util"
- xsi:schemaLocation="http://www.springframework.org/schema/beans http://www.springframework.org/schema/beans/spring-beans.xsd
- http://www.springframework.org/schema/util http://www.springframework.org/schema/util/spring-util-4.1.xsd">
- <util:list id="userList">
- <value>张三</value>
- <value>李四</value>
- <value>王五</value>
- </util:list>
- <bean id="user02" class="test.User02">
- <!-- 注入 list 集合数据 -->
- <property name="myList" ref="userList"></property>
- </bean>
- </beans>
4.1.6、注入其它类型值(空值、特殊符号)
注入空值:
- <bean id="user" class="test.User">
- <property name="name">
- <null></null>
- </property>
- <property name="age" value="12"></property>
- </bean>
注入特殊符号:
XML中共有5个特殊的字符,分别是:&<> “’。如果配置文件中的注入值包括这些特殊字符,就需要进行特别处理。
有两种解决方法:
- 采用本例中的<![CDATA[ ]]>特殊标签,将包含特殊字符的字符串封装起来。<![CDATA[ ]]>的作用是让XML解析器将标签中的字符串当作普通的文本对待,以防止某些字符串对XML格式造成破坏。
- 使用XML转义序列表示这些特殊的字符,这5个特殊字符所对应XML转义序列如下:

示例:给 name 属性赋值为 <<wen>>
- <bean id="user" class="test.User">
- <property name="name" value="<<wen>>"></property>
- <property name="age" value="12"></property>
- </bean>
- <bean id="user" class="test.User">
- <property name="name">
- <value><![CDATA[<<wen>>]]></value> <!-- 给name赋值为<<wen>> -->
- </property>
- <property name="age" value="12"></property>
- </bean>
4.1.7、自动装配(autowire)
传统的XML方式配置 Bean 组件都是通过 <property> 标签为Bean的属性注入所需的值,当需要维护的Bean组件及需要注入的属性更多时,势必会增加配置的工作量,这时我们可以使用自动装配。
使用自动装配只需给 bean 标签添加 autowire 属性即可。配置示例:
- <bean id="user" class="test.User" autowire="byName"/>
通过设置<bean>元素的autowire属性指定自动装配,代替了通过<property>标签显示指定Bean的依赖关系。由BeanFactory检查XML配置文件的内容,为Bean自动注入依赖关系。
Spring提供了多种自动装配方式,autowire属性常用的取值如下所示
- no:不使用自动装配。Bean依赖关系必须通过property元素定义。
- byName:根据属性名自动装配。BeanFactory查找容器中的全部Bean,找出 id 与属性的 setter 方法入参匹配的Bean。找到即自动注入,否则什么都不做。
- byType:根据属性类型自动装配。BeanFactory查找容器中的全部Bean,如果正好有一个与依赖属性类型相同的Bean,就自动装配这个属性;但是如果有多个这样的Bean,Spring无法决定注入哪个Bean,就抛出一个致命异常;如果没有匹配的Bean,就什么都不会发生,属性不会被设置。
- constructor:与byType的方式类似,不同之处在于它应用于构造器参数。如果在容器中没有找到与构造器参数类型一致的Bean,那么将会抛出异常
自动装配的局限性:
- 不是所有类型都可以使用自动装配,不能自动装配的数据类型有:Object、基本数据类型(Date、CharSequence、Number、URI、URL、Class、String)等等。因为自动装配是注入了一个bean。
- 自动装配不如显式装配精确,如果可能的话尽量使用显式装配。
实例:
假设 User 类中有一个属性类型为 Animal 类:
- public class User {
- private Animal animal;
- public Animal getAnimal() {
- return animal;
- }
- public void setAnimal(Animal animal) {
- this.animal = animal;
- }
- }
此时我们可以使用自动装配:
- <?xml version="1.0" encoding="UTF-8"?>
- <beans xmlns="http://www.springframework.org/schema/beans"
- xmlns:xsi="http://www.w3.org/2001/XMLSchema-instance"
- xsi:schemaLocation="http://www.springframework.org/schema/beans http://www.springframework.org/schema/beans/spring-beans.xsd">
- <bean id="user" class="test.User" autowire="byName"></bean>
- <bean id="animal" class="test.Animal"></bean>
- </beans>
上面使用 byName 类型的自动装配,id 为animal 的 bean 将匹配到 User 类中的 setter,所以会将 animal 类注入 User 中的 animal 属性当中。(上面配置直接改成byType也可以)
验证代码:
- package UnitDemo;
- import org.springframework.context.ApplicationContext;
- import org.springframework.context.support.ClassPathXmlApplicationContext;
- import test.User;
- import test.User02;
- public class Test {
- public static void main(String[] args) {
- ApplicationContext context2 = new ClassPathXmlApplicationContext("bean01.xml");
- User user = (User) context2.getBean("user");
- user.getAnimal().setName("cat");
- System.out.println(user.getAnimal().getName());
- }
- }
4.1.8、引入properties配置文件
如果配置过多,在一个 xml 文件里面维护可能相对比较困难,这时我们可以在一个 propreties 配置文件中配置一些属性,然后再在 xml 配置文件中引入 propreties 文件的配置。比如可用于连接数据库的配置。
示例:
在项目的 src 目录下建一个 properties 类型文件 jdbc.properties,properties 类型文件的内容是键值对形式。往该文件写入以下内容:
- prop.driverClass=com.mysql.jdbc.Driver
- prop.url=jdbc:mysql://localhost:3306/userDB
- prop.username=root
- prop.password=123456
然后就可以在 xml 配置文件中引入该文件,在引入之前我们需要先写 context 命名空间:
- <?xml version="1.0" encoding="UTF-8"?>
- <beans xmlns="http://www.springframework.org/schema/beans"
- xmlns:xsi="http://www.w3.org/2001/XMLSchema-instance"
- xmlns:context="http://www.springframework.org/schema/context"
- xsi:schemaLocation="http://www.springframework.org/schema/beans http://www.springframework.org/schema/beans/spring-beans.xsd
- http://www.springframework.org/schema/context http://www.springframework.org/schema/context/spring-context.xsd">
- </beans>
最后就可以通过 <context> 标签将 properties 文件引入,并且可以用 ${} 来使用 properties 文件的值:
- <?xml version="1.0" encoding="UTF-8"?>
- <beans xmlns="http://www.springframework.org/schema/beans"
- xmlns:xsi="http://www.w3.org/2001/XMLSchema-instance"
- xmlns:context="http://www.springframework.org/schema/context"
- xsi:schemaLocation="http://www.springframework.org/schema/beans http://www.springframework.org/schema/beans/spring-beans.xsd
- http://www.springframework.org/schema/context http://www.springframework.org/schema/context/spring-context.xsd">
- <!--引入外部属性文件-->
- <context:property-placeholder location="classpath:jdbc.properties"/>
- <bean id="dataSource" class="com.alibaba.druid.pool.DruidDataSource">
- <property name="driverClassName" value="${prop.driverClass}"></property> <!--通过${}使用外部配置文件的值-->
- <property name="url" value="${prop.url}"></property>
- <property name="username" value="${prop.username}"></property>
- <property name="password" value="${prop.password}"></property>
- </bean>
- </beans>
4.2、注解方式依赖注入(@Autowired、@Qualifier、@Resource、@Value)
spring 注解注入属性提供了几种注解:
- @Autowired:根据属性类型进行自动装配,即 byType
- @Qualifier:根据属性名称进行自动装配,即 byName。需要配合@Autowired进行使用,用于在@Autowired匹配到多个类时,指定究竟使用哪个类来进行注入。
- @Resource:既可以根据类型注入,也可以根据名称注入。不指定 name 和 type 则自动按照 byName 方式进行装配,如果没有匹配成功,则回退为一个原始类型进行匹配,如果匹配成功则自动装配。
- @Value:注入基本数据类型数据
使用注解,比如@Autowired,就相当于把指定类型的Bean注入到指定的字段中。和XML配置相比,注解的方式大幅简化了注入,因为它不但可以写在set()方法上,还可以直接写在字段上,甚至可以写在构造方法中。
- @Component
- public class UserService {
- MailService mailService;
- public UserService(@Autowired MailService mailService) {
- this.mailService = mailService;
- }
- ...
- }
4.2.1、@Autowired(根据类型装配)
@Autowired 注解会根据属性类型进行自动装配,即 byType。默认情况下它要求依赖对象必须存在,如果不存在,程序将会报错。但我们也可以设置它的required属性为false,来让它的依赖对象如果允许为 null 值,@Autowired(required = false)
实例:比如在 UserServiceImpl 类中的某个属性注入 UserDaoImpl 类型值。
UserDaoImpl 代码:只需给实现类添加注解即可,接口不能添加注解
- package dao.impl;
- import dao.UserDao;
- import org.springframework.stereotype.Repository;
- @Repository
- public class UserDaoImpl implements UserDao {
- @Override
- public void add() {
- System.out.println("userdaoimpl add...");
- }
- }
UserServiceImpl 代码:
- package service.impl;
- import dao.UserDao;
- import org.springframework.beans.factory.annotation.Autowired;
- import org.springframework.stereotype.Service;
- import service.UserService;
- @Service
- public class UserServiceImpl implements UserService {
- //不需要添加set方法
- @Autowired
- private UserDao userDao;
- @Override
- public void add() {
- System.out.println("userserviceimpl add...");
- userDao.add();
- }
- }
验证代码:
- package UnitDemo;
- import org.springframework.context.ApplicationContext;
- import org.springframework.context.support.ClassPathXmlApplicationContext;
- import service.UserService;
- import test.User;
- public class Test {
- public static void main(String[] args) {
- //加载spring配置文件
- ApplicationContext context = new ClassPathXmlApplicationContext("bean01.xml");
- //获取配置创建的对象
- UserService userService = (UserService) context.getBean("userServiceImpl");
- userService.add(); //将输出 userserviceimpl add... userdaoimpl add...
- }
- }
4.2.2、@Qualifier(通过名称标识唯一类注入@Autowired中)
使用 @Autowired 时,如果某个类有多个实现类,则 spring 无法识别究竟将哪个实现类来进行注入,此时程序将会直接报错。此时我们可以将 @Autowired 和 @Qualifier 搭配使用,@Qualifier 可通过名称来标识究竟使用哪个类来进行注入。
@Qualifier 用法示例:
假设 UserDao 有多个实现类:UserDaoImpl、UserDaoImpl02,UserDaoImpl02代码如下:
- package dao.impl;
- import dao.UserDao;
- import org.springframework.stereotype.Repository;
- @Repository
- public class UserDaoImpl02 implements UserDao {
- @Override
- public void add() {
- System.out.println("userdaoimpl02 add...");
- }
- }
此时如果我们直接使用 @Autowired 程序将会直接报错,因为 spring 无法识别究竟使用哪个类来进行注入。所以我们可以使用 @Qualifier("bean标识") 来指定究竟使用哪个类来进行注入:
- package service.impl;
- import dao.UserDao;
- import org.springframework.beans.factory.annotation.Autowired;
- import org.springframework.beans.factory.annotation.Qualifier;
- import org.springframework.stereotype.Service;
- import service.UserService;
- @Service
- public class UserServiceImpl implements UserService {
- @Autowired
- @Qualifier("userDaoImpl02")
- private UserDao userDao;
- @Override
- public void add() {
- System.out.println("userserviceimpl add...");
- userDao.add();
- }
- }
验证代码:
- package UnitDemo;
- import org.springframework.context.ApplicationContext;
- import org.springframework.context.support.ClassPathXmlApplicationContext;
- import service.UserService;
- import test.User;
- public class Test {
- public static void main(String[] args) {
- //加载spring配置文件
- ApplicationContext context = new ClassPathXmlApplicationContext("bean01.xml");
- //获取配置创建的对象
- UserService userService = (UserService) context.getBean("userServiceImpl");
- userService.add(); //将输出 userserviceimpl add... userdaoimpl02 add...
- }
- }
4.2.3、@Resource(byType、byName)
匹配规则:
- 如果指定了name,则从上下文中查找名称(id)匹配的bean进行装配,找不到则抛出异常。
- 如果指定了type,则从上下文中找到类似匹配的唯一bean进行装配,找不到或是找到多个,都会抛出异常。
- 如果同时指定了name和type,则从Spring上下文中找到唯一匹配的bean进行装配,找不到则抛出异常。
- 如果既没有指定name,又没有指定type,则自动按照byName方式进行装配;如果没有匹配,则回退为一个原始类型进行匹配,如果匹配则自动装配。
UserDaoImpl02 实现类:
- package dao.impl;
- import dao.UserDao;
- import org.springframework.stereotype.Repository;
- @Repository
- public class UserDaoImpl02 implements UserDao {
- @Override
- public void add() {
- System.out.println("userdaoimpl02 add...");
- }
- }
UserServiceImpl 实现类:
- package service.impl;
- import dao.UserDao;
- import org.springframework.stereotype.Service;
- import service.UserService;
- import javax.annotation.Resource;
- @Service
- public class UserServiceImpl implements UserService {
- @Resource(name = "userDaoImpl02")
- private UserDao userDao;
- @Override
- public void add() {
- System.out.println("userserviceimpl add...");
- userDao.add();
- }
- }
验证代码:
- package UnitDemo;
- import org.springframework.context.ApplicationContext;
- import org.springframework.context.support.ClassPathXmlApplicationContext;
- import service.UserService;
- import test.User;
- public class Test {
- public static void main(String[] args) {
- //加载spring配置文件
- ApplicationContext context = new ClassPathXmlApplicationContext("bean01.xml");
- //获取配置创建的对象
- UserService userService = (UserService) context.getBean("userServiceImpl");
- userService.add(); //将输出 userserviceimpl add... userdaoimpl02 add...
- }
- }
4.2.4、@Value(注入基本数据类型)
@Value 注解即注入一个基本类型数据。
- import org.springframework.beans.factory.annotation.Value;
- import org.springframework.stereotype.Component;
- @Component(value = "user")
- public class User {
- @Value(value = "wen")
- private String name;
- public void showName() {
- System.out.println(this.name);
- }
- }
验证代码:
- package UnitDemo;
- import org.springframework.context.ApplicationContext;
- import org.springframework.context.support.ClassPathXmlApplicationContext;
- import service.UserService;
- import test.User;
- public class Test {
- public static void main(String[] args) {
- //加载spring配置文件
- ApplicationContext context = new ClassPathXmlApplicationContext("bean01.xml");
- //获取配置创建的对象
- User user = (User) context.getBean("user");
- user.showName(); //输出 wen
- }
- }
4.2.5、注入list
有些时候,我们会有一系列接口相同,不同实现类的Bean。例如,注册用户时,我们要对email、password和name这3个变量进行验证。为了便于扩展,我们先定义验证接口:
- public interface Validator {
- void validate(String email, String password, String name);
- }
然后,分别使用3个Validator对用户参数进行验证:
- @Component
- public class EmailValidator implements Validator {
- public void validate(String email, String password, String name) {
- if (!email.matches("^[a-z0-9]+\\@[a-z0-9]+\\.[a-z]{2,10}$")) {
- throw new IllegalArgumentException("invalid email: " + email);
- }
- }
- }
- @Component
- public class PasswordValidator implements Validator {
- public void validate(String email, String password, String name) {
- if (!password.matches("^.{6,20}$")) {
- throw new IllegalArgumentException("invalid password");
- }
- }
- }
- @Component
- public class NameValidator implements Validator {
- public void validate(String email, String password, String name) {
- if (name == null || name.isBlank() || name.length() > 20) {
- throw new IllegalArgumentException("invalid name: " + name);
- }
- }
- }
最后,我们通过一个Validators作为入口进行验证:
- @Component
- public class Validators {
- @Autowired
- List<Validator> validators;
- public void validate(String email, String password, String name) {
- for (var validator : this.validators) {
- validator.validate(email, password, name);
- }
- }
- }
注意到Validators被注入了一个List<Validator>,Spring会自动把所有类型为Validator的Bean装配为一个List注入进来,这样一来,我们每新增一个Validator类型,就自动被Spring装配到Validators中了,非常方便。
因为Spring是通过扫描classpath获取到所有的Bean,而List是有序的,要指定List中Bean的顺序,可以加上@Order注解:
- @Component
- @Order(1)
- public class EmailValidator implements Validator {
- ...
- }
- @Component
- @Order(2)
- public class PasswordValidator implements Validator {
- ...
- }
- @Component
- @Order(3)
- public class NameValidator implements Validator {
- ...
- }
4.2.5、初始化和销毁
有些时候,一个Bean在注入必要的依赖后,需要进行初始化(监听消息等)。在容器关闭时,有时候还需要清理资源(关闭连接池等)。我们通常会定义一个init()方法进行初始化,定义一个shutdown()方法进行清理,然后,引入JSR-250定义的Annotation:
在Bean的初始化和清理方法上标记@PostConstruct和@PreDestroy:
- @Component
- public class MailService {
- @Autowired(required = false)
- ZoneId zoneId = ZoneId.systemDefault();
- @PostConstruct
- public void init() {
- System.out.println("Init mail service with zoneId = " + this.zoneId);
- }
- @PreDestroy
- public void shutdown() {
- System.out.println("Shutdown mail service");
- }
- }
Spring容器会对上述Bean做如下初始化流程:
- 调用构造方法创建
MailService实例; - 根据
@Autowired进行注入; - 调用标记有
@PostConstruct的init()方法进行初始化。
而销毁时,容器会首先调用标记有@PreDestroy的shutdown()方法。Spring只会根据注解查找无参数方法,对方法名不作要求。
4.2.6、完全注解开发(@Configuration)
我们可以通过 spring 配置类来实现完全注解开发,即不需要 xml 配置文件。
用 @Configuration 注解来新建配置类,比如命名为 SpringConfig,以此替代 xml 配置文件:
- import org.springframework.context.annotation.ComponentScan;
- import org.springframework.context.annotation.Configuration;
- @Configuration
- @ComponentScan(basePackages = {"test", "dao", "service"}) //指定 spring 在初始化容器时要扫描的包。作用和在 spring 的 xml 配置文件中的<context:component-scan base-package=“org.woster”/>是一样的。
- public class SpringConfig {
- }
使用@ComponentScan来告诉容器需要扫描的包,如果不指定参数,即只有@ComponentScan,则会自动搜索当前配置类所在的包以及子包。
使用配置类获取 ApplicationContext 对象的语法跟使用配置文件的不太一样,除此之外,其他情况都一样:
- package UnitDemo;
- import org.springframework.context.ApplicationContext;
- import org.springframework.context.annotation.AnnotationConfigApplicationContext;
- import test.SpringConfig;
- import test.User;
- public class Test {
- public static void main(String[] args) {
- ApplicationContext context = new AnnotationConfigApplicationContext(SpringConfig.class);
- User user = (User) context.getBean("user");
- user.showName();
- }
- }


【推荐】国内首个AI IDE,深度理解中文开发场景,立即下载体验Trae
【推荐】编程新体验,更懂你的AI,立即体验豆包MarsCode编程助手
【推荐】抖音旗下AI助手豆包,你的智能百科全书,全免费不限次数
【推荐】轻量又高性能的 SSH 工具 IShell:AI 加持,快人一步
· 阿里最新开源QwQ-32B,效果媲美deepseek-r1满血版,部署成本又又又降低了!
· Manus重磅发布:全球首款通用AI代理技术深度解析与实战指南
· 开源Multi-agent AI智能体框架aevatar.ai,欢迎大家贡献代码
· 被坑几百块钱后,我竟然真的恢复了删除的微信聊天记录!
· AI技术革命,工作效率10个最佳AI工具
2019-03-31 JS一些概念知识及参考链接
2019-03-31 CSS中浮动属性float及清除浮动
2019-03-31 前端一些概念知识及参考链接