vue的使用总结(3)
1、动态组件
代码示例:

component 直接绑定全局组件的组件名:

- <body>
- <div id="dynamic-component-demo" class="demo">
- <button v-for="tab in tabs" v-bind:key="tab" v-bind:class="['tab-button', { active: currentTab === tab }]"
- v-on:click="currentTab = tab">
- {{ tab }}
- </button>
- <component v-bind:is="currentTabComponent" class="tab"></component>
- </div>
- <script>
- Vue.component("tab-home", {
- template: "<div>Home component</div>"
- });
- Vue.component("tab-posts", {
- template: "<div>Posts component</div>"
- });
- Vue.component("tab-archive", {
- template: "<div>Archive component</div>"
- });
- new Vue({
- el: "#dynamic-component-demo",
- data: {
- currentTab: "Home",
- tabs: ["Home", "Posts", "Archive"]
- },
- computed: {
- currentTabComponent: function () {
- return "tab-" + this.currentTab.toLowerCase();
- }
- }
- });
- </script>
- </body>
或者 component 也可以绑定组件选项对象,而不是组件名:
- <body>
- <div id="dynamic-component-demo" class="demo">
- <button v-for="tab in tabs" v-bind:key="tab.name"
- v-bind:class="['tab-button', { active: currentTab.name === tab.name }]" v-on:click="currentTab = tab">
- {{ tab.name }}
- </button>
- <component v-bind:is="currentTab.component" class="tab"></component>
- </div>
- <script>
- var tabs = [
- {
- name: "Home",
- component: {
- template: "<div>Home component</div>"
- }
- },
- {
- name: "Posts",
- component: {
- template: "<div>Posts component</div>"
- }
- },
- {
- name: "Archive",
- component: {
- template: "<div>Archive component</div>"
- }
- }
- ];
- new Vue({
- el: "#dynamic-component-demo",
- data: {
- tabs: tabs,
- currentTab: tabs[0]
- }
- });
- </script>
- </body>
1.1、缓存动态组件(keep-alive)
在使用动态组件时,组件切换后再切换回来,该组件之前的状态并不会被保存起来。在每次切换渲染不同组件的时候,Vue 都会重新创建一个该组价的新实例。
有时候在切换后,我们希望重新切换回该组件时,该组件仍能维持切换之前的状态。比如一开始渲染的是 A 组件,并且在 A 组件中选中了某个表单,此时从 A 组件切换到 B 组件,然后再切换回 A 组件时,我们希望 A 组件的表单仍保持切换之前的状态,而不是恢复到初始状态。要想保持组件的状态,我们可以使用 <keep-alive> 标签来包裹动态组件,实现对组件的缓存:
- <!-- 失活的组件将会被缓存!-->
- <keep-alive>
- <component v-bind:is="currentTabComponent"></component>
- </keep-alive>
注意 <keep-alive> 要求被切换到的组件都有自己的名字,不论是通过组件的 name 选项还是局部/全局注册。
2、异步组件(按需加载)
官方文档:https://cn.vuejs.org/v2/guide/components-dynamic-async.html
在单页应用中,如果没有应用懒加载,运用webpack打包后的文件将会异常的大(此时通常只有一个JS文件),造成进入首页时,需要加载的内容过大,延时过长,不利于用户体验,而运用懒加载则可以将页面进行划分,需要的时候加载页面,可以有效的分担首页所承担的加载压力,减少首页加载用时。
Vue 允许我们以一个工厂函数的方式来定义组件,这个工厂函数会异步解析你的组件定义。并且 vue 只有在这个组件需要被渲染的时候才会触发该工厂函数,且会把结果缓存起来供未来重渲染。
- Vue.component('async-example', function (resolve, reject) {
- setTimeout(function () {
- // 向 `resolve` 回调传递组件定义
- resolve({
- template: '<div>I am async!</div>'
- })
- }, 1000)
- })
- //将异步组件和 webpack 的 code-splitting 功能一起配合使用:
- Vue.component('async-webpack-example', function (resolve) {
- // 这个特殊的 `require` 语法将会告诉 webpack自动将你的构建代码切割成多个包,这些包会通过 Ajax 请求加载
- require(['./my-async-component'], resolve)
- })
- //把 webpack 2 和 ES2015 语法加在一起,我们可以这样使用动态导入:
- Vue.component(
- 'async-webpack-example',
- // 这个动态导入会返回一个 `Promise` 对象。
- () => import('./my-async-component')
- )
- //当使用局部注册的时候,你也可以直接提供一个返回 Promise 的函数:
- new Vue({
- // ...
- components: {
- 'my-component': () => import('./my-async-component')
- }
- })
在 vue 中实现按需加载非常简单,只要将平常的导入组件的方式改一下就行。
- //一般的导入方式
- import componentA from './componentA.js'
异步懒加载导入方式有多种:
- //使用() => import()
- const componentA = () => import ('/componentA.js')
- //使用resolve => require([’’], resolve)
- const componentA = resolve => require([’./componentA.js’], resolve)
- //webpack提供的require.ensure
- require.ensure([’./componentA.js’], () => { resolve(require(’./componentA.js’)) }, ‘tab0’)
- //除了导入方式不同以外,其他地方的使用,比如注册等,都是一样的
- components: {
- componentA
- }
或者也可以使用Webpack 的内置语句: import(*).then(),在有需要时才调用该方法进行导入。比如在某个 tabs 的 change 事件触发时才加载某个组件:

- import('./xxx/index.vue').then(item => {
- Vue.component('my-comp', item.default)
- })
- //上面的路径可以由字符串变量拼接,但不能只是一个字符串变量构成组件的路径。
- //下面写法正常:
- let url = demo/demo.vue
- import(`./modules/${url}`).then(item => {
- Vue.component('my-comp', item.default)
- })
- //这种写法会报错:
- let url = demo/demo.vue
- import(url).then(item => {
- Vue.component('my-comp', item.default)
- })
下面将演示使用resolve => require([’’], resolve) 的方法来实现懒加载,跟使用其他函数来实现的代码是一样的,只是导入时的函数不一样而已。
2.1、使用resolve => require(['xxx.vue'], resolve)实现按需加载
创建一个项目,组件目录:Helloworld 组件是首页,在 HelloWord 中引入加载 item01 组件,在 item01 组件中引入加载 item02 组件。
1、使用普通的引入方式:
- //HelloWord.vue 中的代码
- <template>
- <div class="hello">
- <h3>this is HelloWorld</h3>
- <template v-if="showItem">
- <Item01></Item01>
- </template>
- <button @click="toggleItem">切换</button>
- </div>
- </template>
- import Item01 from './Item01.vue'
- export default {
- name: 'HelloWorld',
- data () {
- return {
- showItem: false
- }
- },
- components: {
- Item01
- },
- methods: {
- toggleItem () {
- this.showItem = !this.showItem;
- }
- }
- }
- //Item01.vue 中的代码
- <template>
- <div>
- <h3>this is item01</h3>
- <Item02></Item02>
- </div>
- </template>
- import Item02 from './Item02.vue'
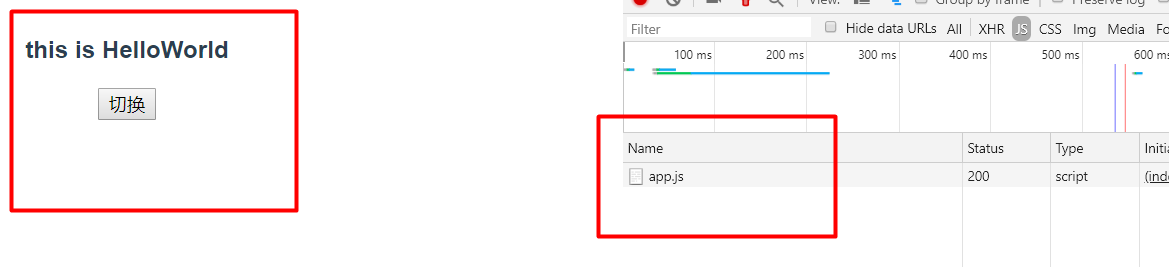
运行项目:

点击切换按钮,显示 item01、item02 组件:

可以看到,加载的 JS 文件并没有任何变化,即没有新加载 JS 文件。可以看到 item01和 item02 组件都被打包到了 app.js 文件中,所有的组件 JS 代码都被打包到了一个文件中,这会导致该文件过大,影响加载速度。
2、使用按需加载的方式:
- //HelloWord.vue 中的代码
- <template>
- <div class="hello">
- <h3>this is HelloWorld</h3>
- <template v-if="showItem">
- <Item01></Item01>
- </template>
- <button @click="toggleItem">切换</button>
- </div>
- </template>
- const Item01 = resolve => require(['./Item01'],resolve) //按需加载 item01 组件
- export default {
- name: 'HelloWorld',
- data () {
- return {
- showItem: false
- }
- },
- components: {
- Item01
- },
- methods: {
- toggleItem () {
- this.showItem = !this.showItem;
- }
- }
- }
- //Item01.vue 中的代码
- <template>
- <div>
- <h3>this is item01</h3>
- <Item02></Item02>
- </div>
- </template>
- const Item02 = resolve => require(['./Item02'],resolve) //按需加载 item02 组件
运行项目:
点击切换按钮,显示 item01、item02 组件:
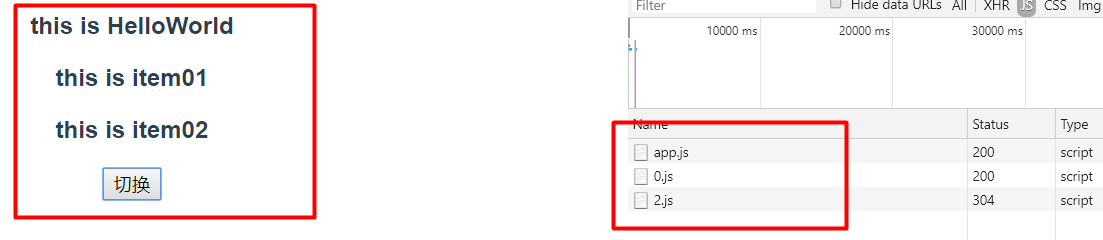
可以看到,一开始没有显示 item01、item02 组件时,浏览器只加载了 app.js 文件。当点击按钮显示 item01、item02 组件后,开始依次加载 item01、item02打包后的 JS 文件。
通过按需加载,webpack 会帮我们将需要按需加载的组件跟一开始需要加载的 JS 文件分离开,当需要加载的时候再加载。按需加载只是改变掉加载组件的方式而已,webpack 会自动帮我们实现按需加载。
利用此特性,我们便能做很多针对前端的优化。比如:将页面核心功能(音、视频播放、文章、商品等等)打包成一个核心模块,通过框架优先加载。其他的一些周边功能打包后,通过服务器异步加载,从而解决业务需求越来越多导致的系统难维护、访问慢问题。
参考:https://segmentfault.com/a/1190000012138052,
其它实现按需加载的引入方法可以参考:https://blog.csdn.net/scarlett_dream/article/details/83756392、https://segmentfault.com/a/1190000011519350
3、使用渲染函数render定义组件
一般我们都会使用模板 template 来定义组件,但有时候使用 template 可能比较繁琐,这时候我们可以使用 render 函数来定义组件。
示例:
使用 template 定义组件:
- //注册组件
- Vue.component('anchored-heading', {
- template: `
- <div>
- <h1 v-if="level === 1">
- <slot></slot>
- </h1>
- <h2 v-else-if="level === 2">
- <slot></slot>
- </h2>
- <h3 v-else-if="level === 3">
- <slot></slot>
- </h3>
- </div>
- `,
- props: {
- level: {
- type: Number,
- required: true
- }
- }
- })
可以看到,上面的判断条件比较多,使用 template 时代码比较冗余。
此时我们可以使用 render 函数来定义组件:
- Vue.component('anchored-heading', {
- render: function (createElement) {
- return createElement(
- 'h' + this.level, // 标签名称
- this.$slots.default // 子节点数组。默认插槽
- )
- },
- props: {
- level: {
- type: Number,
- required: true
- }
- }
- })
createElement 返回的不是一个实际的 DOM 元素,它返回的是虚拟节点。更准确的名字可能是 createNodeDescription,因为它所包含的信息会告诉 Vue 页面上需要渲染什么样的节点,包括及其子节点的描述信息。我们把这样的节点描述为“虚拟节点 (virtual node)”,也常简写它为“VNode”。“虚拟 DOM”是我们对由 Vue 组件树建立起来的整个 VNode 树的称呼。
3.1、creatElement() 函数
createElement() 函数接受三个参数,第一个参数指定了最外围的元素,第二个参数可选,用来指定模板中的选项对象,第三个参数指定最外围元素的子元素。
- Vue.component('anchored-heading', {
- render: function (createElement) {
- return createElement( // @returns {VNode}
- // {String | Object | Function}
- // 一个 HTML 标签名、组件选项对象,或者
- // resolve 了上述任何一种的一个 async 函数。必填项。
- 'div',
- // {Object}
- // 一个与模板中 attribute 对应的数据对象。可选。
- {},
- // {String | Array}
- // 子级虚拟节点 (VNodes),由 `createElement()` 构建而成,
- // 也可以使用字符串来生成“文本虚拟节点”。可选。
- [
- '可以插入文字',
- createElement('h1', '一则头条'),
- createElement(MyComponent, {
- props: {
- someProp: 'foobar'
- }
- })
- ]
- )
- }
- })
数据对象中定义组件的一些选项:
- {
- // 与 `v-bind:class` 的 API 相同,
- // 接受一个字符串、对象或字符串和对象组成的数组
- 'class': {
- foo: true,
- bar: false
- },
- // 与 `v-bind:style` 的 API 相同,
- // 接受一个字符串、对象,或对象组成的数组
- style: {
- color: 'red',
- fontSize: '14px'
- },
- // 普通的 HTML attribute
- attrs: {
- id: 'foo'
- },
- // 组件 prop
- props: {
- myProp: 'bar'
- },
- // DOM property
- domProps: {
- innerHTML: 'baz'
- },
- // 事件监听器在 `on` 内,
- // 但不再支持如 `v-on:keyup.enter` 这样的修饰器。
- // 需要在处理函数中手动检查 keyCode。
- on: {
- click: this.clickHandler
- },
- // 仅用于组件,用于监听原生事件,而不是组件内部使用
- // `vm.$emit` 触发的事件。
- nativeOn: {
- click: this.nativeClickHandler
- },
- // 自定义指令。注意,你无法对 `binding` 中的 `oldValue`
- // 赋值,因为 Vue 已经自动为你进行了同步。
- directives: [
- {
- name: 'my-custom-directive',
- value: '2',
- expression: '1 + 1',
- arg: 'foo',
- modifiers: {
- bar: true
- }
- }
- ],
- // 作用域插槽的格式为
- // { name: props => VNode | Array<VNode> }
- scopedSlots: {
- default: props => createElement('span', props.text)
- },
- // 如果组件是其它组件的子组件,需为插槽指定名称
- slot: 'name-of-slot',
- // 其它特殊顶层 property
- key: 'myKey',
- ref: 'myRef',
- // 如果你在渲染函数中给多个元素都应用了相同的 ref 名,
- // 那么 `$refs.myRef` 会变成一个数组。
- refInFor: true
- }
3.2、使用 JSX 语法
使用 render() 函数写起来很复杂,我们可以使用 JSX 语法,这样写起来就比较简单:
- import AnchoredHeading from './AnchoredHeading.vue'
- new Vue({
- el: '#demo',
- render: function (h) {
- return (
- <AnchoredHeading level={1}>
- <span>Hello</span> world!
- </AnchoredHeading>
- )
- }
- })
- //上面对应的模板如下:
- <anchored-heading :level="1">
- <span>Hello</span> world!
- </anchored-heading>
3.3、函数式组件
我们可以将组件标记为 functional,这意味它无状态 (没有响应式数据),也没有实例 (没有 this 上下文)。
示例:
- Vue.component('my-component', {
- functional: true,
- // Props 是可选的
- props: {
- // ...
- },
- // 为了弥补缺少的实例
- // 提供第二个参数作为上下文
- render: function (createElement, context) {
- // ...
- }
- })
注意:在 2.3.0 之前的版本中,如果一个函数式组件想要接收 prop,则 props 选项是必须的。在 2.3.0 或以上的版本中,你可以省略 props 选项,所有组件上的 attribute 都会被自动隐式解析为 prop。
4、keep-alive组件
keep-alive是vue的内置组件,能在组件切换过程中将状态保留在内存中,相当于缓存,防止DOM的重复渲染。
keep-alive有三个属性:include(只有名字匹配的才会被缓存)、exclude(任何名字匹配的都不会被缓存)、max(最多可以缓存多少个组件)。
在路由router的中:相应组件下规定meta属性,定义keep-alive:true
源码实现方面:可以结合Vue组件实例加载顺序讲解,VNode -> 实例化 -> _updata -> 真实Node,在实例化的时候会判断该组件是否被 keep-alive 保存过,是的话则直接拿其中的DOM进行渲染。
5、服务端器渲染和客户端渲染
5.1、服务器端渲染(SSR,server side render)
服务器端渲染:DOM树在服务端生成,然后返回给前端。实际上指的就是页面内容通过后端直接返回,相当于是前后端不分离,由后端直接返回页面内容。
实现方式:传统的JSP、express+react、express+ejs、vue+nuxt。比如可以通过 express 启动一个后端服务器,然后通过接口直接返回 html 内容,示例可参考:https://cp_fe.gitee.io/course-advance/#/vue-advance/03ssr
服务器端渲染只是通过服务器返回了一串字符串,浏览器直接显示该字符串而已,此时就会有一些问题,比如给元素绑定的事件不生效,vue一些特性不生效等问题,解决该问题的方法是将服务器端返回的字符串作为代码在客户端再重新执行一遍。
从头搭建这么一个服务端渲染的应用是相当复杂的,我们可以使用 Nuxt.js 框架来进行服务器端渲染的开发。nuxt.js 是一套使用vue框架开发应用的服务端渲染框架,提供了开箱即用的功能。
5.2、客户端渲染(CSR,client side render)
客户端渲染指的是后端只提供json格式的数据,渲染成什么样子由客户端通过js控制,也就是平常使用的前后端分离框架。
5.3、服务器端渲染和客户端渲染的对比
主要对比就是首屏时间、SEO优化、开发效率。
服务端渲染的优点:
- 首屏时间短。因为页面由服务器端返回,浏览器压力小,所以耗时少,速度快。
- 有利于SEO优化,因为在后端有完整的html页面,所以爬虫更容易爬取信息。
服务端渲染的缺点:
- 不利于前后端分离,开发的效率降低了。
- 对html的解析,对前端来说加快了速度,但是加大了服务器的压力。
客户端渲染的优点:
- 前后端分离,开发效率高。
- 用户体验更好,我们将网站做成SPA(单页面应用)或者部分内容做成SPA,当用户点击时,不会形成频繁的跳转。
客户端渲染的缺点:
- 首屏时间长。前端响应速度慢,特别是首屏,这样用户是受不了的。
- 不利于SEO优化,因为爬虫不认识SPA,所以它只是记录了一个页面。


【推荐】国内首个AI IDE,深度理解中文开发场景,立即下载体验Trae
【推荐】编程新体验,更懂你的AI,立即体验豆包MarsCode编程助手
【推荐】抖音旗下AI助手豆包,你的智能百科全书,全免费不限次数
【推荐】轻量又高性能的 SSH 工具 IShell:AI 加持,快人一步
· Linux系列:如何用heaptrack跟踪.NET程序的非托管内存泄露
· 开发者必知的日志记录最佳实践
· SQL Server 2025 AI相关能力初探
· Linux系列:如何用 C#调用 C方法造成内存泄露
· AI与.NET技术实操系列(二):开始使用ML.NET
· 被坑几百块钱后,我竟然真的恢复了删除的微信聊天记录!
· 没有Manus邀请码?试试免邀请码的MGX或者开源的OpenManus吧
· 【自荐】一款简洁、开源的在线白板工具 Drawnix
· 园子的第一款AI主题卫衣上架——"HELLO! HOW CAN I ASSIST YOU TODAY
· Docker 太简单,K8s 太复杂?w7panel 让容器管理更轻松!