Canvas学习笔记
慕课网视频《 炫丽的倒计时效果Canvas绘图与动画基础 》&《 Canvas绘图详解 》笔记
↑老师讲的很好,不过语速很慢,二倍速刚好。
基础知识
通过 <canvas></canvas> 即可创建一个canvas。
<canvas id="canvas" style="..."></canvas>
<canvas id="canvas" width="1024" height="768"></canvas>
不建议直接使用css的方式指定大小。css指定的是显示的大小,通过height和width指定的是显示的大小以及分辨率的大小。
JavaScript中指定canvas宽高。
var canvas = document.getElementById('canvas');

canvas.width = 1024;
canvas.height = 768;
canvas 绘图主要通过 canvas.getContext 的获得的上下文的 api 实现。
var context = canvas.getContext('2d'); // 获得绘图上下文环境
canvas坐标轴 :左上角为原点,向右为x轴,向下为y轴。
canvas 是基于状态的绘图。
context.beginPath();
context.moveTo(100, 100);
context.lineTo(700, 700);
context.lineTo(100, 700);
context.lineTo(100, 100);
context.closePath();

context.fillStyle = 'rgb(233, 233, 233)';
context.fill();

context.lineWidth = 5;
context.strokeStyle = '#123456';

context.stroke();

context.beginPath();
context.moveTo(200, 100);
context.lineTo(700, 600);
context.strokeStyle = 'black';
context.stroke();
moveTo(x,y) 画笔移到(x,y)。
lineTo(x,y) 从当前点到(x,y)画一条。
stroke() 把当前的路径绘制出来,但并不会清空当前状态(也就是说下一次调用stroke之前绘制的会再次被绘制)。
fill() 如果路径不是封闭的,会把路径首尾相连。
beginPath() 开始一段新的路径,也就是说,此后再次调用stroke()的时候,之前的线条不会被重新绘制。同时清空当前坐标。(紧接着的lineTo()相当于moveTo())
closePath() 结束一段路径。如果路径没有封闭,就将路径首尾连接起来。
context.lineWidth, context.strokeStyle 设置绘制线条宽度和样式。
context.fillStyle 设置填充样式。
绘制圆和弧
context.arc(
    centerX, centerY, radius,   // 圆心、半径
    startAngle, endAngle,       // 起始角度、结束角度(水平向右为 0°
    anticlockwise = false       // 是都逆时针 默认为false
)
// 例
context.arc(300, 300, 200, 0, 1.5 * Math.PI, true);
通过 canvas 制作动画
通过定时器不断更新状态重新绘制
setInterval(
    function() {
        render();
        update();
    },
    50
)
清空指定区域 clearRect(x1, y1, x2, y2);
画一个七巧板

<!DOCTYPE html>
<html lang="en">
<head>
    <meta charset="UTF-8">
    <title>Document</title>
</head>
<body>
    <canvas id="canvas" width="1024" height="768" style="border:1px solid #aaa; display: block;">
    </canvas>

    <script>
        var tangram = [
            {p:[{x:0,y:0},{x:800,y:0},{x:400,y:400}],color:"green"},
            {p:[{x:0,y:0},{x:400,y:400},{x:0,y:800}],color:"red"},
            {p:[{x:800,y:0},{x:800,y:400},{x:600,y:600},{x:600,y:200}],color:"yellow"},
            {p:[{x:600,y:200},{x:600,y:600},{x:400,y:400}],color:"blue"},
            {p:[{x:400,y:400},{x:600,y:600},{x:400,y:800},{x:200,y:600}],color:"pink"},
            {p:[{x:200,y:600},{x:400,y:800},{x:0,y:800}],color:"black"},
            {p:[{x:800,y:400},{x:800,y:800},{x:400,y:800}],color:"gray"}
        ];

        window.onload = function() {
            var canvas = document.getElementById('canvas');
            var context = canvas.getContext('2d');
            for (var i = 0; i < tangram.length; i++) {
                draw(tangram[i], context);
            }
        }

        function draw(piece, ctx) {
            ctx.beginPath();
            ctx.moveTo(piece.p[0].x, piece.p[0].y);
            for (var i = 1; i < piece.p.length; i++) {
                ctx.lineTo(piece.p[i].x, piece.p[i].y);
            }
            ctx.closePath();
            ctx.fillStyle = piece.color;
            ctx.fill();
        }
    </script>
</body>
</html>
绚丽的倒计时效果
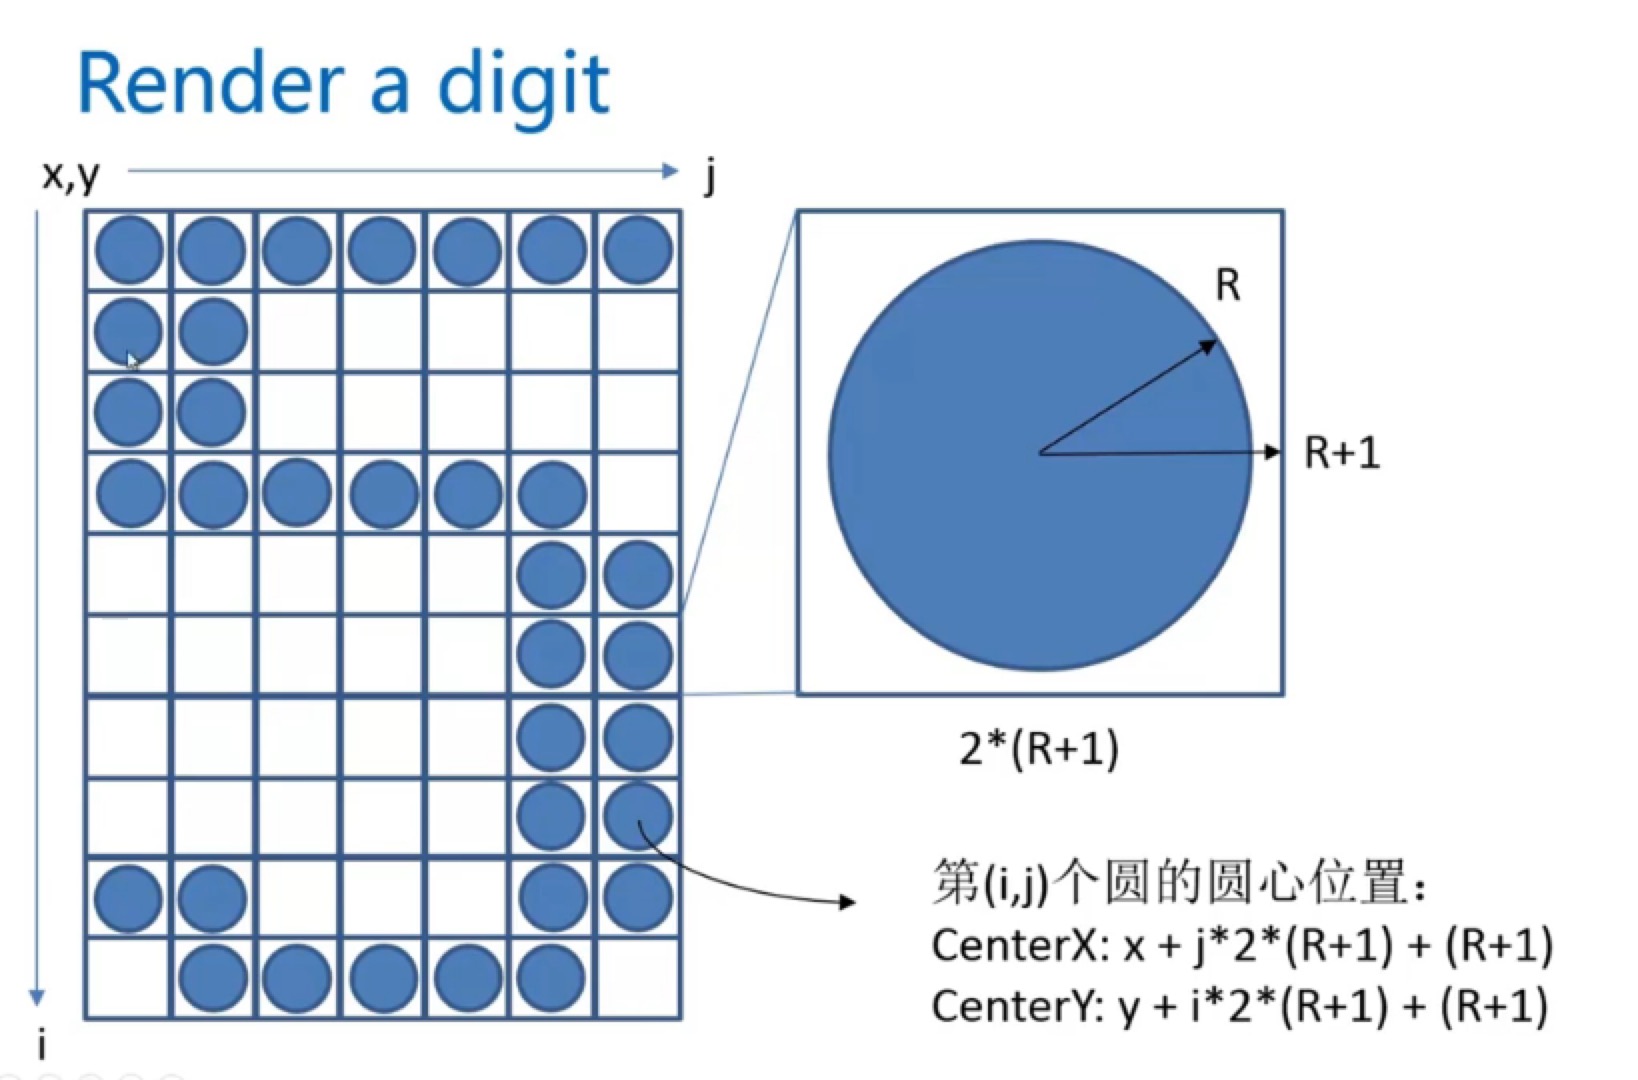
 (坐标推导过程)
index.html

<!DOCTYPE html>
<html>
<head lang="en">
    <meta charset="UTF-8">
    <title></title>
    <style>
        html, body{ margin:0; height:100%; }
    </style>
</head>
<body>
    <canvas id="canvas" style="width:100%; height:100%;">
        当前浏览器不支持Canvas,请更换浏览器后再试
    </canvas>

    <script src="digit.js"></script>
    <script src="countdown.js"></script>
</body>
</html>
countdown.js 和老师写的不完全一样,因为我懒得看了,所以小部分偷懒自己瞎写的

var WINDOW_WIDTH = 1024;
var WINDOW_HEIGHT = 768;
var RADIUS = 8;
var MARGIN_TOP = 60;
var MARGIN_LEFT = 30;

var curShowTimeSeconds = 0;

var balls = [];
const colors = ['#ff5b5b', '#a2ff95', '#95ffc8', '#95b2ff', '#c195ff', '#ff95f4', '#ff95c3', '#ffe295'];

window.onload = function() {

    WINDOW_HEIGHT = document.body.clientHeight-1;
    WINDOW_WIDTH = document.body.clientWidth-1;

    MARGIN_LEFT = Math.round(WINDOW_WIDTH / 10);
    RADIUS = Math.round(WINDOW_WIDTH * 4 / 5 / 108) - 1;

    MARGIN_TOP = Math.round(WINDOW_HEIGHT / 5);

    var canvas = document.getElementById('canvas');
    var context = canvas.getContext('2d');

    canvas.width = WINDOW_WIDTH;
    canvas.height = WINDOW_HEIGHT;

    console.log(canvas);

    curShowTimeSeconds = 3 * 3600; // 倒计时三小时

    var timer = setInterval(
        function() {
            render(context);
            renderBalls(context);
            curShowTimeSeconds -= 1/50;
            update();
            if (curShowTimeSeconds <= 0) {
                curShowTimeSeconds = 0;
                clearInterval(timer);
            }
        },
        20
    )
}

function update() {
    var tempBalls = [];
    for (var ball of balls) {
        ball.x += ball.vx;
        ball.y += ball.vy;
        ball.vy += ball.g;
        if (ball.y >= 768 - ball.r) {
            ball.y = 768 - ball.r;
            ball.vy = -ball.vy * 0.75;
        }
        if (ball.x + RADIUS > 0 && ball.x - RADIUS < WINDOW_WIDTH) {
            tempBalls.push(ball);
        }
    }
    balls = tempBalls;

    var seconds = curShowTimeSeconds % 60;
    if (Math.floor(curShowTimeSeconds) !== Math.floor(curShowTimeSeconds + 1/50)) {
        addBalls(MARGIN_LEFT + 78*(RADIUS+1), MARGIN_TOP, parseInt(seconds/10));
        addBalls(MARGIN_LEFT + 93*(RADIUS+1), MARGIN_TOP, parseInt(seconds%10));
    }
}

function addBalls(x, y, num) {
    for (var i = 0; i < digit[num].length; i++) {
        for (var j = 0; j < digit[num][i].length; j++) {
            if (digit[num][i][j] === 1) { // 点阵中1表示绘制
                balls.push({
                    x: x+j*2*(RADIUS+1)+(RADIUS+1),
                    y: y+i*2*(RADIUS+1)+(RADIUS+1),
                    r: RADIUS,
                    g: 1.5 + Math.random(),
                    vx: Math.pow(-1, Math.ceil(Math.random() * 1000)) * 4,
                    vy: -10,
                    color: colors[Math.floor(Math.random() * colors.length)]
                });
            }
        }
    }
}

function render(ctx) {
    ctx.clearRect(0, 0, WINDOW_WIDTH, WINDOW_HEIGHT);

    var hours = parseInt(curShowTimeSeconds / 3600);
    var minutes = parseInt((curShowTimeSeconds - hours * 3600) / 60);
    var seconds = curShowTimeSeconds % 60;

    renderDigit(MARGIN_LEFT, MARGIN_TOP, parseInt(hours/10), ctx);
    renderDigit(MARGIN_LEFT + 15*(RADIUS+1), MARGIN_TOP, parseInt(hours%10), ctx)
    renderDigit(MARGIN_LEFT + 30*(RADIUS + 1), MARGIN_TOP, 10 , ctx)
    renderDigit(MARGIN_LEFT + 39*(RADIUS+1), MARGIN_TOP, parseInt(minutes/10), ctx);
    renderDigit(MARGIN_LEFT + 54*(RADIUS+1), MARGIN_TOP, parseInt(minutes%10), ctx);
    renderDigit(MARGIN_LEFT + 69*(RADIUS+1), MARGIN_TOP, 10, ctx);
    renderDigit(MARGIN_LEFT + 78*(RADIUS+1), MARGIN_TOP, parseInt(seconds/10), ctx);
    renderDigit(MARGIN_LEFT + 93*(RADIUS+1), MARGIN_TOP, parseInt(seconds%10), ctx);
}

function renderBalls(ctx) {
    balls.forEach((ball) => {
        ctx.fillStyle = ball.color;
        ctx.beginPath();
        ctx.arc(ball.x, ball.y, ball.r, 0, 2 * Math.PI);
        ctx.closePath();

        ctx.fill();
    })
}

// 在 (x,y) 为起点 画一个数字 num
function renderDigit(x, y, num, ctx) {
    ctx.fillStyle = 'rgb(0, 102, 153)';

    for (var i = 0; i < digit[num].length; i++) {
        for (var j = 0; j < digit[num][i].length; j++) {
            if (digit[num][i][j] === 1) { // 点阵中1表示绘制
                ctx.beginPath();
                ctx.arc(x+j*2*(RADIUS+1)+(RADIUS+1), y+i*2*(RADIUS+1)+(RADIUS+1), RADIUS, 0, 2*Math.PI);
                ctx.closePath();
                ctx.fill();
            }
        }
    }
}
digit.js 这个是复制老师的

digit =
    [
        [ //
            [0,0,1,1,1,0,0],
            [0,1,1,0,1,1,0],
            [1,1,0,0,0,1,1],
            [1,1,0,0,0,1,1],
            [1,1,0,0,0,1,1],
            [1,1,0,0,0,1,1],
            [1,1,0,0,0,1,1],
            [1,1,0,0,0,1,1],
            [0,1,1,0,1,1,0],
            [0,0,1,1,1,0,0]
        ],//0
        [
            [0,0,0,1,1,0,0],
            [0,1,1,1,1,0,0],
            [0,0,0,1,1,0,0],
            [0,0,0,1,1,0,0],
            [0,0,0,1,1,0,0],
            [0,0,0,1,1,0,0],
            [0,0,0,1,1,0,0],
            [0,0,0,1,1,0,0],
            [0,0,0,1,1,0,0],
            [1,1,1,1,1,1,1]
        ],//1
        [
            [0,1,1,1,1,1,0],
            [1,1,0,0,0,1,1],
            [0,0,0,0,0,1,1],
            [0,0,0,0,1,1,0],
            [0,0,0,1,1,0,0],
            [0,0,1,1,0,0,0],
            [0,1,1,0,0,0,0],
            [1,1,0,0,0,0,0],
            [1,1,0,0,0,1,1],
            [1,1,1,1,1,1,1]
        ],//2
        [
            [1,1,1,1,1,1,1],
            [0,0,0,0,0,1,1],
            [0,0,0,0,1,1,0],
            [0,0,0,1,1,0,0],
            [0,0,1,1,1,0,0],
            [0,0,0,0,1,1,0],
            [0,0,0,0,0,1,1],
            [0,0,0,0,0,1,1],
            [1,1,0,0,0,1,1],
            [0,1,1,1,1,1,0]
        ],//3
        [
            [0,0,0,0,1,1,0],
            [0,0,0,1,1,1,0],
            [0,0,1,1,1,1,0],
            [0,1,1,0,1,1,0],
            [1,1,0,0,1,1,0],
            [1,1,1,1,1,1,1],
            [0,0,0,0,1,1,0],
            [0,0,0,0,1,1,0],
            [0,0,0,0,1,1,0],
            [0,0,0,1,1,1,1]
        ],//4
        [
            [1,1,1,1,1,1,1],
            [1,1,0,0,0,0,0],
            [1,1,0,0,0,0,0],
            [1,1,1,1,1,1,0],
            [0,0,0,0,0,1,1],
            [0,0,0,0,0,1,1],
            [0,0,0,0,0,1,1],
            [0,0,0,0,0,1,1],
            [1,1,0,0,0,1,1],
            [0,1,1,1,1,1,0]
        ],//5
        [
            [0,0,0,0,1,1,0],
            [0,0,1,1,0,0,0],
            [0,1,1,0,0,0,0],
            [1,1,0,0,0,0,0],
            [1,1,0,1,1,1,0],
            [1,1,0,0,0,1,1],
            [1,1,0,0,0,1,1],
            [1,1,0,0,0,1,1],
            [1,1,0,0,0,1,1],
            [0,1,1,1,1,1,0]
        ],//6
        [
            [1,1,1,1,1,1,1],
            [1,1,0,0,0,1,1],
            [0,0,0,0,1,1,0],
            [0,0,0,0,1,1,0],
            [0,0,0,1,1,0,0],
            [0,0,0,1,1,0,0],
            [0,0,1,1,0,0,0],
            [0,0,1,1,0,0,0],
            [0,0,1,1,0,0,0],
            [0,0,1,1,0,0,0]
        ],//7
        [
            [0,1,1,1,1,1,0],
            [1,1,0,0,0,1,1],
            [1,1,0,0,0,1,1],
            [1,1,0,0,0,1,1],
            [0,1,1,1,1,1,0],
            [1,1,0,0,0,1,1],
            [1,1,0,0,0,1,1],
            [1,1,0,0,0,1,1],
            [1,1,0,0,0,1,1],
            [0,1,1,1,1,1,0]
        ],//8
        [
            [0,1,1,1,1,1,0],
            [1,1,0,0,0,1,1],
            [1,1,0,0,0,1,1],
            [1,1,0,0,0,1,1],
            [0,1,1,1,0,1,1],
            [0,0,0,0,0,1,1],
            [0,0,0,0,0,1,1],
            [0,0,0,0,1,1,0],
            [0,0,0,1,1,0,0],
            [0,1,1,0,0,0,0]
        ],//9
        [
            [0,0,0,0],
            [0,0,0,0],
            [0,1,1,0],
            [0,1,1,0],
            [0,0,0,0],
            [0,0,0,0],
            [0,1,1,0],
            [0,1,1,0],
            [0,0,0,0],
            [0,0,0,0]
        ]//:
    ];
封闭多边形的首尾交点会有缺口,使用 context.closePath() 能解决这个问题。
绘制封闭多边形最好成对使用 beginPath(); 和 closePath();
先绘制线条再填充颜色,边框的一半会被填充色覆盖。所以先绘制填充色再描边。
绘制矩形api:
ctx.beginPath();
ctx.rect(x, y, width, height);
ctx.closePath();
ctx.stroke();

ctx.fillRect(x, y, width, height);

ctx.strokeRect(x, y, width, height);
fillStyle 和 strokeStyle 支持所有CSS支持的颜色表示。
线条的属性
- lineCap 线条两端的形状: butt (默认,平的)round(圆的) square(方的) 后面两个比较butt会突出来。只用于线段结尾处,不用于连接处。
- lineJoin 线条连接处形状: miter(默认,尖角)bevel(平的) round(圆角)miter
- lineJoin 为 miter 时,延长线长度大于miterLimit,会自动变为bevel。miterLimit 默认为10。

图形变换
位移、旋转、缩放。
context.translate(x, y); 默认多个translate会叠加。
context.rotate(deg);
context.scale(sx, sy); 不仅会缩放长度、宽度,还会缩放坐标、边框长度等属性。
save(); restore(); 成对出现,中间绘图状态不会对后面造成影响。用于保存和恢复绘图状态,颜色,方向等
/*
a:水平缩放(默认值1)
b:水平倾斜(默认值0)
c:垂直倾斜(默认值0)
d:垂直缩放(默认值1)
e:水平位移(默认值0)
f:垂直位移(默认值0)
*/
context.transform(a, b, c, d, e, f);
context.transform(); 效果会叠加
如果需要重新初始化矩阵变换的值,用: context.setTransform(a, b, c, d, e, f); 会使得之前设置的 context.transform() 失效
样式填充
线性渐变
var grd = context.createLinearGradient(xstart, ystart, xend, yend);
grd.addColorStop(stop, color); // 可添加任意个 stop[0,1]之间的数字
// 渐变色结束之后的颜色等于结束时的颜色

var grd = context.createLinearGradient(200, 200, 800, 800);
grd.addColorStop(0.0, '#f00');
grd.addColorStop(1.0, '#000');
context.fillStyle = grd;
径向渐变
createRadialGradient(x1,y1,r1,x2,y2,r2);
addColorStop(stop,color);
图片填充
var bgImg = new Image();
bgImg.src = 'https://img1.mukewang.com/5333a1bc00014e8302000200-140-140.jpg';
bgImg.onload = function () {
    var pattern = context.createPattern(bgImg, 'repeat');
    context.fillStyle = pattern;
    context.fillRect(0, 0, 800, 800);
}
用另外一个canvas填充
var bgCanvas = createBackgroundCanvas();
var pattern = context.createPattern(bgCanvas, 'repeat');
context.fillStyle = pattern;
context.fillRect(0, 0, 800, 800);

function createBackgroundCanvas() {
    var canvas = document.createElement('canvas');
    canvas.width = 100;
    canvas.height = 100;
    var context = canvas.getContext('2d');
    drawStar(context, 50, 50, 50, 0); // 之前的课程中写的的
    return canvas;
}
用 video 填充...
其中 repeat-style 可选值 no-repeat/repeat-x/repeat-y/repeat
绘制圆弧。
context.arc( centerX, centerY, radius, startAngle, endAngle, anticlockwise = false )
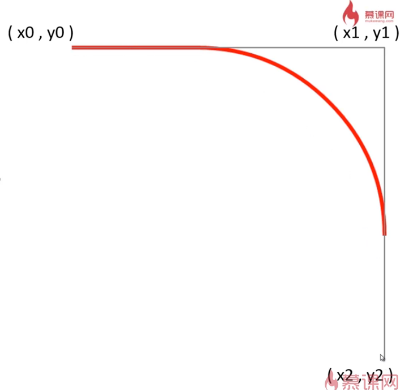
context.arcTo(x1,y1,x2,y2,radius); (x1,y1)是控制点,(x0,y0,x1,y1)作为第一条切线, (x1,y1,x2,y2)作为第二条切线,radius是弧线半径圆弧。起点是当前所在点(x0,y0),到第一个切点作直线,然后画弧,终点是第二个切点。

贝塞尔二次曲线。指定起始点,控制点,终点。
context.quadraticCurveTo(control_x, control_y, targetx, targety);
贝塞尔三次曲线。指定起始点,控制点1,控制点2,终点。
context.quadraticCurveTo(control_x1, control_y1, control_x2, control_y2, targetx, targety);
文字渲染
文字样式
ctx.font = fontStyle; // 默认 '20px sans-serif'
ctx.font = font-style font-variant font-weight font-size font-family
ctx.fillText(string, x, y, [maxlen]);
ctx.strokeText(string, x, y, [maxlen]);

ctx.font = 'bold 40px Arial';
ctx.fillStyle = '#058';
ctx.strokeStyle = 'yellow';
ctx.fillText('文字', 100, 100);
ctx.strokeText('文字', 100, 100);
文字对齐
水平对齐方式 left(default) center right
ctx.textAlign = 'left';
垂直对齐方式 top middle bottom alphabetic(default) hanging alphabetic
ctx.textBaseline = 'top';
文本的度量
获取文本宽度,使用前要先设置 font 属性
ctx.measureText(string).width;
阴影
context.shadowColor
context.shadowOffsetX
context.shadowOffsetY
context.shadowBlur
全局属性
ctx.globalAlpha=0.2;
globalCompositeOperation 属性设置或返回如何将一个源(新的)图像绘制到目标(已有)的图像上。
| source-over | 默认。在目标图像上显示源图像。 |
| source-atop | 在目标图像顶部显示源图像。源图像位于目标图像之外的部分是不可见的。 |
| source-in | 在目标图像中显示源图像。只有目标图像内的源图像部分会显示,目标图像是透明的。 |
| source-out | 在目标图像之外显示源图像。只会显示目标图像之外源图像部分,目标图像是透明的。 |
| destination-over | 在源图像上方显示目标图像。 |
| destination-atop | 在源图像顶部显示目标图像。源图像之外的目标图像部分不会被显示。 |
| destination-in | 在源图像中显示目标图像。只有源图像内的目标图像部分会被显示,源图像是透明的。 |
| destination-out | 在源图像外显示目标图像。只有源图像外的目标图像部分会被显示,源图像是透明的。 |
| lighter | 显示源图像 + 目标图像。 |
| copy | 显示源图像。忽略目标图像。 |
| xor | 使用异或操作对源图像与目标图像进行组合。 |
、、、、、


