SpringBootMVC+thymeleaf模板初探
我们已经学习了SpringBoo的基础概念和连接数据库。那么我们怎么利用SpringBoot实现我们的MVC架构,完成web站点的编码?今天就要介绍SpringMVC登场。
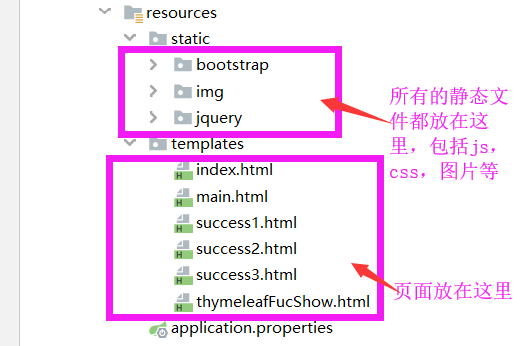
- 首先我们要有一个SpingBoot的项目.引入web的Start配置。
- 接下来我们就要创建一个Controller文件了,同asp.netMvc一样:从代码整洁角度上来说,应该按照约定将Contoller文件创建到专门的Contoller文件夹中,并以Conttoller结尾命名。只要我们给一个类打上@Controller的标志,Spring就会认为这是一个控制器并初始化它。
@Controller
public class IndexController {
}
3. 紧接着我们创建具体的控制器方法,并打上@RequestMapping的标志路由地址。
@Controller
public class IndexController {
    @RequestMapping("/")
    public  String index(Model model){
        System.out.println("控制器方法被调用");
        return "index";
    }
}
4. 创建对应的index页面
5. 编译运行。
<input type="text" name="username" value="fkjava" th:value="${ user.username }" />
这一段的意思是:Thymeleaf模板会把存储在它上下文中的user对象的username作为value赋值给name为username的text控件(如果user对象的username有数据,否则显示默认的fkjava)。
<span th:text="'Welcome to fkit, '+ ${user.name} +'!'">
再看一个静态资源引入的例子:
<link rel="stylesheet" th:href="@{bootstrap/dist/css/bootstrap.css}"/>
<link rel="stylesheet" th:href="@{bootstrap/dist/css/bootstrap-theme.css}"/>
<script type="text/javascript" th:src="@{jquery/dist/jquery.js}"></script>
<script type="text/javascript" th:src="@{bootstrap/dist/js/bootstrap.js}"></script>
th:href还可以带参数

代码分析
1.最终解析的href为:
  /seconddemo/
  /seconddemo/usethymeleaf?name=Dear 相对路径,带一个参数
  /seconddemo/usethymeleaf?name=Dear&alis=Dear 相对路径,带多个参数
  /seconddemo/usethymeleaf?name=Dear&alis=Dear 相对路径,带多个参数
  /seconddemo/usethymeleaf/Dear 相对路径,替换URL一个变量
  /seconddemo/usethymeleaf/Dear/Dear 相对路径,替换URL多个变量
2.URL最后的(name=${name})表示将括号内的内容作为URL参数处理,该语法避免使用字符串拼接,大大提高了可读性
3.@{/usethymeleaf}是Context相关的相对路径,在渲染时会自动添加上当前Web应用的Context名字,假设context名字为seconddemo,那么结果应该是/seconddemo/usethymeleaf,即URL中以”/“开头的路径(比如/usethymeleaf将会加上服务器地址和域名和应用cotextpath,形成完整的URL。
4.th:href属性修饰符:它将计算并替换使用href链接URL 值,并放入的href属性中。
5.th:href中可以直接使用静态地址
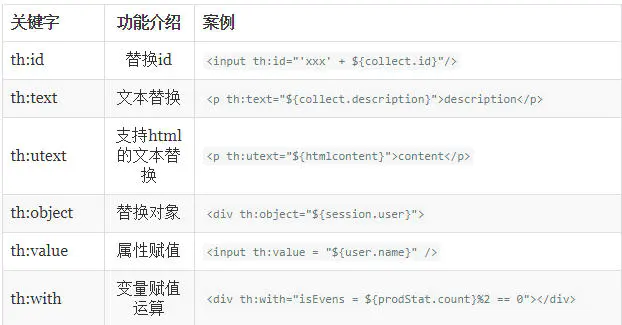
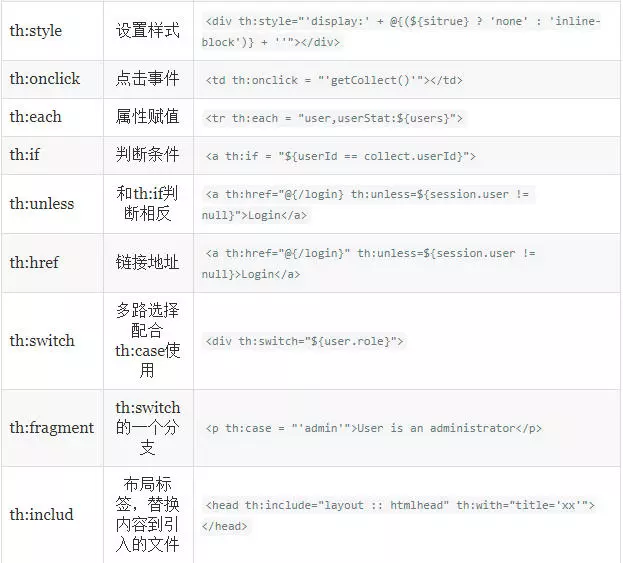
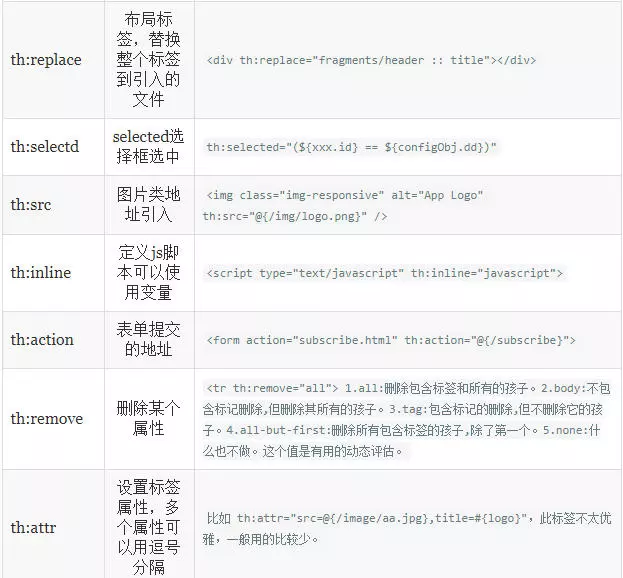
Thymeleaf模板的语法以th开头。${} 表示要处理的数据。
- 修改pom.xml
<dependency>
    <groupId>org.springframework.boot</groupId>
    <artifactId>spring-boot-starter-thymeleaf</artifactId>
</dependency>
2. Html页面上增加Thymeleaf开关。
<!DOCTYPE html>
<html xmlns:th="http://www.thymeleaf.org">
我们重新回到SpringMVC,并尝试将它和Thymeleaf模板引擎结合起来。我们看之前的入门代码
@Controller
public class IndexController {
    @RequestMapping("/")
    public  String index(Model model){
        System.out.println("控制器方法被调用");
        return "index2";
    }
}
有几个关键点值得注意:
@RequestMapping("/iftest")
public String iftest(WebRequest webRequest){
    webRequest.setAttribute("username","fkit",webRequest.SCOPE_REQUEST);
    webRequest.setAttribute("age",21,webRequest.SCOPE_REQUEST);
    webRequest.setAttribute("role","admin",webRequest.SCOPE_REQUEST);
    return  "success2";
}

@RequestMapping("/eachtest")
public  String eachtest(WebRequest webRequest){
    List<Book> books = new ArrayList<>();
    books.add(new Book(1,"Book1","1.jpg","wenpeng",108.00));
    books.add(new Book(2,"Book2","2.jpg","wenpeng",18.00));
    books.add(new Book(3,"Book3","3.jpg","wenpeng",128.00));
    books.add(new Book(4,"Book4","4.jpg","wenpeng",118.00));
    books.add(new Book(5,"Book5","5.jpg","wenpeng",8.00));
    webRequest.setAttribute("books",books,webRequest.SCOPE_REQUEST);
    return "success3";
}
WebRequst通过setAttribute封装信息到username,age,甚至是books这种类的结合变量中。前台就可以接受并处理。
<div class="container">
    <div class="row">
        <div class="col-md-4">
            <p>th:if中条件成立时才显示结果</p><br/>
            <span th:if="${username != null}">username 不为空</span><br/>
            <span th:if="${age != null}">age不为空</span><br/>
            <p>th:unless与th:if相反,只有条件不成立,才会显示</p><br/>
            <span th:unless="${address != null}">address为空</span><br/>
            <p>th:swich,默认选中为*</p><br/>
            <div th:switch="${role}">
                <p th:case="'admin'">管理员</p>
                <p th:case="'guest'">来宾</p>
                <p th:case="'*'">其他</p>
            </div>
        </div>
    </div>
</div>
success3.html
<div class="table table-responsive">
    <table class="table table-bordered table-hover">
        <thead>
            <th class="text-center">封面</th>
            <th class="text-center">书名</th>
            <th class="text-center">作者</th>
            <th class="text-center">价格</th>
        </thead>
        <tbody class="text-center">
            <tr th:each="book:${books}">
                <td><img src="img/1.jpg" th:src="@{'img/'+${book.image}}" height="60"></td>
                <td th:id="${book.id}" th:text="${book.title}" >书名</td>
                <td th:id="${book.id+'name'}" th:text="${book.author}">作者</td>
                <td th:text="${book.price}">价格</td>
            </tr>
        </tbody>
    </table>
</div>
再譬如
@RequestMapping("/regexptest")
public  String regexptest(HttpServletRequest request,
                          HttpSession session){
    request.setAttribute("book","Spring boot 教材");
    session.setAttribute("school","中地数码");
    request.getServletContext().setAttribute("name","Thymeleaf 模板引擎");
    return "success1";
}
通过HttpServletRequest ,HttpSession 等封装消息,在前台使用。
<div class="container"> <div class="row"> <div class="col-md-4"> <p>${param.x}将返回一个名为x的请求参数</p> 访问页面传递的参数:<span th:text="${param.loginName[0]}">登录名</span> <span th:text="${param.password[0]}">密码</span> <p>${x}将返回存储在Thymeleaf上下文中的变量x或作为请求Request作用范围域中的属性</p> 访问request作用域中的变量:<span th:text="${book}">图书信息</span> <p>$ {session.x }将返回一个名为 x 的会话 HttpSession作用范围域中的属性。</p> 访问 sessioni 作用范围域中的变量:<span th:text="${ session .school}">培训中心</span> <p>${app lication.xi 将返回一个名为 x 的全局 ServletContext 上下文作用范围域中的属性。</p> 访问 application 作用范围城中的变量:<span th:text="${application.name}">动态页面模板</span><br/> </div> </div> </div>
再比如
@PostMapping("login")
public ModelAndView login(@RequestParam("loginName") String loginName,
                          @RequestParam("password") String password,
                          ModelAndView mv)
{
    System.out.println("登录验证后台方法被调用");
    System.out.println("登录名:"+loginName+"密码:"+password);
    mv.setViewName("redirect:/main");
    return mv;
}
这个地方肯能有人要问了,怎么一会postMapping一会requestmapping呢?
<div class="panel panel-primary">
    <div class="panel-heading">
        <h3 class="panel-title">Spring Boot thymeleaf 示例</h3>
    </div>
</div>
<div class="container">
    <div class="row">
        <div class="page-header">
            <h2>用户登录</h2>
            <form class="form-horizontal" action="login" method="post" id="loginform">
                <div class="form-group">
                    <div class="input-group col-md-4">
                        <span class="input-group-addon">
                            <i class="glyphicon glyphicon-user"></i>
                        </span>
                        <input class="form-control" placeholder="用户名/邮箱" type="text" name="loginName" id="loginName"/>
                    </div>
                </div>
                <div class="form-group">
                    <div class="input-group col-md-4">
                        <span class="input-group-addon">
                            <i class="glyphicon glyphicon-lock"></i>
                        </span>
                        <input class="form-control" placeholder="密码" type="password" name="password" id="password"/>
                    </div>
                </div>
                <div class="form-group">
                    <div class="col-md-4">
                        <div class="btn-group btn-group-justified">
                            <div class="btn-group">
                                <button type="button" class="btn btn-success" id="loginbtn">
                                    <span class="glyphicon glyphicon-log-in"></span>
                                    登录
                                </button>
                            </div>
                            <div class="btn-group">
                                <button type="button" class="btn btn-danger" id="regiserbtn">
                                    <span class="glyphicon glyphicon-edit"></span>
                                    注册
                                </button>
                            </div>
                        </div>
                    </div>
                </div>
            </form>
        </div>
    </div>
</div>
但是上面的方法都属于前后端严重耦合的,不适用于前后端分离的大趋势。我们想要做出标准的前后段分离的Rest请求怎么办?
@RestController
public class JsonController {
    @RequestMapping("/findBook")
    public Book findBook(@RequestBody Book book){
        System.out.println(book);
        book.setAuthor("文菜鸟");
        book.setImage("1.jpg");
        book.setPrice(58.0);
        return book;
    }
}
需要注意到@Controller,@RestController标注的区别。@Controller是传统控制器,turn返回的是具体的页面地址,通过路由转跳;@RestController是Rest风格的WebAPI,返回是json格式化的对象。
<script type="text/javascript">
    $(document).ready(function () {
        $("#2").click(function () {
            findBook();
        });
    })

    function findBook() {
        $.ajax({
            url:"/findBook",
            dataType:"json",
            type:"post",
            contentType:"application/json",
            data:JSON.stringify({id:2,title:"Book2"}),
            async:true,
            success:function (data) {
                console.log(data);
                $("#2name").html(data.author)
            },
            error:function (er,a,b) {
                alert("数据发送失败");
            }
        })
    }
</script>
总结一下,今天我们学习了如何使用SpringBoot搭建一个简单的MVC程序,以及如何配合thymeleaf模板工作,并且学习了SpringMVC前后端数据交互的方法。以及前后端分离情况下,如果使用WebAPI进行开发的模式。但是使用thymeleaf和SpringMVC真的是唯一的方式么?欢迎大家讨论。

 浙公网安备 33010602011771号