【03】SpringBoot2核心技术-核心功能—数据访问_单元测试_指标监控
3、数据访问(SQL)
3.1 数据库连接池的自动配置-HikariDataSource
1、导入JDBC场景
<dependency>
    <groupId>org.springframework.boot</groupId>
    <artifactId>spring-boot-starter-data-jdbc</artifactId>
</dependency>
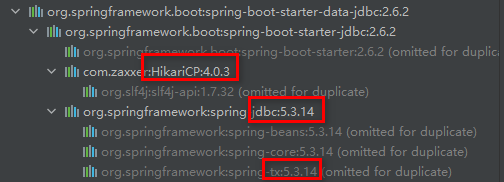
- HikariCP:数据源(数据库连接池)
- jdbc:jdbc
- tx:事务
为什么导入JDBC场景的时候,没有导入数据库驱动?
因为此时并不知道程序员要操作哪个数据库,要使用哪个数据库驱动。但是对于要导入的数据库驱动,springboot已经做好了版本仲裁,只需要导入一下即可,无需注明版本(但如果数据库的版本不符,则需要显示声明版本)。
<dependency>
    <groupId>mysql</groupId>
    <artifactId>mysql-connector-java</artifactId>
</dependency>
修改版本的方法:
	1、直接依赖引入的具体版本(Maven依赖就近原则) <version>版本号</version>
	2、重新声明版本(Maven属性就近原则)
		    <properties>
        		<mysql.version>5.1.49</mysql.version>
    		</properties>
2、分析自动配置
-
DataSourceAutoConfiguration.class : 数据源(数据库连接池)的自动配置
-
-
修改数据源相关的配置:spring.datasource

-
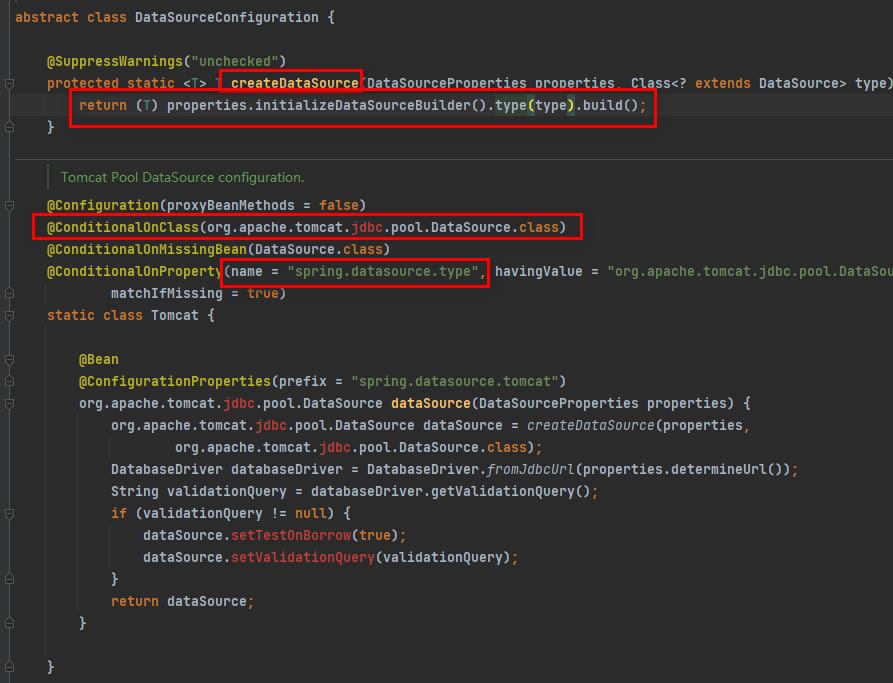
数据库连接池的配置(DataSourceConfiguration.class),是自己容器中没有DataSource才自动配置的
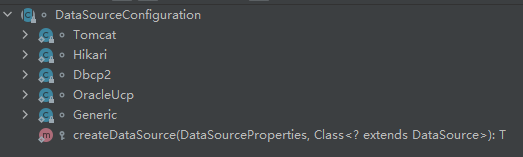
可以看到怎么初始化数据库连接池,以及各个数据库连接池创建的条件,我们可以通过spring.datasource.type去指定数据库连接池
-
-
- 底层配置好的连接池是:HikariDataSource
@Configuration(proxyBeanMethods = false)
@Conditional(PooledDataSourceCondition.class)
@ConditionalOnMissingBean({ DataSource.class, XADataSource.class })
@Import({ DataSourceConfiguration.Hikari.class, DataSourceConfiguration.Tomcat.class,
         DataSourceConfiguration.Dbcp2.class, DataSourceConfiguration.OracleUcp.class,
         DataSourceConfiguration.Generic.class, DataSourceJmxConfiguration.class })
protected static class PooledDataSourceConfiguration{
    ...
}
-
DataSourceTransactionManagerAutoConfiguration: 事务管理器的自动配置
-
JdbcTemplateAutoConfiguration: JdbcTemplate的自动配置,可以来对数据库进行crud(Spring操作数据库的小组件,一般用MyBatis)
-
-
可以修改这个配置项@ConfigurationProperties(prefix = "spring.jdbc") 来修改JdbcTemplate
-
@Bean@Primary JdbcTemplate;容器中有这个组件
@Configuration(proxyBeanMethods = false)
@ConditionalOnMissingBean(JdbcOperations.class)
class JdbcTemplateConfiguration {

	@Bean
	@Primary
	JdbcTemplate jdbcTemplate(DataSource dataSource, JdbcProperties properties) {
		JdbcTemplate jdbcTemplate = new JdbcTemplate(dataSource);
		JdbcProperties.Template template = properties.getTemplate();
		jdbcTemplate.setFetchSize(template.getFetchSize());
		jdbcTemplate.setMaxRows(template.getMaxRows());
		if (template.getQueryTimeout() != null) {
			jdbcTemplate.setQueryTimeout((int) template.getQueryTimeout().getSeconds());
		}
		return jdbcTemplate;
	}

}
-
-
JndiDataSourceAutoConfiguration: jndi的自动配置
-
XADataSourceAutoConfiguration: 分布式事务相关的
3、修改配置项
spring:
  datasource:
    url: jdbc:mysql://localhost:3306/ssm_crud?allowMultiQueries=true
    username: root
    password: zouwenhao
    driver-class-name: com.mysql.cj.jdbc.Driver
#    type: com.zaxxer.hikari.HikariDataSource
  jdbc:
    template:
      query-timeout: 3
4、测试
@SpringBootTest
class Boot05WebAdminApplicationTests {

    @Autowired
    JdbcTemplate jdbcTemplate;

    @Test
    void contextLoads() {
        Long aLong = jdbcTemplate.queryForObject("select count(*) from tbl_emp", Long.class);
        System.out.println(aLong); // 600
    }
}
3.2 使用Druid数据源
1、Druid官方地址
https://github.com/alibaba/druid
整合第三方技术的两种方式:
- 自定义(自己配置)
- springboot官方是否提供了启动器starter
<dependency>
    <groupId>com.alibaba</groupId>
    <artifactId>druid</artifactId>
    <version>1.2.8</version>
</dependency>
2、自定义数据库连接池方式(不推荐)
@Configuration
public class DBSourceConfig {

    /*
    * 默认的自动配置生效,是在@ConditionalOnMissingBean(DataSource.class)条件成立时
    *   如果我们现在需要引入一个第三方的DataSource,此时创建一个数据库连接池组件放入容器中
    *       那么自动配置的数据库连接池HikariDataSource就会失效
    * */
    @Bean
    @ConfigurationProperties("spring.datasource")
    public DataSource dataSource() {
        DruidDataSource druidDataSource = new DruidDataSource();
        // 可以使用配置文件导入,springboot会自动将属性值封装,这样就无需再配置
//        druidDataSource.setUrl();
//        druidDataSource.setName();
//        druidDataSource.setPassword();
        return druidDataSource;
    }

    /**
     * 配置 druid的监控页功能
     * @return
     */
   @Bean
    public ServletRegistrationBean statViewServlet(){
        StatViewServlet statViewServlet = new StatViewServlet();
        ServletRegistrationBean<StatViewServlet> registrationBean = new ServletRegistrationBean<>(statViewServlet, "/druid/*");

        // 给监控页设置登录账号和密码
        registrationBean.addInitParameter("loginUsername","admin");
        registrationBean.addInitParameter("loginPassword","123456");

        return registrationBean;
    }

    /**
     * WebStatFilter 用于采集web-jdbc关联监控的数据。
     */
	@Bean
    public FilterRegistrationBean webStatFilter(){
        WebStatFilter webStatFilter = new WebStatFilter();

        FilterRegistrationBean<WebStatFilter> filterRegistrationBean = new FilterRegistrationBean<>(webStatFilter);
        filterRegistrationBean.setUrlPatterns(Arrays.asList("/*")); // 监控的请求路径
        filterRegistrationBean.addInitParameter("exclusions","*.js,*.gif,*.jpg,*.png,*.css,*.ico,/druid/*"); // 哪些请求不需要监控(被拦截)

        return filterRegistrationBean;
    }
}
3、使用官方starter方式
1、引入druid-starter
<dependency>
    <groupId>com.alibaba</groupId>
    <artifactId>druid-spring-boot-starter</artifactId>
    <version>1.2.8</version>
</dependency>
2、分析Druid自动配置
-
DruidDataSourceAutoConfigure.class
Druid数据库连接池的配置需要在官方数据库连接池自动配置之前,因为需要在官方配置之前在容器中创建好DruidDataSource。
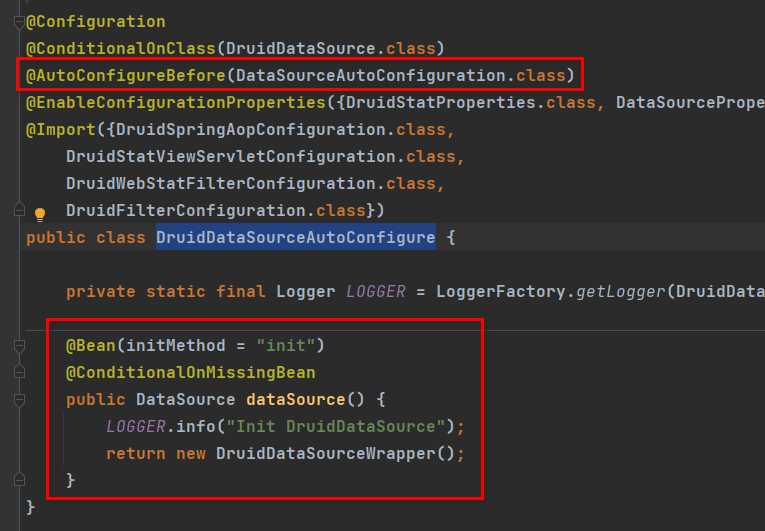
-
涉及到两个配置类DataSourceProperties和DruidStatProperties,其中扩展配置类的前缀配置是 spring.datasource.druid
-
此外,导入了四个类:
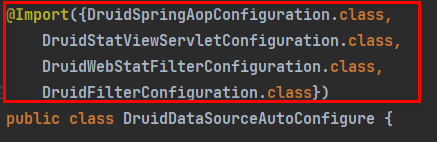
-
DruidSpringAopConfiguration.class:监控SpringBean(监控spring组件)
- 配置项:spring.datasource.druid.aop-patterns**
-
DruidStatViewServletConfiguration.class:监控页的配置
- spring.datasource.druid.stat-view-servlet;默认开启
-
DruidWebStatFilterConfiguration.class:web监控配置
- spring.datasource.druid.web-stat-filter;默认开启
-
DruidFilterConfiguration.class:所有Druid涉及到filter的组件配置
-
private static final String FILTER_STAT_PREFIX = "spring.datasource.druid.filter.stat";
private static final String FILTER_CONFIG_PREFIX = "spring.datasource.druid.filter.config";
private static final String FILTER_ENCODING_PREFIX = "spring.datasource.druid.filter.encoding";
private static final String FILTER_SLF4J_PREFIX = "spring.datasource.druid.filter.slf4j";
private static final String FILTER_LOG4J_PREFIX = "spring.datasource.druid.filter.log4j";
private static final String FILTER_LOG4J2_PREFIX = "spring.datasource.druid.filter.log4j2";
private static final String FILTER_COMMONS_LOG_PREFIX = "spring.datasource.druid.filter.commons-log";
private static final String FILTER_WALL_PREFIX = "spring.datasource.druid.filter.wall";
private static final String FILTER_WALL_CONFIG_PREFIX = FILTER_WALL_PREFIX + ".config";
-
-
-
最后,我们只需要将相应配置属性在配置文件(yaml或properties)中使用相应的前缀进行设置即可。配置示例:
spring:
  datasource:
    url: jdbc:mysql://localhost:3306/ssm_crud?allowMultiQueries=true
    username: root
    password: zouwenhao
    driver-class-name: com.mysql.cj.jdbc.Driver

    druid:
      aop-patterns: com.atguigu.admin.*  #监控SpringBean
      filters: stat,wall     # 底层开启功能,stat(sql监控),wall(防火墙)

      stat-view-servlet: # 配置监控页功能
        enabled: true
        login-username: admin
        login-password: admin
        resetEnable: false

      web-stat-filter: # 监控web
        enabled: true
        urlPattern: /*
        exclusions: '*.js,*.gif,*.jpg,*.png,*.css,*.ico,/druid/*'

      filter:
        stat: # 对上面filters里面的stat的详细配置
          slow-sql-millis: 1000
          logSlowSql: true
          enabled: true
        wall:
          enabled: true
          config:
            drop-table-allow: false
3.3 整合MyBatis操作
引入starter
-
SpringBoot官方的Starter:spring-boot-starter-*
-
第三方的: *-spring-boot-starter
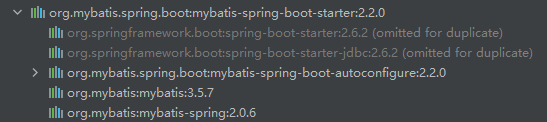
<dependency>
    <groupId>org.mybatis.spring.boot</groupId>
    <artifactId>mybatis-spring-boot-starter</artifactId>
    <version>2.2.0</version>
</dependency>
1、自动配置原理
-
全局配置文件:MybatisAutoConfiguration.class

-
MyBatis的配置在当前环境中只有一个数据库连接池的条件下才自动配置
-
MyBatis的配置类是:MybatisProperties.class
-
@ConfigurationProperties(prefix = MybatisProperties.MYBATIS_PREFIX)
public class MybatisProperties {
    ...
}
-
-
是在数据库连接池配置完之后,才对MyBatis进行配置
-
-
SqlSessionFactory: 自动配置好了
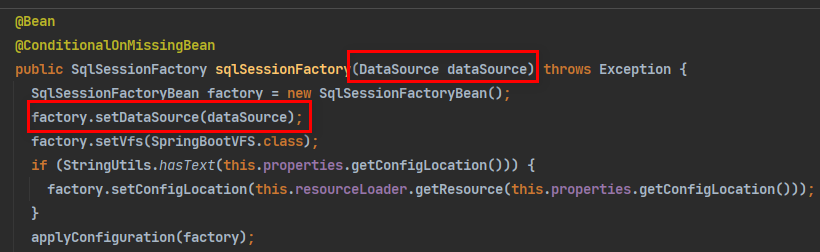
- MyBatis自动配置当前环境中配置好的数据库连接池
-
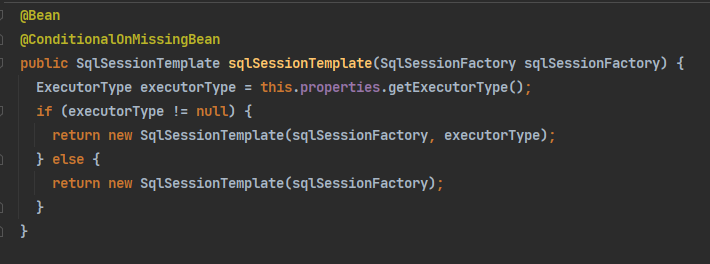
SqlSession:自动配置了 SqlSessionTemplate(这个类实现了SqlSession接口)

-
@Import(AutoConfiguredMapperScannerRegistrar.class);
-
Mapper: 只要我们写的操作MyBatis的接口标准了 @Mapper 就会被自动扫描进来
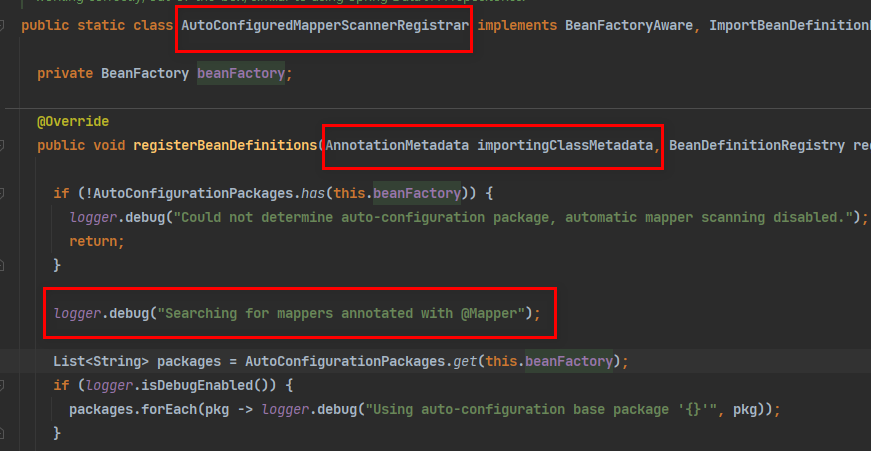
-
2、配置并测试
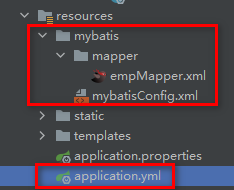
1、文件目录
-
静态资源目录resources下(idea下可以安装MyBatisX插件)
-
dao层、bean层、service层

2、配置MyBatis
spring:
  datasource:
    url: jdbc:mysql://localhost:3306/ssm_crud?allowMultiQueries=true
    username: root
    password: password
    driver-class-name: com.mysql.cj.jdbc.Driver

# 配置Mybatis的规则
mybatis:
#  config-location: classpath:mybatis/mybatisConfig.xml
  mapper-locations: classpath:mybatis/mapper/*.xml
  configuration: # 一旦使用yaml或者properties进行配置,就不能再使用config-location
    # 开启驼峰命名
    map-underscore-to-camel-case: true
当然也可以使用xml配置方式,但是需要注明配置文件的位置,注意的是:一旦我们在yaml或者是properties文件中进行了config配置,那么config-location就不能使用,否则mybatis不知道应该加载哪个配置文件,会造成冲突。
3、测试
-
dao:注意,在spring中是需要配置扫描自定义Mybatis的mapper接口的,而在SpringBoot中,由于我们使用了starter,只需要在dao层下的接口文件添加上@Mapper注解,就会被扫描到并添加到IOC容器中。
@Mapper public interface empMapper { public Emp getEmpById(int id); } -
service(service+serviceImpl)
public interface empService {
    public Emp getEmpById(int id);
}
@Service public class EmpServiceImpl implements empService { @Autowired empMapper empMapper; @Override public Emp getEmpById(int id) { return empMapper.getEmpById(id); } } -
mapper.xml映射
<?xml version="1.0" encoding="UTF-8" ?> <!DOCTYPE mapper PUBLIC "-//mybatis.org//DTD Mapper 3.0//EN" "http://mybatis.org/dtd/mybatis-3-mapper.dtd"> <mapper namespace="com.atguigu.admin.dao.empMapper"> <!--public Emp getEmpById(int id);--> <select id="getEmpById" resultType="com.atguigu.admin.bean.Emp"> select * from tbl_emp where emp_id = #{id} </select> </mapper> -
测试
@Controller
public class MyBatisController {

    @Autowired
    empService empService;

    @ResponseBody
    @RequestMapping("/emp")
    public Emp getempById(@RequestParam("id")int id){
        return empService.getEmpById(id);
    }
}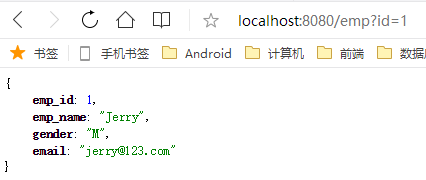
3、纯注解开发及注解配置混合开发
1、纯注解版(适用于查询sql语句比较简单的情况)
在上一小节中,不难发现如果在yaml文件中进行配置的话,是可以省去mybatisConfig.xml。对于mapper.xml映射文件也可以省去,使用@Select注解。
在dao层的接口文件中:
@Mapper
public interface empMapper {
    @Select("select * from tbl_emp where emp_id = #{id}")
    public Emp getEmpById(int id);
}
2、注解配置混合开发
对于一些比较复杂的sql查询功能的实现,显然仅仅使用纯注解开发是行不通的,因此还是需要在mapper.xml文件中进行复杂sql查询功能的实现。
@Mapper
public interface empMapper {
    @Select("select * from tbl_emp where emp_id = #{id}")
    public Emp getEmpById(int id);

    pubilc void insertEmp(Emp emp);
}
对于上面例子中的insert方法,还是能用注解的:
@Insert("insert into  tbl_emp(`emp_name`,`mail`,`gender`) values(#{name},#{mail},#{gender})")
@Options(useGeneratedKeys = true,keyProperty = "emp_id")
public void insertEmp(Emp emp)
4、最佳实战
-
引入mybatis-starter
-
配置application.yaml中,指定mapper-location位置即可
-
编写Mapper接口并标注@Mapper注解
-
简单方法直接注解方式
-
复杂方法编写mapper.xml进行绑定映射
-
在配置类上添加@MapperScan("com.atguigu.admin.dao") ,可以是主程序类。就可以简化在其他的接口不用标注@Mapper注解(在MyBatis中,最好还是在dao层接口上一个一个加上吧)
3.4 整合MyBatis-Plus完成CURD
1、什么是MyBatis-Plus
MyBatis-Plus(简称 MP)是一个 MyBatis 的增强工具,在 MyBatis 的基础上只做增强不做改变,为简化开发、提高效率而生。
建议安装 MybatisX 插件
2、整合Mybatis-plus
- 引入Mybatis-plus的starter,就可以不用引入jdbc和mybatis了
<dependency>
    <groupId>com.baomidou</groupId>
    <artifactId>mybatis-plus-boot-starter</artifactId>
    <version>3.4.3.4</version>
</dependency>
-
自动配置
-
MybatisPlusAutoConfiguration 配置类,MybatisPlusProperties 配置项绑定。
- 前缀为**mybatis-plus:xxx **,就是对mybatis-plus的配置定制
-
SqlSessionFactory 自动配置好(与mybatis同)。底层是容器中已经配置好的数据库连接池
-
mapperLocations 自动配置好的。
-
有默认值:classpath*:/mapper/**/*.xml;任意包的类路径下的所有mapper文件夹下任意路径下的所有xml都是sql映射文件。 (即,类路径文件夹下mapper文件夹中)
/* 是拦截所有的文件夹,不包含子文件夹
/** 是拦截所有的文件夹及里面的子文件夹 -
建议以后sql映射文件,放在类路径下mapper文件夹中
-
-
容器中也自动配置好了 SqlSessionTemplate
-
@Mapper 标注的接口也会被自动扫描
- @MapperScan("com.atguigu.admin.mapper") 批量扫描也行(MyBatisPlus中推荐使用这种)
-
-
优点:
- 只需要我们的Mapper继承 BaseMapper 就可以拥有crud能力
@Mapper
public interface empMapperPlus extends BaseMapper<Emp> {

}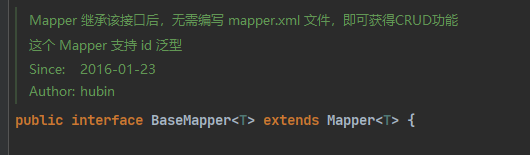
- 如果bean类中,有参数不是数据库中的元素,可以使用@TableField(exist = false)声明不是数据库中表的属性。这样表中不存在,也就不会去查询这些属性的值。

-
如果bean类与数据库中对应的表的名字不一致的话,可以使用@TableName进行指定。(数据库表与bean类的映射关系)
@Data
@AllArgsConstructor
@NoArgsConstructor
@TableName("tbl_emp")
public class Emp {
    private Integer emp_id;
    private String emp_name;
    private char gender;
    private String email;
    @TableField(exist = false)
    private String dept_id;
}
3、一次完整的使用流程(MyBatisPlus)
后台管理模板的数据显示与删除操作(数据库相关配置已经配置完成,上文有)
-
bean层(entity层):注意,如果不声明@TableName和@TableId,可能会造成绑定失败,报500的错误
@Data @AllArgsConstructor @NoArgsConstructor @TableName("tbl_emp") // 将该类与数据库中tbl_emp表建立映射关系 public class Emp { @TableId private Integer empId; // 需使用注解声明主键 private String empName; private String gender; private String email; @TableField(exist = false) private String deptId; // 数据库表中外的数据 } -
dao层:Mapper 继承BaseMapper接口后,无需编写 mapper.xml 文件,即可获得CRUD功能,需要和IService顶级service类结合使用
@Mapper // 注明@Mapper,相当于进行了mybatis自定义mapper接口扫描
public interface empMapperPlus extends BaseMapper<Emp> {

}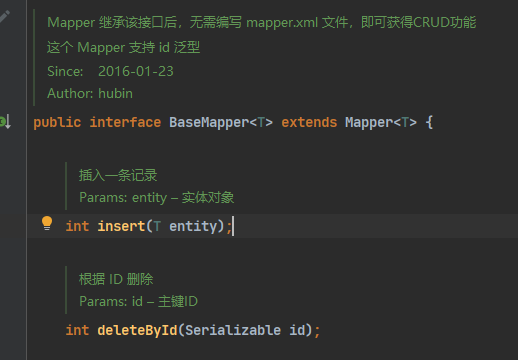
-
service层:由业务逻辑接口和业务逻辑实现类组成
-
service接口:继承了IService类(IService),无需手动添加CURD操作方法
public interface empServicePlus extends IService<Emp> { } -
业务逻辑实现类:同样,需要继承IService 实现类(ServiceImpl),才能使用CURD方法
@Service
public class EmpServicePlusImpl extends ServiceImpl<empMapperPlus, Emp> implements empServicePlus {

}
-
-
controller层:
@Slf4j @Controller public class TableController { @Autowired empServicePlus empServicePlus; @GetMapping("/dynamic_table") public String dynamic_table(@RequestParam(value = "pn", defaultValue = "1")Integer pn, Model model){ // // 表格的内容动态遍历出来 // List<User> users = Arrays.asList(new User("zhangsan", "123456"), // new User("lisi", "12365"), // new User("wangwu", "656"), // new User("xiaoming", "6545465")); // model.addAttribute("users", users); // 一来到这个请求,就要从数据库中获取数据,并展示 List<Emp> emps = empServicePlus.list(); // log.info(emps.toString()); for (Emp emp : emps) { if(emp.getGender().equals(String.valueOf('M'))) { emp.setGender("男"); } else { emp.setGender("女"); } } model.addAttribute("emps", emps); // 使用分页查询数据,必须整合分页插件(需要配置一个拦截器,见官方文档使用) Page<Emp> empPage = new Page<>(pn, 15); // 分页查询的结果 Page<Emp> page = empServicePlus.page(empPage, null); List<Emp> records = page.getRecords(); // 查询结果封装在page.getRecords(),等同于 List<Emp> emps = empServicePlus.list(); long pages = page.getPages(); long current = page.getCurrent(); long total = page.getTotal(); model.addAttribute("page", page); return "table/dynamic_table"; } @GetMapping("/emp/delete/{id}") public String deleteEmpById(@PathVariable("id")Long id, @RequestParam("pn")Integer pn, RedirectAttributes ra){ empServicePlus.removeById(id); ra.addAttribute("pn", pn); // 重定向携带参数 return "redirect:/dynamic_table"; } ....... } -
html
<div class="panel-body">
    <div class="adv-table">
        <table class="display table table-bordered" id="hidden-table-info">
            <thead>
                <tr>
                    <th>#</th>
                    <th>用户名</th>
                    <th>性别</th>
                    <th>邮箱</th>
                    <th>操作</th>
                </tr>
            </thead>
            <tbody>
                <tr class="gradeX" th:each="emp, status:${emps}">
                    <td th:text="${status.count}">Trident</td>
                    <td th:text="${emp.empName}">name</td>
                    <td>[[${emp.gender}]]</td>
                    <td th:text="${emp.email}">email</td>
                    <td>
                        <a th:href="@{/emp/delete/{id}(id=${emp.empId},pn=${page.current})}" class="btn btn-danger btn-sm" type="button">
                            删除
                        </a>
                    </td>
                </tr>
            </tbody>
        </table>
    </div>
    <!--                        <div class="row-fluid">-->
    <!--                            <div class="span6">-->
    <!--                                <div class="dataTables_info" id="hidden-table-info_info">-->
    <!--                                    当前第 [[${page.current}]] 页 总计 [[${page.pages}]] 页 共 [[${page.total}]] 条记录-->
    <!--                                </div>-->
    <!--                            </div>-->
    <!--                        </div>-->
</div>
3.5 NoSQL(待更新)
4、SpringBoot与单元测试
4.1 JUnit5的变化
-
Spring Boot 2.2.0 版本开始引入 JUnit 5 作为单元测试默认库
-
作为最新版本的JUnit框架,JUnit5与之前版本的Junit框架有很大的不同。由三个不同子项目的几个不同模块组成。
-
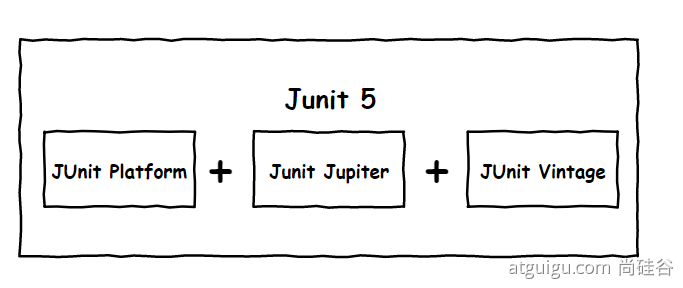
JUnit 5 = JUnit Platform + JUnit Jupiter + JUnit Vintage
-
JUnit Platform: Junit Platform是在JVM上启动测试框架的基础,不仅支持Junit自制的测试引擎,其他测试引擎也都可以接入。
-
JUnit Jupiter: JUnit Jupiter提供了JUnit5的新的编程模型,是JUnit5新特性的核心。内部包含了一个测试引擎,用于在Junit Platform上运行。
-
JUnit Vintage: 由于JUint已经发展多年,为了照顾老的项目,JUnit Vintage提供了兼容JUnit4.x,Junit3.x的测试引擎
-
-
注意:
SpringBoot 2.4 以上版本移除了默认对 Vintage 的依赖。如果需要兼容junit4需要自行引入(不能使用junit4的功能 @Test)
JUnit 5’s Vintage Engine Removed from spring-boot-starter-test,如果需要继续兼容junit4需要自行引入vintage
<!--兼容Junit4-->
<dependency>
    <groupId>org.junit.vintage</groupId>
    <artifactId>junit-vintage-engine</artifactId>
    <scope>test</scope>
    <exclusions>
        <exclusion>
            <groupId>org.hamcrest</groupId>
            <artifactId>hamcrest-core</artifactId>
        </exclusion>
    </exclusions>
</dependency>
使用Junit5:在项目生成的时候,spring-boot-starter-test会导入Junit的包,会默认生成了测试环境,如果需要在整个项目中使用,那么需要把
<dependency>
  <groupId>org.springframework.boot</groupId>
  <artifactId>spring-boot-starter-test</artifactId>
  <scope>test</scope>
</dependency>
项目中会生成一个test测试环境:@SpringBootTest
@Slf4j
@SpringBootTest
class Boot05WebAdminApplicationTests {

    @Autowired
    JdbcTemplate jdbcTemplate;

    @Autowired
    DataSource dataSource;

    @Test
    void contextLoads() {
        Long aLong = jdbcTemplate.queryForObject("select count(*) from tbl_emp", Long.class);
        log.info("记录总数:{}", aLong);
        log.info("数据库连接池的类型:{}", dataSource.getClass());

    }
}
以前的老版本操作:
@SpringBootTest + @RunWith(SpringTest.class)
SpringBoot整合Junit以后:
- 编写测试方法:@Test标注(注意需要使用Junit5版本的注解)
- Junit类具有Spring的功能,@Autowired、比如 @Transactional 标注测试方法,测试完成后自动回滚
- 导入Junit5的包路径:org.junit.jupiter.api.Test
- 导入Junit4的包路径:org.junit.Test
4.2 JUnit5常用注解
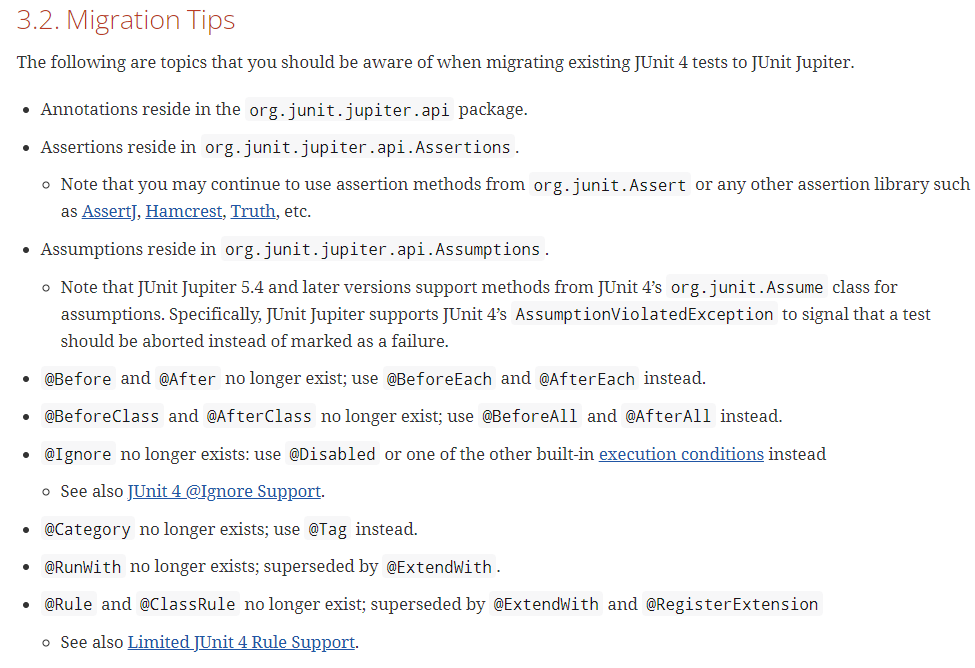
JUnit5的注解与JUnit4的注解有所变化
https://junit.org/junit5/docs/current/user-guide/#writing-tests-annotations
-
@Test :表示方法是测试方法。但是与JUnit4的@Test不同,他的职责非常单一不能声明任何属性,拓展的测试将会由Jupiter提供额外测试
-
@ParameterizedTest :表示方法是参数化测试,下方会有详细介绍
-
@RepeatedTest :表示方法可重复执行,下方会有详细介绍
-
@DisplayName :为测试类或者测试方法设置展示名称
-
@BeforeEach :表示在每个单元测试之前执行
-
@AfterEach :表示在每个单元测试之后执行
-
@BeforeAll :表示在所有单元测试之前执行
-
@AfterAll :表示在所有单元测试之后执行
-
@Tag :表示单元测试类别,类似于JUnit4中的@Categories
-
@Disabled :表示测试类或测试方法不执行,类似于JUnit4中的@Ignore
-
@Timeout :表示测试方法运行如果超过了指定时间将会返回错误
-
@ExtendWith :为测试类或测试方法提供扩展类引用
-
@SpringBootTest:使用SpringBoot环境进行测试,使用AOP容器
-
@RepeatedTest:重复测试,例如@RepeatedTest(5)重复测试五次
/*@RunWith*/
/**
* @BootstrapWith(SpringBootTestContextBootstrapper.class)
* @ExtendWith(SpringExtension.class)
*/
//@SpringBootTest
@DisplayName("junit5功能测试类")
public class Junit5Test {
@Autowired
JdbcTemplate jdbcTemplate;
/**
* 测试前置条件
*/
@DisplayName("测试前置条件")
@Test
void testassumptions(){
Assumptions.assumeTrue(false,"结果不是true");
System.out.println("111111");
}
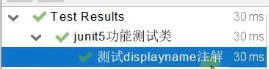
@DisplayName("测试displayname注解")
@Test
void testDisplayName() {
System.out.println(1);
System.out.println(jdbcTemplate); //null值,只有加上@SpringBootTest注解后,才能使用SpringBoot的配置,使用AOP容器
}
@Disabled
@DisplayName("测试方法2")
@Test
void test2() {
System.out.println(2);
}
@RepeatedTest(5)
@Test
void test3() {
System.out.println(5);
}
/**
* 规定方法超时时间。超出时间测试出异常
*
* @throws InterruptedException
*/
@Timeout(value = 500, unit = TimeUnit.MILLISECONDS)
@Test
void testTimeout() throws InterruptedException {
Thread.sleep(600);
}
@BeforeEach
void testBeforeEach() {
System.out.println("测试就要开始了...");
}
@AfterEach
void testAfterEach() {
System.out.println("测试结束了...");
}
@BeforeAll
static void testBeforeAll() {
System.out.println("所有测试就要开始了...");
}
@AfterAll
static void testAfterAll() {
System.out.println("所有测试以及结束了...");
}
}
4.3 断言(assertions)
断言(assertions)是测试方法中的核心部分,用来对测试需要满足的条件进行验证。这些断言方法都是 org.junit.jupiter.api.Assertions 的静态方法。JUnit 5 内置的断言可以分成如下几个类别:
-
检查业务逻辑返回的数据是否合理;
-
所有的测试运行结束以后,会有一个详细的测试报告;
4.3.1 简单断言
用来对单个值进行简单的验证。如:
| 方法 | 说明 |
|---|---|
| assertEquals | 判断两个对象或两个原始类型是否相等 |
| assertNotEquals | 判断两个对象或两个原始类型是否不相等 |
| assertSame | 判断两个对象引用是否指向同一个对象 |
| assertNotSame | 判断两个对象引用是否指向不同的对象 |
| assertTrue | 判断给定的布尔值是否为 true |
| assertFalse | 判断给定的布尔值是否为 false |
| assertNull | 判断给定的对象引用是否为 null |
| assertNotNull | 判断给定的对象引用是否不为 null |
| assertArrayEquals | 判断两个对象或原始类型的数组是否相等 |
//@SpringBootTest // 使用该注解,就可以使用SpringBoot的环境配置,比如AOP容器
@DisplayName("Junit5Test")
public class Junit5Test {
@BeforeAll
static public void beforeAll(){
System.out.println("启动测试....");
}
int cal(int a, int b){
return a + b;
}
/**
* 断言:若是在方法中,前面有一个断言判断条件失败,那么后面的代码都不会执行
*/
@Test
@DisplayName("测试简单断言(1)")
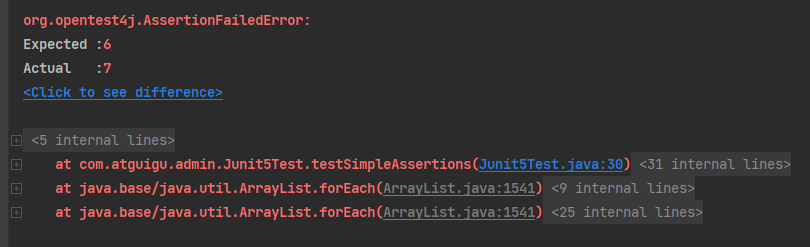
public void testSimpleAssertions(){
int cal = cal(3, 4);
// 断言的判断:错误会有提示信息,当然也可以自定义断言失败时的错误信息
Assertions.assertEquals(6, cal, "加法结果错误");
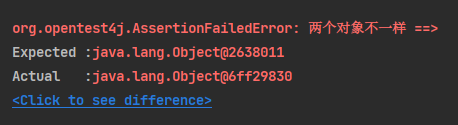
Object o = new Object();
Object o1 = new Object();
Assertions.assertSame(o, o1, "两个对象不一样");
}
@AfterAll
static public void afterAll(){
System.out.println("测试结束....");
}
}
-
没有自定义错误信息时
-
自定义错误信息时
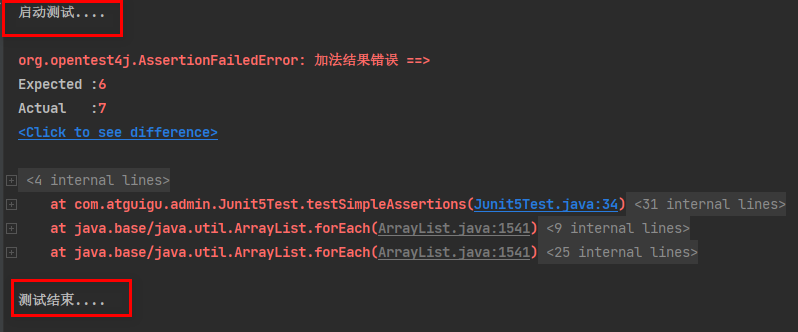
可以看到前一个断言判断条件失败后,下一个判断对象的断言并没有执行
-
第一个断言判断成功,往下执行下一个断言
4.3.2 组合断言
assertAll 方法接受多个 org.junit.jupiter.api.Executable 函数式接口的实例作为要验证的断言,可以通过 lambda 表达式很容易的提供这些断言。
@Test
@DisplayName("assert all")
public void all() { // 第一个参数传入组合断言的名称
 assertAll("Math",
    () -> assertEquals(2, 1 + 1),
    () -> assertTrue(1 > 0)
 );
}
4.3.3 异常断言
在JUnit4时期,想要测试方法的异常情况时,需要用@Rule注解的ExpectedException变量还是比较麻烦的。而JUnit5提供了一种新的断言方式Assertions.assertThrows() ,配合函数式编程就可以进行使用。
断定业务逻辑一定会出现异常
@Test
@DisplayName("异常测试")
public void exceptionTest() { //断定业务逻辑一定会出现异常
    ArithmeticException exception = Assertions.assertThrows(
           //扔出断言异常
            ArithmeticException.class, () -> System.out.println(1 % 0));

   // 另一种写法
    assertThrows(ArithmeticException.class, ()->{
        int i = 10/2;
    }, "业务逻辑仍然在执行中.....");
}
4.3.4 超时断言
Junit5还提供了Assertions.assertTimeout() 为测试方法设置了超时时间
@Test
@DisplayName("超时测试")
public void timeoutTest() {
    //如果测试方法时间超过1s将会异常
    Assertions.assertTimeout(Duration.ofMillis(1000), () -> Thread.sleep(500));
}
4.3.5 快速失败
通过 fail 方法直接使得测试失败
@Test
@DisplayName("快速失败")
public void shouldFail() {
    // 快速失败
    if(1 == 1) {
        fail("测试失败");
    }
}
4.4 前置条件(assumptions)
JUnit 5 中的前置条件(assumptions【假设】)类似于断言,不同之处在于不满足的断言会使得测试方法失败,而不满足的前置条件只会使得测试方法的执行终止。前置条件可以看成是测试方法执行的前提,当该前提不满足时,就没有继续执行的必要,就跳过。
@DisplayName("前置条件")
@Test
public void assumptionsTest(){
    assumeTrue(false, "前置执行条件不满足");
    System.out.println("执行程序中.......");
}
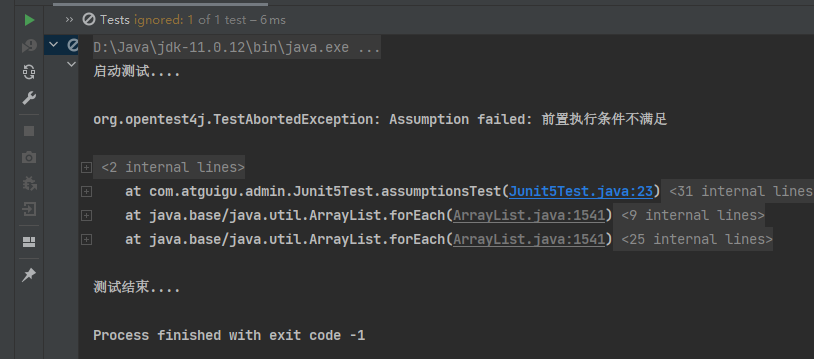
当前置条件不满足时,只是不执行,打印信息,执行结束(相当于跳过)。并不会像断言那样报错。
4.5 嵌套测试(assumptions)
JUnit 5 可以通过 Java 中的内部类和@Nested 注解实现嵌套测试,从而可以更好的把相关的测试方法组织在一起。在内部类中可以使用@BeforeEach 和@AfterEach 注解,而且嵌套的层次没有限制。
@Nested:注明这是一个嵌套测试类
下面的例子好好看看,帮助理解:
@DisplayName("A stack")
class TestingAStackDemo {

    Stack<Object> stack; // 并没有创建一个对象实例

    @Test
    @DisplayName("new Stack()")
    void isInstantiatedWithNew() {
        new Stack<>();
        // 嵌套测试的情况下,外层的Test不能驱动内层测试类的方法(如BeforeEach等)
        assertNotNull(stack); // false,stack为null,这条断言条件不成立,报错
    }

    @Nested // 这是一个嵌套测试
    @DisplayName("when new")
    class WhenNew {

        @BeforeEach
        void createNewStack() {
            stack = new Stack<>();
        }

        @Test
        @DisplayName("is empty")
        void isEmpty() { //@BeforeEach会创建一个栈的实例,但现在栈中没有元素,所以是empty的
            assertTrue(stack.isEmpty());// true
        }

        @Test
        @DisplayName("throws EmptyStackException when popped")
        void throwsExceptionWhenPopped() {
            // 由于栈空,执行不了pop操作,肯定会抛出栈空的异常,所以这条断言能顺利执行
            assertThrows(EmptyStackException.class, stack::pop);
        }

        @Test
        @DisplayName("throws EmptyStackException when peeked")
        void throwsExceptionWhenPeeked() {
            //栈为空,想查看第一个元素,必定会抛出栈空的异常。这也是我们希望的,所以也是能够执行的,断言是成功的
            assertThrows(EmptyStackException.class, stack::peek);
        }

        @Nested
        @DisplayName("after pushing an element")
        class AfterPushing {

            String anElement = "an element";

            @BeforeEach
            void pushAnElement() {// 注意这个嵌套方法,测试之前添加了元素,而栈的实例化,是已经在外层测试中创建了。也就是内层Test能够驱动外层的Test
                stack.push(anElement);
            }

            @Test
            @DisplayName("it is no longer empty")
            void isNotEmpty() {// 此时栈中已经有元素了,不再为空
                assertFalse(stack.isEmpty());// 当前断言成功,即栈不是空栈
            }

            @Test
            @DisplayName("returns the element when popped and is empty")
            void returnElementWhenPopped() {
                assertEquals(anElement, stack.pop());// 一定等于
                assertTrue(stack.isEmpty());// 因为出栈了,所以栈一定为空,断言成功
            }

            @Test
            @DisplayName("returns the element when peeked but remains not empty")
            void returnElementWhenPeeked() {
                assertEquals(anElement, stack.peek());//只查看元素,不弹出移除元素
                assertFalse(stack.isEmpty());// 所以当前栈肯定不为空,断言成功
            }
        }
    }
}
- 嵌套测试的情况下,外层的Test不能驱动内层测试类的方法(如BeforeEach等)
- 而内层Test能够驱动外层的Test
4.6 参数化测试
参数化测试是JUnit5很重要的一个新特性,可以用不同的参数多次运行测试。
利用@ValueSource等注解,指定入参,我们将可以使用不同的参数进行多次单元测试,而不需要每新增一个参数就新增一个单元测试。
参数测试的一些注解:
@ParameterizedTest:这是一个参数化测试(必须注明)
@ValueSource: 为参数化测试指定入参来源,支持八大基础类以及String类型,Class类型
@NullSource: 表示为参数化测试提供一个null的入参
@EnumSource: 表示为参数化测试提供一个枚举入参
@CsvFileSource:表示读取指定CSV文件内容作为参数化测试入参
@MethodSource:表示读取指定方法的返回值作为参数化测试入参(注意方法返回需要是一个流)
    @ParameterizedTest
    @DisplayName("参数化测试")
    @ValueSource(ints = {1,2,3,4,5})
    public void parameterizedTest(int i){
        System.out.println(i);
    }

    @ParameterizedTest
    @DisplayName("参数化测试2")
    @MethodSource("stringProvider")
    public void parameterizedTest2(String str){
        System.out.println(str);
    }

    static Stream<String> stringProvider(){
        return Stream.of("apple", "banana", "orange");
    }
4.7 迁移指南
5、指标监控(SpringBoot Actuator)
5.1 简介
未来每一个微服务在云上部署以后,我们都需要对其进行监控、追踪、审计、控制等。SpringBoot就抽取了Actuator场景,使得我们每个微服务快速引用即可获得生产级别的应用监控、审计等功能。
<dependency>
    <groupId>org.springframework.boot</groupId>
    <artifactId>spring-boot-starter-actuator</artifactId>
</dependency>
5.2 如何使用
-
引入场景(starter)
-
访问 http://localhost:8080/actuator/**(注意actuator前缀)
-
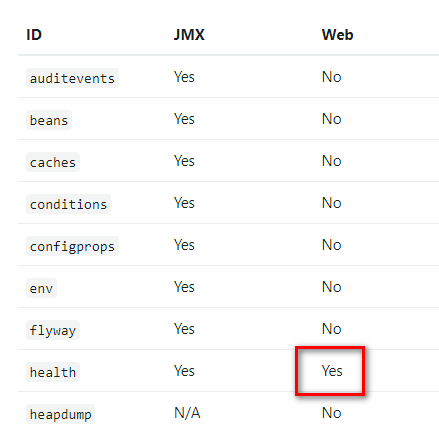
监控端点
-
默认在web中只开启了health这个端点,JMX开启的可以去Jconsol查看
-
-
暴露所有监控信息为HTTP(给web方式开启监控端点)
在配置管理文件文件yaml或properties中进行配置:
management: endpoints: enabled-by-default: true # 默认开启所有端点 web: exposure: include: '*' # 以web方式暴露 -
测试
http://localhost:8080/actuator/beans
http://localhost:8080/actuator/configprops
http://localhost:8080/actuator/metrics
http://localhost:8080/actuator/metrics/jvm.gc.pause
http://localhost:8080/actuator/endpointName/detailPath
5.3 常用端点
| ID | 描述 |
|---|---|
auditevents |
暴露当前应用程序的审核事件信息。需要一个AuditEventRepository组件。 |
beans |
显示应用程序中所有Spring Bean的完整列表。 |
caches |
暴露可用的缓存。 |
conditions |
显示自动配置的所有条件信息,包括匹配或不匹配的原因。 |
configprops |
显示所有@ConfigurationProperties。 |
env |
暴露Spring的属性ConfigurableEnvironment |
flyway |
显示已应用的所有Flyway数据库迁移。 需要一个或多个Flyway组件。 |
health |
显示应用程序运行状况信息。 |
httptrace |
显示HTTP跟踪信息(默认情况下,最近100个HTTP请求-响应)。需要一个HttpTraceRepository组件。 |
info |
显示应用程序信息。 |
integrationgraph |
显示Spring integrationgraph 。需要依赖spring-integration-core。 |
loggers |
显示和修改应用程序中日志的配置。 |
liquibase |
显示已应用的所有Liquibase数据库迁移。需要一个或多个Liquibase组件。 |
metrics |
显示当前应用程序的“指标”信息。 |
mappings |
显示所有@RequestMapping路径列表。 |
scheduledtasks |
显示应用程序中的计划任务。 |
sessions |
允许从Spring Session支持的会话存储中检索和删除用户会话。需要使用Spring Session的基于Servlet的Web应用程序。 |
shutdown |
使应用程序正常关闭。默认禁用。 |
startup |
显示由ApplicationStartup收集的启动步骤数据。需要使用SpringApplication进行配置BufferingApplicationStartup。 |
threaddump |
执行线程转储。 |
如果您的应用程序是Web应用程序(Spring MVC,Spring WebFlux或Jersey),则可以使用以下附加端点:
| ID | 描述 |
|---|---|
heapdump |
返回hprof堆转储文件。 |
jolokia |
通过HTTP暴露JMX bean(需要引入Jolokia,不适用于WebFlux)。需要引入依赖jolokia-core。 |
logfile |
返回日志文件的内容(如果已设置logging.file.name或logging.file.path属性)。支持使用HTTPRange标头来检索部分日志文件的内容。 |
prometheus |
以Prometheus服务器可以抓取的格式公开指标。需要依赖micrometer-registry-prometheus。 |
最常用的Endpoint
-
Health:监控状况
-
Metrics:运行时指标
-
Loggers:日志记录
5.4 Health Endpoint
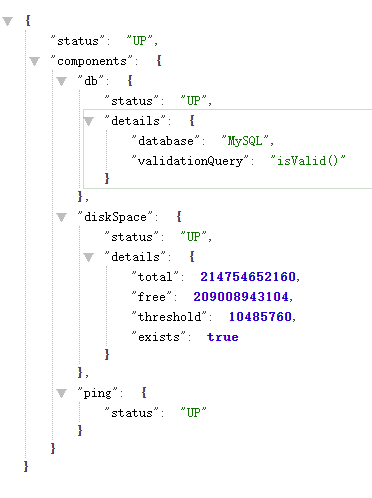
健康检查端点,我们一般用于在云平台,平台会定时的检查应用的健康状况,我们就需要Health Endpoint可以为平台返回当前应用的一系列组件健康状况的集合。
http://localhost:8080/actuator/health
重要的几点:
-
health endpoint返回的结果,应该是一系列健康检查后的一个总汇总报告
-
很多的健康检查默认已经自动配置好了,比如:数据库、redis等
-
可以很容易的添加自定义的健康检查机制
-
在yaml或者properties中的配置文件
# management:是所有actuator的配置
# management.endpoint.端口名.xxx 对某个端点的具体配置
management:
  endpoints: # 所有端点的设置
    enabled-by-default: false # 默认是开启所有端点 true(相当于总开关)
    web:
      exposure:
        include: '*'  # 以web方式暴露
  endpoint: # 单个端点的设置
    health:
      show-details: always
      enabled: true
    beans:
      enabled: true # 如果关闭总开关的话,就要分别挨个开启组件
    metrics:
      enabled: true
5.5 Metrics Endpoint
提供详细的、层级的、空间指标信息,这些信息可以被pull(主动推送)或者push(被动获取)方式得到;
-
通过Metrics对接多种监控系统
-
简化核心Metrics开发
-
添加自定义Metrics或者扩展已有Metrics
-
测试:
-
访问:http://localhost:8080/actuator/metrics/

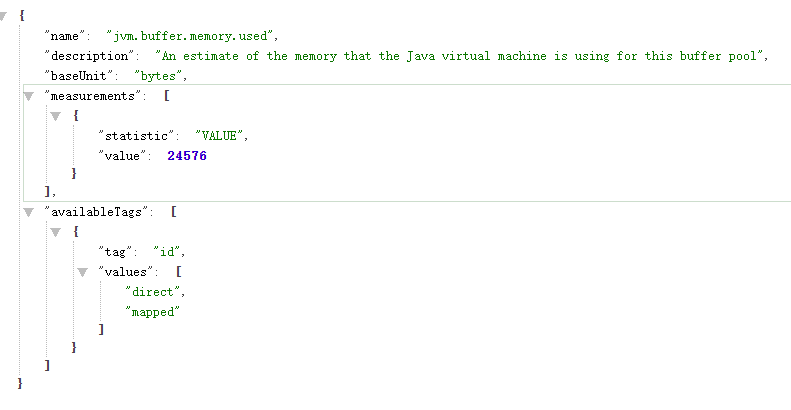
-
进一步查看某行的具体信息,如jvm.buffer.memory.used
http://localhost:8080/actuator/metrics/jvm.buffer.memory.used
-
5.6 定制EndPoint
5.6.1 定制Health信息
继承 extends AbstractHealthIndicator
@Component
public class MyComHealthIndicator extends AbstractHealthIndicator {

    /**
     * 真实的检查方法
     * @param builder
     * @throws Exception
     */
    @Override
    protected void doHealthCheck(Health.Builder builder) throws Exception {
        //mongodb。  获取连接进行测试
        Map<String,Object> map = new HashMap<>();
        // 检查完成
        if(1 == 1){
//            builder.up(); //健康
            builder.status(Status.UP);
            map.put("count",1);
            map.put("ms",100);
        }else {
//            builder.down();
            builder.status(Status.OUT_OF_SERVICE);
            map.put("err","连接超时");
            map.put("ms",3000);
        }

        builder.withDetail("code",100)
                .withDetails(map);

    }
}
management:
    health:
      enabled: true
      show-details: always #总是显示详细信息。可显示每个模块的状态信息
5.6.2 定制info信息
http://localhost:8080/actuator/info 会输出所有的info信息
一般常用有两种方式:
-
通过配置文件定制
info: appName: SpringBoot-Admin appVersion: 1.0.0 mavenProjectName: "@project.artifactId@" #使用@@可以获取maven的pom文件值 mavenProjectVersion: "@project.version@" -
实现InfoContributor接口
@Component
public class AppInfoInfoContributor implements InfoContributor {


    @Override
    public void contribute(Info.Builder builder) {

        builder.withDetail("msg","你好")
                .withDetail("hello","atguigu")
                .withDetails(Collections.singletonMap("world","666600"));
    }
}
5.6.3 定制Metrics信息
1、SpringBoot支持自动适配的Metrics
-
JVM metrics, report utilization of:
-
- Various memory and buffer pools
- Statistics related to garbage collection
-
- Threads utilization
- Number of classes loaded/unloaded
-
CPU metrics
-
File descriptor metrics
-
Kafka consumer and producer metrics
-
Log4j2 metrics: record the number of events logged to Log4j2 at each level
-
Logback metrics: record the number of events logged to Logback at each level
-
Uptime metrics: report a gauge for uptime and a fixed gauge representing the application’s absolute start time
-
Tomcat metrics (
server.tomcat.mbeanregistry.enabledmust be set totruefor all Tomcat metrics to be registered) -
Spring Integration metrics
2、增加定制Metrics
class MyService{
    Counter counter;
    public MyService(MeterRegistry meterRegistry){
         counter = meterRegistry.counter("myservice.method.running.counter");
    }

    public void hello() {
        counter.increment();
    }
}


//也可以使用下面的方式
@Bean
MeterBinder queueSize(Queue queue) {
    return (registry) -> Gauge.builder("queueSize", queue::size).register(registry);
}
5.6.4 定制Endpoint
@Component
@Endpoint(id = "myservice")
public class MyServiceEndPoint {


    @ReadOperation
    public Map getDockerInfo(){
        //端点的读操作  http://localhost:8080/actuator/myservice
        return Collections.singletonMap("dockerInfo","docker started.....");
    }

    @WriteOperation
    public void stopDocker(){
        System.out.println("docker stopped.....");
    }

}
6、Boot-Admin-Server
https://github.com/codecentric/spring-boot-admin
开源的可视化监控平台
客户端:
  boot:
    admin:
      client:
        url: http://localhost:8888
        instance:
          prefer-ip: true  #使用ip注册进来
  application: # 应用名称
    name: boot-05-web-admin

 浙公网安备 33010602011771号