centos7下zabbix搭建
Zabbix 介绍
zabbix 是一个基于 WEB 界面的提供分布式系统监视以及网络监视功能的企业级的开源解决方案 ( 基于 GPL V2 )
zabbix 由 2 部分构成,zabbix server 与可选组件 zabbix agent
Zabbix 工作架构
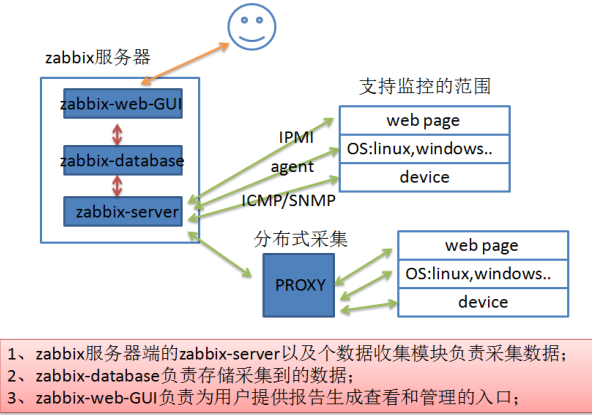
zabbix 安装完成后会产生 5 个程序
1)zabbix_agentd:客户端守护进程,此进程收集客户端数据,例如 cpu 负载、内存、硬盘使用情况等
2)zabbix_get:zabbix 工具,单独使用的命令,通常用于排错
3) zabbix_sender: zabbix 工具, 用于发送数据给 server 或者 proxy , 在脚本完成之后使用 sender 主动将数据提交
4)zabbix_server:zabbix 服务端守护进程,所有的数据都是被提交或主动提交到 zabbix_server 端
5)zabbix_proxy:zabbix 代理守护进程。功能类似 server,唯一不同的是它只是一个中转站,它需要把收集到的数据提交/被提交到 server 里
6)zabbix_java_gateway:zabbix2.0 之后引入的一个功能。顾名思义:Java 网关,类似 agentd,但是只用于 Java 方面。需要特别注意的是,
它只能主动去获取数据,而不能被动获取数据。它的数据最终会给到 server 或者 proxy
硬件需求:

构建 Zabbix 监控服务器
关闭防火墙和selinux
# systemctl stop firewalld && systemctl disable firewalld
# sed -i "s/SELINUX=enforcing/SELINUX=disabled/g" /etc/selinux/config
# reboot
安装LAMP环境
编译安装见https://www.cnblogs.com/wengshaohang/p/12287676.html
使用yum安装
# yum install mariadb mariadb-server mariadb-devel httpd php php-mysql php-gd libjpeg* php-ldap php-odbc php-pear
php-xml php-xmlrpc php-mbstring php-bcmath php-mhash libxml2-devel libevent-devel curl-devel net-snmp* php-snmp
# systemctl enable httpd
# systemctl restart httpd
# systemctl enable mariadb
# systemctl restart mariadb
# mysql_secure_installation
[root@localhost ~]# mysql_secure_installation
NOTE: RUNNING ALL PARTS OF THIS SCRIPT IS RECOMMENDED FOR ALL MySQL
SERVERS IN PRODUCTION USE! PLEASE READ EACH STEP CAREFULLY!
In order to log into MySQL to secure it, we'll need the current
password for the root user. If you've just installed MySQL, and
you haven't set the root password yet, the password will be blank,
so you should just press enter here.
Enter current password for root (enter for none):<–初次运行直接回车
OK, successfully used password, moving on…
Setting the root password ensures that nobody can log into the MySQL
root user without the proper authorisation.
Set root password? [Y/n]    #是否设置root用户密码,输入y并回车或直接回车
New password:               #设置root用户的密码
Re-enter new password:      #再输入一次你设置的密码
Password updated successfully!
Reloading privilege tables..
… Success!
By default, a MySQL installation has an anonymous user, allowing anyone
to log into MySQL without having to have a user account created for
them. This is intended only for testing, and to make the installation
go a bit smoother. You should remove them before moving into a
production environment.
Remove anonymous users? [Y/n]   #是否删除匿名用户,生产环境建议删除,所以直接回车
… Success!
Normally, root should only be allowed to connect from 'localhost'. This
ensures that someone cannot guess at the root password from the network.
Disallow root login remotely? [Y/n] #是否禁止root远程登录,根据自己的需求选择Y/n并回车,建议禁止
… Success!
By default, MySQL comes with a database named 'test' that anyone can
access. This is also intended only for testing, and should be removed
before moving into a production environment.
Remove test database and access to it? [Y/n] #是否删除test数据库,直接回车
- Dropping test database…
… Success!
- Removing privileges on test database…
… Success!
Reloading the privilege tables will ensure that all changes made so far
will take effect immediately.
Reload privilege tables now? [Y/n] #是否重新加载权限表,直接回车
… Success!
Cleaning up…
All done! If you've completed all of the above steps, your MySQL
installation should now be secure.
Thanks for using MySQL!
[root@localhost ~]#
测试lamp环境
在httpd的主配置文件/etc/httpd/conf/httpd.conf的
DirectoryIndex index.html 前面添加index.php,
DirectoryIndex index.php.php index.html
重启httpd
#systemctl restart httpd
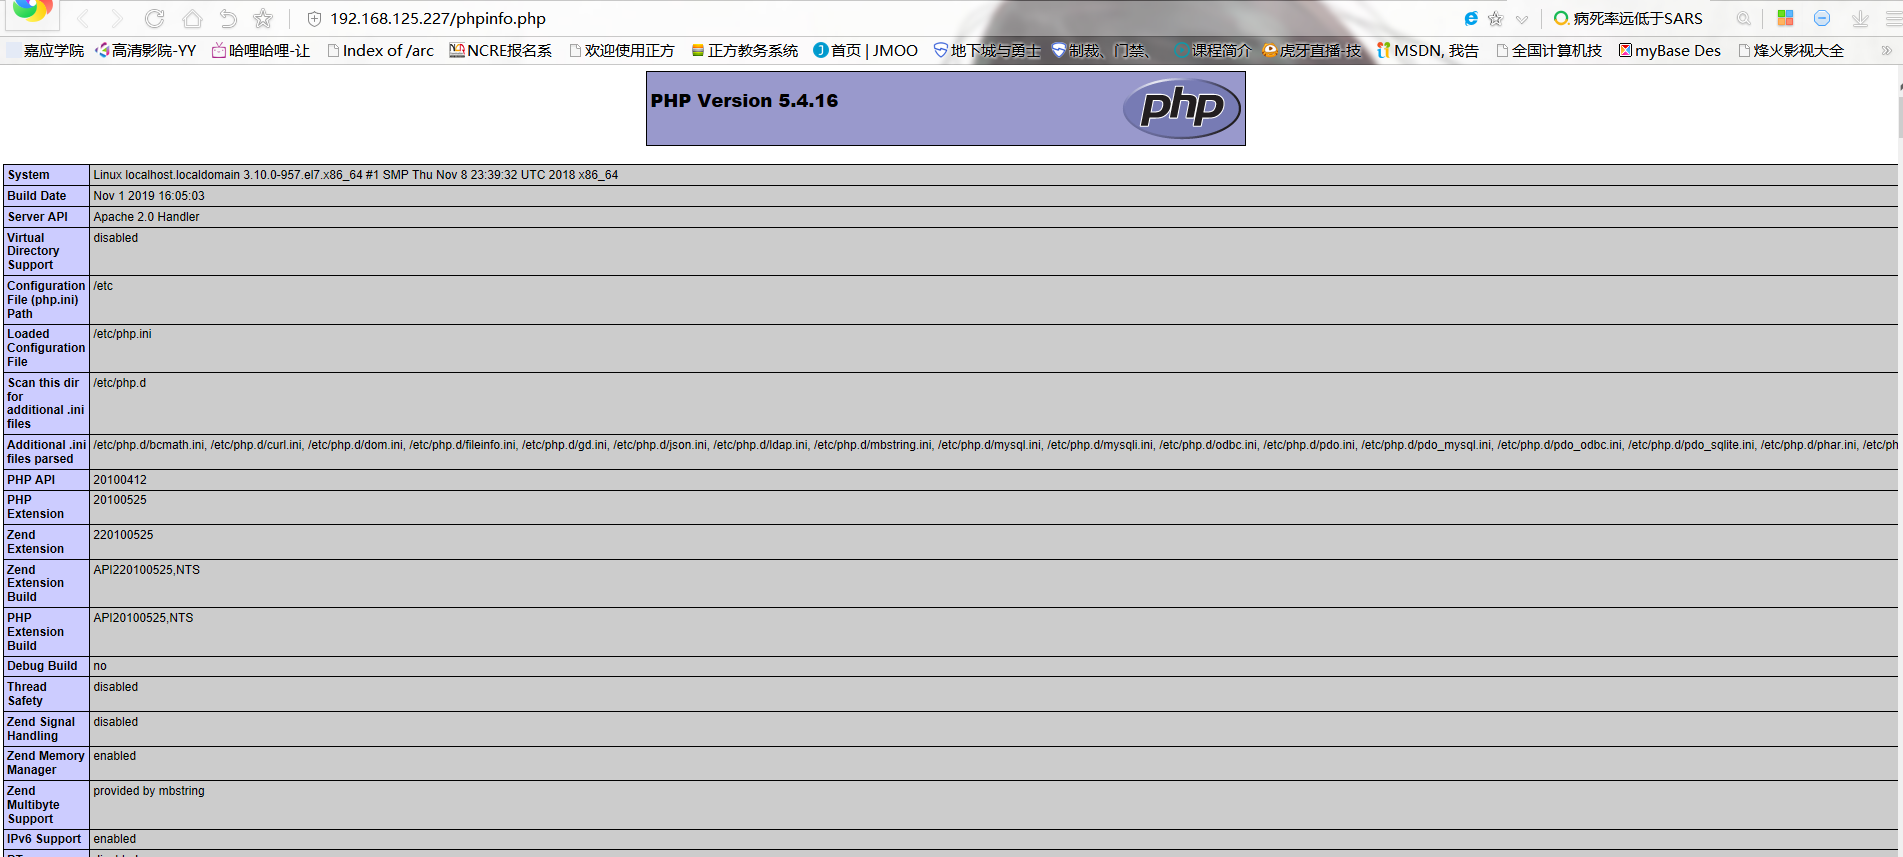
vim /var/www/html/phpinfo.php
<?php
phpinfo();
?>
安装 Zabbix 程序
下载zabbix 软件
前往https://www.zabbix.com/download_sources下载4.2.4,下载完成后上传至服务器
[root@localhost ~]# tar zxvf zabbix-4.2.4.tar.gz
[root@localhost ~]# cd zabbix-4.2.4
创建zabbix用户、用户组
[root@localhost zabbix-4.2.4]# groupadd zabbix
[root@localhost zabbix-4.2.4]# useradd -g zabbix -s /sbin/nologin zabbix
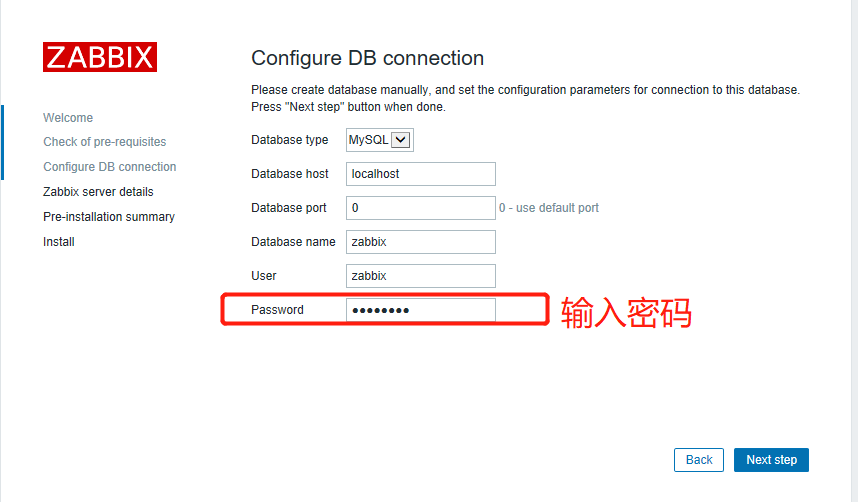
数据库创建zabbix库
[root@localhost ~]# mysql -uroot -pxxxxx //输入自己的密码
MariaDB [(none)]> CREATE DATABASE zabbix character set utf8 collate utf8_bin; //创建zabbix库
MariaDB [(none)]> grant all privileges on zabbix.* to zabbix@localhost identified by 'password' ;//建立zabbix用户并授予zabbix库所有权限
MariaDB [(none)]> flush privileges; //刷新权限
导入zabbix数据库脚本
mysql> use zabbix ;
mysql> source /root/zabbix-4.2.4/database/mysql/schema.sql ;
mysql> source /root/zabbix-4.2.4/database/mysql/images.sql ;
mysql> source /root/zabbix-4.2.4/database/mysql/data.sql ;
编译安装(Zabbix-Server)
[root@localhost ~]# cd /root/zabbix-4.2.4
[root@localhost ~]# yum install -y gcc
[root@localhost zabbix-4.2.4]# ./configure --prefix=/usr/local/zabbix --enable-server --enable-agent --with-mysql --enable-ipv6 --with-net-snmp --with-libcurl --with-libxml2
[root@localhost zabbix-4.2.4]# make && make install
编辑/usr/local/zabbix/etc/zabbix_server.conf,配置数据库用户名、密码
DBName=zabbix
DBUser=zabbix
DBPassword=password
启动服务
# systemctl start mariadb && systemctl start httpd
# /usr/local/zabbix/sbin/zabbix_server &
# /usr/local/zabbix/sbin/zabbix_agentd &
端口说明:
tcp 10050 ---> zabbix_agent
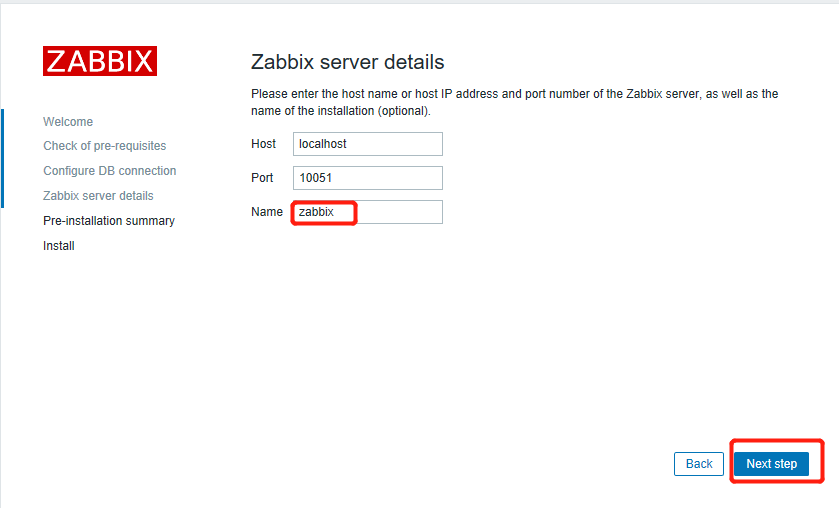
tcp 10051 ---> zabbix_server
查看端口
[root@localhost zabbix-4.2.4]# netstat -tnlp
Active Internet connections (only servers)
Proto Recv-Q Send-Q Local Address Foreign Address State PID/Program name
tcp 0 0 0.0.0.0:3306 0.0.0.0:* LISTEN 8893/mysqld
tcp 0 0 0.0.0.0:22 0.0.0.0:* LISTEN 6586/sshd
tcp 0 0 127.0.0.1:25 0.0.0.0:* LISTEN 6680/master
tcp 0 0 0.0.0.0:10050 0.0.0.0:* LISTEN 24833/zabbix_agentd
tcp 0 0 0.0.0.0:10051 0.0.0.0:* LISTEN 24766/zabbix_server
tcp6 0 0 :::80 :::* LISTEN 8675/httpd
tcp6 0 0 :::22 :::* LISTEN 6586/sshd
tcp6 0 0 ::1:25 :::* LISTEN 6680/master
tcp6 0 0 :::10050 :::* LISTEN 24833/zabbix_agentd
tcp6 0 0 :::10051 :::* LISTEN 24766/zabbix_server
安装Zabbix web界面
只需要简单的从frontends/php路径下复制PHP文件到Web服务器的HTML文件目录,就可以完成安装。
[root@localhost zabbix-4.2.4]# mv /root/zabbix-4.2.4/frontends/php /var/www/html/zabbix
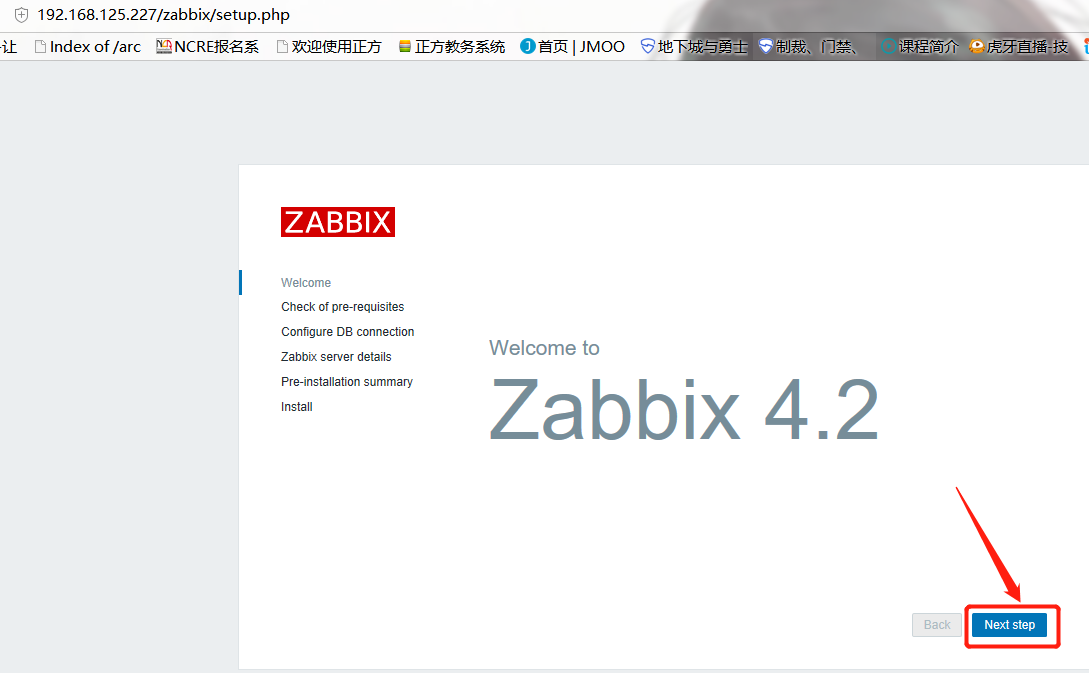
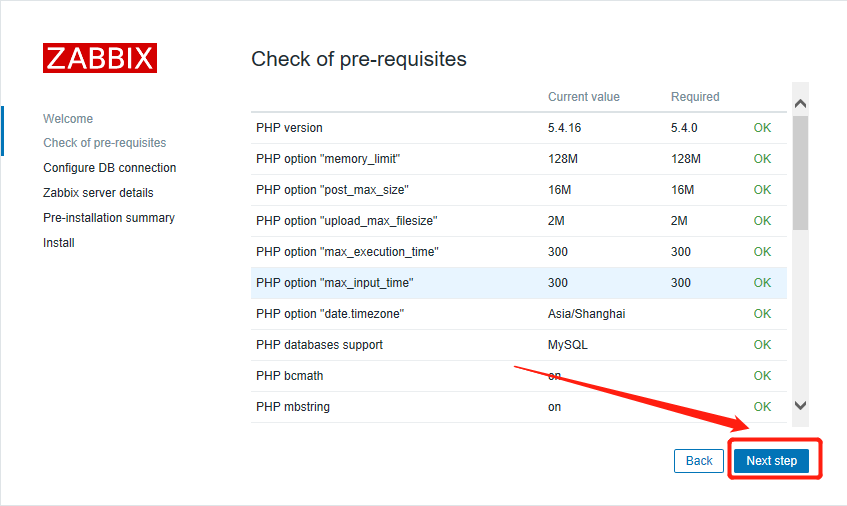
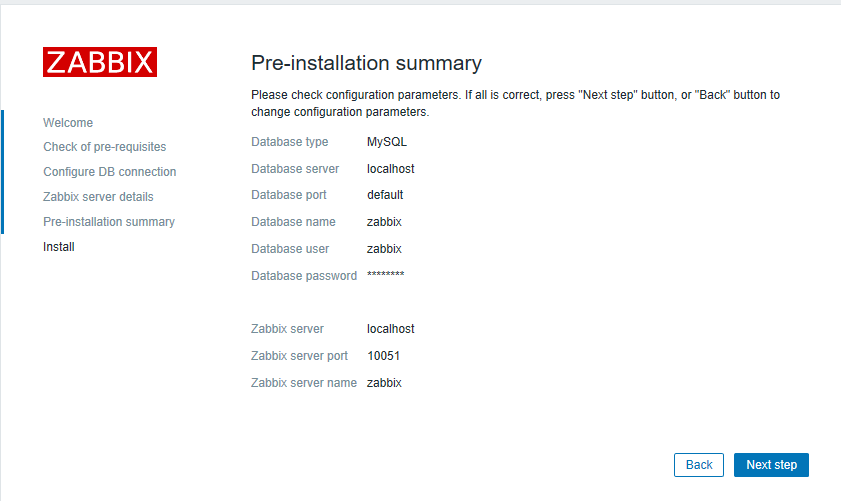
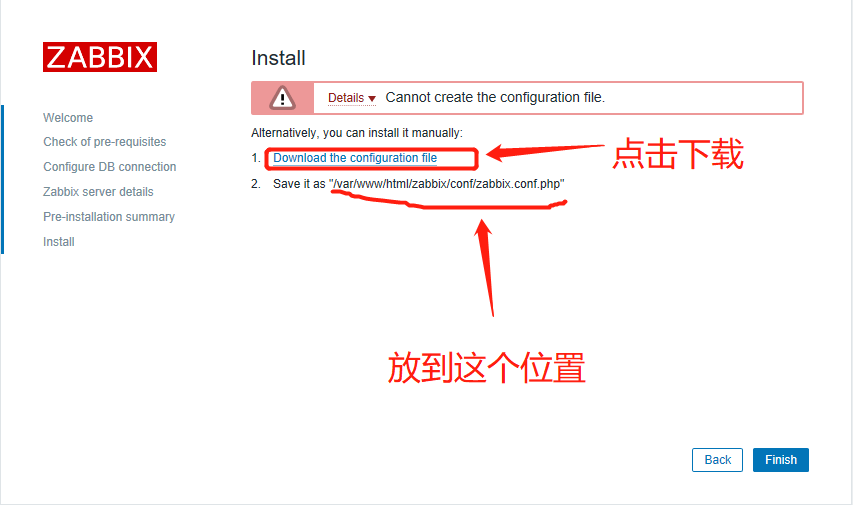
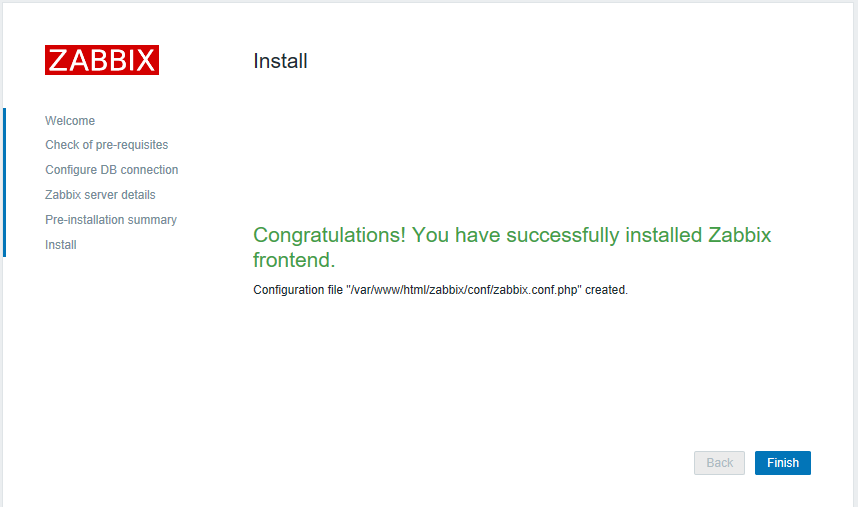
浏览器访问zabbix-server按照向导完成配置
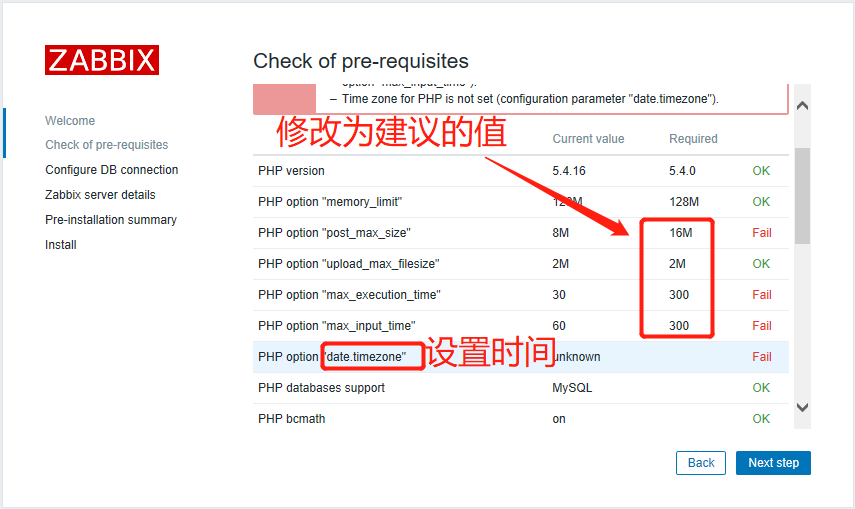
[root@localhost ~]# vi /etc/php.ini ,修改上面报错的地方
重启httpd刷新
[root@localhost ~]# systemctl restart httpd
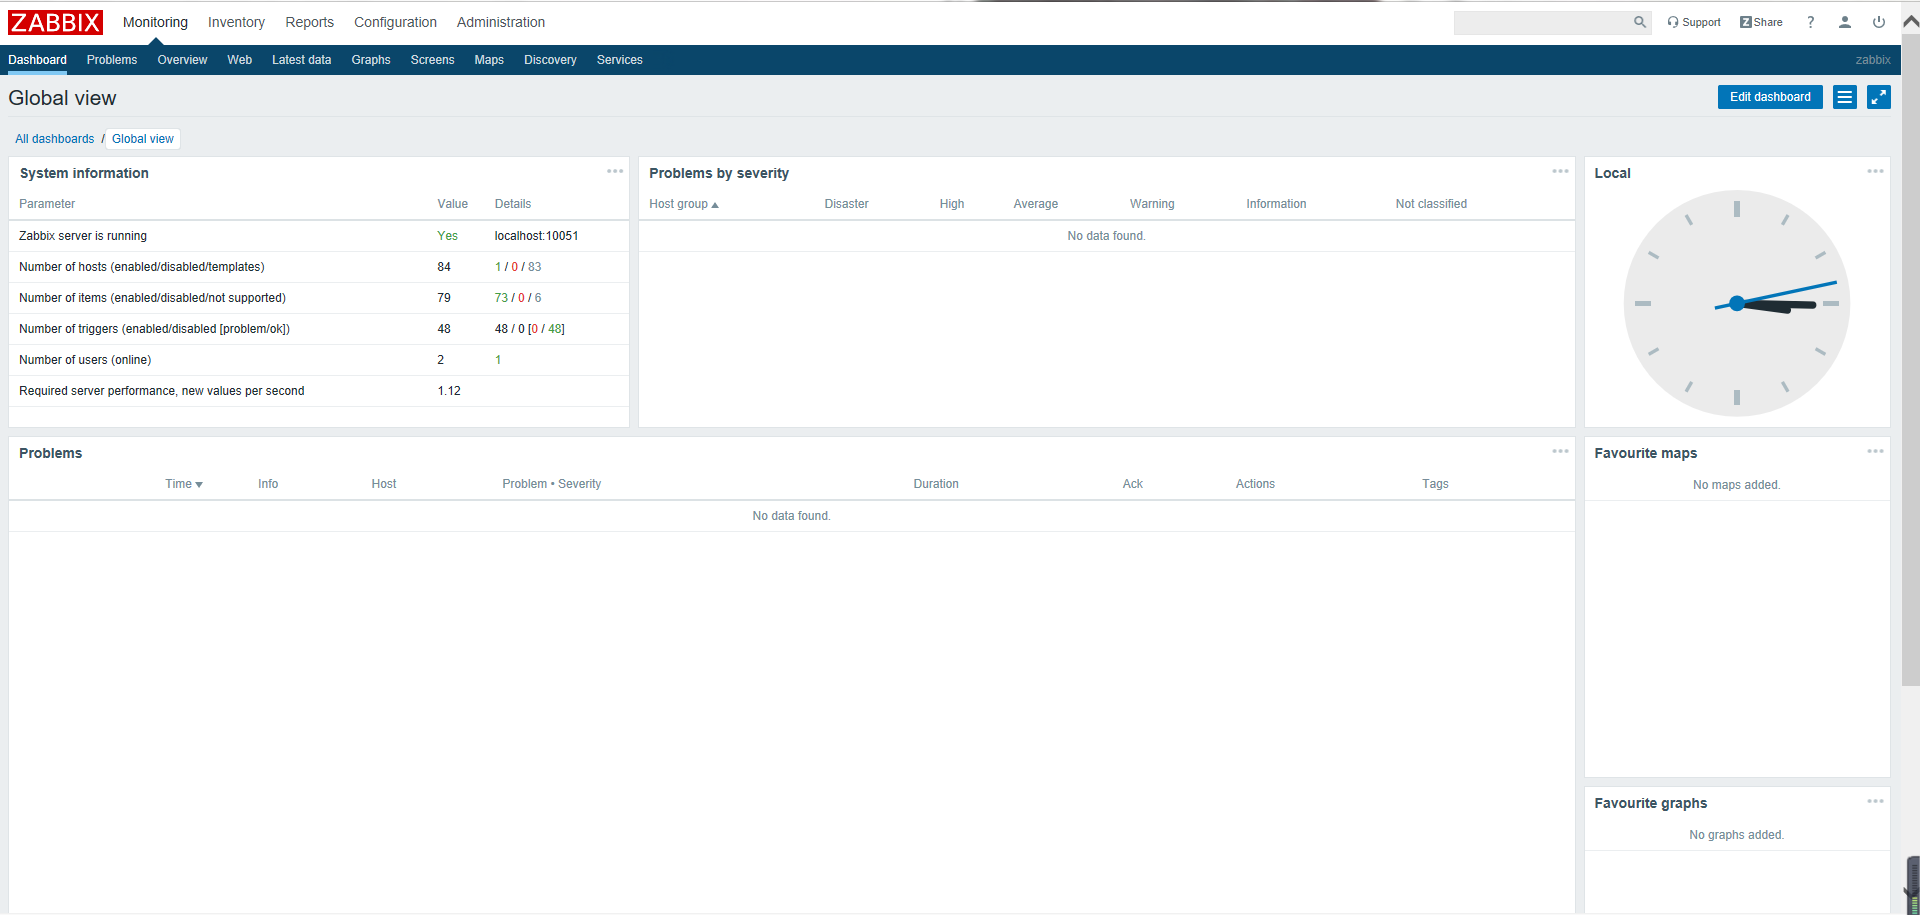
输入初始密码:Admin/zabbix 登录
修改中文乱码问题
find / -name fonts 找到/var/www/html/zabbix/assets/fonts
把原来的字体移动到别处,复制windows下C:\Windows\Fonts\simfang.ttf到/var/www/html/zabbix/assets/fonts/simfang.ttf,
修改/var/www/html/zabbix/include/defines.inc.php配置文件的DejaVuSans为simfang即可
客户端安装
1.编译安装(Zabbix-Agent)
安装依赖
# yum install pcre-devel gcc
如果是安装zabbix-agent,则只需要执行:
#./configure --prefix=/usr/local/zabbix_agent --enable-agent
#make install
添加zabbix用户,不添加用户开启服务时会报错
#useradd -s /sbin/nologin zabbix
2.修改
vi /usr/local/zabbix_agent/etc/zabbix_agentd.conf
Server=192.168.211.156 --->服务器IP
ServerActive=192.168.211.156 --->服务器IP
Hostname=192.168.211.155 --->本机IP或自己的主机名(能被解析)
3.启动服务(agent)
/usr/local/zabbix_agent/sbin/zabbix_agentd &
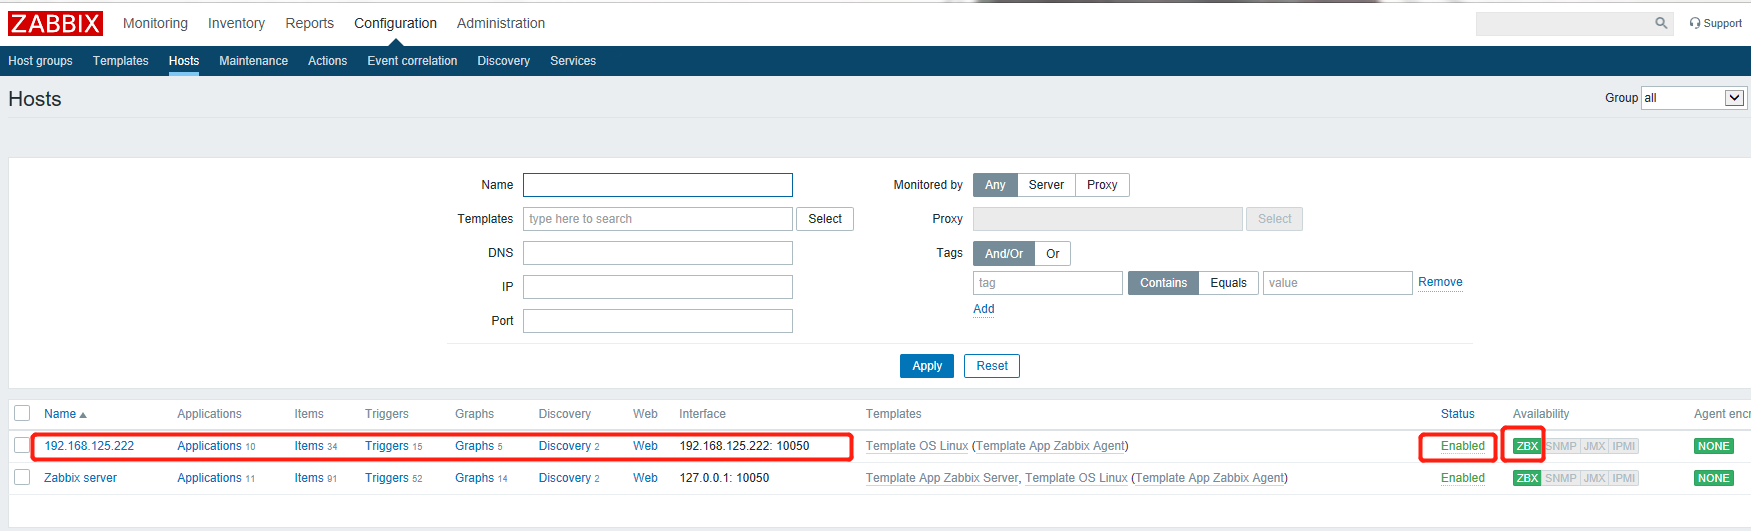
添加被监控端
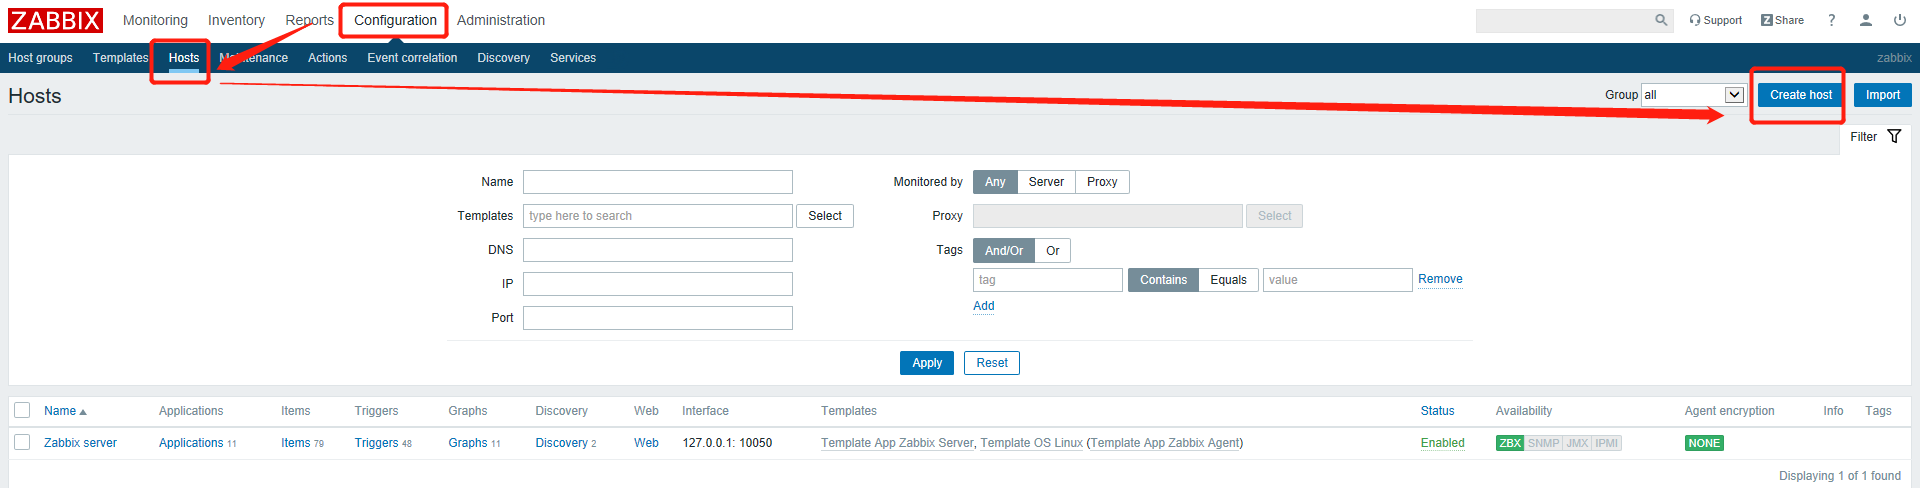
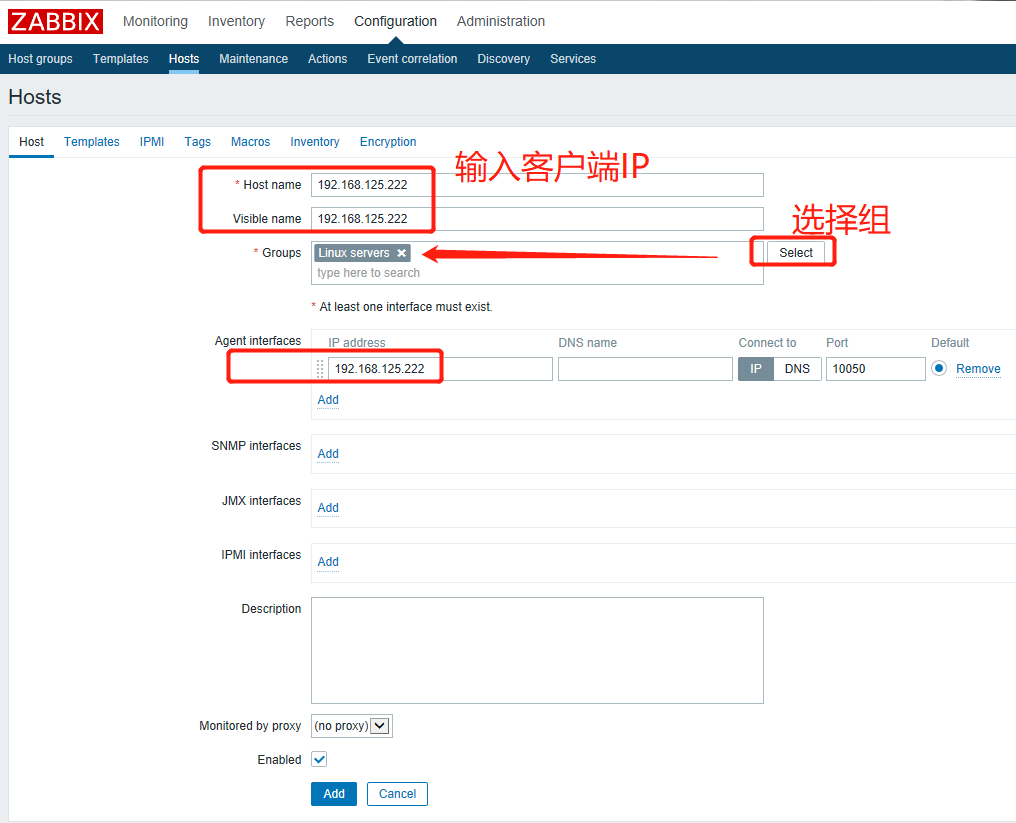
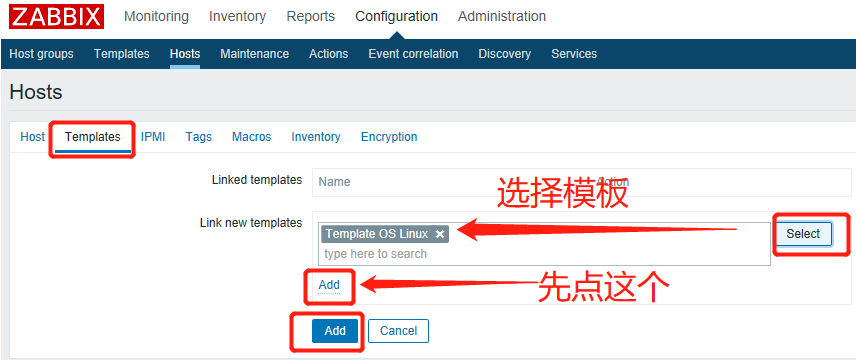
等一会儿可以看到添加成功