jenkins集成ansible、gitlab自动化部署nginx并实现向GitLab提交代码之后自动触发Jenkins构建
jenkins+gitlab+ansible自动化部署nginx
目录
编写ansible playbook模板实现nginx远程部署
将playbook模板提交到GitLab
构建freestyle job实现自动化部署
向GitLab提交代码之后自动触发Jenkins构建
测试提交代码
实验环境:
jenkins、ansible服务器: 192.168.125.224 (ansible和jenkins安装在同一台服务器)
gitlab服务器: 192.168.125.222
centos7做远程测试机:192.168.125.225
修改/etc/hosts文件,3台服务器都要修改
[root@gitlab ~]# cat /etc/hosts
127.0.0.1 localhost localhost.localdomain localhost4 localhost4.localdomain4
::1 localhost localhost.localdomain localhost6 localhost6.localdomain6
192.168.125.225 test.example.com
192.168.125.222 gitlab.example.com
192.168.125.224 jenkins.example.com
编写ansible playbook模板实现nginx远程部署,Ansible安装见https://www.cnblogs.com/wengshaohang/p/12276153.html
登录gitlab页面,创建nginx工程后并复制仓库地址,gitlab相关操作见https://www.cnblogs.com/wengshaohang/p/12269127.html
gitlab安装见https://www.cnblogs.com/wengshaohang/p/12268758.html
打开git bash命令行窗口,把远程仓库克隆到本地,进入克隆的仓库,编写playbook模板,目录如下

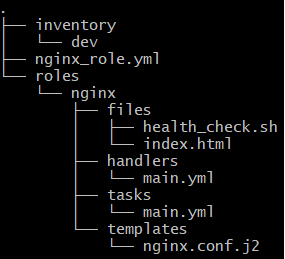
任务入口文件
[deploy@jenkins ansible]$ vim nginx_role.yml
- hosts: "nginx"
gather_facts: true
remote_user: root
roles:
- nginx
主机清单文件
[deploy@jenkins ansible]$vim inventory/dev
[nginx]
test.example.com

[nginx:vars]
server_name=test.example.com
port=88
nguser=deploy
nggroup=deploy
worker_processes=4
max_open_file=65505
ugr=/www
要发送给远程主机的文件,分别是nginx静态页面和健康检查脚本
[deploy@jenkins ansible]$ vim roles/nginx/files/index.html
this is first nginx

[deploy@jenkins ansible]$ vim roles/nginx/files/health_check.sh
#!/bin/sh

URL=$1
PORT=$2

curl -Is http://$URL:$PORT > /dev/null && echo "the remote side is healthy" || echo "the remote side is failed. please check"
handlers文件,当模板文件nginx.conf.j2有更改时触发重启nginx
[deploy@jenkins ansible]$ vim roles/nginx/handlers/main.yml
- name: restart nginx
service: name=nginx state=restarted
tasks任务文件
[deploy@jenkins ansible]$ vim roles/nginx/tasks/main.yml
- name: create deploy group
group: name=deploy
- name: create deploy user
user: name=deploy group=deploy
- name: setup nginx yum source
yum: pkg=epel-release state=latest
- name: setup up the latest nginx
yum: pkg=nginx state=latest
- name: sent nginx config template
template: src=nginx.conf.j2 dest=/etc/nginx/nginx.conf
notify: restart nginx
- name: create nginx root directory
file: name={{ ugr }} state=directory owner={{ nguser }} group={{ nggroup }} mode=0755
- name: copy index.html to remote
copy: src=roles/nginx/files/index.html dest=/www/index.html
- name: start nginx service
service: name=nginx state=started
- name: run the health check locally
shell: sh roles/nginx/files/health_check.sh {{ server_name }} {{ port }}
delegate_to: localhost
register: health_status
- debug: msg={{ health_status.stdout }}
templates模板配置文件,必须是.j2后缀
[deploy@jenkins ansible]$ vim roles/nginx/templates/nginx.conf.j2
# For more information on configuration, see:
user              {{ nguser }};
worker_processes  {{ worker_processes }};

error_log  /var/log/nginx/error.log;

pid        /var/run/nginx.pid;

events {
    worker_connections  {{ max_open_file }};
}


http {
    include       /etc/nginx/mime.types;
    default_type  application/octet-stream;

    log_format  main  '$remote_addr - $remote_user [$time_local] "$request" '
                      '$status $body_bytes_sent "$http_referer" '
                      '"$http_user_agent" "$http_x_forwarded_for"';

    access_log  /var/log/nginx/access.log  main;

    sendfile        on;
    #tcp_nopush     on;

    #keepalive_timeout  0;
    keepalive_timeout  65;

    #gzip  on;

    # Load config files from the /etc/nginx/conf.d directory
    # The default server is in conf.d/default.conf
    #include /etc/nginx/conf.d/*.conf;
    server {
        listen       {{ port }} default_server;
        server_name  {{ server_name }};
        root         {{ ugr }};
        #charset koi8-r;

        location / {
            index  index.html index.htm index.php;
        }

        location ~ \.php$ {
            try_files $uri =404;
            fastcgi_pass unix:/var/run/php-fpm/php-fpm.sock;
            fastcgi_index index.php;
            fastcgi_param SCRIPT_FILENAME $document_root$fastcgi_script_name;
            include fastcgi_params;
        }

    }

}
将playbook模板提交到GitLab
进入克隆的仓库,将playbook模板上传到暂存区
hang@DESKTOP-06U4C20 MINGW64 ~/Desktop/repo/nginx (master)
$ git add .
warning: LF will be replaced by CRLF in inventory/dev.
The file will have its original line endings in your working directory
warning: LF will be replaced by CRLF in nginx_role.yml.
The file will have its original line endings in your working directory
warning: LF will be replaced by CRLF in roles/nginx/files/health_check.sh.
The file will have its original line endings in your working directory
warning: LF will be replaced by CRLF in roles/nginx/files/index.html.
The file will have its original line endings in your working directory
warning: LF will be replaced by CRLF in roles/nginx/handlers/main.yml.
The file will have its original line endings in your working directory
warning: LF will be replaced by CRLF in roles/nginx/tasks/main.yml.
The file will have its original line endings in your working directory
warning: LF will be replaced by CRLF in roles/nginx/templates/nginx.conf.j2.
The file will have its original line endings in your working directory
将暂存区里的文件给提交到本地的仓库
hang@DESKTOP-06U4C20 MINGW64 ~/Desktop/repo/nginx (master)
$ git commit -m"first commit"
[master (root-commit) 65edf84] first commit
 7 files changed, 104 insertions(+)
 create mode 100644 inventory/dev
 create mode 100644 nginx_role.yml
 create mode 100644 roles/nginx/files/health_check.sh
 create mode 100644 roles/nginx/files/index.html
 create mode 100644 roles/nginx/handlers/main.yml
 create mode 100644 roles/nginx/tasks/main.yml
 create mode 100644 roles/nginx/templates/nginx.conf.j2
本地版本库的分支推送到远程服务器上对应的分支
hang@DESKTOP-06U4C20 MINGW64 ~/Desktop/repo/nginx (master)
$ git -c http.sslVerify=false push origin master
Enumerating objects: 16, done.
Counting objects: 100% (16/16), done.
Delta compression using up to 4 threads
Compressing objects: 100% (10/10), done.
Writing objects: 100% (16/16), 2.12 KiB | 310.00 KiB/s, done.
Total 16 (delta 0), reused 0 (delta 0)
To https://gitlab.example.com/root/nginx.git
 * [new branch]      master -> master
构建freestyle job,jenkins job构建详细过程见https://www.cnblogs.com/wengshaohang/p/12273400.html
打开jenkins,创建freestyle job
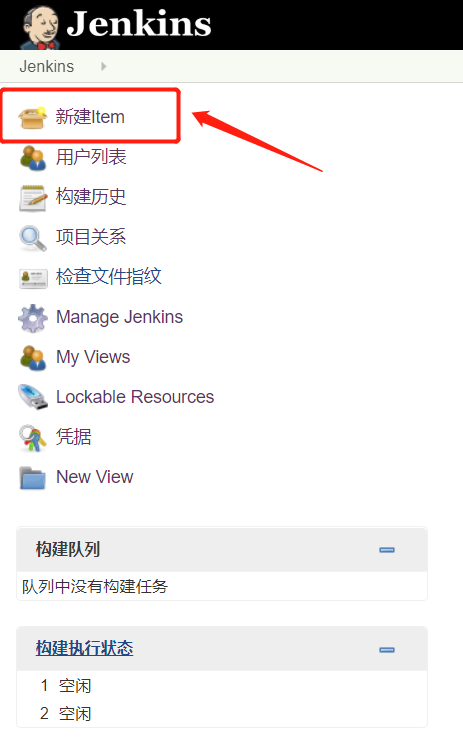

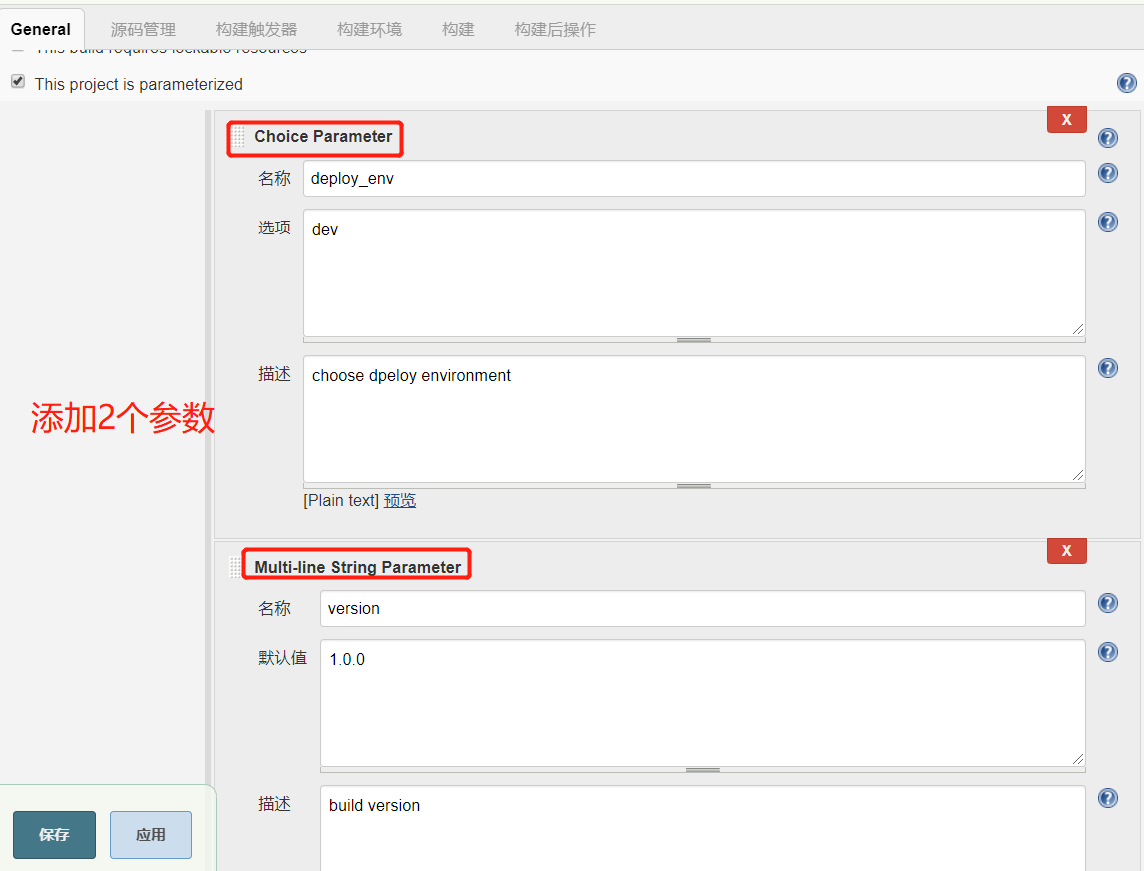
添加描述信息


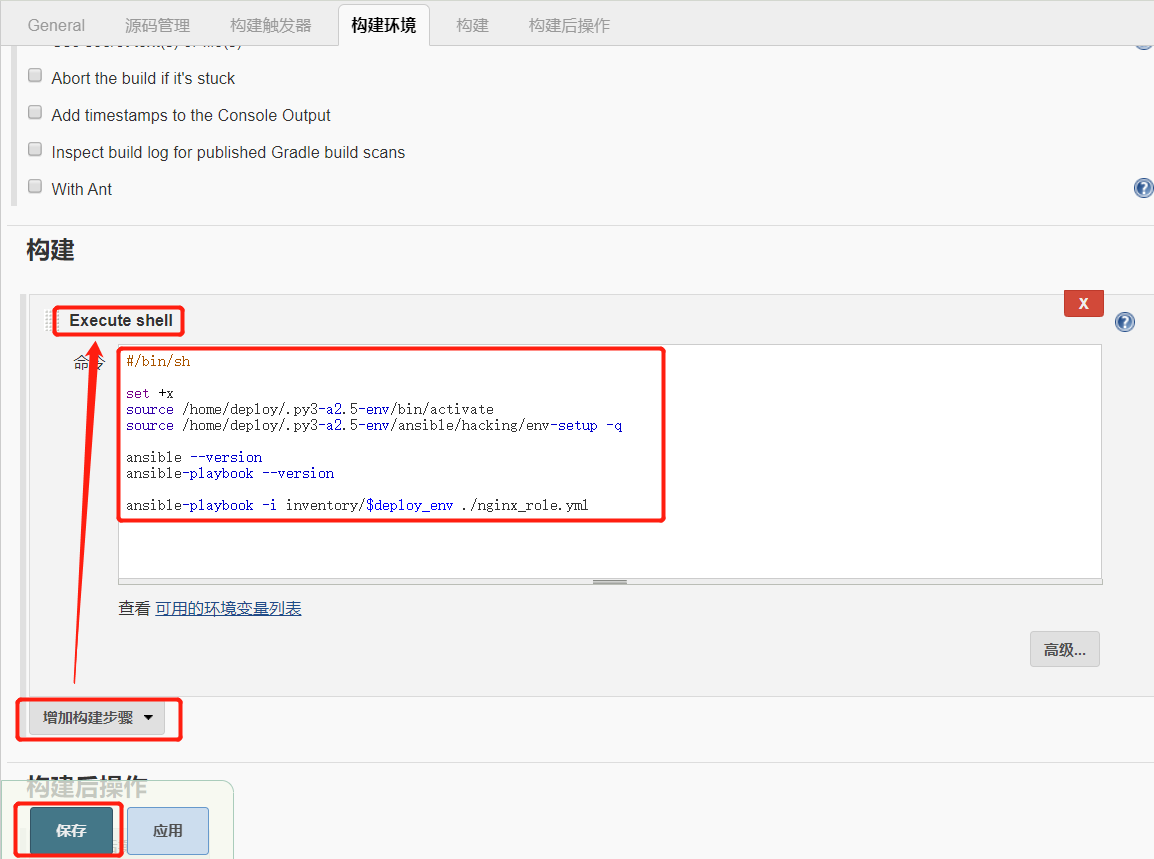
选择执行shell,填写代码,保存
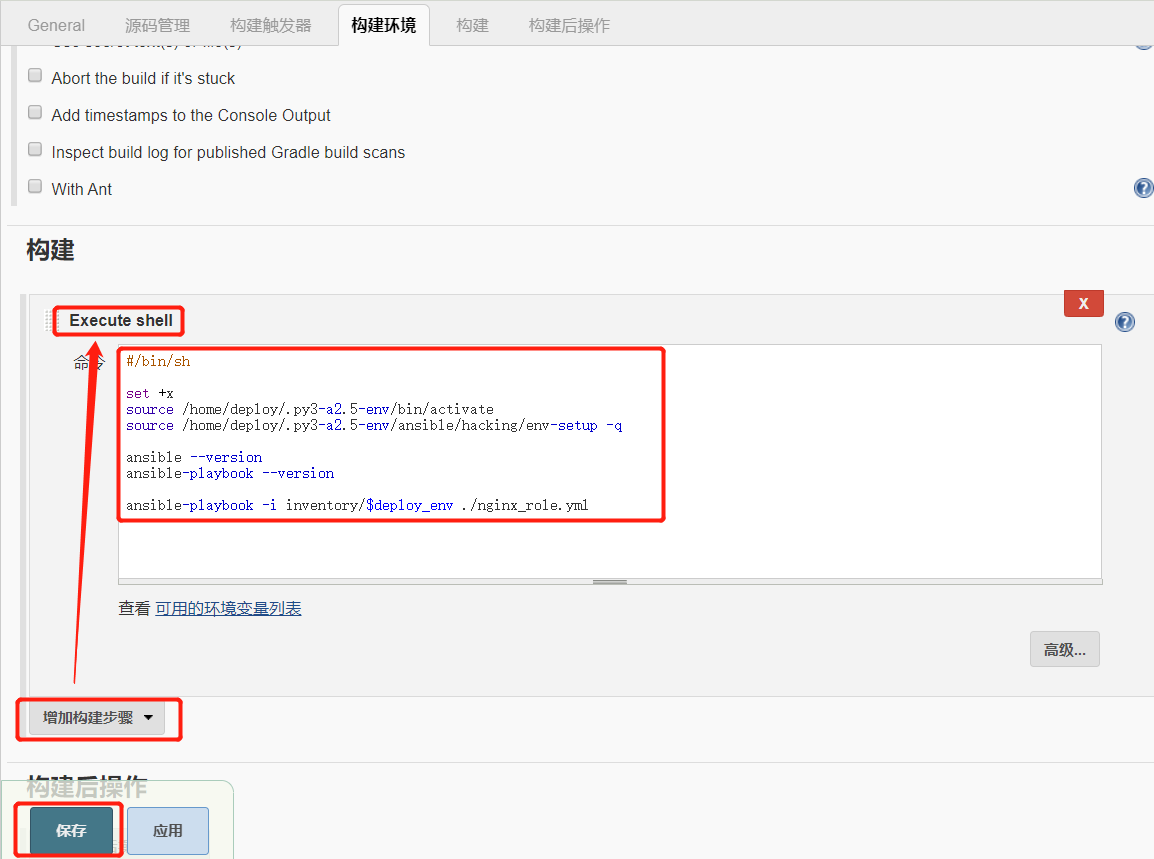
点击Build with Parameters,开始构建

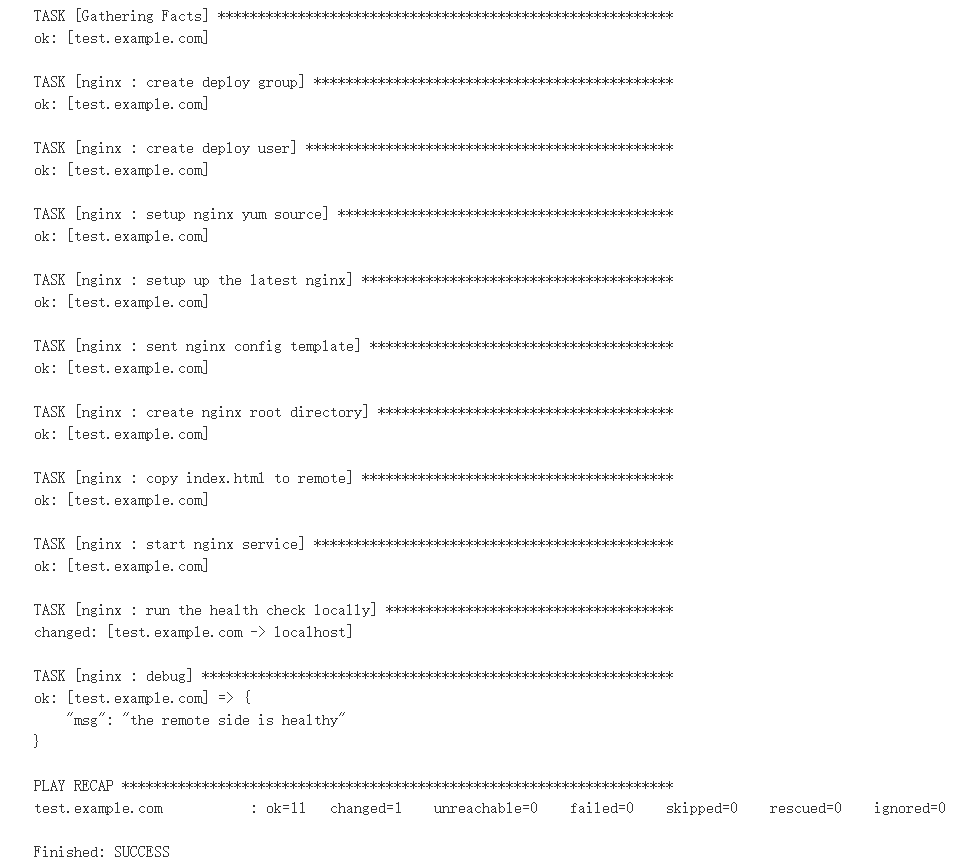
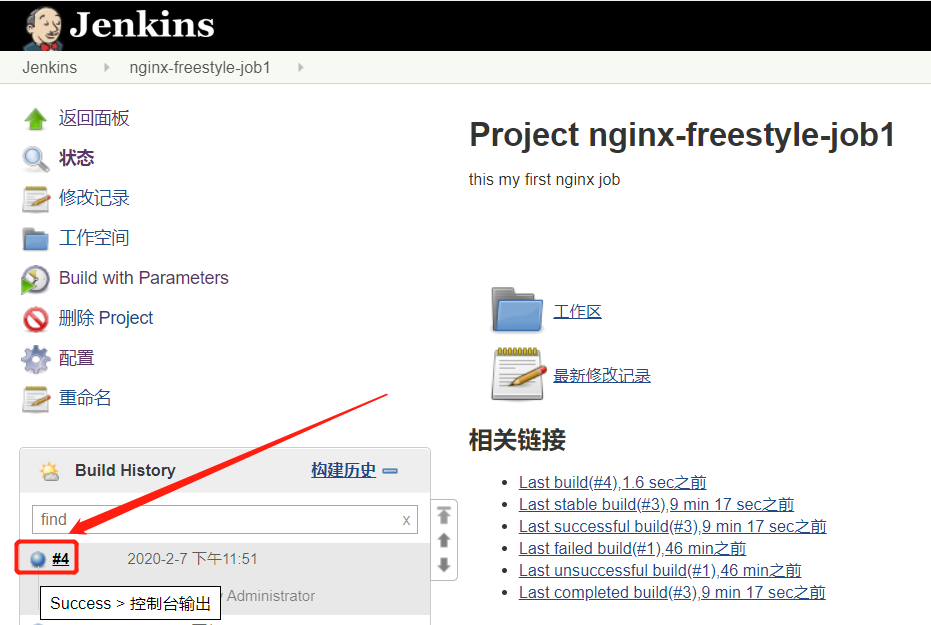
可以看到构建成功,蓝色圆圈代表成功

、
打开浏览器,访问test.example.com:88,可以看到自定义的页面,代表部署成功

向GitLab提交代码之后自动触发Jenkins构建
jenkins配置
安装gitlab、gitlab hook插件,安装方法见https://www.cnblogs.com/wengshaohang/p/12272952.html,
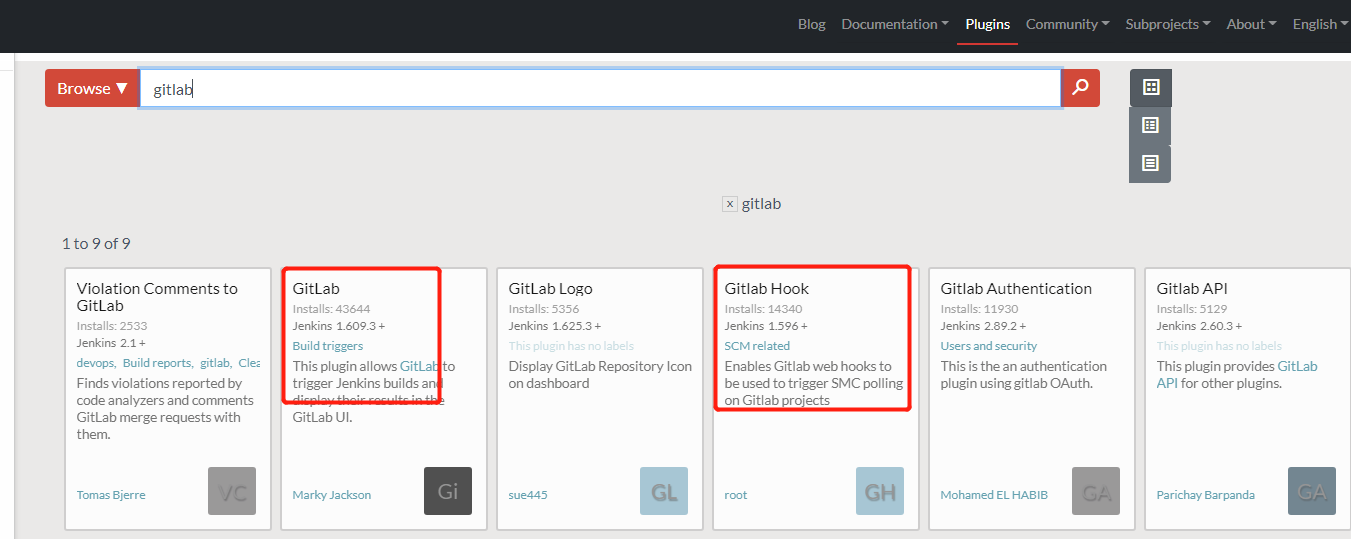
装完没看到这个选项Build when a change is pushed to GitLab. GitLab webhook 就重启jenkins,我没重启就看到了

进入配置界面

勾选Build when a change is pushed to GitLab. GitLab webhook ,复制后面的url,gitlab设置webhook时,会用到,点击高级

点击Generate,复制生成的token,点击保存

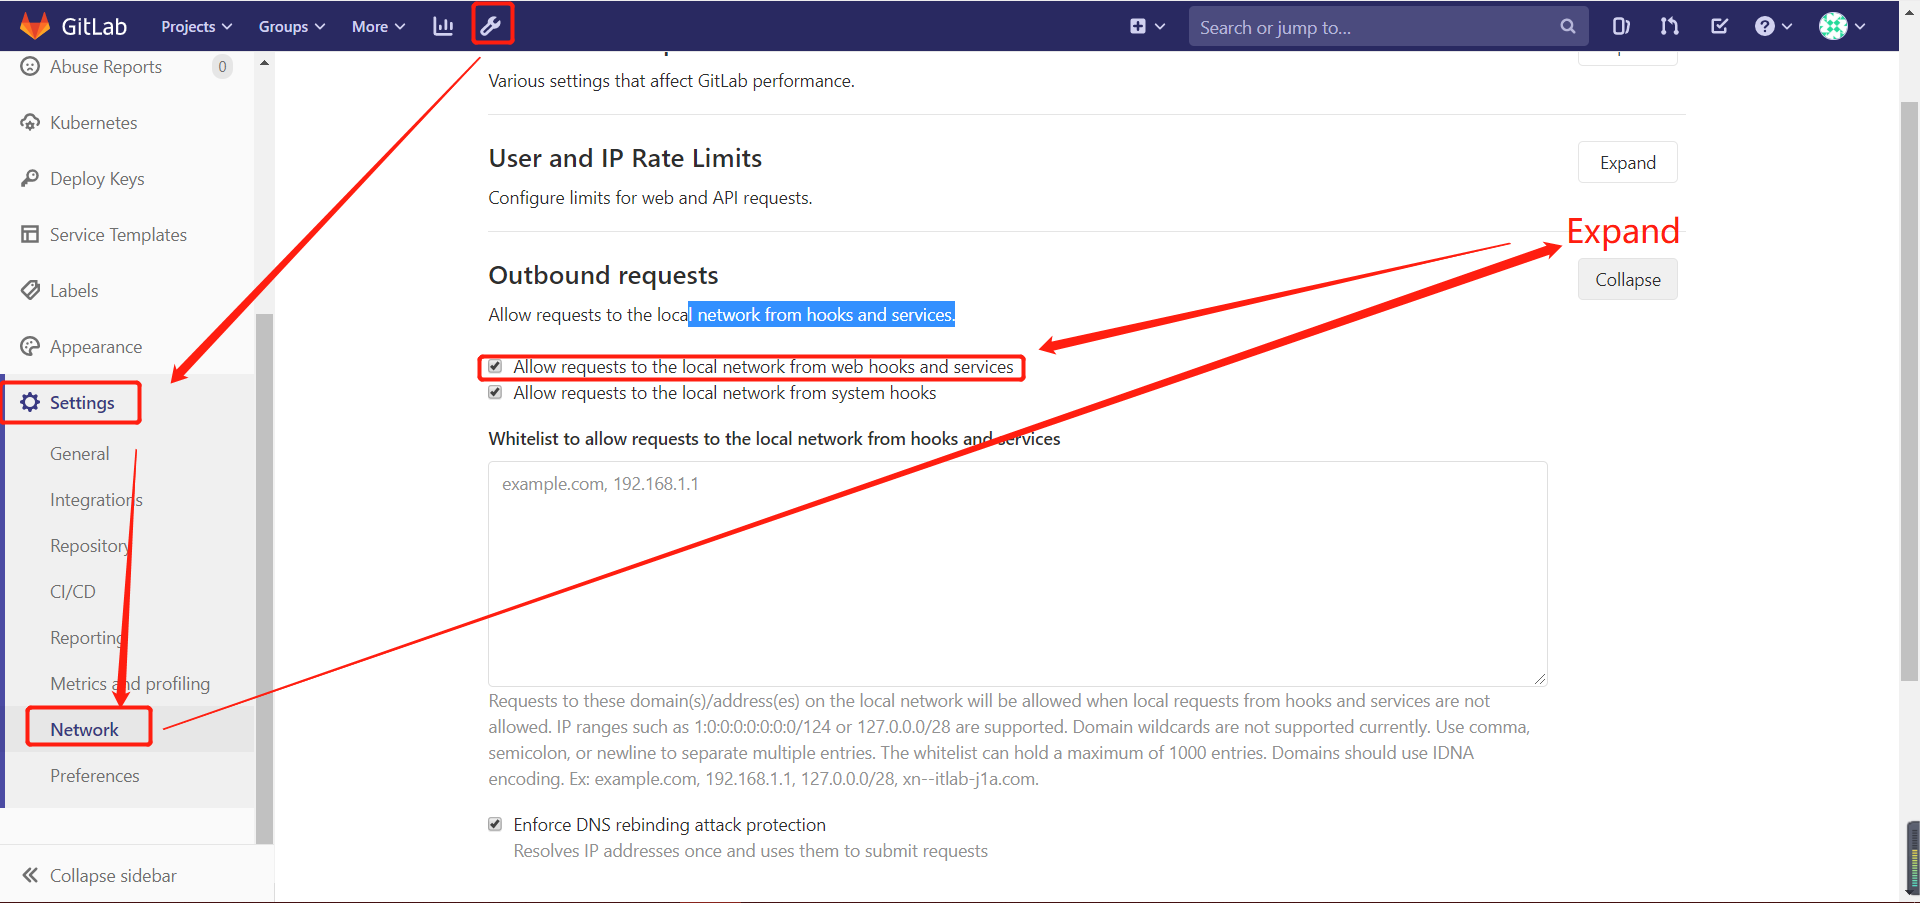
root用户登录,进入gitlab页面,点击扳手,进入集成配置页面
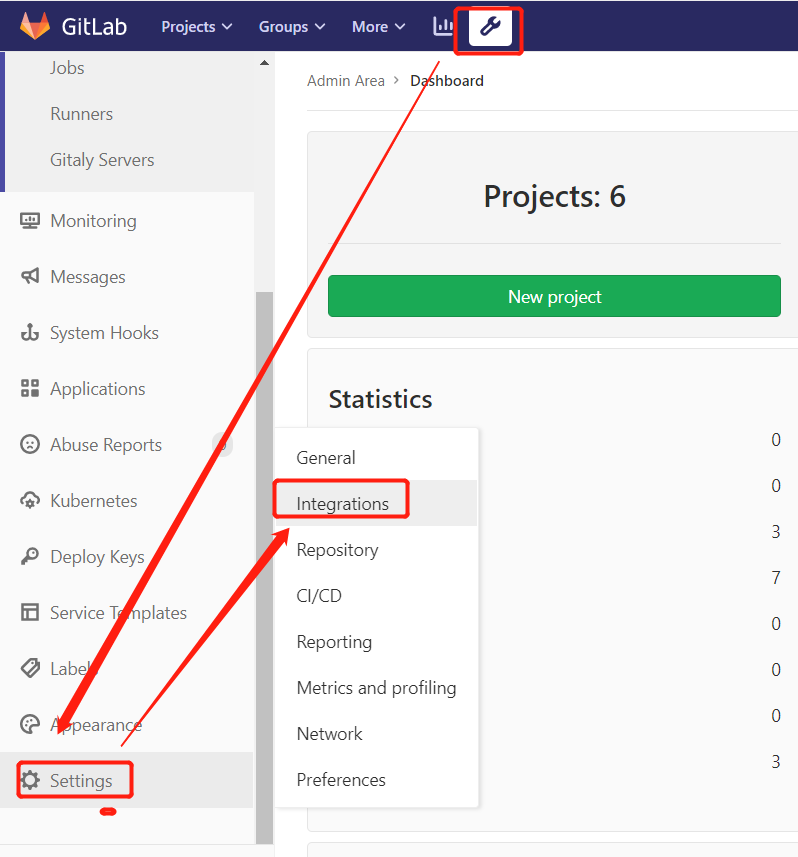
勾选允许本地网络web hook,不然添加web hook时会报错,点击保存
找到项目 nginx,点击设置-->集成,上面步骤的token和URL地址

页面下拉,点击添加

添加完成后,点击push events,它会模拟一次push events事件
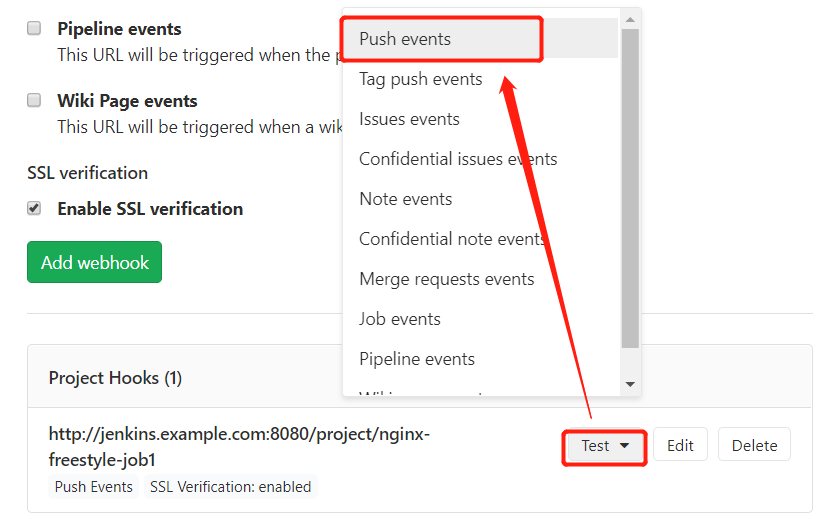
页面会提示push event成功

等待几秒,Jenkins会触发一个构建任务
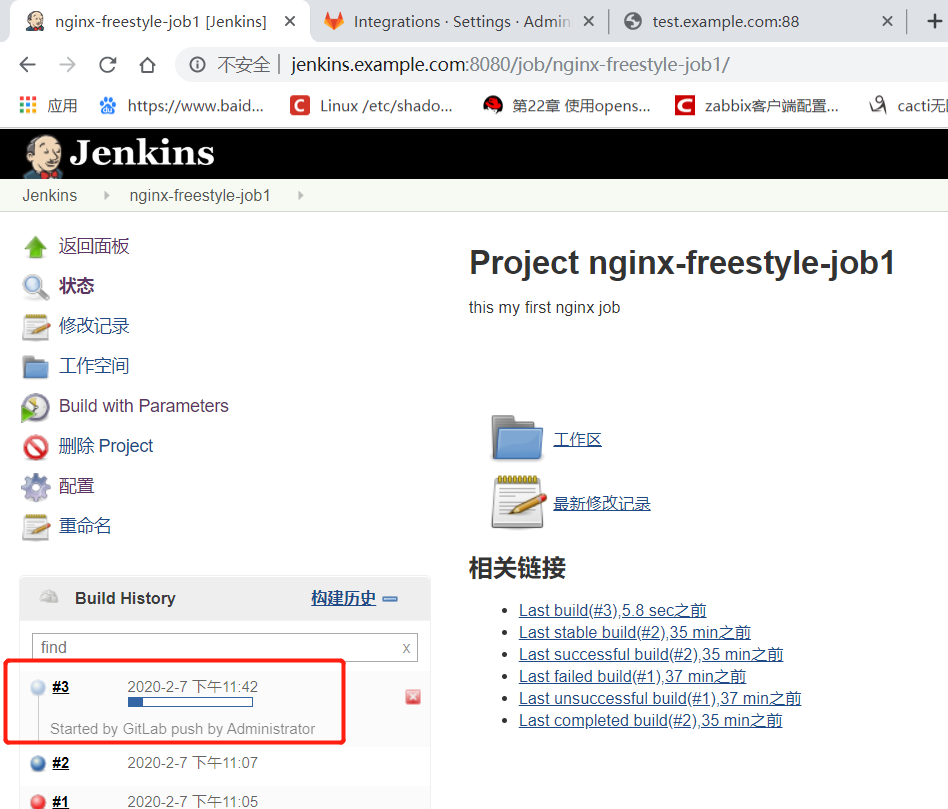
到此,Jenkins+Gitlab配置Web hook基本上完成了。
测试提交代码
把inventory/dev的port改为8888
hang@DESKTOP-06U4C20 MINGW64 ~/Desktop/repo/nginx (master)
$ vim inventory/dev
[nginx]
test.example.com

[nginx:vars]
server_name=test.example.com
port=8888
nguser=deploy
nggroup=deploy
worker_processes=4
max_open_file=65505
ugr=/www
修改index.html代码
hang@DESKTOP-06U4C20 MINGW64 ~/Desktop/repo/nginx (master)
$ cat roles/nginx/files/index.html
this is second nginx
再执行
git add .
git commit -m"second commit"
git -c http.sslVerify=false push origin master
等待7秒左右,就会触发一个构建任务
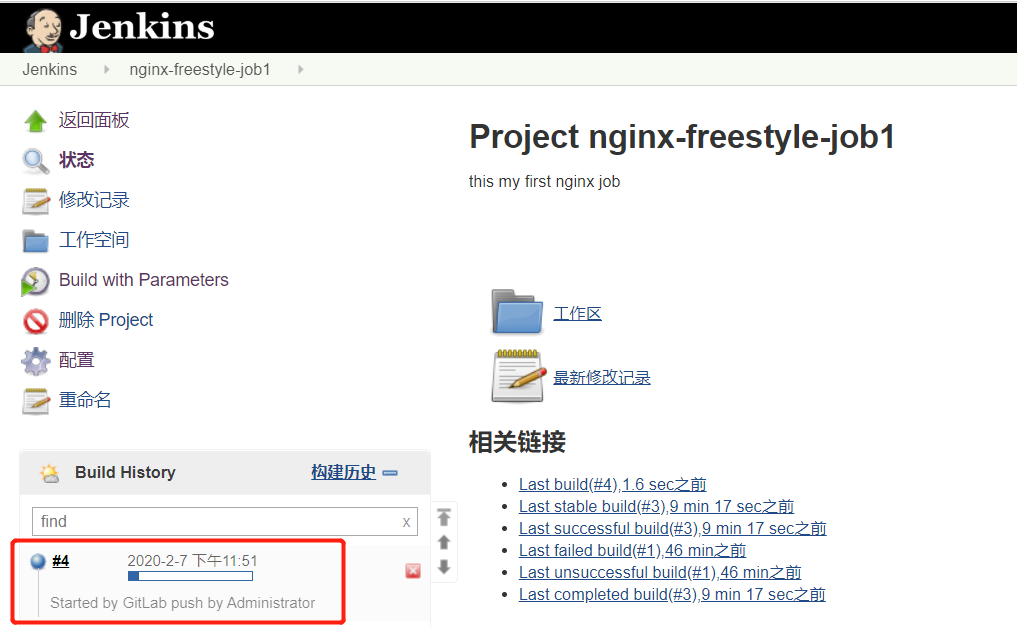
最终会构建成功
打开浏览器访问test.example.com:8888,可以看到修改的配置生效了

到此,Jenkins+Gitlab配置Web hook完成


