iOS开发UI篇—Quartz2D简单使用(二)
iOS开发UI篇—Quartz2D简单使用(二)
一、画文字
代码:
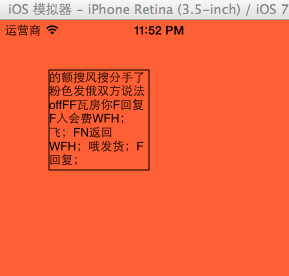
 1 //
 2 //  YYtextview.m
 3 //  04-写文字
 4 //
 5 //  Created by 孔医己 on 14-6-10.
 6 //  Copyright (c) 2014年 itcast. All rights reserved.
 7 //
 8
 9 #import "YYtextview.h"
10
11 @implementation YYtextview
12
13
14 - (void)drawRect:(CGRect)rect
15 {
16
17     // 画文字
18     NSString *str = @"的额搜风搜分手了粉色发俄双方说法offFF瓦房你F回复F入会费WFH;飞;FN返回WFH;哦发货;F回复;FHISFHSIFH我皮肤好APIFRHi分红AWFHIOF威锋网i";
19
20     // 1.获取上下文
21     //    CGContextRef ctx = UIGraphicsGetCurrentContext();
22     // 2.绘图
23     // 不推荐使用C语言的方法绘制文字, 因为quraz2d中的坐标系和UIkit中的坐标系不一致, 绘制出来的文字是颠倒的, 而且通过C语言的方法绘制文字相当麻烦
24     //    CGContextSelectFont(<#CGContextRef c#>, <#const char *name#>, <#CGFloat size#>, <#CGTextEncoding textEncoding#>)
25     //    CGContextShowText(ctx, <#const char *string#>, <#size_t length#>)
26
27     // 绘制矩形
28     // 1.获取上下文
29     CGContextRef ctx = UIGraphicsGetCurrentContext();
30     // 2.绘图
31     CGContextAddRect(ctx, CGRectMake(50, 50, 100, 100));
32     // 3.渲染
33     CGContextStrokePath(ctx);
34
35
36 //    NSMutableDictionary *md = [NSMutableDictionary dictionary];
37 //    // 设置文字颜色
38 //    md[NSForegroundColorAttributeName] =[UIColor redColor];
39 //    // 设置文字背景颜色
40 //    md[NSBackgroundColorAttributeName] = [UIColor greenColor];
41 //    // 设置文字大小
42 //    md[NSFontAttributeName] = [UIFont systemFontOfSize:20];
43
44     //    将文字绘制到指点的位置
45     //    [str drawAtPoint:CGPointMake(10, 10) withAttributes:md];
46
47     //    将文字绘制到指定的范围内, 如果一行装不下会自动换行, 当文字超出范围后就不显示
48     [str drawInRect:CGRectMake(50, 50, 100, 100) withAttributes:nil];
49 }
50
51
52 @end
效果:
二、图片
代码1:
 1 //
 2 //  YYimage.m
 3 //  04-写文字
 4 //
 5 //  Created by 孔医己 on 14-6-10.
 6 //  Copyright (c) 2014年 itcast. All rights reserved.
 7 //
 8
 9 #import "YYimage.h"
10
11 @implementation YYimage
12
13
14 - (void)drawRect:(CGRect)rect
15 {
16
17     //    1.加载图片到内存中
18     UIImage *image = [UIImage imageNamed:@"me"];
19
20
21     // 利用drawAsPatternInRec方法绘制图片到layer, 是通过平铺原有图片
22     [image drawAsPatternInRect:CGRectMake(0, 0, 320, 480)];
23 }
24
25
26 @end
效果(平铺):

代码2:
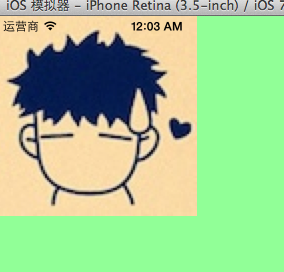
 1 #import "YYimage.h"
 2
 3 @implementation YYimage
 4
 5
 6 - (void)drawRect:(CGRect)rect
 7 {
 8
 9     //    1.加载图片到内存中
10     UIImage *image = [UIImage imageNamed:@"me"];
11
12
13     // 利用OC方法将图片绘制到layer上
14
15     // 利用drawInRect方法绘制图片到layer, 是通过拉伸原有图片
16         [image drawInRect:CGRectMake(0, 0, 200, 200)];
17
18     // 利用drawAsPatternInRec方法绘制图片到layer, 是通过平铺原有图片
19 //    [image drawAsPatternInRect:CGRectMake(0, 0, 320, 480)];
20 }
21
22
23 @end
效果(拉伸图片):
代码3:
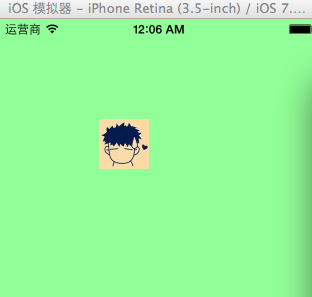
 1 //
 2 //  YYimage.m
 3 //  04-写文字
 4 //
 5 //  Created by 孔医己 on 14-6-10.
 6 //  Copyright (c) 2014年 itcast. All rights reserved.
 7 //
 8
 9 #import "YYimage.h"
10
11 @implementation YYimage
12
13
14 - (void)drawRect:(CGRect)rect
15 {
16
17     //    1.加载图片到内存中
18     UIImage *image = [UIImage imageNamed:@"me"];
19
20
21     // 利用OC方法将图片绘制到layer上
22
23     // 将图片绘制到指定的位置
24     [image drawAtPoint:CGPointMake(100, 100)];
25     }
效果(把图片绘制到一个固定的位置):

 浙公网安备 33010602011771号