博客园主题修改分享 - 基础篇
先上预览图

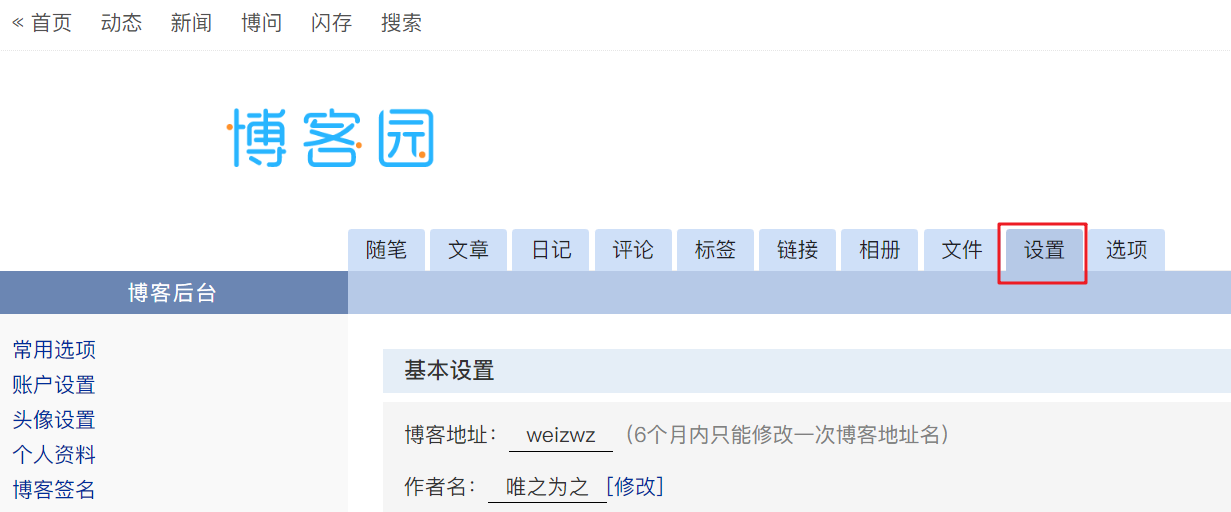
1. 进入博客园个人后台,选择设置
找不见博客园后台的,可以先进入博客园首页,点击头像下的账号设置,进入后左侧列表有博客设置,点击后可进入。

2. 基本设置里,选择皮肤 CodingLife

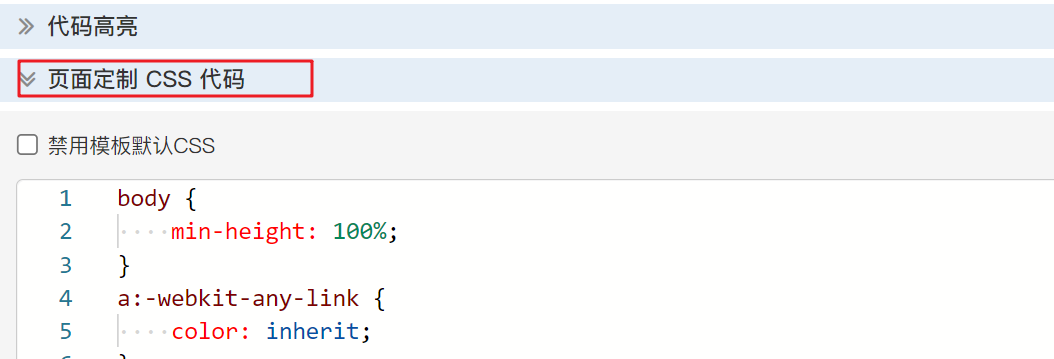
3. 点开页面定制css代码,将下面代码粘贴进去后,保存即可

body {
    min-height: 100%;
}
a:-webkit-any-link {
    color: inherit;
}
#navList a:hover {
    background: linear-gradient(to bottom, #ffffff, #f0eef5);
    height: 40px;
    line-height: 40px;
    margin-top: 10px;
    border-radius: 5px;
}
#profile_block a {
    color: #169fe6;
}
#profile_block a:hover {
    color: #45bcf9;
    border-bottom-color: #45bcf9;
}
#blogTitle {
    display: none;
}
#navList a:link {
    text-shadow: 3px 3px 3px #45bcf9;
}
.day {
    border-radius: 10px;
    margin-bottom: 20px;
}
#profile_block {
    border-radius: 0 0 10px 10px;
}
#sideBarMain > div,
#blog-sidecolumn > div > div {
    background: #f0eef5;
}
/* 分页 */
#nav_next_page a {
    background-color: #45bcf9;
}
.topicListFooter .pager a:hover, .topicListFooter .pager span {
    background-color: #45bcf9;
}
/* 封面图片 */
.desc_img {
    margin: 5px;
    border-radius: 8px;
    border: solid 1px #ffffff;
    box-shadow: 0px 0px 4px 0px rgb(7, 17, 27, 0.1);
}
/*右侧日历*/
#sideBarMain > div#blog-calendar {
    padding: 10px;
    background: #fff;
    border-radius: 10px;
    border: 1px solid #dedede;
}
#blogCalendar a:link,
.postCon a:link,
a.c_b_p_desc_readmore {
    color: #169fe6;
}
#blogCalendar a:hover,
a.c_b_p_desc_readmore {
    color: #45bcf9;
}
/*无日历时去间距*/
#blog-news {
    margin-bottom: 0;
}
/*右侧卡片*/
.sidebar-block {
    background-color: #f0eef5;
}
.catListView {
    background: #f0eef5;
    border-radius: 10px;
    overflow: hidden;
}
#blog-news,
#sidebar_search_box,
.sidebar-block > div > ul,
.sidebar-block > ul,
.catListView > div {
    background: #ffffff;
    border-radius: 0 0 10px 10px;
}
/*标签*/
.sidebar-block ul li {
    padding: 10px 10px 10px 20px;
}
.sidebar-block ul li a:hover {
    color: #45bcf9;
    border-bottom: none;
}
#blog-sidecolumn > div#sidebar_toptags > div > ul,
#blog-sidecolumn > div > div#sidebar_postcategory > ul {
    display: flex;
    flex-wrap: wrap;
    padding: 5px 10px;
}
#sidebar_toptags ul li,
#sidebar_postcategory ul li {
    padding: 5px;
    border: none;
}
#sidebar_toptags ul li:hover,
#sidebar_postcategory ul li:hover {
    background: #fff;
    cursor: inherit;
}
#sidebar_toptags ul li a,
#sidebar_postcategory ul li a {
    padding: 3px 10px;
    line-height: 1.5;
    background: #f0eef5;
    border-radius: 5px;
    color: #169fe6;
}
#sidebar_toptags ul li a:hover,
#sidebar_postcategory ul li a:hover {
    color: #ffffff;
    cursor: pointer;
    background: #45bcf9;
    border-bottom: none;
}
#widget_my_google,
.sidebar-block ul {
    border-radius: 0 0 10px 10px;
}
.catListTitle {
    border-radius: 10px 10px 0 0;
}
/*页脚*/
#footer {
    background: #169fe6;
    display: flex;
    justify-content: center;
    color: #fff;
}
#poweredby {
    margin-left: 100px;
}
/*正文*/
.dayTitle:hover {
    background-color: #45bcf9d1;
}
.dayTitle a:hover {
    text-decoration: none;
}
.postTitle a:link {
    color: #555;
}
.postTitle a:hover {
    color: #45bcf9;
    text-decoration: none;
}
#topics,
#comment_form_container,
.under-post-card {
    border-radius: 10px;
}
#cnblogs_post_body a,
#cnblogs_post_body a:link {
    text-decoration: none;
    color: #169fe6;
}
#cnblogs_post_body a:hover {
    color: #45bcf9;
}
#cnblogs_post_body p a:hover,
#cnblogs_post_body ol li a:hover,
#cnblogs_post_body ul li a:hover {
    border-bottom: none;
}
/* 隐藏推荐 */
#under_post_card1,
#under_post_card2 {
    display: none;
}
/*markdown*/
#topics .postTitle {
    font-weight: bold;
}
#cnblogs_post_body h2 {
    padding-bottom: 0.5rem;
    border-bottom: 1px double rgba(0,0,0,.1);
}
.cnblogs-markdown :not(pre,div,td)>code,
.blogpost-body :not(pre,div,td)>code {
    font-family: source-code-pro, Menlo, Monaco, Consolas, "Courier New", monospace;
    margin: 0;
}
.cnblogs-markdown h1>code, .cnblogs-markdown h2>code,
.blogpost-body h1>code, .blogpost-body h2>code {
    font-size: inherit;
}
#topics .postBody blockquote {
    border-left-width: 3px;
    color: #555;
}
#topics .postBody blockquote p {
    color: #555;
}
/*评论*/
.comment_textarea {
    max-width: inherit;
}
/*标签页*/
#myposts .PostList,
.entrylistItem {
    border-radius: 10px;
    margin-top: 20px !important;
}
4. 参考1,进入博客设置旁边的 选项,点进入之后关闭 日历,分类 可按各自需求关闭。

5. 增加鼠标动效
先需要 申请JS权限,申请入口见标题2图,博客皮肤 的下方,审核需要稍等一会。

然后打开 页脚html代码

粘贴如下代码:
<!-- 鼠标动效 -->
<script src="https://files.cnblogs.com/files/wkfvawl/mouse-click.js"></script>
<canvas width="1777" height="841" style="position: fixed; left: 0px; top: 0px; z-index: 2147483647; pointer-events: none;"></canvas>
6. 公告增加头像框
需要先去相册里上传个人的头像,拿到上传后的头像地址

然后进入 博客侧边栏公告

粘贴如下代码,头像地址请换成自己的
<div class="headImage">
    <img src="https://images.cnblogs.com/cnblogs_com/blogs/xxxx.jpg" alt="头像">
</div>
<style>
#blog-news {
    display: flex;
    background: #fff;
}
#blog-news .headImage {
    width: 40%;
    display: flex;
    align-items: center;
    justify-content: center;
    border: solid 1px #dedede;
    border-right: none;
    border-radius: 0 0 0 10px;
}
#blog-news .headImage > img{
    width: 80%;
    border-radius: 50%;
}
#profile_block {
    flex: 1;
    border-radius: 0 0 10px 0;
}
#profile_block:hover {
    border-color: #dedede
}
/* 搜索按钮 */
input.btn_my_zzk {
    background: #45bcf9;
}
</style>
现在快打开你的博客,开始预览你的主题吧!
https://www.cnblogs.com/weizwz/p/16903556.html
本博客所有文章除特别声明外,均采用 「CC BY-NC-SA 4.0 DEED」 国际许可协议,转载请注明出处!
内容粗浅,如有错误,欢迎大佬批评指正


 浙公网安备 33010602011771号