使用 IDEA和Maven 整合SSH框架
1.创建web工程
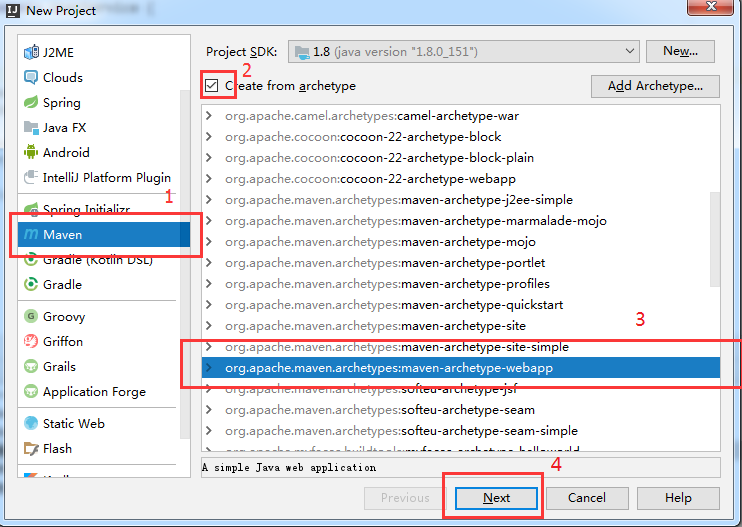
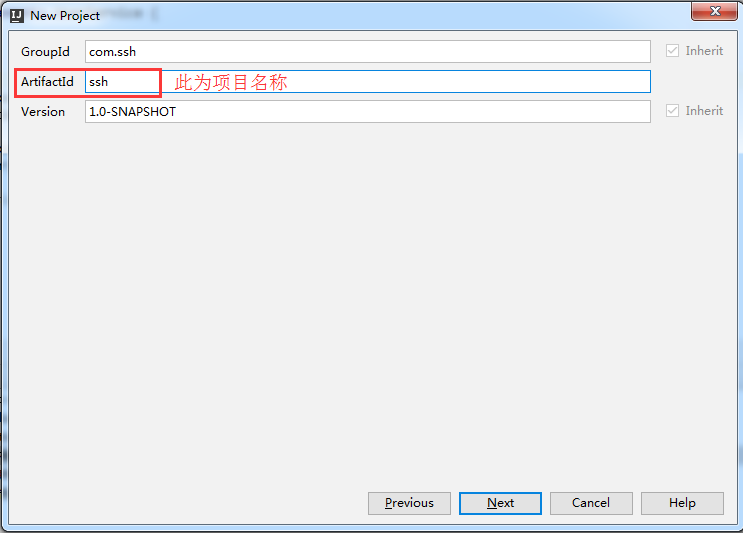
一路next 下去就行。完成后,IDEA会自动构建maven工程。
2.创建如下项目结构
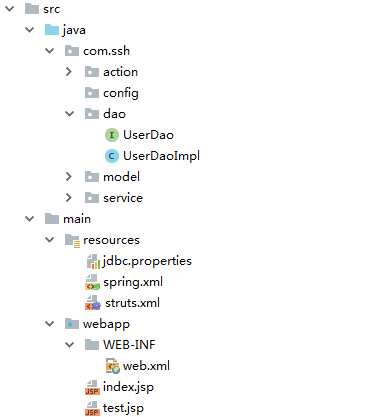
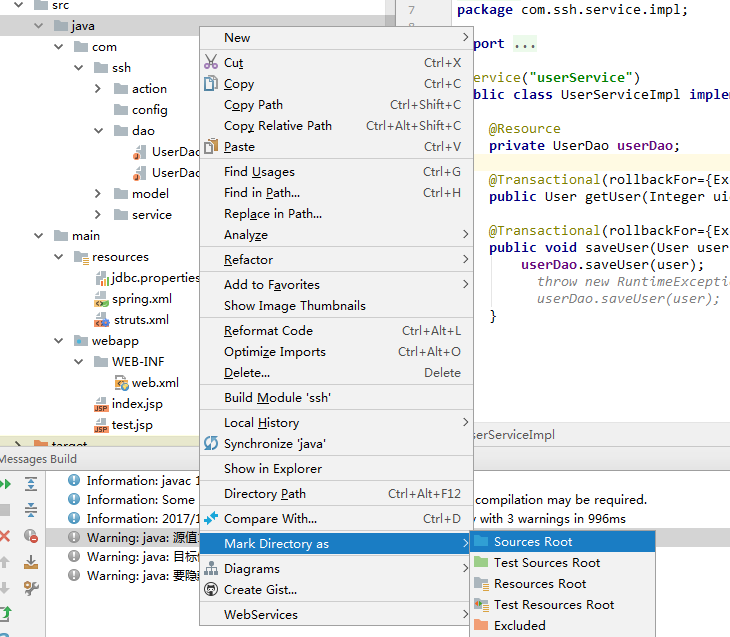
需要将 java文件夹设置为SourcesRoot目录,否则无法创建package
设置操作如下:选择文件夹,右击。
3.在pom.xml文件中引入框架包
<project xmlns="http://maven.apache.org/POM/4.0.0" xmlns:xsi="http://www.w3.org/2001/XMLSchema-instance"
  xsi:schemaLocation="http://maven.apache.org/POM/4.0.0 http://maven.apache.org/maven-v4_0_0.xsd">
  <modelVersion>4.0.0</modelVersion>
  <groupId>com.ssh</groupId>
  <artifactId>ssh</artifactId>
  <packaging>war</packaging>
  <version>1.0-SNAPSHOT</version>
  <name>ssh Maven Webapp</name>
  <url>http://maven.apache.org</url>
  <dependencies>
    <dependency>
      <groupId>junit</groupId>
      <artifactId>junit</artifactId>
      <version>3.8.1</version>
      <scope>test</scope>
    </dependency>

      <!-- hibernate -->
      <dependency>
          <groupId>org.hibernate</groupId>
          <artifactId>hibernate-core</artifactId>
          <version>5.2.12.Final</version>
      </dependency>

      <!-- struts2 -->
      <dependency>
          <groupId>org.apache.struts</groupId>
          <artifactId>struts2-core</artifactId>
          <version>2.5.14.1</version>
      </dependency>

      <!-- struts2 spring  整合的核心包-->
      <dependency>
          <groupId>org.apache.struts</groupId>
          <artifactId>struts2-spring-plugin</artifactId>
          <version>2.5.14.1</version>
      </dependency>

      <!-- spring -->
      <dependency>
          <groupId>org.springframework</groupId>
          <artifactId>spring-core</artifactId>
          <version>5.0.2.RELEASE</version>
      </dependency>
      <dependency>
          <groupId>org.springframework</groupId>
          <artifactId>spring-context</artifactId>
          <version>5.0.2.RELEASE</version>
      </dependency>
      <dependency>
          <groupId>org.springframework</groupId>
          <artifactId>spring-jdbc</artifactId>
          <version>5.0.2.RELEASE</version>
      </dependency>
      <dependency>
          <groupId>org.springframework</groupId>
          <artifactId>spring-beans</artifactId>
          <version>5.0.2.RELEASE</version>
      </dependency>
      <dependency>
          <groupId>org.springframework</groupId>
          <artifactId>spring-web</artifactId>
          <version>5.0.2.RELEASE</version>
      </dependency>
      <dependency>
          <groupId>org.springframework</groupId>
          <artifactId>spring-expression</artifactId>
          <version>5.0.2.RELEASE</version>
      </dependency>
      <dependency>
          <groupId>org.springframework</groupId>
          <artifactId>spring-orm</artifactId>
          <version>5.0.2.RELEASE</version>
      </dependency>
      <dependency>
          <groupId>cglib</groupId>
          <artifactId>cglib-nodep</artifactId>
          <version>2.1_3</version>


      </dependency>

      <!--spring aop包  注释方式使用事务管理 可以不引用-->
      <dependency>
          <groupId>aspectj</groupId>
          <artifactId>aspectjrt</artifactId>
          <version>1.5.0</version>
      </dependency>

      <dependency>
          <groupId>aspectj</groupId>
          <artifactId>aspectjweaver</artifactId>
          <version>1.5.0</version>
      </dependency>

      <!-- 添加对数据库的支持 -->
      <dependency>
          <groupId>mysql</groupId>
          <artifactId>mysql-connector-java</artifactId>
          <version>5.0.5</version>
      </dependency>

      <!-- https://mvnrepository.com/artifact/c3p0/c3p0 -->
      <dependency>
          <groupId>c3p0</groupId>
          <artifactId>c3p0</artifactId>
          <version>0.9.1.2</version>
      </dependency>


  </dependencies>
  <build>
    <finalName>ssh</finalName>
  </build>
</project>
4.配置web.xml文件
<!DOCTYPE web-app PUBLIC
 "-//Sun Microsystems, Inc.//DTD Web Application 2.3//EN"
 "http://java.sun.com/dtd/web-app_2_3.dtd" >

<web-app>
  <display-name>ssh</display-name>

  <context-param>
    <param-name>contextConfigLocation</param-name>
    <param-value>classpath:spring.xml</param-value>
  </context-param>


    <filter>
    <filter-name>struts2</filter-name>
    <filter-class>org.apache.struts2.dispatcher.filter.StrutsPrepareAndExecuteFilter</filter-class>
  </filter>

  <filter-mapping>
    <filter-name>struts2</filter-name>
    <url-pattern>/*</url-pattern>
  </filter-mapping>

  <listener>
    <listener-class>org.springframework.web.context.ContextLoaderListener</listener-class>
  </listener>
</web-app>
5.配置spring的核心配置文件spring.xml,配置文件中扫描,注入各个javaBean,并且管理了hibernate的数据源和事务
--- jdbc配置文件 jdbc.properties
mysql.driverClassName = com.mysql.jdbc.Driver
mysql.url = jdbc:mysql://localhost:3306/test?useUnicode=true&characterEncoding=utf-8
mysql.username = root
mysql.password = 密码
<?xml version="1.0" encoding="UTF-8"?>
<beans xmlns="http://www.springframework.org/schema/beans"
       xmlns:xsi="http://www.w3.org/2001/XMLSchema-instance"
       xmlns:context="http://www.springframework.org/schema/context"
       xmlns:tx="http://www.springframework.org/schema/tx"
       xmlns:aop="http://www.springframework.org/schema/aop"
       xsi:schemaLocation="http://www.springframework.org/schema/beans
       http://www.springframework.org/schema/beans/spring-beans.xsd
       http://www.springframework.org/schema/context
       http://www.springframework.org/schema/context/spring-context.xsd
       http://www.springframework.org/schema/tx
       http://www.springframework.org/schema/tx/spring-tx.xsd
       http://www.springframework.org/schema/aop
        ">

    <context:component-scan base-package="com.ssh.action"></context:component-scan>
    <context:component-scan base-package="com.ssh.service"></context:component-scan>
    <context:component-scan base-package="com.ssh.dao"></context:component-scan>

    <bean id="propertyConfigurer"
          class="org.springframework.beans.factory.config.PropertyPlaceholderConfigurer">
        <property name="location" value="classpath:jdbc.properties"/>
    </bean>
    <!-- data connection setting -->
    <bean id="dataSource" class="com.mchange.v2.c3p0.ComboPooledDataSource">
        <property name="driverClass" value="${mysql.driverClassName}"></property>
        <property name="jdbcUrl" value="${mysql.url}"></property>
        <property name="user" value="${mysql.username}"></property>
        <property name="password" value="${mysql.password}"></property>
        <!-- 设置数据库连接池的最大连接数 -->
        <property name="maxPoolSize">
            <value>50</value>
        </property>
        <!-- 设置数据库连接池的最小连接数 -->
        <property name="minPoolSize">
            <value>5</value>
        </property>
        <!-- 设置数据库连接池的初始化连接数 -->
        <property name="initialPoolSize">
            <value>5</value>
        </property>
        <!-- 设置数据库连接池的连接最大空闲时间 -->
        <property name="maxIdleTime">
            <value>20</value>
        </property>
        <!-- c3p0缓存Statement的数量数 -->
        <property name="maxStatements">
            <value>50</value>
        </property>
        <!-- 当连接池里面的连接用完的时候,C3P0一下获取新的连接数 -->
        <property name="acquireIncrement">
            <value>20</value>
        </property>

    </bean>

    <!-- hibernate 管理-->
    <bean id="sessionFactory" class="org.springframework.orm.hibernate5.LocalSessionFactoryBean">
        <!-- 引用上面设置的数据源 -->
        <property name="dataSource">
            <ref bean="dataSource"/>
        </property>

        <property name="hibernateProperties">
            <props>
                <prop key="hibernate.dialect">org.hibernate.dialect.MySQLDialect</prop>
                <prop key="hibernate.autoReconnect">true</prop>
                <prop key="hibernate.connection.autocommit">true</prop>
                <prop key="hibernate.hbm2ddl.auto">update</prop>
                <prop key="hibernate.show_sql">true</prop>
                <prop key="hibernate.format_sql">true</prop>
                <!-- 解决session关闭问题 -->
                <prop key="hibernate.enable_lazy_load_no_trans">true</prop>
                <!-- spring 和 hibernate 整合的时候默认就是使用线程的,下面这一行不用写,写了反而要报错,此外 sessionFaction,不能使用openSession
                 既不能保存数据到数据库,还不能实现事务功能
                 -->
                <!--<prop key="current_session_context_class">thread</prop>-->

                <prop key="hibernate.max_fetch_depth">3</prop>
                <prop key="hibernate.connection.url" >jdbc:mysql://localhost:3306/test</prop>
                <prop key="hibernate.connection.driver_class">com.mysql.jdbc.Driver</prop>
            </props>

        </property>

        <!-- 包扫描的方式加载注解类 -->
        <property name="packagesToScan">
            <list>
                <value>com.ssh.model</value>
            </list>
        </property>
        <property name="mappingLocations">
            <list>
                <value>classpath:com/ssh/model/User.hbm.xml</value>
            </list>
        </property>
    </bean>

    <!-- 用注解来实现事物管理 -->
    <bean id="txManager" class="org.springframework.orm.hibernate5.HibernateTransactionManager">
        <property name="sessionFactory" ref="sessionFactory"/>
    </bean>
    <tx:annotation-driven transaction-manager="txManager"/>

    <!--<tx:advice id="txAdvice" transaction-manager="txManager">-->
        <!--<tx:attributes>-->
            <!--<tx:method name="*" read-only="false"/>-->
        <!--</tx:attributes>-->
    <!--</tx:advice>-->

    <!--<aop:config>-->
        <!--<aop:pointcut id="pt" expression="execution(* com.ssh.service.impl.*.*(..))"/>-->
        <!--<aop:advisor advice-ref="txAdvice" pointcut-ref="pt"/>-->
    <!--</aop:config>-->
</beans>
6.配置struts2的核心配置文件struts.xml
<?xml version="1.0" encoding="UTF-8"?>

<!DOCTYPE struts PUBLIC
        "-//Apache Software Foundation//DTD Struts Configuration 2.5//EN"
        "http://struts.apache.org/dtds/struts-2.5.dtd">

<struts>


    <!-- 修改常量管理struts 中的action的工程,这个常量的使用,必须引入 spring和struts的整合包,不然spring无法管理struts2 Action 中的实体类-->
    <constant name="struts.objectFactory" value="spring" />


    <package name="user" extends="struts-default" namespace="/">
        <action name="user_*" class="userAction" method="{1}">

            <result name="success">/test.jsp</result>
            <allowed-methods>m1,saveUser</allowed-methods><!-- struts 2.5 之后,使用通配符必须加上这一行 ,否则无法使用通配符访问-->
        </action>
    </package>
</struts>
7.使用IDEA生成数据库对应实体类和hibernate的映射文件
第一步:连接数据库
选择后边侧边栏的Database
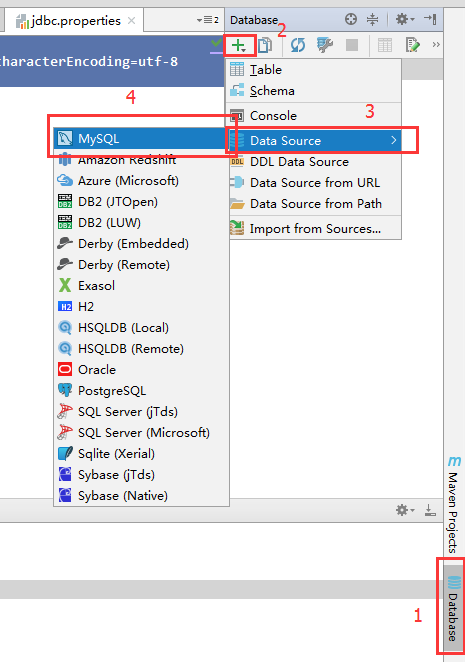
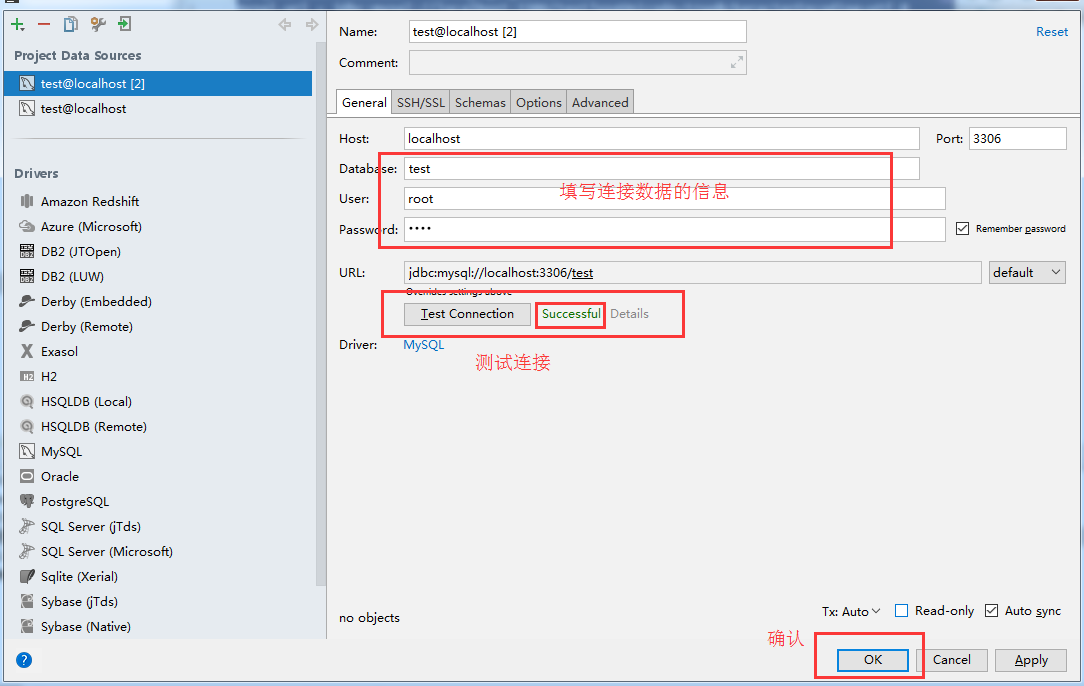
第二步,生成映射文件
选中左边侧边栏的Persistence菜单
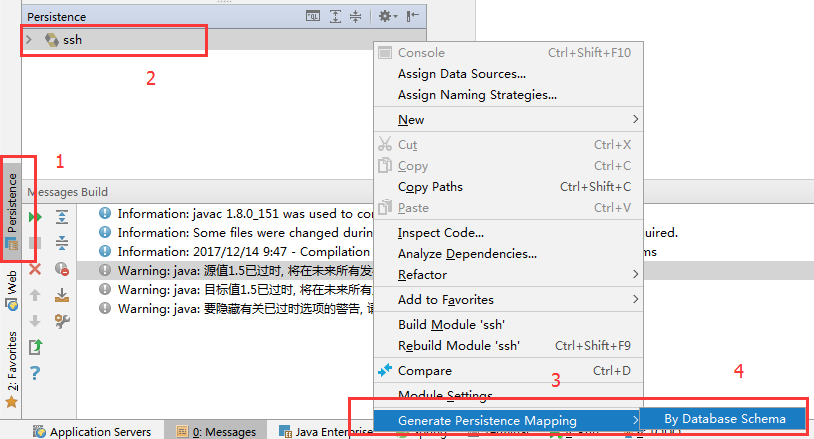
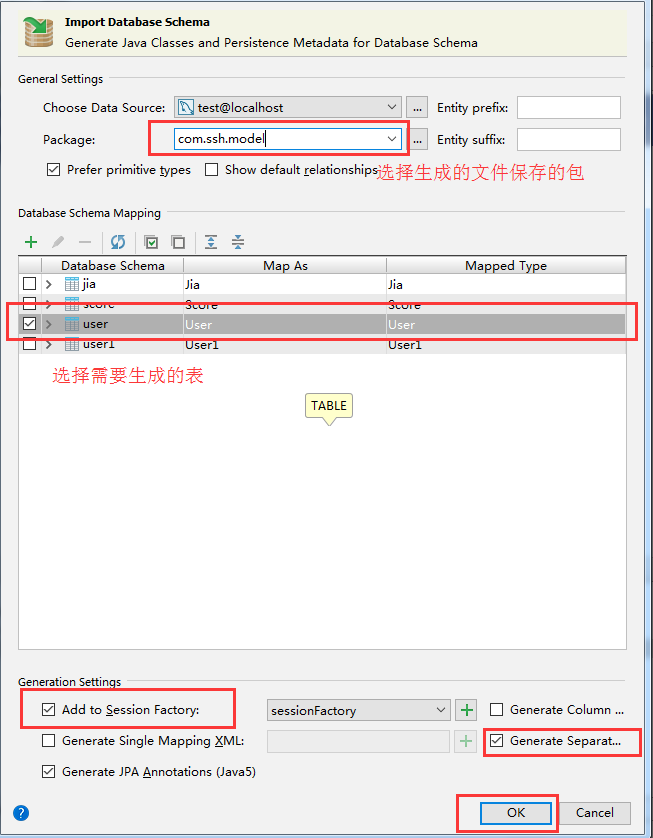
等待生成映射文件,完成后,在对应的包 下面生成如下文件

USer 代码
/**
 * FileName: User
 * Author:   GET_CHEN
 * Date:     2017/12/13 13:45
 * Description:
 */
package com.ssh.model;

import javax.persistence.Basic;
import javax.persistence.Column;
import javax.persistence.Entity;
import javax.persistence.Id;

@Entity
public class User {
    private int uid;
    private String uname;

    @Id
    @Column(name = "uid")
    public int getUid() {
        return uid;
    }

    public void setUid(int uid) {
        this.uid = uid;
    }

    @Basic
    @Column(name = "uname")
    public String getUname() {
        return uname;
    }

    public void setUname(String uname) {
        this.uname = uname;
    }

    @Override
    public boolean equals(Object o) {
        if (this == o) return true;
        if (o == null || getClass() != o.getClass()) return false;

        User user = (User) o;

        if (uid != user.uid) return false;
        if (uname != null ? !uname.equals(user.uname) : user.uname != null) return false;

        return true;
    }

    @Override
    public int hashCode() {
        int result = uid;
        result = 31 * result + (uname != null ? uname.hashCode() : 0);
        return result;
    }
}
USer.hbm.xml文件内容如下:
<?xml version='1.0' encoding='utf-8'?>
<!DOCTYPE hibernate-mapping PUBLIC
    "-//Hibernate/Hibernate Mapping DTD 3.0//EN"
    "http://www.hibernate.org/dtd/hibernate-mapping-3.0.dtd">
<hibernate-mapping>

    <class name="com.ssh.model.User" table="user" schema="test">
        <id name="uid" column="uid"/>
        <property name="uname" column="uname"/>

    </class>
</hibernate-mapping>
8.完成mvc的架构中,各个部分的代码。
-- dao 层

接口UserDao代码
/**
 * FileName: UserDao
 * Author:   GET_CHEN
 * Date:     2017/12/13 11:34
 * Description:
 */
package com.ssh.dao;

import com.ssh.model.User;

public interface UserDao {

    User getUser(Integer uid);

    void saveUser(User user);
}
实现类UserDaoImpl的代码
/**
 * FileName: UserDaoImpl
 * Author:   GET_CHEN
 * Date:     2017/12/13 11:57
 * Description:
 */
package com.ssh.dao;

import com.ssh.model.User;
import org.hibernate.Session;
import org.hibernate.SessionFactory;
import org.hibernate.Transaction;
import org.springframework.stereotype.Repository;
import org.springframework.transaction.annotation.Transactional;

import javax.annotation.Resource;

@Repository("userDao")
public class UserDaoImpl implements UserDao {

    @Resource(name="sessionFactory")
    private SessionFactory sessionFactory;

    public User getUser(Integer uid) {

        Session session = sessionFactory.getCurrentSession();
        //当getCurrentSession所在的方法,或者调用该方法的方法绑定了事务之后,session就与当前线程绑定了,也就能通过currentSession来获取,否则就不能。
        User user = session.get(User.class, uid);
//        session.close();

        return user;
    }

    public void saveUser(User user) {
        Session session = sessionFactory.getCurrentSession();
        session.save(user);
        System.out.println("======="+user.getUname());

        //使用getCurrentSession后,hibernate 自己维护session的关闭,写了反而会报错

    }
}
-- service层

接口UserService的代码
/**
 * FileName: UserService
 * Author:   GET_CHEN
 * Date:     2017/12/13 11:31
 * Description:
 */
package com.ssh.service;

import com.ssh.model.User;

public interface UserService {

    User getUser(Integer uid);

    void saveUser(User user);
}
实现类UserServiceImpl的代码
/**
 * FileName: UserServiceImpl
 * Author:   GET_CHEN
 * Date:     2017/12/13 11:32
 * Description:
 */
package com.ssh.service.impl;

import com.ssh.dao.UserDao;
import com.ssh.model.User;
import com.ssh.service.UserService;
import org.springframework.stereotype.Service;
import org.springframework.transaction.annotation.Transactional;

import javax.annotation.Resource;

@Service("userService")
public class UserServiceImpl implements UserService {

    //依赖Dao
    @Resource
    private UserDao userDao;
    // 注入事务管理
    @Transactional(rollbackFor={Exception.class, RuntimeException.class})
    public User getUser(Integer uid) {
        return userDao.getUser(uid);
    }

    @Transactional(rollbackFor={Exception.class, RuntimeException.class})
    public void saveUser(User user) {
        userDao.saveUser(user);
//        throw new RuntimeException();
//        userDao.saveUser(user);
    }
}
-- 控制层 Action

UserAction代码如下
/**
 * FileName: TestAction
 * Author:   GET_CHEN
 * Date:     2017/12/13 9:52
 * Description:
 */
package com.ssh.action;

import com.opensymphony.xwork2.ActionSupport;
import com.ssh.model.User;
import com.ssh.service.UserService;
import org.springframework.context.annotation.Scope;
import org.springframework.stereotype.Controller;

import javax.annotation.Resource;

@Controller("userAction")
@Scope("prototype")
public class UserAction extends ActionSupport{

   //定义存放到值栈中的对象
    private User user;

  //依赖service
    @Resource
    private UserService userService;

    //实现要存放到值栈中对象的get方法
    public User getUser() {
        return user;
    }

     public String m1(){
       user =  userService.getUser(1);
        System.out.println(user.getUname());
        return SUCCESS;
    }

    public String saveUser(){
        User user = new User();

        user.setUname("事务提交");
        userService.saveUser(user);

        return SUCCESS;
    }
}
-- view层test.jsp页面的代码
<%--
  Created by IntelliJ IDEA.
  User: GET_CHEN
  Date: 2017/12/13
  Time: 13:57
  To change this template use File | Settings | File Templates.
--%>
<%@ page contentType="text/html;charset=UTF-8" language="java" %>
<%-- 引入struts2 的标签库--%>
<%@ taglib prefix="s" uri="/struts-tags" %>

<html>
<head>
    <title>ssh测试</title>
</head>
<body>

    <%-- 获取值栈中的user对象的uname的值--%>
   用户名: <s:property value="user.uname"></s:property>
</body>
</html>
9.部署项目到Tomcat
-- 配置Tomcat

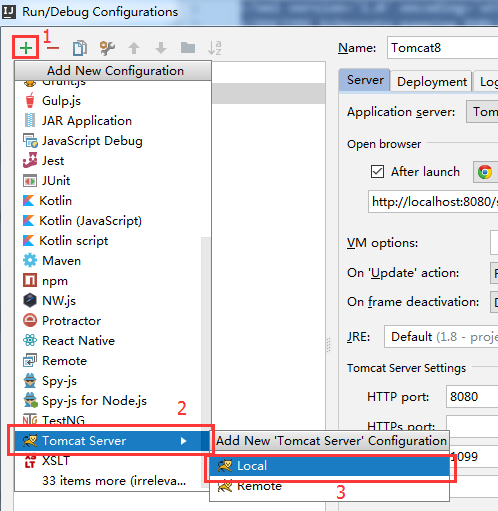
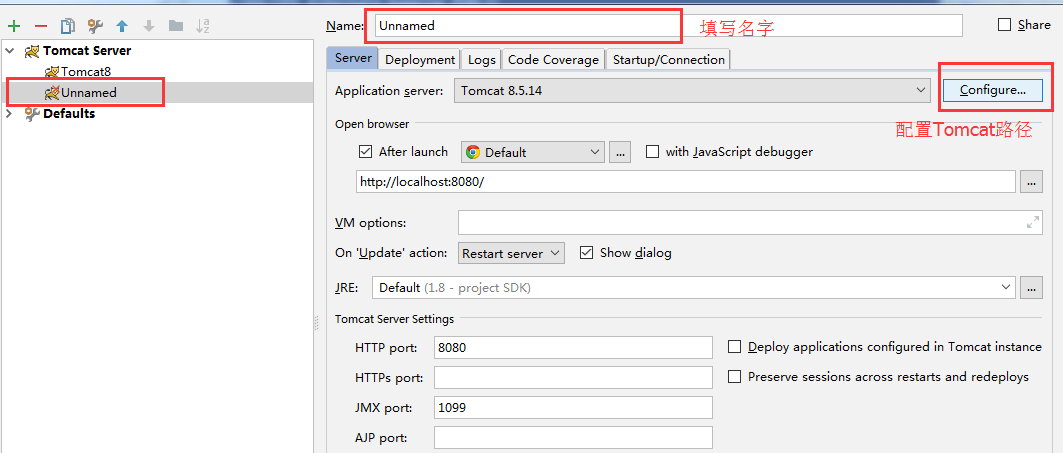
选择上图中的Configure进入,配置tomcat路径
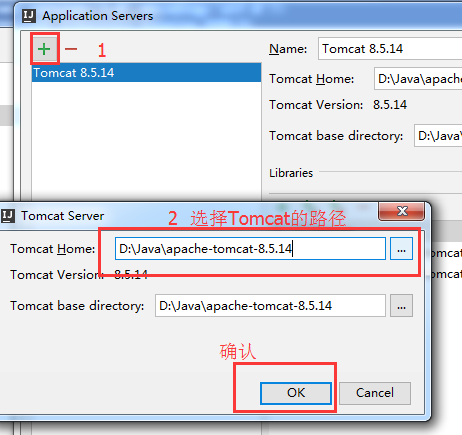
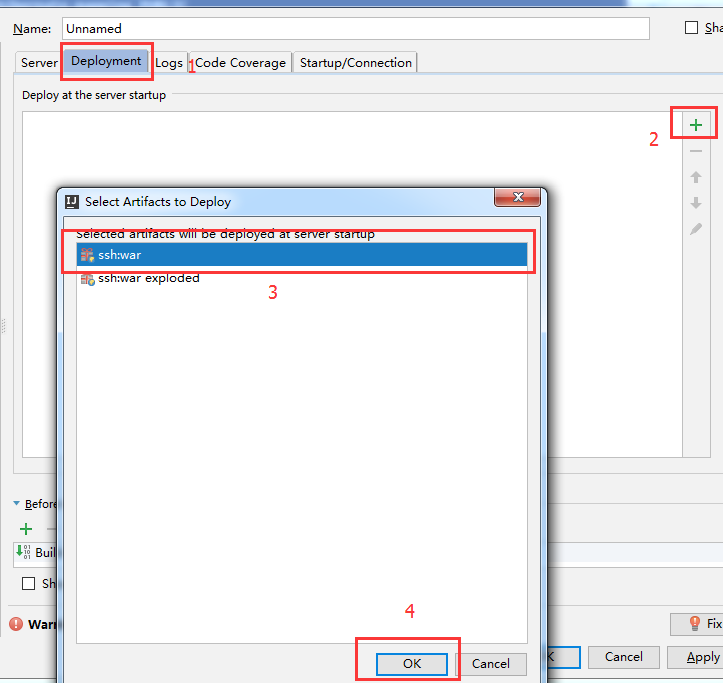
确认后,回到上级页面,选择Deployment菜单项,添加工程到Tomcat
10.启动Tomcat,访问Action中的方法
-- 切换到Tomcat,点击绿色按钮启动Tomcat

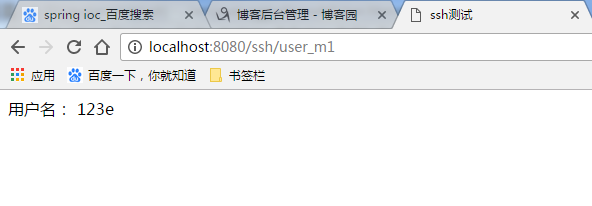
-- 在地址栏输入,如下地址。结果如下。
------------------ 今天分享到处
------------------By GET_CHEN


