k8s-容器资源需求、资源限制及HeapSter-二十二
一、容器资源需求、资源限制
资源需求、资源限制:指的是cpu、内存等资源;
资源需求、资源限制的两个关键字:
- request:需求,最低保障,在调度时,这个节点必须要满足request需求的资源大小;
- limits:限制、硬限制。这个限制容器无论怎么运行都不会超过limits的值;
CPU:k8s的一个cpu对应一颗宿主机逻辑cpu。一个逻辑cpu还可以划分为1000个毫核(millcores)。所以1cpu=1000m;500m=0.5个CPU,0.5m相当于二分之一的核心;
内存的计量单位:E、P、T、G、M、K
[root@master ~]# kubectl explain pods.spec.containers.resources
[root@master ~]# kubectl explain pods.spec.containers.resources.requests
[root@master ~]# kubectl explain pods.spec.containers.resources.limits
用法参考:https://kubernetes.io/docs/concepts/configuration/manage-compute-resources-container/
[root@master metrics]# pwd
/root/manifests/metrics
[root@master metrics]# vim pod-demo.yaml
apiVersion: v1
kind: Pod
metadata:
  name: pod-demo
  labels:
    app: myapp
    tier: frontend
spec:
  containers:
  - name: myapp
    image: ikubernetes/stress-ng
    command: ["/usr/bin/stress-ng", "-c 1", "--metrics-brief"]       #-c 1表示启动一个子进程对cpu做压测.默认stress-ng的一个子进程使用256M内存
    resources:
      requests:
        cpu: "200m"
        memory: "128Mi"
      limits:
        cpu: "500m"
        memory: "512Mi"

#创建pod
[root@master metrics]# kubectl apply -f pod-demo.yaml
pod/pod-demo created

[root@master metrics]# kubectl get pods
NAME       READY   STATUS    RESTARTS   AGE
pod-demo   1/1     Running   0          6s

[root@master metrics]# kubectl exec pod-demo -- top
Mem: 1378192K used, 487116K free, 12540K shrd, 2108K buff, 818184K cached
CPU:  26% usr   1% sys   0% nic  71% idle   0% io   0% irq   0% sirq
Load average: 0.78 0.96 0.50 2/479 11
  PID  PPID USER     STAT   VSZ %VSZ CPU %CPU COMMAND
    6     1 root     R     6884   0%   1  26% {stress-ng-cpu} /usr/bin/stress-ng
    7     0 root     R     1504   0%   0   0% top
    1     0 root     S     6244   0%   1   0% /usr/bin/stress-ng -c 1 --metrics-
我们对容器分配了资源限制后,k8s会自动分配一个QoS,叫服务质量,通过kubectl describe pods pod_name可以查看这个字段;
[root@master metrics]# kubectl describe pods pod-demo |grep QoS
QoS Class:       Burstable
QoS可以分为三类(根据资源设置,自动归类):
- Guranteed:表示每个容器的cpu和内存资源设置了相同的requests和limits值,即cpu.requests=cpu.limits和memory.requests=memory.limits,Guranteed会确保这类pod有最高的优先级,会被优先运行的,即使节点上的资源不够用;
- Burstable:表示pod中至少有一个容器设置了cpu或内存资源的requests属性,可能没有定义limits属性,那么这类pod具有中等优先级;
- BestEffort:指没有任何一个容器设置了requests或者limits属性,那么这类pod是最低优先级。当这类pod的资源不够用时,BestEffort中的容器会被优先终止,以便腾出资源来,给另外两类pod中的容器正常运行;
二、HeapSter
1、介绍
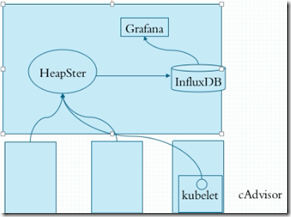
HeapSter的作用是收集个节点pod的资源使用情况,然后以图形界面展示给用户。
kubelet中的cAdvisor负责收集每个节点上的资源使用情况,然后把信息存储HeapSter中,HeapSter再把数据持久化的存储在数据库InfluxDB中。然后我们再通过非常优秀的Grafana来图形化展示;
一般我们监控的指标包括k8s集群的系统指标、容器指标和应用指标。
默认InfluxDB使用的是存储卷是emptyDir,容器一关数据就没了,所以我们生产要换成glusterfs等存储卷才行。
2、部署influxdb:
InfluxDB github:https://github.com/kubernetes-retired/heapster
在node节点上先拉取镜像:
#node01
[root@node01 ~]# docker pull fishchen/heapster-influxdb-amd64:v1.5.2

#node02
[root@node02 ~]# docker pull fishchen/heapster-influxdb-amd64:v1.5.2
在master节点上,拉取yaml文件,并修改、执行:
[root@master metrics]# wget https://raw.githubusercontent.com/kubernetes-retired/heapster/master/deploy/kube-config/influxdb/influxdb.yaml

[root@master metrics]# vim influxdb.yaml
apiVersion: apps/v1        #此处不修改也可以,如果改成apps/v1,要加下面 selector那几行
kind: Deployment
metadata:
  name: monitoring-influxdb
  namespace: kube-system
spec:
  replicas: 1
  selector:            #加此行
    matchLabels:        #加此行
      task: monitoring        #加此行
      k8s-app: influxdb    #加此行
  template:
    metadata:
      labels:
        task: monitoring
        k8s-app: influxdb
    spec:
      containers:
      - name: influxdb
        image: fishchen/heapster-influxdb-amd64:v1.5.2    #修改此处镜像地址
        volumeMounts:
        - mountPath: /data
          name: influxdb-storage
      volumes:
      - name: influxdb-storage
        emptyDir: {}
---
apiVersion: v1
kind: Service
metadata:
  labels:
    task: monitoring
    # For use as a Cluster add-on (https://github.com/kubernetes/kubernetes/tree/master/cluster/addons)
    # If you are NOT using this as an addon, you should comment out this line.
    kubernetes.io/cluster-service: 'true'
    kubernetes.io/name: monitoring-influxdb
  name: monitoring-influxdb
  namespace: kube-system
spec:
  ports:
  - port: 8086
    targetPort: 8086
  selector:
    k8s-app: influxdb

#创建资源
[root@master metrics]# kubectl apply -f influxdb.yaml
deployment.apps/monitoring-influxdb created
service/monitoring-influxdb created

#查看
[root@master metrics]# kubectl get pods -n kube-system |grep influxdb
monitoring-influxdb-5899b7fff9-2r58w    1/1     Running   0          6m59s

[root@master metrics]# kubectl get svc -n kube-system |grep influxdb
monitoring-influxdb    ClusterIP   10.101.242.217   <none>        8086/TCP        7m6s
3、部署rbac
下面我们开始部署heapster,但heapster依赖rbac,所以我们先部署rbac:
[root@master metrics]# wget https://raw.githubusercontent.com/kubernetes-retired/heapster/master/deploy/kube-config/rbac/heapster-rbac.yaml

[root@master metrics]# kubectl apply -f heapster-rbac.yaml
clusterrolebinding.rbac.authorization.k8s.io/heapster created
4、部署heapster
#node01拉取镜像
[root@node01 ~]# docker pull rancher/heapster-amd64:v1.5.4

#node02拉取镜像
[root@node02 ~]# docker pull rancher/heapster-amd64:v1.5.4

#master拉取yaml文件
[root@master metrics]# wget https://raw.githubusercontent.com/kubernetes-retired/heapster/master/deploy/kube-config/influxdb/heapster.yaml

[root@master metrics]# vim heapster.yaml
apiVersion: v1
kind: ServiceAccount
metadata:
  name: heapster
  namespace: kube-system
---
apiVersion: apps/v1
kind: Deployment
metadata:
  name: heapster
  namespace: kube-system
spec:
  replicas: 1
  selector:
    matchLabels:
      task: monitoring
      k8s-app: heapster
  template:
    metadata:
      labels:
        task: monitoring
        k8s-app: heapster
    spec:
      serviceAccountName: heapster
      containers:
      - name: heapster
        image: rancher/heapster-amd64:v1.5.4    #修改此处镜像地址
        imagePullPolicy: IfNotPresent
        command:
        - /heapster
        - --source=kubernetes:https://kubernetes.default
        - --sink=influxdb:http://monitoring-influxdb.kube-system.svc:8086
---
apiVersion: v1
kind: Service
metadata:
  labels:
    task: monitoring
    # For use as a Cluster add-on (https://github.com/kubernetes/kubernetes/tree/master/cluster/addons)
    # If you are NOT using this as an addon, you should comment out this line.
    kubernetes.io/cluster-service: 'true'
    kubernetes.io/name: Heapster
  name: heapster
  namespace: kube-system
spec:
  ports:
  - port: 80
    targetPort: 8082
  type: NodePort        #我添加了此行,
  selector:
    k8s-app: heapster

#创建
[root@master metrics]# kubectl apply -f heapster.yaml
serviceaccount/heapster created
deployment.apps/heapster created

#查看
[root@master metrics]# kubectl get pods -n kube-system |grep heapster-
heapster-7c8f7dc8cb-kph29               1/1     Running   0          3m55s
[root@master metrics]#
[root@master metrics]# kubectl get svc -n kube-system |grep heapster
heapster               NodePort    10.111.93.84     <none>        80:31410/TCP    4m16s    #由于用了NodePort,所以pod端口映射到了节点31410端口上

#查看pod日志
[root@master metrics]# kubectl  logs heapster-7c8f7dc8cb-kph29 -n kube-system
5、部署Grafana
#node01拉取镜像
[root@node01 ~]# docker pull angelnu/heapster-grafana:v5.0.4

#node02拉取镜像
[root@node02 ~]# docker pull angelnu/heapster-grafana:v5.0.4

#master拉取yaml文件
[root@master metrics]# wget https://raw.githubusercontent.com/kubernetes-retired/heapster/master/deploy/kube-config/influxdb/grafana.yaml

#编辑yaml文件
[root@master metrics]# vim grafana.yaml
apiVersion: apps/v1
kind: Deployment
metadata:
  name: monitoring-grafana
  namespace: kube-system
spec:
  replicas: 1
  selector:
    matchLabels:
      task: monitoring
      k8s-app: grafana

  template:
    metadata:
      labels:
        task: monitoring
        k8s-app: grafana
    spec:
      containers:
      - name: grafana
        image: angelnu/heapster-grafana:v5.0.4    #修改镜像地址
        ports:
        - containerPort: 3000
          protocol: TCP
        volumeMounts:
        - mountPath: /etc/ssl/certs
          name: ca-certificates
          readOnly: true
        - mountPath: /var
          name: grafana-storage
        env:
        - name: INFLUXDB_HOST
          value: monitoring-influxdb
        - name: GF_SERVER_HTTP_PORT
          value: "3000"
          # The following env variables are required to make Grafana accessible via
          # the kubernetes api-server proxy. On production clusters, we recommend
          # removing these env variables, setup auth for grafana, and expose the grafana
          # service using a LoadBalancer or a public IP.
        - name: GF_AUTH_BASIC_ENABLED
          value: "false"
        - name: GF_AUTH_ANONYMOUS_ENABLED
          value: "true"
        - name: GF_AUTH_ANONYMOUS_ORG_ROLE
          value: Admin
        - name: GF_SERVER_ROOT_URL
          # If you're only using the API Server proxy, set this value instead:
          # value: /api/v1/namespaces/kube-system/services/monitoring-grafana/proxy
          value: /
      volumes:
      - name: ca-certificates
        hostPath:
          path: /etc/ssl/certs
      - name: grafana-storage
        emptyDir: {}
---
apiVersion: v1
kind: Service
metadata:
  labels:
    # For use as a Cluster add-on (https://github.com/kubernetes/kubernetes/tree/master/cluster/addons)
    # If you are NOT using this as an addon, you should comment out this line.
    kubernetes.io/cluster-service: 'true'
    kubernetes.io/name: monitoring-grafana
  name: monitoring-grafana
  namespace: kube-system
spec:
  # In a production setup, we recommend accessing Grafana through an external Loadbalancer
  # or through a public IP.
  # type: LoadBalancer
  # You could also use NodePort to expose the service at a randomly-generated port
  # type: NodePort
  ports:
  - port: 80
    targetPort: 3000
  type: NodePort        #为了能在集群外部访问Grafana,所以我们需要定义NodePort
  selector:
    k8s-app: grafana


#创建
[root@master metrics]# kubectl apply -f grafana.yaml
deployment.apps/monitoring-grafana created
service/monitoring-grafana created

#查看
[root@master metrics]# kubectl get pods -n kube-system |grep grafana
monitoring-grafana-84786758cc-7txwr     1/1     Running   0          3m47s

[root@master metrics]# kubectl get svc -n kube-system |grep grafana
monitoring-grafana     NodePort    10.102.42.86     <none>        80:31404/TCP    3m55s    #可见pod的端口映射到了node上的31404端口上
pod的端口已经映射到了node上的31404端口上;
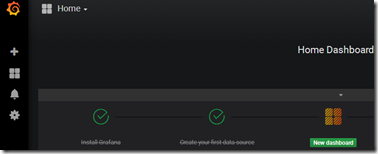
此时,在集群外部,用浏览器访问:http://ip:31404
如下图:
但是如何使用,可能还需要进一步学习influxbd、grafana等;
最后,HeapSter可能快被废除了…
新型的监控系统比如有:Prometheus(普罗米修斯)


