SpringMVC配置
基于XML和注解的配置
- 引入Spring、SpringMVC相关依赖(通过Maven或Gradle完成)
- 在web.xml配置监听器和ServletContext上下文参数(即Spring IoC容器初始化文件),当ServletContext容器建立时初始化Spring IoC容器(即初始化根上下文)
- 配置DispatcherServlet
<?xml version="1.0" encoding="UTF-8"?>
<web-app xmlns="http://xmlns.jcp.org/xml/ns/javaee"
         xmlns:xsi="http://www.w3.org/2001/XMLSchema-instance"
         xsi:schemaLocation="http://xmlns.jcp.org/xml/ns/javaee http://xmlns.jcp.org/xml/ns/javaee/web-app_3_1.xsd"
         version="3.1">
    <!-- 1. 配置监听器 -->
    <listener>
        <listener-class>
            org.springframework.web.context.ContextLoaderListener
        </listener-class>
    </listener>

    <!-- 指定Spring Bean的配置文件所在目录。默认配置在WEB-INF目录下 -->
    <context-param>
        <param-name>contextConfigLocation</param-name>
        <param-value>classpath:applicationContext.xml</param-value>
    </context-param>

	<!-- 配置DispatcherServlet,默认配置在WEB-INF目录下 -->
	<servlet>
    	<servlet-name>dispatcherConfig</servlet-name>
    	<servlet-class>org.springframework.web.servlet.DispatcherServlet</servlet-class>
    	<load-on-startup>1</load-on-startup>
    	</servlet>

    <servlet-mapping>
    	<servlet-name>dispatcherConfig</servlet-name>
    	<url-pattern>/</url-pattern>
    </servlet-mapping>
</web-app>
在配置DispatcherServlet时,容器默认读取WEB-INF目录下的
<servlet-name>-servlet.xml一般需要配置3点:
- 启动注解
- 配置组件扫描
- 声明视图解析器
<?xml version="1.0" encoding="UTF-8"?>
<beans xmlns="http://www.springframework.org/schema/beans"
       xmlns:xsi="http://www.w3.org/2001/XMLSchema-instance"
       xmlns:context="http://www.springframework.org/schema/context" xmlns:p="http://www.springframework.org/schema/p"
       xsi:schemaLocation="http://www.springframework.org/schema/beans http://www.springframework.org/schema/beans/spring-beans.xsd http://www.springframework.org/schema/context http://www.springframework.org/schema/context/spring-context.xsd">

    <!-- 配置组件扫描,并为Autowired等注解提供支持 -->
    <context:component-scan base-package="com.weixia.web"></context:component-scan>

    <!-- 启用MVC注解,为@ResponseBody等注解提供支持 -->
    <mvc:annotation-driven />

    <!-- 配置视图解析器 -->
    <bean class="org.springframework.web.servlet.view.InternalResourceViewResolver" 		p:prefix="/WEB-INF/views/" p:suffix=".jsp" />
</beans>
<context:annotation-config/>、<mvc:annotation-driven/>和<context:component-scan>之间的关系
① <context:annotation-config/>
1.如果你想使用@Autowired注解,那么就必须事先在 spring 容器中声明 AutowiredAnnotationBeanPostProcessor Bean。
2.如果想使用@Resource 、@PostConstruct、@PreDestroy等注解就必须声明CommonAnnotationBeanPostProcessor
3.如果想使用@PersistenceContext注解,就必须声明PersistenceAnnotationBeanPostProcessor的Bean。
4.如果想使用 @Required的注解,就必须声明RequiredAnnotationBeanPostProcessor的Bean。
使用<context:annotation- config/>隐式地向 Spring容器注册这4个BeanPostProcessor :
- AutowiredAnnotationBeanPostProcessor、
- RequiredAnnotationBeanPostProcessor、
- CommonAnnotationBeanPostProcessor以及
- PersistenceAnnotationBeanPostProcessor
即<context:annotation- config/>是用来使上述注解起作用的,也就是说激活已经在application context中注册的bean。
之所以这样说是因为<context:annotation-config />仅能够在已经在已经注册过的bean上面起作用。对于没有在spring容器中注册的bean,它并不能执行任何操作,也就是说如果你并没有spring容器中注册过bean(spring配置文件中配置bean就是注册),那么上述的那些注解并不会在你未注册过的bean中起作用。
②<context:component-scan>
<context:component-scan>做了<context:annotation-config>要做的事情,还额外支持@Component,@Repository,@Service,@Controller注解。
并且<context:component-scan>扫描base-package并且在application context中注册扫描的beans.
所以配置<context:component-scan>就不需要配置<context:annotation- config/>
③ <mvc:annotation-driven/>
至于该项看前缀就应该知道是springmvc所需要的注解。
<mvc:annotation-driven/>相当于注册了DefaultAnnotationHandlerMapping和AnnotationMethodHandlerAdapter两个bean,配置一些messageconverter。
基于纯注解配置
1.继承AbstractAnnotationConfigDispatcherServletInitializer类
在 Servlet 3.0 环境中,容器会在类路径中查找实现 javax.servlet.ServletContainerInitializer 接口的类,如果能发现的话,就会用它来配置 Servlet 容器。
Spring 提供了这个接口的实现,名为 SpringServletContainerInitializer ,这个类反过来又会查找实现 了WebApplicationInitializer 的类并将配置的任务交给它们来完成。 Spring 3.2 引入了一个 WebApplicationInitializer 的基础实现类AbstractAnnotationConfigDispatcherServletInitializer
// 示例代码出自《Spring 4实战》
package spittr.config;

import org.springframework.web.servlet.support.AbstractAnnotationConfigDispatcherServletInitializer;

public class SpittrWebAppInitializer extends AbstractAnnotationConfigDispatcherServletInitializer {
    @Override
    protected String[] getServletMappings() {
        return new String[] {"/"};
    }

    @Override
    protected Class<?>[] getRootConfigClasses() {
        return new Class<?>[] {RootConfig.class};
    }

    @Override
    protected Class<?>[] getServletConfigClasses() {
        return new Class<?>[] {WebConfig.class};
    }
}
getServletMappings方法描述前端DispatcherServlet的请求路径
getRootConfigClasses方法用于配置Spring IoC容器
getServletConfigClasses方法用于初始化DispatcherServlet上下文
WebConfig是基于java类的配置文件
附:基于IDEA的SpringMVC + Maven项目结构配置
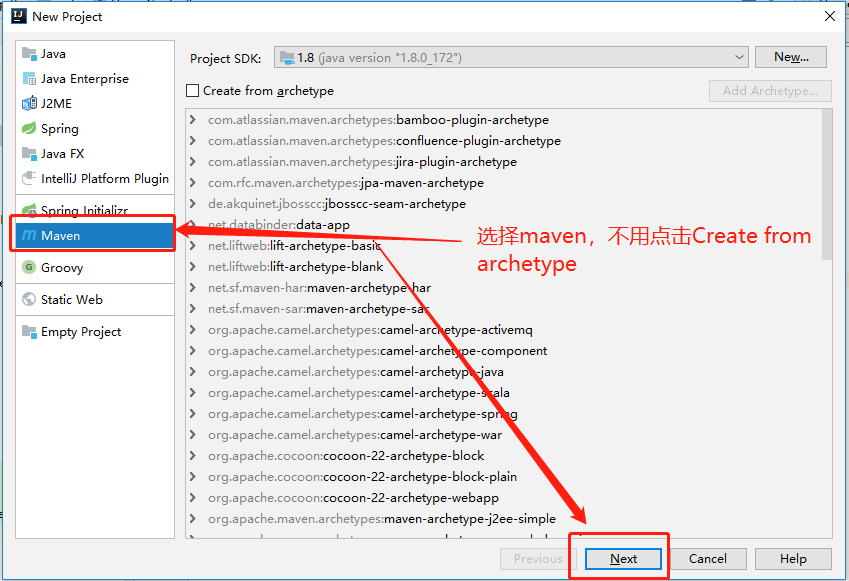
- 搭建maven工程

- 添加web框架

3、将应用打包,等待部署到服务器上

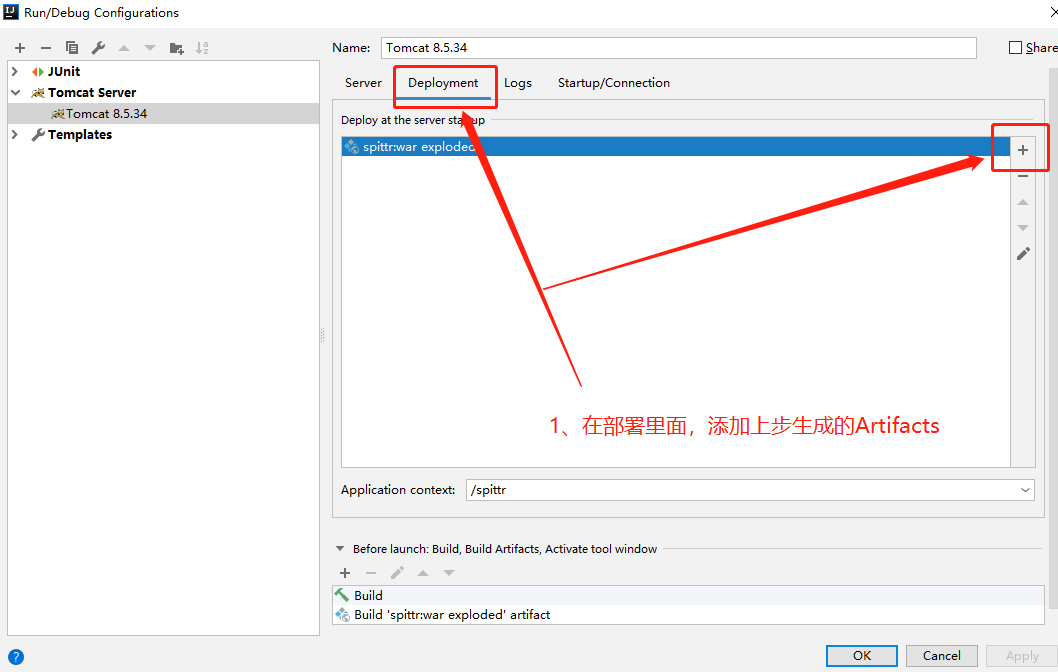
4、将应用部署到服务器上(以Tomcat为例)

参考
context:annotation-config,mvc:annotation-driven和context:component-scan之间的关系


