
前端基础之CSS
CSS介绍
CSS(cascading style sheet,层叠样式表)是一种制作网页的新技术,现在已经为大多数浏览器所支持,成为网页设计必不可少的工具之一。
CSS语法
CSS实例
每个CSS样式由两个组成部分:选择器和声明。声明又包括属性和属性值。每个声明之后用分号结束。
CSS注释
/*这是注释*/
CSS的四种引入方式
行内样式
行内式是在标记的style属性中设定CSS样式。不推荐大规模使用。
<p style="color: red">Hello world.</p>
内部样式
嵌入式是将CSS样式集中写在网页的<head></head>标签对的<style></style>标签对中。格式如下:
<head>
    <meta charset="UTF-8">
    <title>Title</title>
    <style>
        p{
            background-color: #2b99ff;
        }
    </style>
</head>
外部样式
外部样式就是将css写在一个单独的文件中,然后在页面进行引入即可。推荐使用此方式。
<link href="mystyle.css" rel="stylesheet" type="text/css"/>
CSS属性:
   color
   font-size
   width
   height
   background-color
   border(简写) 宽度 类型 颜色
CSS选择器
********基本选择器
标签选择器
p {color: "red";}
ID选择器
#i1 {
  background-color: red;
}
类别选择器
.c1 {
  font-size: 14px;
}
p.c1 {
  color: red;
}
注意:
样式类名不要用数字开头(有的浏览器不认)。
标签中的class属性如果有多个,要用空格分隔。
通用选择器
* {
  color: white;
}
基本选择器示例
<!DOCTYPE html>
<html lang="zh-CN">
<head>
    <meta charset="UTF-8">
    <meta http-equiv="x-ua-compatible" content="IE=edge">
    <title>基本选择器示例</title>
    <style>
        /*标签选择器*/
        /*div {*/
            /*color: red;*/
        /*}*/
        /*ID选择器 根据ID去找标签*/
        /*#d1 {*/
            /*color: red;*/
        /*}*/
        /*class选择器*/
        /*.c1 {*/
            /*color: red;*/
        /*}*/
        /*标签名和clas名一起生效*/
        /*div.c1 {*/
            /*color: red;*/
        /*}*/
        /*所有标签都变红*/
        * {
            color: red;
        }

    </style>
</head>
<body>
    <!--我是HTML注释-->
    <div id="d1" class="c1">我是一个div标签</div>
    <div>我不想变红</div>
    <div>我不想变红2</div>
    <div class="c1">可我想变红</div>
    <p class="c1">我是一个P标签,但我不想变红</p>
</body>
</html>
******层级选择器
组合选择器
/*为所有的div和p标签设置边框属性*/
div, p {
  border: 1px solid red;
}
后代选择器
/*li内部的a标签设置字体颜色*/
li a {
  color: green;
}
儿子选择器
/*选择所有父级是 <div> 元素的 <p> 元素*/
div>p {
  font-family: "Arial Black", arial-black, cursive;
}
毗邻选择器
/*选择所有紧接着<div>元素之后的<p>元素*/
div+p {
  margin: 5px;
}
弟弟选择器
/*i1后面所有的兄弟p标签*/
#i1~p {
  border: 2px solid royalblue;
}
层级选择器示例
<!DOCTYPE html>
<html lang="zh-CN">
<head>
    <meta charset="UTF-8">
    <meta http-equiv="x-ua-compatible" content="IE=edge">
    <title>层级选择器示例</title>
    <style>
        /* 后代选择器*/
        /*div a {*/
            /*color: red;*/
        /*}*/
        /*儿子选择器*/
        /*div>a {*/
            /*color: red;*/
        /*}*/
        /*毗邻选择器*/
        /*label+input {*/
            /*border: 1px solid red;*/
        /*}*/

        /*弟弟选择器*/
        /*p~ul{*/
            /*color: green;*/
        /*}*/

        /*组合选择器 每个选择器都应用该样式*/
        /*p>a, p~a{*/
            /*color: green;*/
        /*}*/

        /*和基本选择器组合使用*/
        p~a.c1{
            color: deeppink;
        }

        .c1 {
            color: blue;
        }

    </style>
</head>
<body>

<div>
    <a href="">我是div内部的a标签</a>
    <p>
        <a href="">我是div的孙子a标签</a>
        <!--P标签不能包ul还有div-->
    </p>
</div>

<form action="">
    <label for="i1">姓名</label>
    <input type="text" id="i1">

    <label for="i2">密码</label>
    <input type="password" id="i2">

    <label for="i3">邮箱</label>
    <input type="email" id="i3">

    <input type="submit" value="提交">
</form>
<a href="">我不想被绿</a>
<ul>
    <li>111</li>
    <li>222</li>
    <li>333</li>
</ul>
<p>这是一个P标签</p>
<ul>
    <li>111</li>
    <li>222</li>
    <li>333</li>
</ul>
<a  class="c1" href="">我是div外面的a标签</a>
<div class="c1">有c1 class的div标签</div>
<a href="">我没有c1这个样式</a>


</body>
</html>
******属性选择器
/*用于选取带有指定属性的元素。*/
p[title] {
  color: red;
}
/*用于选取带有指定属性和值的元素。*/
p[title="213"] {
  color: green;
}

/*上面常用↑*/

/*用于选取属性值包含指定值的每个元素*/
div[class~="c2"] {
  color: red;
}
/*用于选取带有以指定值开头的属性值的元素,该值必须是整个单词。*/
div[class|="c2"] {
  color: red;
}
/*匹配属性值以指定值开头的每个元素*/
div[class^="my"] {
  color: red;
}
/*匹配属性值以指定值结尾的每个元素*/
div[class$="s"] {
  color: red;
}
/*匹配属性值以指定值结尾的每个元素*/
div[class$="s"] {
  color: red;
}
/*匹配属性值包含指定值的每个元素*/
div[class*="sb"] {
  color: red;
}
属性选择器示例
<!DOCTYPE html>
<html lang="zh-CN">
<head>
    <meta charset="UTF-8">
    <meta http-equiv="x-ua-compatible" content="IE=edge">
    <title>属性选择器示例</title>
    <style>
        /*[egon] {*/
            /*color: green;*/
        /*}*/
        /*[type="button"] {*/
            /*background-color: red;*/
        /*}*/

        /*[egon~="green"] {*/
            /*color: blueviolet;*/
        /*}*/
        /**/
        /*[egon^="g"] {*/
            /*color: blueviolet;*/
        /*}*/

        [class|="green"] {
            color: blueviolet;
        }

        /*[class^="my"] {*/
            /*background-color: deeppink;*/
        /*}*/

        /*[class$="k"] {*/
            /*color: brown;*/
        /*}*/
        /*[class*="ee"] {*/
            /*color: goldenrod;*/
        /*}*/

    </style>
</head>
<body>

<div class="green v1">我是绿色的Egon</div>
<div>我没有egon属性</div>
<div class="green-red pink">被污染的Egon</div>
<div class="gray gray v1">被污染的Egon2号</div>

<input class="my-submit1" type="submit" value="提交">
<input class="my-submit2" type="button" value="按钮">

</body>
</html>
******伪类选择器
a:link {color: #FF0000} /* 未访问的链接 */

a:visited {color: #00FF00} /* 已访问的链接 */

a:hover {color: #FF00FF} /* 鼠标移动到链接上 */

a:active {color: #0000FF} /* 选定的链接 */
before和after
/*在每个<p>元素之前插入内容*/
p:before {
  content:"hello";
  color:red;
  display: block;
}

/*在每个<p>元素之后插入内容*/
p:after {
  content:"bye";
  color:red;
  display: block;
}
<!DOCTYPE html>
<html lang="zh-CN">
<head>
    <meta charset="UTF-8">
    <meta http-equiv="x-ua-compatible" content="IE=edge">
    <title>Title</title>
    <style>
        p:after {
            content: "hello";
            display: inline-block;
            color: red;
            background-color: green;
        }

         p:before {
            content: "hello from other side";
            display: inline-block;
            color: red;
        }
    </style>
</head>
<body>
<p>这是p标签</p>
</body>
</html>
伪类选择器的示例
<!DOCTYPE html>
<html lang="zh-CN">
<head>
    <meta charset="UTF-8">
    <meta http-equiv="x-ua-compatible" content="IE=edge">
    <title>伪类选择器示例</title>
    <style>
        /*a{*/
            /*color: grey;*/
            /*opacity: 0;*/
        /*}*/
        /*a:hover {*/
            /*color: green;*/
            /*opacity: 1;*/
        /*}*/

            /*div {*/
                /*width: 50px;*/
                /*height: 80px;*/
                /*background-color: yellow*/
            /*}*/
        /*div:hover {*/
            /*background-color: black;*/
        /*}*/
        a:link {
            color: brown;
        }
        input:focus {
            border: 1px solid red;
        }
    </style>
</head>
<body>

<!--鼠标移上去有效果-->
<a href="">我是a标签</a>


<a href="https://www.tmall.com/" target="_blank">点我去天猫</a>
<a href="https://www.suning.com/" target="_blank">点我去苏宁</a>
<a href="https://www.xxx.com/" target="_blank">点我去百度</a>

<input type="text">

</body>
</html>
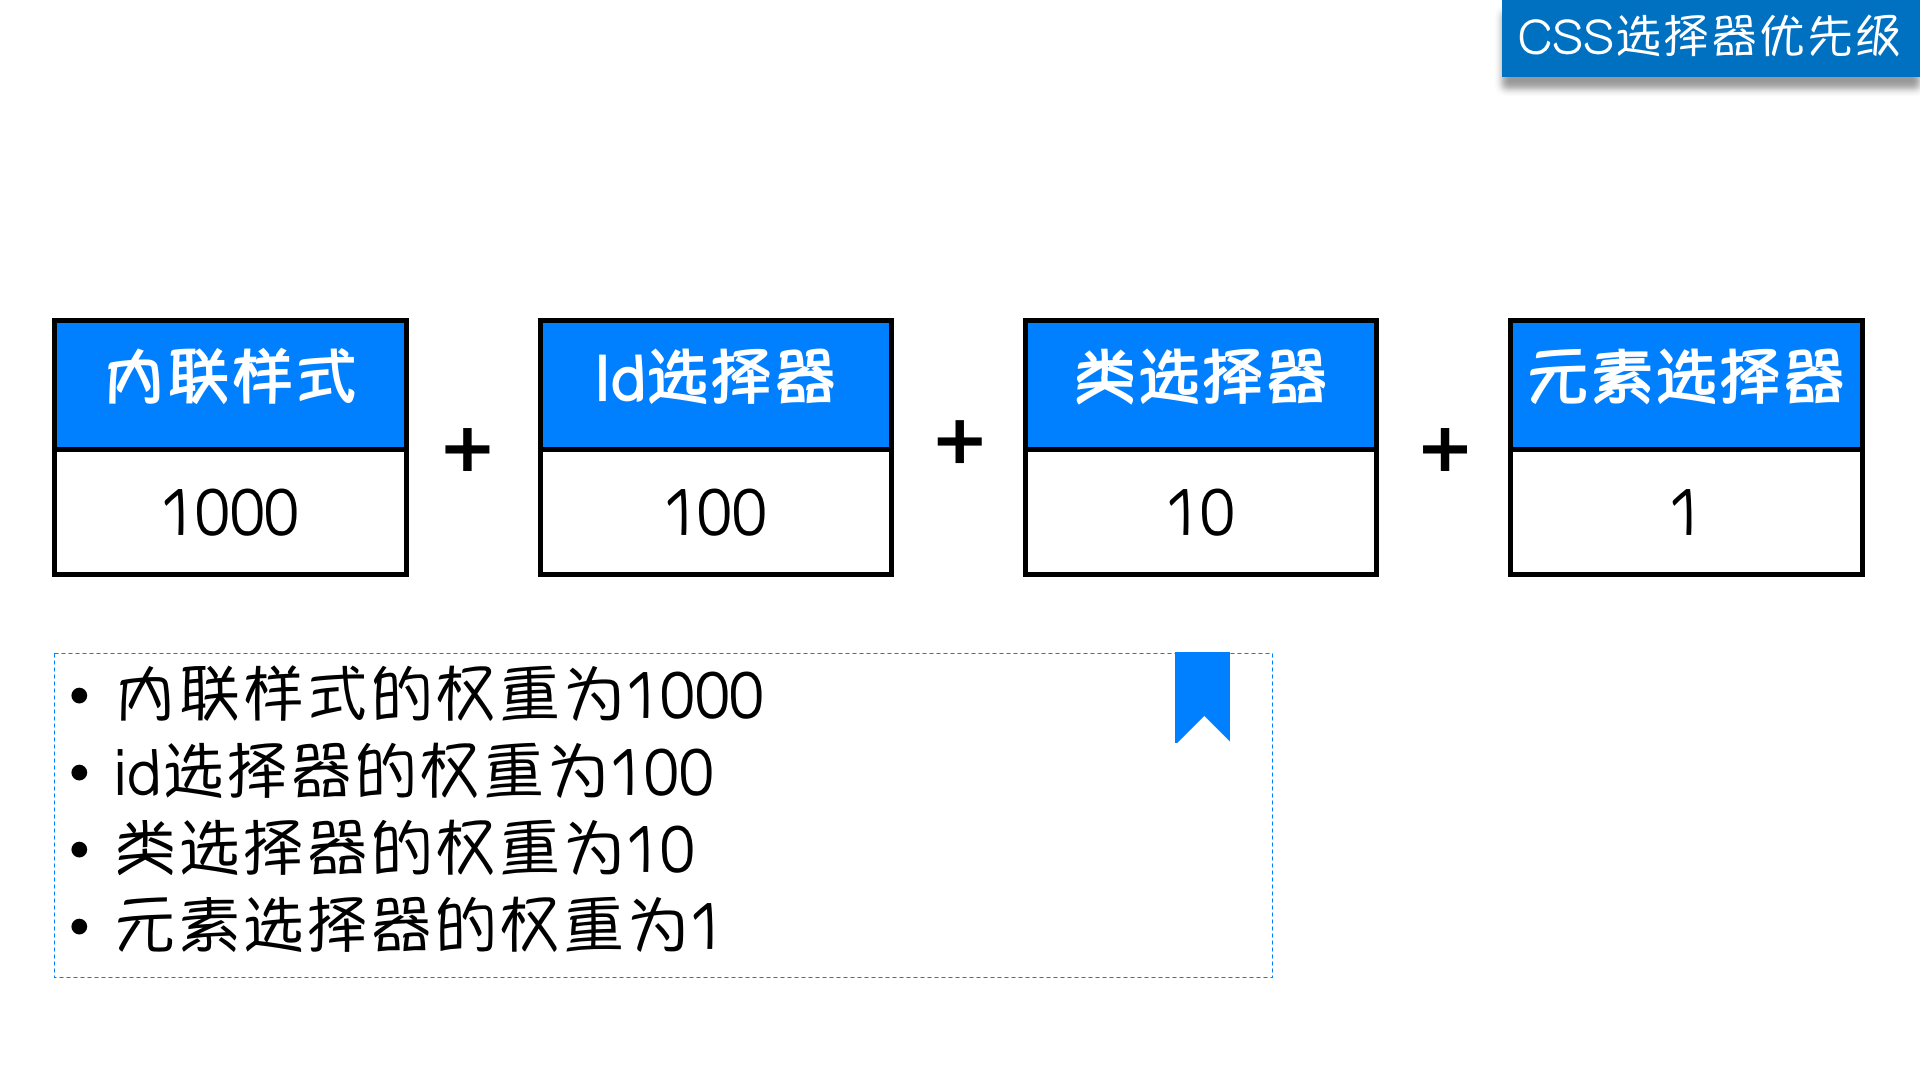
选择器的优先级
CSS继承
继承是CSS的一个主要特征,它是依赖于祖先-后代的关系的。继承是一种机制,它允许样式不仅可以应用于某个特定的元素,还可以应用于它的后代。例如一个body定义了的字体颜色值也会应用到段落的文本中。
body {
  color: red;
}
此时页面上所有标签都会继承body的字体颜色。然而CSS继承性的权重是非常低的,是比普通元素的权重还要低的0。
我们只要给对应的标签设置字体颜色就可覆盖掉它继承的样式。
p {
  color: green;
}
此外,继承是CSS重要的一部分,我们甚至不用去考虑它为什么能够这样,但CSS继承也是有限制的。有一些属性不能被继承,如:border, margin, padding, background等。
样式优先级
万不得已可以使用!import
选择器优先级示例
<!DOCTYPE html>
<html lang="zh-CN">
<head>
    <meta charset="UTF-8">
    <meta http-equiv="x-ua-compatible" content="IE=edge">
    <title>CSS选择器优先级示例</title>
    <style>
        /*.c1 {*/
            /*color: red;*/
        /*}*/
        /*p {*/
            /*color: green;*/
        /*}*/

        #d1 {
            color: blue;
        }
        .c1 {
            color: red!important;
        }
        div.c1 {
            color: green;
        }
        #d1>#d2 {
            color: brown;
        }

        .c3 {
            color: rebeccapurple;
        }
        /*不建议使用,特定情况可以使用*/
        /*span {*/
            /*color: aqua!important;*/
        /*}*/
        .c3 {
            color: chartreuse;
        }
    </style>
       <link rel="stylesheet" href="my-style2.css">
    <link rel="stylesheet" href="my-style1.css">

</head>
<body>

<div class="c1" >我是爷爷
    <div>这是儿子
        <p>这是孙子</p>
    </div>
</div>

<div class="c1" id="d1" style="color: goldenrod">
    <div class="c2" id="d2">id是d2的标签
        <div class="c3">
            div我是什么颜色的呢?
        </div>
    </div>
</div>


<div >
    <p><span class="c3">aaa</span></p>
</div>

<div>
    <div></div>
</div>
</body>
</html>
******CSS属性操作
CSS文本
文本颜色
颜色属性被用来设置文字的颜色。
颜色是通过CSS最经常的指定:
- 十六进制值 - 如: #FF0000
- 一个RGB值 - 如: RGB(255,0,0)
- 颜色的名称 - 如: red
水平对齐
text-align 属性规定元素中的文本的水平对齐方式。
- left 把文本排列到左边。默认值:由浏览器决定
- right 把文本排列到右边
- center 把文本排列到中间
- justify 实现两端对齐文本效果
/*

font-size: 10px;

line-height: 200px;   文本行高 通俗的讲,文字高度加上文字上下的空白区域的高度 50%:基于字体大小的百分比

vertical-align:-4px  设置元素内容的垂直对齐方式 ,只对行内元素有效,对块级元素无效


text-decoration:none       text-decoration 属性用来设置或删除文本的装饰。主要是用来删除链接的下划线

font-family: 'Lucida Bright'

font-weight: lighter/bold/border/

font-style: oblique

text-indent: 150px;      首行缩进150px

letter-spacing: 10px;  字母间距

word-spacing: 20px;  单词间距

text-transform: capitalize/uppercase/lowercase ; 文本转换,用于所有字句变成大写或小写字母,或每个单词的首字母大写

*/
背景属性
/*背景颜色*/
background-color: red;
/*背景图片*/
background-image: url('1.jpg');
/*
 背景重复
 repeat(默认):背景图片平铺排满整个网页
 repeat-x:背景图片只在水平方向上平铺
 repeat-y:背景图片只在垂直方向上平铺
 no-repeat:背景图片不平铺
*/
background-repeat: no-repeat;
/*背景位置*/
background-position: right top(20px 20px);
支持简写:
background:#ffffff url('1.png') no-repeat right top;
使用背景图片的一个常见案例就是很多网站会把很多小图标放在一张图片上,然后根据位置去显示图片。减少频繁的图片请求。
边框
边框属性
- border-width
- border-style
- border-color
#i1 {
  border-width: 2px;
  border-style: solid;
  border-color: red;
}
通常使用简写方式:
#i1 {
  border: 2px solid red;
}
单独设置
#i1 {
  border-top-style:dotted;
  border-right-style:solid;
  border-bottom-style:dotted;
  border-left-style:none;
}
圆
<!DOCTYPE html>
<html lang="zh-CN">
<head>
    <meta charset="UTF-8">
    <meta http-equiv="x-ua-compatible" content="IE=edge">
    <title>圆</title>
    <style>
        .c1 {
            height: 50px;
            width: 50px;
            background-color: red;
            border-radius: 25px;
        }
    </style>
</head>
<body>

<div class="c1"></div>
</body>
</html>
display属性
display="none"
隐藏标签
注意与visibility:hidden的区别:
visibility:hidden可以隐藏某个元素,但隐藏的元素仍需占用与未隐藏之前一样的空间。也就是说,该元素虽然被隐藏了,但仍然会影响布局。
display:none可以隐藏某个元素,且隐藏的元素不会占用任何空间。也就是说,该元素不但被隐藏了,而且该元素原本占用的空间也会从页面布局中消失。
display="block"
将内联标签设置为块级标签
display="inline"
块级标签设置为内联标签
display="inline-block"
行内块元素
<!DOCTYPE html>
<html lang="zh-CN">
<head>
    <meta charset="UTF-8">
    <meta http-equiv="x-ua-compatible" content="IE=edge">
    <title>display示例</title>
    <style>
        span.c1 {
            height: 1000px;
            width: 1000px;
            background-color: red;
            padding: 100px;
            display: none;
        }
        div.c1 {
            height: 1000px;
            width: 600px;
            background-color: green;
            display: none;
        }

        div.c2>div {
            display: inline-block;
            width: 50px;
            border: 1px solid black;
        }

        body {
            background: url("https://res.wx.qq.com/a/wx_fed/webwx/res/static/img/2zrdI1g.jpg") no-repeat 50%;
            background-size: cover;
        }
    </style>
</head>
<body>
<div class="c1">div</div>
<span class="c1">spanssssssssssssssssssssssssssssssssssssssssssssss</span>


<div class="c2">
    <div>111</div>
    <div>222</div>
    <div>333</div>
</div>
</body>
</html>
CSS盒子模型
- margin: 用于控制元素与元素之间的距离;margin的最基本用途就是控制元素周围空间的间隔,从视觉角度上达到相互隔开的目的。
- padding: 用于控制内容与边框之间的距离;
- Border(边框): 围绕在内边距和内容外的边框。
- Content(内容): 盒子的内容,显示文本和图像。
margin外边距
.margin-test {
  margin-top:100px;
  margin-bottom:100px;
  margin-right:50px;
  margin-left:50px;
}
推荐使用简写:
.margin-test {
  margin: 5px 10px 15px 20px;
}
顺序:上右下左
常见居中:
.mycenter {
  margin: 0 auto;
}
padding内填充
.padding-test {
  padding-top: 5px;
  padding-right: 10px;
  padding-bottom: 15px;
  padding-left: 20px;
}
推荐使用简写:
.padding-test {
  padding: 5px 10px 15px 20px;
}
顺序:上右下左
补充:
- 提供一个,用于四边;
- 提供两个,第一个用于上-下,第二个用于左-右;
- 如果提供三个,第一个用于上,第二个用于左-右,第三个用于下;
- 提供四个参数值,将按上-右-下-左的顺序作用于四边;
float属性
三种取值
left:向左浮动
right:向右浮动
none:默认值,不浮动
清除浮动
clear语法:
clear : none | left | right | both
取值:
none : 默认值。允许两边都可以有浮动对象
left : 不允许左边有浮动对象
right : 不允许右边有浮动对象
both : 不允许有浮动对象
但是需要注意的是:clear属性只会对自身起作用,而不会影响其他元素。
float规则
<!DOCTYPE html>
<html lang="zh-CN">
<head>
    <meta charset="UTF-8">
    <meta http-equiv="x-ua-compatible" content="IE=edge">
    <title>浮动规则</title>
    <style>
        .c1,
        .c2,
        .c3{
            height: 100px;
            width: 100px;
            text-align: center;
            color: white;
            font-size: 36px;

        }
        .c1 {
            height: 100px;
            width: 100px;
            background-color: red;
            float: left;
        }
        .c2 {
            height: 200px;
            width: 200px;
            background-color: green;
            float: left;
            clear: left; /*不让左边有浮动元素*/
        }
        .c3 {
            height: 300px;
            width: 300px;
            background-color: blue;
            float: left;
        }
    </style>
</head>
<body>
<div class="c1">c1</div>
<div class="c2">c2</div>
<div class="c3">c3</div>

</body>
</html>
向右float规则
<!DOCTYPE html>
<html lang="zh-CN">
<head>
    <meta charset="UTF-8">
    <meta http-equiv="x-ua-compatible" content="IE=edge">
    <title>浮动规则</title>
    <style>
        .c1,
        .c2,
        .c3{
            height: 100px;
            width: 100px;
            text-align: center;
            color: white;
            font-size: 36px;

        }
        .c1 {
            height: 100px;
            width: 100px;
            background-color: red;
            float: right;
        }
        .c2 {
            height: 200px;
            width: 200px;
            background-color: green;
            float: right;
            clear: right; /*不让右边有浮动元素*/
        }
        .c3 {
            height: 300px;
            width: 300px;
            background-color: blue;
            float: right;
        }
    </style>
</head>
<body>
<div class="c1">c1</div>
<div class="c2">c2</div>
<div class="c3">c3</div>
</body>
</html>
父标签塌陷问题
.clearfix:after {
  content: "";
  display: block;
  clear: both;
}
<!DOCTYPE html>
<html lang="zh-CN">
<head>
    <meta charset="UTF-8">
    <meta http-equiv="x-ua-compatible" content="IE=edge">
    <title>父标签塌陷</title>
    <style>

        * {
            margin: 0;
            padding: 0;
        }
        .c {
            border: 1px solid black;
        }
        .c1,
        .c2 {

            width: 100px;
            float: left;
        }
        .c1 {
            height: 100px;
            background-color: red;
        }
        .c2 {
            height: 100px;
            background-color: green;
        }

        .clearfix:after {
            content: "";
            display: block;
            clear: both;
        }
    </style>
</head>
<body>

<div class="c clearfix">
    <div class="c1"></div>
    <div class="c2"></div>

    <!--<div style="clear: left"></div>-->
</div>
</body>
</html>
CSS属性示例
<!DOCTYPE html>
<html lang="zh-CN">
<head>
    <meta charset="UTF-8">
    <meta http-equiv="x-ua-compatible" content="IE=edge">
    <title>CSS属性</title>
    <style>
        p {
            /*color: red;*/
            /*color: #FF0000;*/
            color: rgb(224, 179, 72);
        }
    </style>
</head>
<body>

<p style="background-color: #336699; text-align: center"></p>

<div style="background-color: aqua;height: 300px; text-align: right; line-height: 300px">海燕</div>


<div style="background-color: pink; text-align: justify">Django is a high-level Python Web framework that encourages rapid development and clean, pragmatic design. Built by experienced developers, it takes care of much of the hassle of Web development, so you can focus on writing your app without needing to reinvent the wheel. It’s free and open source.</div>

<a style="text-decoration:none" href="https://www.sadasda.com">我是a标签</a>

<div style="font-weight: 800">font-weight</div>
<div style="font-style: italic">font-weight</div>


<div style="height: 100px; width: 100px; background-color: chartreuse; border-width: 10px; border-color: black; border-top-style: solid; border-left-style: dashed">

</div>


<div style="height: 100px; width: 100px; background-color: red; padding: 50px 100px;border: 5px solid blue; margin: 10px"></div>

</body>
</html>
*****小结*****
1. 找到标签(选择器)
   基本选择器:
      1. 根据标签名去找标签(标签选择器)
      2. ID选择器 (用#开头,用于给特定的标签设置样式)
      3. class选择器 (用.开头, 用于大批量添加样式)
      4. 标签.class名 (标签名和class名紧挨着,没有空格, 用于给带有class名的指定标签添加样式)
      5. *所有标签(通常用于设置页面默认样式)
   层级选择器
      1. 后代选择器(子子孙孙去找, 从所有后代元素中找符合要求的)
      2. 儿子选择器(只从直接子元素(儿子标签)里找)
      3. 毗邻选择器(label+input,找到紧挨着某个标签的标签, 往下找)
      4. 弟弟选择器(往后找同级的标签)
      5. 组合选择器(减少重复代码,把几个查找标签的条件用","分隔
   属性选择器
      1. [egon]
      2. [type="button"]
   伪类选择器
      1. hover


   CSS选择器优先级:
      1. 继承优先级最低 (我如果没有设置自己的样式,默认我用祖先的样式)
      2. 权重(
         1.不讲道理的!important
         2.内联(写在标签里的style属性) 1000
         3.ID选择器                    100
         4.class选择器                 10
         5.标签选择器                  1
         6.继承的
      )
      3.重名的样式,后加载的覆盖先加载的


2. 设置标签的样式
   1. color

   2. background-color
   3. border
   4. padding
      内填充
   5. margin
      外边距
   6. float

3. 浏览器调试相关
   1. 查看HTML标签层级关系
   2. 查看CSS属性
   3. 查看伪类属性(:hover)
   4. 查看CSS BOX模型
overflow溢出属性
| 值 | 描述 |
|---|---|
| visible | 默认值。内容不会被修剪,会呈现在元素框之外。 |
| hidden | 内容会被修剪,并且其余内容是不可见的。 |
| scroll | 内容会被修剪,但是浏览器会显示滚动条以便查看其余的内容。 |
| auto | 如果内容被修剪,则浏览器会显示滚动条以便查看其余的内容。 |
| inherit | 规定应该从父元素继承 overflow 属性的值。 |
- overflow(水平和垂直均设置)
- overflow-x(设置水平方向)
- overflow-y(设置垂直方向)
定位(position)
static
static 默认值,无定位,不能当作绝对定位的参照物,并且设置标签对象的left、top等值是不起作用的的。
relative(相对定位)
相对定位是相对于该元素在文档流中的原始位置,即以自己原始位置为参照物。有趣的是,即使设定了元素的相对定位以及偏移值,元素还占有着原来的位置,即占据文档流空间。对象遵循正常文档流,但将依据top,right,bottom,left等属性在正常文档流中偏移位置。而其层叠通过z-index属性定义。
注意:position:relative的一个主要用法:方便绝对定位元素找到参照物。
absolute(绝对定位)
定义:设置为绝对定位的元素框从文档流完全删除,并相对于最近的已定位祖先元素定位,如果元素没有已定位的祖先元素,那么它的位置相对于最初的包含块(即body元素)。元素原先在正常文档流中所占的空间会关闭,就好像该元素原来不存在一样。元素定位后生成一个块级框,而不论原来它在正常流中生成何种类型的框。
重点:如果父级设置了position属性,例如position:relative;,那么子元素就会以父级的左上角为原始点进行定位。这样能很好的解决自适应网站的标签偏离问题,即父级为自适应的,那我子元素就设置position:absolute;父元素设置position:relative;,然后Top、Right、Bottom、Left用百分比宽度表示。
另外,对象脱离正常文档流,使用top,right,bottom,left等属性进行绝对定位。而其层叠通过z-index属性定义。
fixed(固定)
fixed:对象脱离正常文档流,使用top,right,bottom,left等属性以窗口为参考点进行定位,当出现滚动条时,对象不会随着滚动。而其层叠通过z-index属性 定义。 注意点: 一个元素若设置了 position:absolute | fixed; 则该元素就不能设置float。这 是一个常识性的知识点,因为这是两个不同的流,一个是浮动流,另一个是“定位流”。但是 relative 却可以。因为它原本所占的空间仍然占据文档流。
在理论上,被设置为fixed的元素会被定位于浏览器窗口的一个指定坐标,不论窗口是否滚动,它都会固定在这个位置。
示例代码:
z-index
#i2 {
  z-index: 999;
}
设置对象的层叠顺序,数值大的会覆盖在数值小的标签之上。
磨砂背景
<!DOCTYPE html>
<html lang="zh-CN">
<head>
    <meta charset="UTF-8">
    <meta http-equiv="x-ua-compatible" content="IE=edge">
    <title>磨砂背景</title>
    <style>
        body {
            background: url("beijing.png") no-repeat 50%;
            background-size: cover;
            height: 720px;
            /*background-color: black;*/
            /*background-color: rgba(0, 0, 0, 0.3);*/
            /*opacity: 0.1;*/
        }
        .cover {
            position: fixed;
            top: 0;
            right: 0;
            bottom: 0;
            left: 0;
            background-color: rgba(0,0,0, 0.5);
        }
    </style>
</head>
<body>

<div class="cover"></div>

</body>
</html>
定位以及返回顶部示例
<!DOCTYPE html>
<html lang="zh-CN">
<head>
    <meta charset="UTF-8">
    <meta http-equiv="x-ua-compatible" content="IE=edge">
    <title>定位</title>
    <style>
        * {
            margin: 0;
            padding: 0;
        }
        .c1 {
            height: 200px;
            width: 200px;
            background-color: red;
        }
        .c2 {
            height: 200px;
            width: 200px;
            background-color: green;
            position: absolute;
            left: 200px;
            top: 200px;
        }
        .c3 {
            height: 200px;
            width: 200px;
            background-color: blue;
        }

        .c {
            height: 200px;
            width: 200px;
            background-color: black;
            position: relative;
            top: 600px;
            left: 600px;
        }
        .returnTop {
            width: 100px;
            height: 50px;
            background-color: darkgrey;
            text-align: center;
            line-height: 50px;
            position: fixed;
            right: 10px;
            bottom: 15px;
        }
    </style>
</head>
<body>

<div class="c1"></div>
<div class="c">
    <div class="c2"></div>
</div>
<div class="c3"></div>

<div class="returnTop">返回顶部</div>
</body>
</html>
z-index模态框示例
<!DOCTYPE html>
<html lang="zh-CN">
<head>
    <meta charset="UTF-8">
    <meta http-equiv="x-ua-compatible" content="IE=edge">
    <title>z-index 模态框示例</title>
    <style>
        .cover {
            position: fixed;
            top: 0;
            right: 0;
            bottom: 0;
            left: 0;

            background-color: rgba(0, 0, 0, 0.5);
            z-index: 999;
        }
        .modal {
            height: 400px;
            width: 600px;
            position: fixed;
            top: 50%;
            left: 50%;
            background-color: white;
            margin-left: -300px;
            margin-top: -200px;
            z-index: 1000;  /*确保我的模态框一定在cover上层*/
         }
    </style>
</head>
<body>

<div class="cover"></div>
<div class="modal"></div>

</body>
</html>
CSS属性补充
<!DOCTYPE html>
<html lang="zh-CN">
<head>
    <meta charset="UTF-8">
    <meta http-equiv="x-ua-compatible" content="IE=edge">
    <title>CSS属性补充</title>
    <style>
        .c1 {
            height: 100px;
            width: 100px;
            background-color: blue;
            overflow: auto;
        }
    </style>
</head>
<body>

<div class="c1">
    海燕
        在苍茫的大海上,
        狂风卷积着乌云,
        在乌云和大海之间,
        海燕像黑色的闪电,
        在高傲地飞翔!
</div>


<ul type="none">
    <li>111</li>
    <li>222</li>
    <li>333</li>
</ul>

<ul style="list-style-type: none">
    <li>444</li>
    <li>555</li>
    <li>666</li>
</ul>
</body>
</html>
HTML
HTTP和HTML
文档机构
<!Doctype html>
HTML
head
<meta>
<title>
<link> icon
<style> 直接写CSS样式
<link> CSS文件
<script> JS文件
body
常用标签:
div
span
h1~h6
a
p
img
form
input
text
password
number
radio
checkbox
sumbit
button
reset
select
textarea
label
ul
ol
dl
table
标签属性
id
class
style
input
name
value
type
form
select
mutiple 多选
selected 默认选中
optgroup 分组显示(label属性=分组名)
checkbox
checked 默认选中
hidden 隐藏
input
disabled
input type=text/password
readonly --> 只读
placeholder --> 提示信息
CSS:
找到标签 修改样式
选择器(找标签):
基本选择器
标签选择器
#ID选择器
.class选择器
*(大包大揽)选择器
层级选择器
后代选择器(空格)
子选择器(>)
毗邻选择器(+)/(label+input)
弟弟选择器(~)
组合选择器(,)
属性选择器
标签可以自定义属性
[egon]
[egon=""]/input[type="button"]
伪类选择器
a:hover(浏览器怎么看)
选择器的优先级:
1.!important 不讲道理
2.内联(直接在标签上写style属性) 1000
3.ID选择器 100
4.class选择器 10
5.标签选择器 1
6.继承的
CSS属性:
color 文本颜色
background 背景
background-color
background-img
background-position(具体数值)
font 字体
font-family
font-size
font-weight
line-height (垂直居中)
text-aligin (水平居中)
border 边框
border-color
border-style
borfer-width
border: 1px solid red;
border-radius
CSS盒子模型:
content (内容)
padding (内填充)
border (边框)
magin (外边距)
margin:0 auto; (块标签的居中)
a
text-decoration=none (去掉下划线)
float(浮动)
left
right
none
浮动规则:
浮动只控制自己
如果前面的标签也是浮动的,就挨着放
如果前面的标签不是浮动的,在下一行开始摆放
清除浮动:
clear:
left
right
both
none
.clearfix:after {
content: "";
display: block;
clear: "both";
}
定位:
static
relative (相对定位)
根据自己原来的位置来做定位 ()
absolute (绝对定位)
根据 往上找已经相对定位的元素的左上角 来做定位
(通常配合相对定位使用)
fixed (固定定位)
z-index
模态弹出框
z-index: 999
z-index: 1000
     返回顶部
         .returnTop {
          position: "fixed";
          right: 10px;
          bottom: 10px;
          }
     模态框(弹出框那个遮罩层)
         .cover {
           position: "fixed";
           top: 0;
           right: 0;
           bottom: 0;
           left: 0;

           height: 400px
           position: "fixed";
           /*固定在屏幕中间*/

           top:50%;
           left: 50%;

           margin-top: -200px;
           margin-left: -400px;
           }
  display:
      块级标签特点: 独占一行, 可以设置长和宽
      内联标签特点: 可以放在一行,不可以设置长和宽,根据内容自适应长和宽
   display
      none         不显示
      block        当成块级标签  独占一行 可以设置长和宽
      inline       当成内联标签 可以放在一行
      inline-block 既能显示在一行又能设置长和宽

   :before和:after
   border-radius   画圆(把值设置成边框的一半)
   list-style-type: none (通过设置CSS属性不显示列表自带样式)

 浙公网安备 33010602011771号