
centos7 centos8 修改网卡名称为eth0
负一 修订记录
| 序号 | 修订内容 | 修订时间 |
|---|---|---|
| 1 | 新增:浪潮M3 机型支持 | 20210407 |
零、说明
本文在CENTOS 7.6.1810 CENTOS 8.1.1911 上做了测试验证,是可以的。
但是在浪潮 SA5212M5 型号的某个配置的机器上,使用cento 7.6.1810 执行却不行,而曙光 华三上安装的CENTOS 7.6.1810 是可以的。
一、环境信息
(一)操作系统信息
[root@ussuricontroller1 ~]# cat /etc/centos-release
CentOS Linux release 8.1.1911 (Core)
[root@ussuricontroller1 ~]#
二、本文使用命令
(一) 网络相关命令
1.查看网络连接
nmcli connection show
2.新增eth0 连接 并关联到ens160
nmcli connection add type ethernet con-name eth0 ifname ens160
3.删除网络连接
nmcli connection delete ens160
(二) sed 编辑
1.匹配每一行的第一个old替换为new
sed -i 's/ens160/eth0/' /etc/sysconfig/network-scripts/ifcfg-eth0
2. 替换 (具体含义待说明)
sed -i 's/rhgb/net.ifnames=0 &/' /etc/default/grub
三 实施
(一)检查现有网卡情况
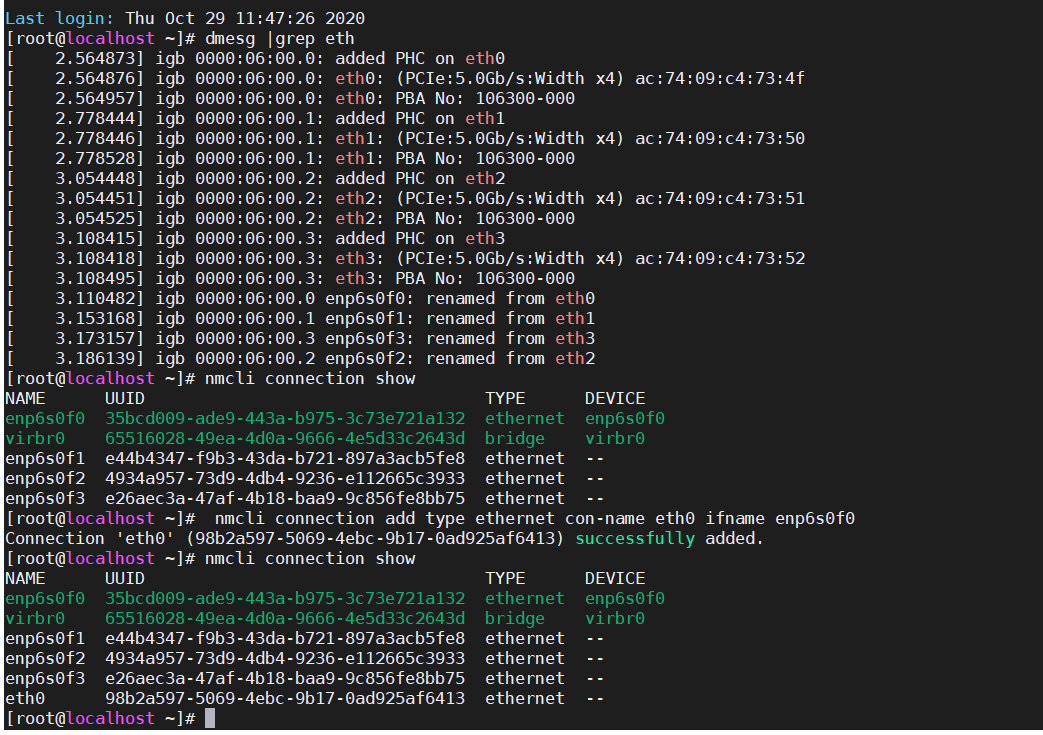
1.执行dmesg 命令 查看当前网卡情况
记录下面,有些机器在后面新增eth0 里时 需与之匹配。
[ 3.110482] igb 0000:06:00.0 enp6s0f0: renamed from eth0
[ 3.153168] igb 0000:06:00.1 enp6s0f1: renamed from eth1
[ 3.173157] igb 0000:06:00.3 enp6s0f3: renamed from eth3
[ 3.186139] igb 0000:06:00.2 enp6s0f2: renamed from eth2
[root@localhost ~]# dmesg |grep eth
[    2.564873] igb 0000:06:00.0: added PHC on eth0
[    2.564876] igb 0000:06:00.0: eth0: (PCIe:5.0Gb/s:Width x4) ac:74:09:c4:73:4f
[    2.564957] igb 0000:06:00.0: eth0: PBA No: 106300-000
[    2.778444] igb 0000:06:00.1: added PHC on eth1
[    2.778446] igb 0000:06:00.1: eth1: (PCIe:5.0Gb/s:Width x4) ac:74:09:c4:73:50
[    2.778528] igb 0000:06:00.1: eth1: PBA No: 106300-000
[    3.054448] igb 0000:06:00.2: added PHC on eth2
[    3.054451] igb 0000:06:00.2: eth2: (PCIe:5.0Gb/s:Width x4) ac:74:09:c4:73:51
[    3.054525] igb 0000:06:00.2: eth2: PBA No: 106300-000
[    3.108415] igb 0000:06:00.3: added PHC on eth3
[    3.108418] igb 0000:06:00.3: eth3: (PCIe:5.0Gb/s:Width x4) ac:74:09:c4:73:52
[    3.108495] igb 0000:06:00.3: eth3: PBA No: 106300-000
[    3.110482] igb 0000:06:00.0 enp6s0f0: renamed from eth0
[    3.153168] igb 0000:06:00.1 enp6s0f1: renamed from eth1
[    3.173157] igb 0000:06:00.3 enp6s0f3: renamed from eth3
[    3.186139] igb 0000:06:00.2 enp6s0f2: renamed from eth2
[root@localhost ~]#
(二)新增eth0 网络连接 并修改配置
1. 新增eth0
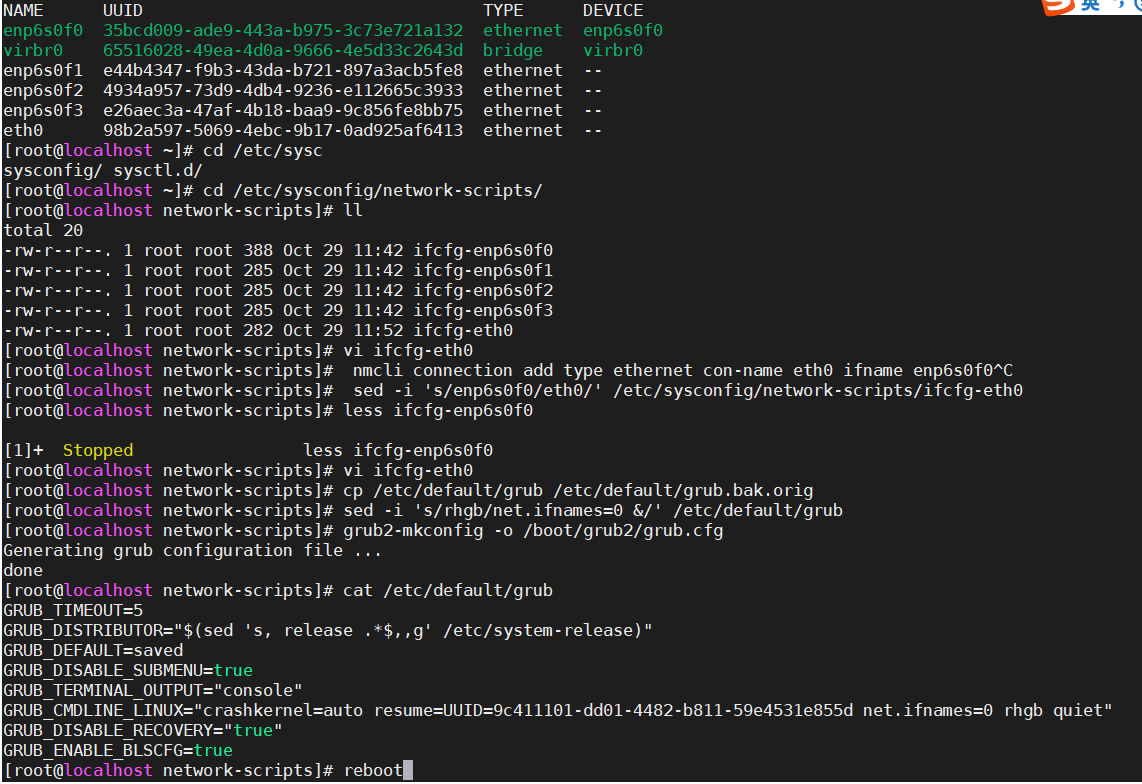
[root@localhost ~]# nmcli connection show`
NAME      UUID                                  TYPE      DEVICE
enp6s0f0  35bcd009-ade9-443a-b975-3c73e721a132  ethernet  enp6s0f0
virbr0    65516028-49ea-4d0a-9666-4e5d33c2643d  bridge    virbr0
enp6s0f1  e44b4347-f9b3-43da-b721-897a3acb5fe8  ethernet  --
enp6s0f2  4934a957-73d9-4db4-9236-e112665c3933  ethernet  --
enp6s0f3  e26aec3a-47af-4b18-baa9-9c856fe8bb75  ethernet  --
[root@localhost ~]#  nmcli connection add type ethernet con-name eth0 ifname enp6s0f0
Connection 'eth0' (98b2a597-5069-4ebc-9b17-0ad925af6413) successfully added.
[root@localhost ~]# nmcli connection show
NAME      UUID                                  TYPE      DEVICE
enp6s0f0  35bcd009-ade9-443a-b975-3c73e721a132  ethernet  enp6s0f0
virbr0    65516028-49ea-4d0a-9666-4e5d33c2643d  bridge    virbr0
enp6s0f1  e44b4347-f9b3-43da-b721-897a3acb5fe8  ethernet  --
enp6s0f2  4934a957-73d9-4db4-9236-e112665c3933  ethernet  --
enp6s0f3  e26aec3a-47af-4b18-baa9-9c856fe8bb75  ethernet  --
eth0      98b2a597-5069-4ebc-9b17-0ad925af6413  ethernet  --
[root@localhost ~]#
2. 修改 ifcfg-eth0
将enp6s0f0替换为eth0,并根据实际情况配置IP
[root@localhost network-scripts]# vi ifcfg-eth0`
[root@localhost network-scripts]#  sed -i 's/enp6s0f0/eth0/' /etc/sysconfig/network-scripts/ifcfg-eth0
3.修改linux 核心配置/etc/default/grub
[root@localhost network-scripts]# cp /etc/default/grub /etc/default/grub.bak.orig
[root@localhost network-scripts]# sed -i 's/rhgb/net.ifnames=0 &/' /etc/default/grub
[root@localhost network-scripts]# grub2-mkconfig -o /boot/grub2/grub.cfg
Generating grub configuration file ...
done
[root@localhost network-scripts]# cat /etc/default/grub
GRUB_TIMEOUT=5
GRUB_DISTRIBUTOR="$(sed 's, release .*$,,g' /etc/system-release)"
GRUB_DEFAULT=saved
GRUB_DISABLE_SUBMENU=true
GRUB_TERMINAL_OUTPUT="console"
GRUB_CMDLINE_LINUX="crashkernel=auto resume=UUID=9c411101-dd01-4482-b811-59e4531e855d net.ifnames=0 rhgb quiet"
GRUB_DISABLE_RECOVERY="true"
GRUB_ENABLE_BLSCFG=true
4 浪潮M3 机型支持
4.1 操作系统
[root@localhost ~]# cat /etc/centos-release
CentOS Linux release 7.6.1810 (Core)
[root@localhost ~]#
4.2 /etc/default/grub 配置文件修订
配置文件内容先修订如下,不行。
GRUB_CMDLINE_LINUX="crashkernel=auto rd.lvm.lv=centos/root rd.lvm.lv=centos/swap net.ifnames=0 rhgb quiet"
GRUB_CMDLINE_LINUX="crashkernel=auto rd.lvm.lv=centos/root rd.lvm.lv=centos/swap net.ifnames=0 biosdevname=0 rhgb quiet"
改成如下,则可以。
GRUB_CMDLINE_LINUX="crashkernel=auto rd.lvm.lv=centos/root net.ifnames=0 biosdevname=0 rd.lvm.lv=centos/swap rhgb quiet "
4.重启机器 reboot 即可
posted on 2020-10-29 08:49 weiwei2021 阅读(1251) 评论(0) 收藏 举报

 浙公网安备 33010602011771号