

NDK开发基础
搭建好AS2.3开发环境后,再安装NDK,NDK可以用AS软件自己下载安装;
新建一个支持C++开发的示例工程,步骤基本上和建立一个普通的安卓工程一样,只是有一两个步骤需要修改一下:
第一个要修改的地方是:

如上图,在新建工程的时候要选中红色部分,让工程支持C++;
另一个需要注意的地方是:

如上2个红圈所示,上面那个红圈我一般选择C++11 ,支持最新的C++规范,下面两个根据项目需求不一样进行筛选;
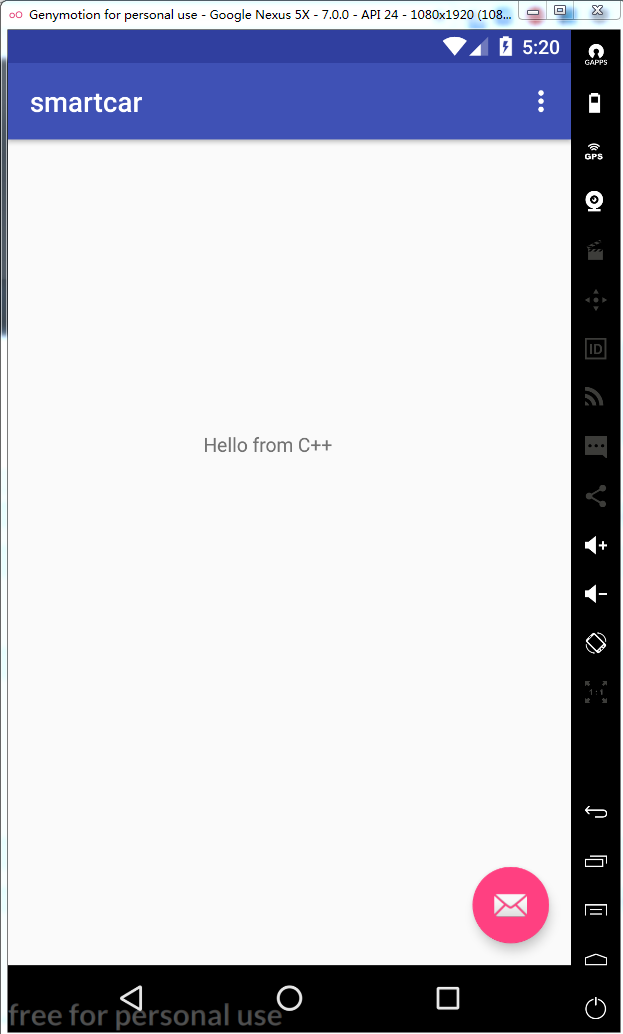
点击finish后,便建立了一个支持NDK开发的空工程了,AS开发工具为我们自动添加了一个示例代码,JNI调用C++函数打印“Hello from C++”的示例:
效果如图:
本博客将要完成如下工作:完完全全从零开始NDK开发,重新生成一个CPP文件,并且通过JNI调用该文件里面的方法,显示到模拟器上;效果如下:
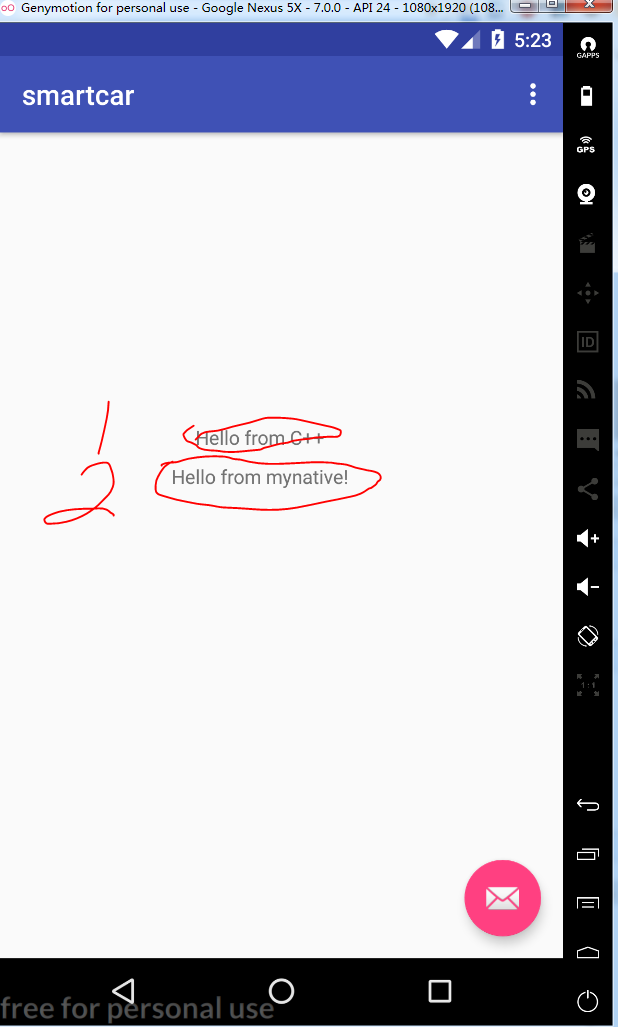
上图红圈1是原示例的显示效果,红圈2是自己添加的方法;
步骤如下:
在module名上右键,选择new功能,new c++ source file,新建后,在cpp目录下会新加一个cpp文件,如图
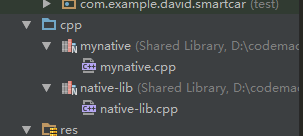
其中mynative.cpp就是我手动添加的源文件;
为了简单起见,方法的实现直接copy系统示例的方法,具体代码如下:
using namespace std;
extern "C"
{
JNIEXPORT jstring JNICALL
Java_com_example_david_smartcar_MainActivity_stringFromJNI2(JNIEnv *env, jobject /* this */) {
    string hello = "Hello from mynative!";
    return env->NewStringUTF(hello.c_str());
}
}
然后在MainActivity.java文件中引用我们定义的文件、定义native方法、并且调用:
System.loadLibrary("mynative");
public native String stringFromJNI2();
TextView tv2 = (TextView) findViewById(R.id.sample_text2);
        tv2.setText(stringFromJNI2());
注:
TextView tv2 = (TextView) findViewById(R.id.sample_text2);中的sample_text2需要修改xml界面配置文件,我的文件名字是content_main.xml,在layout路径下,修改后的内容如下:
<?xml version="1.0" encoding="utf-8"?>
<android.support.constraint.ConstraintLayout
    xmlns:android="http://schemas.android.com/apk/res/android"
    xmlns:app="http://schemas.android.com/apk/res-auto"
    xmlns:tools="http://schemas.android.com/tools"
    android:layout_width="match_parent"
    android:layout_height="match_parent"
    app:layout_behavior="@string/appbar_scrolling_view_behavior"
    tools:context="com.example.david.smartcar.MainActivity"
    tools:showIn="@layout/activity_main">

    <TextView
        android:id="@+id/sample_text"
        android:layout_width="wrap_content"
        android:layout_height="wrap_content"
        android:text="Hello World!"
        app:layout_constraintBottom_toBottomOf="parent"
        app:layout_constraintLeft_toLeftOf="parent"
        app:layout_constraintRight_toRightOf="parent"
        app:layout_constraintTop_toTopOf="parent"
        app:layout_constraintVertical_bias="0.42"
        app:layout_constraintHorizontal_bias="0.498"/>
    <TextView
        android:id="@+id/sample_text2"
        android:layout_width="wrap_content"
        android:layout_height="wrap_content"
        android:text="Hello World!"
        app:layout_constraintBottom_toBottomOf="parent"
        app:layout_constraintLeft_toLeftOf="parent"
        app:layout_constraintRight_toRightOf="parent"
        app:layout_constraintTop_toTopOf="parent"
        app:layout_constraintVertical_bias="0.465"
        app:layout_constraintHorizontal_bias="0.498"/>

</android.support.constraint.ConstraintLayout>
最后是修改CMakeLists.txt文件,这个类似一个makefile的配置文件,用于设置目标和依赖项等;修改后的内容如下:
# For more information about using CMake with Android Studio, read the
# documentation: https://d.android.com/studio/projects/add-native-code.html

# Sets the minimum version of CMake required to build the native library.

cmake_minimum_required(VERSION 3.4.1)

# Creates and names a library, sets it as either STATIC
# or SHARED, and provides the relative paths to its source code.
# You can define multiple libraries, and CMake builds them for you.
# Gradle automatically packages shared libraries with your APK.

add_library( # Sets the name of the library.
             native-lib

             # Sets the library as a shared library.
             SHARED

             # Provides a relative path to your source file(s).
             src/main/cpp/native-lib.cpp )
add_library( # Sets the name of the library.
             mynative
             # Sets the library as a shared library.
             SHARED

             # Provides a relative path to your source file(s).
             src/main/cpp/mynative.cpp )

# Searches for a specified prebuilt library and stores the path as a
# variable. Because CMake includes system libraries in the search path by
# default, you only need to specify the name of the public NDK library
# you want to add. CMake verifies that the library exists before
# completing its build.

find_library( # Sets the name of the path variable.
              log-lib

              # Specifies the name of the NDK library that
              # you want CMake to locate.
              log )

# Specifies libraries CMake should link to your target library. You
# can link multiple libraries, such as libraries you define in this
# build script, prebuilt third-party libraries, or system libraries.

target_link_libraries( # Specifies the target library.
                       native-lib
                       mynative

                       # Links the target library to the log library
                       # included in the NDK.
                       ${log-lib} )
至此,代码基本修改完毕,点击运行,便可以正确运行我们添加的native方法;
技巧:在生成native方法的时候可以先声明一个native方法名,然后自动生成一个方法的实现函数:
具体方法如下图:先选中我们声明的方法名,然后同时按下alt+enter键,选取红圈2中的项,便会在系统默认的native 源文件中生成具体的实现方法:

JNIEXPORT jstring JNICALL
Java_com_example_david_smartcar_MainActivity_stringFromJNI3(JNIEnv *env, jobject instance) {

    // TODO


    return env->NewStringUTF(returnValue);
}
只需人工实现要完成的逻辑代码就行了,不需要人工编写函数名称之类的信息;
以上内容,纯属入门级别,仅供参考。
