

脚本进阶数组
1.声明数组
1)普通数组可以不支持声明,直接使用
declare -a ARRAT_NAME
2)关联数组必须先声明,再使用
declare -A ARRAY_NAME
2.数组赋值
1)一次赋值一个
ARRAY_NAME[INDEX]=VALUE
例:
1 2 | [root@centos7 ~]# weilan[0]=kai[root@centos7 ~]# weilan[2]=kimmich |
2)一次赋值全部
ARRAY_NAME=("VAL1""VAL2".....)
例:
1 2 3 4 | [root@centos7 ~]# title=("joshua""kimmich""sule")[root@centos7 ~]# num=({0..10})[root@centos7 ~]# alpha=({a..g})[root@centos7 ~]# file=(*.sh) |
3)只赋值特定元素
ARRAY_NAME=([0]="VAL1" [3]="VAL2"...)
4)交互式数值赋值
1 2 | [root@centos7 ~]# read -a kkk111 |
3.显示数组
1 | declare -a |

4.引用数组
1)使用某一个数组中的元素
${ARRAY_NAME[INDEX]}
注意:若不写索引则默认为0
2)引用数组所有元素
${ARRAY_NAME[*]}
${ARRAY_NAME[@]}
3)显示数组的长度即元素个数
${#ARRAY_NAME[*]}
${#ARRAY_NAME[@]}
5.删除数组
1)删除数组中的某一个元素,会导致稀疏格式
unset ARRAY[INDEX]
2)删除整个数组
unset ARRAY
6.范例:数组的基本使用
1)声明一个数组
[root@centos7 ~]# declare -a title
2)查看该数组
[root@centos7 ~]# declare -a | grep 'title'

3)赋值(一次一个)
[root@centos7 ~]# title[0]=ceo; title[1]=coo; title[2]=cto;title[3]=ufo
4)显示数组的所有元素
1 2 3 4 | [root@centos7 ~]# echo ${title[*]}ceo coo cto ufo[root@centos7 ~]# echo ${title[@]}ceo coo cto ufo |
5)显示数组长度
1 2 3 4 | [root@centos7 ~]# echo ${#title[*]}4[root@centos7 ~]# echo ${#title[@]}4 |
6)显示数组中某一个元素
1 2 3 4 | [root@centos7 ~]# echo ${title[0]}ceo[root@centos7 ~]# echo ${title[3]}ufo |
7)创建并赋值一个数组
1 2 3 4 5 6 7 | [root@centos7 ~]# car=(bmw benz audi xiaomi)[root@centos7 ~]# echo ${#car[*]}4[root@centos7 ~]# echo ${car[*]}bmw benz audi xiaomi[root@centos7 ~]# echo ${car[2]}audi |
8)创建一个以本目录的所有元素以.sh文件名的数组
1 2 3 | [root@centos7 data]# file=(*.sh)[root@centos7 data]# echo ${file[@]}f10.sh f1.sh f2.sh f3.sh f4.sh f5.sh f6.sh f7.sh f8.sh f9.sh |
9)对其交互式变量赋值
1 2 3 4 5 6 | [root@centos7 data]# read -a name11 22 33 44 55 66 77[root@centos7 data]# echo ${name[1]}22[root@centos7 data]# echo ${#name[*]}7 |
7.关联数组问题
赋值定义一个关联数组
1)
1 2 3 4 5 6 | [root@centos7 data]# read -a name11 22 33 44 55 66 77[root@centos7 data]# echo ${name[1]}22[root@centos7 data]# echo ${#name[*]}7 |
我们显示其元素:
1 2 3 4 5 | [root@centos7 data]# echo ${family[num]}3[root@centos7 data]# echo ${family[address]}3[root@centos7 data]# echo ${family[name]} <br>3 |
发现出问题了,结果都是3,其实是因为我们要对关联数组先声明再定义,所以思路清晰
2)将其删掉,重新来过
[root@centos7 data]# unset family
[root@centos7 data]# declare -a | grep 'family'
[root@centos7 data]#
3)先声明再定义
1 2 3 4 5 6 7 8 | [root@centos7 data]# declare -A family[root@centos7 data]# family[name]=weilan; family[address]=beijing; family[num]=3[root@centos7 data]# echo ${#family[*]}3[root@centos7 data]# echo ${family[@]}weilan 3 beijing[root@centos7 data]# echo ${family[name]}weilan |
8.数组数据处理
1)数组切片:
格式:
${ARRAY[@]:uffset:number}
例:跳过前三个取后续四个
1 2 3 4 5 | [root@centos7 data]# n=({1..10})[root@centos7 data]# echo ${n[@]}1 2 3 4 5 6 7 8 9 10[root@centos7 data]# echo ${n[*]:3:4}4 5 6 7 |
2)数组后续增加一个元素(拿当前元素个数当新元素的下标),因为最后一个元素的下标+1=数组元素个数,所以将元素个数作为索引来新增元素:
1 2 3 4 5 | [root@centos7 data]# n[${#n[*]}]=11[root@centos7 data]# echo ${#n[@]}11[root@centos7 data]# echo ${n[@]}1 2 3 4 5 6 7 8 9 10 11 |
注意:这种方式并不适用于稀松格式
3)稀松格式增加新元素
例:创建稀疏环境
1 2 3 | [root@centos7 data]# unset n[3][root@centos7 data]# echo ${n[*]}1 2 3 5 6 7 8 9 10 11 |
自己指定所添加的元素位置。
9.范例:
1)生成10个随机数保存于数组中,并找出其最大值和最小值
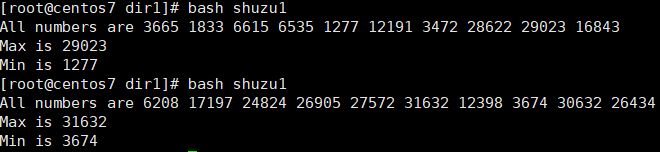
1 2 3 4 5 6 7 8 9 10 11 12 13 14 15 16 17 | [root@centos7 dir1]# vim shuzu1#!/bin/bashdeclare -i max mindeclare -a numsfor ((i=0;i<10;i++));do nums[$i]=$RANDOM [ $i -eq 0 ] && min=${nums[0]} && max=${nums[0]} && continue [ ${nums[$i]} -gt $max ] && max=${nums[$i]} && continue [ ${nums[$i]} -lt $min ] && min=${nums[$i]}doneecho "All numbers are ${nums[*]}"echo Max is $maxecho Min is $min[root@centos7 dir1]# bash shuzu1All numbers are 3665 1833 6615 6535 1277 12191 3472 28622 29023 16843Max is 29023Min is 1277 |
2)冒泡排序(shell有点折磨就暂时用c替代吧)
1 2 3 4 5 6 7 8 9 10 11 12 13 14 15 16 17 18 19 20 21 22 23 24 25 26 27 28 | #include <stdio.h>#include <stdlib.h>int main(void){ int arr[7] = { 6, 1, 1, 2, 8, 3, 7 }; for (int i = 0; i < 7; i++) { for (int j = 0; j < 7 - i; j++) { if (arr[j] < arr[j + 1]) { int Temp = arr[j]; arr[j] = arr[j + 1]; arr[j + 1] = Temp; } } } for (int i = 0; i < 7; i++) { printf("%d ", arr[i]); } system("pause>0"); return 0;} |
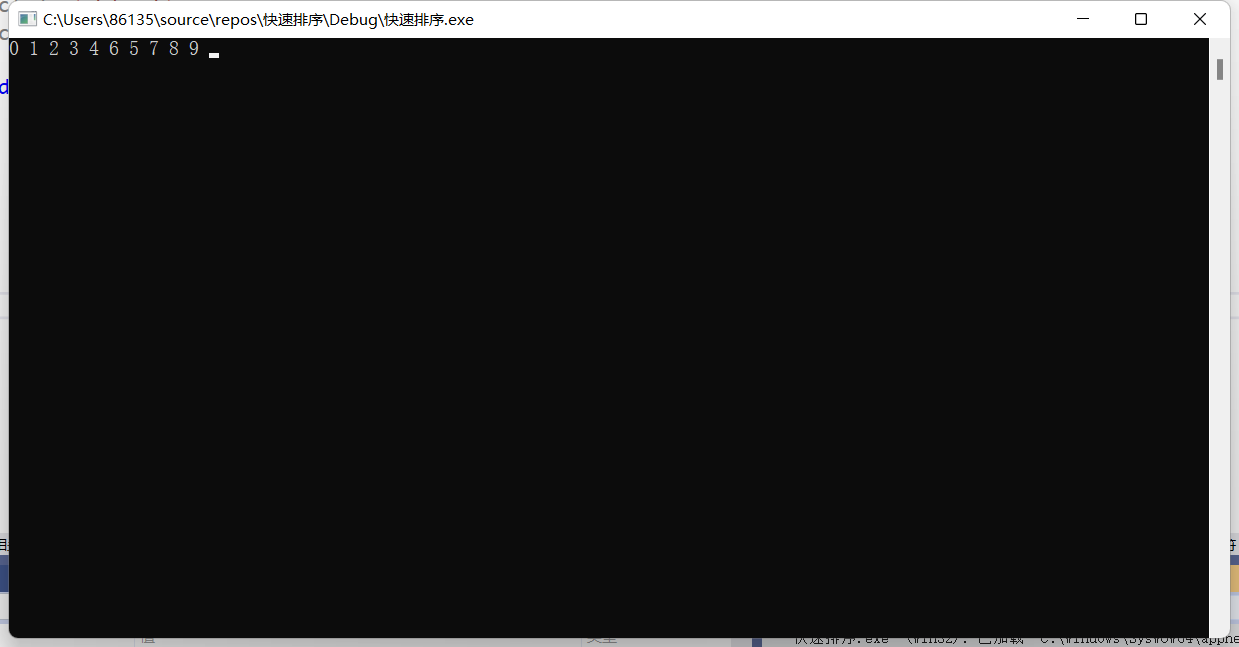
3)快速排序
1 2 3 4 5 6 7 8 9 10 11 12 13 14 15 16 17 18 19 20 21 22 23 24 25 26 27 28 29 30 31 32 33 34 35 36 37 38 39 40 41 42 43 44 45 46 47 48 49 50 51 52 53 54 55 | #include <stdio.h>#include <stdlib.h>void Sort(int* arr, int left, int right){ if (left >= right) return; else { int q = left; int h = right; while (q < h) { while (q < h && arr[h] >= arr[left]) { h--; } while (q < h && arr[q] <= arr[right]) { q++; } if (q == h) break; int Temp = arr[q]; arr[q] = arr[h]; arr[h] = Temp; } if (q != left)//guiwei { int temp = arr[q]; arr[q] = arr[left]; arr[left] = temp; } //递归 Sort(arr, left, q - 1); Sort(arr, h + 1, right); }}int main(void){ int arr[10] = { 0, 5, 3, 6, 2, 1, 9, 7, 4, 8 }; Sort(arr, 0, 9); for (int i = 0; i < 10; i++) { printf("%d ", arr[i]); } system("pause>0"); return 0;} |
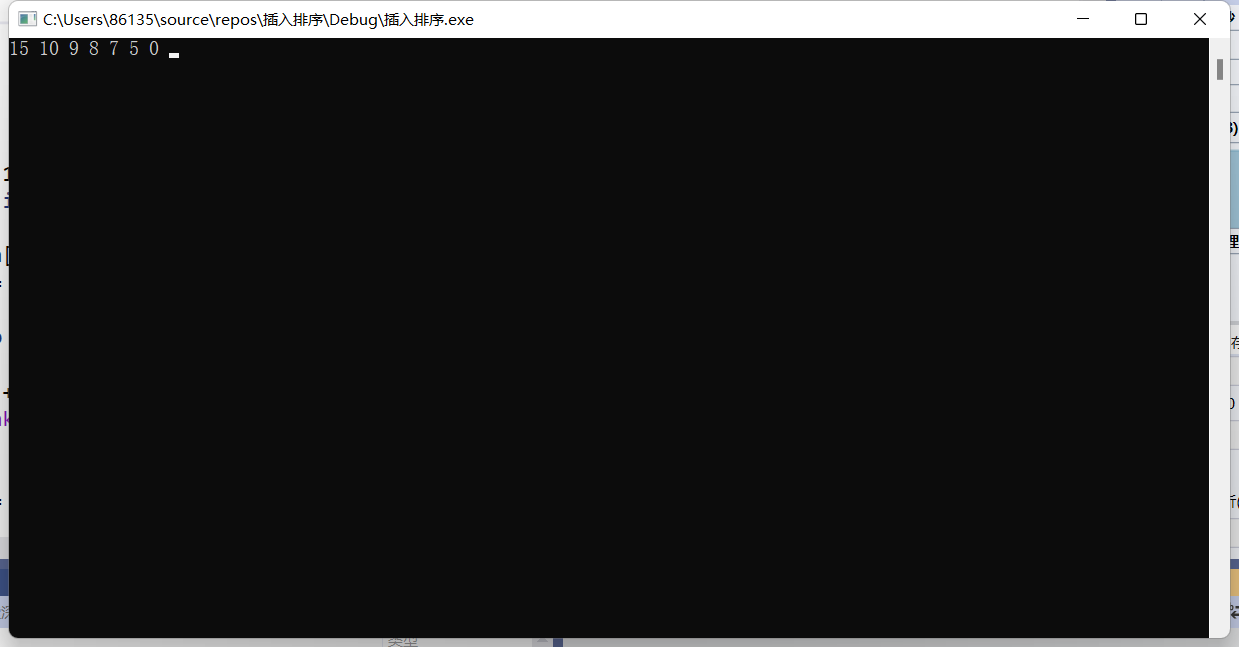
4)插入排序
1 2 3 4 5 6 7 8 9 10 11 12 13 14 15 16 17 18 19 20 21 22 23 24 25 26 27 28 29 30 31 32 33 | #include <stdio.h>#include <stdlib.h>int main(void){ int a[7] = { 7, 10, 8, 9, 15, 5}; for (int i = 1; i < 7; i++) { int Temp = a[i]; for (int j = i - 1; j >= 0; j--) { if (Temp <= a[j]) { a[j + 1] = Temp; break; } a[j + 1] = a[j]; if (j == 0) { a[0] = Temp; } } } for (int i = 0; i < 7; i++) { printf("%d ", a[i]); } system("pause>0"); return 0;} |
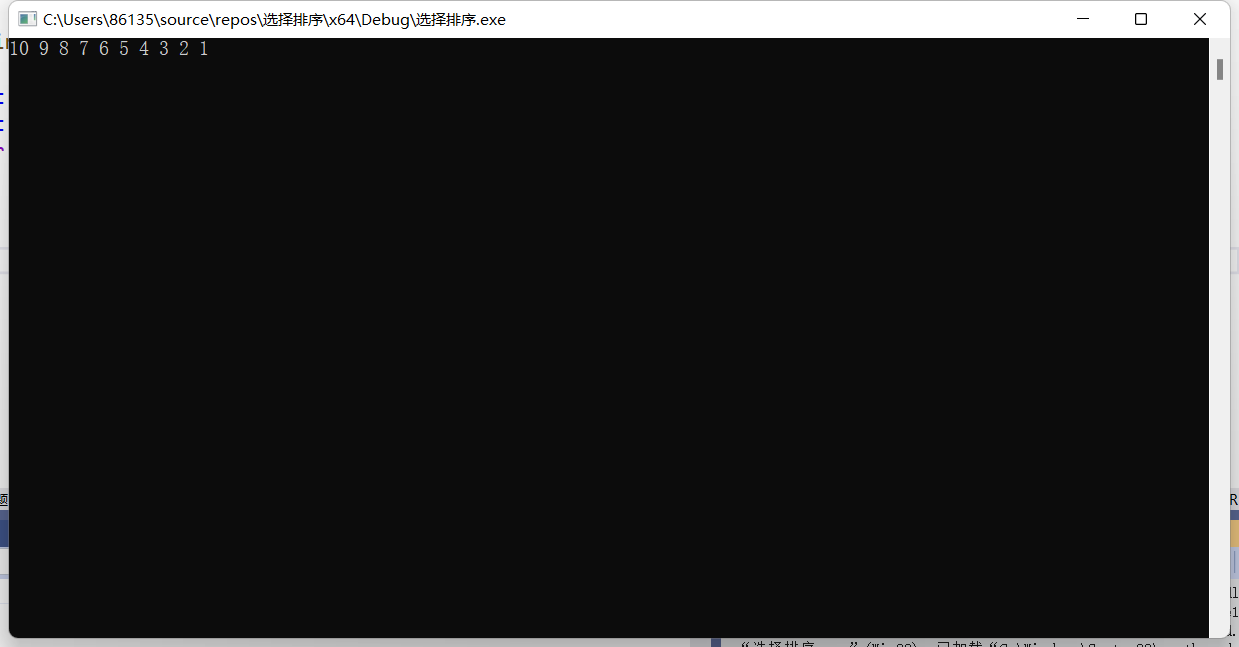
5)选择排序
1 2 3 4 5 6 7 8 9 10 11 12 13 14 15 16 17 18 19 20 21 22 23 24 25 26 27 28 29 30 31 32 33 34 35 36 | #include <stdio.h>#include <stdlib.h>int main(void){ int a[10] = { 8, 6, 10, 1, 4, 7, 9, 2, 5, 3 }; int rig = 9; for (int j = 1; j <= 9; j++) { int min = a[0]; int iNdex = 0; for (int i = 1; i <= rig; i++) { if (min > a[i]) { min = a[i]; iNdex = i; } } int Temp = a[rig]; a[rig] = a[iNdex]; a[iNdex] = Temp; (rig--); } for (int i = 0; i <= 9; i++) { printf("%d ", a[i]); } system("pause>0"); return 0;} |


【推荐】国内首个AI IDE,深度理解中文开发场景,立即下载体验Trae
【推荐】编程新体验,更懂你的AI,立即体验豆包MarsCode编程助手
【推荐】抖音旗下AI助手豆包,你的智能百科全书,全免费不限次数
【推荐】轻量又高性能的 SSH 工具 IShell:AI 加持,快人一步
· 分享一个免费、快速、无限量使用的满血 DeepSeek R1 模型,支持深度思考和联网搜索!
· 基于 Docker 搭建 FRP 内网穿透开源项目(很简单哒)
· ollama系列01:轻松3步本地部署deepseek,普通电脑可用
· 按钮权限的设计及实现
· 25岁的心里话