安卓学习-界面-View的自定义
android的所有UI控件,都是基于View的,因此特意重点学习了下这个,为后面学习其他控件打下基础。
参照了疯狂android讲义和http://blog.csdn.net/guolin_blog/article/details/17357967,还有几个例子到后面再写,主要是现在看不懂
重新时常用覆盖的方法

package com.example.ddddddd;

import android.content.Context;
import android.graphics.Canvas;
import android.graphics.Rect;
import android.util.AttributeSet;
import android.util.Log;
import android.view.KeyEvent;
import android.view.MotionEvent;
import android.view.View;
import android.widget.Button;

public class MyButton extends Button{

    public MyButton(Context context, AttributeSet attrs) {
        super(context, attrs);
    }

    //窗口加载这个组件时会执行
    protected void onFinishInflate() {
        super.onFinishInflate();
        Log.d("test", "我被XML加载了");
    }

    //看不懂,不知道什么意思,解释如下
    //用来检测View组件和他包含的所有子组件的大小
    protected void onMeasure(int widthMeasureSpec, int heightMeasureSpec) {
        super.onMeasure(widthMeasureSpec, heightMeasureSpec);
    }

    //当该组件需要分配其子组件位置、大小时会调用该方法
    protected void onLayout(boolean changed, int left, int top, int right, int bottom) {
        super.onLayout(changed, left, top, right, bottom);
    }

    //该组件大小被改变时会调用该方法
    protected void onSizeChanged(int w, int h, int oldw, int oldh) {
        Log.d("test", "被改变大小了,原来w="+oldw+"y="+oldh+" 现在w="+w+"y="+h);
        super.onSizeChanged(w, h, oldw, oldh);
    }

    //要绘制该组件内容时回调该方法
    protected void onDraw(Canvas canvas) {
        super.onDraw(canvas);
    }

    //光标在这个组件上,并且按键被按下时调用该方法
    public boolean onKeyDown(int keyCode, KeyEvent event) {
        Log.d("test", "按键"+keyCode+"按下了");
        return super.onKeyDown(keyCode, event);
    }

    //光标在这个组件上,并且按键松开时调用该方法
    public boolean onKeyUp(int keyCode, KeyEvent event) {
        Log.d("test", "按键"+keyCode+"松开了");
        return super.onKeyUp(keyCode, event);
    }

    //发生轨迹球事件,不知道是个什么东西
    public boolean onTrackballEvent(MotionEvent event) {
        return super.onTrackballEvent(event);
    }

    //发生触摸屏事件,触发此方法
    public boolean onTouchEvent(MotionEvent event) {
        Log.d("test", "我被触摸了,位置 X:"+event.getX()+" Y:"+event.getY());
        return super.onTouchEvent(event);
    }

    //当得到或失去焦点,触发
    protected void onFocusChanged(boolean gainFocus, int direction, Rect previouslyFocusedRect) {
        if(gainFocus){
            Log.d("test", "得到焦点");
        }else{
            Log.d("test", "失去焦点");
        }
        super.onFocusChanged(gainFocus, direction, previouslyFocusedRect);
    }

    //该组件放入某个窗口时,触发
    protected void onAttachedToWindow() {
        super.onAttachedToWindow();
    }

    //组件从窗口上分离,触发
    protected void onDetachedFromWindow() {
        Log.d("test", "分离");
        super.onDetachedFromWindow();
    }

    //可见性发生改变时触发,一般调用setVisibility(View.GONE)
    protected void onVisibilityChanged(View changedView, int visibility) {
        Log.d("test", "摧毁");
        super.onVisibilityChanged(changedView, visibility);
    }

}
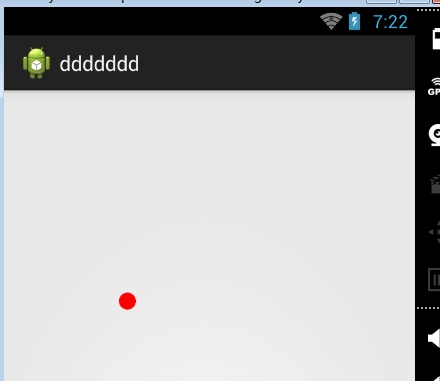
一个跟随手指移动的球


public class MyView extends View{

    public MyView(Context context) {
        super(context);
    }

    public MyView(Context context, AttributeSet attrs) {
        super(context, attrs);
    }

    //定义一个画笔
    private Paint paint=new Paint();
    private float cx=0;
    private float cy=0;

    protected void onDraw(Canvas canvas) {
        super.onDraw(canvas);
        //设置画笔颜色,这里制定红色
        paint.setColor(Color.RED);
        //绘制一个位置在cx,cy的半径15,的圆
        canvas.drawCircle(cx, cy, 15, paint);
    }

    public boolean onTouchEvent(MotionEvent event) {
        cx=event.getX();
        cy=event.getY();
        //重绘
        invalidate();
        return true;
    }
}
标题,参照网上的一个帖子做的

title.xml

<?xml version="1.0" encoding="utf-8"?>
<RelativeLayout xmlns:android="http://schemas.android.com/apk/res/android"
    android:layout_width="match_parent"
    android:layout_height="50dp"
    android:background="#ffcb05" >

    <Button
        android:id="@+id/button_left"
        android:layout_width="60dp"
        android:layout_height="40dp"
        android:layout_centerVertical="true"
        android:layout_marginLeft="5dp"
        android:background="@drawable/back_button"
        android:textColor="#fff" />

    <TextView
        android:id="@+id/title_text"
        android:layout_width="wrap_content"
        android:layout_height="wrap_content"
        android:layout_centerInParent="true"
        android:text="标题"
        android:textColor="#fff"
        android:textSize="20sp" />

</RelativeLayout>
组件TitleView.java

public class TitleView extends FrameLayout {

    //左边返回的按钮
    private Button leftButton;
    //中间的标题文字
    private TextView titleText;

    //初始化
    public TitleView(Context context, AttributeSet attrs) {
        super(context, attrs);
        //获取XML配置文件
        LayoutInflater.from(context).inflate(R.layout.title, this);
        //获取标题文字组件
        titleText = (TextView) findViewById(R.id.title_text);
        //获取返回按钮组件
        leftButton = (Button) findViewById(R.id.button_left);
        //点击事件
        leftButton.setOnClickListener(new OnClickListener() {
            public void onClick(View v) {
                ((Activity) getContext()).finish();
            }
        });
    }

    public void setTitleText(String text) {
        titleText.setText(text);
    }
    public void setLeftButtonText(String text) {
        leftButton.setText(text);
    }
    public void setLeftButtonListener(OnClickListener l) {
        leftButton.setOnClickListener(l);
    }
}
activity_main.xml

<RelativeLayout xmlns:android="http://schemas.android.com/apk/res/android"
    xmlns:tools="http://schemas.android.com/tools"
    android:layout_width="match_parent"
    android:layout_height="match_parent" >

    <com.example.ddddddd.TitleView
        android:id="@+id/title_view"
        android:layout_width="match_parent"
        android:layout_height="wrap_content" >
    </com.example.ddddddd.TitleView>

</RelativeLayout>
自动以ListView
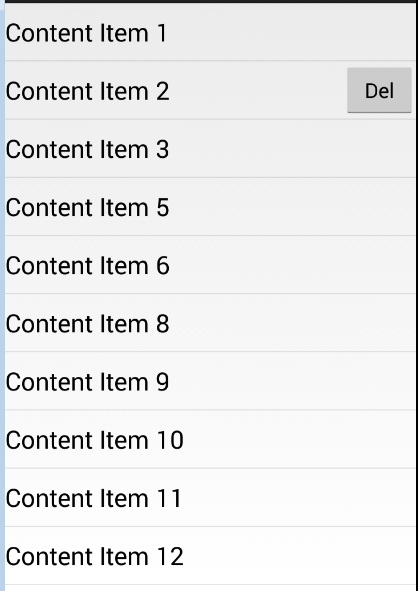
当快速向右滑动时会显示一个Del按钮,点击可删除该条信息

1.按钮的自定义XML页面
del_button.xml

<Button xmlns:android="http://schemas.android.com/apk/res/android"
    android:id="@+id/button1"
    android:layout_width="wrap_content"
    android:layout_height="wrap_content"
    android:text="Del" />
2.ListView要用到的item
my_list_view_item.xml

<RelativeLayout xmlns:android="http://schemas.android.com/apk/res/android"
    android:layout_width="fill_parent"
    android:layout_height="fill_parent" >

    <TextView
        android:id="@+id/textView1"
        android:layout_width="wrap_content"
        android:layout_height="50dp"
        android:layout_alignParentLeft="true"
        android:layout_alignParentTop="true"
        android:text="Large Text"
        android:gravity="center_vertical"
        android:textAppearance="?android:attr/textAppearanceLarge" />

</RelativeLayout>
3.自定义ListView
MyListView.java
这里面用到了OnTouchListener和OnGestureListener
通过onTouch触发OnGestureListener手势识别,当onFling执行时判断是否是横向快速滑动,是的话创建del_button.xml视图,并添加按钮事件

public class MyListView extends ListView implements OnTouchListener,OnGestureListener{

    private View delButton;
    private ViewGroup view;
    private int selectedItem;

    //删除事件
    private OnDeleteListener onDeleteListener;

    //手势
    private GestureDetector gestureDetector;

    public MyListView(Context context, AttributeSet attrs) {
        super(context, attrs);
        gestureDetector = new GestureDetector(getContext(), this);

        //这句也不要忘记
        setOnTouchListener(this);
    }


    public void setOnDeleteListener(OnDeleteListener onDeleteListener) {
        this.onDeleteListener = onDeleteListener;
    }


    //必须写这个方法,然后将触摸的事件交给手势来做
    public boolean onTouch(View v, MotionEvent event) {
            //交给手势来处理
            return gestureDetector.onTouchEvent(event);

    }

    /*****************OnGestureListener接口的实现类******************/
    //每次按下都会触发
    public boolean onDown(MotionEvent e) {
        Log.v("wjj", "onDown");

        //按下就先清除原来的删除按钮
        if(delButton != null){
            view.removeView(delButton);
            delButton=null;
        }

        //pointToPosition 根据x,y获取item的位置
        selectedItem = pointToPosition((int) e.getX(), (int) e.getY());
        Log.v("wjj", "selectedItem="+selectedItem);

        return false;
    }

    //类似单击,按下后过一会才弹起,但还没达到longpress的标准
    //介于onSingleTapUp和onLongPress之间吧
    public void onShowPress(MotionEvent e) {
        Log.v("wjj", "onShowPress");

    }

    //类似单击,按下后马上弹起
    public boolean onSingleTapUp(MotionEvent e) {
        Log.v("wjj", "onSingleTapUp");
        return false;
    }

    //手指比较慢的滑动,可以纵向横向
    public boolean onScroll(MotionEvent e1, MotionEvent e2, float distanceX, float distanceY) {
        //Log.v("wjj", "onScroll");
        return false;
    }

    //长按记录
    public void onLongPress(MotionEvent e) {
        Log.v("wjj", "onLongPress");
        //长按时显示删除按钮
    }

    //手指快速的滑动,可以纵向横向
    //4个参数相当于向量
    //e1为向量的起点,e2为向量的终点,velocityX为向量水平方向的速度,velocityY为向量垂直方向的速度
    public boolean onFling(MotionEvent e1, MotionEvent e2, float velocityX, float velocityY) {
        Log.v("wjj", "onFling");

        //水平方向速度大于垂直方向速度,认为是横向滑动
        if(Math.abs(velocityX)>Math.abs(velocityY)){
            //获取删除按钮视图
            delButton=LayoutInflater.from(getContext()).inflate(R.layout.del_button,null);
            delButton.setOnClickListener(new OnClickListener() {
                public void onClick(View v) {
                    Log.v("删除", selectedItem+"");
                    view.removeView(delButton);
                    delButton=null;
                    onDeleteListener.onDelete(selectedItem);
                }
            });

            //设置位置
            RelativeLayout.LayoutParams params=new RelativeLayout.LayoutParams(RelativeLayout.LayoutParams.WRAP_CONTENT, RelativeLayout.LayoutParams.WRAP_CONTENT);
            params.addRule(RelativeLayout.ALIGN_PARENT_RIGHT);
            params.addRule(RelativeLayout.CENTER_VERTICAL);

            //获得滑动位置的item
            //selectedItem onDown时获取,
            //当前显示的第一个getFirstVisiblePosition
            //getChildAt,比如当前总共显示10个,那么不管在那个位置,都是从0到9
            view=(ViewGroup)getChildAt(selectedItem-getFirstVisiblePosition());
            TextView tv=(TextView)view.findViewById(R.id.textView1);
            Log.v("wjj", "TextView "+tv.getText());
            view.addView(delButton,params);
        }
        return false;
    }

     //增加删除事件,方便外部调用
     public interface OnDeleteListener {
            void onDelete(int index);
     }

}
4.自定义Adapter
MyAdapter.java

public class MyAdapter extends ArrayAdapter<String> {

    public MyAdapter(Context context, int resource, List<String> objects) {
        super(context, resource, objects);
        // TODO 自动生成的构造函数存根
    }

    @Override
    public View getView(int position, View convertView, ViewGroup parent) {
        View view;
        //是否该视图已经存在
        if(convertView==null){
            //不存在,直接从xml加载视图
            view=LayoutInflater.from(getContext()).inflate(R.layout.my_list_view_item, null);
        }else{
            view=convertView;
        }
        //获取text
        TextView tv=(TextView)view.findViewById(R.id.textView1);
        //设置text的值
        tv.setText(getItem(position));
        //返回自定义view
        return view;
    }

}
5.主界面
activity_main.xml

<RelativeLayout xmlns:android="http://schemas.android.com/apk/res/android"
    xmlns:tools="http://schemas.android.com/tools"
    android:layout_width="match_parent"
    android:layout_height="match_parent" >

    <com.example.ddddddd.MyListView
        android:id="@+id/listView1"
        android:layout_width="match_parent"
        android:layout_height="match_parent"
        android:layout_alignParentLeft="true" >

    </com.example.ddddddd.MyListView>

</RelativeLayout>
MainActivity.java

public class MainActivity extends Activity {
    MyListView lv;
    private List<String> contentList = new ArrayList<String>();

    protected void onCreate(Bundle savedInstanceState) {
        super.onCreate(savedInstanceState);
        setContentView(R.layout.activity_main);

        initList();

        lv=(MyListView)findViewById(R.id.listView1);
        lv.setAdapter(new MyAdapter(this, 0, contentList));
        lv.setOnDeleteListener(new OnDeleteListener() {
            public void onDelete(int index) {
                //删除
                contentList.remove(index);
                ((MyAdapter)lv.getAdapter()).notifyDataSetChanged();
            }
        });

    }

     private void initList() {
             for(int i=1;i<=100;i++){
                 contentList.add("Content Item "+i);
             }
    }

}


 浙公网安备 33010602011771号