nagios维护之添加监控
查看修改的配置是否有误:
/usr/local/nagios/bin/nagios -v /usr/local/nagios/etc/nagios.cfg
一、nagios监控交换机
编辑 /usr/local/nagios/etc/objects 下的 switch.cfg文件
define host{ use generic-switch host_name SW_1.101 alias SW_1..101 address 192.168.1.101 hostgroups sw_group #主机所属组 } define service{ use generic-service ; Inherit values from a template hostgroup_name sw_group ; The name of the hostgroup service_description PING ; The service description check_command check_ping!200.0,20%!600.0,60% ; The command used to monitor the service normal_check_interval 5 ; Check the service every 5 minutes under normal conditions retry_check_interval 1 ; Re-check the service every minute until its final/hard state is determined }
修改/usr/local/nagios/etc/nagios.cfg
# Definitions for monitoring a router/switch
cfg_file=/usr/local/nagios/etc/objects/switch.cfg #去掉前边注释
二、nagios监控windows
1、监控内容
a. 内存使用状况
b. CPU负载
c. 磁盘使用状况
d. 服务状态
e. 运行的进程
2.监控原理:
在windows服务器内安装NSClient++的监控引擎,nagios服务器通过check_nt来获取监控数据
3、配置:
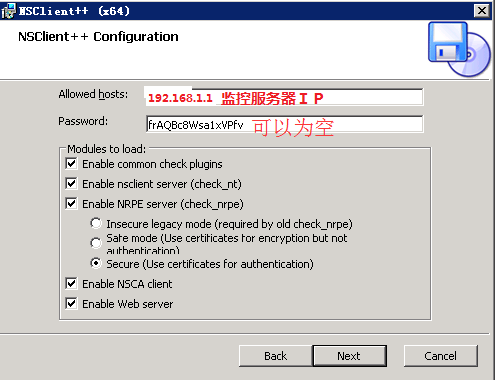
a、在被监控机(客户端)安装NSCP(NSClient++)
下载地址:http://www.nsclient.org/nscp/downloads NSCP*.mis
b、安装-->如下图所示:
c、在nagios服务端配置监控项。
编辑windows.cfg
define host{ use windows-server ; 应用的模板名称 host_name xp_73.220 ; 主机名 alias xp_192.168.73.220 ; 主机别名 address 192.168.73.220 #主机IP hostgroups windows-servers #主机所属组 }
define hostgroup{
hostgroup_name windows-servers ; The name of the hostgroup
alias Windows Servers ; Long name of the group
}
define service{
use generic-service
host_name xp_73.220
service_description NSClient++ Version
check_command check_nt!CLIENTVERSION
}
#主机开机时长
define service{
use generic-service
host_name xp_73.220
service_description Uptime
check_command check_nt!UPTIME
}
#主机cpu负载
define service{
use generic-service
host_name xp_73.220
service_description CPU Load
check_command check_nt!CPULOAD!-l 5,80,90
}
#主机内存使用
define service{
use generic-service
host_name xp_73.220
service_description Memory Usage
check_command check_nt!MEMUSE!-w 80 -c 90
}
#主机 磁盘空间
define service{
use generic-service
host_name xp_73.220
service_description C:\ Drive Space
check_command check_nt!USEDDISKSPACE!-l c -w 80 -c 90
}
define service{
use generic-service
host_name xp_73.220
service_description W3SVC
check_command check_nt!SERVICESTATE!-d SHOWALL -l W3SVC
}
define service{
use generic-service
host_name xp_73.220
service_description Explorer
check_command check_nt!PROCSTATE!-d SHOWALL -l Explorer.exe
}
三、nagios监控linux
在客户端安装nagios插件和nrpe
1、安装nrpe
tar zxvf nrpe-2.12.tar.gz
cd nrpe-2.12
./configure
make all
make install-plugin
make install-daemon
make install-daemon-config
2、安装nagios插件
tar zxvf nagios-plugins-1.4.15.tar.gz
cd nagios-plugins-1.4.15
./configure --with-nagios-user=nagios --with-nagios-group=nagios
make
make install
3、在服务器端配置
a、创建services.cfg
define host{
use linux-server
host_name 192.168.1.211
alias 192.168.1.211
address 192.168.1.211
}
define service{
use generic-service
host_name 192.168.1.211
service_description check_ping
check_command check_ping!100.0,20%!200.0,50%
max_check_attempts 5
normal_check_interval 1
}
b、修改/usr/local/nagios/etc/nagios.cfg
添加
cfg_file=/usr/local/nagios/etc/objects/services.cfg
c、重启服务器
4、添加联系人
define contact{ contact_name admin1 use generic-contact alias Ad1 service_notification_period 24x7 host_notification_period 24x7 service_notification_options w,u,c,r host_notification_options d,u,r service_notification_commands notify-service-by-email host_notification_commands notify-host-by-email email admin@text.com } define contact{ contact_name admin2 #联系人名称 use generic-contact alias Ad2 service_notification_period 24x7 #service故障 报警时间段 host_notification_period 24x7 #host故障 报警时间段 service_notification_options w,u,c,r #服务报警级别 host_notification_options d,u,r #主机报警级别 service_notification_commands notify-service-by-email #报警方式 host_notification_commands notify-host-by-email email admin2@text.com #邮箱 } define contactgroup{ contactgroup_name admins alias Nagios Administrators members admin1,admin2 #将联系人添加至admins 组。 }