基于libtorch的Alexnet深度学习网络实现——Cifar-10数据集分类(91.01%准确率)
“ 前面我们使用libtorch实现的Alexnet网络对Cifar-10数据集进行训练和分类,准确率仅达到72.02%。本文我们在前文的基础上做一定修改,使准确率达到91.01%。”
前文链接:
1. 基于libtorch的Alexnet深度学习网络实现——Alexnet网络结构与原理
2. 基于libtorch的Alexnet深度学习网络实现——Cifar-10数据集分类
3. 基于libtorch的Alexnet深度学习网络实现——Cifar-10数据集分类(提升准确率)
本文在主要在以上的第3个链接文章的基础上,作以下修改:
调整网络结构;
修改调整学习率的策略;
增加全局对比度归一化的数据预处理;
修改Tensor张量的维度顺序(这一点最重要,之前犯了这个低级错误,导致准确率一直上不去)。
01
—
调整网络结构
所作的结构调整如下图所示:

以上第3个链接文章的网络结构
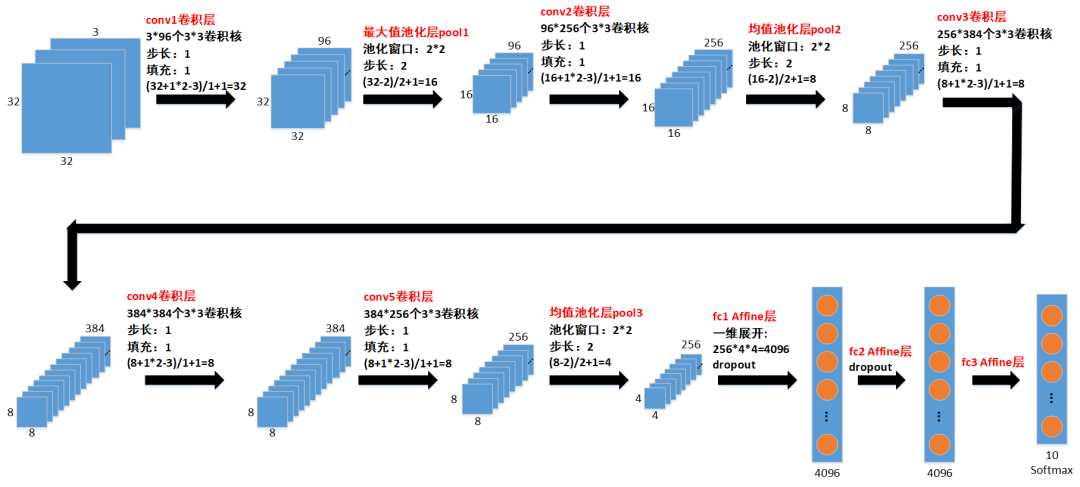
本文修改之后的网络结构
通过对比可以看到,我们的主要修改点为:
1. 横向拓宽了网络,比如原本conv1输出64个卷积结果,现在改为输出96个卷积结果。
2. 将conv2和conv5后面的两个最大值池化层改为均值池化层;
3. 将fc1和fc2的输出数据个数均改为4096。
代码实现:
struct AlexNet : torch::nn::Module
{
  AlexNet(int num_class = 10)
  {
    conv1 = register_module("conv1", torch::nn::Conv2d(torch::nn::Conv2dOptions(3, 96, { 3,3 }).padding(1).stride({ 1,1 })));


    c1b = register_module("c1b", torch::nn::BatchNorm2d(torch::nn::BatchNorm2dOptions(96).eps(1e-5).momentum(0.1).affine(true).track_running_stats(true)));

    conv2 = register_module("conv2", torch::nn::Conv2d(torch::nn::Conv2dOptions(96, 256, { 3,3 }).padding(1).stride({ 1,1 })));


    c2b = register_module("c2b", torch::nn::BatchNorm2d(torch::nn::BatchNorm2dOptions(256).eps(1e-5).momentum(0.1).affine(true).track_running_stats(true)));


    conv3 = register_module("conv3", torch::nn::Conv2d(torch::nn::Conv2dOptions(256, 384, { 3,3 }).padding(1).stride({ 1,1 })));


    c3b = register_module("c3b", torch::nn::BatchNorm2d(torch::nn::BatchNorm2dOptions(384).eps(1e-5).momentum(0.1).affine(true).track_running_stats(true)));


    conv4 = register_module("conv4", torch::nn::Conv2d(torch::nn::Conv2dOptions(384, 384, { 3,3 }).padding(1).stride({ 1,1 })));


    c4b = register_module("c4b", torch::nn::BatchNorm2d(torch::nn::BatchNorm2dOptions(384).eps(1e-5).momentum(0.1).affine(true).track_running_stats(true)));


    conv5 = register_module("conv5", torch::nn::Conv2d(torch::nn::Conv2dOptions(384, 256, { 3,3 }).padding(1).stride({ 1,1 })));


    c5b = register_module("c5b", torch::nn::BatchNorm2d(torch::nn::BatchNorm2dOptions(256).eps(1e-5).momentum(0.1).affine(true).track_running_stats(true)));


    fc1 = register_module("fc1", torch::nn::Linear(256 * 4 * 4, 4096));


    f1b = register_module("f1b", torch::nn::BatchNorm1d(torch::nn::BatchNorm1dOptions(4096).eps(1e-5).momentum(0.1).affine(true).track_running_stats(true)));


    fc2 = register_module("fc2", torch::nn::Linear(4096, 4096));


    f2b = register_module("f2b", torch::nn::BatchNorm1d(torch::nn::BatchNorm1dOptions(4096).eps(1e-5).momentum(0.1).affine(true).track_running_stats(true)));


    fc3 = register_module("fc3", torch::nn::Linear(4096, num_class));


  }


  ~AlexNet()
  {


  }


  // Implement the Net's algorithm.
  torch::Tensor forward(torch::Tensor input)
  {


    namespace F = torch::nn::functional;


    auto x = conv1->forward(input);
    x = c1b->forward(x);
    x = F::relu(x);
    x = F::max_pool2d(x, F::MaxPool2dFuncOptions(2).stride({ 2, 2 }));


    x = conv2->forward(x);
    x = c2b->forward(x);
    x = F::relu(x);
    x = F::avg_pool2d(x, F::AvgPool2dFuncOptions(2).stride({ 2, 2 }));


    x = conv3->forward(x);
    x = c3b->forward(x);
    x = F::relu(x);


    x = conv4->forward(x);
    x = c4b->forward(x);
    x = F::relu(x);


    x = conv5->forward(x);
    x = c5b->forward(x);
    x = F::relu(x);
    x = F::avg_pool2d(x, F::AvgPool2dFuncOptions(2).stride({ 2, 2 }));


    x = x.reshape({ x.size(0), -1 });


    x = F::dropout(x, F::DropoutFuncOptions().p(0.5));
    x = fc1->forward(x);
    x = f1b->forward(x);
    x = F::relu(x);


    x = F::dropout(x, F::DropoutFuncOptions().p(0.5));
    x = fc2->forward(x);
    x = f2b->forward(x);
    x = F::relu(x);


    x = fc3->forward(x);


    return x;
  }


  torch::nn::Conv2d conv1{ nullptr };
  torch::nn::BatchNorm2d c1b{ nullptr };   //batchnorm在卷积层之后、激活函数之前
  torch::nn::Conv2d conv2{ nullptr };
  torch::nn::BatchNorm2d c2b{ nullptr };
  torch::nn::Conv2d conv3{ nullptr };
  torch::nn::BatchNorm2d c3b{ nullptr };
  torch::nn::Conv2d conv4{ nullptr };
  torch::nn::BatchNorm2d c4b{ nullptr };
  torch::nn::Conv2d conv5{ nullptr };
  torch::nn::BatchNorm2d c5b{ nullptr };
  torch::nn::Linear fc1{ nullptr };
  torch::nn::BatchNorm1d f1b{ nullptr };
  torch::nn::Linear fc2{ nullptr };
  torch::nn::BatchNorm1d f2b{ nullptr };
  torch::nn::Linear fc3{ nullptr };


};
02
—
修改调整学习率的策略
之前我们在训练过程中保持学习率固定不变,导致损失函数值出现较大的震荡现象。现在我们改变策略,每间隔一定的epoch减小学习率,以减缓损失函数值的震荡:
1. 在前30个epoch内学习率每隔5个epoch乘以0.98;
2. 在前30~70个epoch内学习率每隔5个epoch乘以0.95;
3. 在前70~100个epoch内学习率每隔5个epoch乘以0.925;
4. 在前100~200个epoch内学习率每隔5个epoch乘以0.9;
5. 在200个epoch之后学习率每隔5个epoch乘以0.88。
代码实现:
//每个5个epoch更新一次学习率代码
if (epoch <= 30 && (epoch + 1) % 5 == 0)
{
     alpha *= 0.98;
     updata_learn_rate(optimizer, alpha);
}
else if (epoch > 30 && epoch <= 70 && (epoch + 1) % 5 == 0)
{
     alpha *= 0.95;
     updata_learn_rate(optimizer, alpha);
}
else if (epoch > 70 && epoch <= 100 && (epoch + 1) % 5 == 0)
{
     alpha *= 0.925;
     updata_learn_rate(optimizer, alpha);
}
else if (epoch > 100 && epoch <= 200 && (epoch + 1) % 5 == 0)
{
     alpha *= 0.9;
     updata_learn_rate(optimizer, alpha);
}
else if (epoch > 200 && (epoch + 1) % 5 == 0)
{
     alpha *= 0.88;
     updata_learn_rate(optimizer, alpha);
}
03
—
增加全局对比度归一化数据预处理
在分析或处理不同量纲、不同取值范围的不同系列数据时,通常对不同系列数据分别做标准化,使它们的均值为0、标准差为1,同时保留了原始数据中各数据之间的相对大小和分布。我们在前文已详细讲过的全局对比度归一化正是这样一种数据预处理方法:
增加GCN操作之后,我们数据预处理的基本流程如下:
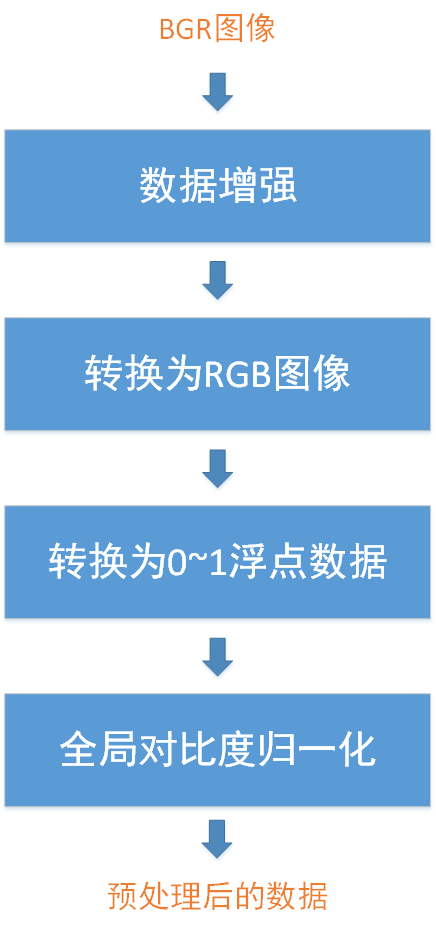
04
—
修改Tensor张量的维度顺序
这个问题跟我们搭建Resnet34残差网络时犯的错误是一样的,此处再重复说明一下,因为该问题真的是超级影响准确率!
libtorch处理数据的基本单位是Tensor张量,而Opencv读取的图像为Mat格式的BGR图像(后来转换为Mat格式的RGB图像),所以需要把Mat格式图像数据转换为Tensor张量。
之前本人犯了一个很严重的低级错误,就是把Mat格式转换为Tensor张量时,把维度顺序弄错了:
Opencv Mat存储三通道图像的顺序为[Height, Width, Channels],比如RGB图像展开成一维来看就是下面这种形式:

然而libtorch要求输入神经网络的Tensor张量存储三通道图像的顺序为[Channels, Height, Width],比如RGB图像展开成一维来看就是下面这种形式:

我没有转换Mat格式的顺序就直接将其数据赋值给Tensor张量,导致网络因为维度顺序不对而不能准确捕获图像特征,因此分类准确率低下。
基于以上原因,我们该错误纠正过来:首先把[Height, Width, Channels]的Mat格式数据转换为[Height, Width, Channels]的Tensor张量,然后再调用Tensor张量的permute函数把数据的维度顺序调整为[Channels, Height, Width]。这样一来就没问题了。
代码实现:
auto inputs = torch::ones({ batch_size, 32, 32, 3 });  //[batch_size, Height, Width, Channels]
for (int b = 0; b < batch_size; b++)
{
    inputs[b] = torch::from_blob(img_list[b].data, { img_list[b].rows, img_list[b].cols, img_list[b].channels() }, torch::kFloat).clone();
}
//[batch_size, Height, Width, Channels]转换为[batch_size, Channels, Height, Width]
inputs = inputs.permute({ 0, 3, 1, 2 });
05
—
分类结果
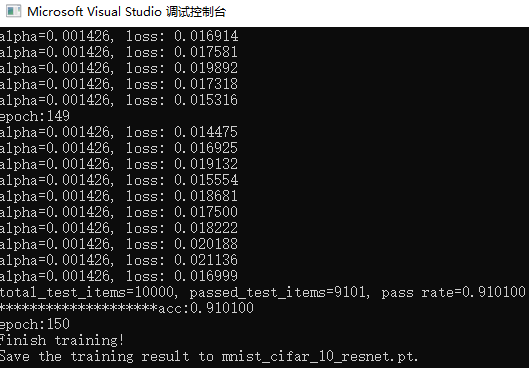
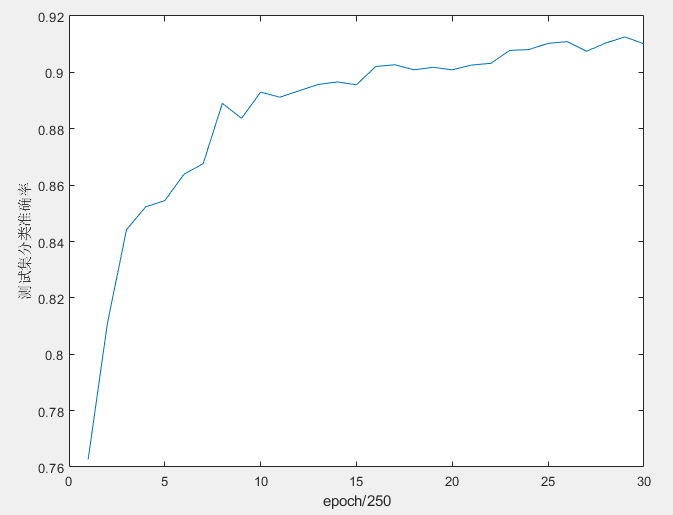
训练150个epoch,对测试集进行分类,得到的结果如下所示,准确率达到了91.01%。提高的幅度还是很大的。
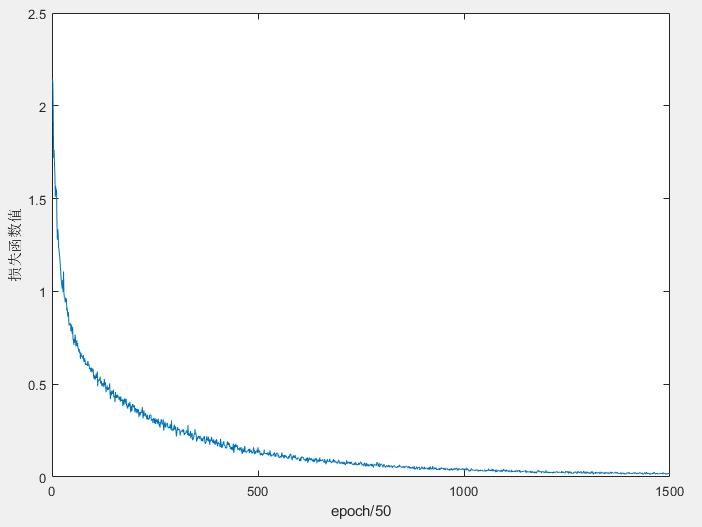
训练过程中损失函数值的变化情况如下图所示,我们可以看到震荡情况减轻了很多:
训练过程中测试集分类准确率的变化情况如下图所示,可以看到测试集分类的准确率总体来说还是稳步提升的:
本文的完整代码和Cifar-10数据集已上传到以下网站:
代码:
https://download.csdn.net/download/shandianfengfan/19733431
Cifar-10数据集:
https://download.csdn.net/download/shandianfengfan/19733201
欢迎扫码关注本微信公众号,接下来会不定时更新更加精彩的内容,敬请期待~


